
Find and replace text

-
Go to Home > Replace.
-
Enter the word or phrase you want to replace in Find what.
-
Enter your new text in Replace with.
-
Choose Replace All to change all occurrences of the word or phrase. Or, select Find Next until you find the one you want to update, and then choose Replace.
-
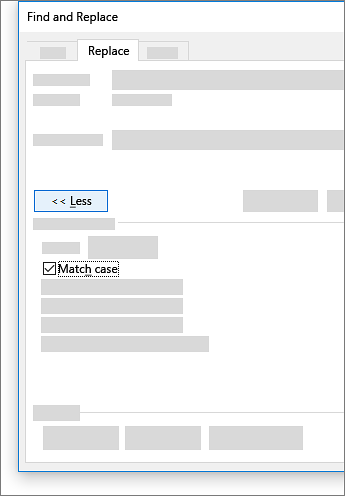
To specify only upper or lowercase in your search, select More > Match case. There are several other ways to search in this menu.
For other options, see Find and replace text
Find and replace basic text
In the upper-right corner of the document, in the search box  , type the word or phrase that you want to find, and Word will highlight all instances of the word or phrase throughout the document.
To replace found text:
-
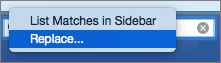
Select the magnifying glass, and then select Replace.

-
In the Replace With box, type the replacement text.
-
Select Replace All or Replace.
Tips:
-
You can also open the basic Find and Replace pane with the keyboard shortcut CONTROL + H.
-
When you replace text, it’s a good idea to select Replace instead of Replace All. That way you can review each item before replacing it.
-
You can find text with special formatting, such as bold or highlight, by using the Format menu.
-
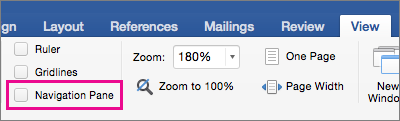
Select View > Navigation Pane.
-
In the Navigation Pane, select the magnifying glass.
-
Select Settings
, and then select Advanced Find & Replace.
Notes:
-
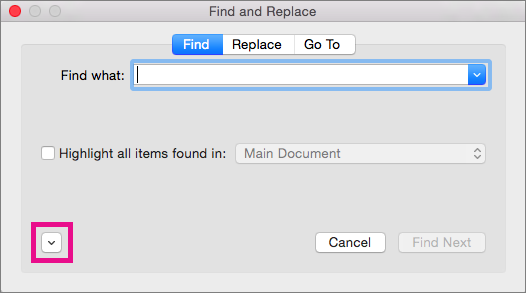
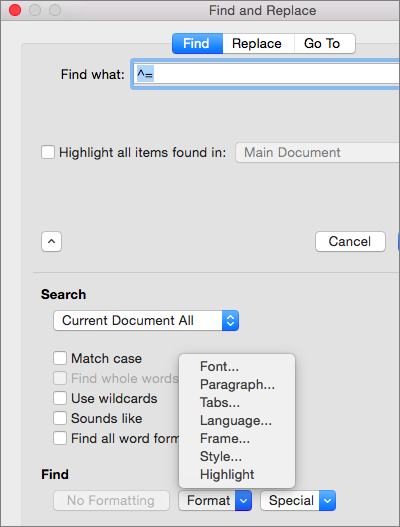
Select the arrow at the bottom of the Find and Replace dialog box to show all options.
-
-
-
On the Format menu, select the option that you want.
If a second dialog box opens, select the options that you want, and then select OK.
-
In the Find and Replace dialog box, select Find Next or Find All.
 , and then select Advanced Find & Replace.
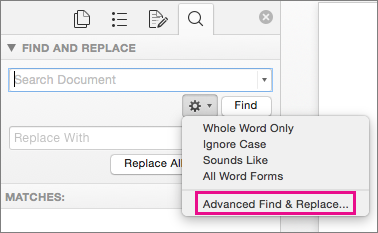
You can find and replace text with special formatting, such as bold or highlight, by using the Format menu.
-
Select View > Navigation Pane.
-
In the Navigation Pane, select the magnifying glass.
-
Select Settings
, and then select Advanced Find & Replace.
-
At the top of the dialog box, select Replace.
Notes:
-
Select the arrow at the bottom of the Find and Replace dialog box to show all options.
-
-
-
On the Find what box, type the text that you want to find.
-
On the Format menu, select the formatting that you want to find.
If a second dialog box opens, select the options that you want, and then select OK.
-
Select in the box next to Replace with.
-
On the Format menu, select the replacement formatting. If a second dialog box appears, select the formats that you want, and then select OK.
-
Select Replace, Replace All, or Find Next.
-
Select View > Navigation Pane.
-
In the Navigation Pane, select the magnifying glass.
-
Select Settings
, and then select Advanced Find & Replace.
Notes:
-
Select the arrow at the bottom of the Find and Replace dialog box to show all options.
-
-
-
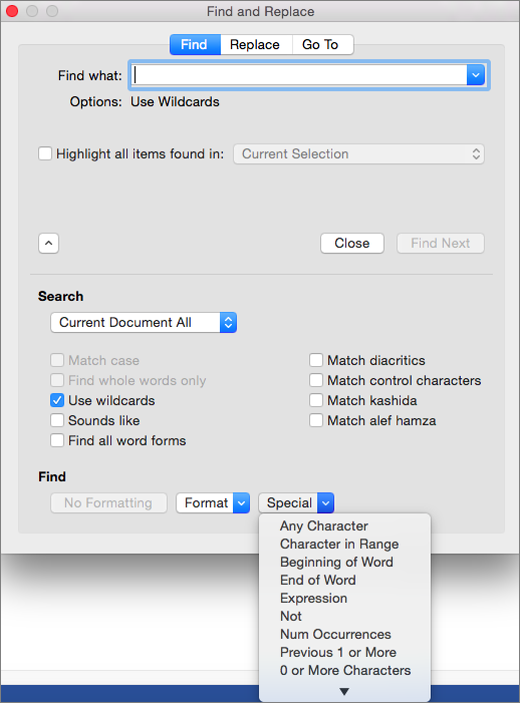
On the Special menu, select the special character that you want to find.
-
Select Find Next.

-
Select View > Navigation Pane.
-
In the Navigation Pane, select the magnifying glass.
-
Select Settings
, and then select Advanced Find & Replace.
Notes:
-
Select the arrow at the bottom of the Find and Replace dialog box to show all options.
-
-
-
At the top of the Find and Replace dialog box, select Replace and then select in the Find What box, but don’t type anything there. Later, when you select a special character, Word will automatically put the character code in the box for you.
Note: Select the arrow at the bottom of the Find and Replace dialog box to show all options.
-
On the Special menu, select the special character that you want to find.
-
Select in the Replace with box.
-
On the Special menu, select the special character that you want to use as a replacement.
-
Select Replace or Find Next.
-
Select View > Navigation Pane.
-
In the Navigation Pane, select the magnifying glass.
-
Select Settings
, and then select Advanced Find & Replace.
-
Select the Use wildcards check box.
If you don’t see the Use wildcards check box, select
. -
Select the Special menu, select a wildcard character, and then type any additional text in the Find what box.
-
Select Find Next.
Tips:
-
To cancel a search in progress, press
+ PERIOD. -
You can also enter a wildcard character directly in the Find what box instead of selecting an item from the Special pop-up menu.
-
To search for a character that’s defined as a wildcard character, type a backslash () before the character. For example, type ? to find a question mark.
-
You can use parentheses to group the wildcard characters and text and to indicate the order of evaluation. For example, search for <(pre)*(ed)> to find «presorted» and «prevented.»
-
You can search for an expression and use the n wildcard character to replace the search string with the rearranged expression. For example, type (Newman) (Belinda) in the Find what box and 2 1 in the Replace with box. Word will find «Newman Belinda» and replace it with «Belinda Newman.»
-
-
To replace found text:
-
Select the Replace tab, and then select the Replace with box.
-
Select Special, select a wildcard character, and then type any additional text in the Replace with box.
-
Select Replace All, Replace, or Find Next.
Tip: When you replace text, it’s a good idea to select Replace instead of Replace All. That way you can confirm each replacement to make sure that it’s correct.
-
 .
.
 + PERIOD.
You can refine a search by using any of the following wildcard characters.
|
To find |
Use this |
For example |
|---|---|---|
|
Any single character |
? |
s?t finds «sat» and «set.» |
|
Any string of characters |
* |
s*d finds «sad» and «started.» |
|
One of the specified characters |
[ ] |
w[io]n finds «win» and «won.» |
|
Any single character in this range |
[-] |
[r-t]ight finds «right» and «sight» and «tight.» Ranges must be in ascending order. |
|
Any single character except the characters inside the brackets |
[!] |
m[!a]st finds «mist» and «most» but not «mast.» |
|
Any single character except characters in the range inside the brackets |
[!x-z] |
t[!a-m]ck finds «tock» and «tuck» but not «tack» or «tick.» Ranges must be in ascending order. |
|
Exactly n occurrences of a character or expression |
{ n} |
fe{2}d finds «feed» but not «fed.» |
|
At least n occurrences of a character or expression |
{ n,} |
fe{1,}d finds «fed» and «feed.» |
|
A range of occurrences of a character or expression |
{ n, n} |
10{1,3} finds «10,» «100,» and «1000.» |
|
One or more occurrences of a character or expression |
@ |
lo@t finds «lot» and «loot.» |
|
The beginning of a word |
< |
<(inter) finds «interesting» and «intercept» but not «splintered.» |
|
The end of a word |
> |
(in)> finds «in» and «within,» but not «interesting.» |
Word for the web lets you find and replace basic text. You can match case or fine whole words only. For more varied options, open your document in Word for the desktop.
Need more help?

При работе с текстовыми документами часто приходится исправлять какие-то ошибки. При этом не редко такие ошибки повторяются по всему тексту и их исправление занимает достаточно много времени.
К счастью, в текстовом редакторе Word есть функции, которые позволяют значительно упростить такие рутинные задачи. Сейчас мы расскажем о том, как заменить слово в Word по всему тексту документа. Материал будет полезен как для современных версий Word (например, Word 2007, 2010, 2013 и 2016), так и для Word 2003.
Для того чтобы заменить слово в документе Word по всему тексту необходимо использовать специальную функцию, которая называется «Найти и заменить». Вызвать данную функцию можно разными способами. Самый простой вариант, это нажать комбинацию клавиш CTRL-H на клавиатуре. Данная комбинация клавиш универсальна и работает во всех версиях текстового редактора Word, включая Word 2003, 2007, 2010, 2013 и 2016.

Также вы можете вызвать функцию «Найти и заменить» с помощью мышки. В новых версиях редактора Word, например, таких как Word 2007, 2010, 2013 и 2016, для этого необходимо перейти на вкладку «Главная» и нажать на кнопку «Заменить», которая находится ближе к правому верхнему углу окна.

В Word 2003 функцию для замены слов можно вызвать с помощью меню «Правка – Заменить».

Пользоваться функцией «Найти и заменить» очень просто. В окне «Найти и заменить» вы увидите два текстовых поля. Первое называется «Найти» и в него необходимо вводить слово, которое вы хотите найти и заменить в документе. Второе текстовое поле называется «Заменить на», сюда необходимо вводить слово, которое будет использоваться для замены первого слова.
Дальше есть два варианта: заменять слова по одному либо все сразу. Для того чтобы заменять слова по одному просто нажимайте на кнопку «Заменить». По первому клику слово будет выделятся в тексте, а по второму заменятся на новое.

Для того чтобы заменить сразу все слова по всему тексту документа нажмите на кнопку «Заменить все».

В этом случае Word сразу заменит все найденные в тексте документа слова и покажет окно с числом выполненных замен.

необходимо отметить, что при замене слов по одному, функция «Найти и заменить» начинает работать от текущей позиции курсора и после достижения конца документа переходит на его начало. А при замене сразу всех слов в документе слова заменяются по всему документу начиная с первой страницы. Изменить поведение функции «Найти и заменить» можно с помощью дополнительных настроек, которые можно открыть, кликнув по кнопке «Больше».

Здесь доступны настройки, которые позволяют учитывать регистр при замене, заменять слова только целиком, менять направление замены слов и т.д. Одной из самых полезных опций, которые здесь доступны, является возможность замены специальных символов с помощью кнопки «Специальный».

Таким образом можно, например, заменить все знаки табуляции на пробелы.
Как заменить слово в Ворде по всему тексту
Как заменить слово в Word на другое слово или фразу автозамена в ворде

Did you know you can use Word 2010 AutoCorrect to automatically replace words or add symbols beyond basic Latin characters? Here’s how.

I spend a lot of time in Word 2010 every day, so I’m always looking for shortcuts, tips, and tricks to increase my productivity and save time. For instance, have you ever had trouble with specific words you write with a special symbol in them?
This used to be a daily time-consuming task always to correct them throughout my document…That is until I found a feature in Word 2010 which does all the work for you. Let’s take a look at this quick trick.
Step 1
Once you open Word 2010, Click File > Options.

Step 2
Click Proofing and Select AutoCorrect Options.

Step 3 – It’s Magic Time
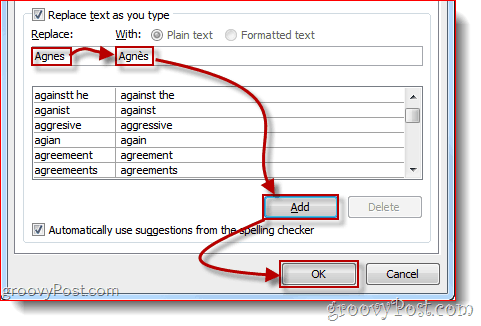
Now head over to the Replacement section and fill in any words that you would like to correct while writing. First, type in your word miswritten, then in the second field, type your word written correctly. When done, click Add and OK to save.
That’s it! Now all ya need to figure out is what you’re going to do with all that time I just gave you back!
Do you have a cool tip or trick? We would love to hear about it in the comments below, or shoot us an email at – tips@groovypost.com.
![]()
Lesson 2: Text Basics
/en/word2010/getting-started-with-word/content/
Introduction
It’s important to know how to perform basic tasks with text when working in a word processing application. In this lesson, you’ll learn the basics of working with text, including how to insert, delete, select, copy, cut, paste, and drag and drop text.
Working with text
If you’re new to Microsoft Word, you’ll need to learn the basics of working with text so you can type, reorganize, and edit text. You’ll need to know how to insert, delete, and move text, as well as how to find and replace specific words or phrases.
Optional: You can download this example for extra practice.
To insert text:
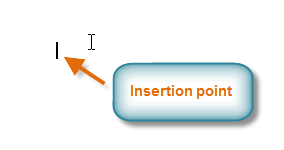
- Move your mouse to the location where you want text to appear in the document.
- Click the mouse. The insertion point appears.
The insertion point
- Type the text you want to appear.
To delete text:
- Place the insertion point next to the text you want to delete.
- Press the Backspace key on your keyboard to delete text to the left of the insertion point.
- Press the Delete key on your keyboard to delete text to the right of the insertion point.
To select text:
- Place the insertion point next to the text you want to select.
- Click the mouse. While holding it down, drag your mouse over the text to select it.
- Release the mouse button. You have selected the text. A highlighted box will appear over the selected text.
Selecting text

When you select text or images in Word, a hover toolbar with formatting options appears. This makes formatting commands easily accessible, which can save you time. If the toolbar does not appear at first, try moving the mouse over the selection.
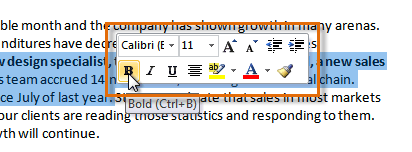 Hover toolbar with formatting options
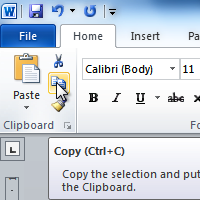
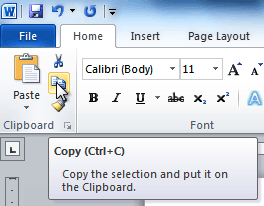
To copy and paste text:
- Select the text you want to copy.
- Click the Copy command on the Home tab. You can also right-click your document and select Copy.
The Copy command
- Place your insertion point where you want the text to appear.
- Click the Paste command on the Home tab. The text will appear.
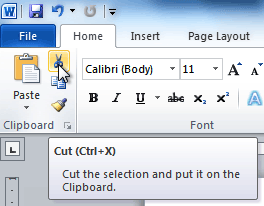
To cut and paste text:
- Select the text you want to copy.
- Click the Cut command on the Home tab. You can also right-click the document and select Cut.
The Cut command
- Place your insertion point where you want the text to appear.
- Click the Paste command on the Home tab. The text will appear.
You can also cut, copy, and paste by right-clicking the document and choosing the desired action from the drop-down menu. When you use this method to paste, you can choose from three options that determine how text will be formatted: Keep Source Formatting, Merge Formatting, and Keep Text Only. You can hover the mouse over each icon to see what it will look like before clicking it.
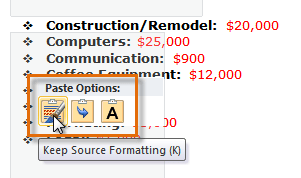 Paste Options
To drag and drop text:
- Select the text you want to copy.
- Click and drag the text to the location where you want it to appear. The cursor will have a rectangle under it to indicate that you are moving text.
Dragging and dropping text
- Release the mouse button, and the text will appear.

If text does not appear in the exact location you want, you can click the Enter key on your keyboard to move the text to a new line.
Finding and replacing text
When you’re working with longer documents, it can be difficult and time consuming to locate a specific word or phrase. Word can automatically search your document using the Find feature, and it even allows you to change words or phrases using Replace.
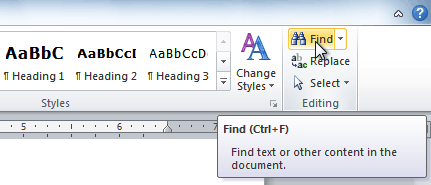
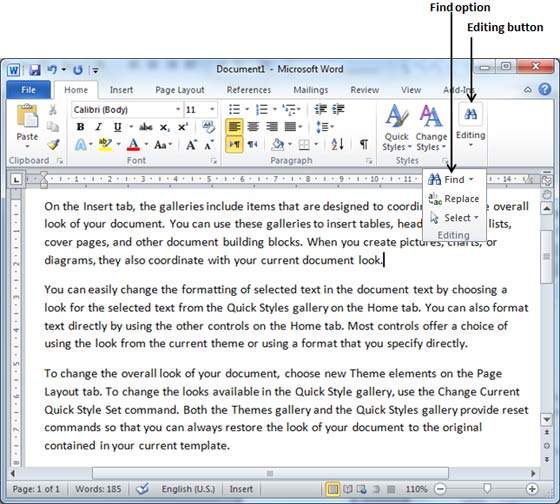
To find text:
- From the Home tab, click the Find command. The navigation pane will appear on the left side of the screen.
Clicking the Find command
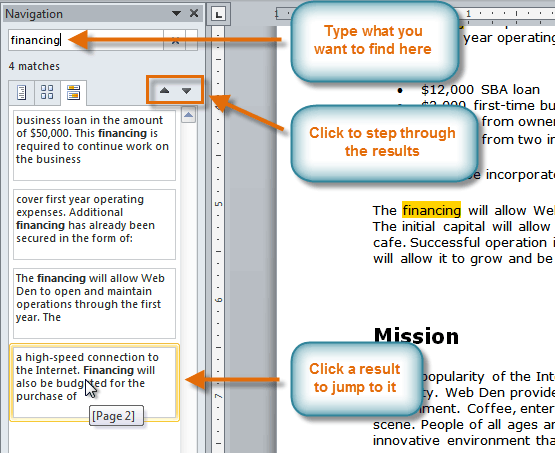
- Type the text you want to find in the field at the top of the navigation pane.
- If the text is found in the document, it will be highlighted in yellow, and a preview will appear in the navigation pane.
- If the text appears more than once, you can click the arrows on the navigation pane to step through the results. You can also click the result previews on the navigation pane to jump to the location of a result in your document.
The Navigation pane
- When you close the navigation pane, the highlighting will disappear.
To replace text:
- From the Home tab, click the Replace command. The Find and Replace dialog box will appear.
Clicking the Replace command
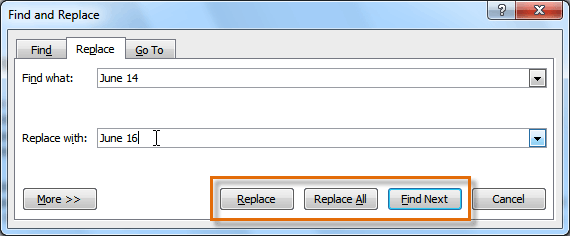
- Type the text you want to find in the Find what field.
- Type the text you want to replace it with in the Replace with field.
- Click Find Next and then Replace to replace text. You can also click Replace All to replace all instances within the document.
The Find and Replace dialog box
Challenge!
- Open an existing Word document. If you want, you can use this example.
- Select a sentence.
- Copy and paste the sentence from one location in the document to another.
- Select another sentence.
- Cut and paste the sentence to another location in the document.
/en/word2010/formatting-text/content/
In this chapter, we will discuss the Find and Replace operation in Word 2010. While working on editing a document you come across a situation very frequently when you want to search a particular word in your document and many times you will be willing to replace this word with another word at a few or all the places throughout the document. Here, we will understand how to find a word or phrase in a word document and how to replace an existing word with any other word using simple steps.
Find Command
The Find command enables you to locate specific text in your document. Following are the steps to find a word document in the following screen −
Step 1 − Let us work out on a sample text available in our Word document. Just type =rand() and press Enter; the following screen will appear −
Step 2 − Click the Find option in the Editing group on the Home tab or press Ctrl + F to launch the Navigation pane −
Step 3 − Enter a word which you want to search in the Search box, as soon as you finish typing, Word searches for the text you entered and displays the results in the navigation pane and highlights the word in the document as in the following screenshot −
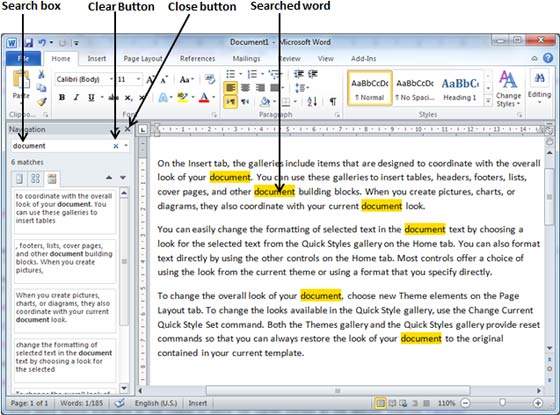
Step 4 − You can click the clear button (X) to clear the search and results and perform another search.
Step 5 − You can use further options while searching for a word. Click the option button to display the options menu and then click the Options option; this will display a list of options. You can select the options like match case to perform case-sensitive search.
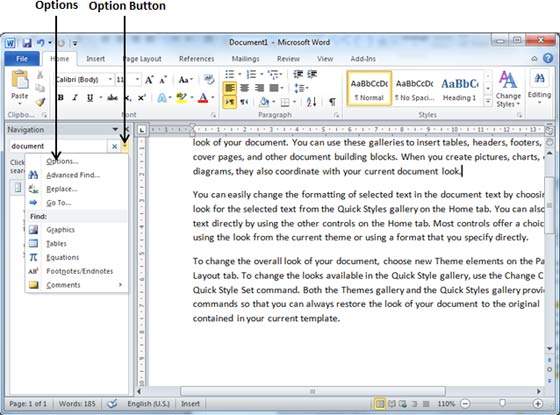
Step 6 − Finally, if you are done with the Search operation, you can click the close button (X) to close the Navigation Pane.
Find & Replace Operation
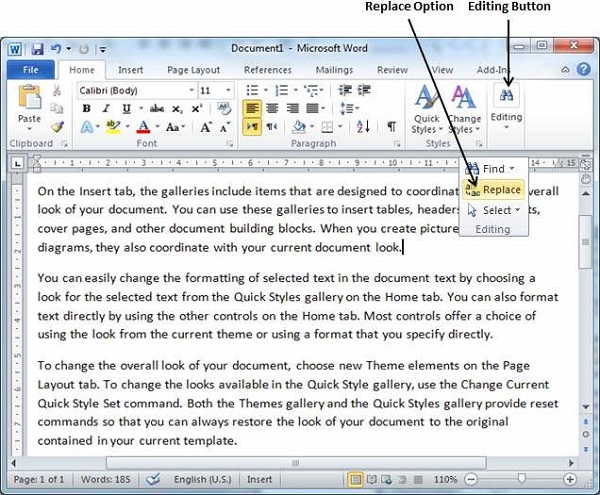
We assume you are an expert in searching a word or phrase in a word document as explained above. This section will teach you how you can replace an existing word in your document. Following are the simple steps −
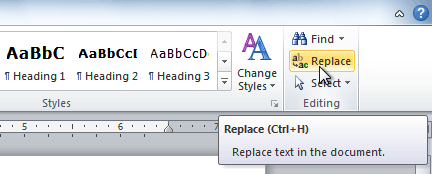
Step 1 − Click the Replace option in the Editing group on the Home tab or press Ctrl + H to launch the Find and Replace dialog box shown in Step 2 −
Step 2 − Type a word which you want to search. You can also replace the word using the Find and Replace dialog box as in the following screenshot −
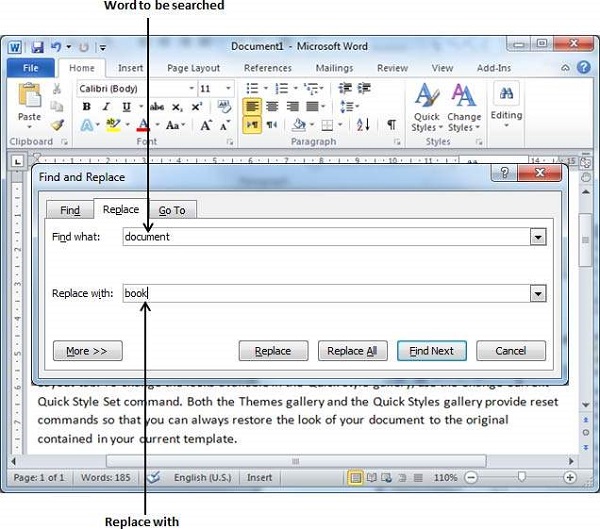
Step 3 − Click the Replace button available on the Find and Replace dialog box and you will see the first occurrence of the searched word would be replaced with the replace with word. Clicking again on Replace button would replace next occurrence of the searched word. If you will click Replace All button then it would replace all the found words in one go. You can also use Find Next button just to search the next occurence and later you can use Replace button to replace the found word.
Step 4 − You can use More >> button available on the dialog box to use more options and to make your search more specific like case sensitive search or searching for whole word only etc.
Step 5 − Finally, if you are done with the Find and Replace operation, you can click the Close (X) or Cancel button of the dialog box to close the box.