
Excel for Microsoft 365 Word for Microsoft 365 Outlook for Microsoft 365 PowerPoint for Microsoft 365 Publisher for Microsoft 365 Excel for Microsoft 365 for Mac Word for Microsoft 365 for Mac Outlook for Microsoft 365 for Mac PowerPoint for Microsoft 365 for Mac Excel for the web Word for the web PowerPoint for the web Excel 2021 Word 2021 Outlook 2021 PowerPoint 2021 Publisher 2021 Office 2021 Excel 2021 for Mac Word 2021 for Mac Outlook 2021 for Mac PowerPoint 2021 for Mac Excel 2019 Word 2019 Outlook 2019 PowerPoint 2019 Publisher 2019 Office 2019 Excel 2019 for Mac Word 2019 for Mac Outlook 2019 for Mac PowerPoint 2019 for Mac Excel 2016 Word 2016 Outlook 2016 PowerPoint 2016 Publisher 2016 Office 2016 Excel 2016 for Mac Word 2016 for Mac Outlook 2016 for Mac PowerPoint 2016 for Mac Excel 2013 Word 2013 Outlook 2013 PowerPoint 2013 Publisher 2013 Office 2013 Excel for iPad Word for iPad PowerPoint for iPad Excel for iPhone Word for iPhone PowerPoint for iPhone Word for Android tablets Excel for Android tablets PowerPoint for Android tablets Excel 2010 Word 2010 Outlook 2010 PowerPoint 2010 Publisher 2010 Office 2010 Publisher 2007 Excel for Mac 2011 Word for Mac 2011 Outlook for Mac 2011 PowerPoint for Mac 2011 Excel for Android phones Excel for Windows Phone 10 Excel Mobile PowerPoint for Android phones PowerPoint for Windows Phone 10 PowerPoint Mobile Word for Android phones Word for Windows Phone 10 Word Mobile More…Less
There are three areas in Microsoft Office where you may want to change the language.
-
Editing or Authoring is the language in which you write and edit your content. You may need to install an associated keyboard for this language via Windows settings.
-
Proofing tools are spelling and grammar check. Typically, you’ll set this language to be the same as the editing or authoring language.
-
Display language is for all the buttons, menus, and controls in Office.
You can set the display and editing or authoring languages independently from each other. For example, you may want the display language to be English, but the document you’re writing or editing is in French.
Note: If you want to completely change Office, permanently, to a different language you’ll get the best results if you first set that to be your default display language in Windows as well. For more information on doing that see this article for Windows 10 or this article for Windows 7 or 8.
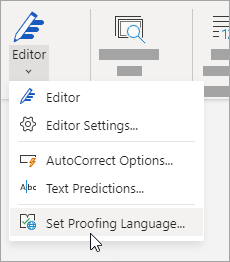
Tip: To prevent having to manually configure the proofing language with each new document in Word, switch on the option to detect the language you’re writing. On the Review tab, go to Language. Choose Language > Set Proofing Language, and then select Detect language automatically.
Note: If you’re using Office 365 and the commands available are different from what’s shown here, expand the Configure Office language for Office 2016 or earlier section and follow the instructions there.
In Office, the language options are in the Office Language Preferences dialog box. The display and authoring languages can be set independently. For example, you could have everything match the language of your operating system, or you could use a combination of languages for your operating system, authoring, and display.
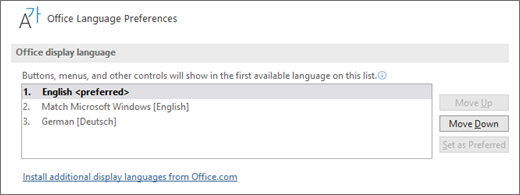
To configure the display language:
-
Within any Office application, select File > Options > Language.
-
Under Office display Language, make sure the display language you want Office to use is listed.

-
Select the language you want, and then select Set as Preferred. If you want your Office display language to match the display language you have for Windows, select Match Microsoft Windows [Language].
-
If the language you want is not listed, select Install additional display languages from Office.com and follow the instructions there.
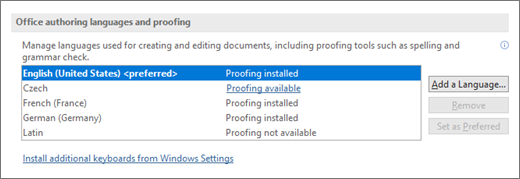
To configure the authoring and proofing language:
-
Within any Office application, select File > Options > Language.
-
Under Office authoring languages and proofing, make sure the language you want to use for authoring your document is listed.
-
If the language you want appears in the list, select it, and then select Set as Preferred. If the language you want is not listed, select Add a language, and then follow the instructions in the Add an authoring language dialog box.
-
If the language accessory pack includes proofing tools for that language, its status appears as Proofing installed. If the status is Proofing available, click the link to install the proofing tools.
Tip: To prevent having to manually configure the proofing language with each new document in Word, switch on the option to detect the language you’re writing. On the Review tab, go to Language. Choose Language > Set Proofing Language, and then select Detect language automatically.
In Office, the language options are in the Set the Office Language Preferences dialog box. The display and help languages can be set independently. For example, you could have everything match the language of your operating system, or you could use a combination of languages for your operating system, editing, display, and Help.
To configure the editing and proofing language:
-
Within any Office application, select File > Options > Language.
-
If your language already appears among the editing languages press Set as Default. Otherwise select the language from the Add additional editing languages list then press the Add button. The new language will appear in the list of editing languages.
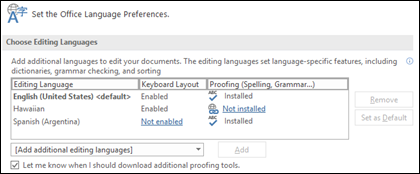
If the Keyboard Layout shows as Enabled, you’re all set for editing. If it says Not enabled in the Keyboard Layout column follow these steps to enable it:
-
Click the Not enabled link.
-
In the Add Languages dialog box, press Add a language, select your language in the list, and then press Add.
-
Close the Add Languages dialog box. Your language should display as Enabled under Keyboard Layout in the Choose Editing Languages section.
Under Proofing, if your language shows as Installed, you’re ready to go. Otherwise press Not installed and Office will take you to a page where you can download the necessary Language Accessory Pack for that language. Follow the instructions on that page to download and install the pack, then come back to the Office Language Preferences dialog box to confirm that it’s now installed.
To configure the display and help languages:
-
Within any Office application, select File > Options > Language.
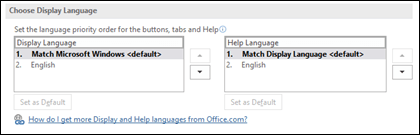
If you’ve already set your Microsoft Windows display language to be the language you want Office to display in you can leave this set to Match Microsoft Windows. Otherwise select your language and press Set as Default to move that language to the top of the list. The language that is listed first is the one Office will use for its menus and buttons. Please note, if your Windows display language is not also installed in Office, your Office display language will appear in the next language in the display list.
Repeat to configure your help language if you want to.
If the language you want isn’t available…
Download the proper Language Accessory Pack for the language you want to use from this page: Language Accessory Pack for Office. The Language Accessory Pack contains the display and proofing tools for most languages, but you can still choose to have your display in one language and editing or authoring in another.
Microsoft Office for Mac already contains all of the available languages, so there’s nothing to download. To configure Office to use those languages follow these steps:

User Interface — The display language for Office for Mac uses the primary language set for operating system. To change the display language for Office for Mac, you need to set a different primary language for your operating system:
-
On the Apple menu, choose System Preferences > Language & Region
-
In the Preferred Languages list, set the desired language to be your primary language by dragging it to the top of the list.
-
If the language you want doesn’t appear just press the + sign and add it.
-
You’ll have to restart your Office application for this change to take effect.
Editing — Setting the editing language depends on the program you’re working in.
Word and PowerPoint
To change your editing language in Word for Mac or PowerPoint for Mac, go to Tools > Language, select your language, and select OK.
To make it the default for all new documents select Default.
Tip: To prevent having to manually configure the proofing language with each new document in Word, switch on the option to detect the language you’re writing. On the Review tab, go to Language, and then select Detect language automatically.
Excel
To change your editing language in Excel for Mac, go to Tools > Language, select your language, and select OK.
OneNote
To change your editing language in OneNote for Mac, go to Tools > Set Proofing Language, select your language, and select OK.
User Interface & Editing — The display and keyboard languages for Office for Android is the same as the language that the device is set to. You can configure those by going to Settings > Language and Input.
Proofing — On Android you can change the proofing language in Word.
In Word on your Android phone, tap Edit  at the top of your screen, and then tap Proofing and Language under Review.
In Word on your Android tablet go to the Review tab and you can select your proofing language from the ribbon.
Proofing — On iOS you can change the proofing language in Word.
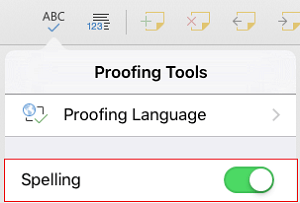
In Word on your iPhone, tap Edit , tap Home > Review > Proofing tools, and then tap Proofing Language.
In your document, on the Review tab, tap Spell Check  , and then tap Proofing Language.
Proofing — On Windows Mobile you can change the proofing language in Word.
In your document, on the Review tab, you can select the proofing language from the ribbon.
User Interface — The best way to set the display language in Office for the web is to set the language in the host where your documents live. That’s usually OneDrive, SharePoint, Dropbox, etc. When you open a document from one of those sites, Office Online will use the display language you have that service set to.
Tip: If you’re using a personal Microsoft account, you can choose your preferred display language in your profile settings at https://account.microsoft.com/profile.
-
Change views on OneDrive (Scroll to the bottom for language settings)
-
Set your language in SharePoint. If you’re using SharePoint, and want a language other than your system language, you’ll want to be sure to select a SharePoint language.
-
Change your language settings in Dropbox
To set the proofing tools language in your app go to the Review tab > Spelling & Grammar > Set Proofing Language. In OneNote for the web this is found on the Home tab.
Things to know
-
This change will only take effect from this point in the document forward.
-
To apply this change to any existing text in the document, press Ctrl+A to select all of the existing text, then set the proofing language with the steps above.
-
This change only affects the current document. For subsequent documents you’ll need to repeat these steps.
See Also
Check spelling and grammar in a different language
What languages are supported in Office?
Translate text into a different language
Remove languages and fonts you don’t use
Right-to-left language features
Need more help?
Если у русскоязычного пользователя все интерфейсы Word Online отображаются на иностранном языке, он будет испытывать дискомфорт. Чтобы в процессе работы не допускать никаких ошибок при работе с текстом, его форматировании, нужно самостоятельно изменить настройки. Из этой статьи вы узнаете, как поменять язык в Ворд Онлайн, используя функционал системы.

Содержание
- 1 Как самостоятельно изменить язык интерфейса
- 2 Как поменять язык в Ворд Онлайн
- 3 Как перевести текст в Word Online
Как самостоятельно изменить язык интерфейса
При первом обращении к службе Word Online все меню может быть на английском языке. Чтобы изменить его на русский:
- Заходите в личный кабинет.
- После успешной авторизации открываете документ Word Online.
- В верхней части страницы находите раздел «Settings».
- В выпавшем меню выбираете подраздел «Documents settings».
- Нажимаете на значок «Русский».
- Кликаете мышкой по кнопке «Save».
На заметку: Действуя по инструкции, пользователь самостоятельно выполнит настройку. После этого интерфейс Word Online будет отображаться на русском языке.

Как поменять язык в Ворд Онлайн
Чтобы текст в документе Word Online отображался на русском (или любом другом языке) нужно выполнить ряд действий:
- Выполняете авторизацию в Ворд Онлайн, входите в личный кабинет, указав логин и пароль.
- Открываете документ.
- Выбираете в верхней части меню раздел под названием «Файл».
- В открывшемся окне находите подраздел «Язык», делаете клик мышкой.
- В всплывающем меню выбираете нужный язык «Русский» (или другой вариант), нажимаете на него.
- Система автоматически выполнит и сохранит изменения.
На заметку: Если у пользователя браузер настроен на иностранном языке, изменить его на русский можно самостоятельно. Для этого нужно зайти в настройки и выбрать нужную опцию.

Как перевести текст в Word Online
При работе с документом Ворд Онлайн может возникнуть необходимость в изменении языка в определенном фрагменте текста. Для этого нужно:
- В документе Word Online выделяете нужный фрагмент текста.
- Выбираете в верхнем меню опцию «Инструменты».
- Кликаете мышкой по функции «Перевести документ».
- В открывшемся окне указываете заголовок для нового файла.
- Выбираете из всплывающего меню язык, на который нужно перевести фрагмент текста.
- Нажимаете кнопку «Перевести».
- Система выполнит поставленную задачу, откроет в новом окне файл.
На заметку: Следуя данной инструкции можно переводить весь текст в документе Ворд Онлайн. Все проведенные изменения будут отображаться в копии базового файла, название которому пользователь задает самостоятельно.
Need to write or read in a different language? Follow these tips
Updated on October 15, 2022
What to Know
- In Windows: Choose the desired Display and Help Languages in File > Options > Word Options > Language.
- Then, select Choose Editing Options in the same section to change the editing language.
- All but the proofing language in Office for Mac are the same as those for the operating system. To change it in Word: Tools > Language.
This article explains how to change display and/or editing languages in Word for Office 365, Word 2019, Word 2016, Word 2013, Word 2010, Word Online, and Word for Mac. In Windows—but not in macOS—you can choose them independently of the language installed for your operating system.
How to Change the Display Language
The display language in Word governs the ribbon, buttons, tabs, and other controls. To force a display language in Word that’s different from that of your operating system:
-
Select File > Options.
-
In the Word Options dialog box, select Language.
-
In the Choose Display Language section, choose the Display Language and Help Language you want to use. Languages installed in Windows 10 are listed.
-
If a specific language is not listed, select Get more display and help languages from Office.com. If necessary, install a Language Accessory Pack, then close and re-launch Word. You may need to reboot your computer, as well. After a language pack loads, go to the Word Options menu and choose that pack in the Display Language and Help Language lists.
-
Select Set as Default for both the Display Language and the Help Language lists.
-
Select OK to save your changes.
How to Change the Editing Language in Word
The editing language—which governs spelling, grammar, and word sorting—can be changed in the Word Options screen. Go to the Choose Editing Languages section, and select a language from the list. If the language isn’t listed, select the Add additional editing languages drop-down arrow and choose a language.
To proofread in the selected language, highlight the text, then go to the Review tab and select Language > Set proofing language. Choose a language from the list. Word will consider the highlighted selection to be the non-default, selected language and will check the spelling and grammar accordingly.
How to Change Language in Word Online
Language options for Office Online are similar to those in desktop versions of Office. In Office Online, highlight the text for proofing in the non-default language. Select Review > Spelling and Grammar > Set Proofing Language, then choose your alternative language. All proofing in that selected block will be governed by the rules of the alternative language.
How to Change Language in Word for Mac
The display and keyboard layout languages used in Office for Mac are the same as the ones for the operating system. You cannot use separate languages for the OS and Office applications. However, you can specify a different proofing language for Office for Mac.
To change the proofing language in Office for Mac, select Tools > Language in Word or another Office application. To change the proofing language for new documents, select Default.
If you select OK instead of Default, the proofing language you chose will only apply to the current file.
Normally, Word defaults to the language of the operating system. As a rule, you should use Windows to install language files rather than rely on an application like Word to do it for you.
FAQ
-
How do you delete a page in Word?
To delete a page in Word, select View, then go to the Show section and select Navigation Pane. In the left pane, select Pages, choose the page you want to delete and tap the delete or backspace key.
-
How do I check the word count in Word?
To check the word count in Microsoft Word, look at the status bar. If you don’t see the number of words, right-click the status bar and choose Word Count.
-
How do I insert a signature in Word?
To insert a signature in Microsoft Word, scan and insert a signature image into a new Word document and type your information beneath the signature. Then, select the signature block and go to Insert > Quick Parts > Save Selection to Quick Part Gallery. Name the signature > AutoText > OK.
Thanks for letting us know!
Get the Latest Tech News Delivered Every Day
Subscribe
Some people don’t wish to use the default English (U.S.) as their preferred language for Office Online when they create new documents there. Interestingly, you can change the option but it doesn’t seem to work for all languages. Here’s how to change the setting, but it has limitations.

In my case, my production tenant is set up in Australia. The language I use everywhere is English (Australia). You would think that this applies to any new document created using Office Online. Not so, it seems. If I create a new Word document using the web interface as shown above, I get:

but if you look in the lower left you see:

If you click on the language text you get:

Here I can select English (Australia) as my language. Now my document reports:

All good right? Sure, until you create a new document using Office Online. You are then back to original language. In my case English (U.S.) not English (Australia)! I don’t want to be changing the language manually for every new document I create with Office Online. How do I therefore make my preferred language ‘stick’ with Office Online?
As far I can tell, to make a different language ‘stick’ for a user when they use Office Online they will need to do the following:
1. Login to the Microsoft 365 portal (https://portal.office.com) with their own credentials.
2. Select their Account Manager icon in the top right of the portal window like so:

3. From the menu that appears select My Office profile like so:

4. Select the Update profile button the Delve page like so:

5. On the Update your profile page, locate and select How can I change language and region settings? as shown:

6. This reveal a new line that includes a hyperlink on the word “here” as shown below, which you need to select. Note the additional instructions it also gives you – click the ellipse (…) and then choose Language and Region.

7. As the previous instructions detailed, on the Edit Details page select the ellipse (…) like so:

8. From the items that are displayed, select Language and Region as previously directed:

9. Select the option to Show Advanced Language Settings as shown:

10. Select the Pick a new language for both of the selection boxes displayed like so:

11. It is at this point that not all options are accepted it turns out. In my case if I select English (Australia), the Office Online documents continue to open with English (U.S.). As it turns out, the best I can do in my case is set the language to English (United Kingdom) and then select the Add button like so:

If you want another language, you’ll probably have to try a few to see whether they ‘stick’.
12. My end result looks like:

You’ll also need to either remove the existing language (as I have done, so English (U.S.) no longer appears) or change the priority of the language added, via the up/down arrows on the right of the language, and place it at the top of list to make it the default.
13. Scroll to the bottom of the page and make sure you select Save all and close to update your preferences:

14. Lastly, you’ll need to wait about 15 minutes or so it seems for this to take effect.
If you now open a new Office Online document, you should now see the selected language as default like so:

Phew, that’s a lot of work isn’t it? It may not be English (Australia) but it is now much closer to that than what it used to be. Remember, that each individual who wants their language changed for Office Online will need to complete these steps.
Next challenge, how to script it with PowerShell for bulk deployment? Not sure I want to go down that rabbit hole. We’ll see. Let me know if you’d find value in a script to make these changes across your tenant.
Home
> H
> How Do I Change The Language On Microsoft Word Online?
Setting proofing language in Office online
- Open the Microsoft Word app on your web browser.
- Click the Review tab.
- Click the Spelling & Grammar (arrow) button and select the Set Proofing Language option.
- Select the new language that you want to use for proofing.
- Click the OK button.
Read more
One may also ask how do i change my microsoft word back to english?
Open an Office program such as Word. Click File > Options > Language. Select the language you wish to use in the Set the Office Language Preferences dialog box. Subsequently, how do i change the language on office 365? Office 365: Change UI language Open the app that you wish to change the language. Go to File>Options. Select the Language tab. Check the Office Display Language section to see if your language has been listed. Choose the language that you wish to install. Your browser will now open.
How do I change Word to UK English?
Changing to UK English Select Language from the Tools menu and then choose Set Language from a submenu. Word displays the Language dialog box. Select the language you wish to use as default from the list. Click on the Default button. You will be asked to confirm your action. Close the Language dialog box Regarding this, how do i change the language on office 365 from chinese to english? Depending on the configuration of your Microsoft 365 organization, Settings might be found in a different location. Select Settings from the top right corner of your screen. Select Settings > Microsoft 365 settings and then select the Settings tab. Select Language and Time Zone and choose the language that you prefer.
And another question, why can’t i change the language in word?
How to Change Language in Word Online. Office Online offers similar language options to Office desktop. Office Online offers the following options: Highlight the text to proof in the non-default languages Select Review > Grammar and Spelling > Set Proofing Language. Next, choose your alternate language. And another question, how do i stop word from changing languages? Click on the «Review» tab and then click on «Language->Set Proofing Language.» Check the box next «Do not check spelling or grammar,» then click OK. Your selected section will be reset to ignore all grammar, spelling, and other language styles.
How do I change the start language in Microsoft Word?
Windows allows you to manage display language settings Select Start > Settings > Language & Region > Time & Language > Select a language from Windows’s display language menu. If it isn’t listed, click Add a Language to Install the one you choose. How do I switch languages on my keyboard? You can add a language to Gboard using Android settings Open the Settings app on your Android tablet or phone. Tap System. Languages & input Tap Gboard. Select the layout you wish to use. Tap Done
How do I change OneDrive to English?
To view OneDrive in a different language, sign in with your Microsoft account. Click Settings at the top of this page to select the language currently displayed. Select your language and press Select. Follow the prompts.
Similar articles
- How do I change Excel to English?
Click on the file to open it.
- How do I convert DOCX file to Word?
Click the File tab to learn how to convert a DOCX to a DOCOpen Microsoft Word. Click the File tab to open the file and then choose the Word 97-2003 Document option to save it.
- How do I change the language on InDesign to English?
The Creative Cloud desktop app is the official way to change the language used by Adobe applications. Go to Preferences, select the language you want, uninstall the application, and then re- install it.
- How do I change the language on my numbers?
You can change a spreadsheet’s language.
- How can I change PHP language to English?
- How do I change VLC to English?
- What is Lua language used for?
- What is the extension of a Word file?