
Change How Word Looks on Screen to Be More Productive
How do you change views in Word documents?
Updated on December 4, 2019
Microsoft Word provides several ways to view a document you’re working on. Each is suitable for different aspects of working with a document, and some are better suited for multi-page documents than single pages. If you’ve always worked in the default view, you may find other views that make you more productive.
Instructions in this article apply to Word for Microsoft 365, Word 2019, Word 2016, Word 2013, and Word 2010.
Change Layouts
Word documents open in the Print Layout by default. You can select an alternative layout at any time.
-
Go to the Ribbon and select the View tab.
-
In the Views group, select one of the other available layouts available to change the layout.
Change Layouts With the Icons Under the Document
Another way to change layouts on the fly is to use the buttons at the bottom of the Word document window. The current layout icon is highlighted. To switch to a different layout, select the corresponding icon.
Word Layout Options
Current versions of Word provide the following layout options:
- Print Layout is the default layout and the one you see most often.
- Web Layout is suitable if you are designing a web page in Word. Web Layout view shows how the document will look as a web page.
- Outline generates an outline version of the contents of the document. You can control the number of levels that are shown and whether the text is formatted. Use Outline view to organize and navigate through a lengthy document.
- Draft view displays only basic text without any formatting or graphics. It is Word’s equivalent of a plain text editor.
- Read Mode hides the writing tools and menus, leaving leave more room for the document pages.
- Focus Mode is a simplified view of the document without any distractions and is available in Microsoft 365. If you need the ribbon, move the mouse to the top of the screen and the ribbon will drop down.
Other Ways to Change How Word Displays
Also in the View tab are other ways to control how a Word document looks on screen.
- Zoom opens a dialog box you can use to specify the percentage of zoom you want. Choose from Word-supplied choices or enter any percentage you like.
- Zoom to 100% instantly returns the document to 100% size.
- One Page or Multiple Pages toggles the view so that either one page of the document displays on the screen or thumbnails of several pages display on the screen.
- Page Width expands the width of the working document to the screen size, usually displaying only the top part of the document.
- Ruler and Gridlines make it easier to measure distance and objects in a document and line up objects on the page.
- Navigation Pane adds a column to the left of the document that holds thumbnails for every page. It is useful for navigating through documents that have more than one page.
- Split displays parts of two pages at the same time, which is useful when you want to copy text or graphics from one page and paste to another.
Thanks for letting us know!
Get the Latest Tech News Delivered Every Day
Subscribe
Change page orientation to landscape or portrait

Change orientation of whole document
-
To change the orientation of the whole document, select Layout > Orientation.
-
Choose Portrait or Landscape.

Change part of a document to landscape
-
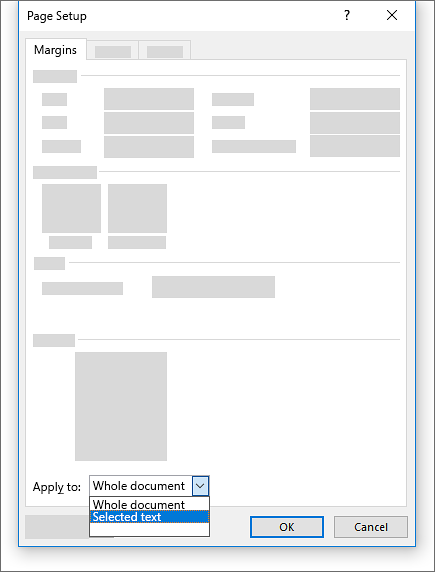
Select the content that you want on a landscape page.
-
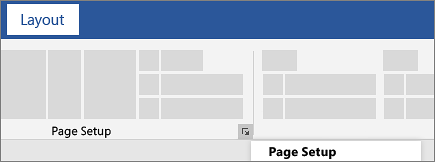
Go to Layout, and open the Page Setup dialog box.

-
Select Landscape, and in the Apply to box, choose Selected text.
Need more help?
Want more options?
Explore subscription benefits, browse training courses, learn how to secure your device, and more.
Communities help you ask and answer questions, give feedback, and hear from experts with rich knowledge.
Go to the Ribbon and select the View tab. In the Views group, select one of the other available layouts available to change the layout.
Contents
- 1 How do I change back to normal view in Word?
- 2 How do I change the layout of a Word document?
- 3 Can you change the default view in Word?
- 4 How do I get out of view mode in Word?
- 5 How do I get back to normal view in Word 2013?
- 6 How do I change the view in Microsoft Office?
- 7 How do I change the default view in Word for one page?
- 8 How do I change the view in Word 2016?
- 9 How do I get Word 2016 to open in Edit View?
- 10 How do I change the default view in Word to print layout?
- 11 Why is my word account view only?
- 12 How do I get out of fullscreen in Word?
- 13 What is the default view in Word?
- 14 How do I change outlook back to classic view?
- 15 How do I fix Microsoft Outlook view?
- 16 How do I change the reading pane in Windows 10?
- 17 How do I view two pages at once in Word?
- 18 How do I view a whole page in Word?
- 19 How do I make 2 pages into 1 page in Word?
- 20 Why does my Microsoft Word look different?
How do I change back to normal view in Word?
Microsoft Word gives you two ways to switch between different document views:
- Click the view icons in the bottom-right corner of your document window.
- Click the View tab and then click the view you want to use, such as Print Layout or Draft view.
How do I change the layout of a Word document?
Change orientation of whole document
- To change the orientation of the whole document, select Layout > Orientation.
- Choose Portrait or Landscape.
Can you change the default view in Word?
When you open one of your business documents in Microsoft Word 2010, it is displayed in the Print Layout view, which is the default view. You can change the view at any time. If you find that you are having to change the view every time you open a document, you can save time by modifying the default open view in Word.
How do I get out of view mode in Word?
To get out of Read Mode, click or tap View > Edit Document. In addition to the reading controls you use regularly, you can zoom in and out on images and other objects, expand or collapse sections, or watch embedded videos.
How do I get back to normal view in Word 2013?
Draft: A simple text-only view that hides most graphics and ignores multi-column layouts and page headers and footers.
- In Word 2013, click the View tab.
- Choose View→Read Mode.
- Click the View command on the menu bar at the top of the screen and click Edit Document on the menu that appears to return to normal viewing.
How do I change the view in Microsoft Office?
Create a new view
- Click View > Current View> Change View > Manage Views > New.
- Enter a name for your new view, and then choose the type of view.
- Under Can be used on, accept the default setting of All Mail and Post folders or choose another option, and then choose OK.
How do I change the default view in Word for one page?
In Word 2016 (365), in the View Ribbon, select Print View. Then Words opens to just one page.
How do I change the view in Word 2016?
To switch between Read Mode, Print Layout, and Web Layout views, click one of the View buttons, found in the lower-right corner of the Word program window. The View buttons are shown in the lower right corner of the Word 2016 program window.
How do I get Word 2016 to open in Edit View?
Open Word In Full Edit Mode
- Click the “File” menu in the upper left corner.
- Click “Options”
- Click “Trust Center” in the left pane.
- Click “Trust Center Settings”
- Click “Protected View”
- Uncheck all 3 options under protected view and click “OK”
How do I change the default view in Word to print layout?
How to Open a Word Document in Print Layout
- Go the “File” menu and select “Options.”
- Select the “General” tab and find the section labeled “Start Up Options.”
- Uncheck the box next to “Open email attachments and other uneditable files in reading view.” Click “OK” to save the change.
Why is my word account view only?
Turn Off The Trust Center Options To Remove Word Opening In Read Only. Trust Center is a feature in Word that blocks certain documents from being fully opened with editing capabilities on your computer. You can disable the feature in the program and that should fix the read only issue you’re facing with your document.
How do I get out of fullscreen in Word?
While the document is in Full Screen Reading view, do the following: Click Close in the upper-right corner of the screen, or press ESC.
What is the default view in Word?
Although Microsoft Word has several different ways you can view or edit your documents, the Print Layout view is the default.
How do I change outlook back to classic view?
RELATED: How to Toggle Outlook Between Touch and Mouse Mode
Start by clicking on the small down arrow icon found in the far right of the ribbon. This arrow acts like a toggle to switch between the simplified and classic ribbons whenever you want.
How do I fix Microsoft Outlook view?
It looks like you are viewing your Inbox in Single view. Please try changing to Compact view to see the result. To do this, click your Inbox, click View tab > Change View and then click Compact. If still not working, please try resetting the Compact View to see if the issue persists.
How do I change the reading pane in Windows 10?
The Reading Pane is turned on by default. Do one of the following: To turn off the Reading Pane: On the View tab, in the Layout group, select Reading Pane, and then select Off. To turn on or move the Reading Pane: On the View tab, in the Layout group, select Reading Pane, and then select Right or Bottom.
How do I view two pages at once in Word?
To view multiple pages at one time, keep the “View” tab active. Place your cursor in the text of the first page you want to view in the multiple-page view. In the “Zoom” section, click “Multiple Pages.” By default, two pages are shown side-by-side.
How do I view a whole page in Word?
Make Word Full Screen Using The Read Mode
To access the read mode in MS Word, click on the View menu while your document is open and select the Read Mode option. To switch back to the normal mode, press the Esc key on your keyboard. You’ll be back to the normal editing screen with all the toolbars on it.
How do I make 2 pages into 1 page in Word?
Click the “1 Page Per Sheet” button to open a drop-down menu with more options. Click “2 Pages Per Sheet.”
Why does my Microsoft Word look different?
Microsoft Word documents display differently on different systems because of differences between the systems. Getting Microsoft Word documents to display identically typically means processing them into something else.Word documents were never intended to do what you’re doing.

on
March 26, 2019, 4:29 PM PDT
How to work with different views in Microsoft Word
You can change views in Word to more easily see and work with your documents. Check out your options and learn about the benefits of each one.
We may be compensated by vendors who appear on this page through methods such as affiliate links or sponsored partnerships. This may influence how and where their products appear on our site, but vendors cannot pay to influence the content of our reviews. For more info, visit our Terms of Use page.

You might keep Microsoft Word primarily in Print Layout view, which displays your document as it would look when printed, complete with margins, page breaks, and other visual elements. But that’s not the only view that Word offers. The Web Layout view displays your documents without margins and page breaks. Read Mode displays your document formatted as columns for easier reading. Draft Mode and Outline view also offer certain benefits.
And there are other options, such as Side to Side view, Single Page view, Multiple Page view, and Split View, each of which provides specific advantages depending on how you want to see and work with your document. Let’s take a closer look at your options. (I’m using the latest flavor of Word via Microsoft Office 365, but the process for viewing documents works the same with previous versions of Word as well.)
SEE: 10 all-purpose keyboard shortcuts to boost your Word efficiency (free PDF) (TechRepublic)
Open a document in Word. If you use Word the way I do, your default view is likely set to Print Layout. To confirm, click the View icon. At the View ribbon, the Print Layout button should be highlighted; if it’s not, click that icon.
The major benefit with Print Layout is that you can see how your document will appear if printed, so you can better judge the margins, spacing, page breaks, and other visual elements and adjust any of them if necessary. But even if you don’t intend to print your document, Print Layout can show you where and how to tweak it to make it easier to read on the screen (Figure A).
Figure A
If you find the margins, spacing, page breaks, and other elements too distracting or disruptive, click the button for Web Layout (Figure B). Web Layout view is designed to show you what your document would like if you intend to publish it as a webpage. It also serves to display a compact version of your document without margins and page breaks so you can view more content on the screen at one time. With Web Layout view, you can continue to edit and modify your document so you don’t need to keep switching between this mode and Print Layout.
Figure B

If you prefer to read your document as if it were a printed book, click the icon for Read Mode. Your document appears in a compact form in two columns but with the text large enough to easily see and read on the screen (Figure C).
Figure C
You can’t edit your document in Read Mode, as it’s designed more for finished documents. If you need to edit it, click View and select Edit Document to return to Print Layout mode. To adjust the look and layout of Read Mode, click View and move to Column Width. This is where you can change the layout from the default of two columns to a narrow view of four columns or a wide view of one column. Move to Page Color, and you can switch the color to Sepia or Inverse (white on black). Move to Layout and select Paper Layout to switch to a large single-column view.
Other options are available from the View menu. Syllables separates each word into its syllables. Text Spacing adds spacing between each letter, word, and line. And Read Aloud reads your document aloud. To exit Read Mode, click the View menu and select Edit Document or just press the Esc key.
Outline view is useful if you want to view just the primary headings, subheadings, and text of your document without images or other visuals. To exit this view, click the icon to Close Outline View (Figure D).
Figure D
Back at the View ribbon, click the icon for Draft. This view displays just the text in your document without margins and page breaks and without images and other visual elements (Figure E).
Figure E
With certain views, such as Print Layout, you can zoom out to view multiple pages on the screen. Click the Side to Side icon to display your document two pages at a time (Figure F).
Figure F

In Side to Side view, click the Thumbnails icon to view small thumbnails of each page in your document. This view is helpful if you need a bird’s-eye view of your document or want to jump to a specific page in a lengthy document. Click the Thumbnails icon again to return to your previous view (Figure G).
Figure G

You can switch among different zoom levels using the various Zoom icons. One Page displays your entire current page. Multiple Pages displays two or more pages at a time. And Page Width displays the edges and margins of your document. From here, you can select 100% to zoom in on your document. How much of the document you see at 100% depends on the size of your monitor and the size of your window for Word. You can fine-tune the zoom level by clicking the Zoom button and choosing or typing a specific percentage (Figure H).
Figure H

You can view two separate areas of your document at the same time; this is handy if you need to refer to two different areas and don’t want to keep scrolling up and down, or if you need to copy and paste content from one area to another. Click the icon for Split to split your document into separate views. You can work with and navigate each of the two panes independently. Drag and drop the split bar to change the length of one pane versus the other. Click the icon to Remove Split or double-click the split bar to return to normal view (Figure I).
Figure I

Also See
-
10 time-saving tips to speed your work in Word
(TechRepublic) -
5 ways to modify and customize styles in Microsoft Word
(TechRepublic) -
How to add a traditional glossary to a Microsoft Word document
(TechRepublic) -
How to find and recover a lost Microsoft Word document
(TechRepublic) -
How to share and collaborate on Microsoft Office documents on an iPad
(TechRepublic) -
Software usage policy
(Tech Pro Research) -
Microsoft Office has changed, how you use it should too
(ZDNet) -
Microsoft Office update brings simplified design, better search
(CNET) -
Why I turned off Word’s AutoSave feature in Office 365
(CNET) -
The best alternatives to Microsoft Word in 2019
(Download.com) -
Get more Word how-to tips
(TechRepublic on Flipboard)
-
Microsoft
-
Software
If you’ve been using Microsoft Word for a while now, you know how annoying it can be to edit and review a document with several pages. Granted, you can’t entirely get rid of all annoyances, but changing how you view your document in Word can sometimes help you work even faster.
Everything you need to change how your document is laid out is found in the View tab in the Microsoft Word ribbon menu.
Five document views are available, each of which is designed for a specific purpose
- Print Layout – Your document appears on the screen just like how it would look if you decided to print it. It also allows you to click anywhere in the document and start typing a la freestyle writing. This is the default view when you create a new document.
- Full Screen Reading – When you want to type and read your document without any distractions, choose full screen reading. It removes most of the buttons and options. You can choose to show one or two pages at a time.
- Web Layout – Your document appears on the screen just like how it would look on a browser. This is a useful view when you’re creating a document that you plan to publish as a Web page.
- Outline – When you want to see the headings and subheadings of your document easily, switch to outline view. You can edit and move blocks of text according to the heading levels. Showing your document as an outline helps you organize your ideas and bring attention to details that make the most impact.
- Draft – When you only want to edit and format text with no regards to how it looks in print, the draft view is the recommended document view. Page elements, such as page boundaries, headers and footers, are hidden to help you focus on editing the body text.
Not all computer displays are created equal
- Zoom 100% – view the document in its normal size
- Zoom One Page – view the document one page at a time
- Zoom Two Pages – view the document two pages at a time
- Zoom Page Width – view the document so that its width matches the width of the Microsoft Word window
If you need to edit multiple pages simultaneously without having to scroll through pages between them, use the View menu’s window options. Click New Window to open a new window of the same document. You can go to another page in the new window without leaving the page you’re currently viewing in the original window. As you open more windows, you can easily arrange them using the Arrange All button. Other buttons let you view two windows side-by-side, switch between windows or synchronize their scrolling. The Windows taskbar also have options for arranging open windows.