There are several ways to adjust line spacing in Microsoft Word. Today’s tutorial explains the basic method using the ribbon and a more advanced method using the Paragraph dialog box.
See the Quick Tip at the bottom of this tutorial to learn how to single-space an entire document from the Paragraph dialog box.
This tutorial is available as a YouTube video showing all the steps in real time.
Watch more than 150 other document software tutorials on my YouTube channel.
The images below are from Word for Microsoft 365.The steps are the same in Word 2021, Word 2019, and Word 2016, and similar for Word 2013 and Word 2010. However, your interface may look slightly different in those older versions of the software.
Basic Method: Adjust Line Spacing from the Ribbon
- Select the Home tab in the ribbon.
- (Optional Step) Select the Show/Hide button in the Paragraph group to show paragraph break symbols and other formatting that may affect line spacing.
- Select the text with the line spacing that needs to be changed.
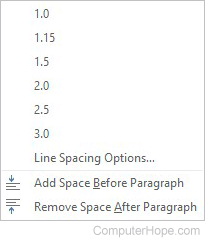
- Select the Line and Paragraph Spacing button in the Paragraph group.
- Select an option from the drop-down menu:
A. Numbers 1.0 through 3.0 add space between lines.
B. Add Space Before Paragraph adds space before paragraphs but not before the lines within them.
C. Remove Space After Paragraph removes space after paragraphs but not after the lines within them.
These three options are based on your current font size with 1.0 being the equivalent of single-spacing.
Your changes will be applied immediately.
Note that you can apply the individual line spacing (the numbers 1.0 through 3.0) and the paragraph spacing to the same text to further customize your results.
- (Optional Step) Select the Show/Hide button again to hide paragraph symbols and other formatting (see figure 2).
Now, let’s move on to an advanced method offering additional spacing options.
Advanced Method: Adjust Line Spacing from the Paragraph Dialog Box
- Select the Home tab in the ribbon (see figure 1).
- (Optional Step) Select the Show/Hide button in the Paragraph group to show paragraph break symbols and other formatting that may affect line spacing (see figure 2).
- Select the text with the line spacing that needs to be changed (see figure 3).
Pro Tip: PC users can press Ctrl + A to select the entire document if all the line spacing needs to be changed. However, this includes items you may not want to alter, including headings, tables, table titles, figure captions, tables of contents, footnotes, endnotes, and reference lists.
- Select the dialog box launcher in the Paragraph group.
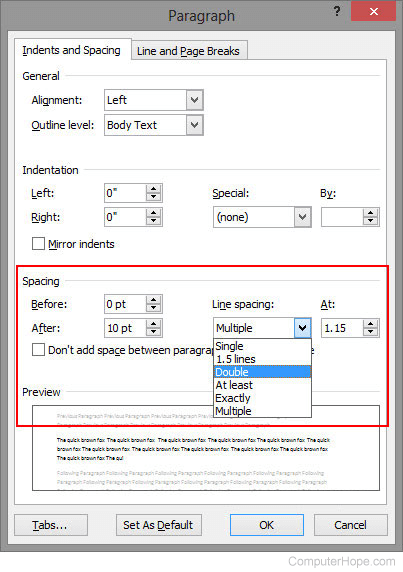
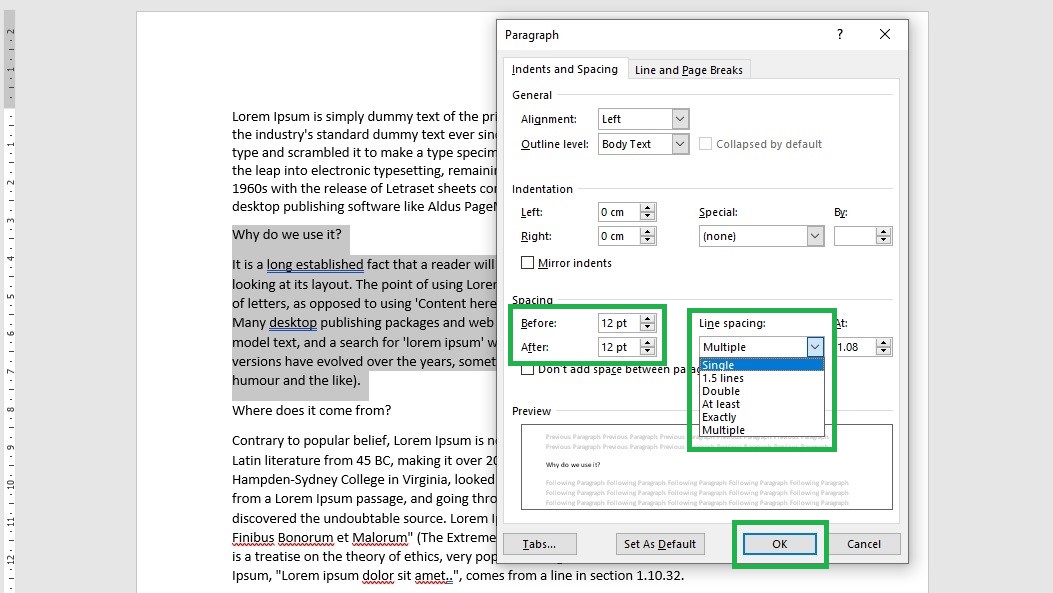
- Make changes in the Spacing section of the Paragraph dialog box:
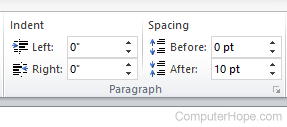
A. The Before and After boxes represent the spaces before and after paragraphs measured in points with one point being 1/72 of an inch tall. Use the increment arrows to choose a whole number or enter a number with a decimal (e.g., 2.75) directly into the box.
B. The Line spacing drop-down menu offers six options:
1. Single—Creates single-spacing based on your current font size.
2. 1.5 Lines—Creates a space and a half as large as your current font size.
3. Double—Creates double-spacing based on your current font size.
4. At Least—Determines the minimum amount of space between lines based on the number of points entered in the At box.
5. Exactly—Creates space between lines based on the number of points entered in the At box.
6. Multiple—Creates spacing multiplied by the number entered in the At box. For example, if you enter four in the At box, your spacing will be four times as large as your current single-spacing.
C. Don’t add space between paragraphs of the same style—For many users, this will remove spaces between all paragraphs because general documents commonly have only one paragraph style.
Note that the Preview box updates as you make adjustments in the Spacing section.
- Select the OK button to close the Paragraph dialog box.
- (Optional Step) Select the Show/Hide button again to hide paragraph symbols and other formatting (see figure 2).
Quick Tip: Single-Space an Entire Document from the Paragraph Dialog Box
- Select the Home tab in the ribbon (see figure 1).
- Select the entire document. (PC users can press Ctrl + A.)
- Select the dialog box launcher in the Paragraph group (see figure 7).
- Enter 0 in the Before box in the Paragraph dialog box (see figure 8).
- Enter 0 in the After box in the Paragraph dialog box (see figure 8).
- Select Single in the Line spacing drop-down menu (see figure 8).
- Select the OK button (see figure 9).
Related Resources
How to Adjust Letter Spacing in Microsoft Word (PC & Mac)
How to Adjust the Space between Words in Microsoft Word
How to Adjust Page Margins in Microsoft Word
Updated June 25, 2022
You may have heard of single or double line spacing, or even used them yourself.
Single line spacing is inserting one empty line between each line.
Double line spacing is inserting two empty lines between each line.
This method limits you to whole line spacings and also to the font size you are using, we’ve all tried to reduce or increase a line space by changing the font from font 12 to font 5 within the blank line….but it doesn’t need to be that difficult or manual.
Microsoft has a line spacing functionality that gives you a few popular pre-set options to quickly select from – 1 line space, 1.5 line space, 2 line spaces and so on or the ability to create a custom line space through their advanced options. Making line spacing easy!
In this article, we will walk you through how to insert a line space using one of Microsofts pre-set options and how to customise the line space to something more specific.
Changing the line spacing in Microsoft Word
- Open Word
- Select the text you would like to change the line spacing within
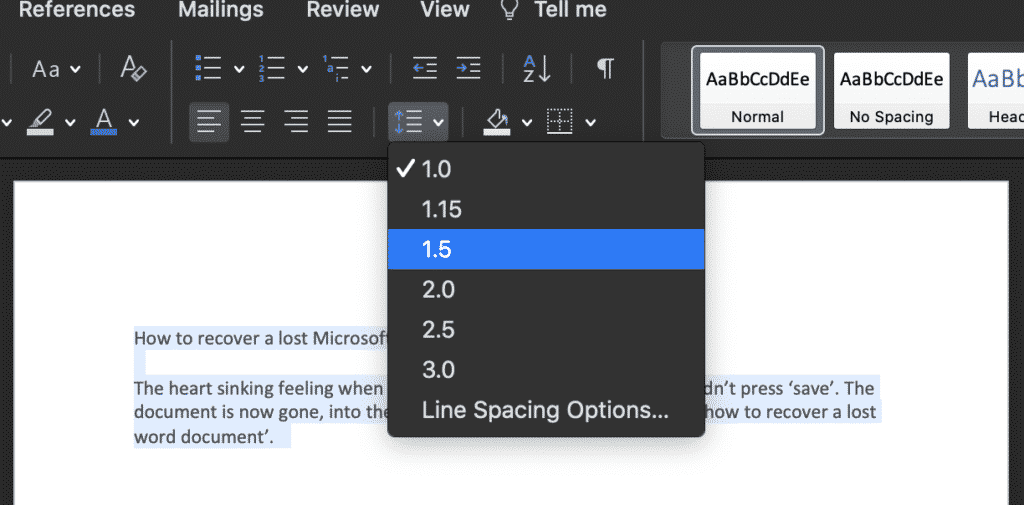
- Found under the Home tab, click Line and Paragraph Spacing
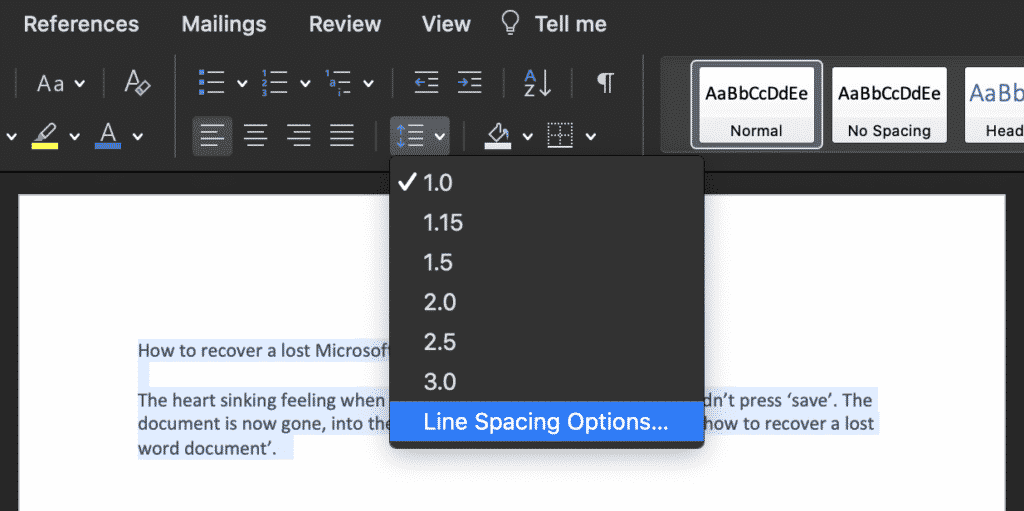
- To customise the spacing, click Line Spacing Options…
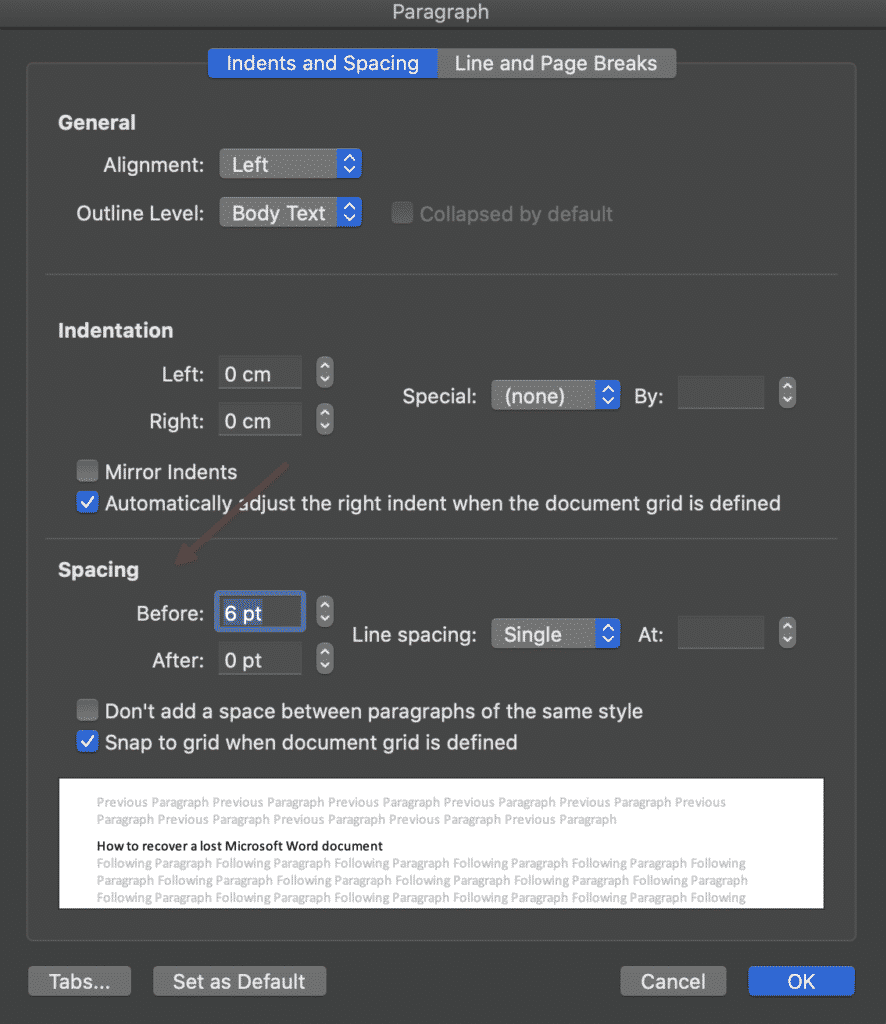
- Under spacing, manually type the spacing you would like between each highlighted line
- Press OK
You have now successfully changed the line spacing within your Microsoft Word file.
Often we find the line spacing to be too large within a shared document, you can reduce the line spacing by following the steps above, selecting a new, smaller line space.
Looking for an easier solution to your collaboration frustrations?
When collaborating in Microsoft Word, your email inbox can quickly become filled with updated versions of a document being sent back and forward between colleagues.
John made an edit, sent an email ‘see updated attached’.
Then Lucy made an edit, sent an email 30minutes later ‘updated version attached’, and it goes on for days.
Sending updated versions via email is one way to know a new version is available and required your attention. But it can also clutter your inbox with internal emails, with a single line or sometimes nobody of text in the email.
The alternative is to send them via a group chat channel such as Slack or Microsoft Teams, but you should make a new channel for the document updates so that you don’t miss one, or lose it in an open channel as other conversations start happening around the document being sent.
With overflowing inboxes and your slack channel constantly telling you there are un-read messages there needs to be a solution for collaborating alone. Somewhere your updated versions can live in peace, with no other noise around them to allow you to easily review and check them at any time.
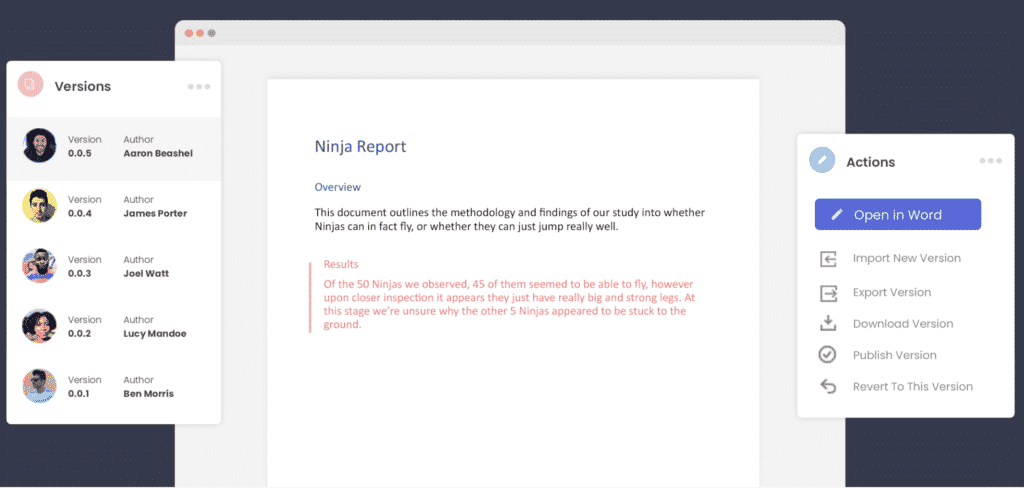
The solution is here and it comes in the form of a great new purpose-built tool called Simul Docs.
Simul was built just for Microsoft Word and for you, to help you collaborate with ease.
First and foremost, Simul will store and manage every version of your document in an easy to navigate toolbar that you can access from anywhere you have an internet connection (or offline if you do a quick download before losing your connection).
As a new version of your document is created, Simul will automatically save the file under a numerical version number that makes sense. The first version is named 0.0.1, the second 0.0.2, the third 0.0.3 and so on. Making it easy for you to keep track of how many versions have been made and which one is the most recent.
But what about any extra notes or comments the author wanted to make, ones they would usually put in the email such as ‘Tim, this is my final round of edits before we send onto client’? No worries, Simul allows you to add comments and notes to any version as well, so your team can see what is going on at all times.
Speaking of comments and notes, Simul will also track every comment, change or edit made to a version for you, without you having to remember to turn tracked changes on. That’s pretty cool, right?
So a tool that manages your version control, saves your files and stores them and tracks all of your edits and changes without you thinking about any of it, it sounds too good to be true or as though it would be difficult to use or implement. Well, don’t worry it’s not, it’s here and it is called Simul Docs and it’s so easy to use, after walking through the in-app tutorial we had it down within 3 minutes.
It’s a bit like an apple product, it just makes sense. It’s clean and simple, nothing too complicated, but with everything you need all in the one spot.
If you’re not convinced already, head over to Simul now and give their free trial a go.
Collaboration just got a whole lot easier with Simul Docs.
Updated: 05/03/2022 by
When typing in Microsoft Word, you might need to change the line spacing, depending on the document’s style. The steps to enable double spacing differ slightly between versions. Consequently, you may need to use intuition to adapt them for older versions.
Tip
Use the keyboard shortcuts Ctrl+1 to single space, Ctrl+2 to double space, or Ctrl+5 to set the spacing to 1.5 line spacing on any line, paragraph, or all highlighted text.
Note
When pressing Enter, it starts a new paragraph with extra space between the two paragraphs. If you want to go to the next line without starting a new paragraph, press Ctrl+Enter.
To increase or decrease line spacing or enable double spacing, select a link below and follow the steps.
Enable double spacing for the whole document
Microsoft Word 2016 and 2019 (Office 365)
- Open Microsoft Word.
- On the Home tab, in the Paragraph group, click the Line and Paragraph Spacing (
) icon.
- Select the desired spacing option from the available list.
- For additional spacing options, select Line Spacing Options in the list.
Microsoft Word 2007, 2010, and 2013
- Open Microsoft Word.
- On the Home tab, in the Styles group, right-click Normal.
- Select Modify from the drop-down menu.
- Under Formatting, click the Double Space button (shown below).
- Click OK.
or
- Open Microsoft Word.
- Click the Page Layout tab.
- Click the down arrow in the bottom right corner next to Paragraph to bring up the Paragraph window.
- In the Paragraph window, make sure you are on the Indents and Spacing tab.
- Click the down arrow next to the Line spacing box.
- Select Double and click the OK button.
Modify line spacing for all or part of an existing document
Microsoft Word 2007 and later
- Open Microsoft Word and the document you want to modify.
- Highlight the text where you want to change the line spacing or select all.
- Right-click the highlighted text, and select Format and then Paragraph, or only Paragraph depending on your version of Word.
- In the Paragraph window, make sure you are on the Indents and Spacing tab.
- Click the down arrow in the Line spacing drop-down box.
- Select Double and click the OK button.
Download Article
Download Article
This wikiHow teaches you how to customize a Word document’s layout design by changing line spacing and character spacing, using a computer.
-
1
Open a Word document on your computer. Find the Word document you want to edit on your computer, and open it.
-
2
Select the entire text in the document. You can click and drag your mouse from the beginning to the end, or use a keyboard combination to select all.
- The keyboard shortcut to select all is ⌘ Command+A on Mac, and Control+A on Windows.
- Alternatively, you can select a paragraph or only a few lines. In this case, you will be editing line spacing only for the selected part of your document.
Advertisement
-
3
Click the Home tab. This button is in the upper-left corner of the app window. It will open your Home toolbar at the top of the document.
-
4
Click the line spacing icon. This button looks like three horizontal lines with two blue arrows pointing up and down. You can find it at the middle of the Home toolbar. Clicking will open your line spacing options on a drop-down menu.
-
5
Select a line spacing value. Your options here include 1.0, 1.15, 1.5, 2.0, 2.5, and 3.0. Selecting a value here will change your line spacing, and apply it to the selected text.
- If you want to manually put in a number, you can select Line Spacing Options at the bottom of the drop-down menu. This will open advanced spacing options in a new pop-up window.
Advertisement
-
1
Open a Word document on your computer. Find the Word document you want to edit on your computer, and open it.
-
2
Select the entire text in the document. You can click and drag your mouse from the beginning to the end, or use a keyboard combination to select all.
- The keyboard shortcut to select all is ⌘ Command+A on Mac, and Control+A on Windows.
- Alternatively, you can select a paragraph or only a few lines. In this case, you will be editing character spacing only for the selected part of your document.
-
3
Press ⌘ Command+D on Mac or Control+D on Windows. This will open your Font options in a new pop-up window.
-
4
Click the Advanced tab. It’s next to Font at the top of the pop-up window.
-
5
Click the selector bar next to Spacing. This option is located under the Character Spacing heading. It will allow you to select one of Normal, Expanded or Condensed for character spacing.
-
6
Adjust the spacing value in the box next to the selector bar. You can click the up and down arrow buttons here to adjust character spacing to the precise amount.
-
7
Click the OK button. This will apply your new character spacing settings to the selected text.
Advertisement
Ask a Question
200 characters left
Include your email address to get a message when this question is answered.
Submit
Advertisement
Thanks for submitting a tip for review!
About This Article
Thanks to all authors for creating a page that has been read 12,291 times.
Is this article up to date?

If you’ve used Office before, you may already know how to change line spacing in Word, at least on a very basic level: the “Styles” box on the Home tab can act as a very prominent switch between standard and zero spacing. But did you know you can also adjust the space between lines to a much finer degree?
In this guide, we’ll show you how to take full control of line spacing in Word, enabling you to make your documents more easily readable with extra space — or to fit more text on each page by closing the gaps.
- Learn how to save a Word document as a PDF
- How to sign a Word document before sending it
- Discover how to track changes in Word
There are several reasons why you may want to increase the vertical spacing between lines, or alternatively, narrow or remove that space. Greater line spacing can make a document easier to read, so could be useful for writing scripts, while tighter spacing can save you printer paper by squeezing additional text onto each page.
Word’s default spacing is 1.08 lines, so the gap between each line is very slightly larger than single-spaced. In this guide we’ll show you how to quickly change line spacing throughout your document, as well as how to adjust spacing for specific paragraphs.
How to change line spacing in Word
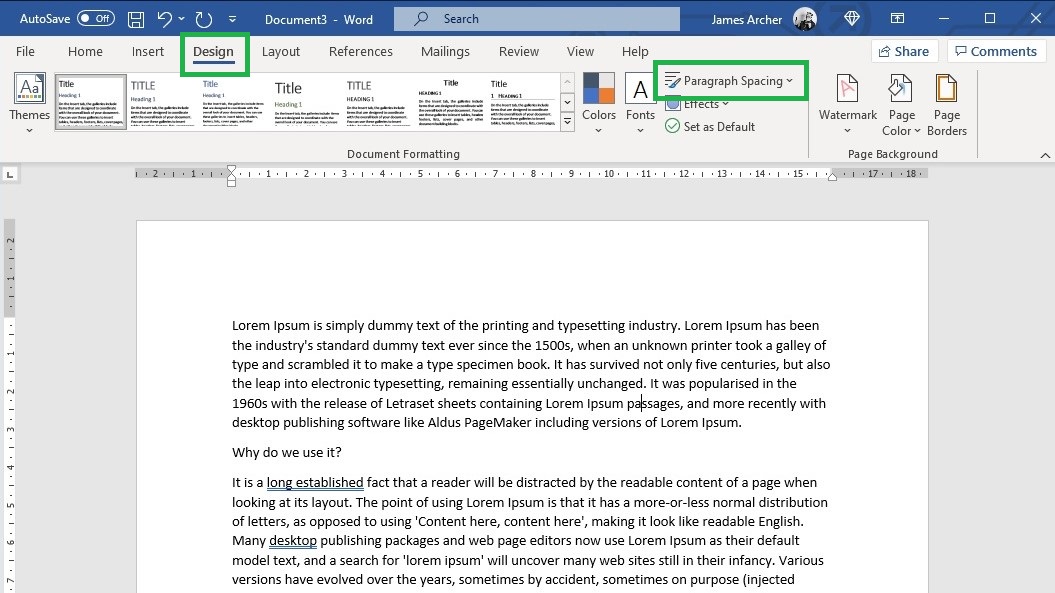
1. In Word, open the “Design” tab and click “Paragraph Spacing.”
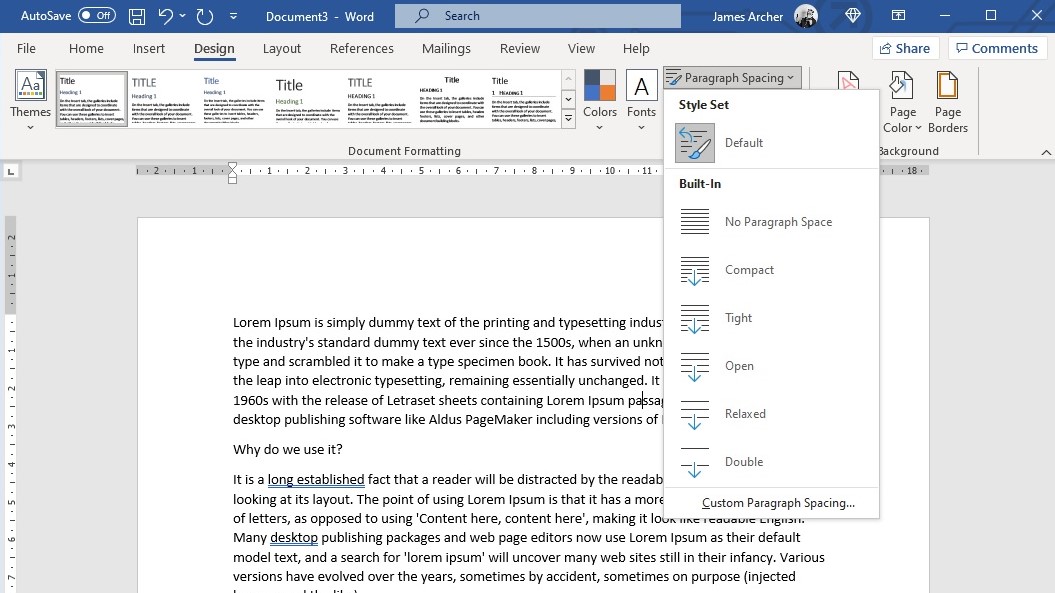
2. To quickly change the line spacing for the entire document, simply click one of the six “Built-In” spacing options.
From top to bottom, these range from zero spacing (“No Paragraph Space”) to double spacing (“Double”), with single spacing represented by the “Compact” option.
If there’s already text in the document, it will dynamically change as you hover your mouse over each option, so check which one you like best before clicking it.
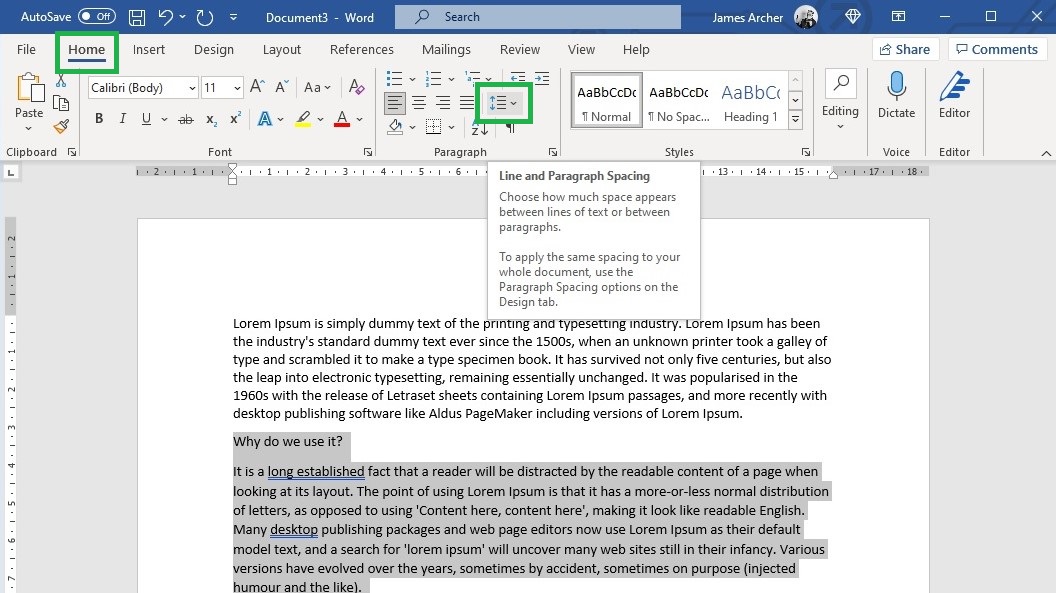
3. You can also tweak spacing for individual paragraphs or sections. To do this, highlight the section you want to edit, then open the “Home” tab. Then, in the “Paragraph” section, click the “Line and Paragraph Spacing” icon.
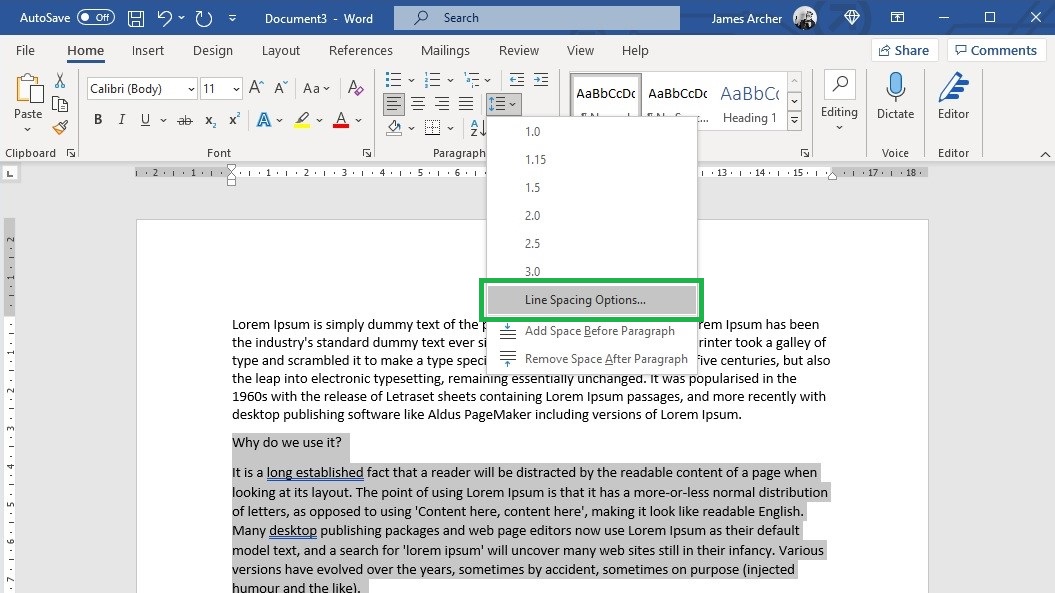
4. Click “Line Spacing Options.”
5. Under “Spacing,” adjust the “Before” value to select the size of the spacing that will go immediately before your highlighted text, and adjust the “After” value to select the size of the spacing immediately after it.
You can also use the “Line spacing” drop-down menu to adjust general line spacing for the highlighted section. This will override the selection you made in step 2. Finally, click “OK.”
Stay tuned for more tips on using Microsoft Office software; you can also check out our guides on how to convert a PDF to Excel and how to use VLOOKUP in Excel.
- More: How to delete a page in Microsoft Word
Get instant access to breaking news, the hottest reviews, great deals and helpful tips.
James is currently Hardware Editor at Rock Paper Shotgun, but before that was Audio Editor at Tom’s Guide, where he covered headphones, speakers, soundbars and anything else that intentionally makes noise. A PC enthusiast, he also wrote computing and gaming news for TG, usually relating to how hard it is to find graphics card stock.


