
The following shows an intro with lower case Roman numerals. You can use any other format instead.
-
Select between the intro and the body of the document and go to Layout > Breaks > Next Page.
Tip: To see section breaks and other formatting marks, go to Home and select Show/Hide (¶) to turn on the display of formatting marks.
-
In the header for the body section, deselect Link to Previous. If Link to Previous is dimmed, check to make sure a section break was created.
-
In the intro section select Page Number and choose a location and style. If your change only affects the first page of your section, make sure Different First Page is not selected.
-
To choose a format or to control the starting number, select Page Number > Format Page Numbers.
-
Do either or both of the following:
-
Select Number format to select the format for the numbering, such as a, b, c or i, ii, iii for the intro.
-
Under Page numbering, choose Start at and type a number that you want to start the section with. For example, restart numbering at the beginning of the body section.
-
-
Select Close Header and Footer, or double-click anywhere outside the header or footer area to exit.
The following shows an intro with lower case Roman numerals. You can use any other format instead.
-
Select between the intro and the body of the document and go to Layout > Breaks > Next Page.
-
In the header for the body section, deselect Link to Previous. If Link to Previous is dimmed, check to make sure a section break was created.
Note: Headers and footers are linked separately, so if your page number is in the header, turn off linking for headers. If your page number is in the footer, turn off linking for footers.
-
Go to Header & Footer > Page Number, and then click Page Number.
-
Choose the position and alignment of page numbers. If you don’t want a page number to appear on the first page, clear Show number on first page.
-
To choose a format or to control the starting number, go to Header & Footer > Page Number > Format Page Numbers.
-
To change the numbering style, select a different style in Number format.
-
To change the starting page number of the newly created section, select Start at, and then enter a number.
-
Select OK.
-
Select Close Header and Footer, or double-click outside of the header or footer to exit.
If you need to customize an existing numbered list (see
how to create a numbered list) or apply your
specifications to the number format, use the Define New Number Format dialog box.
I. To create a custom numbering format, do the following:
1. On the Home tab, in the Paragraph group,
choose the Numbering button:

2. In the Numbering list, click
Define New Number Format… item to display the Define New Number Format dialog
box:

3. In the Define New Number Format dialog box:
- Number style — Specifies the numbering style that you want. Choices include Arabic numerals,
uppercase and lowercase Roman numerals, uppercase and lowercase alphabet letters, and word series
(1st, One, and First). You can also choose no numbers at all, killing the sequential numbering. - Font… — Specifies the special font or font attributes (such as bold, italic, and underline)
and the point size for the numbers. A standard Font dialog box appears when this button is chosen. - Number format — Types the characters, if any that you want to come before each number. If you
want each number enclosed in parentheses, for example, type an opening parenthesis before the number
in this box.
Do not type over this number in this box! If you do so, even replacing it with another
number, you will break the automatic numbering; each number in the list will be the same. - Alignment — Sets the distance from the left, centered or right margin that Word places the
number.
II. To create a custom multilevel list format, following:
On the Home tab, in the Paragraph group, choose the Multilevel List button and
click Define New Multilevel List… item to display the Define new Multilevel List dialog
box:

If the button in the lower-left corner is the More >> button, click it. Word displays an
extra panel at the right of the dialog box, so you see the full dialog box, as shown here. Word also
changes the More >> button to a << Less button that you can click to hide the
extra section of the dialog box again.
- In the Click Level To Modify, select the list level you want to change. Word selects the
first level, 1, when you open the Define New Multilevel List dialog box. - If you need to link this numbered list level to a particular style, select the style in the Link
Level To Style drop-down list. - Use the controls in the Number Format area to specify the number format.
- In the Number Style For This Level drop-down list, select the number format you want
to use. For example:- «1, 2, 3,»
- «i, ii, iii,»
- «A, B, C.»
- To include the number from the previous level (or a higher level), choose the level from the
Include Level Number From drop-down list. (This drop-down list is unavailable for the
first level because there’s no level above it.) For example: if Level 1 uses «1, 2, 3»
numbering and Level 2 uses «a, b, c» numbering, applying Level 1 in the Include Level
Number From drop-down list to Level 2 changes the Level 2 numbering to 1a, 1b, and
so on. - Word displays the number formatting you’ve chosen in the Enter Formatting For Number
text box. Type any changes for the text of the format into this text box. For example, you
might edit the «A)» format to «Section A)» so that each instance of the number included the
word «Section.» - To specify font formatting, click the Font button. Word displays the Font
dialog box. Choose the font, font style, size, and any extras (such as color or effects),
and then click the OK button. - To customize the numbering, use the Start At spinner to change the starting number.
If you want to restart numbering after a certain level, select the Restart List After
check box and choose that level in the drop-down list. (The Restart List After
controls aren’t available for the first level in the list, because there’s no higher level.) - Select the Legal Style Numbering check box if you want to use legal-style numbering:
changing any roman numeral to an Arabic numeral. For example, 1.1.1 instead of
I.1.1.
- In the Number Style For This Level drop-down list, select the number format you want
- Use the controls in the Position box to customize where the number appears.
- In the Number Alignment drop-down list, choose Left, Centered, or
Right. - In the Aligned At text box, choose the position at which to align the number.
- In the Text Indent At text box, set the indent position for the text.
- In the Follow Number With drop-down list, select the character to include after the
number: a tab, a space, or nothing. If you choose a tab, you can select the Add Tab Stop
At check box and set the distance at which to place a tab stop.
- In the Number Alignment drop-down list, choose Left, Centered, or
Note: more details are available
in the Numbered lists section
in the Work with bulleted, numbered and multi-level lists lesson
of the Create basic documents free course.
See also this tip in French:
Comment personnaliser une liste numérotée.
This tutorial shows two ways to create numbered lists in Microsoft Word. We will also look at how to change list levels, start with a different list number, and change the font, size, and color of list numbers.
Do you want to create bulleted lists? Please see my previous tutorial “How to Create Bulleted Lists in Microsoft Word.”
What about Lists Ordered by Letters?
For simplicity, this tutorial refers to “numbered lists” because Word organizes all ordered (hierarchical) list options in the Numbering Library. However, all the steps shown here also apply to lists organized by letters.
If you would like to learn more about ordered and unordered lists, please see “How to Write Vertical Lists (Ordered and Unordered).”
Table of Contents
- How to Create a Numbered List — Basic Method 1
- How to Create a Numbered List — Basic Method 2
- How to Change Numbered List Levels
- How to Start a List with a Different Number
- How to Change the Font, Size, and Color of List Numbers
Watch all the steps shown here in real time!
Explore more than 200 other writing-related software tutorials on my YouTube channel.
The images below are from Word for Microsoft 365. These steps also apply to Word 2021, Word 2019, Word 2016, and Word 2013.
The basic steps are similar in Word for Mac. However, the more advanced steps, such as starting a list with a different number, are different on Mac. So, we will cover this topic for Word for Mac in a separate tutorial.
How to Create a Numbered List — Basic Method 1
This is the basic method to create a numbered list in Word. This method requires you to type each item as you create the list. If you have already typed your list items, see Method Two below.
- Place your cursor where you want to start your list.
- Select the Home tab in the ribbon.

- Select the menu arrow next to the Numbering button.
![]()
- Choose a number style from the Numbering Library.

The number one will appear in your document.

- Type your first list item after the number, and then press the Enter key on your keyboard. The next number will appear.

Continue typing your list items and pressing the Enter key until your list is complete.
- After typing the final item, press the Enter key twice to remove your cursor from the list.
How to Create a Numbered List — Basic Method 2
This method is for existing text formatted vertically as a list.
- Select the text.

- Select the Home tab in the ribbon (see figure 1).
- Select the menu arrow next to the Numbering button (see figure 2).
- Choose a style from the Numbering Library (see figure 3).
Your selected items should become a numbered list.

How to Change Numbered List Levels
Word lets you create numbered lists with up to nine nested levels. Here are two ways to change the level of list items.
Change List Levels — Method 1
Important note: This method won’t work for the first item in your list.
- Select one or more list items (other than the first item).

- Select the Home tab in the ribbon (see figure 1).
- Select the Increase Indent button in the Paragraph group.

Each time you select the Increase Indent button, the item(s) will move one level and take on the appropriate format for that level (e.g., lowercase letters, roman numerals, etc.).

Pro Tip: To return the selected text to a previous level, select the Decrease Indent button to the left of the Increase Indent button.
Change List Levels — Method 2
- Select one or more list items (see figure 8).
- Select the Home tab in the ribbon (see figure 1).
- Select the menu arrow next to the Numbering button (see figure 2).
- Select Change List Level from the drop-down menu.

- Select a list level from the list-level menu.

Your list item(s) should move to the next level.
How to Start a List with a Different Number
You can start a list with a number other than one or continue the numbering from the previous list.
- Select the first list number or place your cursor within the first list item. If you select the list number, all numbers on that level should also be selected.

- Select the Home tab in the ribbon (see figure 1).
- Select the menu arrow next to the Numbering button (see figure 2).
- Select Set Numbering Value from the drop-down menu.

5.a. Enter the number you want to start with in the Set value to text box in the Set Numbering Value dialog box.

5.b. (Alternative Option) Select Continue from previous list if you want to continue the numbering from a previous list in your document.

- Select the OK button.

Your list should be renumbered according to your selections in the Set Numbering Value dialog box.
How to Change the Font, Size, and Color of List Numbers
By default, the font, size, and color of your list numbers will be the same as your normal text style. However, you can manually change the appearance of list numbers by selecting them separately from the text.
- Select one list number. All numbers on that level should also be selected.

- Select the Home tab in the ribbon (see figure 1).
- Select a new font, size, or color from the Font group.

Your list numbers should change to the new formatting. Repeat these steps for each level in your list, as necessary.

Related Resources
How to Write Run-In Lists
How to Create and Update a List of Tables or Figures in Microsoft Word
How to Create Numbered Lists in PowerPoint (PC & Mac)
Updated February 12, 2023
As part of my series on footnotes and endnotes, here’s how to change your footnote and endnote numbering styles on the go (e.g. while editing someone’s work, or when you change your mind, or when you’re working to a particular journal’s style and need to amend something you’ve already written) in Word 2007, Word 2010 and Word 2013.
Why would I want to change my footnote or endnote numbering style?
The main reason to change your footnote or endnote numbering style is because of the style guide of whatever you’re writing the document for. For example, academic journals will usually have some form of Guidelines for Authors which will lay out (sometimes) the font, heading styles, reference styles and footnote styles that you are expected to use. If you’re re-using an article which has been rejected by another journal, or repurposing a chapter of your PhD, you might find that the style for one journal is different from what you’ve done previously.
Alternatively, you may just decide you would prefer to use roman numerals, arabic numerals, symbols or whatever for your footnotes or endnotes, and want to change them.
How to change the number format for footnotes/endnotes
In this example, we’re starting off with some footnotes or endnotes that use roman numerals (i, ii, iii …):
Now, we want to change them to, for example, arabic numerals (1, 2, 3 …)
First of all, go to the Footnotes menu. This is in the References tab, and there’s a whole area called Footnotes:

Click the little arrow at the bottom right of the Footnotes area to access the Footnote and Endnote menu. Once you’ve clicked on the little arrow, you should see this menu:
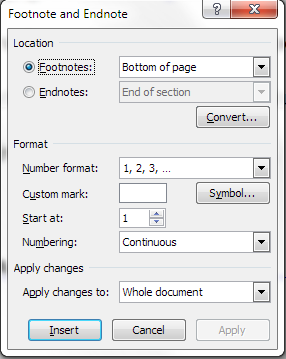
We can see lots of things we can do here, including changing the number footnotes start at, whether they restart every chapter, etc. (these more obscure details will be the subject of another article). But for our purposes, the important features are choosing whether you’re telling Word about Endnotes or Footnotes and telling Word what the number format should be.
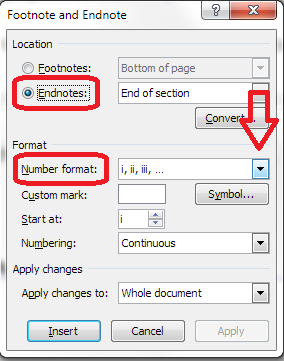
In this case, we’re using Endnotes (although these instructions cover both), so I’ve clicked the radio button (circle) next to Endnotes. This tells Word that we’re using Endnotes and talking about the Endnote numbering.
Going down one section, you can see that at the moment, the Number format is set to i, ii, iii … To change this, click on the down arrow to the right of the box saying i, ii, iii … (if the Endnotes are set to 1, 2, 3 or a, b, c, this will display in this box):
Once you’ve clicked that arrow, you will be able to see all of the choices you have for your footnote or endnote numbering. Now click on the format that you want to use:
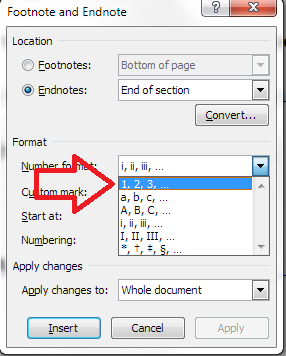
The Number format will now change to the one that you have chosen. Once you have got the correct format in this box, click the Apply button to apply the changes:

When we return to our document, the endnote numbering has changed from a roman numeral (i) to an arabic numeral (1). You can change this as many times as you want.
This article has explained how to change the number format in your footnotes or endnotes.
Related posts from this blog:
How to insert and format footnotes
How to insert and format endnotes
How to swap between using footnotes and endnotes
Please note, these hints work with versions of Microsoft Word currently in use – Word 2007, Word 2010 and Word 2013, all for PC. Mac compatible versions of Word should have similar options. Always save a copy of your document before manipulating it. I bear no responsibility for any pickles you might get yourself into!
Find all the short cuts here …
Lesson 14: Modifying Page Numbers in Word
/en/word-tips/basic-keyboard-shortcuts/content/
Modifying page numbers in Word
If you’re having trouble with page numbers in Microsoft Word, you’re not alone. We’ve received tons of comments and questions from learners like you on our Page Numbers video.
One of the most common questions is How do I restart or reformat my page numbers partway through the document? Apparently, this is a common problem for students who are working on academic papers.
Your comments prompted us to look for an answer, and we found one. Special thanks to Jessica, who discovered the solution while proofreading dissertations in her spare time.
Modifying page numbers with section breaks
The key to using different types of numbering in the same document is section breaks. Once you’ve added a section break to your document (you can add as many as you need), you’ll be able to restart your page numbers there and/or apply a different style.
Here’s an overview of the steps you need to follow. These steps should work for Word 2007, Word 2010, and Word 2013.
- Place your cursor on the page where you want the first section to end.
- Go to the Page Layout tab, then click the Breaks command.
- Choose Next Page from the menu.
- A section break will be added, creating a new section on the next page.
- To continue, select your header or footer in the new section.
- Go to the Design tab, and deselect the Link to Previous command.
- Now you can modify the page numbers in your new section depending on what you need. To restart your numbering, click the Page Number command, then choose Format Page Numbers. From there, you’ll be able to select Start at: 1.
- To reformat your numbering, select the page number, then go back to the Home tab. You can change the font, color, size, and more.
For more information, read our Page Numbers lesson from our Word 2016 tutorial.
/en/word-tips/how-to-create-a-table-of-contents-in-word/content/