
Word for Microsoft 365 Word 2021 Word 2019 Word 2016 Word 2013 More…Less
Changing the numbering sequence in a list can cause headaches, but use the following steps and you’ll avoid hassles later:
-
Double-click the numbers in the list. The text won’t appear selected.

-
Right-click the number you want to change.
-
Click Set Numbering Value.
-
In the Set value to: box, use the arrows to change the value to the number you want.
Tip: Tempting as it is to manually change the numbers in a list, don’t do it. Always use the command options to make the changes. If Word loses track of what you’ve done, problems can pop up when you want to make other list changes later.
Start with 1.
If you want to change any number in a list to 1, here’s how:
-
Double-click the numbers in the list. The text will not appear selected.
-
Right-click the number you want to start a new list.
-
Click Restart at 1.
More about lists
Change bullet indents
Top of Page
Need more help?
You can customize the appearance of a list by defining your own numbered, bulleted, and multilevel lists. Once you customize them, you can save those settings as a style and use it again and again.
What would you like to do?
-
Define a new bullet format
-
Define a new number format
-
Define a new multilevel list
-
Define a new list style
-
Turn off automatic numbering for lists
-
Related information
Define a new bullet
Do any of the following:
Change the bullet to a symbol
-
Select the text or bulleted list you want to change.
-
On the Home tab, in the Paragraph group, click the arrow next to Bulleted List
, and then click Define New Bullet. -
Click Symbol and then click the symbol you want to use.
-
Click OK.
 , and then click Define New Bullet.
Change a bullet to a picture
-
Select the text or bulleted list you want to change.
-
On the Home tab, in the Paragraph group, click the arrow next to Bulleted List
, and then click Define New Bullet. -
Click Picture and then browse for your picture from a file or Bing Image Search.
-
Click Insert.
-
Review what the picture bullets will look like and click OK to add it or change the picture by repeating steps 3-5.
Change the bullet font
-
Select the text or bulleted list you want to change.
-
On the Home tab, in the Paragraph group, click the arrow next to Bulleted List
, and then click Define New Bullet. -
Click Font and then change the font properties to be used for the bullet. You can choose settings on the Font tab or Advanced tab:
|
Tab |
Description |
|---|---|
|
Font tab |
Change the bullet font, style, size, color, underline style, underline color, and effects. |
|
Advanced tab |
Change the bullet font character spacing and OpenType features. |
Change the bullet alignment
-
Select the text or bulleted list you want to change.
-
On the Home tab, in the Paragraph group, click the arrow next to Bulleted List
, and then click Define New Bullet. -
Under alignment, choose Left, Centered, or Right.
-
Click OK.
Define a new number format
-
Select the text or numbered list you want to change.
-
On the Home tab, in the Paragraph group, click the arrow next to Numbered List
, and then click Define New Number Format. -
To change the style, click the down arrow next to Number style and choose numbers, letters, or another chronological format.
-
To change the font size, style, and color, click Font and choose a setting on the Font tab or Advanced tab:.
Tab
Description
Font tab
Change the bullet font, style, size, color, underline style, underline color, and effects.
Advanced tab
Change the bullet font character spacing and OpenType features.
-
To append the numbering with a dash, parentheses, or another value, enter it in the Number format field.
-
To change the number alignment, choose Left, Centered, or Right under Alignment.
-
Click OK.
 , and then click Define New Number Format.
Define a new multilevel list
-
Select the text or numbered list you want to change.
-
On the Home tab, in the Paragraph group, click the arrow next to Multilevel List
, and then click Define New Multilevel List. -
Expand the Multilevel list dialog box by clicking More in the lower left corner.
-
Choose the list level to modify by selecting it in the list. 1 is selected by default.
-
Choose where you would like to apply your changes by clicking Whole list, This point forward, or Current paragraph.
-
To use an existing style in Word for each level in the list, choose a style under Link level to style.
-
Choose the number to show in the gallery. Level 1 is shown by default.
-
Give the multilevel list a name in the ListNum field list name. This name will appear wherever you see the Listnum field.
-
To append the numbered list with a dash, parentheses, or another value, enter it in the Number format field.
-
To change the font size, style, and color, click Font and choose a setting on the Font tab or Advanced tab:.
Tab
Description
Font tab
Change the bullet font, style, size, color, underline style, underline color, and effects.
Advanced tab
Change the bullet font character spacing and OpenType features.
-
To change the style, click the down arrow next to Number style and choose numbers, letters, or another chronological format. Specify a level number to include this from.
-
Choose the number to start the list at. The default value is 1. To restart numbering after a specific level, select the Restart List After check box and choose a level in the list.
-
Select Legal Style Numbering to enforce a legal style on the multilevel list.
-
To change the number alignment, choose Left, Centered, or Right under Alignment
-
Specify a value for where to start the alignment and a value for the text indent.
-
To apply these values to the entire list, choose Set for All Levels.
-
Enter a value for what should follow each number, Tab character, Space, or Nothing. Check Add tab stop at and enter a value.
-
Click OK.
 , and then click Define New Multilevel List.
Define a new list style
-
Select the text or numbered list you want to change.
-
On the Home tab, in the Paragraph group, click the arrow next to Multilevel List
, and then click Define New List Style. -
Specify a name for your new list style.
-
Choose the number to start the list at. The default value is 1.
-
Choose a level in the list to apply your formatting.
-
Specify the font face, size, and color for the list style.
-
Change the down arrow to change the style of the numbered list or bulleted list.
-
Choose a symbol for the list.
-
Choose an image for the list.
-
Choose to move the indent to the left or the right.
-
Choose to apply these changes to Only in this document or New documents based on this template.
-
To change more formatting settings, click Format and choose Font, Numbering, Text effects, and so forth.
-
Click OK.
Turn off automatic numbering for lists
-
Use one of the following methods, as appropriate for the version of Word you’re using:
Word 2016, Word 2013, or Word 2010
-
Select File, and then from the left pane, select Options.
Word 2007
-
Click the Microsoft Office button, and then select Word Options.
-
-
In the Word Options dialog, in the left pane, select Proofing.
-
In the right pane, under AutoCorrect options, select AutoCorrect Options.
-
Select the AutoFormat As You Type tab.
-
Under Apply as you type, clear the Automatic numbered lists check box, and then select OK.
If you need to customize an existing numbered list (see
how to create a numbered list) or apply your
specifications to the number format, use the Define New Number Format dialog box.
I. To create a custom numbering format, do the following:
1. On the Home tab, in the Paragraph group,
choose the Numbering button:

2. In the Numbering list, click
Define New Number Format… item to display the Define New Number Format dialog
box:

3. In the Define New Number Format dialog box:
- Number style — Specifies the numbering style that you want. Choices include Arabic numerals,
uppercase and lowercase Roman numerals, uppercase and lowercase alphabet letters, and word series
(1st, One, and First). You can also choose no numbers at all, killing the sequential numbering. - Font… — Specifies the special font or font attributes (such as bold, italic, and underline)
and the point size for the numbers. A standard Font dialog box appears when this button is chosen. - Number format — Types the characters, if any that you want to come before each number. If you
want each number enclosed in parentheses, for example, type an opening parenthesis before the number
in this box.
Do not type over this number in this box! If you do so, even replacing it with another
number, you will break the automatic numbering; each number in the list will be the same. - Alignment — Sets the distance from the left, centered or right margin that Word places the
number.
II. To create a custom multilevel list format, following:
On the Home tab, in the Paragraph group, choose the Multilevel List button and
click Define New Multilevel List… item to display the Define new Multilevel List dialog
box:

If the button in the lower-left corner is the More >> button, click it. Word displays an
extra panel at the right of the dialog box, so you see the full dialog box, as shown here. Word also
changes the More >> button to a << Less button that you can click to hide the
extra section of the dialog box again.
- In the Click Level To Modify, select the list level you want to change. Word selects the
first level, 1, when you open the Define New Multilevel List dialog box. - If you need to link this numbered list level to a particular style, select the style in the Link
Level To Style drop-down list. - Use the controls in the Number Format area to specify the number format.
- In the Number Style For This Level drop-down list, select the number format you want
to use. For example:- «1, 2, 3,»
- «i, ii, iii,»
- «A, B, C.»
- To include the number from the previous level (or a higher level), choose the level from the
Include Level Number From drop-down list. (This drop-down list is unavailable for the
first level because there’s no level above it.) For example: if Level 1 uses «1, 2, 3»
numbering and Level 2 uses «a, b, c» numbering, applying Level 1 in the Include Level
Number From drop-down list to Level 2 changes the Level 2 numbering to 1a, 1b, and
so on. - Word displays the number formatting you’ve chosen in the Enter Formatting For Number
text box. Type any changes for the text of the format into this text box. For example, you
might edit the «A)» format to «Section A)» so that each instance of the number included the
word «Section.» - To specify font formatting, click the Font button. Word displays the Font
dialog box. Choose the font, font style, size, and any extras (such as color or effects),
and then click the OK button. - To customize the numbering, use the Start At spinner to change the starting number.
If you want to restart numbering after a certain level, select the Restart List After
check box and choose that level in the drop-down list. (The Restart List After
controls aren’t available for the first level in the list, because there’s no higher level.) - Select the Legal Style Numbering check box if you want to use legal-style numbering:
changing any roman numeral to an Arabic numeral. For example, 1.1.1 instead of
I.1.1.
- In the Number Style For This Level drop-down list, select the number format you want
- Use the controls in the Position box to customize where the number appears.
- In the Number Alignment drop-down list, choose Left, Centered, or
Right. - In the Aligned At text box, choose the position at which to align the number.
- In the Text Indent At text box, set the indent position for the text.
- In the Follow Number With drop-down list, select the character to include after the
number: a tab, a space, or nothing. If you choose a tab, you can select the Add Tab Stop
At check box and set the distance at which to place a tab stop.
- In the Number Alignment drop-down list, choose Left, Centered, or
Note: more details are available
in the Numbered lists section
in the Work with bulleted, numbered and multi-level lists lesson
of the Create basic documents free course.
See also this tip in French:
Comment personnaliser une liste numérotée.
This tutorial shows two ways to create numbered lists in Microsoft Word. We will also look at how to change list levels, start with a different list number, and change the font, size, and color of list numbers.
Do you want to create bulleted lists? Please see my previous tutorial “How to Create Bulleted Lists in Microsoft Word.”
What about Lists Ordered by Letters?
For simplicity, this tutorial refers to “numbered lists” because Word organizes all ordered (hierarchical) list options in the Numbering Library. However, all the steps shown here also apply to lists organized by letters.
If you would like to learn more about ordered and unordered lists, please see “How to Write Vertical Lists (Ordered and Unordered).”
Table of Contents
- How to Create a Numbered List — Basic Method 1
- How to Create a Numbered List — Basic Method 2
- How to Change Numbered List Levels
- How to Start a List with a Different Number
- How to Change the Font, Size, and Color of List Numbers
Watch all the steps shown here in real time!
Explore more than 200 other writing-related software tutorials on my YouTube channel.
The images below are from Word for Microsoft 365. These steps also apply to Word 2021, Word 2019, Word 2016, and Word 2013.
The basic steps are similar in Word for Mac. However, the more advanced steps, such as starting a list with a different number, are different on Mac. So, we will cover this topic for Word for Mac in a separate tutorial.
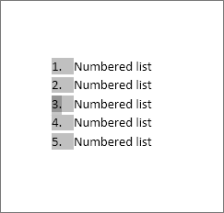
How to Create a Numbered List — Basic Method 1
This is the basic method to create a numbered list in Word. This method requires you to type each item as you create the list. If you have already typed your list items, see Method Two below.
- Place your cursor where you want to start your list.
- Select the Home tab in the ribbon.

- Select the menu arrow next to the Numbering button.
![]()
- Choose a number style from the Numbering Library.

The number one will appear in your document.

- Type your first list item after the number, and then press the Enter key on your keyboard. The next number will appear.

Continue typing your list items and pressing the Enter key until your list is complete.
- After typing the final item, press the Enter key twice to remove your cursor from the list.
How to Create a Numbered List — Basic Method 2
This method is for existing text formatted vertically as a list.
- Select the text.

- Select the Home tab in the ribbon (see figure 1).
- Select the menu arrow next to the Numbering button (see figure 2).
- Choose a style from the Numbering Library (see figure 3).
Your selected items should become a numbered list.

How to Change Numbered List Levels
Word lets you create numbered lists with up to nine nested levels. Here are two ways to change the level of list items.
Change List Levels — Method 1
Important note: This method won’t work for the first item in your list.
- Select one or more list items (other than the first item).

- Select the Home tab in the ribbon (see figure 1).
- Select the Increase Indent button in the Paragraph group.

Each time you select the Increase Indent button, the item(s) will move one level and take on the appropriate format for that level (e.g., lowercase letters, roman numerals, etc.).

Pro Tip: To return the selected text to a previous level, select the Decrease Indent button to the left of the Increase Indent button.
Change List Levels — Method 2
- Select one or more list items (see figure 8).
- Select the Home tab in the ribbon (see figure 1).
- Select the menu arrow next to the Numbering button (see figure 2).
- Select Change List Level from the drop-down menu.

- Select a list level from the list-level menu.

Your list item(s) should move to the next level.
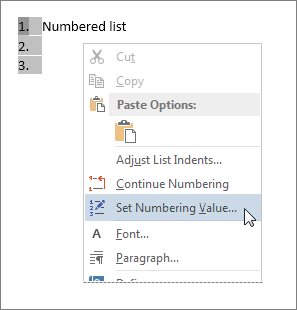
How to Start a List with a Different Number
You can start a list with a number other than one or continue the numbering from the previous list.
- Select the first list number or place your cursor within the first list item. If you select the list number, all numbers on that level should also be selected.

- Select the Home tab in the ribbon (see figure 1).
- Select the menu arrow next to the Numbering button (see figure 2).
- Select Set Numbering Value from the drop-down menu.

5.a. Enter the number you want to start with in the Set value to text box in the Set Numbering Value dialog box.

5.b. (Alternative Option) Select Continue from previous list if you want to continue the numbering from a previous list in your document.

- Select the OK button.

Your list should be renumbered according to your selections in the Set Numbering Value dialog box.
How to Change the Font, Size, and Color of List Numbers
By default, the font, size, and color of your list numbers will be the same as your normal text style. However, you can manually change the appearance of list numbers by selecting them separately from the text.
- Select one list number. All numbers on that level should also be selected.

- Select the Home tab in the ribbon (see figure 1).
- Select a new font, size, or color from the Font group.

Your list numbers should change to the new formatting. Repeat these steps for each level in your list, as necessary.

Related Resources
How to Write Run-In Lists
How to Create and Update a List of Tables or Figures in Microsoft Word
How to Create Numbered Lists in PowerPoint (PC & Mac)
Updated February 12, 2023
Download PC Repair Tool to quickly find & fix Windows errors automatically
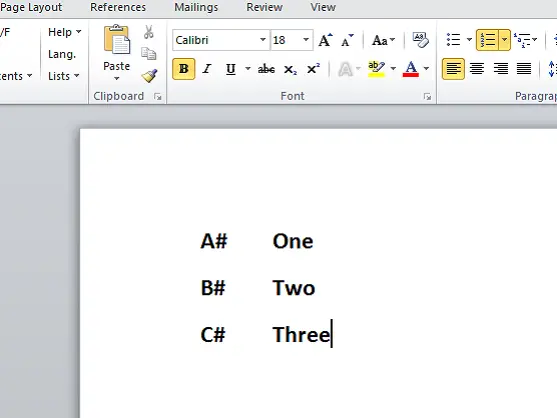
We all know that the default numbered list used in Microsoft Word is like – 1, 2, 3, etc. But if you wish, you can change them to letters or another type, as the Roman numbers. If we look closely at them, numbers or letters are added with a dot (.) beside them as shown below:
- One
- Two
- Three
There might be a situation where you may want to have something other than a dot (.). What we can do, is remove that dot and replace it with the character that we want. If it is one or two, then it is easy, but what if we have many entries to change?
This article will help you to change, edit or create the new numbered list as you want. If you want to add different characters after the number or letter, it can be done easily and I will let you know how to do that.
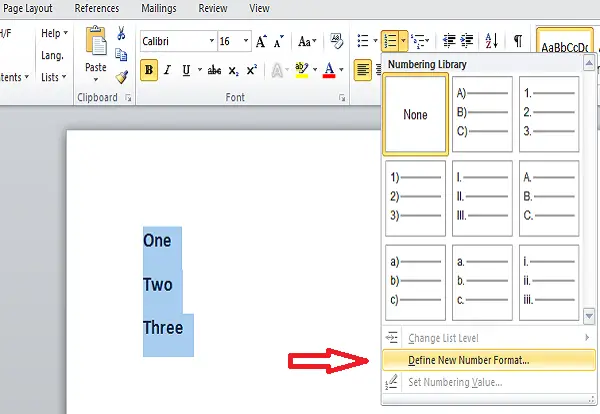
To get started, select the text to which you want to add the numbered list and click the downward arrow of the Numbering button of the Paragraph section in the Home tab.
- The Number Format which you have used recently is shown Recently Used Number Formats.
- The Number Formats which you have used in the present document are shown in Document Number Formats.
![]()
You can use the Number Formats available in the Numbering Library. The problem comes when the number formats which we want to use are available in the Numbering Library. Here comes the use of this article. We can create our own number formats which we want.
Click on the Define New Number Format and select the respective style which you want to define from the Number style drop-down list.
You can select anything like,
- Uppercase Roman: I, II, III
- Lowercase Roman: i, ii, iii
- Arabic: 1, 2, 3
- Leading Zeros: 01, 02, 03
- Arabic: 1, 2, 3, and more
By default, we have a dot (.) in the Number Format editable text box. Delete that dot and type the character whatever you want. You can add hyphens ‘-‘, the colon ‘:’, ampersand ‘&’ or any character you are interested in.
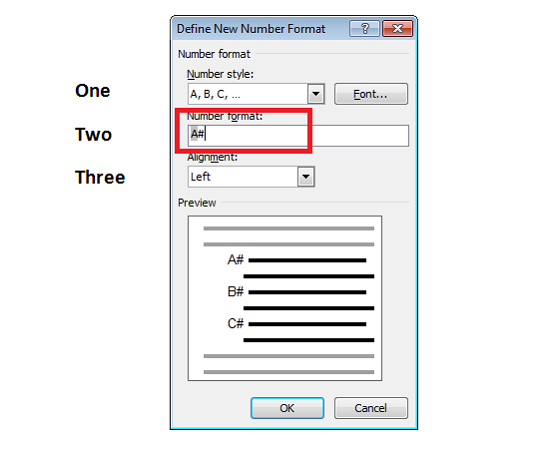
The Alignment specifies whether your number or letter should be left or right or centered in the space for numbering. By default, it is left aligned and you can change it to whatever you want.
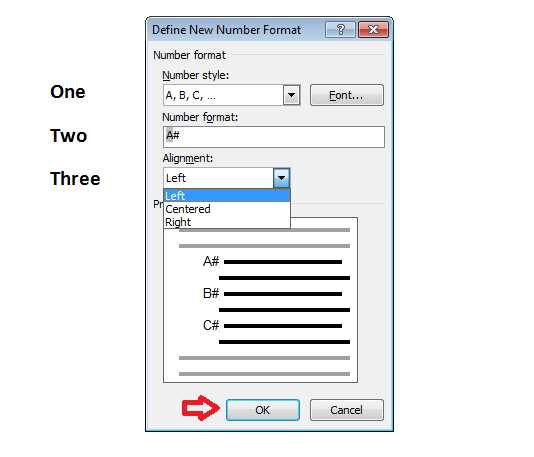
If you want to change the Font of numbers or letters you want to use in the number formats, then you can specify the font you want. Once you are done with your changes and if you are satisfied, then click “OK”.
Now, you will see that the created numbered list is applied to the selected text. When you press Enter, the same numbered list is applied to the other entries as well.
Isn’t this cool?
These are the simple steps to change the default numbered list in Word and define your own number format. You can create your own numbered list and make your Word document look good.
If you have anything to add or suggest, please do share with us through comments.
Read: How to create a Forecast in Excel on Windows PC.
How do I make numbering lists automatically in Word?
Open Word, and then go to Options > Proofing. Here you can click on the AutoCorrect Options button, and then switch to the AutoFormat tab. Check the box next to Automatic bulleted lists or Automatic numbered lists. Apply the changes, and it will be set to automatic.
How do you continue multilevel numbering in Word?
Open the Word document, and select the set of text to which you want to apply multilevel numbering. Ensure the paragraph appearing below the first is set to the left-side or has a tab space before it. Once selected, go to Home tab > Paragraph > and select Multilevel List.

Sridhar is a Software Engineer who loves to stay updated with developments in the world of technology. He is fond of writing everything related to Internet, Computers and Mobile and Desktop Operating Systems.