
Excel for Microsoft 365 Word for Microsoft 365 Outlook for Microsoft 365 PowerPoint for Microsoft 365 Publisher for Microsoft 365 Excel for Microsoft 365 for Mac Word for Microsoft 365 for Mac Outlook for Microsoft 365 for Mac PowerPoint for Microsoft 365 for Mac Excel for the web Word for the web PowerPoint for the web Excel 2021 Word 2021 Outlook 2021 PowerPoint 2021 Publisher 2021 Office 2021 Excel 2021 for Mac Word 2021 for Mac Outlook 2021 for Mac PowerPoint 2021 for Mac Excel 2019 Word 2019 Outlook 2019 PowerPoint 2019 Publisher 2019 Office 2019 Excel 2019 for Mac Word 2019 for Mac Outlook 2019 for Mac PowerPoint 2019 for Mac Excel 2016 Word 2016 Outlook 2016 PowerPoint 2016 Publisher 2016 Office 2016 Excel 2016 for Mac Word 2016 for Mac Outlook 2016 for Mac PowerPoint 2016 for Mac Excel 2013 Word 2013 Outlook 2013 PowerPoint 2013 Publisher 2013 Office 2013 Excel for iPad Word for iPad PowerPoint for iPad Excel for iPhone Word for iPhone PowerPoint for iPhone Word for Android tablets Excel for Android tablets PowerPoint for Android tablets Excel 2010 Word 2010 Outlook 2010 PowerPoint 2010 Publisher 2010 Office 2010 Publisher 2007 Excel for Mac 2011 Word for Mac 2011 Outlook for Mac 2011 PowerPoint for Mac 2011 Excel for Android phones Excel for Windows Phone 10 Excel Mobile PowerPoint for Android phones PowerPoint for Windows Phone 10 PowerPoint Mobile Word for Android phones Word for Windows Phone 10 Word Mobile More…Less
There are three areas in Microsoft Office where you may want to change the language.
-
Editing or Authoring is the language in which you write and edit your content. You may need to install an associated keyboard for this language via Windows settings.
-
Proofing tools are spelling and grammar check. Typically, you’ll set this language to be the same as the editing or authoring language.
-
Display language is for all the buttons, menus, and controls in Office.
You can set the display and editing or authoring languages independently from each other. For example, you may want the display language to be English, but the document you’re writing or editing is in French.
Note: If you want to completely change Office, permanently, to a different language you’ll get the best results if you first set that to be your default display language in Windows as well. For more information on doing that see this article for Windows 10 or this article for Windows 7 or 8.
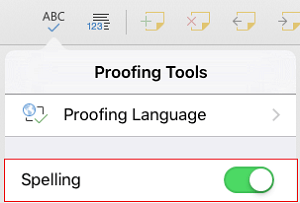
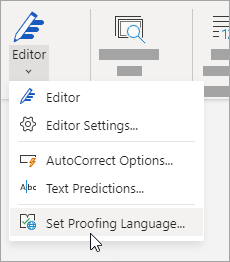
Tip: To prevent having to manually configure the proofing language with each new document in Word, switch on the option to detect the language you’re writing. On the Review tab, go to Language. Choose Language > Set Proofing Language, and then select Detect language automatically.
Note: If you’re using Office 365 and the commands available are different from what’s shown here, expand the Configure Office language for Office 2016 or earlier section and follow the instructions there.
In Office, the language options are in the Office Language Preferences dialog box. The display and authoring languages can be set independently. For example, you could have everything match the language of your operating system, or you could use a combination of languages for your operating system, authoring, and display.
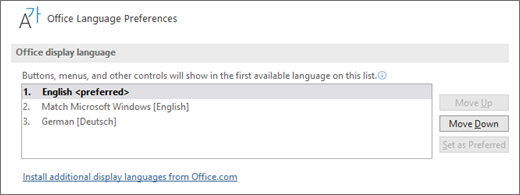
To configure the display language:
-
Within any Office application, select File > Options > Language.
-
Under Office display Language, make sure the display language you want Office to use is listed.

-
Select the language you want, and then select Set as Preferred. If you want your Office display language to match the display language you have for Windows, select Match Microsoft Windows [Language].
-
If the language you want is not listed, select Install additional display languages from Office.com and follow the instructions there.
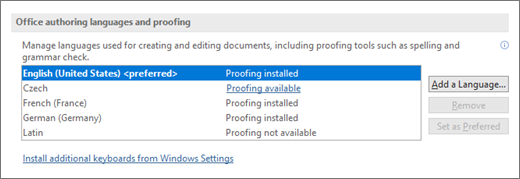
To configure the authoring and proofing language:
-
Within any Office application, select File > Options > Language.
-
Under Office authoring languages and proofing, make sure the language you want to use for authoring your document is listed.
-
If the language you want appears in the list, select it, and then select Set as Preferred. If the language you want is not listed, select Add a language, and then follow the instructions in the Add an authoring language dialog box.
-
If the language accessory pack includes proofing tools for that language, its status appears as Proofing installed. If the status is Proofing available, click the link to install the proofing tools.
Tip: To prevent having to manually configure the proofing language with each new document in Word, switch on the option to detect the language you’re writing. On the Review tab, go to Language. Choose Language > Set Proofing Language, and then select Detect language automatically.
In Office, the language options are in the Set the Office Language Preferences dialog box. The display and help languages can be set independently. For example, you could have everything match the language of your operating system, or you could use a combination of languages for your operating system, editing, display, and Help.
To configure the editing and proofing language:
-
Within any Office application, select File > Options > Language.
-
If your language already appears among the editing languages press Set as Default. Otherwise select the language from the Add additional editing languages list then press the Add button. The new language will appear in the list of editing languages.
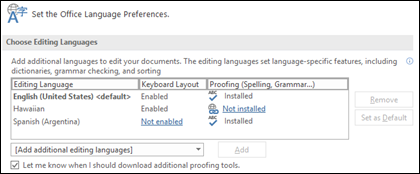
If the Keyboard Layout shows as Enabled, you’re all set for editing. If it says Not enabled in the Keyboard Layout column follow these steps to enable it:
-
Click the Not enabled link.
-
In the Add Languages dialog box, press Add a language, select your language in the list, and then press Add.
-
Close the Add Languages dialog box. Your language should display as Enabled under Keyboard Layout in the Choose Editing Languages section.
Under Proofing, if your language shows as Installed, you’re ready to go. Otherwise press Not installed and Office will take you to a page where you can download the necessary Language Accessory Pack for that language. Follow the instructions on that page to download and install the pack, then come back to the Office Language Preferences dialog box to confirm that it’s now installed.
To configure the display and help languages:
-
Within any Office application, select File > Options > Language.
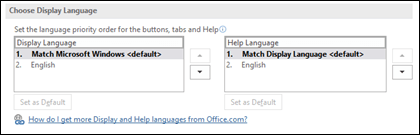
If you’ve already set your Microsoft Windows display language to be the language you want Office to display in you can leave this set to Match Microsoft Windows. Otherwise select your language and press Set as Default to move that language to the top of the list. The language that is listed first is the one Office will use for its menus and buttons. Please note, if your Windows display language is not also installed in Office, your Office display language will appear in the next language in the display list.
Repeat to configure your help language if you want to.
If the language you want isn’t available…
Download the proper Language Accessory Pack for the language you want to use from this page: Language Accessory Pack for Office. The Language Accessory Pack contains the display and proofing tools for most languages, but you can still choose to have your display in one language and editing or authoring in another.
Microsoft Office for Mac already contains all of the available languages, so there’s nothing to download. To configure Office to use those languages follow these steps:

User Interface — The display language for Office for Mac uses the primary language set for operating system. To change the display language for Office for Mac, you need to set a different primary language for your operating system:
-
On the Apple menu, choose System Preferences > Language & Region
-
In the Preferred Languages list, set the desired language to be your primary language by dragging it to the top of the list.
-
If the language you want doesn’t appear just press the + sign and add it.
-
You’ll have to restart your Office application for this change to take effect.
Editing — Setting the editing language depends on the program you’re working in.
Word and PowerPoint
To change your editing language in Word for Mac or PowerPoint for Mac, go to Tools > Language, select your language, and select OK.
To make it the default for all new documents select Default.
Tip: To prevent having to manually configure the proofing language with each new document in Word, switch on the option to detect the language you’re writing. On the Review tab, go to Language, and then select Detect language automatically.
Excel
To change your editing language in Excel for Mac, go to Tools > Language, select your language, and select OK.
OneNote
To change your editing language in OneNote for Mac, go to Tools > Set Proofing Language, select your language, and select OK.
User Interface & Editing — The display and keyboard languages for Office for Android is the same as the language that the device is set to. You can configure those by going to Settings > Language and Input.
Proofing — On Android you can change the proofing language in Word.
In Word on your Android phone, tap Edit  at the top of your screen, and then tap Proofing and Language under Review.
In Word on your Android tablet go to the Review tab and you can select your proofing language from the ribbon.
Proofing — On iOS you can change the proofing language in Word.
In Word on your iPhone, tap Edit , tap Home > Review > Proofing tools, and then tap Proofing Language.
In your document, on the Review tab, tap Spell Check  , and then tap Proofing Language.
Proofing — On Windows Mobile you can change the proofing language in Word.
In your document, on the Review tab, you can select the proofing language from the ribbon.
User Interface — The best way to set the display language in Office for the web is to set the language in the host where your documents live. That’s usually OneDrive, SharePoint, Dropbox, etc. When you open a document from one of those sites, Office Online will use the display language you have that service set to.
Tip: If you’re using a personal Microsoft account, you can choose your preferred display language in your profile settings at https://account.microsoft.com/profile.
-
Change views on OneDrive (Scroll to the bottom for language settings)
-
Set your language in SharePoint. If you’re using SharePoint, and want a language other than your system language, you’ll want to be sure to select a SharePoint language.
-
Change your language settings in Dropbox
To set the proofing tools language in your app go to the Review tab > Spelling & Grammar > Set Proofing Language. In OneNote for the web this is found on the Home tab.
Things to know
-
This change will only take effect from this point in the document forward.
-
To apply this change to any existing text in the document, press Ctrl+A to select all of the existing text, then set the proofing language with the steps above.
-
This change only affects the current document. For subsequent documents you’ll need to repeat these steps.
See Also
Check spelling and grammar in a different language
What languages are supported in Office?
Translate text into a different language
Remove languages and fonts you don’t use
Right-to-left language features
Need more help?
Want more options?
Explore subscription benefits, browse training courses, learn how to secure your device, and more.
Communities help you ask and answer questions, give feedback, and hear from experts with rich knowledge.
Find solutions to common problems or get help from a support agent.
Skip to content

-
View Larger Image


How to change the display language in Excel
Different reasons might make you want to change the language in Excel. You may need Excel to be in a familiar language for you to allow you to do your work. For a training or demonstration session, you may need to change the Excel language to fit another person’s preferences.
Also, sometimes changing the Excel Language to English may enable some features that can be available for the English version only at that moment.
Let’s see how to change Excel’s language from English to Portuguese in Excel for Microsoft 365. The steps are similar if you are looking to switch between any other two languages.
These instructions were crated in Excel for Microsoft 365 on Oct 9, 2020.
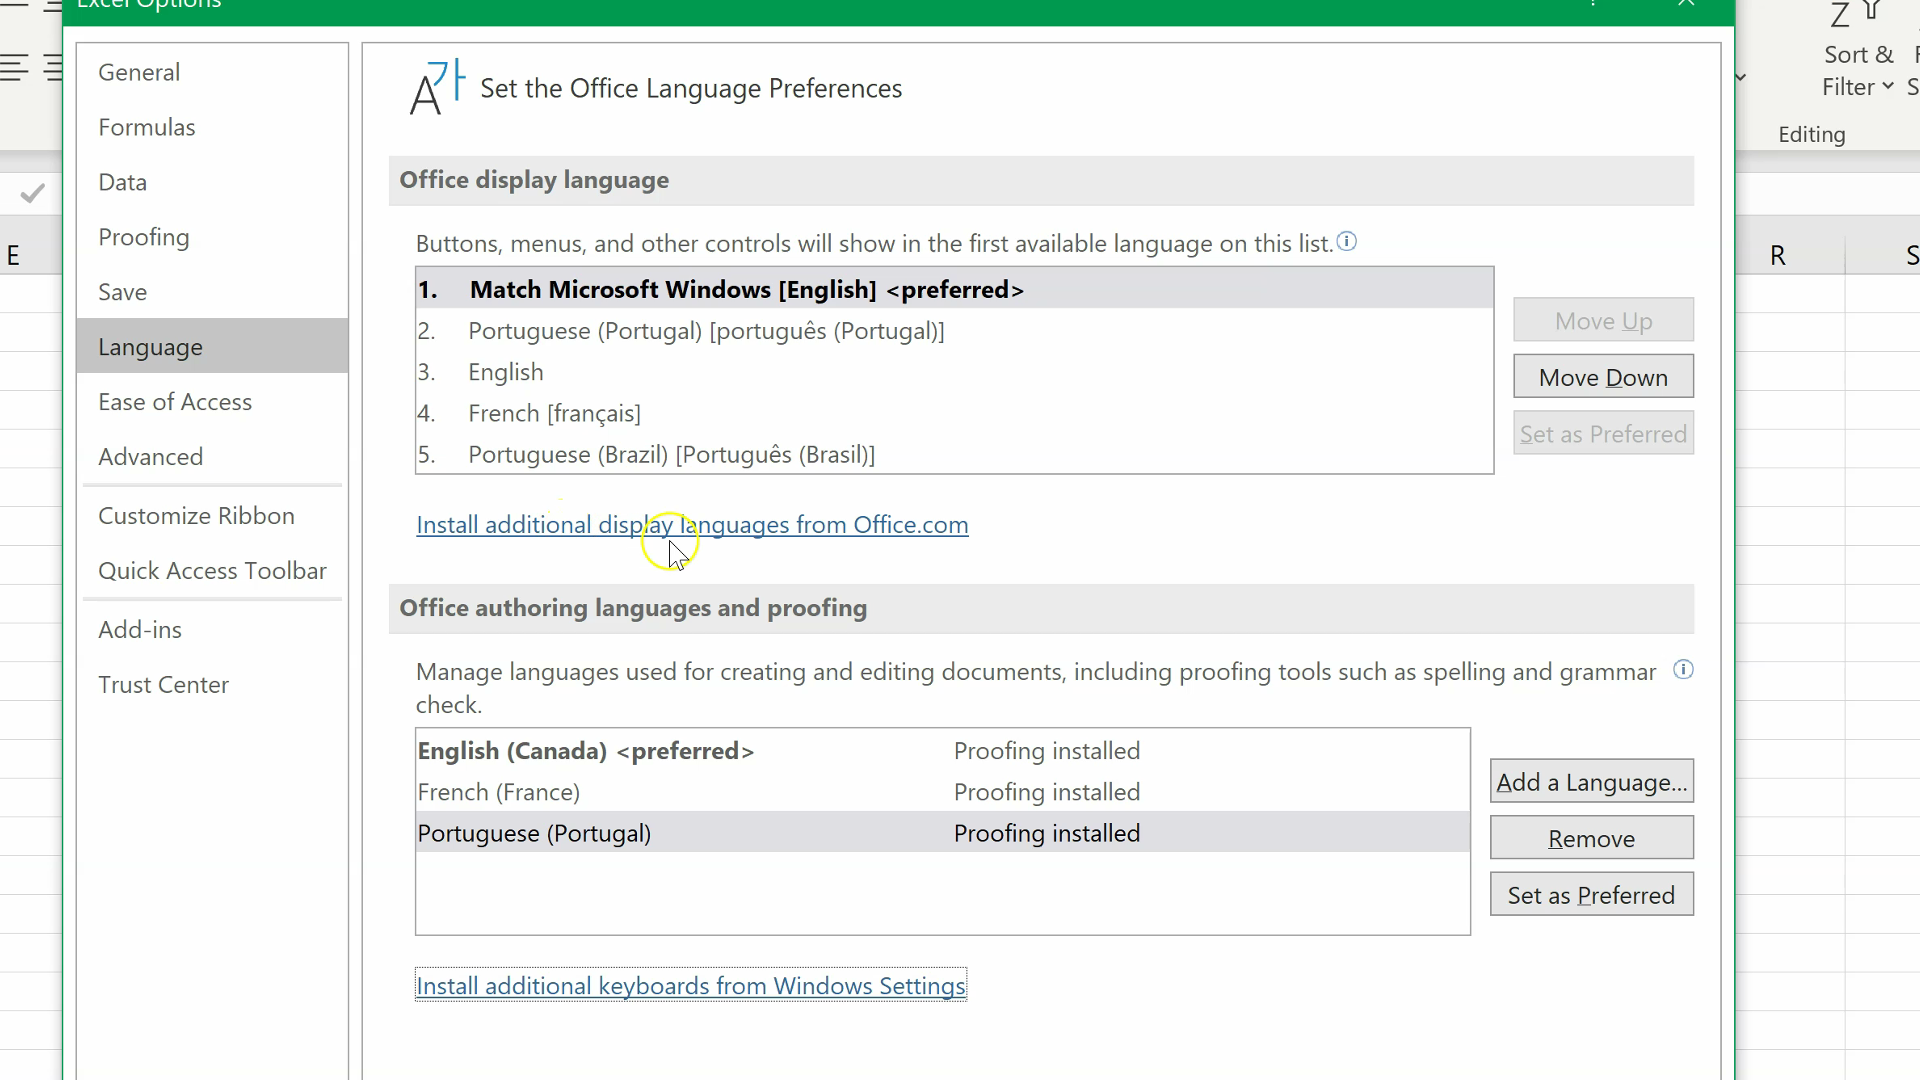
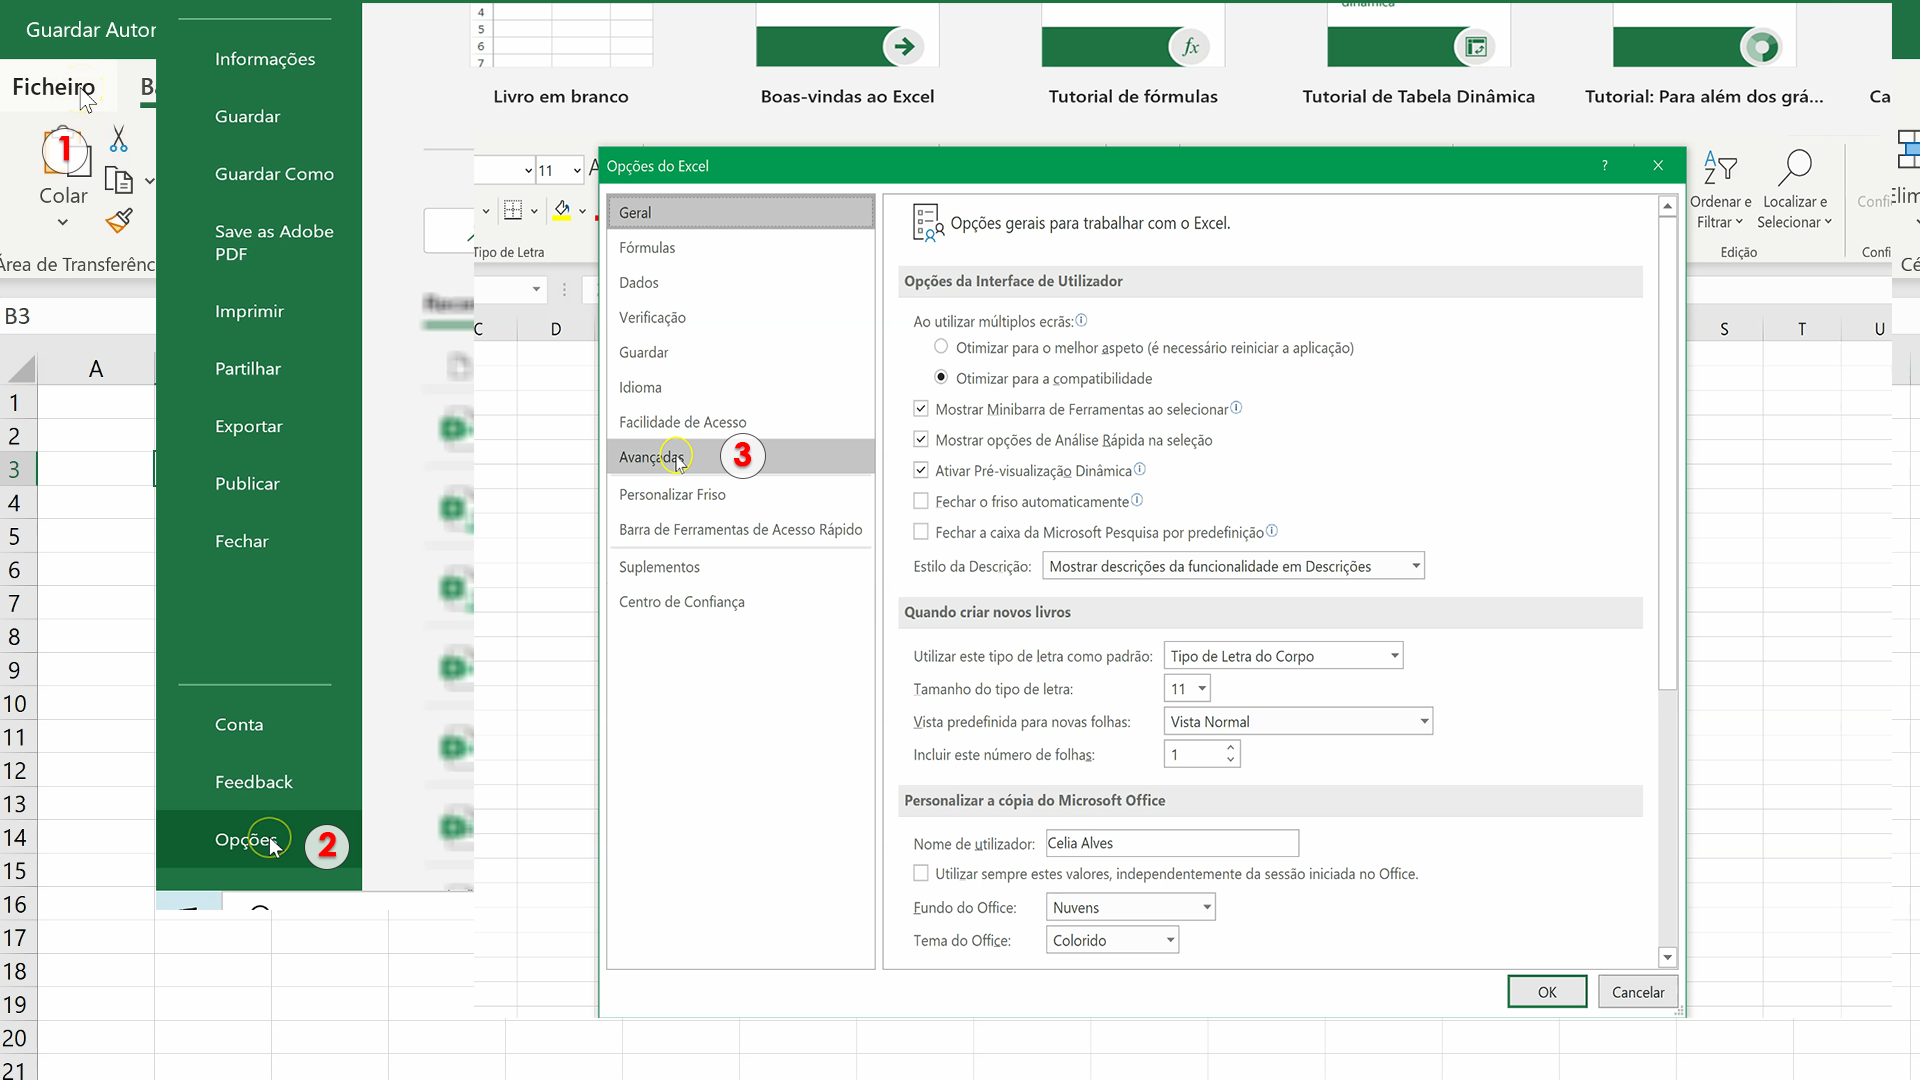
Open Excel, go to the File tab, and choose Options, and then Language.
Check if the language that you want is installed under Office Display Language.
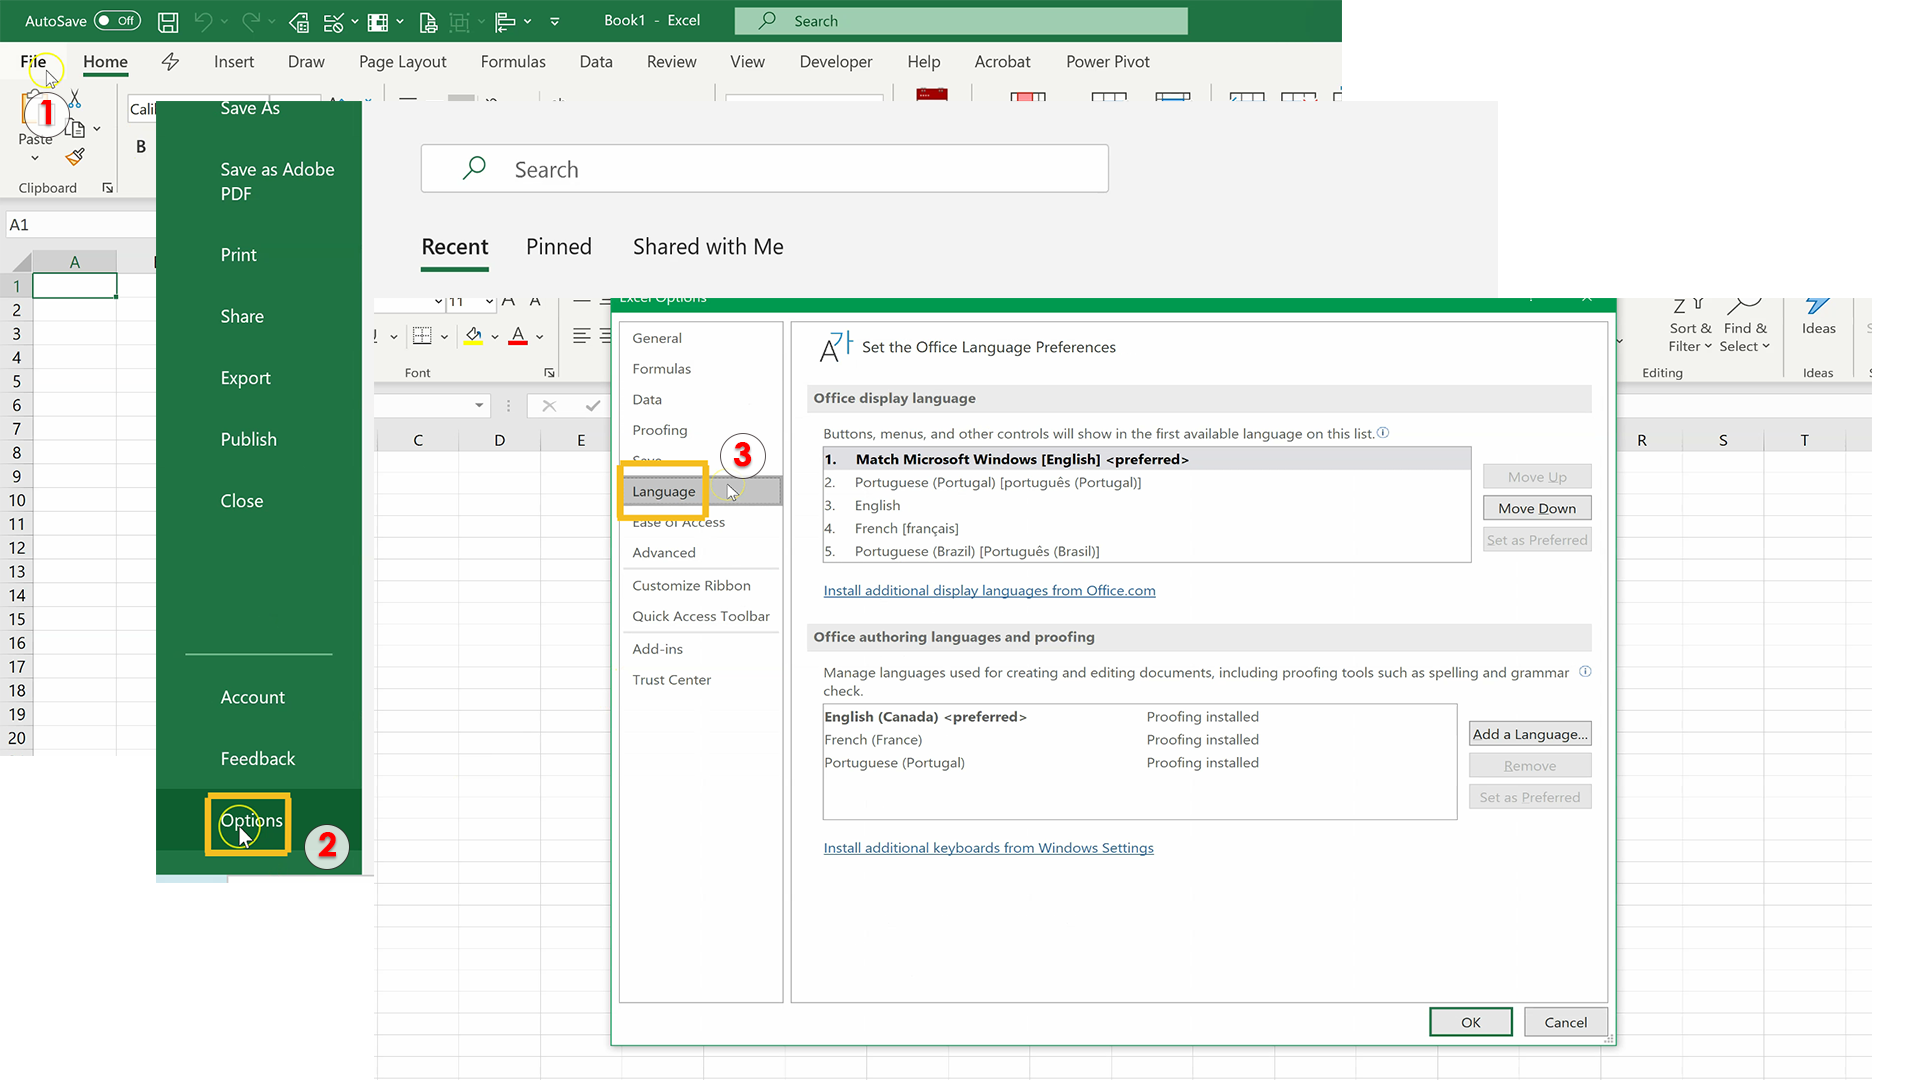
In my case, I already have the Portuguese language installed there, but If you still don’t have the language that you need, you can click on install additional display languages from Office.com
You will get a window with a list of languages, you can choose the language that you need.
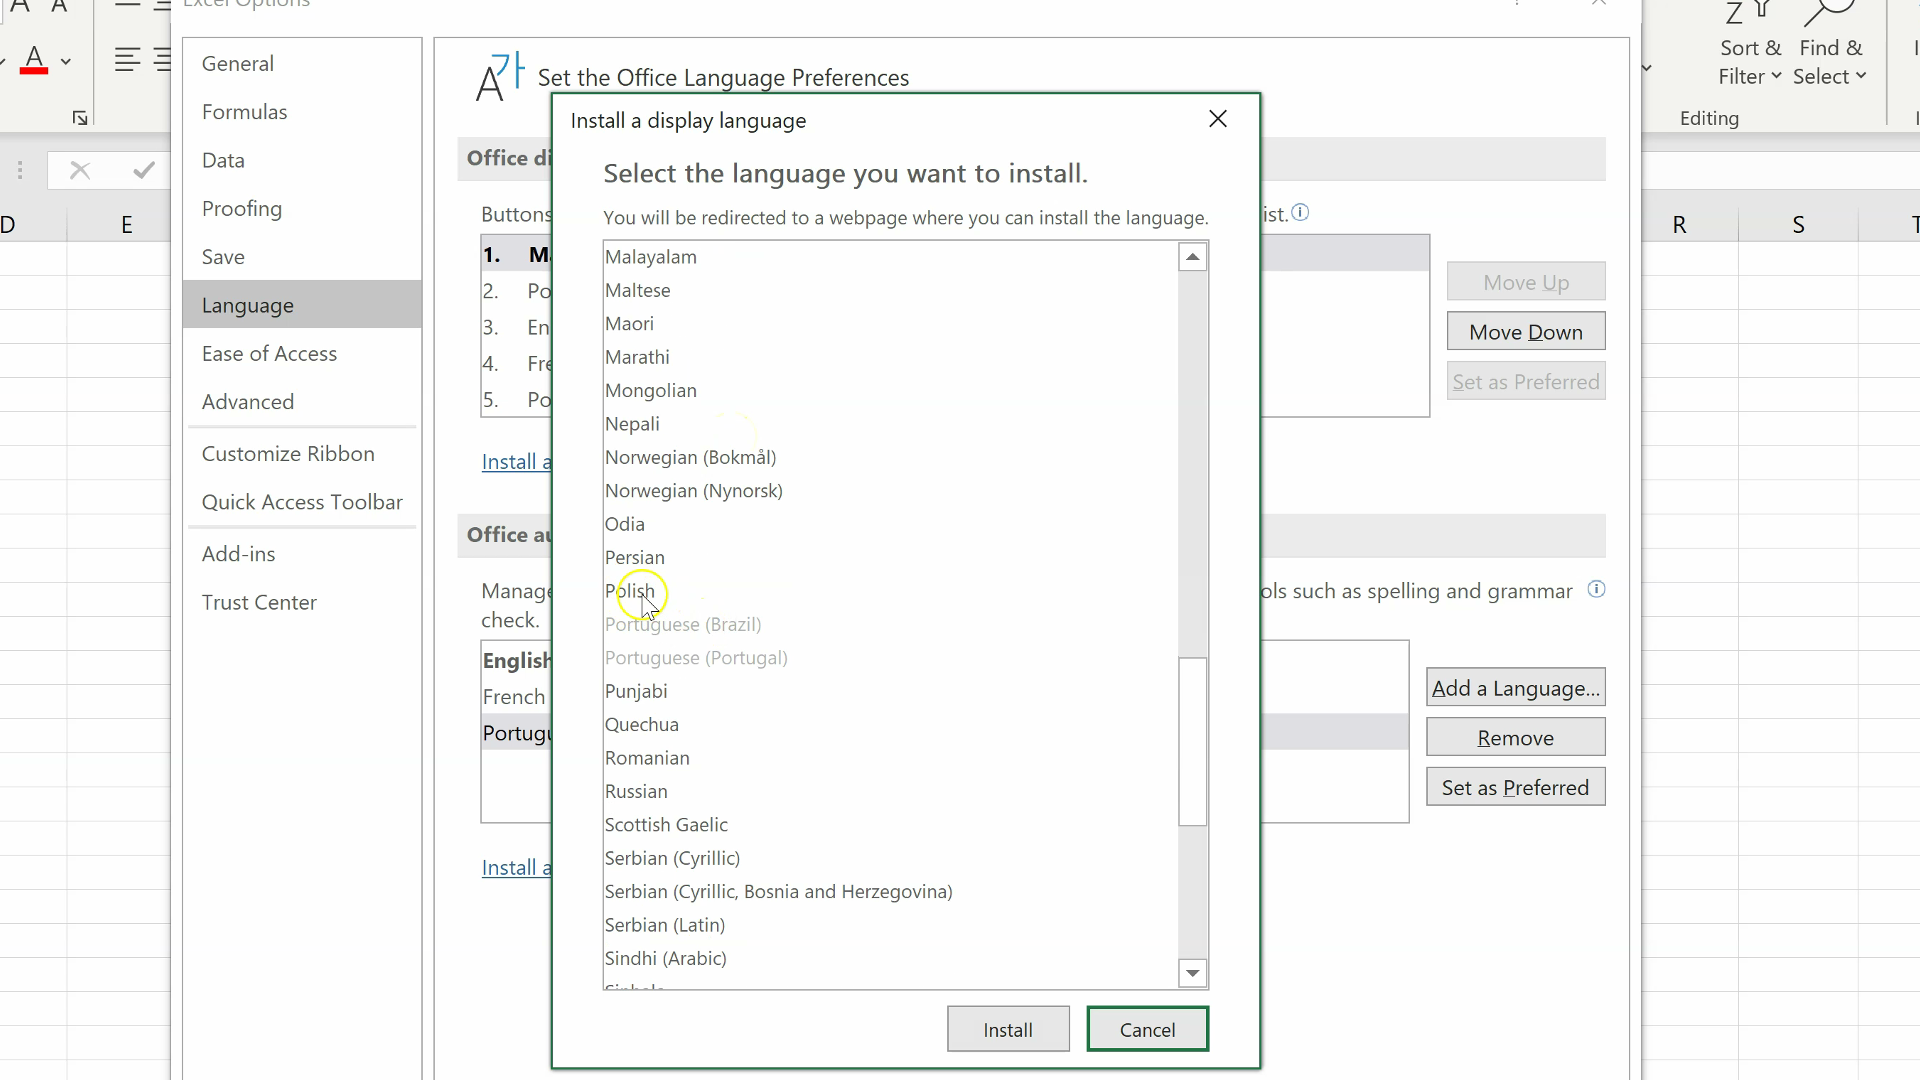
When you click on the language that you want to install, Excel will take you to a page where you can download the language package. You may need to choose the appropriate version for your system (32-bit or 64-bit.)
After you download the file, you have to open it, install it and then close and reopen Excel.
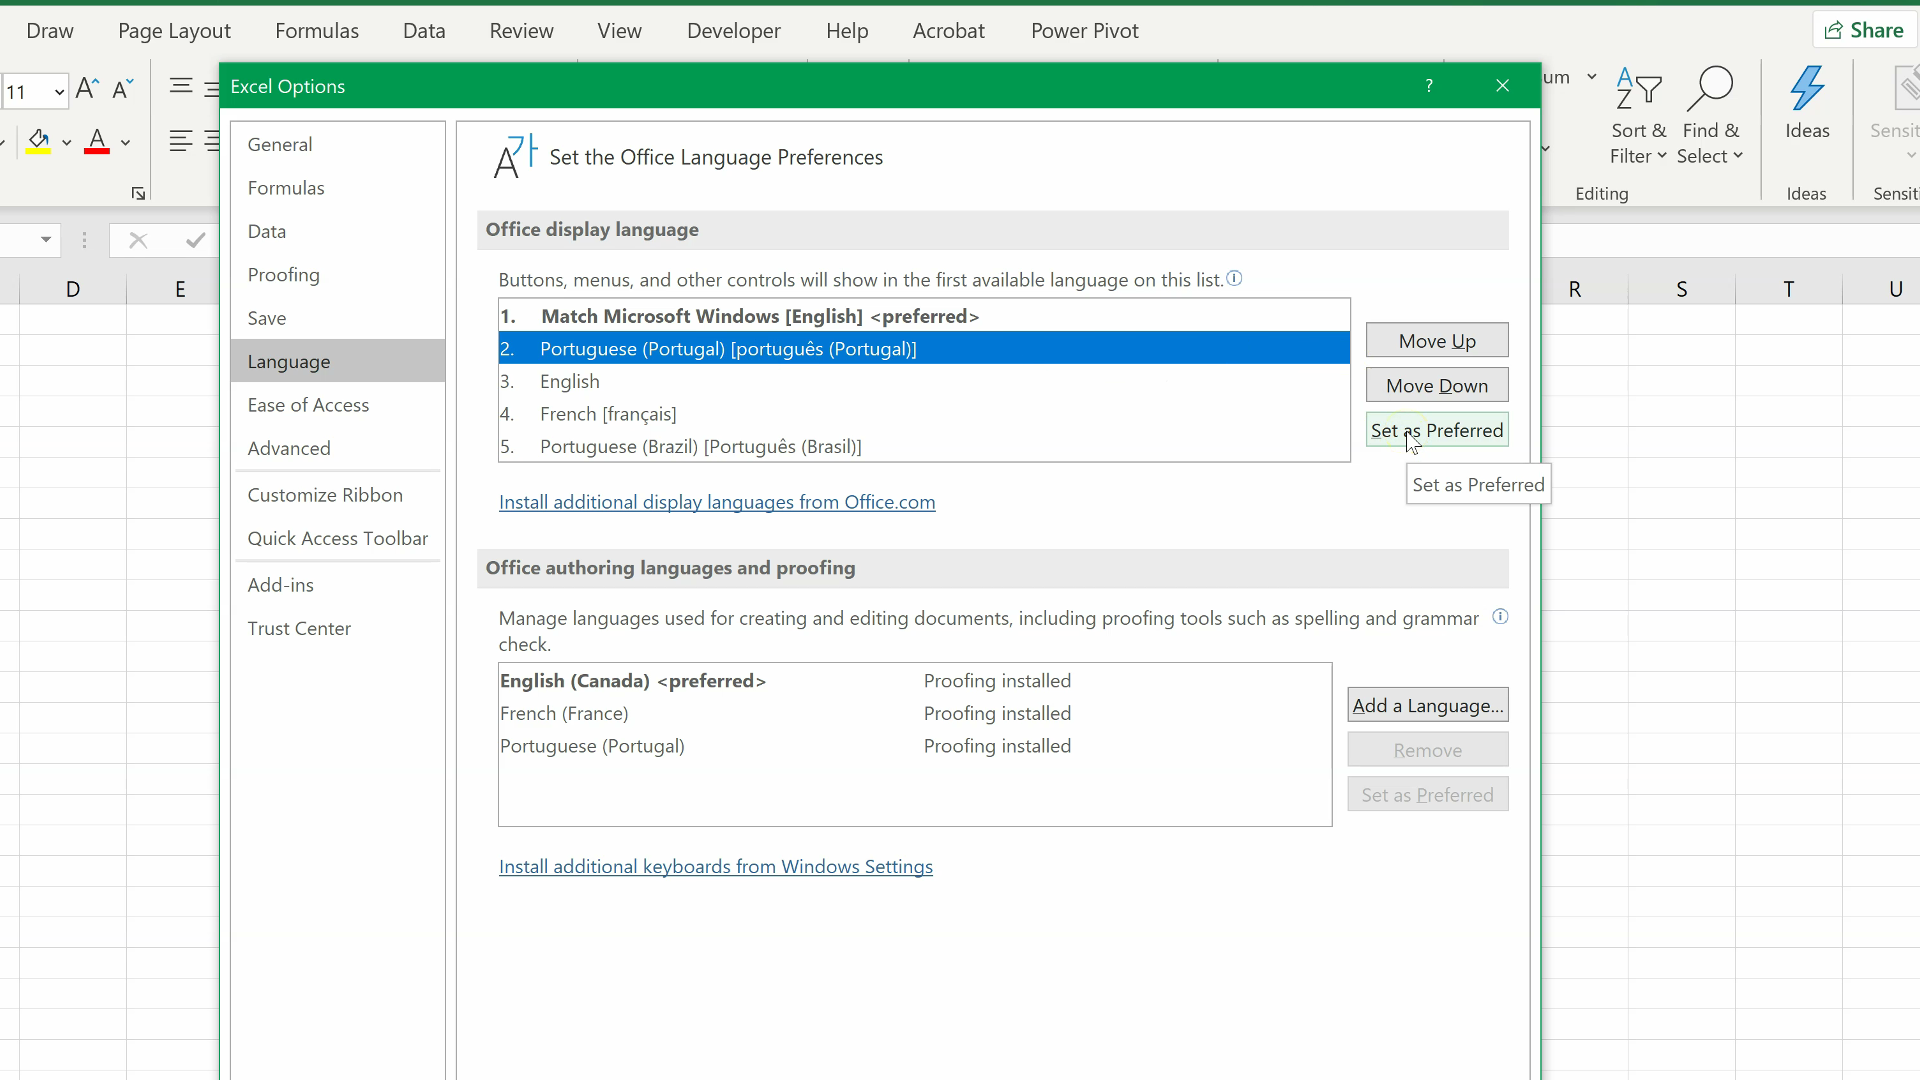
After having installed the file for the language that you need, go to the File tab and choose Options and then Language.
Choose the language you want, in this case, Portuguese, and then click on set as preferred.
You can also change the language under Office authoring languages and proofing and then click on set as preferred.
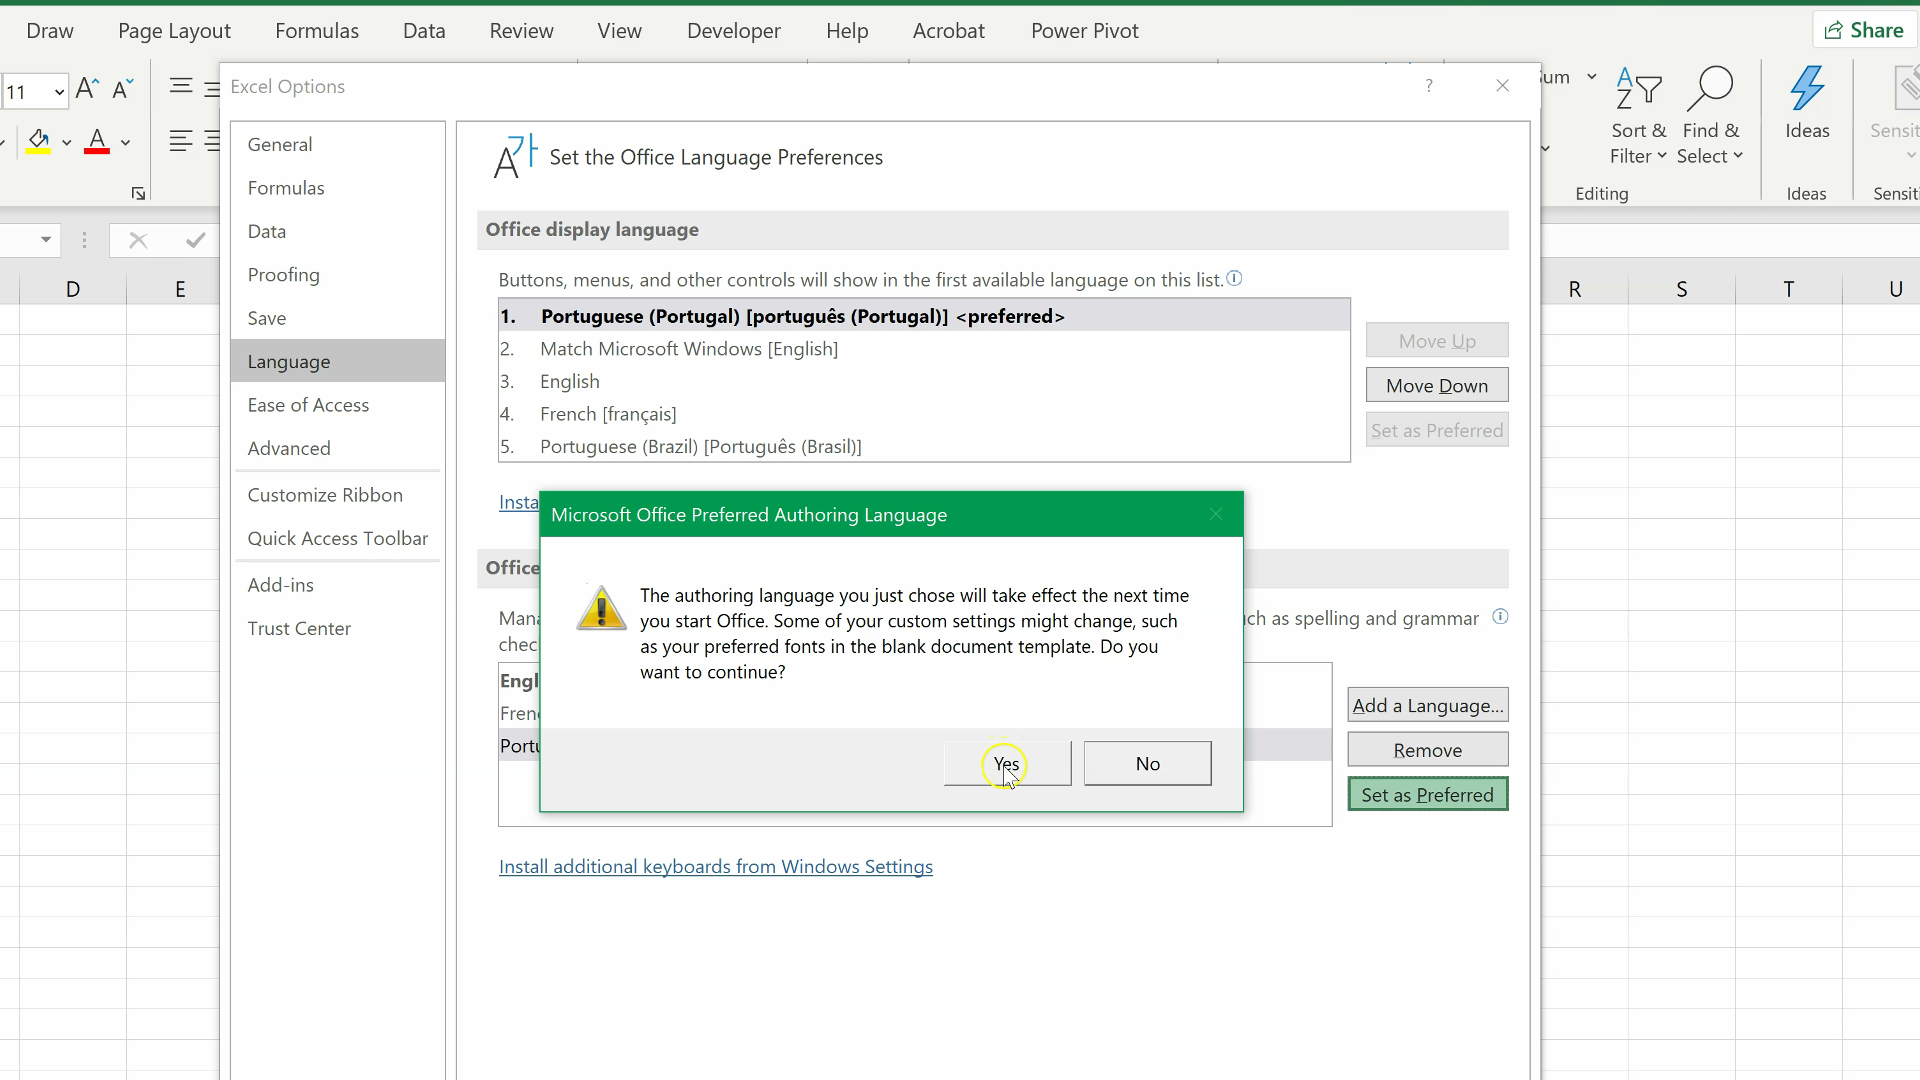
Please note that this change will take effect the next time you start Office.
The next time you open Excel, you will find that the display language changed.
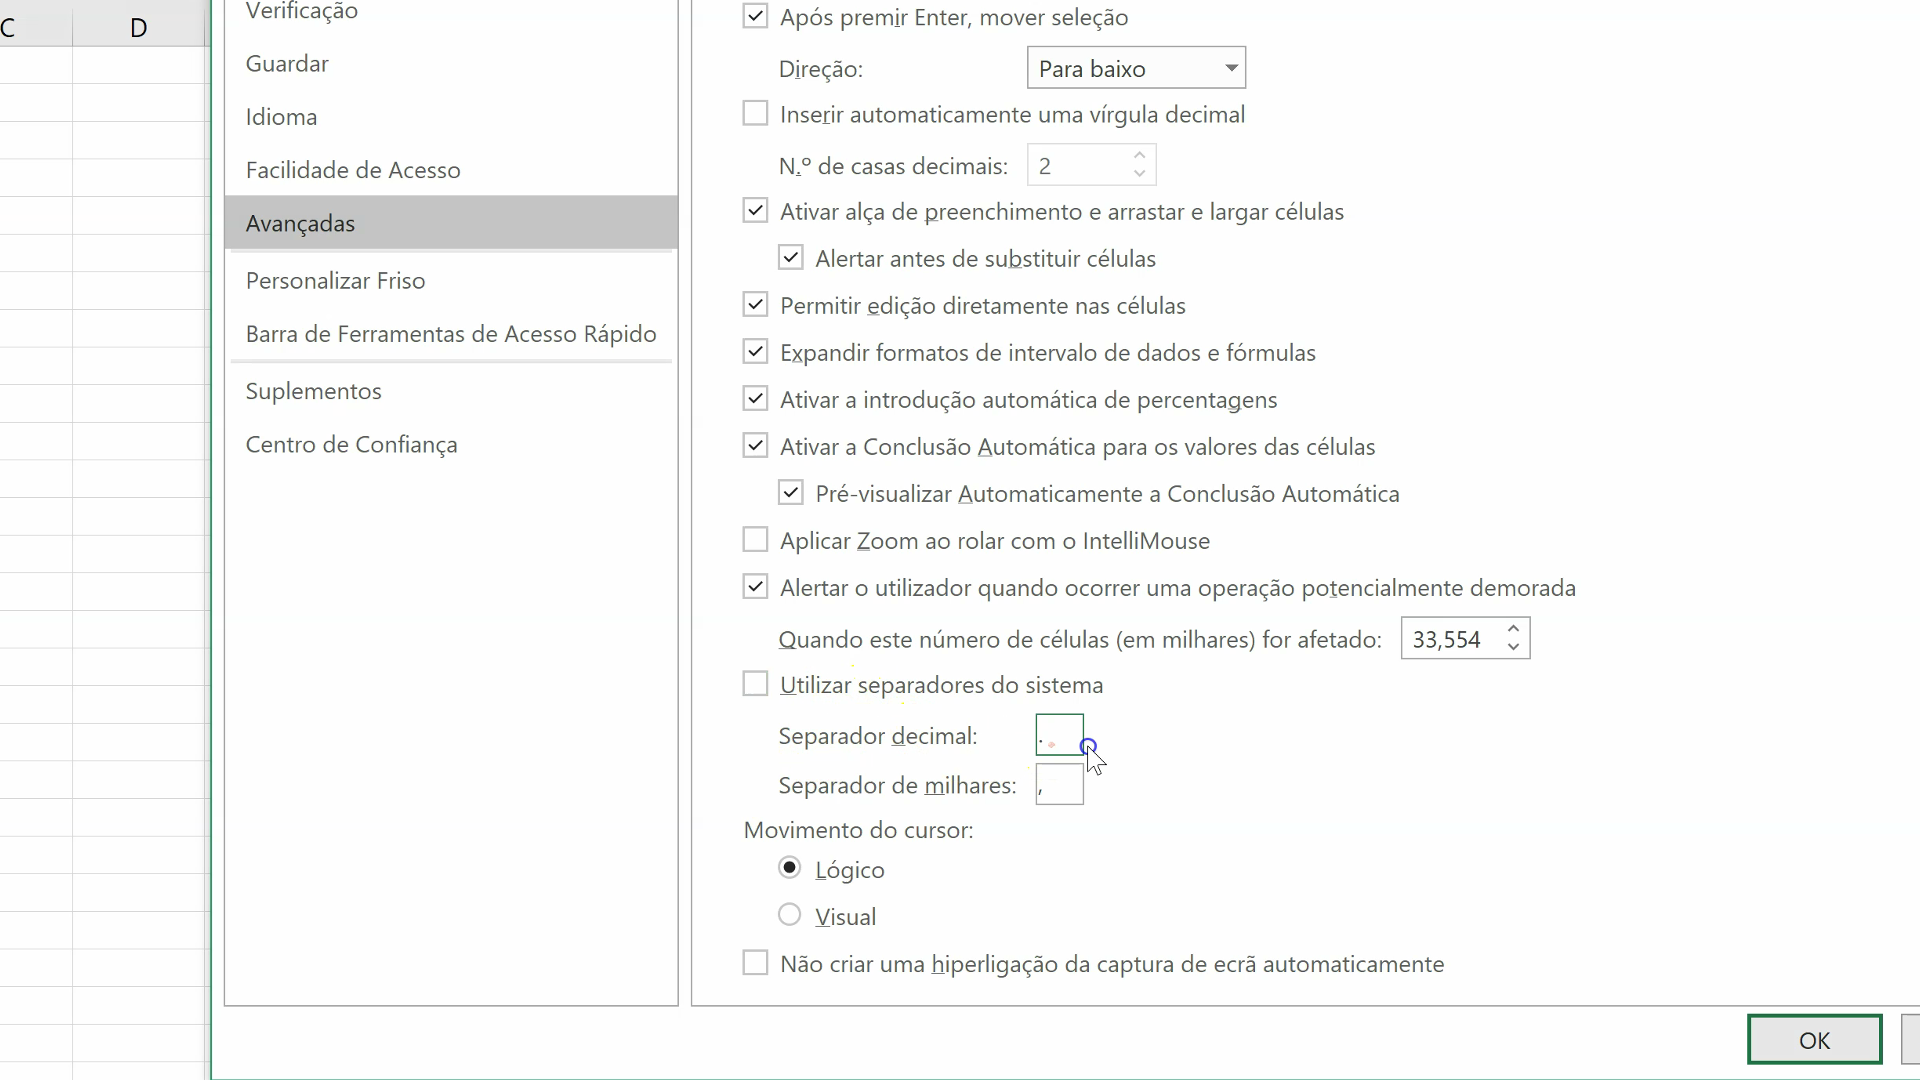
Another thing is might be important that you check, are the decimal and thousand separators.
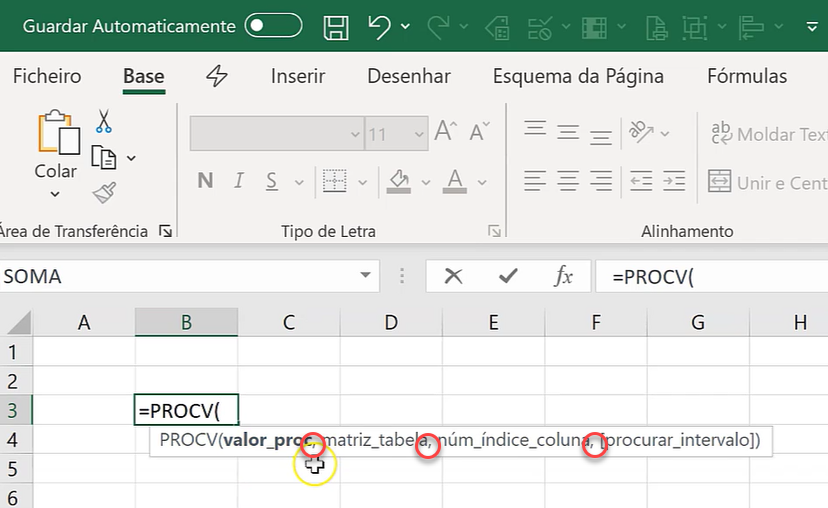
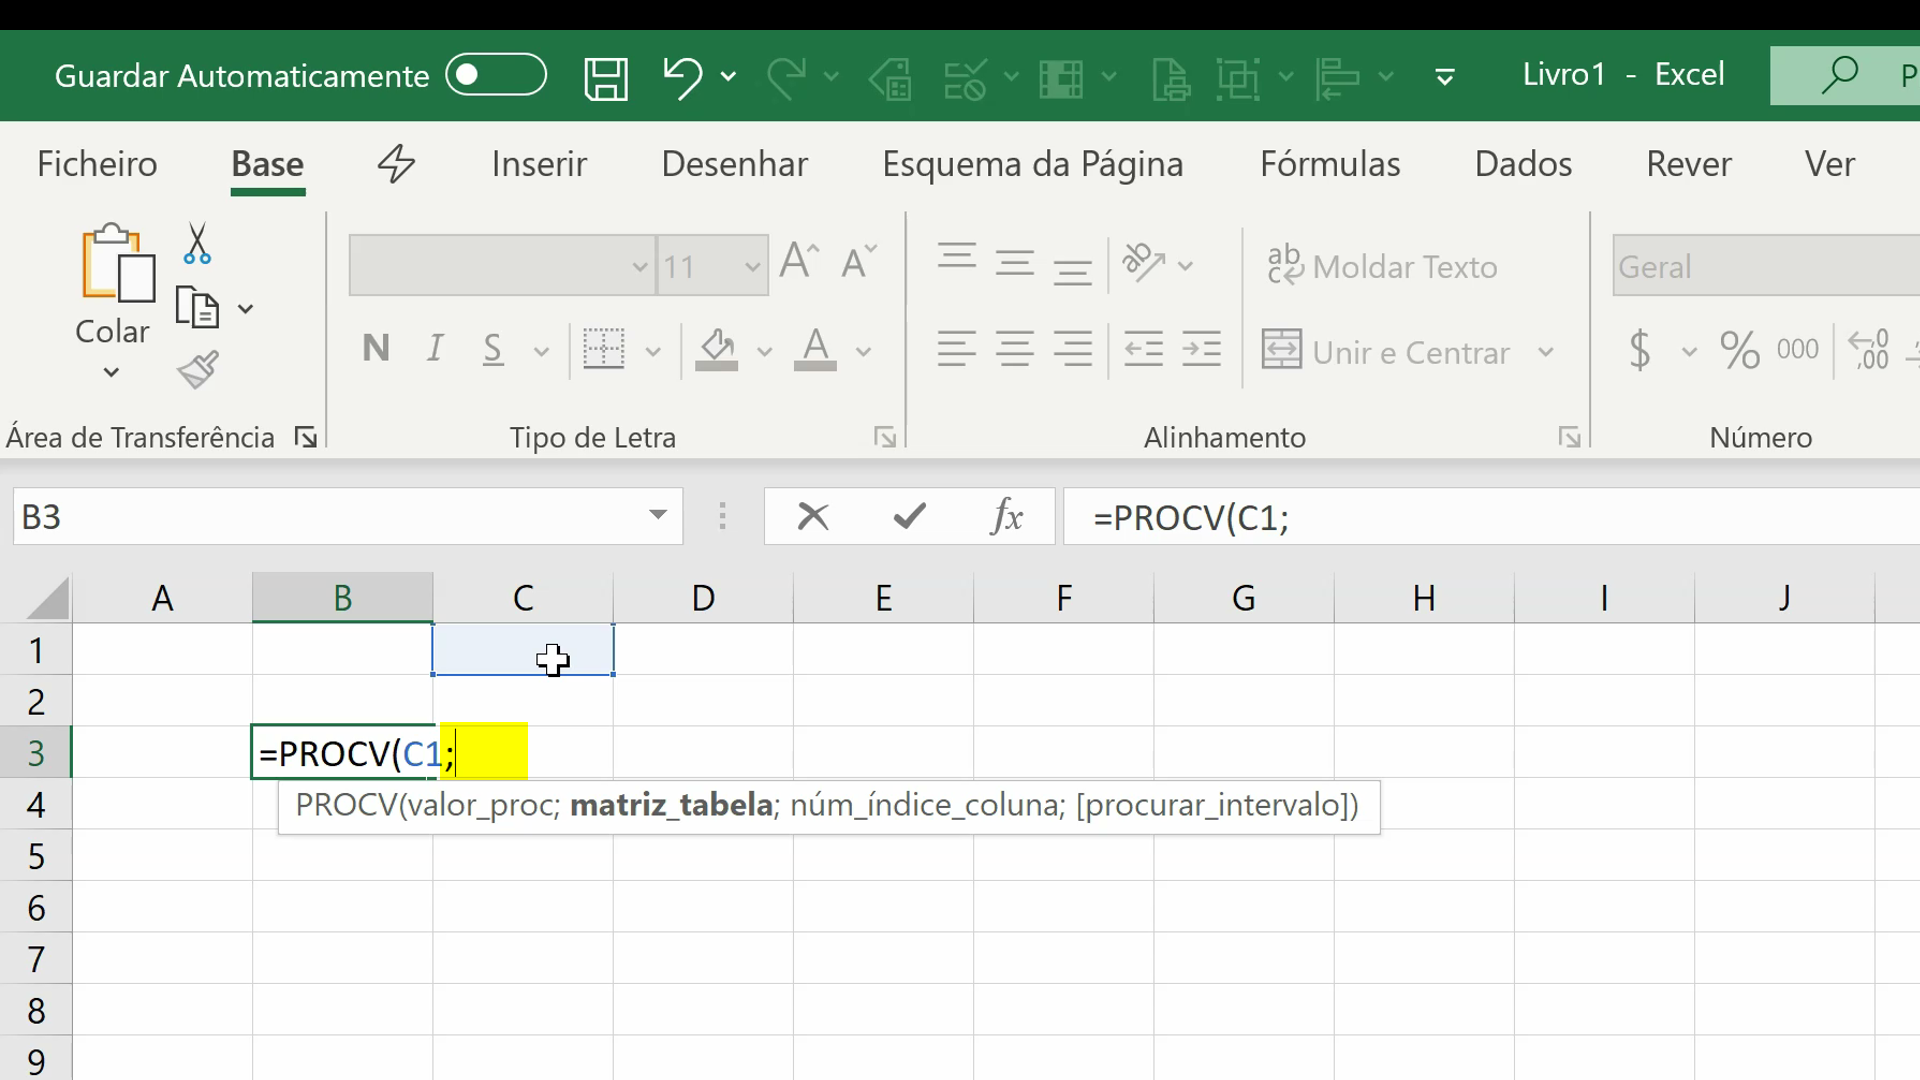
After having changed the display language to Portuguese, If I type VLOOKUP, Excel will not find this function because the equivalent of VLOOKUP in Portuguese is PROCV.
If I type PROCV, and check the separators between the different parameters, I will see they are commas. But in fact, in Portugal, because the comma is used as the decimal separator, it cannot be used as a separator in the formulas between the parameters. If we want to have the full Portuguese experience when using Excel, so that we enter data and write formulas the same way we would do if we were in Portugal using the Portuguese version of Excel, we may need to change decimal and thousand separators.
To do this, click on File (in Portuguese it is Ficheiro,) then go to Options (Portuguese: Opções,) and under Advanced (Portuguese: Avançadas), look for the separators (Portuguese: separadores.)
Unlike in English, in Portuguese, we use a comma for the decimal separator and a dot (.) as the thousands separator.
After changing the decimal and thousand separator to comma and dot respectively, if I type PROCV in Excel’s formula bar, we will see the semicolon as the separator between parameters.
Now you should have your Excel ready to work in the new language.
A final Note: Please BE CAREFUL not to change the display language to a language that you do not understand, because it can be tricky to find your way back to set it to the language you understand.
Share This Post

Related Posts
9 Comments
-
 Frustated at Microsoft stupidity
September 13, 2021 at 2:47 PM — ReplyThe trouble I have is excel is in a language I cant read Korean, why oh why dont they have a symbol for change language……
-
Johann Schtotelmyer
November 26, 2021 at 6:42 PM — ReplyWhat if you only want to change only one column and not the whole sheet consistently to another language?
-
The post is about changing the display language on the ribbon and the user interface in general. It is not about changing the language of the spreadsheet cells content.
-
Chitrali Sarkar
May 4, 2022 at 7:52 PM — ReplyIs it possible to change the language of the cell content without changing the interface language?
Thanks in advance
-
Chitrali, do you mean to translate the content of a cell to another language? I know that Google Sheets has a function for that but unfortunately Excel doesn’t.
-
-
-
-
maria vaccaro
December 29, 2021 at 4:04 PM — ReplyHi
tks a lot for your help!Now i have excel in English language!!!
God job!
Maria -
Sare’
March 18, 2022 at 11:52 AM — ReplyExcel : Issue of speak selected text tool
speak selected text tool is working for only English language . Let’s say if i install Japanese language , speak selected text tool is not working. This tool skipping the cells without speaking anything.At the same time this tool is perfectly fine for ms word.
Could you let’s know where we are missing?
-
Chiven
June 16, 2022 at 12:08 PM — Replythe prob is that i don’t have install additional display languages from Office.com
-
Israel
January 3, 2023 at 2:14 AM — ReplyI try to change from spanish to english and it is NOT working


Page load link
Go to Top
In this article, we’ll learn to change the language in Excel. But also, data in your desired or native language is a great help for both better readability and interpretation. As language is an integral part of the culture and society and data representing such should be presented in the same relatable language to reflect the masses.
Also read: Change Date Format in Excel: A Complete Step-by-Step Guide
In Microsoft Excel, you can easily change the language of your Worksheet by following the simple steps below:
- Open Microsoft Excel on your computer system.
- The Excel by default is displayed in English.
Suppose, I have a special request to record the data in an Excel worksheet in Portuguese, so I would like to change the language in Excel from English to Portuguese.
- To start with, go to File.

- Then go to Options.
- Now select Language from the left option menu from the pop-up dialogue box opened.
- Now, search for the language in which you want to change the language of your Excel worksheet.
- Note: You will only find Languages in search, which are installed in your system.
- From here you can select the language you want.
In our example, we already have a Portuguese language pack installed.

- Select the language you prefer in the Portuguese package. (You can also choose any other language as desired)
- Click on Set as Preferred both on ‘Office Display Language‘ and ‘Office Authoring Language and proofing‘.
- This will reveal a pop-up window, warning you of the details, select Yes to close the dialogue box.
- Click on OK to apply the new language to your Excel worksheet.
Note: The new language after following the above steps, only gets applied when you Restart the Excel or Office software.

Now, you can notice that restarting the Portuguese language is applied.
Install a Language Pack on your computer
To install the language pack which isn’t in your system
Suppose, we need to apply “Polish” language, for that:
Click on Install additional keyboards from Windows Setting to install the Polish Language pack.

- Select the language you want to install. In our example, installing Polish language pack.
- On selecting the language to install, you will be redirected to a page where in you will need to select the appropriate language pack to download based on your computer system 32-bit (x86) or 64-bit (x64).

After, downloading the language pack, run the downloaded language pack to install it in your computer system.
Change the Language of your Excel Worksheet to this newly installed language pack by following the steps discussed above.
Conclusion
That’s It! You can change the language of your Excel worksheet easily by following the above step-by-step procedure now, in your Excel sheets.
We hope you learned and enjoyed this lesson and we’ll be back soon with another awesome Excel tutorial!
In many companies, Excel is often in English. But for a lot of people, it’s not easy to work with the Excel functions in English. But no panic, you can easily change the language of Office.
Version before Excel 2013
Unfortunately, for all the Excel versions before 2013 — Excel 2010, Excel 2007, Excel 2003 (still 🤔) — the package languages are no more available ❌❌❌
Formerly, it was necessary to buy a specific package language and install it ; not friendly 😡
Version after Excel 2013
With the version of Excel 2013, Excel 2016, Excel 2019 and Office 365, it’s very easy to change the language and free 😉
- Go to the menu File > Options
- Then you go to the menu Language (1)

- You can visualise the languages already installed (2)
- But if the language you want is not installed, you can download it (3)
Install a new language
In our situation, we want to install the Spanish language. So we click on the link Install additional display languages from Office.com. And a new dialog box with the languages available for downloading
- Select the language you want to install
- Then, click on the button Install

- Then, your computer opens your browser directly to the download page of the chosen language 😍😍😍

- Run the installation

- Wait a bit and a new language is installed on your Office version 😃😃😃

Change the language
To change the language it’s very easy.
- Select the language you want to load
- Click on the button Move up to move the language on the first position


- Click on OK to validate your selection
- Restart Office and now, all your Office Apps are in Spanish 😍😎

Tutorial Video
The following video explain you how to install a new package for Excel 2016
Microsoft Office
Since Microsoft is a US-based firm, the default language in Microsoft Excel is English (United States). However, the Microsoft Office suite is quite adaptable and offers a large variety of languages.

How to Change Language in Microsoft Excel
You can change the language in Microsoft Excel based on your preference. And if necessary, you may even add more languages to the application.
-
Step 1: Go to the File Tab of Microsoft Excel

Microsoft Excel has a language function for it. To begin with, launch Microsoft Excel. From there, go to the File tab at the top left side of the Excel window. Then, choose Options.
-
Step 2: Access the Language Option
After clicking Options in step 1, a dialog box will pop up. From there, go to the Language option. The “Office display language” will be the first option you’ll see, and English is listed as the preferred language in this selection, which implies that the Microsoft Excel interface, including the buttons, menus, and other controls, is displayed in English.
-
Step 3: Change the Language Based on Your Preference
In this step, you can now choose your preferred language by moving down to the first preferred language. For example, if you want Bangla to be your chosen language, all you have to do is select the Move Up option to move Bangla to the number one spot. After that, you click OK. Microsoft Excel will then prompt you to restart the application. Once Excel has been restarted, you will notice that the language has been changed and that all of the buttons, bars, and controls have been translated into the language of your choice.


FAQs
How do I add a new language to Microsoft Excel?
If you want a language that isn’t listed under preferred languages, go back to the language option (take notice of Office authoring languages and proofing), then you will see an “Add a language” option, then select the language of your choice (take the Chinese language, for example), locate the Chinese language in the selections and click Add, and once you set the language as “Set as preferred.”
How can I download a new language in Microsoft Excel?
To download a new language in Microsoft Excel, simply go to the language option, click the “Install additional display languages from office.com” option, click Install after selecting your chosen language from the dialog window that appears, and then after pressing the install button; you will be redirected to the Microsoft support website from where you can download the language, and once the language pack has been downloaded and installed, you can find your new language pack under the language option).
How to set the preferred language to Japanese in Microsoft Excel?
To set the preferred language to Japanese in Microsoft Excel, go to the File tab, select Options, click on the Language option from the dialog box that appears (if the Japanese language is not on the preferred language list, go to “Office authoring and proofing”, select the “Add a language” option, find Japanese, and click Add), and then when you select “Set as preferred” for the language setting.