
My friend is using Microsoft Word for Mac (which is a total train smash). and we want to change the spell check from English (US) to English (UK).
This is what I have tried:
- Make a spelling mistake otherwise you can’t get to spelling options.
- Click Tools > Spelling and Grammar > Options > Dictionaries
- Change language to English (UK) and click OK
- Type an English (US) word ‘Categorize’
- Click Tools > Spelling and Grammar — ‘Spelling and Grammar check complete’ i.e. it did not mark the work incorrect.
asked Nov 19, 2012 at 9:10
![]()
Try this:
-
Select all the text in the document (keyboard shortcut should be
 +A)
+A) -
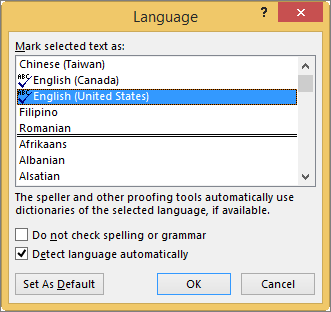
Go to
Tools / Languageand select English (UK) (instead of English (US) as shown below): -
Remember to click the Default button (agree to the prompt)
 +A)
+A)
Note: I’ve found that even after doing this (on Word for Windows at least), it still considers certain US spellings as acceptable alternates for UK ones and refuses to mark them as incorrect.
![]()
answered Nov 20, 2012 at 16:30
![]()
KaranKaran
55.6k20 gold badges117 silver badges189 bronze badges
Checking spelling and grammar in multiple languages can present unique problems, such as correctly spelled words being flagged as incorrect, or misspelled words in a different language not flagged as incorrect. This article addresses common problems and helps you make sure your text is identified with the correct language; that the correct language dictionary is being used to check your spelling and grammar; and that the automated language tools in Office are enabled.
Misspelled words aren’t marked as misspelled
Make sure that:
-
The language that you want is enabled
-
The correct language is applied to the text
-
The correct language dictionary is being used
-
The Detect Language Automatically check box is selected
-
The Automatically switch keyboard to match language of surrounding text check box is selected
-
The Do not check spelling and grammar check box is clear
-
The misspelled word hasn’t been unintentionally added to the custom dictionary
Make sure the language that you want is enabled
To correctly check the spelling and grammar in a different language, the language must be enabled in Office. If you need a language that isn’t listed as an editing language in the Set the Office Language Preferences dialog box, you might need to obtain and install a language pack before you can check the spelling. For more information on how to enable languages in Office, see Add a language or set language preferences in Office and Language Accessory Pack for Office.
Top of Page
Make sure that the correct language is applied to the text
If the spelling checker isn’t checking words that you typed in a different language, or if it marks words in a different language that are spelled correctly as misspelled, the words might be identified with the wrong language.
To manually change the language of particular words or a section of text in Word, do the following:
-
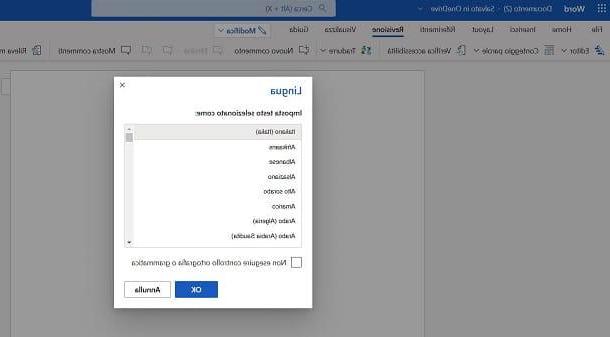
On the Review tab, in the Language group, click Language > Set Proofing Language.
(In Word 2007, click Set Language in the Proofing group.)
-
In the Language dialog box, select the language that you want.
Important: If the language that you want is not shown above the double line, you must enable the language for it to be available to check spelling.
-
Start typing.
Note: To type characters, such as the umlaut in German (ö), the tilde in Spanish (ñ), the cedilla in Turkish (Ç), or even a symbol, such as a check mark, on the Insert tab, in the Symbols group, click Symbol, and then click the character that you want.
-
To switch back to the original language, or to switch to a different language, repeat Steps 1–3. In Step 3, choose the next language.
Top of Page
Make sure that the correct language dictionary is being used
Make sure that the correct dictionary language location is selected for your text—for example, English (United States) instead of English (United Kingdom).
To change the dictionary to a particular language in Word, do the following:
-
On the Review tab, in the Language group, click Language > Set Proofing Language.
(In Word 2007, click Set Language in the Proofing group.)
-
In the Language dialog box, select the language that you want.
Important: If the language that you want is not shown above the double line, you must enable the language for it to be available to check spelling.
Note: If your version of Office does not provide proofing tools, such as the spelling checker, for the language that you want to use, you might need to get a language pack. For more information, see Language Accessory Pack for Office.
To change the dictionary for selected text, do the following:
-
Select the text for which you want to change the dictionary language.
-
On the Review tab, in the Language group, click Language > Set Proofing Language.
(In Word 2007, click Set Language in the Proofing group.)
-
Under Mark selected text as, click the language that you want the section of text to be identified as. If the languages that you use are not shown above the double line, you must enable those languages (turn on the language-specific options) for them to be available.
Top of Page
Make sure that the Detect language automatically check box is selected
To select the Detect language automatically check box in Word, do the following:
-
On the Review tab, in the Language group, click Language > Set Proofing Language.
(In Word 2007, click Set Language in the Proofing group.)
-
In the Language dialog box, select the Detect language automatically check box.
-
Review the languages shown above the double line in the Mark selected text as list. Word can detect only those languages listed above the double line. If the languages that you need are not available, you must enable the editing language to have Word automatically detect them.
Notes:
-
Automatic language detection requires that a sentence of text be written in that language. Depending on the length of your sentences, you might need to type several sentences before Word has enough contextual information to automatically detect the language and apply the correct dictionary.
-
Words that are spelled the same way in several languages, such as «centre» in English (United Kingdom) and French (France) might cause the Detect language automatically check box to incorrectly identify the language of text. To solve this problem, type more words in the language that you want, or clear the Detect language automatically check box.
Top of Page
Make sure that the Automatically switch keyboard to match language of surrounding text check box is selected
The Automatically switch keyboard to match language of surrounding text check box might be turned on and causing typographical errors by changing your keyboard language as you type. Try typing more words in the language that you want, or clear the Automatically switch keyboard to match language of surrounding text check box.
To select the Automatically switch keyboard to match language of surrounding text check box (in Office 2010, Office 2013, and Office 2016):
-
Open Word.
-
Click File > Options > Advanced.
-
Under Editing options, select the Automatically switch keyboard to match language of surrounding text check box.
Note: The Automatically switch keyboard to match language of surrounding text check box is only visible after you enable a keyboard layout for a language. If you do not see this option, enable a keyboard layout for the language that you want to use.
Top of Page
Make sure that the Do not check spelling and grammar check box is clear
If the Do not check spelling and grammar check box is selected, the spelling in your documents is not checked.
To clear the Detect language automatically check box in Word, do the following:
-
On the Review tab, in the Language group, click Language > Set Proofing Language.
(In Word 2007, click Set Language in the Proofing group.)
-
In the Language dialog box, clear the Do not check spelling or grammar check box.
Learn more about checking spelling and grammar in different languages.
Top of Page
Make sure that the misspelled word hasn’t been inadvertently added to the custom dictionary
If a misspelled word was added to a custom dictionary, you need to find and delete the word. For information on how to check a custom dictionary for misspelled words, see Use custom dictionaries to add words to the spelling checker. For information on how to remove a word from a dictionary, see Add or edit words in a spell check dictionary.
Top of Page
The dictionary language that I want isn’t listed in the Language dialog box
The most common reasons for a dictionary language not appearing in the Dictionary language list in the Language dialog box are that the language has not been enabled as an editing language, or it is a language that isn’t included in the installed version of Office and a language pack for that language needs to be installed. For information on how to enable an editing language, see Change the language Office uses in its menus and proofing tools.
Top of Page
Still need help?
Contact us with your question or problem.
More information about spelling and grammar
Check spelling and grammar
Add or edit words in a spell check dictionary
The spelling and grammar checker isn’t working as expected
Add a language or set language preferences in Office
Check spelling and grammar in a different language
![]()
Written by Allen Wyatt (last updated September 1, 2021)
This tip applies to Word 2000, 2002, and 2003
Subscriber Stan Witz recently expressed his exasperation with getting Word 2000 to keep its language settings as English UK, rather than converting to English US. It seems that when he would make the changes necessary, eventually Word would always switch to English US.
Understanding how Word works with different languages can sometimes seem more difficult than actually learning those languages in the first place. There are, in reality, several different settings that come into play when working with languages in Word 2000 or later versions. To set the default language used by Word, you follow these steps:
- Choose Language from the Tools menu, then choose Set Language from the submenu. Word displays the Language dialog box.
- In the list of languages, select the one you want to use by default.
- Click on the Default button. You are asked to confirm you action.
- Close the Language dialog box.
The only thing that the Default button does is to change the language settings in whatever template you have attached to your current document. Thus, any new documents based on that template will default to the language you select. Any documents based on a different template will not, unless you change them, as well. In addition, any existing documents will not have their language changed. In order to affect an existing document, you need to do the following:
- Select the entire document (press Ctrl+A).
- Choose Language from the Tools menu, then choose Set Language from the submenu. Word displays the Language dialog box.
- In the list of languages, select the one you want to use by default.
- Click on the OK button.
The situation in regard to languages becomes even more complex, however. Let’s say your template has been set to have English UK as its language. Further, the styles in the template have the Automatically Update flag set. (This is not uncommon.) If you later open a document from someone else that has the language set to English US, or you edit an HTML-encoded e-mail that uses English US, then the styles in your template could automatically update to reflect English US rather than English UK. The solution to this, obviously, is to make sure that the Automatically Update flag is turned off for all your styles.
Another complexity is the language-related settings in Windows itself. (You can see these by selecting Start | Settings | Control Panel | Regional Options. Pay attention to both the Regional Settings/General tab and the Input Locales tab.) If you have more than one keyboard (input locale) installed on your system, when you start a blank document—regardless of the template in use—Word will automatically apply direct formatting on the text matching the currently active input locale, thereby overriding the default setting in the Language dialog box. Word is designed this way so that when you start typing, the language Word assumes you want to use has the greatest probability of matching the actual language being typed.
It is important to note that Word’s match-the-language-to-the-input-locale behavior applies direct (non-styled) formatting. The language in the template and its styles remains as you set it, Word simply overrides your default to match the setting of the input locale. The upshot, of course, is to make sure that the input locale specified in Windows is English UK, which is what you want Word to use for your documents.
Word 2000 and later versions have an additional feature that causes them to try to automatically determine the language you are actually typing, which in practice does not always match the language of the input locale (keyboard) you are using. This is controlled by the Detect Language Automatically check box in the Language dialog box. If you specify the languages you use in the Office Language Settings utility (Start | Programs | Microsoft Office Tools | Microsoft Office Language Settings), then the check box becomes active and you can select it. With the check box selected, Word tries to automatically detect the language you are typing, and then automatically sets the Language setting based on its determination.
Finally, even after you have the default language set as you really want it, the grammar and spelling tools may still not work properly. This is because those tools are not installed for all languages. Instead, you may need to purchase foreign language tools from Alki Software (this is where Microsoft would send you, as well). You can visit their Web site at http://www.proofing.com.
WordTips is your source for cost-effective Microsoft Word training.
(Microsoft Word is the most popular word processing software in the world.)
This tip (1678) applies to Microsoft Word 2000, 2002, and 2003.
Author Bio
With more than 50 non-fiction books and numerous magazine articles to his credit, Allen Wyatt is an internationally recognized author. He is president of Sharon Parq Associates, a computer and publishing services company. Learn more about Allen…
MORE FROM ALLEN
Sorting Letters and Numbers
Sorting information in a worksheet can be confusing when Excel applies sorting rules of which you are unaware. This is …
Discover More
Putting a Chart Legend On Its Own Page
Displaying information using charts in Excel is easy and there are a variety of chart styles to choose from. Integrated …
Discover More
Putting a File Name and Path in a Default Footer
Want to add a filename and path to the footer of a template? You might be confused by what you see in documents created …
Discover More
![]()
Download Article
![]()
Download Article
This wikiHow will show you how to change the language in Word. You can easily change the editing, display, and priority languages on a Windows computer, but if you have a Mac, Android, or iOS device, you cannot set Word to a language other than what your OS uses. However, you can specify a different editing language on these devices.
-
1
Open Word. This document icon looks like two pieces of paper, one with a bunch of lines and one with a large «W.» You can find this app on your Home screen, in the app drawer, or by searching.
-
2
Tap the icon that looks like a pencil and an «A» at the top of your screen. This will open the editing menu.
Advertisement
-
3
Tap Home. You’ll see a list of options.
-
4
Tap Review. The menu options to the right will change.[1]
-
5
Tap Proofing and Language. The options in the menu will change again.
-
6
Tap the right-pointing arrow
next to the current language. You’ll see a list of languages.
-
7
Tap the language you want for your document. You’ll be redirected back to the previous menu.
- You can tap to select boxes next to «Hide All Proofing Marks» and «Hide Proofing Marks in Selected Text» if you want your current text to remain un-edited.[2]
- You can tap to select boxes next to «Hide All Proofing Marks» and «Hide Proofing Marks in Selected Text» if you want your current text to remain un-edited.[2]


Advertisement
-
1
Open a document in Word. You can open a project you’re working on or you can create a new document to change these settings. But any settings you edit will apply every time you open Word. For example, if you set the language to French from a new document, the language will still be in French when you open Word later.
-
2
Click File. You’ll find this in the editing ribbon above the document.[3]
-
3
Click Options. A new window will open.
-
4
Click Language. You’ll see this tab in the left pane. A new window titled, «Set the Office Language Preferences» will open.
-
5
Choose an «editing language.« Remember that changing the language here will also change any language-specific features including dictionaries, grammar checking, and spelling.
- For example, if you type «casa» instead of «case» and your language is set to Spanish, Word won’t suggest it’s incorrectly spelled.
-
6
Click Set as Default to confirm.
-
7
Choose «Display and Help Languages.« This will change the language of any dialogue box that pops up.
-
8
Click OK. The «Set the Office Language Preferences» window will close and your settings will be applied.


Advertisement
-
1
Open a document in Word. You can open a project you’re working on or you can create a new document to change these settings. But any settings you edit will apply every time you open Word. For example, if you set the language to French from a new document, the language will still be in French when you open Word later.
- If you want to change the display and help languages, you’ll have to change your OS language in Apple menu>System Preferences>Language&Region.
-
2
Click Tools. You’ll see this in the menu along the top of your screen.[4]
-
3
Click Language. A new window will pop-up.
-
4
Click to select your language. If you want this to apply to every instance you open Word, click Default. If you don’t set the language as the default, then Word will return to the original language the next time you open it.
-
5
Click OK. You’ll see this in the bottom right of the pop-up window.


Advertisement
Ask a Question
200 characters left
Include your email address to get a message when this question is answered.
Submit
Advertisement
Thanks for submitting a tip for review!
References
About This Article
Article SummaryX
1. Open Word.
2. Tap the edit icon that looks like an «A» and pencil.
3. Tap Home and Review.
4. Tap Proofing and Language.
5. Tap the right-pointing arrow next to the current language.
6. Tap the language you want for your document.
Did this summary help you?
Thanks to all authors for creating a page that has been read 28,616 times.
Is this article up to date?
How to change proofing language in Word
As I already explained to you at the beginning of this guide, there are two scenarios in which it may prove necessary change the language on Word: the first concerns the modification of the language used in the spelling check phase of the documents; the second, on the other hand, involves the translation of the program interface, that is, the menus, options and functions available.
In this section, I will deal with the first option; instead, I will have the opportunity to analyze the second scenario in the next chapter of this tutorial.
Windows
The procedure for change the language of Word’s spell checker for Windows it is very simple: all you have to do, in practice, is to install the additional files specific to the language of your interest and set up Word so that it can use them correctly.
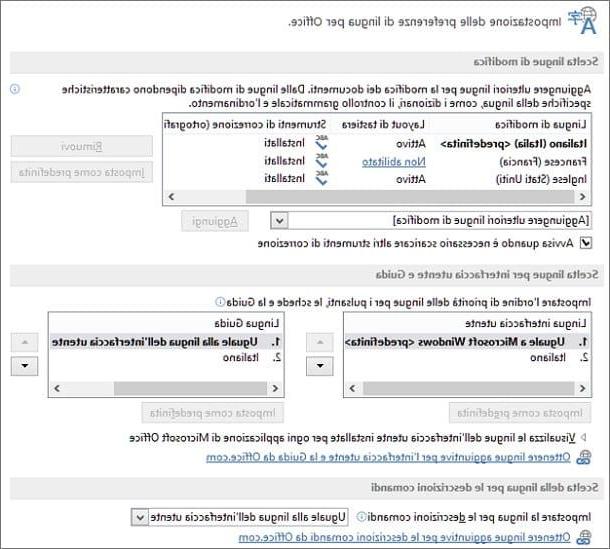
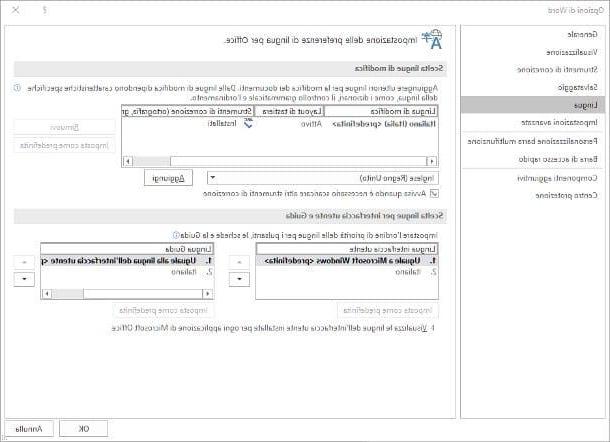
To proceed, start Microsoft Word calling it up from the menu Home Windows (the flag icon located in the lower left corner of the screen), creates a new document or open an existing one and, once you have entered the text entry interface, click on the menu Fillet (top left) and choose the item options from the next screen.
At this point, click on the section Language located in the left part of the window and check if the language of your interest is already present in the appropriate table attached to the box Change language choice: if so, click on it and press the button Set as default placed immediately next to the table.
Otherwise, instead, click on the drop-down menu [Aggiungere ulteriori lingue di modifies], choose the language of your interest from the proposed list (eg. English (United Kingdom)) and the first button Add placed immediately next to it to add it to the list of available languages. Should warnings appear regarding the download of additional files, accept without hesitation.
At this point, to carry out the grammar check (as well as the sorting options and dictionaries) using the newly added language, all you have to do is click on the relevant item and press the button Set as default resident next to the table of editing languages, confirming the willingness to proceed by pressing the button Yes. Finally, for the changes to take effect, you simply need to restart Word.
Note: when you are done, you can reset the correction in cittàn by repeating the same procedure and selecting the item as the default option cittàno (city), present in the list of available languages.
MacOS
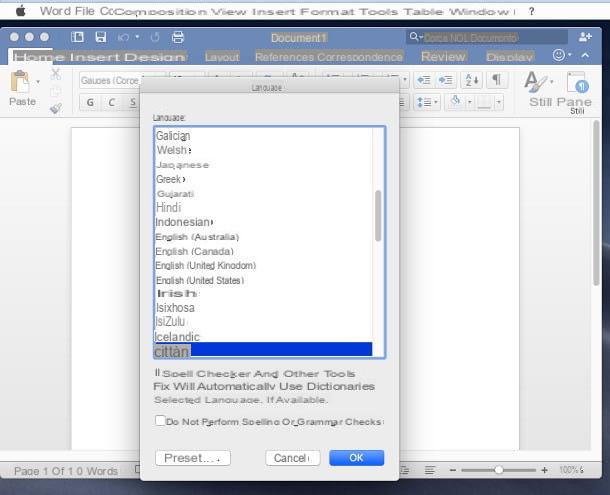
Change the language of Word’s spell checker to MacOS it’s really very, very simple! To do this, start the program by selecting its icon from the Launchpad or by looking for it in Spotlight and go to the menu Tools> Language … (above) to access the menu for choosing the available languages.
At this point, click on language you want to use to spell check the current document and press the button OK to confirm the change. If, on the other hand, you want to make it the default in all documents, click on the buttons Presets … e Yes.
Word Online
If you use Word Online you should know that you can change the language of the spell check using the feature Editor. Therefore, open the link I provided, log in with your Microsoft account and open a document already present in the cloud or create a new one by choosing one of the templates above.
At this point, select the tab revision and press the icon ▼ situata accanto to the pulsating Editor. In the menu that is shown to you, then choose the item Set editing language and select the one you prefer, then confirming with the button OK.
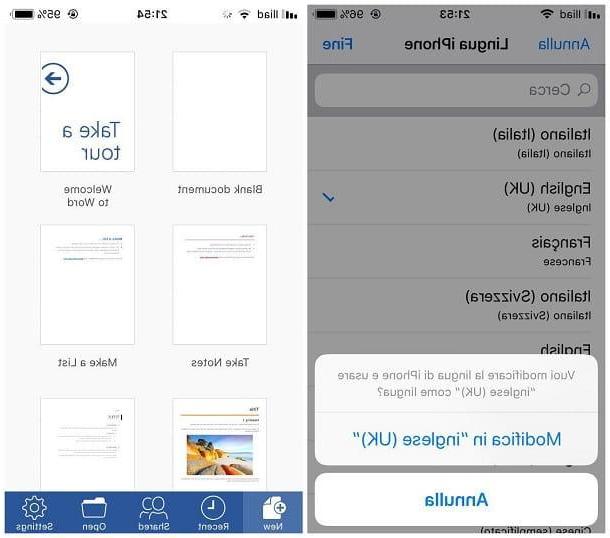
Android / iOS / iPadOS
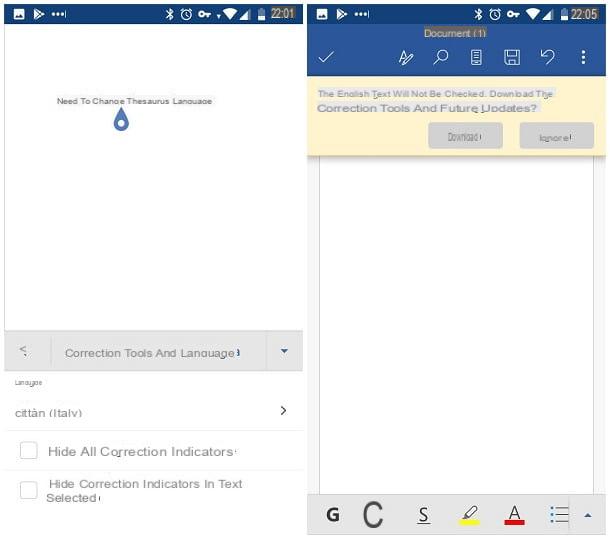
You need to do the grammar check in a different language on Word for Android (also available on alternative stores) or iOS / iPadOS? You can do this extremely quickly, by following a few simple instructions.
First, open the Word, create a new document or open an existing one, tap the button in the shape of upward arrowhead su Android o (…) on iOS, then press on the drop-down menu Home located at the bottom right and move to the section revision.
With that done, tap on the rumors Proofing tools and language> cittàno (or any other language set) to Android, or Proofing Tools> Proofing Language su iOS, and then choose the language of your interest from the list proposed later.
Finally, if you find yourself on Android, press the button several times to return to the previous menu and touch the text area of the open document, until a warning appears about not checking the text in the new language set: touch the freccetta verse il basso corresponding to the aforementioned message and presses the button Download to immediately obtain the files of the language of your interest.
Once the download is complete, the document will be checked again and errors will be highlighted following the dictionary for the language set previously. Up iOSinstead, the language files are downloaded automatically. Easy, right?
Change the Word UI language
After showing you the steps required to change Word’s spell check language, it’s time to figure out how change the language of the program interface (menus, options and, where possible, help files). Below I show you all the steps necessary to perform this operation on Windows, macOS, Android and iOS. Unfortunately, it is not possible to change the interface language in Word Online.
Windows
It is your intention change language on Word to Windows, especially for the user interface (menu, help file, etc.), you must first install the language pack (or Language Accessory Pack) best suited to your case. To proceed, first close all active Word and any Office program windows, saving the currently open files if necessary.
Once this is done, connected to this Internet page, click on the section that best suits the version of Office in your possession (eg. Newer versions, if you have Word 2016 or Word 2019) and choose the language of your interest (eg. English) from the drop-down menu immediately below. Once this is done, click on the link Download (64 bit) if you are using 64-bit Office or on the link Download (32 bit) if, on the other hand, 32-bit Office is installed on your computer.
Once you have obtained the language file (eg. setuplanguagepack.x64.en-us.exe), launch it, press the button Yes and follow the on-screen instructions (typically, you need to press the button several times NEXT and then the button Install) to add the newly downloaded language to all Office programs.
Once the procedure is complete, start Word again by creating a blank document or opening an existing one, brought to the menu Fillet and choose the item options from the proposed panel, then click on the section Language located in the left part of the window that opens on the screen and identifies the section Language choice for user interface and guide.
At this point, to change the localization of the Word menus and options, you have to choose the User interface language from the table on the left by clicking on the option of your interest (eg. English (United Kingdom)) and then on the button Set default placed immediately below; if you need to change the language of help files, repeat the operation with the table on the right.
For the changes to take effect, close Word (and all other Office programs) and open it immediately afterwards; if the changes do not apply, restart your computer.
When you are done, you can go back to the original language (the same as the operating system) by repeating the procedure above, taking care to select the option Same as Microsoft Windows
from the left table and the entry Same as the language of the user interface
from the one on the right. That’s all!
MacOS
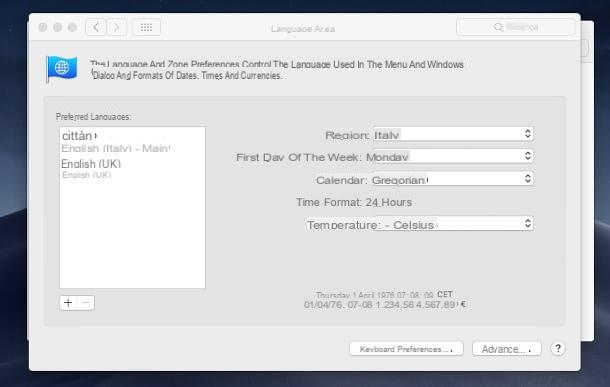
For Macon the other hand, the speech is slightly different, as the Word user interface language automatically adapts to the language used by the operating system. This means, in practice, that for change language on Word you must necessarily change the language of macOS.
How? Very simple: first, access the System preference by clicking on the button in the shape of gear attached to the Dock bar, access the section Language and area and take a look at the section Preferred languages, the one that contains the languages installed on the system. If the location of your interest is present in the list, «grab it» with the mouse and drag it to the top to apply it to the next reboot.
If, on the other hand, you cannot see the language of your interest, click on the button [+] placed immediately below the list in question, select the language of your interest from the proposed box and press the button Add to install it immediately. At this point, move the newly added language to the top of the list of available languages, as I showed you earlier.
Once this operation is complete, close the «System Preferences» window, restart the Mac and, once entered the system, open again WordIf everything went smoothly, the user interface language should be identical to the one in use on the system. When you are done, you can reset the cittàn following the same steps seen a little while ago.
Android
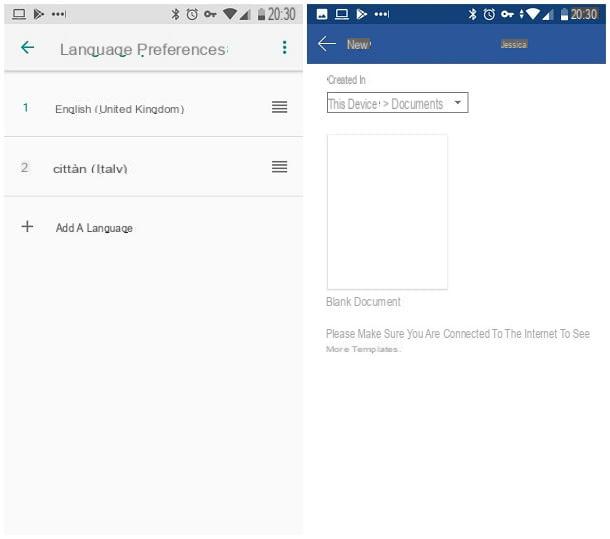
Also regarding Android, the reasoning is similar to that seen for macOS: to change the language of the Word user interface, it is also necessary to change the language of the smartphone or tablet, as all Office programs «inherit» the localization options from the operating system on which they are installed.
To proceed, tap the icon Settings placed in the drawer of your device, tap on the section System and, subsequently, on the rumors Languages and input e Language: at this point, click on the button Add a language, select the language of your interest from the proposed list and move it to the top of it: to do so, press and hold the ☰ icon corresponding to the chosen language and «drag» the entire item to the first position in the list.
After a few seconds, the Android language should change and the language files related to the apps installed should be automatically downloaded: at this point, try to open the Word and verify that the user interface is displayed in the language of your choice.
iOS / iPadOS
Exactly as seen above, to change the user interface language of Word to iPhone / iPad you need to change the display language of the entire operating system.
Doing so is really simple: first, log in to Settings of iOS by touching the homonymous icon located on the Home screen, touch the items Generali e Language and area and, subsequently, access the section IPhone language (o IPad language).
At this point, search for the language of your interest in the list that is displayed on the screen (helping you, if necessary, with the search bar located at the top) and tap on its name to put the check mark on it; when you are done, press the button end located at the top right, touch the item Change to «[chosen language»] and wait a few seconds for the operation to be completed.
Finally, launch the app Word and verify that the user interface language has actually been changed; if not, manually restart your device.
How to change dictation language on Word

In Word you can use the dictation to easily type text by voice. By default the same language set on the operating system is used but you can also decide to change it, so as to allow you to dictate even in a foreign language.
In this regard, my advice is to consult my guide on how to dictate on Word, in which you will find all the useful information about this feature and how to change the language.
How to change keyboard language in Word

Based on the text you are typing in Word, it can be helpful to you change the keyboard layout, in order to reflect the same language as the text you need to write.
Although the default language is the same as that of the operating system, in case you want to add other languages to the keyboard, I suggest you read my tutorial dedicated to the subject.
How to change language in Word