
Excel for Microsoft 365 Word for Microsoft 365 PowerPoint for Microsoft 365 OneNote for Microsoft 365 Publisher for Microsoft 365 Visio Plan 2 Excel for Microsoft 365 for Mac Word for Microsoft 365 for Mac PowerPoint for Microsoft 365 for Mac Word for the web Excel 2021 Word 2021 PowerPoint 2021 Publisher 2021 Visio Professional 2021 Visio Standard 2021 OneNote 2021 Excel 2021 for Mac Word 2021 for Mac PowerPoint 2021 for Mac Excel 2019 Word 2019 PowerPoint 2019 Publisher 2019 Visio Professional 2019 Visio Standard 2019 Excel 2019 for Mac Word 2019 for Mac PowerPoint 2019 for Mac Excel 2016 Word 2016 Outlook 2016 PowerPoint 2016 OneNote 2016 Publisher 2016 Visio Professional 2016 Visio Standard 2016 Excel 2013 Word 2013 Outlook 2013 PowerPoint 2013 OneNote 2013 Publisher 2013 Visio Professional 2013 Visio 2013 Outlook.com Excel 2010 Word 2010 Outlook 2010 PowerPoint 2010 OneNote 2010 Publisher 2010 Visio 2010 Visio Standard 2010 New Outlook for Windows More…Less

The Translate feature is currently available for Word, Excel, OneNote, Outlook, and PowerPoint.
Note: The procedures for Outlook for the web are the same as the procedures for the new Outlook for Windows. Select the Web tab above for those instructions.
Translate an email in Outlook
In Outlook, you can translate words, phrases, and full messages when you need them. You can also set Outlook to automatically translate messages you receive in other languages.
When you receive an email in another language, you’ll see a prompt at the top of the message asking if you’d like Outlook to translate it into your preferred language.
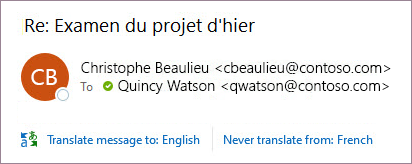
When you receive an email in another language, you can respond in two different ways:
-
In the message, select Translate message. Outlook replaces the message text with translated text.
After you’ve translated the message, you can select Show original to see the message in the original language or Turn on automatic translation to always translate messages to your preferred language.
-
In the message, select Never translate. Outlook won’t ask you if you’d like to translate messages in the future.
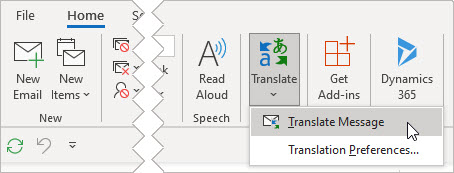
If, for some reason, Outlook doesn’t offer these options, select the Translate button from the ribbon, or right-click on the message and select Translate, then Translate Message.
-
On the Home tab, select Translate > Translate Message.

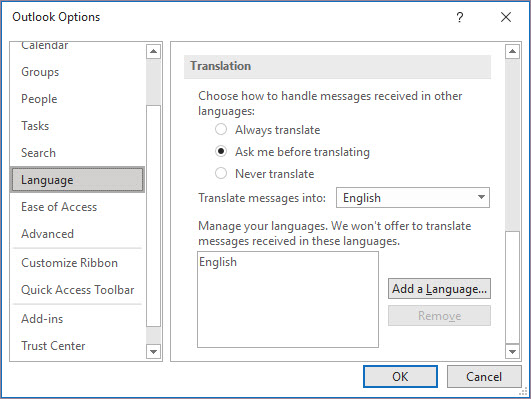
To change your translation preferences, go to Home > Translate > Translation Preferences.

Here you can set your preferred language.
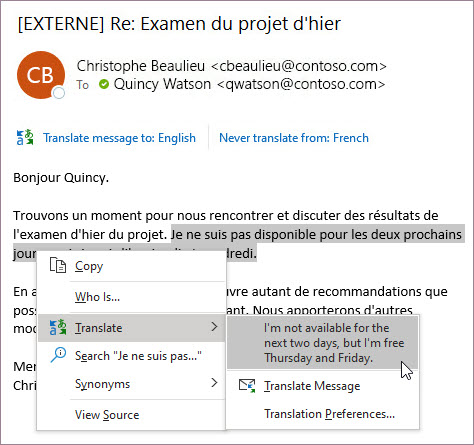
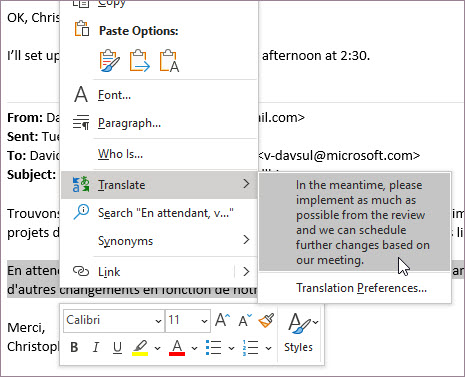
Translate part of an email
To translate just a bit of text from a message, select that text and right-click. Outlook will show you the translation right there in the context menu that appears.
You can also select text and right-click to translate to your preferred language when you’re composing an email. When you click the translated text, you can insert it into the message you’re writing.
To learn more see Announcing new translation features in Outlook.
Note: Automatic translation and intelligent translation suggestions are only available for Exchange Online mailboxes.
Word for Microsoft 365 makes it easy
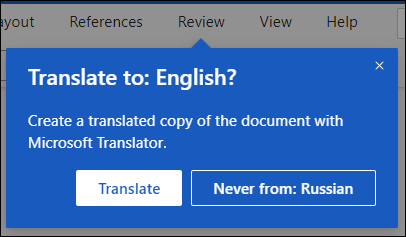
In Word for Microsoft 365 when you open a document in a language other than a language you have installed in Word, Word will intelligently offer to translate the document for you. Click the Translate button and a new, machine-translated, copy of the document will be created for you.

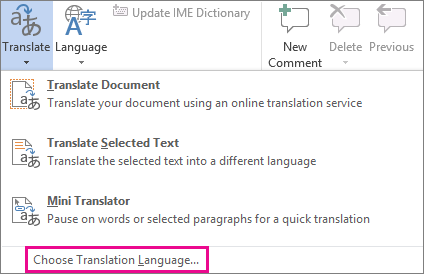
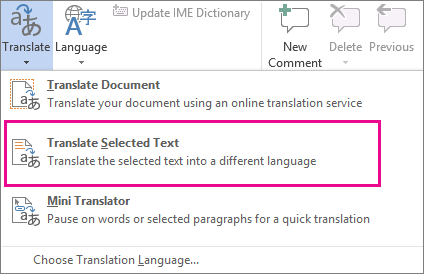
Translate words or phrases in Word, Excel, or PowerPoint
-
In your document, spreadsheet or presentation, highlight the cell or text you want to translate.
-
Select Review > Translate.
-
Select your language to see the translation.
-
Select Insert. The translated text will replace the text you highlighted in step 1.
Note: In Excel, there is no Insert button, you’ll have to copy/paste the text you highlighted in step1.
You might see a list of several translations. Expand the translated item to show a usage example in both languages. Choose the one you want and click Copy.

Available in: 


This feature is available to Microsoft 365 subscribers and Office 2019 customers using Version 1710 or higher of Word; or Version 1803 or higher of PowerPoint or Excel. You must also be connected to the internet, and have Office connected experiences enabled to use Translator.
Subscribers get new features and improvements monthly.
Buy or try Microsoft 365
Not sure what version of Office you’re running? See What version of Office am I using?
This feature is not currently available to customers using Microsoft 365 operated by 21Vianet.
Translate a whole file in Word
-
Select Review > Translate > Translate Document.
-
Select your language to see the translation.
-
Select Translate. A copy of the translated document will be opened in a separate window.
-
Select OK in the original window to close translator.
Available in:
This feature is available to Microsoft 365 subscribers and Office 2019 customers using Version 1710 or higher of Word. You must also be connected to the internet, and have Office connected experiences enabled to use Translator.
Users with Office 2016, but without a subscription, will have the same translation features that are available in Office 2013 and earlier.
Subscribers get new features and improvements monthly.
Not sure what version of Office you’re running? See What version of Office am I using?

Translate words or phrases in OneNote for Windows 10
-
In your notes highlight the text you want to translate.
-
Select View > Translate > Selection.
-
Select your language to see the translation.
-
Select Insert. The translated text will replace the text you highlighted in step 1.
Translate a whole page in OneNote for Windows 10
-
Select View > Translate > Page.
-
Select your language to see the translation.
-
Select Translate. The translated page will be added as a sub-page of the existing page.
-
Select OK in the original window to close translator.
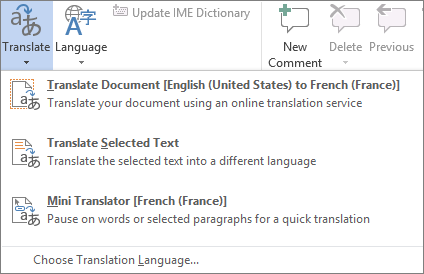
If you later want to change the To language for document translation, or if you need to translate a document to more than one language, you can do so, by selecting Set Document Translation Language…from the Translate menu.

See also
-
Admin considerations for modern translator feature in Office
-
Languages supported by Microsoft Translator
The translation tools available depend on which Office program you’re using:
-
Translate Document/Translate Item: Word, Outlook.
-
Translate Selected Text: Word, Outlook, OneNote, PowerPoint, Publisher, Excel, Visio.
-
Mini Translator: Word, Outlook, PowerPoint, OneNote

You can have an entire Word document or Outlook message translated by a computer («machine translation») and displayed in a web browser. When you choose this kind of translation, the content in your file is sent over the Internet to a service provider.
Note: Machine translation is helpful for conveying the basic subject matter of the content and for confirming whether the content is relevant to you. For high accuracy or sensitive files, human translation is recommended, because machine translation might not preserve the full meaning and tone of the text.
Choose your translation language
-
On the Review tab, in the Language group, click Translate > Choose Translation Language.
-
Under Choose document translation languages click the Translate from and Translate to languages that you want, and then click OK.
Translate the document or message
-
On the Review tab, in the Language group, click Translate.
-
Click Translate Document (Translate Item in Outlook). The From and To languages that you selected are listed.
A browser tab opens with your file in both the original language and the language that you selected for translation.
Note: If this is the first time you have used translation services, you may need to click OK to install the bilingual dictionaries and enable the translation service through the Research pane. You can also see which bilingual dictionaries and machine translation services you have enabled by clicking the Translation options link in the Research pane. See the next section (Translate selected text) to learn how to access the Research pane.
You can use the Research pane to translate a phrase, sentence, or paragraph into several selected language pairs in the following Microsoft Office programs: Excel, OneNote, Outlook, PowerPoint, Publisher, Visio, and Word.
Note: In PowerPoint, only one slide’s text box can be translated at a time.
-
On the Review tab, in the Language group, click Translate > Translate Selected Text to open the Research pane.
Note: In Word, you can right-click anywhere in the document, and then click Translate.
-
In the Research pane, in the All Reference Books list, click Translation.
-
Do one of the following to translate a word or short phrase:
-
Select the words, press ALT, and then click the selection. The results appear in the Research pane under Translation.
-
Type the word or phrase in the Search for box, and then press Enter.
Notes:
-
If this is the first time you have used translation services, click OK to install the bilingual dictionaries and enable the translation service through the Research pane.
-
You can also see which bilingual dictionaries and machine translation services you have enabled by clicking the Translation options link in the Research pane.
-
To change the languages that are used for translation, in the Research pane, under Translation, select the languages that you want to translate from and to. For example, to translate English to French, click English in the From list and French in the To list.
-
To customize which resources are used for translation, click Translation options, and then select the options that you want.
-
-

In Word, Outlook, PowerPoint, and OneNote, the Mini Translator displays the translation of one word as you point at it with your cursor. You can also copy the translated text to the Clipboard, paste it into another document, or play a pronunciation of the translated word.
-
On the Review tab, in the Language group, click Translate > Mini Translator.
-
Point to a word or phrase that you want translated with your mouse. When a faint dialog box appears overlayed in your document, move your mouse over it to see any translations available.
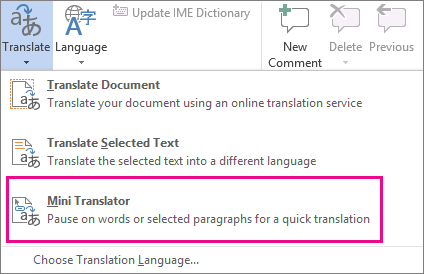
Note: The Mini Translator will continue to appear whenever you move over words. To turn it off, repeat step 1 above.
For more information, see See translations with the Mini Translator.
This feature is only available if you have an Office 365 subscription, or Office 2019 for Mac, and only for Word, Excel, and PowerPoint. For Translator in Outlook see Translator for Outlook for more information.
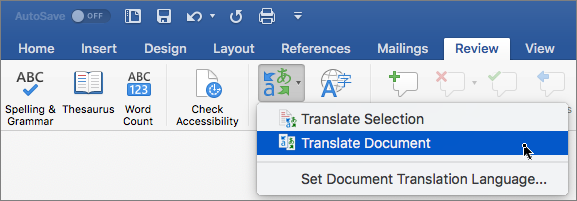
Translate a whole document
-
Select Review > Translate > Translate Document.
-
Select your language to see the translation.
-
Select Translate. A copy of the translated document will be opened in a separate window.
Available in:
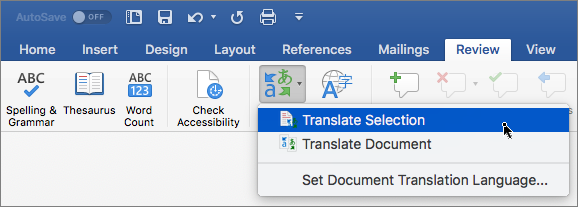
Translate selected text
-
In your document, highlight the text you want to translate.
-
Select Review > Translate > Translate Selection.
-
Select your language to see the translation.
-
Select Insert. The translated text will replace the text you highlighted in step 1.
Note: In Excel, there is no Insert button, you’ll have to copy/paste the text you highlighted in step1.
Available in:
Translate a whole document
Word for the web makes it easy to translate an entire document. When you open a document that is in a language other than your default language, Word for the web will automatically offer to create a machine-translated copy for you.
If you’d prefer to initiate the translation manually, you can still do that with these steps:
-
Select Review > Translate > Translate Document.
-
Select your language to see the translation.
-
Select Translate. A copy of the translated document will be opened in a separate window.
Available in:
Translate selected text
-
In your document, highlight the text you want to translate.
-
Select Review > Translate > Translate Selection.
-
Select your language to see the translation.
-
Select Insert. The translated text will replace the text you highlighted in step 1.
Available in:
Translate an email
-
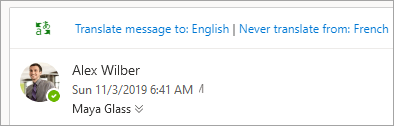
When you receive an email in another language, a prompt will appear at the top of the message asking if you’d like Outlook to translate it into your default language.
-
If you select Translate message, Outlook will replace the message text with translated text.
You can then select Show original message to see the message in the original language or Turn on automatic translation to always translate messages in another language.
-
If you select Never translate, Outlook won’t ask you if you’d like to translate messages in that language in the future.
-
You can change your translation preferences and choose your translation language by going to Settings
> View all Outlook settings > Mail > Message handling.Available in:
 > View all Outlook settings > Mail > Message handling.
More information
-
Microsoft Translator languages
-
Right-to-left languages
-
Language Accessory Pack for Office
-
Change the language Office uses in its menus and proofing tools
-
Enable or change the keyboard layout language
-
Check spelling and grammar in a different language
Need more help?
Want more options?
Explore subscription benefits, browse training courses, learn how to secure your device, and more.
Communities help you ask and answer questions, give feedback, and hear from experts with rich knowledge.
Need to write or read in a different language? Follow these tips
Updated on October 15, 2022
What to Know
- In Windows: Choose the desired Display and Help Languages in File > Options > Word Options > Language.
- Then, select Choose Editing Options in the same section to change the editing language.
- All but the proofing language in Office for Mac are the same as those for the operating system. To change it in Word: Tools > Language.
This article explains how to change display and/or editing languages in Word for Office 365, Word 2019, Word 2016, Word 2013, Word 2010, Word Online, and Word for Mac. In Windows—but not in macOS—you can choose them independently of the language installed for your operating system.
How to Change the Display Language
The display language in Word governs the ribbon, buttons, tabs, and other controls. To force a display language in Word that’s different from that of your operating system:
-
Select File > Options.
-
In the Word Options dialog box, select Language.
-
In the Choose Display Language section, choose the Display Language and Help Language you want to use. Languages installed in Windows 10 are listed.
-
If a specific language is not listed, select Get more display and help languages from Office.com. If necessary, install a Language Accessory Pack, then close and re-launch Word. You may need to reboot your computer, as well. After a language pack loads, go to the Word Options menu and choose that pack in the Display Language and Help Language lists.
-
Select Set as Default for both the Display Language and the Help Language lists.
-
Select OK to save your changes.
How to Change the Editing Language in Word
The editing language—which governs spelling, grammar, and word sorting—can be changed in the Word Options screen. Go to the Choose Editing Languages section, and select a language from the list. If the language isn’t listed, select the Add additional editing languages drop-down arrow and choose a language.
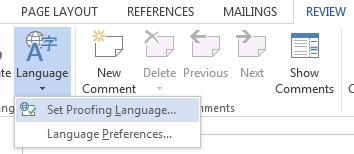
To proofread in the selected language, highlight the text, then go to the Review tab and select Language > Set proofing language. Choose a language from the list. Word will consider the highlighted selection to be the non-default, selected language and will check the spelling and grammar accordingly.
How to Change Language in Word Online
Language options for Office Online are similar to those in desktop versions of Office. In Office Online, highlight the text for proofing in the non-default language. Select Review > Spelling and Grammar > Set Proofing Language, then choose your alternative language. All proofing in that selected block will be governed by the rules of the alternative language.
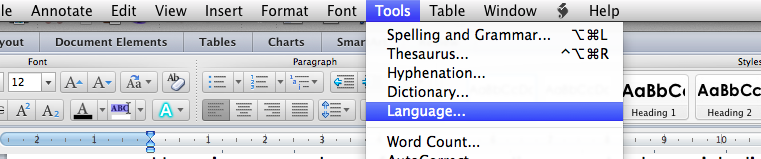
How to Change Language in Word for Mac
The display and keyboard layout languages used in Office for Mac are the same as the ones for the operating system. You cannot use separate languages for the OS and Office applications. However, you can specify a different proofing language for Office for Mac.
To change the proofing language in Office for Mac, select Tools > Language in Word or another Office application. To change the proofing language for new documents, select Default.
If you select OK instead of Default, the proofing language you chose will only apply to the current file.
Normally, Word defaults to the language of the operating system. As a rule, you should use Windows to install language files rather than rely on an application like Word to do it for you.
FAQ
-
How do you delete a page in Word?
To delete a page in Word, select View, then go to the Show section and select Navigation Pane. In the left pane, select Pages, choose the page you want to delete and tap the delete or backspace key.
-
How do I check the word count in Word?
To check the word count in Microsoft Word, look at the status bar. If you don’t see the number of words, right-click the status bar and choose Word Count.
-
How do I insert a signature in Word?
To insert a signature in Microsoft Word, scan and insert a signature image into a new Word document and type your information beneath the signature. Then, select the signature block and go to Insert > Quick Parts > Save Selection to Quick Part Gallery. Name the signature > AutoText > OK.
Thanks for letting us know!
Get the Latest Tech News Delivered Every Day
Subscribe
If you are writing an essay at a UK university, chances are you will have to write in British English. Likewise, if you’re in the UK and writing for an international audience, you should make sure to adapt your language use accordingly.
Most word processors, including Microsoft Word, are automatically set to US spelling. This is fine if you’re writing for an American (or even international) audience. But otherwise you might need to make a change. In this post, we explain how to change the language of a document in Microsoft Word.
Step One
Select all of the text in your document. To do this quickly, use ‘Ctrl + A’ (or ‘command + A’ on Mac). If you want to use different language settings in different parts of the document, simply selected the text you want to modify.
Step Two
On a Windows PC, go to the ‘Review’ tab, click ‘Language’ and select ‘Set Proofing Language’.
 On a Mac, go to ‘Tools-Language’.
Alternatively, you can click on the ‘Language’ setting at the bottom of the screen.
Find this useful?
Subscribe to our newsletter and get writing tips from our editors straight to your inbox.
![]() This will open a new dialogue box.
This will open a new dialogue box.
Step Three
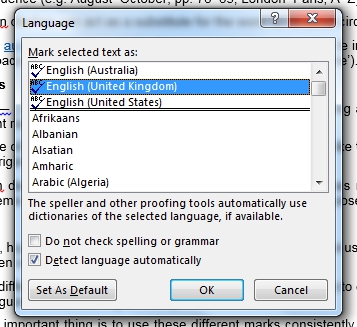
In the window that opens, choose your preferred language from the list. Click ‘OK’ to change the proofing language of the selected text.
 Step Four
If you usually use this language for your documents, click ‘Set As Default’. And that’s it! Good luck!
![]()
Download Article
![]()
Download Article
This wikiHow will show you how to change the language in Word. You can easily change the editing, display, and priority languages on a Windows computer, but if you have a Mac, Android, or iOS device, you cannot set Word to a language other than what your OS uses. However, you can specify a different editing language on these devices.
-
1
Open Word. This document icon looks like two pieces of paper, one with a bunch of lines and one with a large «W.» You can find this app on your Home screen, in the app drawer, or by searching.
-
2
Tap the icon that looks like a pencil and an «A» at the top of your screen. This will open the editing menu.
Advertisement
-
3
Tap Home. You’ll see a list of options.
-
4
Tap Review. The menu options to the right will change.[1]
-
5
Tap Proofing and Language. The options in the menu will change again.
-
6
Tap the right-pointing arrow
next to the current language. You’ll see a list of languages.
-
7
Tap the language you want for your document. You’ll be redirected back to the previous menu.
- You can tap to select boxes next to «Hide All Proofing Marks» and «Hide Proofing Marks in Selected Text» if you want your current text to remain un-edited.[2]
- You can tap to select boxes next to «Hide All Proofing Marks» and «Hide Proofing Marks in Selected Text» if you want your current text to remain un-edited.[2]


Advertisement
-
1
Open a document in Word. You can open a project you’re working on or you can create a new document to change these settings. But any settings you edit will apply every time you open Word. For example, if you set the language to French from a new document, the language will still be in French when you open Word later.
-
2
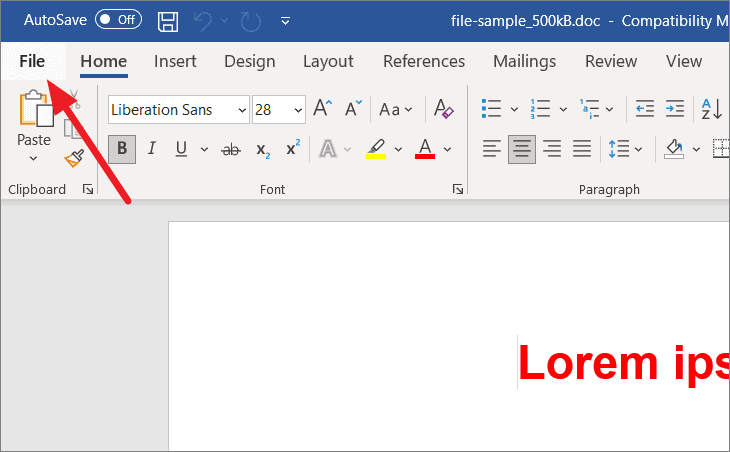
Click File. You’ll find this in the editing ribbon above the document.[3]
-
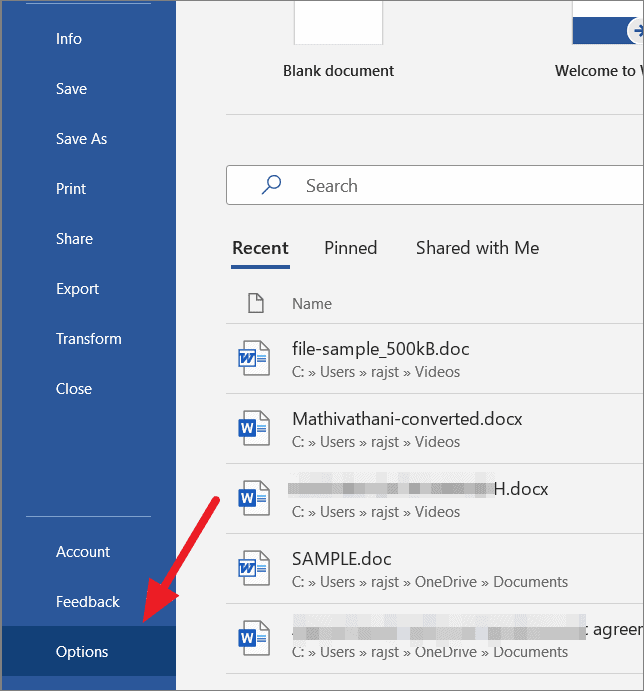
3
Click Options. A new window will open.
-
4
Click Language. You’ll see this tab in the left pane. A new window titled, «Set the Office Language Preferences» will open.
-
5
Choose an «editing language.« Remember that changing the language here will also change any language-specific features including dictionaries, grammar checking, and spelling.
- For example, if you type «casa» instead of «case» and your language is set to Spanish, Word won’t suggest it’s incorrectly spelled.
-
6
Click Set as Default to confirm.
-
7
Choose «Display and Help Languages.« This will change the language of any dialogue box that pops up.
-
8
Click OK. The «Set the Office Language Preferences» window will close and your settings will be applied.


Advertisement
-
1
Open a document in Word. You can open a project you’re working on or you can create a new document to change these settings. But any settings you edit will apply every time you open Word. For example, if you set the language to French from a new document, the language will still be in French when you open Word later.
- If you want to change the display and help languages, you’ll have to change your OS language in Apple menu>System Preferences>Language&Region.
-
2
Click Tools. You’ll see this in the menu along the top of your screen.[4]
-
3
Click Language. A new window will pop-up.
-
4
Click to select your language. If you want this to apply to every instance you open Word, click Default. If you don’t set the language as the default, then Word will return to the original language the next time you open it.
-
5
Click OK. You’ll see this in the bottom right of the pop-up window.


Advertisement
Ask a Question
200 characters left
Include your email address to get a message when this question is answered.
Submit
Advertisement
Thanks for submitting a tip for review!
References
About This Article
Article SummaryX
1. Open Word.
2. Tap the edit icon that looks like an «A» and pencil.
3. Tap Home and Review.
4. Tap Proofing and Language.
5. Tap the right-pointing arrow next to the current language.
6. Tap the language you want for your document.
Did this summary help you?
Thanks to all authors for creating a page that has been read 28,616 times.
Is this article up to date?
Microsoft Word is one of the most popular and widely used programs for documentation purposes around the world. If you hail from a non-English speaking country, then you may want to use MS Word in your own language or any other language of your choice.
Sometimes, you may want to access accent marks or include special characters from a different language in your writing – this would require you to change the MS Word language itself. Fortunately, Microsoft Word allows you to change the editing language, proofing tools, and the user interface language (display language) and set a different display language while applying another language in editing and proofing documents.
In this article, we’ll show you how to change the display language as well as the editing and proofing language in Microsoft Word. Throughout the post, we’ll be using Microsoft 365 but most of the options are similar to the offline versions (2019, 2016, 2013, or 2010) and Office 365. So irrespective of the version you’re using, this article can surely help change or switch up the language(s) on your Microsoft Word.
Changing the Display and Help Languages
When you install Microsoft Office, it usually has English as its default language or the local/regional language of the location that powered the MS Word purchase. If you want to change this language(s) to any other, you would have to manually install it/them first.
A display language is the one that’s visible on all tabs, menus, buttons, preferences, dialog boxes and other controls on your Word application. If you want to use a different language instead of the default, follow these steps:
Open Microsoft Word and click the ‘File’ tab.
In the backstage view, click ‘Options’.
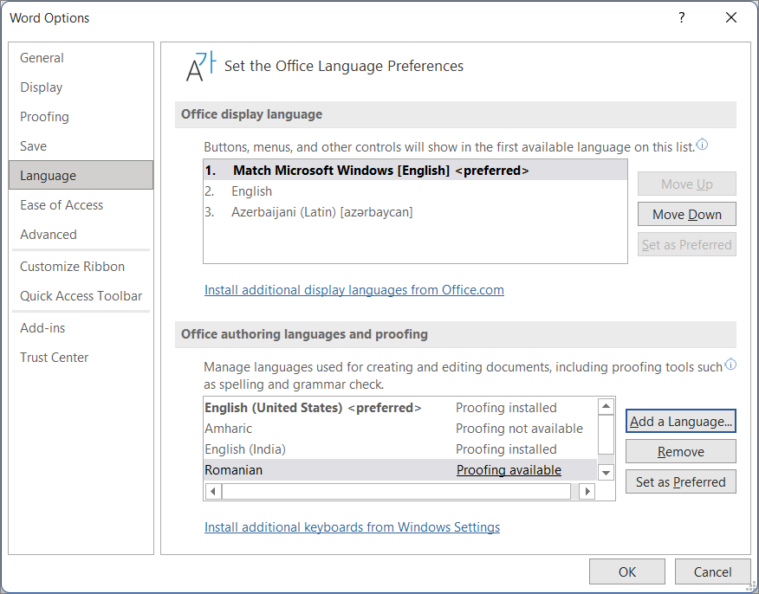
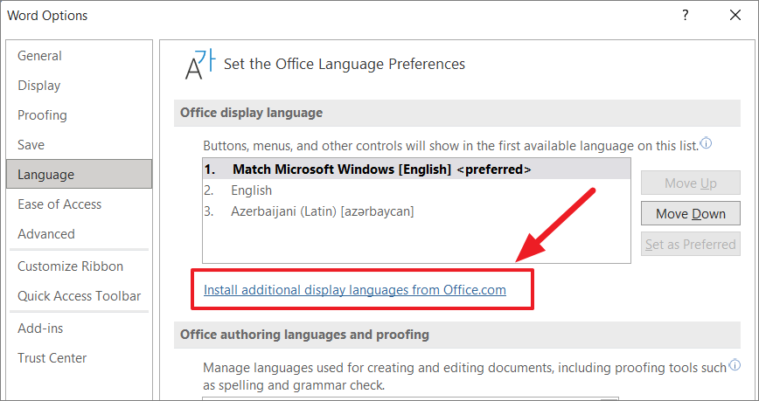
A Word Options dialog window will appear. Here, select the ‘Language’ tab. In the Language tab, you will see two sections – ‘Office display language’ and ‘Office authoring languages and proofing’.
If you are using Office 2019, 2016, 2013, or 2010, you will see ‘Choose Editing Languages’ and ‘Choose Display Languages’

‘Office display language’ or ‘Choose Display Languages’ section is where you can set the MS Word display (UI) language. You’ll see a list of installed languages under this section. If the language you’re looking for is not in the box, you would have to manually download and install that particular language pack.
Adding Language Packs on Office
If a specific language is not listed here, click the ‘Install additional display languages from Office.com’ link below the box (as shown below).
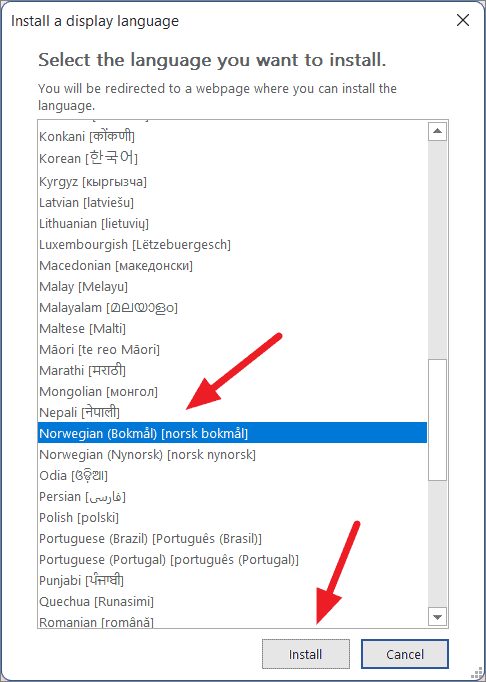
This will show you a ‘Install a display language’ dialog. Here, choose your language and click ‘Install’.
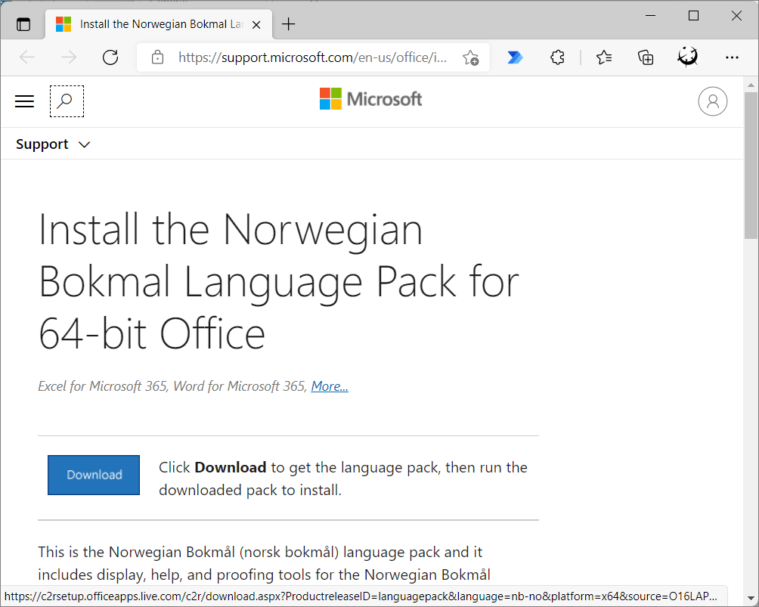
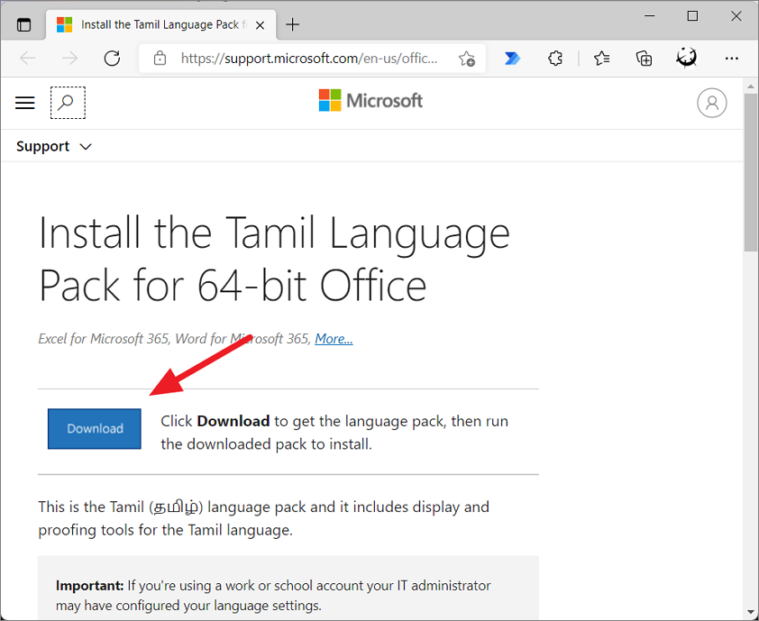
This will take you to the Microsoft website where you can download the language pack for the selected language as shown below. Here, click the ‘Download’ button.
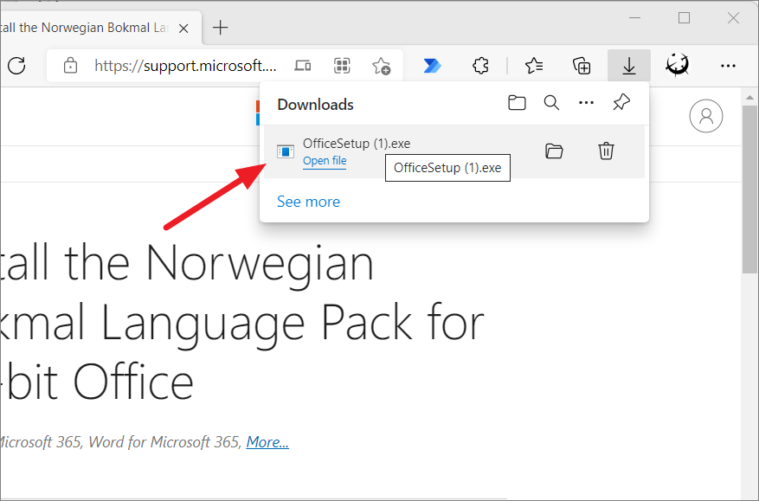
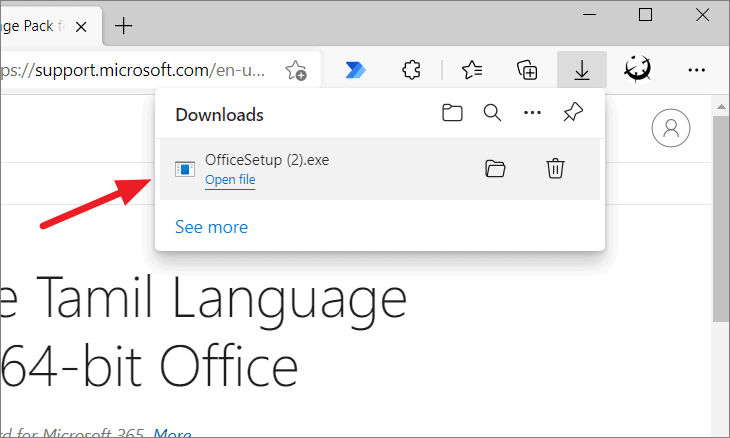
Run the downloaded setup file to install it.
Wait for the installation to complete, then close and re-launch Word. Sometimes, you may need to reboot your computer for smoother functioning.

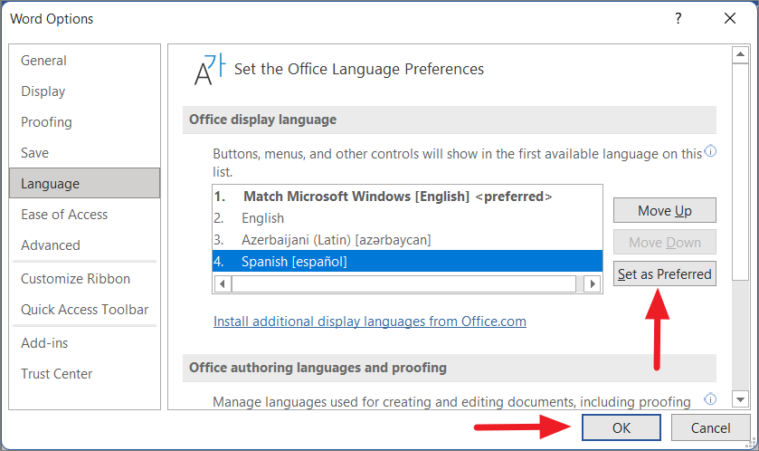
Then, open the MS Word app again and go to File > Options > Language. As you can see, the ‘Office display language’ box lists the installed language. Now, select your desired language and click the ‘Set as Preferred’ or ‘Set as Default’ option (for Office 2019 and older versions).
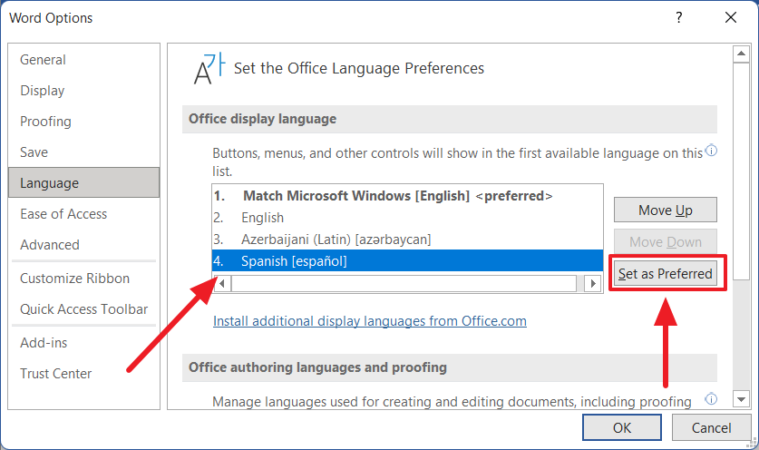
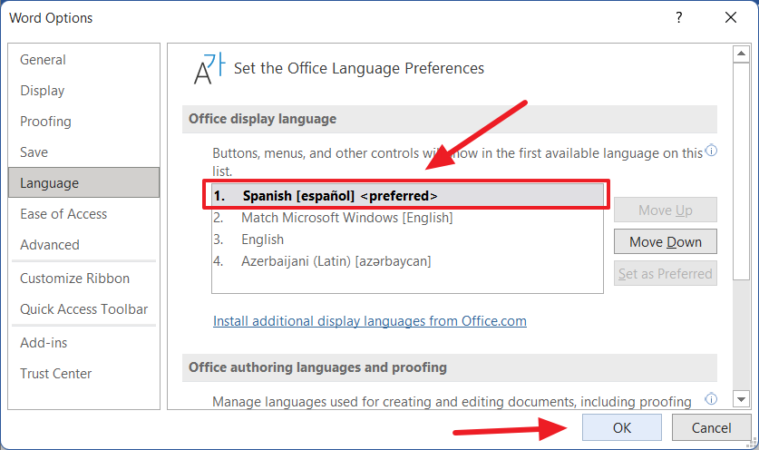
After you select the ‘Set as preferred’ or ‘Set as Default’ button, your selected language should show ‘<preferred>’ at the end as shown below. Then, click ‘OK’.
Adding Language Packs from Office Webpage
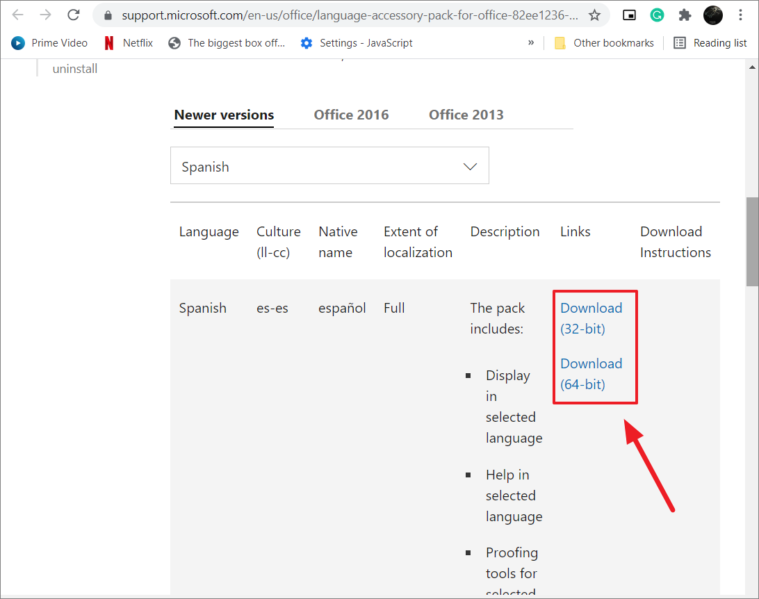
Alternatively, you can directly visit the MS Office’s Language pack for Office page, where you can download the language you wish to use. Microsoft Office offers over 100 additional language accessory packs which you can download and install for free.
Once you’re on Office’s language accessory pack webpage, scroll to see a section called ‘Step 1: Install the language accessory pack’. Under this section, select your Office version tab.
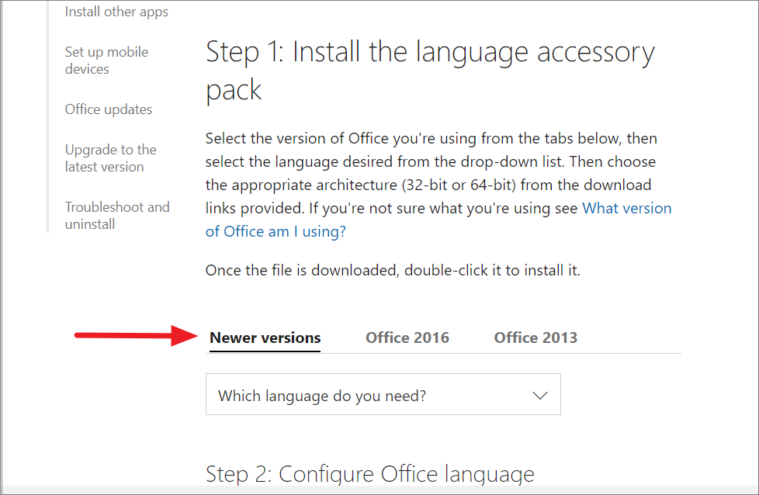
Then, choose your language from the ‘Which language do you need?’ drop-down.
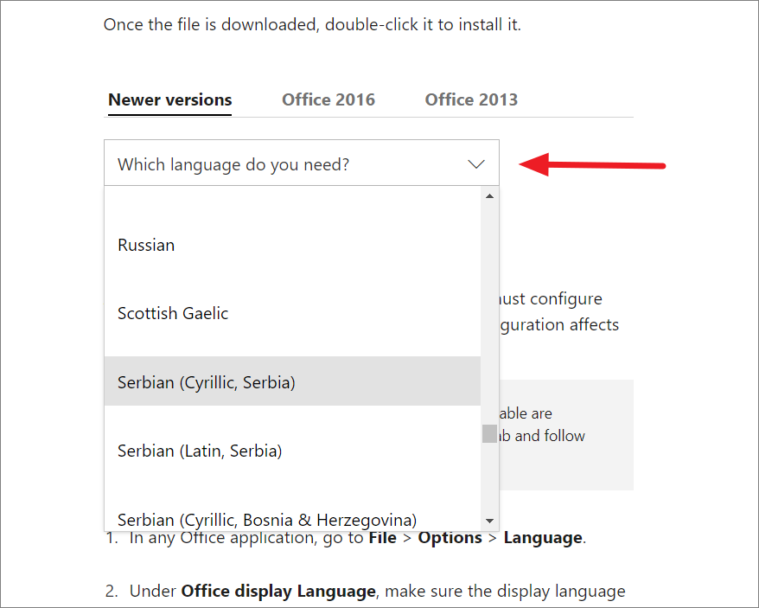
Once you select the language, you’ll notice the ’32-bit’ and ’64-bit’ download links. If your operating system is of 32-bit architecture, click ‘Download (32-bit)’. Or if your system uses 64-bit OS, then, select the ‘Download (64)’ bit.
After the file is downloaded, install the setup file, close, and re-open the Word app. Then, go to the Word Options menu, choose the language pack you installed under the ‘Office display language’ box and select ‘Set as Preferred or ‘Set as default’. Then, click ‘OK’.
Restart Word and you’ll see that the UI language is changed for MS Word.
Changing the Editing and Proofing Language
The editing/authoring language is the language in which you write and edit documents. This language also controls the text direction and arrangement for vertical, right-to-left, and mixed text. The Proofing tool checks for spelling and grammatical errors. If the editing/input and proofing language is already installed on your computer, you can easily change it. If not, you need to first manually install the language and then change it.
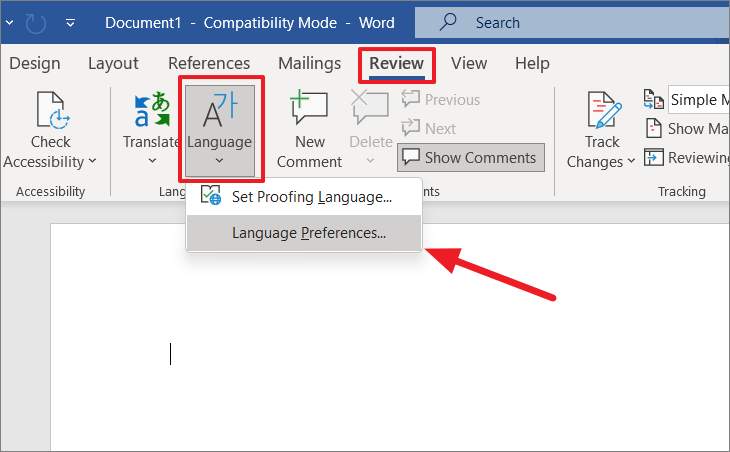
Open the Word application, click the ‘File’ tab and select ‘Options’ to open Word Options. You can also open the Word Options window by switching to the ‘Review’ tab in the Ribbon and clicking the ‘Language’ button and then selecting the ‘Language Preference’ option.
In the Word Options, select the ‘Language’ tab. You’ll see the ‘Office authoring languages and proofing’ or ‘Choose Editing language’ section where you can add and set the language for editing. When you install MS Word, the app will automatically be configured to use the default system language.
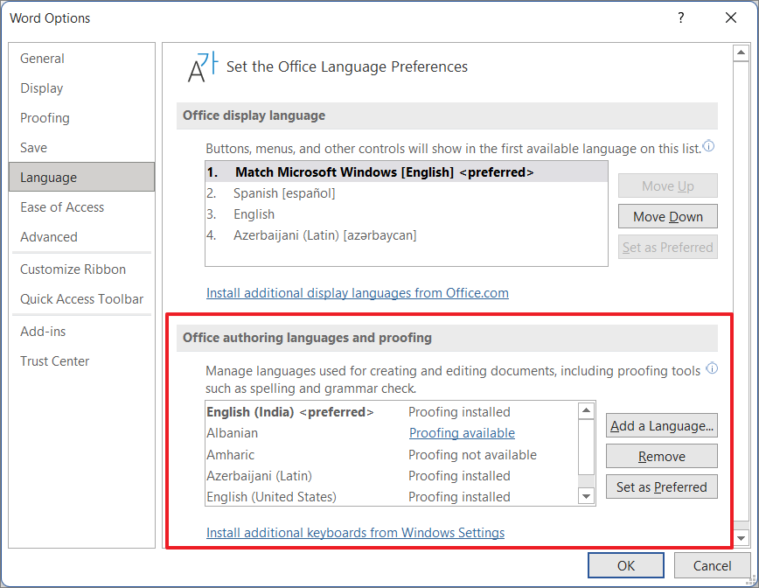
The ‘Office authoring languages and proofing’ box lists all installed system and Office languages. If the language you want to change is on the list, select the language and click ‘Set as Preferred’ or ‘Set as Default’.

Installing Additional Input Languages for Word
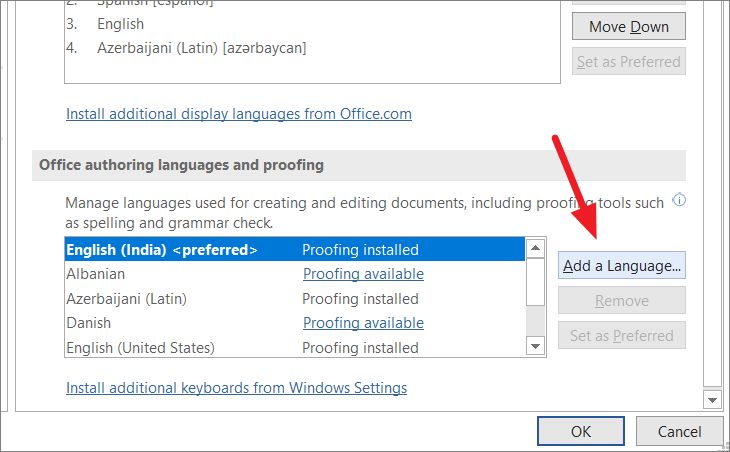
Follow these installation steps if a specific language is on the ‘Office authoring languages and proofing’ box.
To add an authoring language, click the ‘Add a Language..’ button.
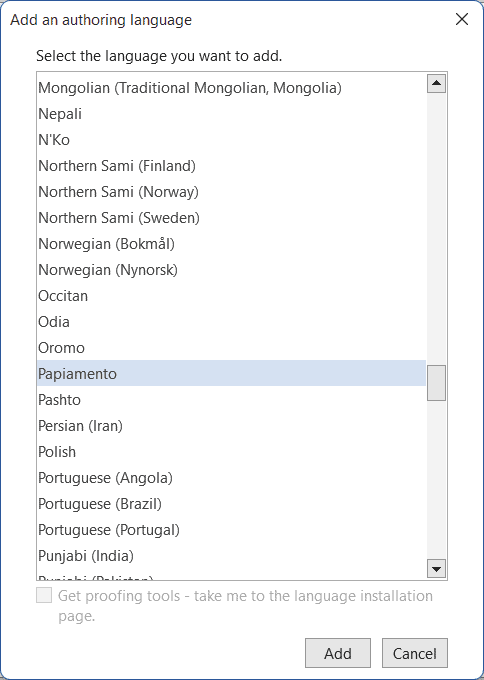
Select the language you want to add and click ‘Add’.
Most of the time, even if you add the language, you still have to manually install the language or additional proofing tools on your Windows OS.
To install additional input/editing language on your computer, click the ‘Install additional keyboards from Windows Settings’ link below the Office authoring languages and proofing box.
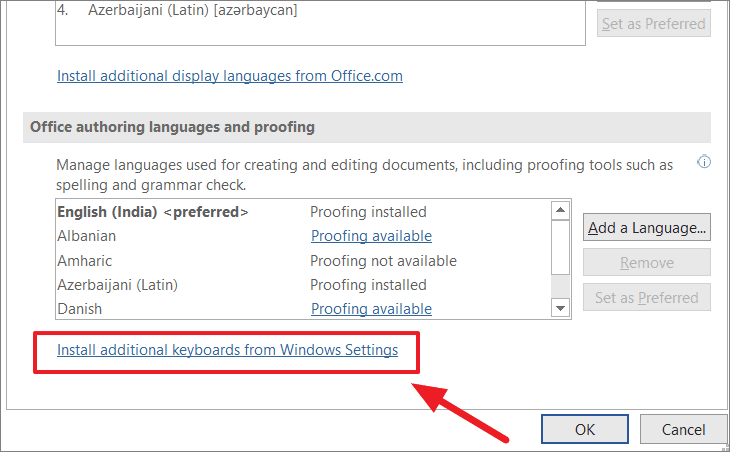
This will open the Windows Settings page where you can install languages on your system. Click the ‘Add a language’ button (if you have Windows 10 or 11).
In the ‘Choose a language to install’ dialog box, choose a language and select ‘Next’.
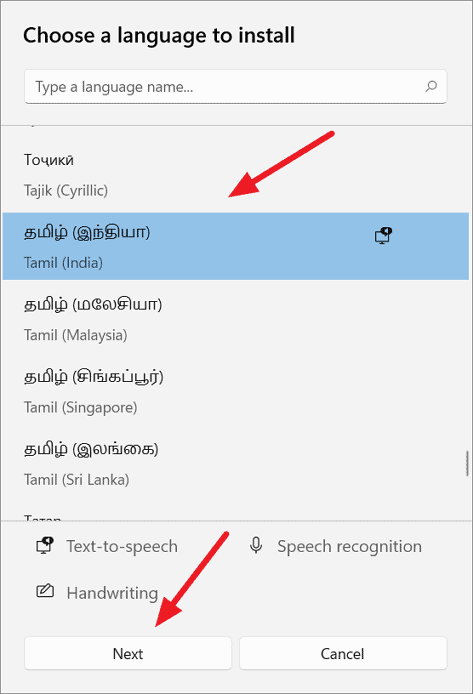
On the next page, select ‘Install’.

Once done, you’ll see the installed language in the list of languages.

Usually, when you type on your computer, the system will use the default input language (first in this list) to input characters. So, you should change the input language to the recently installed language to actively use the latter. You can do this via the settings application or from the taskbar.
Via Settings App
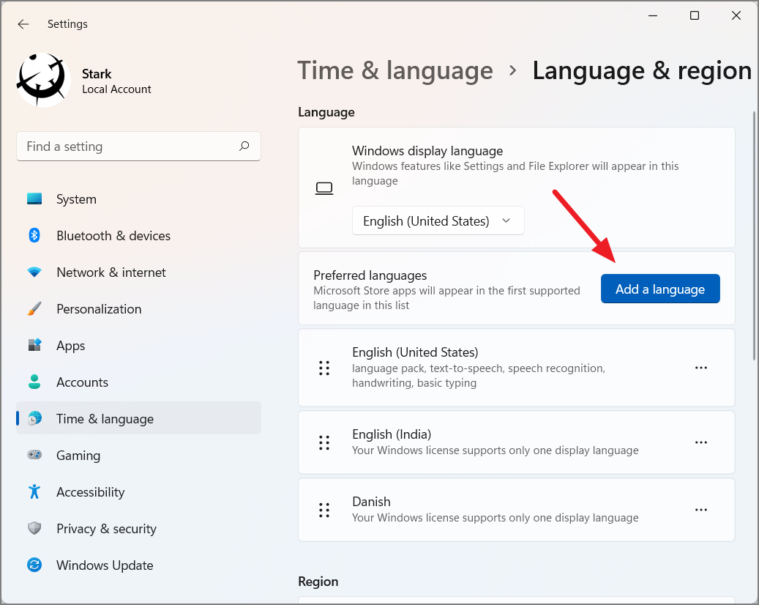
To change the input keyboard layout, select the ‘Time & language’ settings, and click the ‘Typing’ option.
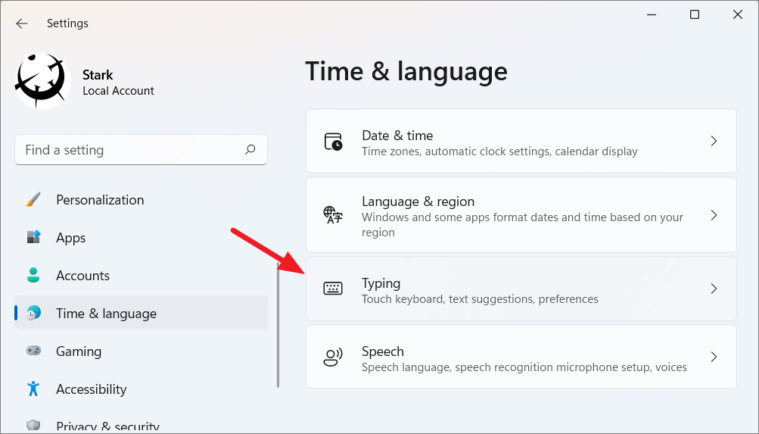
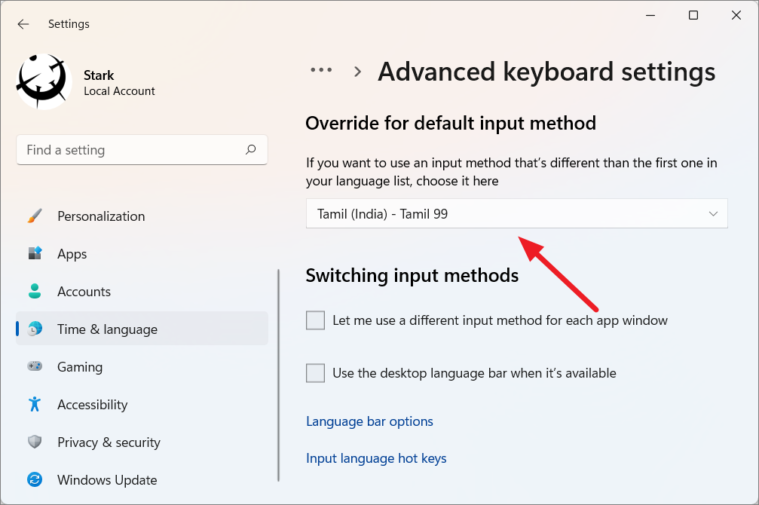
Then, select ‘Advanced keyboard settings’.

Now, choose your input method to use as a default.
Via Taskbar
OR, you can easily switch between the input method from the taskbar.
After you installed the language, go back to File > Options > Language. In the Word Options, you’ll notice the installed language in the ‘Office authoring and proofing language’ box.
To remove an editing language, first, select the language and then hit ‘Remove’.
Installing Proofing Tools
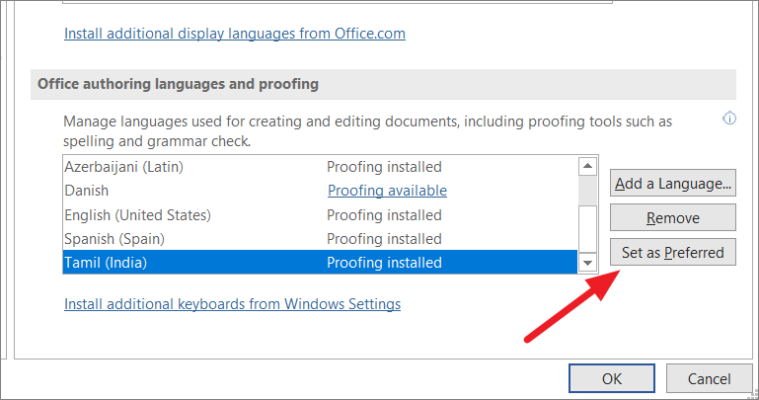
Sometimes, proofing tools may not be installed on Office even after installing the input language. If you’re using Microsoft 365, you would see three proofing tool statuses next to each language, namely – ‘Proofing available, Proofing not available, Proofing installed’. For other Office suites (like Office 2019, 2016, etc.), the status will be shown as ‘Enabled’ or ‘Not enabled’ under the Keyboard layout column.
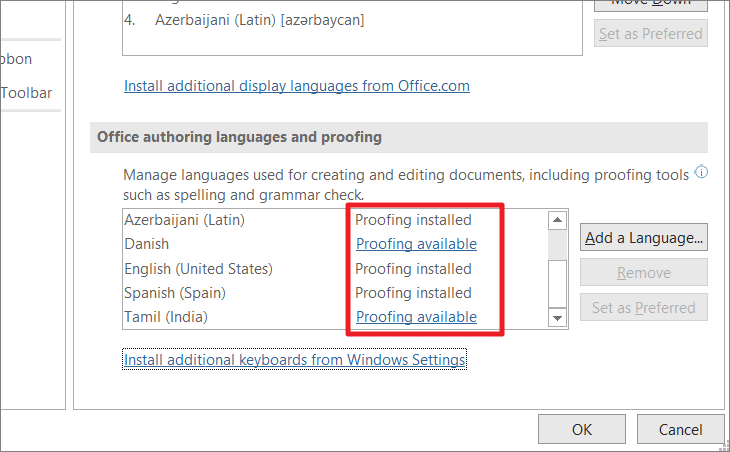
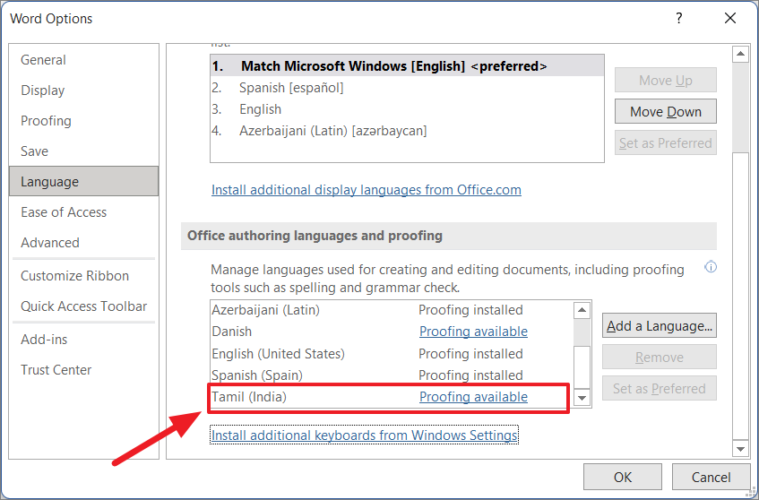
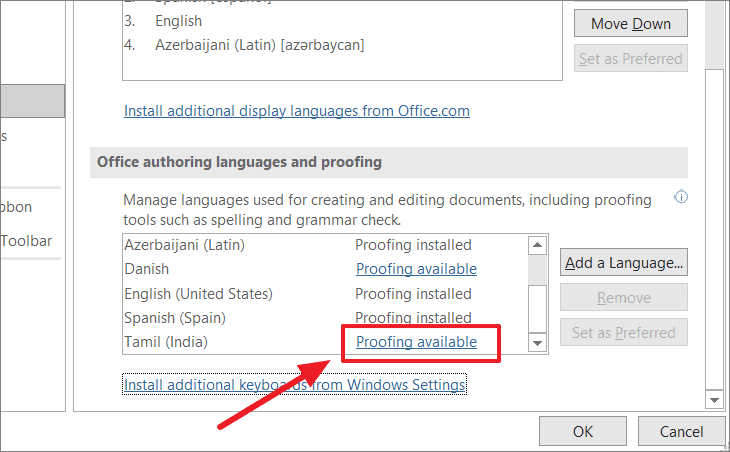
‘Proofing not available’ means the proofing tools are not available for that particular language. ‘Proofing available’ suggests you download and install the language pack with proofing tools for that language. And ‘Proofing installed’ means the proofing tools are installed for that specific language and you are free to use them.
If Proofing tools are available but not installed, click the ‘Proofing available’ link next to the language you want to use to download the language pack.
This will direct you to the Language pack download page on the Microsoft Office website. Here, click the ‘Download’ button.
After the download is complete, install the ‘OfficeSetup.exe’ file, wait for the installation to complete, then close and re-launch the Word app.
After re-launching the app, go to Word Options. You’ll now see ‘Proofing installed’ next to the chosen language. Now, select the language and click ‘Set as Preferred’.
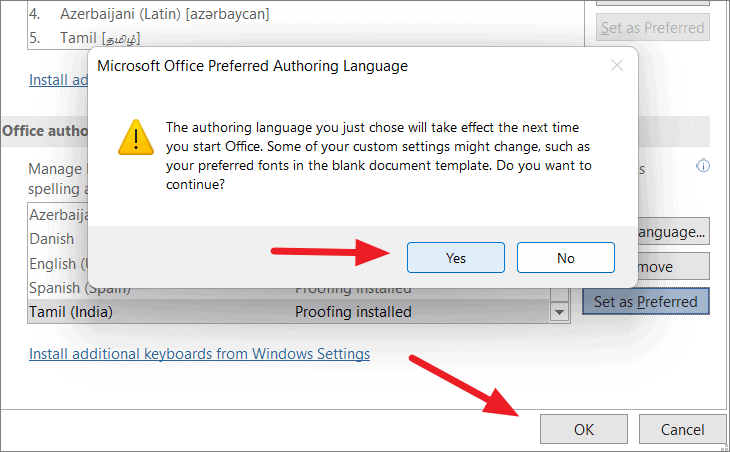
Word will show you a warning message to let you know that the authoring language you just chose will take effect the next time you launch Office. It also warns you of changes that may occur to custom settings (like your preferred default font). If you want to continue, click ‘Yes’. Then, click ‘OK’ to close the Word Options.
Now, restart your Microsoft Word, again, to change the editing and proofing language.
Once the Word editing language is changed, you would have to change your keyboard layout to type text in the changed language. Usually, the keyboard layout language matches the characters of a different language as the keys on your keyboard would automatically translate to the chosen different language on your screen. Essentially, the keyboard layout language controls and changes display characters when manually typed.
Switching Between Keyboard Layouts
When you install a new language on your OS, it comes with a keyboard for language-specific key layouts and input options. After you install more than one keyboard layout for different languages, you can easily switch between those keyboard languages using the language bar.
When you change/switch the keyboard language, the keyboard layout shifts to the keyboard for that particular language. For instance, if you are writing something in English and if you want to include content in a different language, you can quickly switch between keyboard layouts to write in different languages.
Here’s what you need to do to change the keyboard layout to a different language.
When you have more than one layout installed, the Language bar (language abbreviation) automatically appears in the ‘System Tray’ or ‘Notification Area’. To change the keyboard layout, click the language icon (ENG stands for English keyboard) and select the language you want to use from the list of available keyboards.
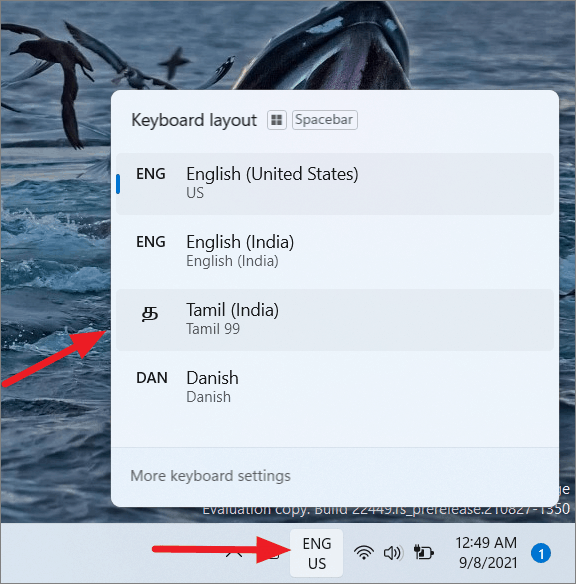
If you have Windows 10 or 11, you can press Windows+Spacebar to switch layouts. The language abbreviation represents the active keyboard layout of the system.
Now, you can easily write and edit Word documents using a different language.
Proofreading in Different Languages
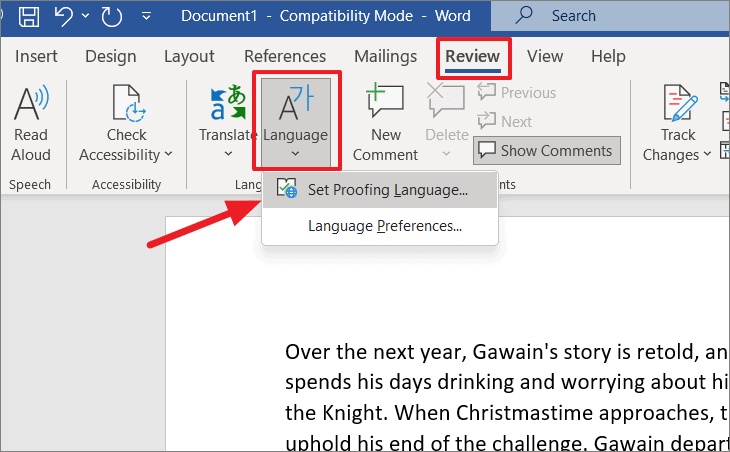
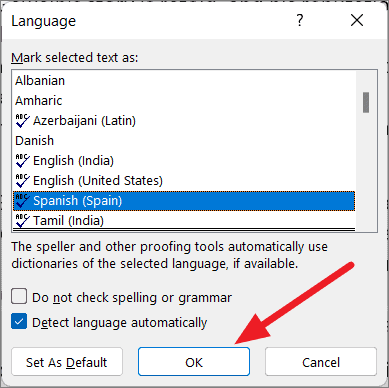
MS Word also allows you to write or edit in one language and proofread text in another. To proofread in a different language, go to the ‘Review’ tab, select ‘Language’, and click the ‘Set Proofing Languages..’ option.
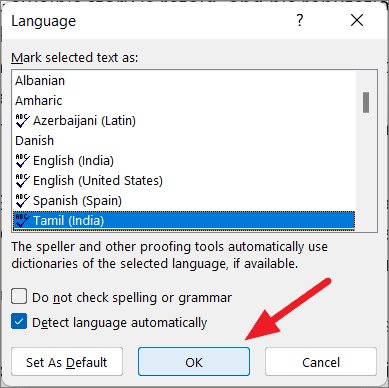
Then, select the language from the Language dialog box and click ‘OK’. Here, you also have options to ignore spelling/grammar errors, detect language automatically or set the default language.
For instance, if you want to include a word or phrase in a different language without showing grammatical errors, you should only change the proofing language for the particular word or phrase.
To do this, first, select the word or phrase, then go to the ‘Review’ tab, select ‘Language’ and click the ‘Set Proofing Languages..’ option. Then, choose a language from the list and click ‘OK’. Word will ignore spelling and grammar on the highlighted selection.
That’s it, folks! You can now easily change both the display and editing and proofreading languages on your MS Word to any language(s) of your choice.