
-
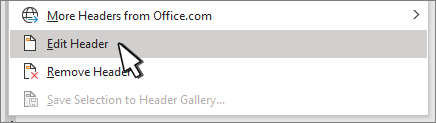
Double-click the header or footer you want to edit, or select Header or Footer, and then select Edit Header or Edit Footer.

-
Add or change text for the header or footer or do any of the following:
-
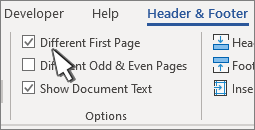
To remove the first page header or footer Select Different First Page.
-
To add a page number Click or tap where you want the number, select Page Number and choose a style. You may need to edit for better formatting. For more info, see Add page numbers to a header or footer in Word.
-
To change the font, color or size Select the text to change then go to Home and choose the options you want from the Font section.
-
To add an image to a header or footer See Add images to a header or footer.
-
-
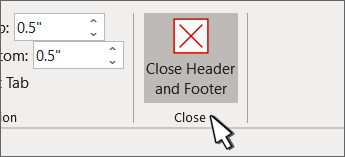
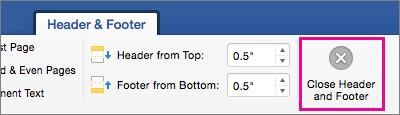
When you’re done, select Close Header and Footer or press Esc.
-
Double-click inside the header or footer area.
-
Select the text you want to change and type your new header or footer in its place.
-
Select Close Header and Footer or double-click anywhere outside of the header or footer area to exit.
Change or delete the header or footer from the first page
-
Double-click the first page header or footer area.
-
Check Different First Page to see if it’s selected. If not:
-
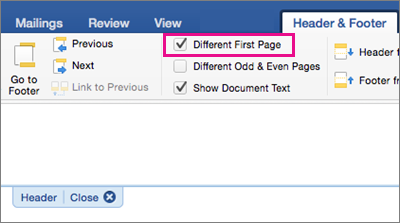
Select Different First Page.
-
Content of the header or footer on the first page is removed.
Note: Different First Page is a toggle, so be sure you’re turning it on.
-
-
Add your new content into the header or footer.
-
Select Close Header and Footer or press Esc to exit.
Change or delete a header or footer from another single page
To delete or change headers and footers on individual pages within a document, start by inserting a section break.
Important: Section breaks are different from page breaks. If you already have a page break before the page where you want to change the header or footer, remove a page break and replace it with a section break as shown below.
-
Click or tap where you want to start a new page without the header or footer.
-
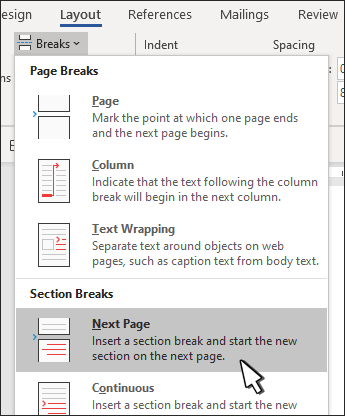
Go to Layout > Breaks > Next Page to create a section break.
-
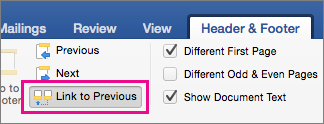
Double-click the header or footer area to open the Header & Footer tab.
-
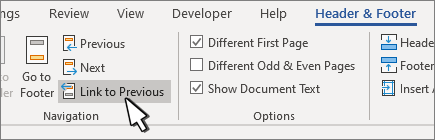
Select Link to Previous to turn off the link between the sections.
-
Select Header or Footer and do one of the following:
-
Choose Remove Header or Remove Footer .
-
Add or change the content in the header or footer.
(You’ll need to repeat steps 3-5 if you want to delete or change both the header and the footer.)
-
-
To return to the body of your document, select Close Header and Footer or press ESC.
Change or delete the header or footer from the first page
-
Double-click the header or footer area (near the top or bottom of the page) to open the Header & Footer tab.
-
Check Different First Page to see if it’s selected. If not:
-
Select Different First Page.
-
Content of the header or footer on the first page is removed.
-
-
Type new content into the header or footer.
-
To return to the body of your document, select Close Header and Footer or press ESC.
Change a header or footer on another single page
To change headers and footers from individual pages within a document, start by inserting a section break.
Important: Section breaks are different from page breaks. If you already have a page break before the page where you want to change the header or footer, remove a page break and replace it with a section break as shown below.
-
Click or tap where you want to start a new page without the header or footer.
-
Go to Layout > Breaks > Next Page to create a section break.
-
Double-click the header or footer area (near the top or bottom of the page) to open the Header & Footer tab.
-
Select Link to Previous to turn off the link between the sections.
-
Select Header or Footer and do one of the following:
-
Choose Remove Header or Remove Footer near the bottom of the menu.
-
Edit or change the Header or Footer.
(You’ll need to repeat steps 2-5 if you want to change both the header and the footer.)
-
-
To return to the body of your document, select Close Header and Footer or press ESC.

The header and/or footer is changed from the first page after the section break.
![]()
Download Article
![]()
Download Article
This wikiHow teaches you how to create your own custom headers and footers in Microsoft Word. You can start with one of Word’s pre-made header and footer templates or start yours from scratch. Both headers and footers can include custom text, page numbers, images, and special formatting.
Things You Should Know
- Click Insert > Header or Footer > Edit Header or Edit Footer.
- Create your header. You can add page numbers, date, and logos. Then, hit Close Header & Footer to preview it on the document.
- Double click the header or footer to make edits or change the settings.
-
1
Click the Insert tab. It’s at the top of Word.
- If you’ve already inserted a header or footer and want to edit it, simply double-click it now.
-
2
Click Header or Footer. It’s in the «Header & Footer» panel at the top of Word. A menu will expand.
- On the menu, you’ll see different header and footer styles that you can use as a starting point—all are fully editable. You can select one of these now to add it to your document if you’d like. To edit the header or footer after placing it, just double-click it on the page.
- You can also browse more pre-made headers and footers by clicking More Headers from Office.com.
Advertisement
-
3
Click Edit Header or Edit Footer. Depending on the option you selected, you’ll see the link at the bottom of the menu. This opens a Design tab in the toolbar that’s specifically for creating custom headers and footers.
- Every time you double-click a header or footer to edit it, the Design tab (Windows) or Header & Footer tab (Mac) will automatically open.
-
4
Click Page Number to add page numbering. You can select from a number of numbering styles and locations from the menu.
- Click the Format Page Numbers menu to choose a different number format, such as roman numerals. You can also choose to add other numbering elements here, such as chapter numbers and headings.[1]
- Click the Format Page Numbers menu to choose a different number format, such as roman numerals. You can also choose to add other numbering elements here, such as chapter numbers and headings.[1]
-
5
Add text to the header or footer. If you’d like to add specific text, such as your name, to the header or footer, you can easily type it at the desired location. If you chose one of Word’s pre-made header or footer templates, you can edit the placeholder text by clicking the text and typing over it.
-
6
Insert other features into the header or footer. The «Insert» panel on the Design or Header & Footer tab contains a bunch of different features you can add to your header or footer:
- Date & Time: This allows you to select a date and/or time format to place in the header or footer.
-
Document Info: Use this option to include certain information about your document in the header or footer, such as the document’s title, author name, and file path.[2]
- Quick Parts: Quick Parts are reusable text and properties that you can add to any part of your document, including headers and footers.
-
Pictures or Online Pictures: You can use either of these options to place an image into your header or footer.[3]
For best results, stick to a small image, such as a decorative horizontal bar or logo.
-
7
Click Close Header & Footer. It’s the red-and-white «X» icon on the far right side of the Design tab. This closes the header and footer editor, which shows you how it will really look on your document.
- If you added a header and want to add a footer as well (or vice-versa), return to the Insert tab and select Header or Footer as necessary.


Advertisement
-
1
Double-click the header or footer. If you don’t want the header or footer you created to appear on the first page (or until a certain page you specify), use this method. Start by double-clicking the header or footer on the first page to open it for editing.
-
2
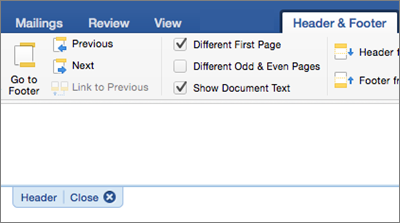
Check the box next to «Different First Page.» It’s in the Options panel on the Design tab (PC) or Header & Footer tab (Mac), which opens automatically. This removes the header or footer from the first page, making the second page of your document the new Page 1.
- If you’d like, you can select Different Odd & Even Pages to place different headers/footers on even and odd pages. For example, if you want odd pages to contain the title of your document and even pages to display a page number.
- The Show Document Text option just toggles the actual text of your document on or off so can see what the header or footer looks like without the document.
-
3
Click Close Header & Footer. It’s the red-and-white «X» icon on the far right side of the Design or Header & Footer tab. This saves your changes.


Advertisement
Add New Question
-
Question
How can I put my name in a footer on the left on every page and put the page number on the right, having it change on each page?

Malsha Ranawaka
Community Answer
There are pre-designed footers like this available. If this is not in your list, simply select a footer design that has two text fields on the left and right. Then go to «edit footer» mode and put the name on the left. Select the text field on the right. In the «Header & Footer Tools» tab, select «Quick Parts.» From the dropdown, select «Fields.» This will open a dialog box. Select «Page» from the field names list. Select a page number format and click «OK.» You will get an updating page number field on the right.
-
Question
How do I insert a line above the footer?
Malsha Ranawaka
Community Answer
Go to Edit Footer, and place your cursor somewhere in the first line of words you have in the footer. Select the «Home» tab. In the «Paragraph» section, select the «Borders» dropdown. From the dropdown menu, select «Top Border», and you will get a border above the footer.
-
Question
How do I edit a horizontal line in MS Word 2007?
Malsha Ranawaka
Community Answer
Double click on the line, or right click it and select «Format Horizontal Line» to get the dialog box with edit options.

See more answers
Ask a Question
200 characters left
Include your email address to get a message when this question is answered.
Submit
Advertisement
Video
-
Browse through Microsoft Word’s collection of templates before you start adding your own header and footer to documents. The pre-set templates can save you a lot of time.
Thanks for submitting a tip for review!
Advertisement
About This Article
Article SummaryX
1. Click the Insert tab.
2. Click Header or Footer.
3. Click a header or filter option, or select Edit Header/Footer to start from scatch.
4. Click Page Number to add automatic numbering.
5. Add text.
6. Insert dates, document info, quick parts, and/or images.
7. Click Close Header & Footer.
Did this summary help you?
Thanks to all authors for creating a page that has been read 324,489 times.
Is this article up to date?
 When I first wrote this blog post, Word 2003 was still the predominant version of the program, more commonly used than Word 2007. (And Word 2010 was just a gleam in some Microsoft programmer’s eye…) So I basically wrote the post for users of 2003 and then just posted a brief explanation where to find the same functions in 2007, which was the first version to use ribbons instead of dropdown menus. Over the years, this has been one of the most popular T4L posts but now that 2007 and 2010 are more widely used, I’ve decided to spell out the steps for those versions in full. You can still find the instructions for Word 2003 and earlier versions later in the post.
NOTE: I’ve never had Office 2013, so I can’t say if there are any differences for that version, but I now have Office 2016 and the process is exactly the same, so it’s a good bet that it is for 2013 as well. (If you have Word 2013 and there is any difference, please post a comment below and I’ll add that info here.)
Both sets of instructions are for creating different sections in an MS-Word document so you can change the header for each section. For example, you might want to have different headers with each chapter name to help readers find the section they’re looking for more quickly.
Note: The same techniques work for creating separate footers, which you might want to do to start Page 1 after a Table of Contents, for example.
Section Break vs. Page Break
You may already know that you can force a page break by placing your cursor in front of the text you want to start on the next page and pressing Ctrl + Enter on your keyboard. (And if you don’t know that, consider this a bonus tip!) 🙂
However, that won’t work for our purpose. We don’t want to just move the text to the next page; we want to start a new section so we can create a new header.
Instructions for Word 2007, 2010, 2013, and 2016
Put your cursor at the start of the text you want to start a new section.
On the Page Layout ribbon, click the down arrow beside the Breaks button. (In Word 2016, the ribbon is just called Layout. I don’t know which one it is in 2013.)

Select Section Breaks > Next Page.
Now the text is at the top of the next page.
Move your cursor near the top of the page and double-click to display the Header area.

NOTE: Some readers have reported that if they create a Header section using the Insert > Header command and choose anything other than the Blank option, the instructions don’t work. I’m not sure why this is as it works for me, but if you are still having problems after following these steps, try changing the Header format to Blank.
The Header and Footer Tools Design ribbon has opened at the top of the page. You can see that the Link to Previous button is depressed, meaning the two sections will have the same header. (You can also see a Same to Previous tab on the bottom border of the header section.)

Click the Link to Previous button.

The Same as Previous tab is now gone from the header section.
Type “Section 2 Header” in the header area.
Double-click in the main text area of the page.
This will close the header section and remove the toolbar. The new header appears at the top of the page.

Now, if you scroll back up to the first page, you can see that the header is still blank, because the two headers are no longer linked. You could also enter text into the header area and it wouldn’t change the header on the next page.
![]()
Simply repeat these steps for each new section and you can have as many different headers as you want.
Instructions for Word 2003 and Earlier Versions
Note: The screenshots below show a document I used when I wrote the original post. I no longer have it and I no longer have Word 2003, so I can’t update the document. But the dialog boxes should look the same.
Put your cursor at the start of the text you want to start a new section.
From the Insert menu, select Break.
In the dialog box that comes up, select the “Next page” radio button from the “Section break types” area.

Now the text is at the top of the next page. You can tell it’s also the beginning of a new section by looking at the status line at the bottom left of the Word window.

From the View menu, click Header and Footer.
The header section of the page will display and the Header and Footer toolbar also appears.

You’ll notice, above the header box, it says “Same as previous.” This is the default option for when you create a header, and that’s what we need to change.
Click the Same as Previous button on the toolbar.
You can mouse over the buttons to see the names of them. You want to click it so it doesn’t look like it’s depressed.

The “Same as previous” text is now gone from the header box at the top of the page.

Type “Section 2 Header” in the header area.
Double-click in the main text area of the page.
This will close the header section and remove the toolbar.

Now, if you scroll back up to the first page, you can see the header is still blank, because the two headers are no longer linked.
![]()
Simply repeat these steps for each new section and you can have as many different headers as you want.
You may also be interested in:
Save Text Snippets to Easily Reuse in Microsoft Word
Four Formatting Tips for Excel
Microsoft Products: News, Views, & How-Tos
Filed Under: Formatting, How To, MS-Word, Popular, Top Ten, Updates
If you found this post helpful, maybe your friends will too (hint, hint)!
To receive future blog posts in your Inbox, please fill out the form below.