
Excel for Microsoft 365 Word for Microsoft 365 PowerPoint for Microsoft 365 Excel 2021 Word 2021 PowerPoint 2021 Excel 2019 Word 2019 PowerPoint 2019 Excel 2016 Word 2016 PowerPoint 2016 Excel 2013 Word 2013 PowerPoint 2013 Excel 2010 Word 2010 PowerPoint 2010 More…Less
You can change the font size for all text or just selected text in desktop Excel, PowerPoint, or Word.
Change the default font size for all text
The way you change the default font size varies by app. Select your app below, and then follow the steps.
-
Click File > Options.
-
In the dialog box, click General.
-
Under When creating new workbooks, in the Font Size box, enter the font size you want.

Or, you can type in any size you want, between 1 and 409, in multiples of .5, such as 10.5 or 105.5. You can also choose a different default font style.
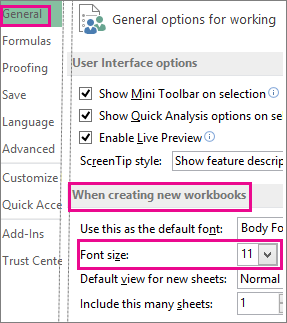
Note: To begin using the new default font size or font, you must restart Excel. The new default font and font size are used only in new workbooks created after you restart Excel; any existing workbooks are not affected. To use the new default font and size in existing workbooks, move worksheets from an existing workbook to a new workbook.
To change the font size for all slides, change it on the slide master. Every PowerPoint presentation contains a slide master with related slide layouts.
Note: If you want to change the theme, you should do that before changing the font, as a different theme may use different fonts.
-
On the View tab, click Slide Master.
In Slide Master View, the slide master is at the top of the thumbnail pane with the related layouts beneath it.
-
Click the slide master to change the font on all slides, or click any of the layouts to change the font size on just that layout.
-
On the slide master or layout, select the level of placeholder text for which you want to change the font size.
-
On the Home tab, click the font size you want in the Font Size box.
You can also type in any size you want in multiples of .1, such as 10.3 or 105.7.
The bullet automatically increases or decreases in size to match the font size changes.


-
Open a new blank document.
-
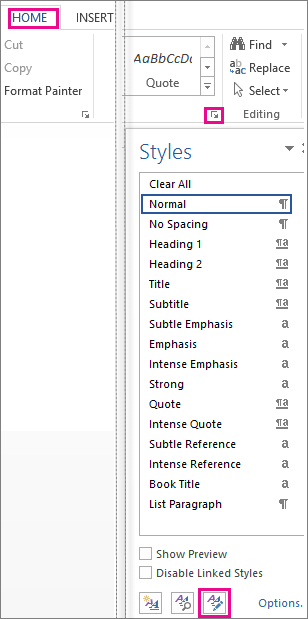
On the Home tab, in the Styles group, click the dialog box launcher
..Or press Ctrl+Alt+Shift+S.
-
Click the Manage Styles button (third from left at the bottom).
-
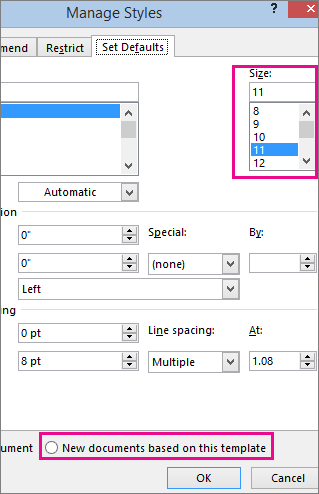
Click the Set Defaults tab and pick the size you want in the Size box.
You can also type in any size you want, between 1 and 1638, in multiples of .5, such as 10.5 or 105.5.
-
Click the New documents based on this template option.
-
Close and reopen Word. If you’re prompted to save the Normal template, say Yes.
Tip: You can also change the default font or font color on the Set Defaults tab.
 ..
..
When you set a default font, every new document you open will use the font settings you selected and set as the default. The default font applies to new documents that are based on the active template, usually Normal.dotm. You can create different templates to use different default font settings.
Change the size of selected text
To change the font size of selected text in desktop Excel, PowerPoint, or Word:
-
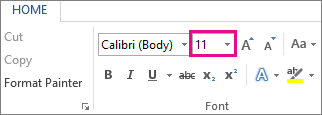
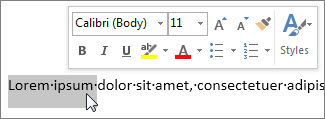
Select the text or cells with text you want to change. To select all text in a Word document, press Ctrl + A.
-
On the Home tab, click the font size in the Font Size box.
You can also type in any size you want, within the following limits:
-
Excel: between 1 and 409, between 1 and 409, in multiples of .5 (such as 10.5 or 105.5)
-
PowerPoint: between 1 and 3600, in multiples of .1 (such as 10.3 or 105.7)
-
Word: between 1 and 1638, in multiples of .5 (such as 10.5 or 105.5)
-
Tips:
-
When you select text, a mini toolbar appears near your cursor. You can also change the text size in this toolbar.
-
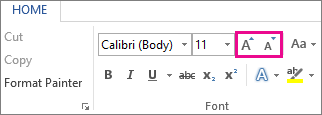
You can also click the Increase Font Size or Decrease Font Size (Grow Font and Shrink Font in some earlier versions of Office programs) icons until the size you want is displayed in the Font Size box.
See Also
Change or set the default font in Word
Change the fonts in a footer on a slide
Change a theme (Excel and Word)
Format text in cells (Excel)
Need more help?
Excel for Microsoft 365 Word for Microsoft 365 PowerPoint for Microsoft 365 Excel 2021 Word 2021 PowerPoint 2021 Excel 2019 Word 2019 PowerPoint 2019 Excel 2016 Word 2016 PowerPoint 2016 Excel 2013 Word 2013 PowerPoint 2013 Excel 2010 Word 2010 PowerPoint 2010 More…Less
You can change the font size for all text or just selected text in desktop Excel, PowerPoint, or Word.
Change the default font size for all text
The way you change the default font size varies by app. Select your app below, and then follow the steps.
-
Click File > Options.
-
In the dialog box, click General.
-
Under When creating new workbooks, in the Font Size box, enter the font size you want.
Or, you can type in any size you want, between 1 and 409, in multiples of .5, such as 10.5 or 105.5. You can also choose a different default font style.
Note: To begin using the new default font size or font, you must restart Excel. The new default font and font size are used only in new workbooks created after you restart Excel; any existing workbooks are not affected. To use the new default font and size in existing workbooks, move worksheets from an existing workbook to a new workbook.
To change the font size for all slides, change it on the slide master. Every PowerPoint presentation contains a slide master with related slide layouts.
Note: If you want to change the theme, you should do that before changing the font, as a different theme may use different fonts.
-
On the View tab, click Slide Master.
In Slide Master View, the slide master is at the top of the thumbnail pane with the related layouts beneath it.
-
Click the slide master to change the font on all slides, or click any of the layouts to change the font size on just that layout.
-
On the slide master or layout, select the level of placeholder text for which you want to change the font size.
-
On the Home tab, click the font size you want in the Font Size box.
You can also type in any size you want in multiples of .1, such as 10.3 or 105.7.
The bullet automatically increases or decreases in size to match the font size changes.
-
Open a new blank document.
-
On the Home tab, in the Styles group, click the dialog box launcher
..Or press Ctrl+Alt+Shift+S.
-
Click the Manage Styles button (third from left at the bottom).
-
Click the Set Defaults tab and pick the size you want in the Size box.
You can also type in any size you want, between 1 and 1638, in multiples of .5, such as 10.5 or 105.5.
-
Click the New documents based on this template option.
-
Close and reopen Word. If you’re prompted to save the Normal template, say Yes.
Tip: You can also change the default font or font color on the Set Defaults tab.
When you set a default font, every new document you open will use the font settings you selected and set as the default. The default font applies to new documents that are based on the active template, usually Normal.dotm. You can create different templates to use different default font settings.
Change the size of selected text
To change the font size of selected text in desktop Excel, PowerPoint, or Word:
-
Select the text or cells with text you want to change. To select all text in a Word document, press Ctrl + A.
-
On the Home tab, click the font size in the Font Size box.
You can also type in any size you want, within the following limits:
-
Excel: between 1 and 409, between 1 and 409, in multiples of .5 (such as 10.5 or 105.5)
-
PowerPoint: between 1 and 3600, in multiples of .1 (such as 10.3 or 105.7)
-
Word: between 1 and 1638, in multiples of .5 (such as 10.5 or 105.5)
-
Tips:
-
When you select text, a mini toolbar appears near your cursor. You can also change the text size in this toolbar.
-
You can also click the Increase Font Size or Decrease Font Size (Grow Font and Shrink Font in some earlier versions of Office programs) icons until the size you want is displayed in the Font Size box.
See Also
Change or set the default font in Word
Change the fonts in a footer on a slide
Change a theme (Excel and Word)
Format text in cells (Excel)
Need more help?
Want more options?
Explore subscription benefits, browse training courses, learn how to secure your device, and more.
Communities help you ask and answer questions, give feedback, and hear from experts with rich knowledge.
Changing font size is a basic operation in Word. In this article, we summarized 5 simple ways to change font size in your Word that applies to different situations.
As of today, almost all of the Word users know how to adjust the font size in a document. However, we still have much to explore as regards setting font sizes. The following 5 methods will provide you with different ways to change font sizes.
Method 1: Select Your Font Size
The most commonly used method is to select a font size in the “Home” menu. However, the limit is that there are only limited size options, and you will only be able to choose from one of the installed fonts.
- First, elect the text that you want to change font size.
- On the “Home” tab, click the down arrow for the font in the “Font” section. Scroll down the list, you can select each of the installed fonts on your computer.


Method 2: Enter a Specific Font Size
You can also specify a font size on the “Home” menu, if you need to apply a font size that is not included in the font size drop-down list, such as “30”. In addition, provided you need large font sizes above “72”, which is the upper limit in the font size list, you can adopt this method.
- First, select the text that you want to change font size.
- On the “Home” tab, click the box for the font in the “Font” section, where you can input the font size you desire and simply press “Enter” to change font size.


Method 3: Change Font Size via Shortcut Keys
We all know Word has many useful shortcut keys such as “Ctrl + C” and “Ctrl + V”. Less well known are the shortcut keys to change the point size of a text selection. In this section, we will introduce a way to change font sizes by 10 points with your keyboard.
Select the texts and press one of the following combination keys:
- To make the texts larger, press “Ctrl + Shift + >”.
- To make the texts smaller, press “Ctrl + Shift + <”.
Method 4: Adjust Font Size Precisely
Alternatively, you can also use another shortcut key to change the point size of texts. The difference is that you can control the point size more precisely, since it will change font sizes by 1 point every time you press the shortcut keys.
Select the texts and select one of the following combination keys:
- To make the texts larger, press “Ctrl + ]”.
- To make the texts smaller, press “Ctrl + [”.
Method 5: Set Default Font in Word
If you want to use the font settings that you desire every time you open a new document, you can set is as default font. That way, your selected font will apply to all the new documents
- Under “Home” tab, click the “Font” Dialog Box Launcher.


- A “Font” dialog comes up, you can select the options that you desire, such as font style and font size, and then click “Set As Default”.


Salvage Your Data in Times of Word Corruptions
As a regular Word user, you may have on more than one occasion, inadvertently causes Word corruptions. Also, external factors such as power failure, infection from viruses and malware will result in Word damages as well, which will render huge loss of data. In such situations, the very first tool to take use of is the in-built repair tool in Word. But still, you can take aid of external word repair, which feature powerful capabilities to repair severely word files in no time.
Author Introduction
Kelly Zhao is a data recovery expert in DataNumen, Inc., which is the world leader in data recovery technologies, including excel recovery and pdf repair software products. For more information visit www.datanumen.com
Change the size of selected text
- Select the text or cells with text you want to change. To select all text in a Word document, press Ctrl + A.
- On the Home tab, click the font size in the Font Size box. You can also type in any size you want, within the following limits:
let’s discuss this in detail below!
When working in Microsoft Word, your highest priorities should include the look and feel of your document. It’s possible that you just typed up an excellent essay or made an awesome business report. However, if you don’t format your documents correctly, people might have a hard time reading your files. This can cause dissatisfied teachers, clients or employers.
If you want to avoid making this mistake, you need to learn how to format your Word documents correctly. The very first step is learning how you can modify the size of your text, as well as the font you’re using. Follow our step-by-step guide to make your documents more readable, eye-catching and memorable.
Things you’ll need
- A device with Microsoft Word installed and activated.
How to change Text Size and Font in Word
Let’s start learning!
- Launch Word, then either open an existing document or create a new one from the welcome screen, then type in your text.
- If you only want to change the size and font of a portion of your text, you need to select it. Hold down the left mouse key and make your selection. Now, only the selected text will be affected by the font and size change. If you want to change your entire document, you need to select everything by pressing the Ctrl + A keys on your keyboard.

- To change your text to a different font or size, you need to be on the Home tab in the Ribbon.

- In the Font section, you’ll see two drop-down menus. The one on the left shows the name of the current font you’re using. The default font in Word is either Calibri or Times New Roman, you’re most likely seeing one of the two.

- The other drop-down menu shows the current size of your text. By default, Word sets the size to either 11 or 12 points.
- To change the font you’re using, open the first drop-down menu. This will display every font installed on your computer. When you hover over a font, you’ll see a preview of how it’ll look like in your document. Simply click on the font you want to use to select it.

- Similarly, you can click on the second drop-down menu with the numbers to change the text size. Hovering over a number will preview how your text will look like, and clicking on it finalizes the change.


How to Change the default text size and font in Word
You can also change the default text size and font in Word. This means that each time you start a new document, Word will automatically use the font and text size you define.
- Click on the arrow in the bottom-right corner of the Font section (again, found in the Home tab).

- A new window will appear. Here, you can select a font, modify the size of it and even apply font styles and effects. However, if you’re settings a default font, we recommend sticking to the Regular style without any effects.

- After you customized the font you want to use, click on the Set As Default button in the bottom-left corner of the window.

- Another window will come up. Here, select if you want to make your settings the default font in the currently open document only (first option), or make it the default font for all documents (second option).
- Press the OK button.


We hope that this article was able to help you learn how you can change the size and font of your text in Microsoft Word. Do you know someone who’s starting out with Word and other Microsoft Office products? Don’t forget to share this article with them! Your friends, classmates, colleagues or employees can all get help in getting started with Word. If you want to learn more about Word or other Microsoft Office suite applications, feel free to browse our section of guides.
If you’re looking for a software company you can trust for its integrity and honest business practices, look no further than SoftwareKeep. We are a Microsoft Certified Partner and a BBB Accredited Business that cares about bringing our customers a reliable, satisfying experience on the software products they need. We will be with you before, during, and after all the sales.
Learn Microsoft Word from articles in our Help Center
Here are some more content to help you learn Microsoft Word:
» How To Change Your Apple ID Password on Any Device
» 7 Microsoft Word Hacks You Need to Know in 2022
» MS Word Features: 20 Secret Functions Revealed
» How to Create a Hanging Indent in Microsoft Word
» How to make columns in Microsoft Word
» How to Fix the Spell Check Not Working in Word
» How to Install Fonts to Word on Mac
» How to Unfreeze Word on Mac Without Losing Work
» Top 14 Microsoft Word Tips and Tricks for Productivity
Final Thoughts
This guide has been about Microsoft Word. We hope you’ve learned how to use Microsoft Word and more tricks.
We’re glad you read the article up to here  Thank you
As we’ve shared above, there are more articles you can read about Microsoft Word and Microsoft Office in our Help Center and Blog.
Please share this article on your socials or with your friends. Someone else may benefit from it too.
One more thing …
Subscribe to our newsletter and be among the first to receive these documents in your inbox. We also share deals, promotions, and more through email. Don’t be left out.
This tutorial shows three ways to change the font, font size, and font color in Microsoft Word. First, we’ll use the font options in the ribbon. Then, we’ll use the Mini toolbar. Finally, we’ll use the Font dialog box.
Do you want to change your default font, font size, or font color? Check out my other tutorial “How to Change the Default Font in Microsoft Word.”
Quick Links:
- How to Change the Font, Font Size, and Font Color in the Ribbon
- How to Change the Font, Font Size, and Font Color in the Mini Toolbar
- How to Change the Font, Font Size, and Font Color in the Font Dialog Box
This tutorial is also available as a YouTube video showing all the steps in real time.
Watch more than 200 other document software tutorials on my YouTube channel.
The images below are from Word for Microsoft 365. The steps are the same in Word 2019, Word 2016, Word 2013, and Word 2010. However, your interface may look slightly different in those older versions of the software.
In Word, the main toolbar at the top of the screen is called the ribbon. The ribbon offers many of the font options most users will need for general content.
- Select the Home tab in the ribbon.

If your document is blank, skip to step 3.
- Select the text with the font you want to change.
To select the entire document, press Ctrl + A on your keyboard.
Alternatively, select Select in the Editing group, and then select Select All from the drop-down menu.

- Select the Font menu arrow to choose a new font. (This menu lists the fonts installed on your computer. Your fonts may differ from those shown in figure 3.)

- Select the Font Size menu arrow to choose a new font size. (The numbers represent typography points. Each point is 1/72 of an inch.)

Alternatively, you can select the Increase Font Size or Decrease Font Size buttons to increase or decrease the font by one point.

- Select the Font Color menu arrow to choose a new color.

For additional color options, select More Colors in the Font Color drop-down menu (see figure 6). Choose a color in the Standard tab of the Colors dialog box. Or, enter a custom color in the Advanced tab.

Pro Tip: Select the Change Case button to choose Sentence case, lowercase, UPPERCASE, Capitalize Each Word, or tOGGLE cASE.

Your text should change to your new font choices immediately.
The Mini toolbar offers many of the same font options as the ribbon from within the text.
- Select and then right-click the text to display the Mini toolbar.
- Select the arrow menus to select a font, font size, or font color. (Note that the Mini toolbar includes the Increase Font Size or Decrease Font Size buttons to increase or decrease the font by one point.)

Once again, your text should change to your new font choices immediately.
How to Change the Font, Font Size, and Font Color in the Font Dialog Box
The Font dialog box offers advanced options that aren’t available in the ribbon or the Mini shortcut menu.
- Select the Home tab in the ribbon (see figure 1).
If your document is blank, skip to step 3.
- Select the text with the font you want to change.
To select the entire document, press Ctrl + A on your keyboard.
Alternatively, select Select in the Editing group, and then select Select All from the drop-down menu (see figure 2).
- Select the dialog box launcher in the Font group.

- Select a new font, font size, and font color from the Font tab in the Font dialog box.

- (Optional Step) Select the Advanced tab for additional options for character spacing and OpenType features.

- Select the OK button.

Your text should change to your new font choices as soon as the Font dialog box closes.
Related Resources
How to Create Drop Caps in Microsoft Word
How to Adjust Line Spacing in Microsoft Word
How to Adjust Page Margins in Microsoft Word
How to Adjust Letter Spacing in Microsoft Word (PC & Mac)
Updated January 14, 2023