
Learn how to change American English to British English when you’re in the United States and writing for an audience in the United Kingdom
American English is different from English in Britain. If you’re American writing for a UK publication, you’ll need to be sure that your use of the English language is correct for British readers. There are many situations in which Americans may need to use British English to meet the needs of their audiences, including writing for an overseas publication, writing for a British university or other academic institution, or writing a blog for an audience of primarily British readers.
Many publishers work in or are from the UK, and communicating with them in the most familiar English form can go a long way in creating a solid relationship. Thankfully, changing your communication from American English to British English is simple and will be much appreciated by your business partners across the pond.
You’ll find that switching from American English to British English doesn’t make much of a difference in your writing speed. However, you may pause when you see certain words marked as incorrect (such as the American spelling of flavor, as the British version is spelled flavor). Over time, you’ll get used to your British writing style, and you’ll find that you can quickly flip between the two versions.
Here, we’ll explore how to switch from American spelling to British spelling using various language settings.
Best Grammar Checker
Grammarly
Grammarly is a top spelling, grammar and plagiarism checker. It’ll help you find and fix errors fast, and it works everywhere. It’s trusted by millions of writers for a reason.
![]()
Become a Writer Today is reader-supported. When you buy through links on our site, we may earn an affiliate commission.
Contents
- How to Change American To British English In Windows
- How to Change American To British English In Google Docs
- How to Change American To British English On A Mac
- How To Change American To British English On Grammarly
- How To Change American To British English On MS Word
- British Vs. American English
- Author
Are you moving to the UK? Working exclusively with British clientele? You may want to change your computer system to operate in British English instead of American English. This can make it easier to stay on track with preferred communication for your business partners or publishers across the sea.
Step 1. Navigate to the tools menu.
Step 2. Choose a set language from the Tools submenu.
Step 3. Click on the dropdown list of languages.
Step 4. Choose UK English as your default language.
Step 5. Confirm your default language selection.
Step 6. Close the dialogue box.
How to Change American To British English In Google Docs
Working on Google Docs is convenient, as you can access your work from anywhere simply by signing into your Google account. Thankfully, it’s easy to change American English to British English in Google docs, letting work seamlessly from any location in any style of English.
Step 1. Sign in to your Google account.
Step 2. Navigate to the Account Preferences menu.
Step 3. Select Language and Input Tools.
Step 4. Select Input Tools.
Step 5. Click the Select Languages option.
Step 6. Navigate to the English option.
Step 7. Click on English, then select English (UK) for the type of English you’d like to add.
Step 8. Click the checkbox for “Suggest.”
Step 9. Open the Options menu.
Step 10. Click “Synchronize dictionary.”
Step 11. Click “Done.”
Step 12. Open Google docs.
Step 13. Navigate to the File menu.
Step 14. Select “Language” from the file menu.
Step 15. Select English (UK).
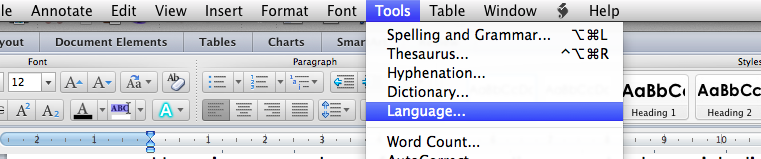
How to Change American To British English On A Mac
Like changing the standard language on a Windows operating system, it’s easy to switch from American English to British English on a Mac. Doing so can allow you to get your head in the game each day when you begin work.
Step 1. Click the Apple menu on the home screen of your Mac.
Step 2. Click System Preferences.
Step 3. Click “Language & Region.”
Step 4. Click “Language & Region Preferences.”
Step 5. Click “General.”
Step 6. Click “Add.”
Step 7. Select “English (UK),” then click “Add” again.
How To Change American To British English On Grammarly

Grammarly can help you ensure that the text you’re submitting is up to par, and you must be using the tool to check the right form of English. Thankfully, it’s simple to change Grammarly from American to British English.
1. Open a new document in Grammarly.
2. Click the three dashed lines at the top left corner of the document.
3. Scroll down and hover over the “Language Preference” option.
4. Select British English.
How To Change American To British English On MS Word
Microsoft Word is used by both PC and Mac users and is often the preferred format for professional documents. If you’re sending a manuscript to a British publisher, you’ll want to be sure you’re using British English to write and edit your document in Microsoft Word.
1. Navigate to the Tools menu in the Word toolbar.
2. Choose “Language” from the Tools menu.
3. Choose “Set Language.” A dialogue box will appear on the screen.
4. Select “British English” from the list of languages in the dialogue box.
5. Click on “Default.”
6. Confirm the action.
7. Close the dialogue box.
British Vs. American English
Language is fascinating, and it can be fun to understand how two different versions of English can be so similar yet so different. English is made up of words derived from many languages, including French, German, Spanish, Italian, Greek, and more. While many words are pronounced the same in British and American English, spellings can be different. This can make it tricky for people who are used to one type of English to write for an audience used to another form of English.
British English, in most cases, retains much of the original spelling of words, authentic to the language from which the words are derived. American English evolved as British settlers immigrated to the United States, and many words evolved to be spelled to mimic how the words sound. While this explanation sounds simple enough, it can be tough to switch between British and American English when writing. It’s often helpful to change the language settings on your computer or writing program to your preferred version of English so that you’re able to spot mistakes easily.
Some of the most noticeable differences between American and British English include:
Our vs. Or
Many British words utilize the “our” spelling over “or,” for example, color vs. color, flavor vs. flavor, and neighbor vs. neighbor.
Ise vs. Ize
British English takes an either-or approach to the endings “ize” and “ise,” while American English typically only uses “ize” endings. Examples include apologize vs. apologies, organize vs. organize, and recognize vs. recognize.
Yse vs. Yze
British English verbs in “yse” typically end in “yze” in American English. Examples include analyse vs. analyze, breathalyse vs. breathalyze, and paralyse vs. paralyze.
Ence vs. Ense
Some British English nouns are spelled with an “ence” ending, while their American English counterparts are spelled with an “ense” ending. Examples include defence vs. defense, licence vs. license, offence vs. offense, and pretence vs. pretense.
While it can take some time to get used to British English, changing your computer or writing program settings can make it easier for you to communicate with others. If you’re American writing for a British company, ask whether they’d prefer that you submit manuscripts in British or American English, as some British companies may still be working to appeal to an American audience and prefer that you stick to American English.
If you accidentally submit a document in the wrong type of English, copy and paste the document into your writing program, change the preferred language, and run the spellcheck function. Words that are spelled correctly in American English but need to be changed to British English will be highlighted as incorrect, making it simple for you to go through and make the necessary changes.
If you are interested in learning more, check out these common writing mistakes!
Join over 15,000 writers today
Get a FREE book of writing prompts and learn how to make more money from your writing.
![]()
Written by Allen Wyatt (last updated September 1, 2021)
This tip applies to Word 2000, 2002, and 2003
Subscriber Stan Witz recently expressed his exasperation with getting Word 2000 to keep its language settings as English UK, rather than converting to English US. It seems that when he would make the changes necessary, eventually Word would always switch to English US.
Understanding how Word works with different languages can sometimes seem more difficult than actually learning those languages in the first place. There are, in reality, several different settings that come into play when working with languages in Word 2000 or later versions. To set the default language used by Word, you follow these steps:
- Choose Language from the Tools menu, then choose Set Language from the submenu. Word displays the Language dialog box.
- In the list of languages, select the one you want to use by default.
- Click on the Default button. You are asked to confirm you action.
- Close the Language dialog box.
The only thing that the Default button does is to change the language settings in whatever template you have attached to your current document. Thus, any new documents based on that template will default to the language you select. Any documents based on a different template will not, unless you change them, as well. In addition, any existing documents will not have their language changed. In order to affect an existing document, you need to do the following:
- Select the entire document (press Ctrl+A).
- Choose Language from the Tools menu, then choose Set Language from the submenu. Word displays the Language dialog box.
- In the list of languages, select the one you want to use by default.
- Click on the OK button.
The situation in regard to languages becomes even more complex, however. Let’s say your template has been set to have English UK as its language. Further, the styles in the template have the Automatically Update flag set. (This is not uncommon.) If you later open a document from someone else that has the language set to English US, or you edit an HTML-encoded e-mail that uses English US, then the styles in your template could automatically update to reflect English US rather than English UK. The solution to this, obviously, is to make sure that the Automatically Update flag is turned off for all your styles.
Another complexity is the language-related settings in Windows itself. (You can see these by selecting Start | Settings | Control Panel | Regional Options. Pay attention to both the Regional Settings/General tab and the Input Locales tab.) If you have more than one keyboard (input locale) installed on your system, when you start a blank document—regardless of the template in use—Word will automatically apply direct formatting on the text matching the currently active input locale, thereby overriding the default setting in the Language dialog box. Word is designed this way so that when you start typing, the language Word assumes you want to use has the greatest probability of matching the actual language being typed.
It is important to note that Word’s match-the-language-to-the-input-locale behavior applies direct (non-styled) formatting. The language in the template and its styles remains as you set it, Word simply overrides your default to match the setting of the input locale. The upshot, of course, is to make sure that the input locale specified in Windows is English UK, which is what you want Word to use for your documents.
Word 2000 and later versions have an additional feature that causes them to try to automatically determine the language you are actually typing, which in practice does not always match the language of the input locale (keyboard) you are using. This is controlled by the Detect Language Automatically check box in the Language dialog box. If you specify the languages you use in the Office Language Settings utility (Start | Programs | Microsoft Office Tools | Microsoft Office Language Settings), then the check box becomes active and you can select it. With the check box selected, Word tries to automatically detect the language you are typing, and then automatically sets the Language setting based on its determination.
Finally, even after you have the default language set as you really want it, the grammar and spelling tools may still not work properly. This is because those tools are not installed for all languages. Instead, you may need to purchase foreign language tools from Alki Software (this is where Microsoft would send you, as well). You can visit their Web site at http://www.proofing.com.
WordTips is your source for cost-effective Microsoft Word training.
(Microsoft Word is the most popular word processing software in the world.)
This tip (1678) applies to Microsoft Word 2000, 2002, and 2003.
Author Bio
With more than 50 non-fiction books and numerous magazine articles to his credit, Allen Wyatt is an internationally recognized author. He is president of Sharon Parq Associates, a computer and publishing services company. Learn more about Allen…
MORE FROM ALLEN
Sorting Letters and Numbers
Sorting information in a worksheet can be confusing when Excel applies sorting rules of which you are unaware. This is …
Discover More
Putting a Chart Legend On Its Own Page
Displaying information using charts in Excel is easy and there are a variety of chart styles to choose from. Integrated …
Discover More
Putting a File Name and Path in a Default Footer
Want to add a filename and path to the footer of a template? You might be confused by what you see in documents created …
Discover More
The on line American to British English converter, what it can do for you.
It is said that the United States and Britain are two countries divided by a
common language. We are both nations central to the English speaking
world. However, the language that we use has been altered by geography and
adapted to circumstances, largely due to phonetic language being translated
into practical every day written Anglo- American.
To that end we have created
an on line American English to British English translator to make it easier for
people to use American words and English words safely and to conveniently
convert American spelling to UK English spelling. For example, American
English does not have the letter ‘u’ in the words; color, favor, and flavor, unlike
the English spelling. UK English uses the letter ‘ut in those words and we have;
colour, favour, and flavour. It is not just a matter of being pedantic,
misunderstandings can occur. America English words such as tire (part of an
auto wheel) mean ‘to’ tire in British English, the word tyre is the English word
for the auto wheel, clearly misunderstandings can happen.
We are keen to assist people in understanding the differences, and to obviate
them.
The British American Converter enables the user to enter American text
into an on line tool that will then translate the text into British English.
If you are writing an essay at a UK university, chances are you will have to write in British English. Likewise, if you’re in the UK and writing for an international audience, you should make sure to adapt your language use accordingly.
Most word processors, including Microsoft Word, are automatically set to US spelling. This is fine if you’re writing for an American (or even international) audience. But otherwise you might need to make a change. In this post, we explain how to change the language of a document in Microsoft Word.
Step One
Select all of the text in your document. To do this quickly, use ‘Ctrl + A’ (or ‘command + A’ on Mac). If you want to use different language settings in different parts of the document, simply selected the text you want to modify.
Step Two
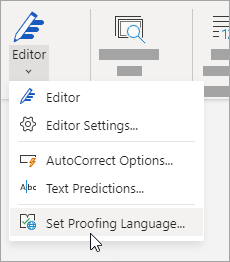
On a Windows PC, go to the ‘Review’ tab, click ‘Language’ and select ‘Set Proofing Language’.
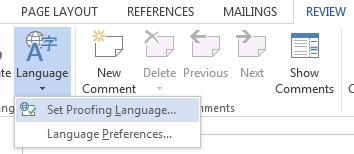 On a Mac, go to ‘Tools-Language’.
Alternatively, you can click on the ‘Language’ setting at the bottom of the screen.
Find this useful?
Subscribe to our newsletter and get writing tips from our editors straight to your inbox.
![]() This will open a new dialogue box.
This will open a new dialogue box.
Step Three
In the window that opens, choose your preferred language from the list. Click ‘OK’ to change the proofing language of the selected text.
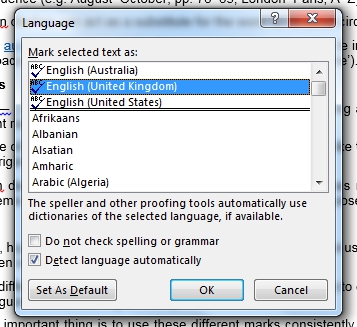 Step Four
If you usually use this language for your documents, click ‘Set As Default’. And that’s it! Good luck!
Excel for Microsoft 365 Word for Microsoft 365 Outlook for Microsoft 365 PowerPoint for Microsoft 365 Publisher for Microsoft 365 Excel for Microsoft 365 for Mac Word for Microsoft 365 for Mac Outlook for Microsoft 365 for Mac PowerPoint for Microsoft 365 for Mac Excel for the web Word for the web PowerPoint for the web Excel 2021 Word 2021 Outlook 2021 PowerPoint 2021 Publisher 2021 Office 2021 Excel 2021 for Mac Word 2021 for Mac Outlook 2021 for Mac PowerPoint 2021 for Mac Excel 2019 Word 2019 Outlook 2019 PowerPoint 2019 Publisher 2019 Office 2019 Excel 2019 for Mac Word 2019 for Mac Outlook 2019 for Mac PowerPoint 2019 for Mac Excel 2016 Word 2016 Outlook 2016 PowerPoint 2016 Publisher 2016 Office 2016 Excel 2016 for Mac Word 2016 for Mac Outlook 2016 for Mac PowerPoint 2016 for Mac Excel 2013 Word 2013 Outlook 2013 PowerPoint 2013 Publisher 2013 Office 2013 Excel for iPad Word for iPad PowerPoint for iPad Excel for iPhone Word for iPhone PowerPoint for iPhone Word for Android tablets Excel for Android tablets PowerPoint for Android tablets Excel 2010 Word 2010 Outlook 2010 PowerPoint 2010 Publisher 2010 Office 2010 Publisher 2007 Excel for Mac 2011 Word for Mac 2011 Outlook for Mac 2011 PowerPoint for Mac 2011 Excel for Android phones Excel for Windows Phone 10 Excel Mobile PowerPoint for Android phones PowerPoint for Windows Phone 10 PowerPoint Mobile Word for Android phones Word for Windows Phone 10 Word Mobile More…Less
There are three areas in Microsoft Office where you may want to change the language.
-
Editing or Authoring is the language in which you write and edit your content. You may need to install an associated keyboard for this language via Windows settings.
-
Proofing tools are spelling and grammar check. Typically, you’ll set this language to be the same as the editing or authoring language.
-
Display language is for all the buttons, menus, and controls in Office.
You can set the display and editing or authoring languages independently from each other. For example, you may want the display language to be English, but the document you’re writing or editing is in French.
Note: If you want to completely change Office, permanently, to a different language you’ll get the best results if you first set that to be your default display language in Windows as well. For more information on doing that see this article for Windows 10 or this article for Windows 7 or 8.
Tip: To prevent having to manually configure the proofing language with each new document in Word, switch on the option to detect the language you’re writing. On the Review tab, go to Language. Choose Language > Set Proofing Language, and then select Detect language automatically.
Note: If you’re using Office 365 and the commands available are different from what’s shown here, expand the Configure Office language for Office 2016 or earlier section and follow the instructions there.
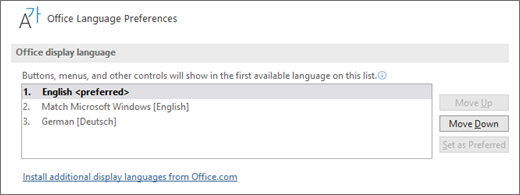
In Office, the language options are in the Office Language Preferences dialog box. The display and authoring languages can be set independently. For example, you could have everything match the language of your operating system, or you could use a combination of languages for your operating system, authoring, and display.
To configure the display language:
-
Within any Office application, select File > Options > Language.
-
Under Office display Language, make sure the display language you want Office to use is listed.

-
Select the language you want, and then select Set as Preferred. If you want your Office display language to match the display language you have for Windows, select Match Microsoft Windows [Language].
-
If the language you want is not listed, select Install additional display languages from Office.com and follow the instructions there.
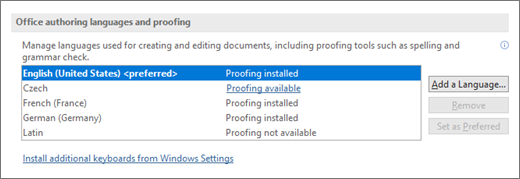
To configure the authoring and proofing language:
-
Within any Office application, select File > Options > Language.
-
Under Office authoring languages and proofing, make sure the language you want to use for authoring your document is listed.
-
If the language you want appears in the list, select it, and then select Set as Preferred. If the language you want is not listed, select Add a language, and then follow the instructions in the Add an authoring language dialog box.
-
If the language accessory pack includes proofing tools for that language, its status appears as Proofing installed. If the status is Proofing available, click the link to install the proofing tools.
Tip: To prevent having to manually configure the proofing language with each new document in Word, switch on the option to detect the language you’re writing. On the Review tab, go to Language. Choose Language > Set Proofing Language, and then select Detect language automatically.
In Office, the language options are in the Set the Office Language Preferences dialog box. The display and help languages can be set independently. For example, you could have everything match the language of your operating system, or you could use a combination of languages for your operating system, editing, display, and Help.
To configure the editing and proofing language:
-
Within any Office application, select File > Options > Language.
-
If your language already appears among the editing languages press Set as Default. Otherwise select the language from the Add additional editing languages list then press the Add button. The new language will appear in the list of editing languages.
If the Keyboard Layout shows as Enabled, you’re all set for editing. If it says Not enabled in the Keyboard Layout column follow these steps to enable it:
-
Click the Not enabled link.
-
In the Add Languages dialog box, press Add a language, select your language in the list, and then press Add.
-
Close the Add Languages dialog box. Your language should display as Enabled under Keyboard Layout in the Choose Editing Languages section.
Under Proofing, if your language shows as Installed, you’re ready to go. Otherwise press Not installed and Office will take you to a page where you can download the necessary Language Accessory Pack for that language. Follow the instructions on that page to download and install the pack, then come back to the Office Language Preferences dialog box to confirm that it’s now installed.
To configure the display and help languages:
-
Within any Office application, select File > Options > Language.
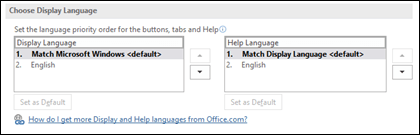
If you’ve already set your Microsoft Windows display language to be the language you want Office to display in you can leave this set to Match Microsoft Windows. Otherwise select your language and press Set as Default to move that language to the top of the list. The language that is listed first is the one Office will use for its menus and buttons. Please note, if your Windows display language is not also installed in Office, your Office display language will appear in the next language in the display list.
Repeat to configure your help language if you want to.
If the language you want isn’t available…
Download the proper Language Accessory Pack for the language you want to use from this page: Language Accessory Pack for Office. The Language Accessory Pack contains the display and proofing tools for most languages, but you can still choose to have your display in one language and editing or authoring in another.
Microsoft Office for Mac already contains all of the available languages, so there’s nothing to download. To configure Office to use those languages follow these steps:

User Interface — The display language for Office for Mac uses the primary language set for operating system. To change the display language for Office for Mac, you need to set a different primary language for your operating system:
-
On the Apple menu, choose System Preferences > Language & Region
-
In the Preferred Languages list, set the desired language to be your primary language by dragging it to the top of the list.
-
If the language you want doesn’t appear just press the + sign and add it.
-
You’ll have to restart your Office application for this change to take effect.
Editing — Setting the editing language depends on the program you’re working in.
Word and PowerPoint
To change your editing language in Word for Mac or PowerPoint for Mac, go to Tools > Language, select your language, and select OK.
To make it the default for all new documents select Default.
Tip: To prevent having to manually configure the proofing language with each new document in Word, switch on the option to detect the language you’re writing. On the Review tab, go to Language, and then select Detect language automatically.
Excel
To change your editing language in Excel for Mac, go to Tools > Language, select your language, and select OK.
OneNote
To change your editing language in OneNote for Mac, go to Tools > Set Proofing Language, select your language, and select OK.
User Interface & Editing — The display and keyboard languages for Office for Android is the same as the language that the device is set to. You can configure those by going to Settings > Language and Input.
Proofing — On Android you can change the proofing language in Word.
In Word on your Android phone, tap Edit  at the top of your screen, and then tap Proofing and Language under Review.
In Word on your Android tablet go to the Review tab and you can select your proofing language from the ribbon.
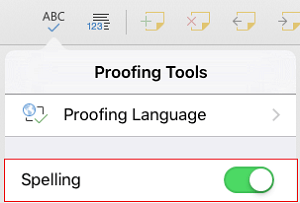
Proofing — On iOS you can change the proofing language in Word.
In Word on your iPhone, tap Edit , tap Home > Review > Proofing tools, and then tap Proofing Language.
In your document, on the Review tab, tap Spell Check  , and then tap Proofing Language.
Proofing — On Windows Mobile you can change the proofing language in Word.
In your document, on the Review tab, you can select the proofing language from the ribbon.
User Interface — The best way to set the display language in Office for the web is to set the language in the host where your documents live. That’s usually OneDrive, SharePoint, Dropbox, etc. When you open a document from one of those sites, Office Online will use the display language you have that service set to.
Tip: If you’re using a personal Microsoft account, you can choose your preferred display language in your profile settings at https://account.microsoft.com/profile.
-
Change views on OneDrive (Scroll to the bottom for language settings)
-
Set your language in SharePoint. If you’re using SharePoint, and want a language other than your system language, you’ll want to be sure to select a SharePoint language.
-
Change your language settings in Dropbox
To set the proofing tools language in your app go to the Review tab > Spelling & Grammar > Set Proofing Language. In OneNote for the web this is found on the Home tab.
Things to know
-
This change will only take effect from this point in the document forward.
-
To apply this change to any existing text in the document, press Ctrl+A to select all of the existing text, then set the proofing language with the steps above.
-
This change only affects the current document. For subsequent documents you’ll need to repeat these steps.
See Also
Check spelling and grammar in a different language
What languages are supported in Office?
Translate text into a different language
Remove languages and fonts you don’t use
Right-to-left language features