
Word for Microsoft 365 Word for Microsoft 365 for Mac Word 2021 Word 2021 for Mac Word 2019 Word 2019 for Mac Word 2016 Word 2016 for Mac Word 2013 Word 2010 Word for Mac 2011 More…Less
Text boxes and most shapes can include text in them. The text can be positioned horizontally or vertically, and it can appear on one line or wrap to multiple lines.
You can change the direction of the text, and you can also change the margins of text boxes and shapes for optimal spacing, or resize shapes for a better text fit.
Specify text direction in a shape or text box
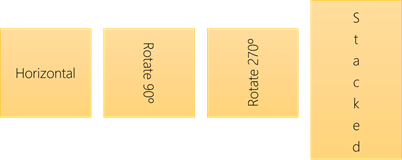
In a shape or text box, you can change the direction in which text is read. That is, you can pivot text 90 or 270 degrees so that it appears sideways.
-
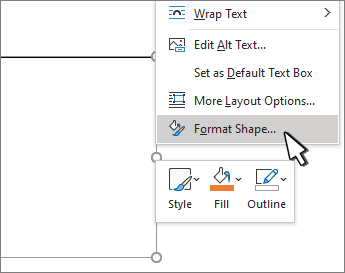
Right-click the edge of the shape or text box.
-
On the shortcut menu, select Format Shape.

-
In the Format Shape pane, click Size/Layout & Properties
. -
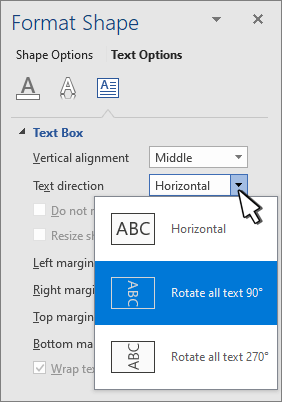
Under Text Box, select the option that you want in the Text direction list.
 .
.
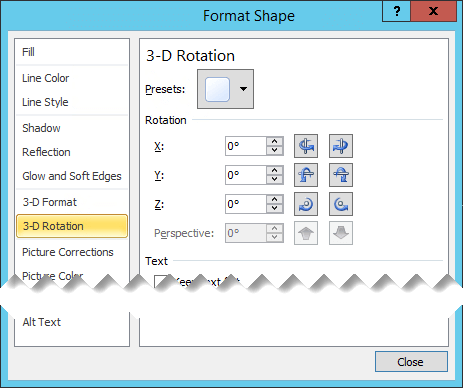
Rotate (mirror) text in a shape or text box

-
Right-click the box or shape and select Format Shape.
-
In the Format Shape pane, select Effects.
-
Select 3-D Rotation and in the X Rotation or Y Rotation box, enter 180.
-
(Optional) If your text box is filled with a color, you can remove the color in the Format Shape pane. Select Fill & Line
, select Fill, and then select No fill. -
(Optional) To remove the text box outline, right-click the text box, select Outline in the mini toolbar that appears, and choose No Outline.
 , select Fill, and then select No fill.
-
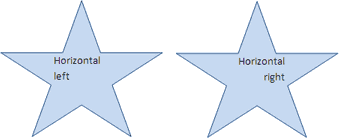
Select the paragraph, line of text, shape, or text box that you want to modify.
-
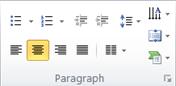
Go to Home and select the horizontal alignment option that you want.
-
Right-click the border of the shape or text box.
-
On the shortcut menu, select Format Shape.
-
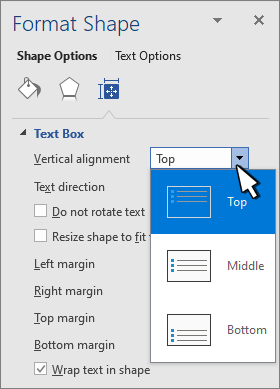
In the Format Shape pane, select Size/Layout & Properties
.
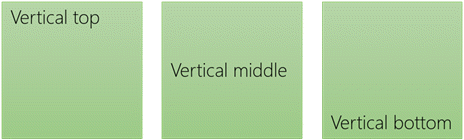
-
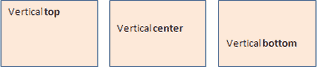
Select the option that you want in the Vertical alignment list.
When text wraps, it automatically continues on a new line as it reaches the right border of the shape or text box.
-
Right-click the border of the shape or text box that contains the text you want to wrap.
-
On the shortcut menu, select Format Shape.
-
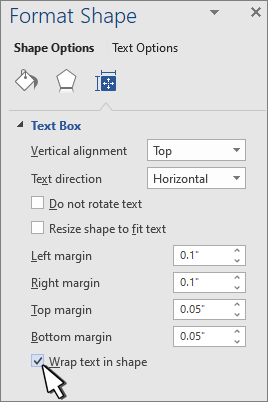
In the Format Shape pane, select Size/Layout & Properties
, and then select Wrap text in shape.
The margin is the distance between the text and the outer border of the enclosing shape or text box.
-
Right-click the border of the shape or text box.
-
On the shortcut menu, select Format Shape.
-
In the Format Shape pane, select Size/Layout & Properties
.
-
Specify a measurement in inches or millimeters (mm) for any of the following margins:
-
Left margin
Distance between the left border of a shape and the leftmost text -
Right margin
Distance between the right border of a shape and the rightmost text -
Top margin
Distance between the top border of a shape and the uppermost text -
Bottom margin
Distance between the bottom border of a shape and the lowest text
-
You can automatically increase the size of a shape or text box vertically so that the text fits inside it.
-
Right-click the border of the shape or text box.
-
On the shortcut menu, select Format Shape.
-
In the Format Shape pane, select Layout & Properties
, select Text Box, and then select Resize shape to fit text.

Tip: You can reduce the size of the text to fit it in the shape or text box by selecting Shrink text on overflow.
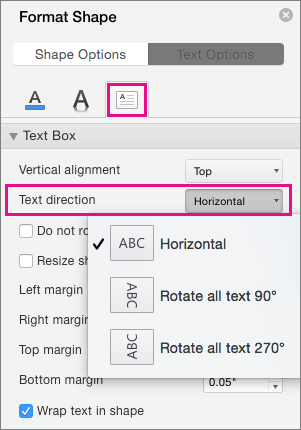
Specify text direction in a shape or text box
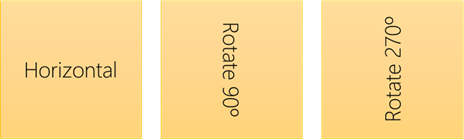
You can change direction of text in a shape or text box. For example, you can rotate text 90 or 270 degrees so that it appears sideways.
-
Right-click the edge of the shape or text box that contains the text.
-
On the shortcut menu, select Format Shape.
-
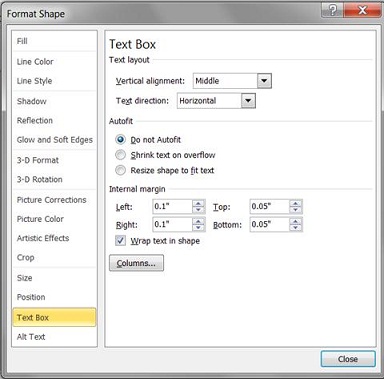
In the left pane of the dialog box, select Text Box.
-
Under Text layout, select the option that you want in the Text direction list.
-
Select Close.
Rotate (mirror) text in a shape or text box
-
Insert a text box or shape in your document, and then type and format your text.
-
Right-click the box or shape and select Format Shape.
-
In the Format Shape dialog box, select 3-D Rotation on the left.
-
In the X box, enter 180.
-
Select Close.
-
Click or tap in the paragraph, line of text, shape, or text box that you want to modify.
-
On the Home tab, select the horizontal alignment option that you want.
-
Right-click the border of the shape or text box.
-
On the shortcut menu, select Format Shape, and then select Text Box in the left pane.
-
Under Text layout, select the option that you want in the Vertical alignment list.
-
Select Close.
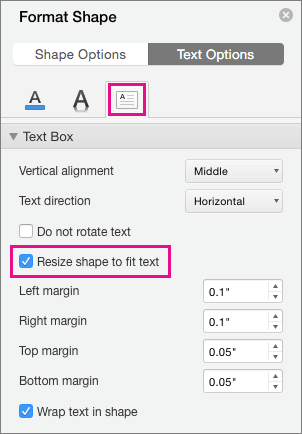
You can automatically increase the size of a shape or text box vertically so that the text fits inside it.
-
Right-click the border of the shape or text box that you want to resize.
-
On the shortcut menu, select Format Shape, and then select Text box in the left pane.
-
Under Autofit, select Resize shape to fit text.
-
Select Close.
Tip: You can reduce the size of the text to fit it in the shape or text box by selecting Shrink text on overflow.
The internal margin is the changeable distance between text and the outer border of a shape or text box.
-
Right-click the border of the shape or text box.
-
On the shortcut menu, select Format Shape, and then select Text Box in the left pane.
-
Under Internal Margin, choose one or more of the following:
-
Left
Specifies the distance between the left border of a shape and the text. -
Right
Specifies the distance between the right border of a shape and the text. -
Top
Specifies the distance between the top border of a shape and the text. -
Bottom
Specifies the distance between the bottom border of a shape and the text.
-
-
Select Close.
Specify text direction in a shape or text box
-
Control + Click the border of the shape or text box that contains the text, and then select Format Shape.
-
In the Format Shape pane on the right, select Text Options.
-
Select the third icon, Textbox, and then select the option that you want from the Text direction list.
Position text horizontally in a paragraph, text box or shape
-
Click or tap in the paragraph, line of text, shape, or text box that you want to modify.
-
Go to Home, and in the Paragraph group, click the horizontal alignment option that you want.

You can automatically increase the size of a text box or shape vertically so that the text fits inside it.
-
Control + Click the border of the shape or text box that you want to resize, and then select Format Shape.
-
In the Format Shape pane on the right, select Text Options.
-
Select Layout & Properties, and then select the check box next to Resize shape to fit text.
By default, the text wraps automatically as you type in a text box or shape. If you don’t want the text to wrap, do the following:
-
Control + Click the shape that contains the text, and then select Format Shape.
-
In the Format Shape pane on the right, select Text Options.
-
Select Layout & Properties, and then clear the check box next to Wrap text in shape.
Specify text direction in a shape, text box, or table cell
-
Enter the text in the shape or text box or table cell, and then select the text.
-
Ctrl+Click the selected text, and then select Format Shape. On the Text Box tab in the dialog box, choose a direction from the Text Direction box.
Position text horizontally in a shape or text box
-
Select the text in the shape or text box.
-
On the Home tab, under Paragraph, select the horizontal alignment button that you want.
(Align Left, Centered, Align Right, Justified, or Distribute Text)

-
Select the text in the shape or text box.
-
On the Home tab, under Paragraph, select
, and then select the vertical alignment that you want.
 , and then select the vertical alignment that you want.
By default, the text wraps automatically as you type in a text box or shape. If you don’t want the text to wrap, do the following:
-
Select the text in the shape or text box.
-
Go to Format > Shape.
-
On the left side of the dialog box, select Text Box.
-
Under Internal Margin, clear the Wrap text in shape check box.
-
Select the text in the shape or text box.
-
Go to Format > Shape.
On the Format menu, select Shape.
-
On the left side of the dialog box, select Text Box.
-
Under Autofit, select Resize shape to fit text.
Need more help?
Want more options?
Explore subscription benefits, browse training courses, learn how to secure your device, and more.
Communities help you ask and answer questions, give feedback, and hear from experts with rich knowledge.
![]()
Download Article
An easy-to-follow guide on changing the direction of text in Microsoft Word
![]()
Download Article
- Rotating Text
- Making Text Vertical
- Mirroring Text
- Changing Paper Orientation
|
|
|
Do you want to type vertically in word? You can create vertical text by creating a textbox and adjusting its settings to set the position. You can change the text’s direction, rotate it, and mirror it. You could also change the document’s orientation from portrait to landscape mode. This wikiHow will show you how to write vertically in word on your Windows or Mac computer.
Things You Should Know
- Create a textbox with your text. Click «Shape Format» → «Text Direction» → «Rotate all text 90°».
- To make text vertical, drag the right-center circle of your textbox towards the left.
- To mirror text, right-click the textbox, then «Format Shape». Click «Effects», then input «180» into the X or Y Rotation field.
-
1
-
2
Create a textbox. To do this, click the Insert tab in the top toolbar, then click the Text Box icon in the Text section. You can select Simple Text Box from the presets.
Advertisement
-
3
Insert your text. Input the text you want to edit. You can copy and paste from another program into Microsoft Word.
- Make sure the textbox is still selected.
-
4
Click Shape Format. You can find this at the top toolbar, next to Help. Alternatively, double-click the edge of the textbox to be quickly redirected.
-
5
Click Text Direction. This will be in the Text section.
- A drop-down menu will open.
-
6
Select Rotate all text 90°. You can also select Rotate all text 270° if you want the top of the words to face the left side.
- Your text will be rotated.
- You can continue to edit your text in the textbox. The words will type in the direction set.


Advertisement
-
1
Open a project in Microsoft Word. This looks like a W on top of a blue square. Microsoft Word is available to install for Windows and Mac.
- You must have a subscription to use Office 365.
-
2
Create a textbox. To do this, click the Insert tab in the top toolbar, then click the Text Box icon in the Text section. You can select Simple Text Box from the presets.
-
3
Insert your text. Input the text you want to edit. You can copy and paste from another program into Microsoft Word.
- Make sure the textbox is still selected.
-
4
Click and drag the center circle on the right towards the left. With the textbox selected, you’ll see four circles at each point of the text box and one circle between each corner. Use the middle circle on the left side.
- As you drag the text box towards the left, it will become smaller. The text inside will adjust to fit the size of the box in vertical format.
- Make sure not to drag past the point of the left line. This could result in the words returning to their normal positions.
-
5
Remove the textbox lines (optional). If you want to remove the lines around the text, double-click the textbox to return to the Shape Format tab.
- Click Shape Outline, then select No Outline from the drop-down menu.
- The textbox lines will be hidden. Be sure to save your document if you need to return to it later.


Advertisement
-
1
Open a project in Microsoft Word. This looks like a W on top of a blue square. Microsoft Word is available to install for Windows and Mac.
- You must have a subscription to use Office 365.
-
2
Create a text box. To do this, click the Insert tab in the top toolbar, then click the Text Box icon in the Text section. You can select Simple Text Box from the presets.
-
3
Insert your text. Input the text you want to edit. You can copy and paste from another program into Microsoft Word.
- Make sure the textbox is still selected.
-
4
Right-click the textbox. A drop-down menu will open.
-
5
Click Format Shape…. This will be at the very bottom of the menu.
- A panel will open on the right side.
- If you don’t see this option, make sure the textbox is selected, not the text.
-
6
Click the «Effects» icon. This looks like a pentagon, next to the paint bucket icon.
-
7
Enter 180 in the X or Y field. If you want your text to be mirrored left-right, enter 180 into the X Rotation field. If you want your text to be mirrored up-down, enter 180 into the Y Rotation field.
- The changes will take effect immediately.
-
8
Remove the textbox lines (optional). If you want to remove the lines around the text, double-click the textbox to return to the Shape Format tab.
- Click Shape Outline, then select No Outline from the drop-down menu.
- The textbox lines will be hidden. You can print your document if needed.


Advertisement
-
1
Open a project in Microsoft Word. This looks like a W on top of a blue square. Microsoft Word is available to install for Windows and Mac.
- You must have a subscription to use Office 365.
- Use this method if you want to change your paper orientation from portrait to landscape.
-
2
Click Layout. This will be in the top toolbar, between Design and References.
-
3
Click Orientation. You can find this at the top, next to Margins.
- A drop-down menu will open.
-
4
Click Landscape. Your Microsoft Word document will change to landscape orientation.
- If you change back to portrait mode after inputting text, the text will follow the portrait mode orientation. It will not save in its landscape position.


Advertisement
Ask a Question
200 characters left
Include your email address to get a message when this question is answered.
Submit
Advertisement
Thanks for submitting a tip for review!
About This Article
Article SummaryX
1. Click Insert.
2. Click Text.
3. Click Text Box.
4. Click Draw Text Box.
5. Click and drag a text box.
6. Type text into the box.
7. Hover the mouse over the box outline.
8. Click the rotation icon and drag in any direction.
Did this summary help you?
Thanks to all authors for creating a page that has been read 1,279,262 times.
Is this article up to date?
Specify text direction in a shape or text box
- Right-click the edge of the shape or text box that contains the text.
- On the shortcut menu, select Format Shape.
- In the left pane of the dialog box, select Text Box.
- Under Text layout, select the option that you want in the Text direction list.
- Select Close.
Contents
- 1 How do I change the direction of text in a Word document?
- 2 How do you change the direction of typing?
- 3 Which tool can change the direction of text using?
- 4 How do I change the position of words in Word?
- 5 How do I change text from right to left?
- 6 How do I change text from right to left in Word?
- 7 How do I fix my keyboard backwards?
- 8 How do I type vertically in Word 2010?
- 9 Which feature allows you to change the direction of the cell content?
- 10 How do you change from horizontal to vertical in Word?
- 11 How do I align text left and right on the same line in Word?
- 12 How do you fix an inverted arrow key?
- 13 Why have my keys swapped on my keyboard?
- 14 Why is my keyboard deleting backwards?
- 15 How do you make text vertical?
- 16 How do I make text vertical in a Word table?
- 17 How do I change the direction of text in Word for Mac?
- 18 Which option allows you to change the way text appear in a cell or a group of cells?
- 19 How will you rotate the text in a table cell?
- 20 How do I change text from horizontal to vertical in Excel?
How do I change the direction of text in a Word document?
To change the text direction, select Table Tools Layout > Text Direction. The text will rotate to the right. Select Text Direction again to rotate the text another 90 degrees. To change the text alignment, choose an Alignment option to change how the text appears in the cell.
How do you change the direction of typing?
In most Windows programs (including MS Word, Internet Explorer, and Notepad), you can use the following shortcuts to switch direction:
- For right-to-left, press: Ctrl + Right. Shift.
- For left-to-right, press: Ctrl + Left. Shift.
Which tool can change the direction of text using?
To do so, select the cells for which you want to change the text direction and click the Layout tab under Table Tools. Click Text Direction in the Alignment section of the Layout tab. Each time you click Text Direction, a different direction is applied.
How do I change the position of words in Word?
Opening and Using the Position Menu
In your document, select the object with which you want to work, switch to the “Layout” menu, and then click the “Position” button. That button also appears on the “Format” menu of the Ribbon and works the same way.
How do I change text from right to left?
Select the text that needs to be fixed, or select all text in the document by pressing Ctrl-A. Click both the Left-to-Right Text Direction and Ltr Run buttons (it doesn’t matter which you click first).
How do I change text from right to left in Word?
You can change the text direction from within a Microsoft Office program by choosing the Right-to-left paragraph button in the Paragraph group on the Home tab (this only appears if you have a right-to-left language enabled).
How do I fix my keyboard backwards?
Keyboard typing backward from right to left
- Restart your PC.
- Hard reboot your PC.
- Check your system’s Region.
- Run the Keyboard Troubleshooter.
- Change the keyboard typing direction.
- Update or Reinstall your keyboard driver.
- Troubleshoot in Clean Boot State.
How do I type vertically in Word 2010?
8 Answers
- Enter your Word art as usual.
- Then click on the word art box you just made.
- Make sure you click on ‘Format’ on the top of Publisher.
- Third option across the top says ‘vertical text’
- Click and your text is vertical 😉
Which feature allows you to change the direction of the cell content?
Select a cell, row, column, or a range. > Format Cell Alignment. Under Orientation on the right side, in the Degrees box, use the up or down arrow to set the exact number of degrees that you want to rotate the selected cell text.
How do you change from horizontal to vertical in Word?
To change the orientation of the whole document, select Layout > Orientation. Choose Portrait or Landscape.
How do I align text left and right on the same line in Word?
Flush Left and Flush Right On the Same Line
- Make sure the paragraph is formatted as left-aligned.
- Display the Home tab of the ribbon.
- Click the small icon at the bottom-right of the Paragraph group.
- Click the Tabs button.
- What you want to do is to insert a right-aligned tab near the right edge of the line.
How do you fix an inverted arrow key?
5 Answers. Hold down the Fn key, usually on the right side of the space bar, and press W while you are holding it. Should fix it instantly.
Why have my keys swapped on my keyboard?
The reason why the @ and ” keys keep swapping is because your keyboard is switching between two different language settings.On a UK keyboard, pressing shift +’ will give you an @ symbol, and pressing shift+2 will give you an apostrophe. On a US keyboard, this is reversed.
Why is my keyboard deleting backwards?
Press the “Ins” key to toggle overtype mode off. Depending on your keyboard model, this key may also be labeled “Insert.” If you simply want to disable overtype mode but keep the ability to toggle it back on, you are done.
How do you make text vertical?
Make text flow vertically within a text box or shape
On the Text Box Tools Format tab, click Text Direction. If you want your text to go the other direction (bottom to top, instead of top to bottom), drag the rotation handle for the text box or shape until the text direction is reversed.
How do I make text vertical in a Word table?
You can change text direction by following these steps:
- Right-click your mouse on the cell whose text direction you want to change. A Context menu appears.
- Choose Text Direction from the Context menu. The Text Direction dialog box appears.
- Select the Orientation you want used for your text.
- When satisfied, click on OK.
Specify text direction in a shape, text box, or table cell
- Enter the text in the shape or text box or table cell, and then select the text.
- Ctrl+Click the selected text, and then click Format Shape. On the Text Box tab in the dialog box, choose a direction from the Text Direction box.
Which option allows you to change the way text appear in a cell or a group of cells?
Answer: Alignment Tab. Explanation: You can position text and numbers, change the orientation and specify text control in cells by using the Alignment tab in the Format Cells dialog box.
How will you rotate the text in a table cell?
Change the orientation of text in a cell
- Select a cell, row, column, or a range.
- Select Home > Orientation. , and then select an option. You can rotate your text up, down, clockwise, or counterclockwise, or align text vertically:
How do I change text from horizontal to vertical in Excel?
In Excel, you can use the Paste Special to convert a horizontal list to a vertical list. In Excel 2007, after selecting the Paste Special from the context menu, it will open the Paste Special dialog. In the dialog, please check All option and Transpose option, and click OK button.
Microsoft Word doesn’t permit changing the direction of normal paragraph text.
However, it does permit you to change the direction of text in case of Tables, shapes, or text boxes. Whether you want to change the text from Vertical to Horizontal or vice versa, it’s possible with shapes and tables.
With that being said, I’ll demonstrate how you can leverage
tables, shapes or text boxes to change text directions in Word.
To change text direction in Word using shapes or text boxes, obey the following instructions.
First insert a rectangular shape or text box that will contain the text. If you don’t know the steps to insert shapes in Word, follow the steps below:
- Click on the Insert tab.
- Click on the Shapes button in the Illustrations group.
- Select and draw the rectangle shape.
This is the shape that will contain the text. Don’t worry if you have a colored shape, I’ll soon show you how to remove the shape border and color shading so that it won’t be visible.

- Right-Click on the rectangle and select Add
Text.

- Now type your text inside the shape.

- To remove the shape color, right-click on it for the shortcut menu. Then Select the Fill drop-down and select No Fill. Alternatively, select the shape and go to Drowing Tool Format tab, under the Shape Style category, select Fill > No Fill.

The remaining steps will now show you how to change the text direction in word.
- The simplest way is to click and drug the rotate icon of the shape. (see screenshot)

For another way to change the text direction in the shape, continue with the steps below.
- Click on the Drawing Tool Format tab
- In the Text group, click on the Text Direction button.

- From the drop-down list, select how you want the
text direction to be. If you don’t like the 90° or 270° rotation, click on the Text
Direction options for more options.

As you change the text direction, the shape size will automatically
scale to accommodate your text. You may have to also adjust the shape afterward
to make the text in the shape more presentable.
NOTE: The above steps can also be used to change text
direction in text boxes in Word.
- Remove the shape color and border.
If you are new to shapes in Word, you might have problem removing the shape border and shading. If the border and shading is ok for you then ignore this step.
To remove the inside shading of the shape, click on the
shape and go to the Drawing Tool Format tab. In the shapes style group,
click on Shape Fill and select No Fill.

This will remove the color shading inside the shape.
In this case, you should change the text color in the shape
to black. White text may become invisible on a white background.
Change text direction in Word using Tables
Text in a table must not always flow from left to right.
So, to change the text direction in in a table, obey the instructions
below:
- Click inside the cell containing the text you want to change direction.
- If you want to change the text direction of a group of cells, select this group of cells by clicking and dragging over the cells.

- Click on the Table Tools Layout tab.
- In the Alignment group, click on the Text Direction button.

- Each time you click on the Text Direction button, the text changes direction by 90 degrees.

- Keep on clicking on this button until you are
pleased with the text direction.
As you change the text direction, the cell size will automatically
scale to accommodate your text. You may have to also adjust the rows and
columns afterward to make your table fit to be seen.
How to Rotate Text in Word
Change the text direction in Word
Updated on November 29, 2022
What to Know
- Rotate a text box: Go to Insert > Text Box to create a text box. Select the box and drag the rotation handle to the right or left to rotate.
- Rotate text within a text box: Select Drawing Tools Format > Text Direction and choose either Rotate all text 90° or Rotate all text 270°.
- Change the direction of a table: Go to Insert > Table to create a table. Select a cell, then select Table Tools Layout > Text Direction.
You can use a text box or table in Microsoft Word to orient text in any direction you like. In this guide, we show you how to rotate a text box, how to rotate text within a text box, and how to change the direction of a table in the desktop versions of Microsoft Word for PC or Mac. (This task cannot be done in Word Online or the Word mobile apps.)
How to Rotate a Text Box in Word
Text boxes make it easy to change the direction of text in word. All you do is create the text box, add some text, and decide how to rotate the text box.
To create a text box, select Insert > Text Box and choose one of the built-in designs. To add text, select the text box and begin typing.
Drag the rotation handle on a text box to rotate the text.
To rotate the text with the rotation handle, select the text box and drag the rotation handle to the right or to the left. Release it when the text is in the direction you want.
To rotate the text box by 15-degree increments, hold Shift while dragging the rotation handle.
To rotate the text box 90 degrees:
- In Word for PC: Select the text box, select Layout > Rotate, and choose either Rotate Right 90° or Rotate Left 90°.
- In Word for Mac: Click the text box, click Shape Format > Arrange > Rotate > Rotate, and choose either Rotate Right 90° or Rotate Left 90°.
Choose a custom rotation angle.
To set a custom rotation angle:
- In Word for PC: Select the text box, select Layout > Rotate, and select More Rotation Options. From the Size tab, change the rotation angle to the angle you need.
- In Word for Mac: Click the text box, click Shape Format > Arrange > Rotate > Rotate, and click More Rotation Options. From the Size tab, change the rotation angle so the text points in the direction you need.
How to Rotate Text in a Text Box
Instead of rotating the text box, you can opt to rotate the text inside the box instead.
You can also rotate text inside a shape.
Choose how to rotate text inside a text box.
To rotate text in a text box, select Drawing Tools Format > Text Direction and choose either Rotate all text 90° or Rotate all text 270°. The text will appear vertically on the page.
To align the text inside a text box, select Drawing Tools Format > Align Text, and align the text with the right side of the text box, the left side, or the center.
How to Change Text Direction in a Table
You can also rotate text inside a table. Rotating text makes it possible to have narrow rows in a table.
To create a table, select Insert > Table and choose a table size.
Change text direction in a Word table.
To change text direction in a table:
-
Select the cell containing the text you want to change direction.
-
To change the text direction, select Table Tools Layout > Text Direction. The text will rotate to the right. Select Text Direction again to rotate the text another 90 degrees.
-
To change the text alignment, choose an Alignment option to change how the text appears in the cell. You can align the text to the center, to the left, to the right, to the bottom, or to the top.
FAQ
-
How do I rotate a picture in Word?
Select the picture you want to rotate, then select and hold the rotation handle that appears just above the picture. While still holding, drag the handle to the left or right to rotate. Note that if you have multiple pictures selected at once, they will all rotate individually.
-
How do I rotate a document in Word?
To rotate a document in Word, select Layout > Orientation, and then choose the page orientation you prefer: Landscape (horizontal) or Portrait (vertical).
-
How do I rotate a single page in Word?
Select the page you want to reorient, then select Page Layout > Page Setup and choose either Portrait or Landscape under Orientation. Then select Apply to > Selected text.
Thanks for letting us know!
Get the Latest Tech News Delivered Every Day
Subscribe