
Although CSV stands for comma-separated values, it has become a common file type to define simple text files including delimiter-separated data. Thus, a CSV file can use a semicolon or tab character as a delimiter as well. In this guide, we’re going to show you how to change CSV delimiter in Excel.
Changing the delimiter in Excel Options
The first approach in our article is about changing how Excel evaluates CSV files including saving. You can make Excel using semicolon (;) as the delimiter.
- Open Advanced Options by following File > Options > Advanced.
- In the Editing options section, find Use system operators
- Uncheck it to override the system settings.
- Set Decimal separator to comma (,) and Thousands separator to period (.).
- Clicking OK ensures that Excel uses semicolon (;) as the delimiter.


This setting allows Excel to save CSV files with semicolons (;).
If you are using a computer with European version, your settings may already be like above. You can change the operators to convert the delimiter from a semicolon to a comma.
Changing the CSV delimiter when importing files
Excel also allows you to change the delimiter while opening files. This is a more convenient way if you do not want to alter Excel’s entire behavior. Because Excel’s data import features have been updated vastly beginning with 2016, we divided this section into two parts.
Power Query — Excel 2016 and newer
Disclaimer: Power Query has been part of Excel 2010 and Excel 2013 as well. However, Microsoft released it as an add-in. Excel 2016 has the Power Query features by default. You can learn more about Power Query at Power Query 101.
Power Query allows you to choose the delimiter when creating a connection. You can find the option in the Preview dialog. You can create the connection by using From Text/CSV command in Data > Get & Transform Data.

Selecting the file opens the Preview window. Probably, the Power Query guessed the delimiter correctly. However, you can change CSV delimiter easily at a dropdown option.
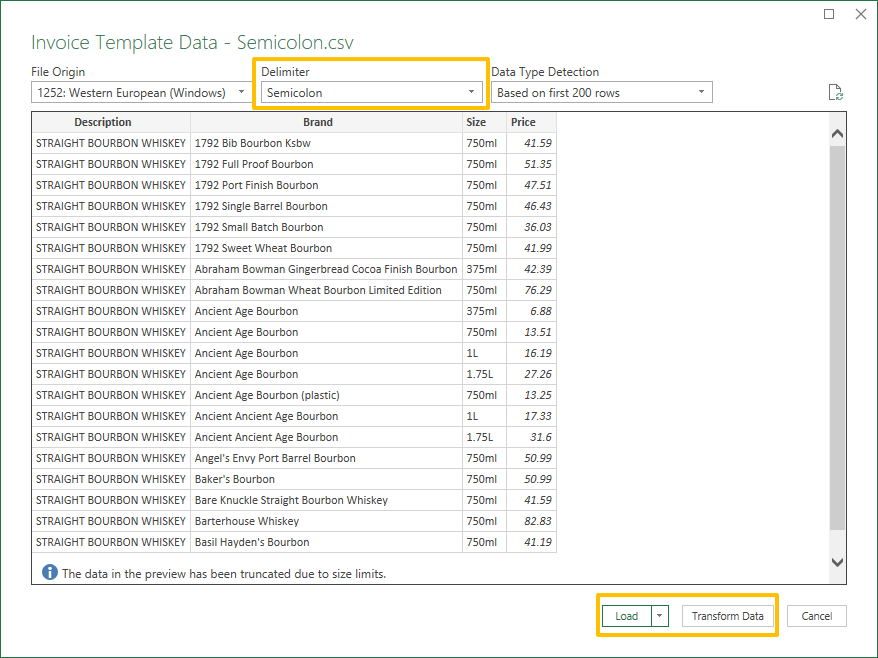
Use Load or Transform Data buttons to load the data directly into your workbook or modify it in the Power Query window respectively.
Excel 2013 or older
If you are using Excel 2013 or a previous version without the Power Query add-in, you can use Text Import Wizard which shares a similar user interface with Text to Columns wizard.
- Click Data > Get External Data > From Text to select a file and open the Text Import Wizard.
- In the first step of the wizard, make sure to select Delimited
- Click Next button to continue.

- Select one or more delimiters that fits your data. You can see if the data is separated correctly in the Data preview section.
- You can modify data types for columns at the next step. Click Next to continue the third step or click the Finish button to populate the separated data in your worksheet.


Import or export text (.txt or .csv) files
There are two ways to import data from a text file with Excel: you can open it in Excel, or you can import it as an external data range. To export data from Excel to a text file, use the Save As command and change the file type from the drop-down menu.
There are two commonly used text file formats:
-
Delimited text files (.txt), in which the TAB character (ASCII character code 009) typically separates each field of text.
-
Comma separated values text files (.csv), in which the comma character (,) typically separates each field of text.
You can change the separator character that is used in both delimited and .csv text files. This may be necessary to make sure that the import or export operation works the way that you want it to.
Note: You can import or export up to 1,048,576 rows and 16,384 columns.
Import a text file by opening it in Excel
You can open a text file that you created in another program as an Excel workbook by using the Open command. Opening a text file in Excel does not change the format of the file — you can see this in the Excel title bar, where the name of the file retains the text file name extension (for example, .txt or .csv).
-
Go to File > Open and browse to the location that contains the text file.
-
Select Text Files in the file type dropdown list in the Open dialog box.
-
Locate and double-click the text file that you want to open.
-
If the file is a text file (.txt), Excel starts the Import Text Wizard. When you are done with the steps, click Finish to complete the import operation. See Text Import Wizard for more information about delimiters and advanced options.
-
If the file is a .csv file, Excel automatically opens the text file and displays the data in a new workbook.
Note: When Excel opens a .csv file, it uses the current default data format settings to interpret how to import each column of data. If you want more flexibility in converting columns to different data formats, you can use the Import Text Wizard. For example, the format of a data column in the .csv file may be MDY, but Excel’s default data format is YMD, or you want to convert a column of numbers that contains leading zeros to text so you can preserve the leading zeros. To force Excel to run the Import Text Wizard, you can change the file name extension from .csv to .txt before you open it, or you can import a text file by connecting to it (for more information, see the following section).
-
Import a text file by connecting to it (Power Query)
You can import data from a text file into an existing worksheet.
-
On the Data tab, in the Get & Transform Data group, click From Text/CSV.
-
In the Import Data dialog box, locate and double-click the text file that you want to import, and click Import.
-
In the preview dialog box, you have several options:
-
Select Load if you want to load the data directly to a new worksheet.
-
Alternatively, select Load to if you want to load the data to a table, PivotTable/PivotChart, an existing/new Excel worksheet, or simply create a connection. You also have the choice of adding your data to the Data Model.
-
Select Transform Data if you want to load the data to Power Query, and edit it before bringing it to Excel.
-
If Excel doesn’t convert a particular column of data to the format that you want, then you can convert the data after you import it. For more information, see Convert numbers stored as text to numbers and Convert dates stored as text to dates.
Export data to a text file by saving it
You can convert an Excel worksheet to a text file by using the Save As command.
-
Go to File > Save As.
-
Click Browse.
-
In the Save As dialog box, under Save as type box, choose the text file format for the worksheet; for example, click Text (Tab delimited) or CSV (Comma delimited).
Note: The different formats support different feature sets. For more information about the feature sets that are supported by the different text file formats, see File formats that are supported in Excel.
-
Browse to the location where you want to save the new text file, and then click Save.
-
A dialog box appears, reminding you that only the current worksheet will be saved to the new file. If you are certain that the current worksheet is the one that you want to save as a text file, click OK. You can save other worksheets as separate text files by repeating this procedure for each worksheet.
You may also see an alert below the ribbon that some features might be lost if you save the workbook in a CSV format.
For more information about saving files in other formats, see Save a workbook in another file format.
Import a text file by connecting to it
You can import data from a text file into an existing worksheet.
-
Click the cell where you want to put the data from the text file.
-
On the Data tab, in the Get External Data group, click From Text.
-
In the Import Data dialog box, locate and double-click the text file that you want to import, and click Import.
Follow the instructions in the Text Import Wizard. Click Help
 on any page of the Text Import Wizard for more information about using the wizard. When you are done with the steps in the wizard, click Finish to complete the import operation.
 -
In the Import Data dialog box, do the following:
-
Under Where do you want to put the data?, do one of the following:
-
To return the data to the location that you selected, click Existing worksheet.
-
To return the data to the upper-left corner of a new worksheet, click New worksheet.
-
-
Optionally, click Properties to set refresh, formatting, and layout options for the imported data.
-
Click OK.
Excel puts the external data range in the location that you specify.
-
 on any page of the Text Import Wizard for more information about using the wizard. When you are done with the steps in the wizard, click Finish to complete the import operation.
If Excel does not convert a column of data to the format that you want, you can convert the data after you import it. For more information, see Convert numbers stored as text to numbers and Convert dates stored as text to dates.
Export data to a text file by saving it
You can convert an Excel worksheet to a text file by using the Save As command.
-
Go to File > Save As.
-
The Save As dialog box appears.
-
In the Save as type box, choose the text file format for the worksheet.
-
For example, click Text (Tab delimited) or CSV (Comma delimited).
-
Note: The different formats support different feature sets. For more information about the feature sets that are supported by the different text file formats, see File formats that are supported in Excel.
-
-
Browse to the location where you want to save the new text file, and then click Save.
-
A dialog box appears, reminding you that only the current worksheet will be saved to the new file. If you are certain that the current worksheet is the one that you want to save as a text file, click OK. You can save other worksheets as separate text files by repeating this procedure for each worksheet.
-
A second dialog box appears, reminding you that your worksheet may contain features that are not supported by text file formats. If you are interested only in saving the worksheet data into the new text file, click Yes. If you are unsure and would like to know more about which Excel features are not supported by text file formats, click Help for more information.
For more information about saving files in other formats, see Save a workbook in another file format.
The way you change the delimiter when importing is different depending on how you import the text.
-
If you use Get & Transform Data > From Text/CSV, after you choose the text file and click Import, choose a character to use from the list under Delimiter. You can see the effect of your new choice immediately in the data preview, so you can be sure you make the choice you want before you proceed.
-
If you use the Text Import Wizard to import a text file, you can change the delimiter that is used for the import operation in Step 2 of the Text Import Wizard. In this step, you can also change the way that consecutive delimiters, such as consecutive quotation marks, are handled.
See Text Import Wizard for more information about delimiters and advanced options.
If you want to use a semi-colon as the default list separator when you Save As .csv, but need to limit the change to Excel, consider changing the default decimal separator to a comma — this forces Excel to use a semi-colon for the list separator. Obviously, this will also change the way decimal numbers are displayed, so also consider changing the Thousands separator to limit any confusion.
-
Clear Excel Options > Advanced > Editing options > Use system separators.
-
Set Decimal separator to , (a comma).
-
Set Thousands separator to . (a period).
When you save a workbook as a .csv file, the default list separator (delimiter) is a comma. You can change this to another separator character using Windows Region settings.
Caution: Changing the Windows setting will cause a global change on your computer, affecting all applications. To only change the delimiter for Excel, see Change the default list separator for saving files as text (.csv) in Excel.
-
In Microsoft Windows 10, right-click the Start button, and then click Settings.
-
Click Time & Language, and then click Region in the left panel.
-
In the main panel, under Regional settings, click Additional date, time, and regional settings.
-
Under Region, click Change date, time, or number formats.
-
In the Region dialog, on the Format tab, click Additional settings.
-
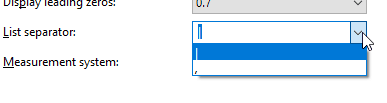
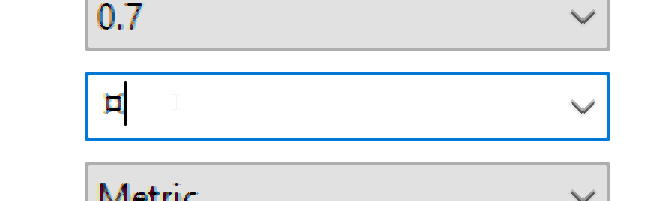
In the Customize Format dialog, on the Numbers tab, type a character to use as the new separator in the List separator box.
-
Click OK twice.
-
In Microsoft Windows, click the Start button, and then click Control Panel.
-
Under Clock, Language, and Region, click Change date, time, or number formats.
-
In the Region dialog, on the Format tab, click Additional settings.
-
In the Customize Format dialog, on the Numbers tab, type a character to use as the new separator in the List separator box.
-
Click OK twice.
Note: After you change the list separator character for your computer, all programs use the new character as a list separator. You can change the character back to the default character by following the same procedure.
Need more help?
You can always ask an expert in the Excel Tech Community or get support in the Answers community.
See Also
Import data from external data sources (Power Query)
Need more help?
Want more options?
Explore subscription benefits, browse training courses, learn how to secure your device, and more.
Communities help you ask and answer questions, give feedback, and hear from experts with rich knowledge.
I don’t see an option immediately in Excel, but I can offer some advice.
Remember that CSV files are Comma Separated Values, which follows a standard: Data, a comma, data, a comma, etc. To break this means it will not follow the specification.
What happens if you have a comma in your data though? Excel will automatically surround that cell’s content with quotation marks ("), so the program importing the file will know when that cell actually ends.
If you do not want a comma as a separator, you can save the file as a CSV still, then edit it manually. Open a text editor like Notepad or Notepad++. Do a search for whatever character you want to use (i.e. in Notepad, go to Edit->Find). If you want a pipe, search for a pipe (|). If you hit any results, do not use this character. To search for a tab easily, I’d recommend using Notepad++.
Once you find that the character you want to use isn’t being used elsewhere in your document, then you can do a Search and Replace. In Notepad, go to Edit->Replace…. In ‘Find what:’, type a comma. In ‘Replace with:’, type the character you want to use for the separator. The next part is to hit Find Next. The reason for this, is that if there are commas in your data as well, this will break your file. Only replace the commas that are delimiters of the data, and nothing in quotation marks.
Once this is done, you can save the file. If you want to import it, I’d recommend renaming it to a .TXT file, so Excel will ask you what the Field Delimiter Character is. If you choose to open a .CSV file, it will automatically use a comma as the delimiter, which is what you don’t want.
This post was most recently updated on March 13th, 2023.
6 min read.
This article will explain how you can change the Excel list delimiter for your CSV (or other) file exports. Because it isn’t always a comma. And setting the delimiter won’t escape or strip the same characters in the values, so it’ll mess up your data quite easily.
Recently, I needed to find a way to import data from an old Excel file to a custom-coded system that could import CSV files. However, the data was fairly non-sanitized – containing commas, semicolons, and other weird characters. I could define the delimiter used in the imported data – however, that would be useless if I wasn’t also able to define it in the export.
With Excel, it’s not that simple, though. Excel, just like other Microsoft Office applications loves trying its best to respect the regional & localization settings of the machine it’s running on – most often to frustrating results.
Which just means you can change the delimiter value used in CSV export by tweaking these settings. This way, you can change the commas to semicolons, or save the CSV with any other delimiter.
And this article describes how!
Background
If you’re still here, let’s delve into the background of the issue a bit deeper.
I needed to wrangle data stored in a .xlsx file into another form, that another application could read. This file format happened to be CSV. Which brought me into the beautiful world of CSV delimiter configuration in Windows.
What’s a “CSV” -file ?
Stands for “comma-separated values” – A text file that uses a comma to separate values.
Each line of the file is a data record. Each record consists of one or more fields, separated by commas. The use of the comma as a field separator (Delimiter) is the source of the name for this file format.
Normally, that’s simple – just “save as” with a different file format. However, this time I was posed with an issue: the data included both commas (“,”) and semicolons (“;”), both of which are typical delimiters in CSV files. Additionally, I couldn’t wrap the values inside quotes due to limitations in both the export and the import functionality. So I needed to use another character – such as pipe (“|”).
Instead of being able to configure the delimiter in the export (like in any sensible spreadsheet editor, if you ask me!), Excel is just going to use your regional settings and grab the list separator from there. Nice and automatic – probably someone thought this to be user friendly, but instead it makes edge cases a pain.
This means that in English, CSV is going to be values limited by commas, like this:
Value1,Value2,Value3,Value4...But in Finnish, for example, we’ll be using the semicolon – like so:
Value1;Value2;Value3;Value4...And I could imagine there are plenty of other locales where you might need to tell the values apart with a semicolon instead of a comma. Or you might even need something totally different!
But simply changing my region to something else isn’t a solution this time. The data I had been supplied had both colons and semicolons in cell values. The data would be incorrectly split and parsed due to that.
However, we can luckily override the delimiter to be almost anything – and it’s all done through the regional settings. Read on to see for yourself!
Solution
So, I started googling. And naturally, I found a couple of examples on how to save a csv file with a different delimiter in Windows 7… Obviously, that’ll help you eventually find your way in Windows 10 or Windows 11 as well, even though the user interfaces are a bit different. But I thought it’s always useful to also document the exact steps!
The guide below should be accurate for Windows 10 and 11, and be “close enough” for Windows 7. 
Here are the steps for saving a csv in Excel with a different delimiter, in writing – and see some useful screenshots further below!
Time needed: 10 minutes.
How to export a CSV with a custom delimiter in Excel?
- Make sure Microsoft Excel is closed before trying to change the CSV delimiter
Making sure Excel is closed is required to make sure it picks up your changes.
- Open Control Panel
Opening the Control Panel can be done by hitting win+r and writing “Control Panel” in the Run window.
Or by searching for “Control Panel” in your start menu. Whichever suits you.
- Next, you need to access Regional Settings
Now you’ll need to navigate to Regional Settings.
This is where you can find it:

It’s available either under “Region” or “Clock and Region” -> “Region”. - Click the “Additional settings” -button
Hit that “Additional settings…” -button now! This will pop up quite a few additional options – in hindsight, not that surprising, but it’s always nice when a button does what you expect it to do.

- Find the “List separator” and change it to your preferred delimiter such as a pipe (“|”).
You’ll need to edit the “List separator” now.
While the dropdown might have some prepopulated values, you can actually just safely ignore them and input whatever delimiter you need to use to the text field directly.

Note, that there’s at least one, undocumented limitation here: you can’t use the same character as both decimal and list separator! This means that if you’re using regional settings like Finnish, where a comma is considered to be a decimal separator instead of a full stop or “dot”, you can’t use it as a list delimiter…
Before you change the decimal separator to something else, that is
This also doesn’t come without some side effects: the same list separator is used, for example, as the separator for passing parameters to an Excel function, as Faz notes in the comments section below.
- Click OK -> OK -> exit Control Panel, after which you can proceed to actually export the file!
With the selection done, just hit “OK” a couple of times and head back to Excel!
Now we can retry saving the file!
- Open the Excel file
Open the file you want to export to a CSV with a custom delimiter (in my example, to a “pipe-delimited file”).
- Select File -> Save As
Time to save the file! Hit File > “Save as”. This should pop up the classic saving dialog – which in Excel comes with some useful options.
- Change the ‘Save as type’ to ‘CSV (Comma delimited)(*.csv)’
Changing to “CSV (Comma delimited)” is admittedly a bit misleading at this point, but we’ll just have to live with that. It will in fact respect your selected delimiter despite the name.
- Change the name and file extension if need be
You can modify the extension and the file name, but by default, it stays as csv even if you’re using a different delimiter.
- Click Save -> OK -> Yes
After hitting a couple of extra affirmative buttons, you should be good!


So now you know how to save (or export, if you prefer that term) a CSV file with a custom delimiter (anything different than a comma or semicolon, depending on your machine configuration) in Microsoft Office Excel on Windows. If you run into any questions, drop them in the comments-section below!
As an interesting side note, you can use completely nonsensical characters as delimiters! Take the picture below as an example – I actually needed this delimiter for a work project once. A project, that’s probably still running in production…
What is the default delimiter for a CSV?
If you search for this online, you’ll get the easy answer – a comma. It’s “comma-separated values” after all, right?
Well, as usual, the easy answer is wrong. You can even find it on support.microsoft.com. But it’s still the wrong answer.
The default delimiter is defined by your Windows locale. It’s usually either a comma or a semi-colon, but it’s not necessarily one of those. It can be something different, too. Just so you know.
Why are CSV files so confusing and non-standard?
Because Microsoft wants to implement localization everywhere but doesn’t actually care about people using any other locales than EN-US. 😅
References
Big kudos to Barry Stevens for his blog post on the topic! And also to Sami Laiho, for noticing you can’t use the same character as both decimal and list separator 😬..
- Author
- Recent Posts

Antti Koskela is a proud digital native nomadic millennial full stack developer (is that enough funny buzzwords? That’s definitely enough funny buzzwords!), who works as Solutions Architect for Precio Fishbone, building delightful Digital Workplaces.
He’s been a developer from 2004 (starting with PHP and Java), and he’s been working on .NET projects, Azure, Office 365, SharePoint and a lot of other stuff. He’s also Microsoft MVP for Azure.
This is his personal professional (e.g. professional, but definitely personal) blog.
Solution
- Make sure Microsoft Excel is closed before trying to change the CSV delimiter.
- Open Control Panel.
- Next, you need to access Regional Settings.
- Click the “Additional Settings” -button.
- Find the “List separator” and change it to your preferred delimiter such as a pipe (“|”).
Contents
- 1 How do I change my delimiter?
- 2 Can a CSV have a different delimiter?
- 3 How do I change a semicolon to a CSV delimiter?
- 4 How do I change delimiters in Excel?
- 5 How do I change a CSV file to delimiter in Excel?
- 6 How do I change a delimiter to a csv file in Python?
- 7 What is a delimiter in CSV?
- 8 How do you change a Semicoter to a delimiter in Excel?
- 9 How do I put commas in a CSV file?
- 10 What is a colon delimited format?
- 11 What are delimiters in Excel?
- 12 How do I set text qualifier in CSV?
- 13 How do I edit a CSV file in Excel?
- 14 How do I convert text to delimiter in Excel?
- 15 How do you change the delimiter in Python?
- 16 How do you set a separator in Python?
- 17 How do I use delimiter in Python?
- 18 How do I change the delimiter in a text file?
- 19 How does CSV determine delimiter?
- 20 Where should you add a delimiter?
How do I change my delimiter?
In Microsoft Windows, click the Start button, and then click Control Panel. Open the dialog box for changing Regional and Language settings. In the dialog box, look for the List separator setting. (Location may vary based on Windows version.
Can a CSV have a different delimiter?
Although the file is defined as Comma Separated Values, the delimiter could be anything. The most common delimiters are: a comma (,), a semicolon (;), a tab (t), a space ( ) and a pipe (|). But theoretically anything can be a delimiter as long as it is consistent.
How do I change a semicolon to a CSV delimiter?
To use notepad or set the default list separator symbol in the Regional Settings
- Right click on the file.
- Click the Edit menu.
- Enter a semicolon ‘;’ into the Find what box.
- Enter a comma ‘,’ into the Replace with box.
- Click the Replace all button.
- Close the Replace window.
- Save the file as a .
How do I change delimiters in Excel?
1 Answer
- Do Data -> Text to Columns.
- Make sure to choose Delimited.
- Click Next >
- Enable the Tab delimiter, disable all the others.
- Clear Treat consecutive delimiters as one.
- Click Cancel.
How do I change a CSV file to delimiter in Excel?
Mac/Windows
- Open a new Excel sheet.
- Click the Data tab, then From Text.
- Select the CSV file that has the data clustered into one column.
- Select Delimited, then make sure the File Origin is Unicode UTF-8.
- Select Comma (this is Affinity’s default list separator).
- Finally, click Finish.
- Remember to Save your document!
How do I change a delimiter to a csv file in Python?
How to change the delimiter in a CSV file
- Create a new Python file in the location where your CSV file is saved.
- Open up an Anaconda Prompt instance.
- Type python change_delimiter.py (replacing change_delimiter.py with the name of your Python file) then press Enter.
What is a delimiter in CSV?
Answer: A tab-delimited or comma-separated value (CSV) file are text format files.with a character such as a comma (,). This character is called the field separator or delimiter. When the field separator (delimiter) is a comma, the file is in comma-separated (CSV) or comma-delimited format.
How do you change a Semicoter to a delimiter in Excel?
To achieve the desired result we need to temporary change the delimiter setting in the Excel Options. Uncheck the “Use system separators” setting and put a comma in the “Decimal Separator” field. Now save the file in the . CSV format and it will be saved in the semicolon delimited format !!!
How do I put commas in a CSV file?
The encoded values will never contain a comma so every comma in your CSV will be a separator. You can use the Text_Qualifier field in your Flat file connection manager to as ” . This should wrap your data in quotes and only separate by commas which are outside the quotes.
What is a colon delimited format?
Delimited formats
Any character may be used to separate the values, but the most common delimiters are the comma, tab, and colon.This prevents the comma in the actual field value (Bloggs, Fred; Doe, Jane, etc.) from being interpreted as a field separator.
What are delimiters in Excel?
A delimiter is the symbol or space which separates the data you wish to split. For example, if your column reads “Smith, John” you would select “Comma” as your delimiter. Select the delimiter within your data. Check the box next to “Treat consecutive delimiters as one.” Click [Next].
How do I set text qualifier in CSV?
Click on Export icon > Export Data to CSV and the Save as CSV Options box opens. Set the Text qualifier as either double or single quotes. Set the Column delimiter as a comma. Click OK.
How do I edit a CSV file in Excel?
Open an CSV file using the Text Import Wizard
- In Windows Explorer, rename the CSV file with a TXT file extension. For example, rename Import.
- in Excel, open the import file. Select File > Open, and browse to your file.
- The Text Import Wizard is displayed.
- Your file will be opened in Excel.
How do I convert text to delimiter in Excel?
If you’re using Microsoft Excel:
- Open the File menu and select the Save as… command.
- In the Save as type drop-down box, select the Text (tab delimited) (*. txt) option.
- Select the Save button. If you see warning messages pop up, select the OK or Yes button.
How do you change the delimiter in Python?
Given List of Strings and replacing delimiter, replace current delimiter in each string.
- Input : test_list = [“a, t”, “g, f, g”, “w, e”, “d, o”], repl_delim = ‘ ‘
- Output : [“a t”, “g f g”, “w e”, “d o”]
- Explanation : comma is replaced by empty spaces at each string.
How do you set a separator in Python?
The separator between the arguments to print() function in Python is space by default (softspace feature) , which can be modified and can be made to any character, integer or string as per our choice. The ‘sep’ parameter is used to achieve the same, it is found only in python 3. x or later.
How do I use delimiter in Python?
Split strings in Python (delimiter, line break, regex, etc.)
- Split by delimiter: split() Specify the delimiter: sep.
- Split from right by delimiter: rsplit()
- Split by line break: splitlines()
- Split by regular expression: re.split()
- Concatenate list of strings.
- Split based on the number of characters: slice.
How do I change the delimiter in a text file?
You can change the separator character that is used in both delimited and . csv text files.
Change the default list separator for saving files as text (. csv) in Excel
- Clear Excel Options > Advanced > Editing options > Use system separators.
- Set Decimal separator to , (a comma).
- Set Thousands separator to . (a period).
How does CSV determine delimiter?
Here’s what I do.
- Parse the first 5 lines of a CSV file.
- Count the number of delimiters [commas, tabs, semicolons and colons] in each line.
- Compare the number of delimiters in each line. If you have a properly formatted CSV, then one of the delimiter counts will match in each row.
Where should you add a delimiter?
When designing a data file format, use delimiters that will not appear in the data or padding, or use CSV or SSV forms. When copying from a table into a file, you can insert delimiters independently of columns. For example, to insert a newline character at the end of a line, specify nl=d1 at the end of the column list.