
Windows operating system uses a mouse cursor which is also called pointer. This is a small arrow that tracks your touchpad or mouse movement. However, this mouse cursor is different than the one you see in most text processing applications like Microsoft Word. In this article, we will explain how to change text cursor size and color in Microsoft Word.
Related: How to quickly insert dividers in Microsoft Word?
Different Cursors Used in Word
You can find the following types of cursors when using Word documents:
- Arrow cursor – this is a system’s mouse cursor and looks as per the settings you have for your mouse pointer. You can find how to change the color and size of this mouse cursor as explained in our earlier article.
- Text select – this is also a mouse cursor however appears only when you move the pointer on the text typing area. This is called “Text Select” cursor and you can change this icon from mouse pointer settings.
- Text cursor – this is thin line blinking on the text area and moves ahead when you start typing. Note that this text cursor stays on the same place even you move the mouse to another place in the document without clicking.
- Inverted arrow – this will appear when you move the pointer to left margin area of the document. Clicking with inverted arrow will select the line and you can drag to select multiple lines. This cursor stays as it is and does not change with respect to mouse cursor or text cursor changes.
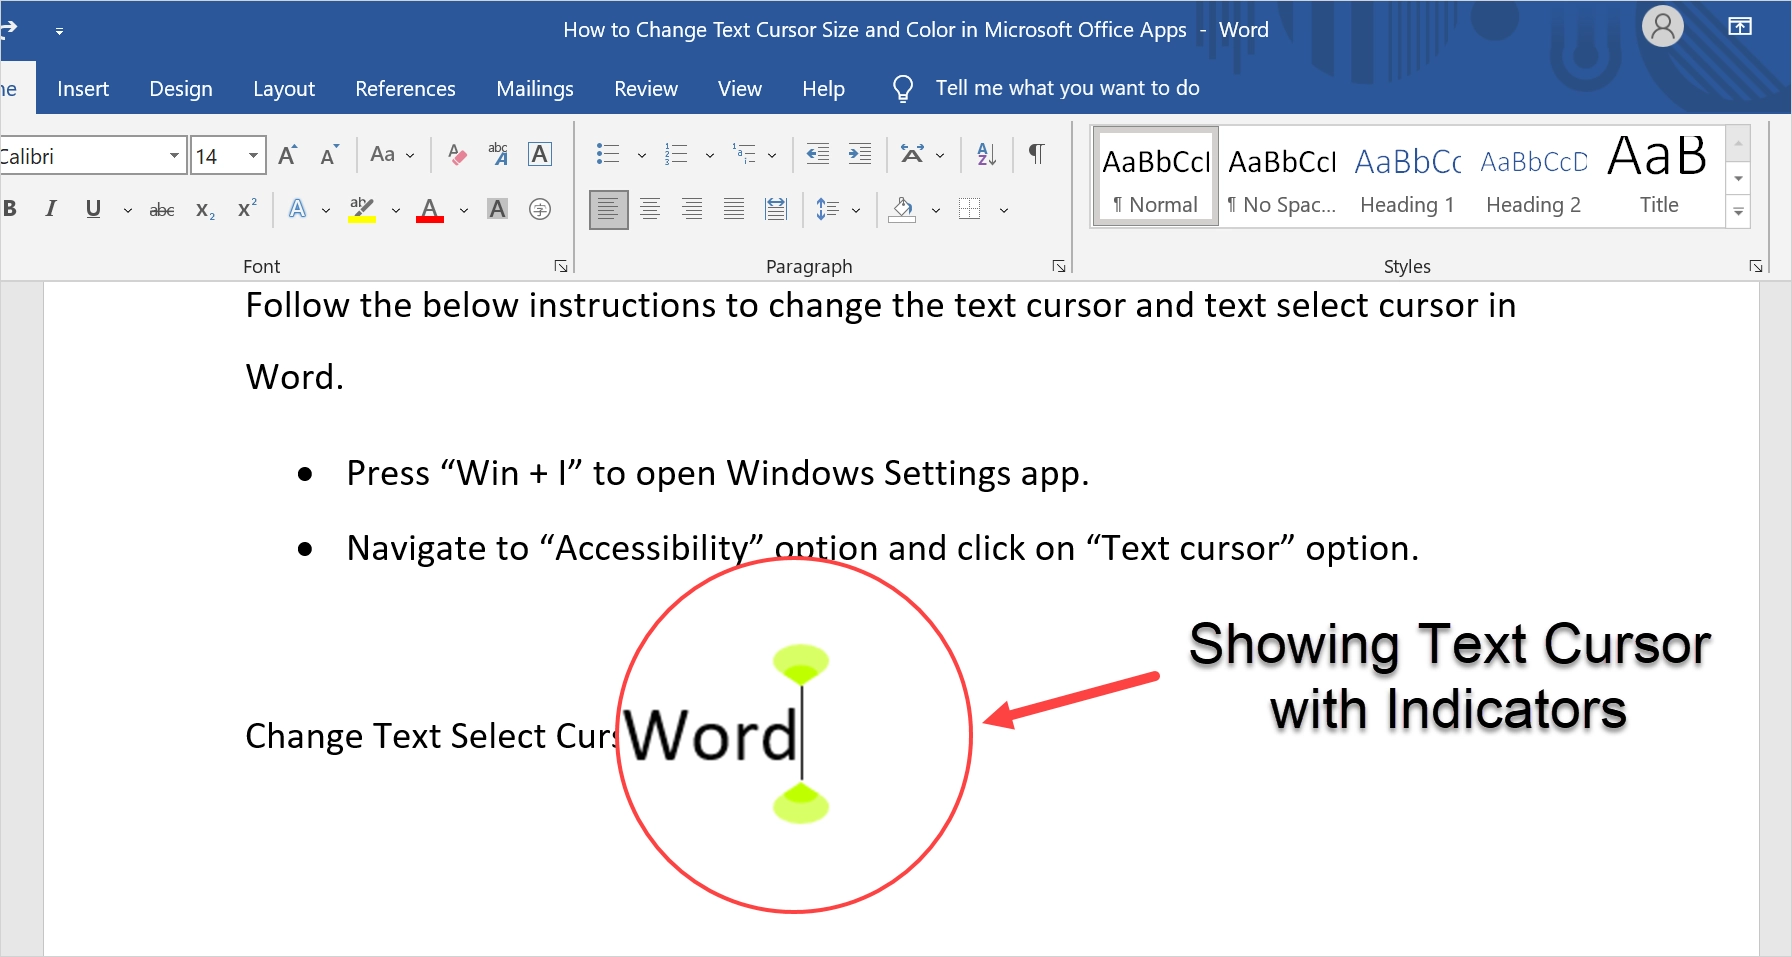
You can change the color, size and thickness of the text cursor in Word. First, press “Win + I” to open Windows Settings app. Navigate to “Accessibility” option and click on “Text cursor” option. Here you can preview your text cursor and customize it as per your convenience.
Enable Text Cursor Indicator
The first option is to enable “Text cursor indicator” which is disabled by default. This is an indicator that appears top and bottom of the blinking cursor icon.
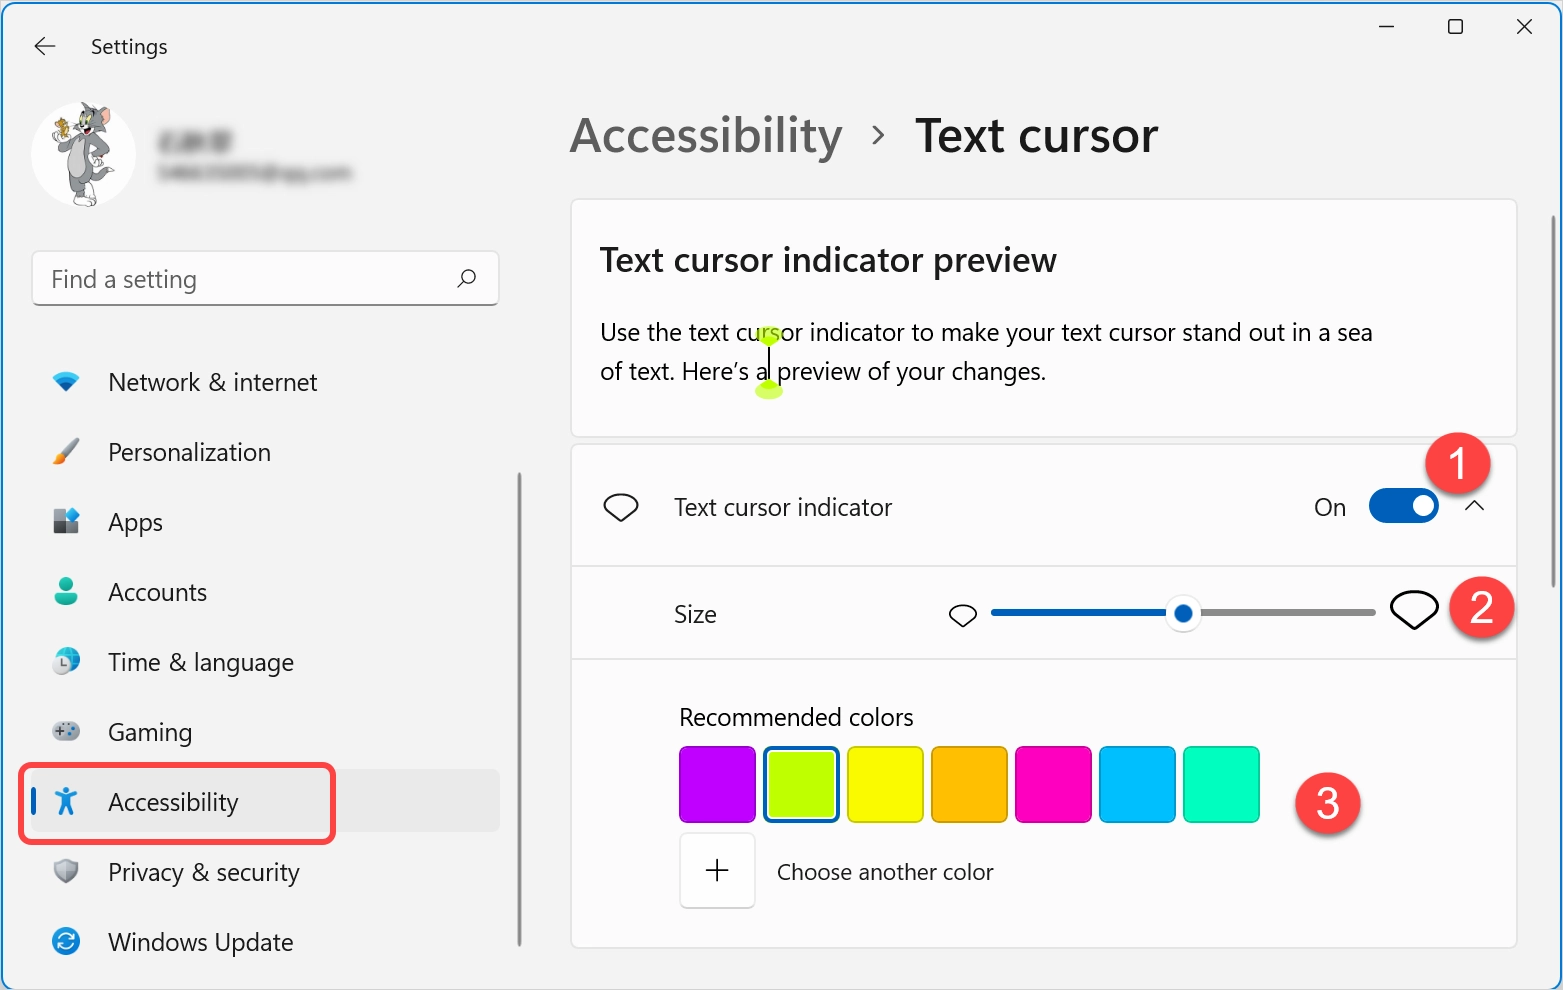
Enabling the indicator will mark the text cursor like as shown in the picture below.
You can change the indicator’s size by simply dragging the slider to desired position. Finally, you can change the color of the indicators by selecting it from recommended colors or click the + icon and select a custom color of your choice.
Change Text Cursor Size
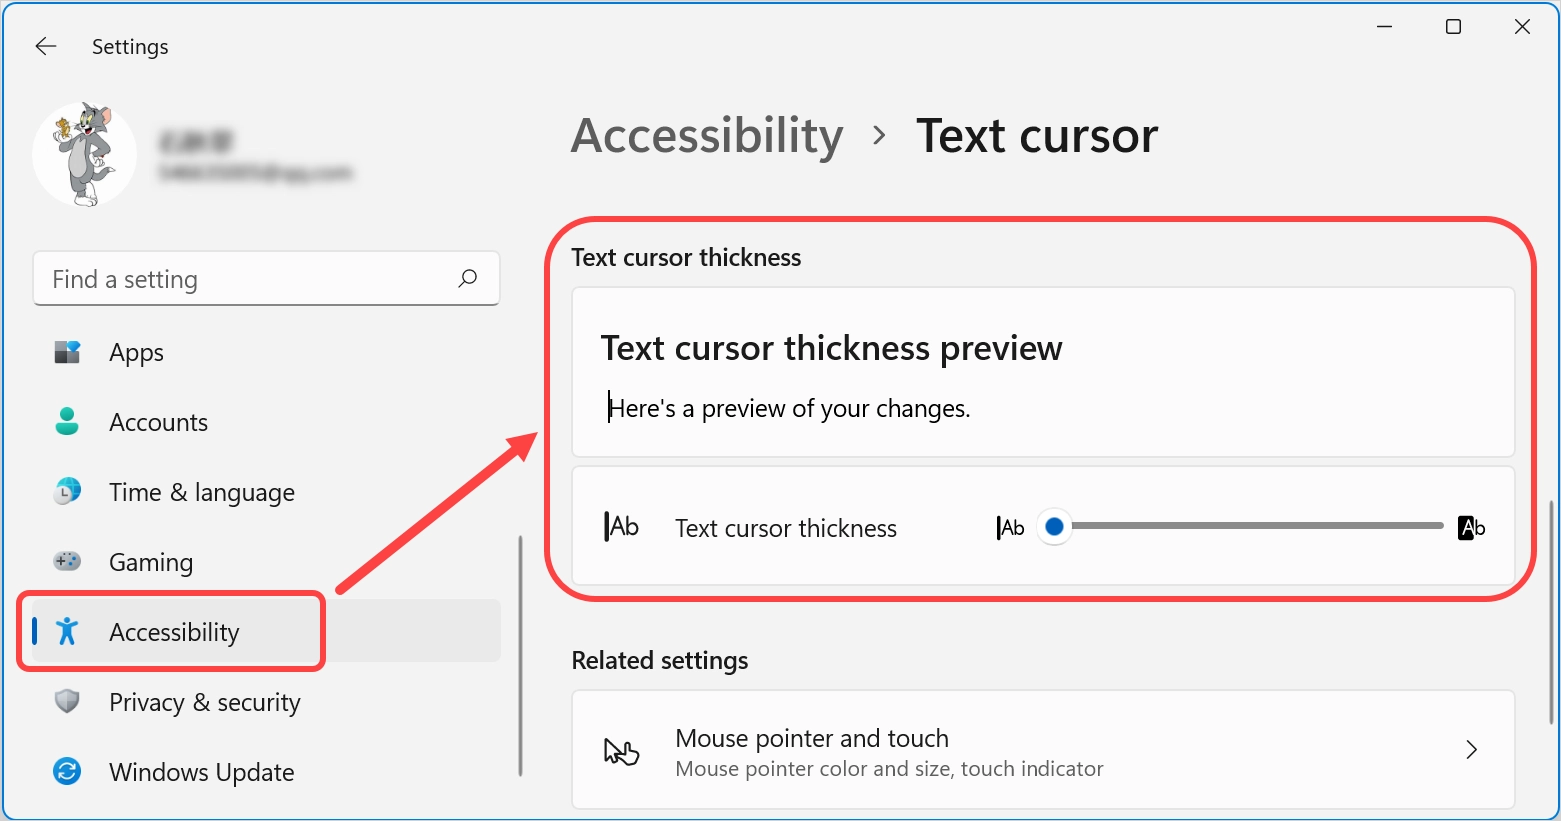
Scroll down a bit on the settings page to find “Text cursor thickness” section. Drag the slider to desired position to increase the cursor’s thickness. You can also see the instant preview without going to your documents.
Change Text Select Cursor in Word
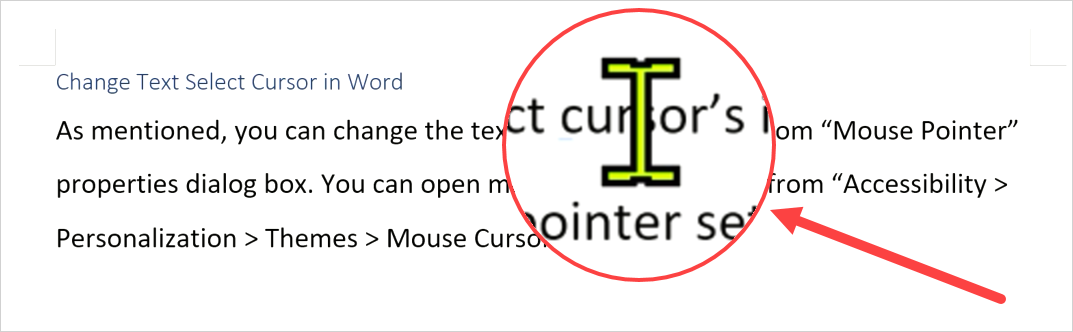
As mentioned, you can change the text select cursor’s icon from “Mouse Pointer” properties dialog box. You can open mouse pointer settings from “Personalization > Themes > Mouse Cursor” section in Windows Settings app. However, for changing the color and size, go to “Accessibility > Mouse pointer and touch” in Windows Settings app.
You can change the mouse pointer style to white, black, inverted or custom color. In addition, you can move the slider to increase the size of the text select pointer. If you are using touch screen, you can enable the touch indicator to look larger.

It will look like below in the Word document.
Points to Note
Though text cursor settings help to visually locate the text cursor easily, it will appear in all apps where there is a text area. Even you will see the indicator when searching with Windows Search and typing the file names. So, you will be easily annoyed unless you have some vision problem to see the cursor. This is the reason Microsoft disabled this option by default in Windows.

Similarly, text select cursor settings will also affect the default mouse cursor arrow icon. Therefore, you need to use nominal size for text cursor and text select cursor so that it will look appropriate and not affect the use of other apps.
Table of Contents
- 1 How do I change the cursor position in Word?
- 2 How do you move the insertion point to the top of a document?
- 3 When you place your cursor over the insertion point to what shape does it change?
- 4 Where is my cursor position?
How do I change the cursor position in Word?
0604. To use the mouse to move the insertion point, first position the desired section of text in the document window by using the scroll bars….Moving the Cursor Point in Word.
| Keystroke | Result |
|---|---|
| Ctrl+End | Moves the insertion point to the end of the document. |
How do I move the cursor in Excel VBA?
Auto move cursor to specific cell with VBA code
- Press Alt + F11 keys simultaneously to open the Microsoft Visual Basic for Applications window.
- In the Microsoft Visual Basic for Applications window, double click ThisWorkbook in the left pane to open the ThisWorkbook (Code) window.
Which key is used to move the cursor to the top of the document?
Navigate the document
| To do this | Press |
|---|---|
| Move the cursor to the top of the next page. | Ctrl+Page down |
| Move the cursor to the top of the previous page. | Ctrl+Page up |
| Move the cursor to the end of the document. | Ctrl+End |
| Move the cursor to the beginning of the document. | Ctrl+Home |
How do you move the insertion point to the top of a document?
The key combinations to move to the top or bottom of the current screen are Ctrl+Alt+PgUp and Ctrl+Alt+PgDn….How to Move the Insertion Pointer in Word 2010.
| Press This Key or Combination | To Whisk the Insertion Pointer |
|---|---|
| Home | To the start of a line of text |
| Ctrl+End | To the end of the document |
| Ctrl+Home | To the tippy-top of the document |
How do you move the insertion point quickly in Word?
Arrow keys: You can also use the arrow keys on your keyboard to move the insertion point. The left and right arrow keys will move between adjacent characters on the same line, while the up and down arrows will move between paragraph lines. You can also press Ctrl+Left or Ctrl+Right to quickly move between entire words.
What command can you use to quickly move the insertion point to a specific word in a document?
Keystroke shortcuts Pressing Ctrl+Home moves it to the beginning of the document. Specifically, this combo moves the insertion point to the space before the first character in your document.
When you place your cursor over the insertion point to what shape does it change?
Word Lesson 1 Reveiw
| A | B |
|---|---|
| I-beam | When you place your cursor over the insertion point, to what shape does it change? |
| command | A __________ is an instruction based on the action that you give to Word by clicking a button or entering information in a dialog box. |
What controls the position of the pointer on the screen?
A position-control input device (e.g., mouse, finger on touch screen) directly changes the absolute or relative position of the on-screen pointer. A rate-control input device (e.g., trackpoint, joystick) changes the speed and direction of the movement of the on-screen pointer.
Which command is used to set the cursor position?
In this article
| Command | Description |
|---|---|
| CmdYMoveAbsolute | Command to move the cursor to an absolute y-position. |
| CmdYMoveRelDown | Command to move the cursor down from the current y-position, by the specified amount. |
| CmdYMoveRelUp | Command to move the cursor up from the current y-position, by the specified amount. |
Where is my cursor position?
You can locate your cursor by tapping the CTRL key on your keyboard, but you first need to enable this feature in Windows (no download is required). Go to the ‘Pointer Options’ tab. 5. At the bottom of the window, check mark ‘Show Location of Pointer when I press the CTRL key’.
What is input cursor?
This is sometimes referred to as the text input cursor. The caret appears in elements such as <input> or those with the contenteditable attribute. The caret is typically a thin vertical line that flashes to help make it more noticeable. By default, it is black, but its color can be altered with this property.
Which method returns the current position of cursor in Android?
| Public methods | |
|---|---|
| abstract int | getPosition() Returns the current position of the cursor in the row set. |
| abstract short | getShort(int columnIndex) Returns the value of the requested column as a short. |
| abstract String | getString(int columnIndex) Returns the value of the requested column as a String. |
 Please Note:
This article is written for users of the following Microsoft Word versions: 97, 2000, 2002, and 2003. If you are using a later version (Word 2007 or later), this tip may not work for you. For a version of this tip written specifically for later versions of Word, click here: Changing the Insertion Point Cursor.
![]()
Written by Allen Wyatt (last updated January 4, 2022)
This tip applies to Word 97, 2000, 2002, and 2003
Depending on your preferences in programs, you might find Word’s blinking «insertion point» cursor to be bothersome. For instance, you might prefer that the insertion point actually blink at a different rate, or not at all.
There is no way within Word to control the insertion point in this way. However, you can affect its behavior by making some changes directly within Windows. Try following these steps if you are using Windows 7:
- Click the Start button and then click Control Panel. You’ll see the familiar Control Panel dialog box.
- Click Hardware and Sound.
- Click Ease of Access.
- Click Ease of Access Center. (You may hear your computer talk to you for just a moment.)
- Click Make the Keyboard Easier to Use.
- Click Keyboard Settings. (This option is near the very bottom of the dialog box.) Windows displays the Keyboard Properties dialog box.
- Make sure the Speed tab is displayed. (See Figure 1.)
- At the bottom of the dialog box is a place to control the Cursor Blink Rate. Adjust the blink rate, as desired.
- Click on OK.
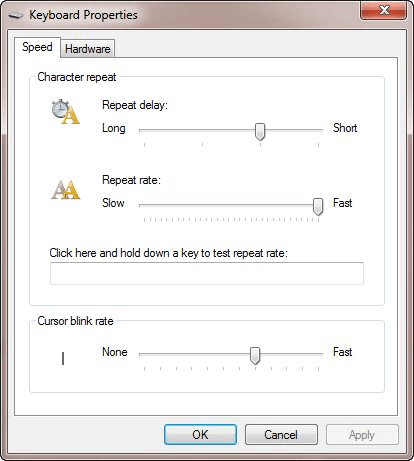
Figure 1. The Speed tab of the Keyboard Properties dialog box.
If you are using Windows XP, follow these much simpler steps instead:
- Choose Settings from the Start menu, and then choose Control Panel. Windows displays the Control Panel.
- Double-click on the Keyboard applet. Windows displays the Keyboard Properties dialog box.
- At the bottom of the dialog box is a place to control the Cursor Blink Rate. Adjust the blink rate, as desired.
- Click on OK.
Depending on your system, you may need to restart Windows in order for the change to take effect.
It should be noted that the above instructions will not work with all versions of Windows or with all keyboards. Different versions of Windows, for instance, have different steps you follow to display the Control Panel. (That should be obvious from comparing the Windows 7 instructions to the Windows XP instructions.) In addition, some non-standard keyboards may have their own setup programs that differ from the one used by my keyboard. In any event, if you are able to display the configuration program for your keyboard, it should have settings that allow you to control the blink rate of the cursor, as described above.
WordTips is your source for cost-effective Microsoft Word training.
(Microsoft Word is the most popular word processing software in the world.)
This tip (1521) applies to Microsoft Word 97, 2000, 2002, and 2003. You can find a version of this tip for the ribbon interface of Word (Word 2007 and later) here: Changing the Insertion Point Cursor.
Author Bio
With more than 50 non-fiction books and numerous magazine articles to his credit, Allen Wyatt is an internationally recognized author. He is president of Sharon Parq Associates, a computer and publishing services company. Learn more about Allen…
MORE FROM ALLEN
Colors for Tracking Changes not Acting Properly
When the Track Changes feature is turned on, Word, by default, displays the edits made by each document editor in …
Discover More
Selecting a Chart Pattern
If you don’t have Excel installed on your system, Microsoft Graph is a handy way to create simple charts for your …
Discover More
Spell Checking Forms
Word may be used to create protected forms that limit where the user may input data. Normally spell checking is disabled …
Discover More
Islander
-
#1
While I was typing a document I must have inadvertently changed the
appearance of my blinking cursor in Word. Rather than a blinking line, it now
appears as a blinking dot which is often very difficult to see when placed
within large amounts of text. I have tried search to locate a solution to
change it back but have been unsuccessful. I searched using the terms:
cursor, appearance, change and other variations. The cursor is ok as I type
this — it is only in my Word documents.
Advertisements
Islander
-
#2
I used the 500% zoom trick (see the 2006 thread on this topic) and it worked.
One of those mysteries of life!!
Advertisements
grammatim
-
#3
They usually say change your Zoom to 500% then back to 100%.
I’ve never had this problem, but it gets asked about a whole lot!
Want to reply to this thread or ask your own question?
You’ll need to choose a username for the site, which only take a couple of moments. After that, you can post your question and our members will help you out.
Ask a Question
Microsoft Word is a program which is often used by people. There, we are able to type anything such as a story, letter, tasks from school or office and many more. So, using Microsoft well is useful. Now, how to be able to type anywhere on a word document? Here, we will explain about it for you.
Typing Anywhere on a Word Document
Do you want to type anywhere on your word document, but you do not know how to do that? Well, to type anywhere on a word document is very easy. You just have to double click on the location that you want on your word document and then type anything there. You are able to see how people do it on the Youtube videos. Here are some videos about how to type anywhere on a word document that you are able to watch on Youtube.
- A video of Chris Menard entitled Word 2016 Just Click and Type Instead of Using a Text Box By Chris Menard which was uploaded on February 27th, 2017. The duration of the video is 39 seconds and now it has been watched more than 3k times.
- A video of Vicky’s Blog entitled How to Type Anywhere in the MS Word Document which was uploaded on May 15th, 2015. The duration of the video is 1 minute and 36 seconds. It has been watched more than 78k times.
In the videos, you are able to see that if you want to type anywhere, you just have to double click anywhere by using your mouse and then you are able to type anything there.
Table of Contents on this article below:

Moving The Cursor To The Top of The Word Document
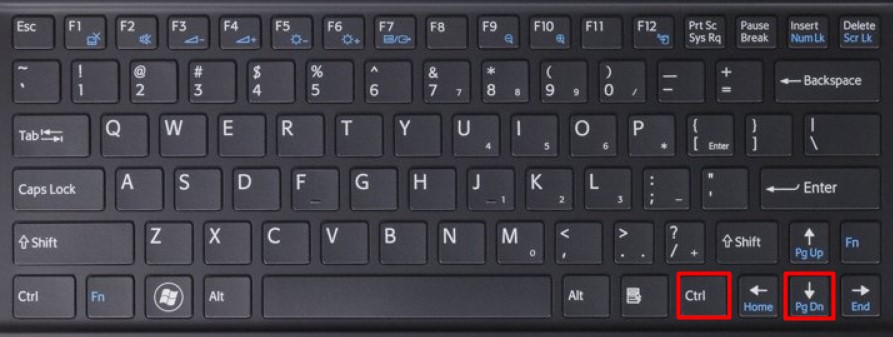
After you know how to type anywhere in a word document, now you may want to know how to move the cursor to the top of the document. You may have typed a lot and then you want to edit several things at the top part of your word document such as the title of the document of the introduction part of it, then you have to jump to the top of it by using a keyboard shortcut. Actually, you can do that by scrolling the document and then double click your cursor on the part that you want to edit. If you want to use a keyboard shortcut, you can go to the top of the document by pressing Ctrl+Page Down together. Using this keyboard shortcut can make you go to the top of the word document in each page. So, if you are in the second page and then you use this shortcut, you will go to the top of the document in the second page.
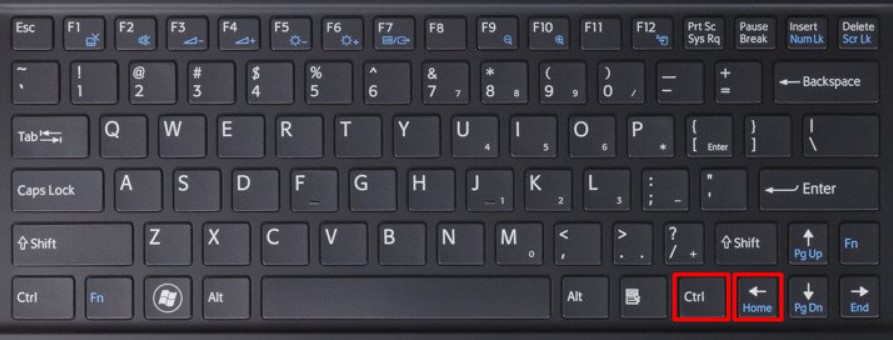
Alternatively, you are also able to use Ctrl+Page Up. By using this shortcut, your cursor will go to the top of the document even though you are in the second page. For example, you are in the second page, third page or even another page of the document, then you want to go to the top of the document, you are able to use Ctrl+Page Up so that your cursor will be on the top of the document in the first page. Another shortcut for making your cursor to the top of the document in the first page is by using Ctrl+Home.
Here is the list of keyboard shortcuts for making your cursor point go to the top of the document.
- Ctrl+Page Down (it is for going to the top of each page)
- Ctrl+Page Up

- Ctrl+Home
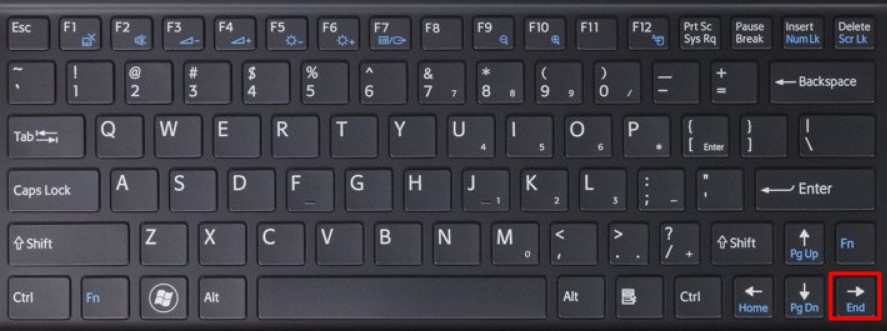
If you want to move your cursor to the end of the document, you are able to use Ctrl+End.

And the list below, you can use a certain keyboard key to go to a certain part in your word document.
- Up, Down, Left and Right arrow. If you use one of these keys, you are able to move the cursor point to the next or previous character or line.
![]()
- Page Up. If you click on this key on your keyboard, you are able to move the cursor point up one screen.

- Page Down. If you use this key on your keyboard, you are able to move the cursor point down one screen.

- Home. If you use this key on your keyboard, you are able to move the cursor point to the beginning of the current line.

- End. If you use this key on your keyboard, you are able to move the cursor point to the end of the current line.
Moving The Cursor Point by Using The Find Feature
Besides using the shortcuts and keys above, you can also move the cursor point on your word document by using the Find feature. How to do that? You are able to follow the steps below.
- The first thing that you have to do is to select Find on the Editing group on the Home ribbon tab.
- After that, when you are in the Find and Replace dialog box, you have to make sure that the Find tab is chosen.
- When you are on the Find tab, in the Find What text box, you have to type the word or phrase that you want.
- Here, you have to choose Find Next so that it will find the next occurence of the text.
- You are able to repeat step 4 as you need.
- Alternatively, you are able to choose OK in the information box.
- Or, when you are in the Find and Replace dialog box, you are able to choose Cancel.
- If you find the text that you want by using this method, then in the document you have to click on the highlighted text.
Okay, as you are able to see that it is very easy to move your cursor as you want in the word document. This is actually a basic thing that you must know so that you can use Word Document well. So, we hope that now you are able to move your cursor easily by using the methods above.

AUTHOR BIO
On my daily job, I am a software engineer, programmer & computer technician. My passion is assembling PC hardware, studying Operating System and all things related to computers technology. I also love to make short films for YouTube as a producer. More at about me…