
The default ‘Body Text’ style in Word needs some changes to suit your needs. Here’s some suggestions for things to alter or check to make sure they suit your, er, style.
Can’t see a Body Text style? See Make Body Text style appear in Microsoft Word
Body Text style can be different
The default Body Text style in a Blank Document / normal.dotm might be different on your computer. It depends on the version of Office, Windows or Mac, changes made previously and, perhaps, your horoscope.
Word 365/2019 for Windows
This is the current Word 2019/365 for Windows default Body Text style, at least on our test machines.
Word 365 for Mac
Word 365 for Mac has Body Text style also with the style is based on Normal, instead of (no style). There are other differences like Line Spacing is Single.

Your mileage may vary a little, but not much
Your ‘Body Text’ style may be different but the settings and options will be the same (or almost the same). This is an area which has not changed much for many versions of Office/Word.
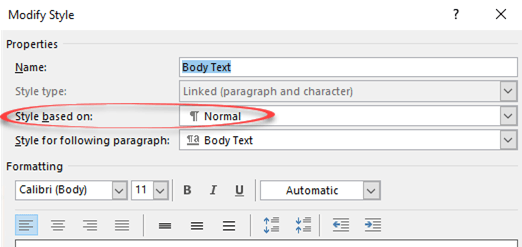
Change ‘Style Based on’
The main reason you use ‘Body Text’ instead of ‘Normal’ for most paragraphs is to avoid any inheritance problems if you change the main paragraph settings. Microsoft knows this, but still the ‘Body Text’ style is based on Normal.

This is important and the first thing we’ll change. Switching to ‘(no style)’ reveals all the style settings as listed below. ‘(no style)’ means that the settings from ‘Normal’ are copied into ‘Body Text’ (copied not linked) to make a standalone style which inherits no settings from any other style.
Body Text default settings
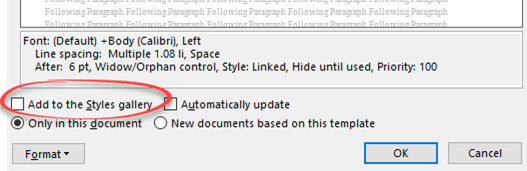
Here are the default settings as seen above for Word 365/2019/2021 for Windows. The listing in the Word dialog isn’t entirely clear with some strange wrapping (e.g. Space … After ).
Linked style – it can apply to both a paragraph and characters.
Style based on: (no style).
Style for following paragraph: pressing Enter to end a paragraph in this style, the next paragraph will be: Body Text.
- Font: (Default) +Body (Calibri)
- (Justification) Left
- Line spacing: Multiple 1.08 li,
- Space After: 6 pt
- Widow/Orphan control,
- Style: Linked
- Hide until used
- Priority 100 (order in styles list)
Add to Style Gallery: No
Changes to the document formatting do NOT change the style (‘Automatically update’ is OFF)
Any style changes only apply to the current document (not ‘New documents based on this template’ i.e. change the style settings in the template).
Body Text settings to check or change
The Body Text style settings may be different on your computer. Here’s some settings to check or change to suit you. All these settings are available from Modify Style, mostly via the ‘Format’ list.

The basic settings like Font, Justification,Line Spacing, Space before/after, Indents are on the Modify Style box with a very simple preview:

Style based on
We’ve already mention this. Change ‘Style based on ..’ to (no style) which makes Body Text standalone from any other style changes.
Font
Choose another font, suggestions for body text include Times New Roman, Garamond or Georgia.
Justification
The default is Left justification which is the standard for document drafts.
Change to Justify whenever you like, most commonly for the final stages before publication.
Line Spacing
Increase the line spacing for drafts, especially printed drafts or using digital ink markup.
Switching to, say, 1.5 or double spacing gives you more ‘scribble’ room.
For the final release, change Line Spacing to single line spacing or similar.
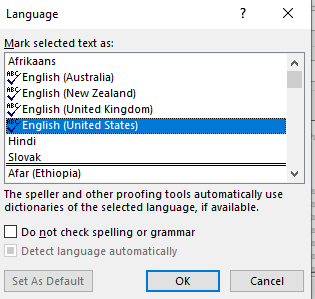
Language
Make sure the Language setting is correct because it effects the spell and grammar checking done by Word.
There are often language variants like English (Canada) or English (UK) to choose instead of English (US) which appears as the default all over the world.
It’s a similar story in French, Spanish and other languages.
For multi-lingual documents, you could have extra styles linked to ‘Body Text’ with only a language change e.g. ‘Body Text – Finnish’ ‘Body Text – German’ etc. That will ensure the correct spell and grammar checks are applied. Modern Word has automatic language detection, but many users find it’s more reliable to specify the language.
Use the ‘Do not check spelling or grammar’ choice for computer code, quotations or other text that doesn’t need spell/grammar checks. Make a linked style ‘Body Text – no proofing’.
Quick Style Gallery
Do you want the style to appear in the Styles Gallery (i.e on the ribbon)?
Add to Styles Gallery on Modify Styles will do that.
Word for Mac has the same option except it’s called a ‘Quick Style List’.
Shortcut key
The quickest way to apply a style is a shortcut key. See Add a Fast keyboard shortcut for any Word style and Shortcuts for Word heading styles.
For Body Text we use Ctrl + Alt + ` because the third keypress is immediately to the left on the of the Heading 1 shortcut (Ctrl + Alt + 1). An alternative could be Ctrl + Alt + 0 at the right side of the keyboard number row.

Another choice is Ctrl + Alt + N which will override the default shortcut for Normal style.
This document or the template?
Are these style changes for the current document only or all documents based on the current template?
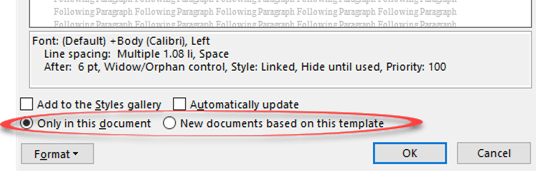
Make that choice from:
- Only in this document
- New documents based on this template
See Make Body Text style appear in Microsoft Word
Why choose Body Text vs Normal in Word
 Please Note:
This article is written for users of the following Microsoft Word versions: 97, 2000, 2002, and 2003. If you are using a later version (Word 2007 or later), this tip may not work for you. For a version of this tip written specifically for later versions of Word, click here: Changing Body Text to a Heading.
![]()
Written by Allen Wyatt (last updated April 4, 2020)
This tip applies to Word 97, 2000, 2002, and 2003
Word contains a powerful outlining system that allows you to make changes to document structure quickly. You do this in Outline view, which is most easily invoked by clicking on the Outline view button on the status bar. When you enter Outline view, Word displays an Outline toolbar at the top of the document window. You use the controls on the toolbar to change indentation levels for your outline, as you’ve learned in other issues of WordTips.
Besides headings, you may have body text within your document. You may wish to change a paragraph of body text to a heading. You can do this in any of these ways, after positioning the insertion point on the paragraph you want to change:
- Using the mouse, click on the Promote tool. This is the one that looks like a left arrow.
- Apply a heading level style.
- Using the mouse, drag the body text indicator (the small square to the left of the body text paragraph) to the left.
WordTips is your source for cost-effective Microsoft Word training.
(Microsoft Word is the most popular word processing software in the world.)
This tip (769) applies to Microsoft Word 97, 2000, 2002, and 2003. You can find a version of this tip for the ribbon interface of Word (Word 2007 and later) here: Changing Body Text to a Heading.
Author Bio
With more than 50 non-fiction books and numerous magazine articles to his credit, Allen Wyatt is an internationally recognized author. He is president of Sharon Parq Associates, a computer and publishing services company. Learn more about Allen…
MORE FROM ALLEN
Fonts Don’t Work in Word on New System
When you upgrade from a system with an older version of Word to a system that has a newer version, your fonts may not …
Discover More
Enhanced Filling
Using the AutoFill feature of Excel is very handy. If you want to expand the utility offered by the feature, all you need …
Discover More
Testing for an Empty Worksheet
If you are using a macro to process a number of worksheets, you may have a need to know if the worksheet is empty or not. …
Discover More
More WordTips (menu)
Changing the Number of Headings in an Outline
When viewing a document in Outline view, you have complete control over how much outline detail is shown on-screen. This …
Discover More
Outline Numbering
Want to add numbers to your outline? Here’s the steps.
Discover More
Understanding Outlining in Word
Remember when you needed to create outlines for your writing when you were in school? Word includes outlining …
Discover More
If you’re sick of MicroSoft word fonts Calibri and Cambria, change your default heading and body styles so you can start every new Word document with the fonts you prefer.
Put Font Frustration Behind You!
One of the most persistent frustrations legal users have with Microsoft Word fonts is the default font settings. Fortunately, you can permanently change just two Styles (+Body and +Headings) to give your documents a more businesslike typeface.
These settings are found in the Design tab (introduced into Microsoft Word with version 2013).
Over on the far right is a drop-down called Fonts. Clicking on Fonts will give you a list of preconfigured font sets. From here, you want to choose Customize Fonts.
That’s going to take you into the Create New Theme Fonts dialog box. On the left, you’ll see Heading font and Body font. This is where you set the two Styles I told you about earlier, +Body and +Headings, which in turn control basic settings for many of the other Styles in a Word document. Just use the drop-down for each to find a font more to your liking. Then you can name your preferred font set before clicking Save.
Once you reset the font style, the default text size is an easy fix, too.
Go to the Home tab and click on the small launcher arrow in the lower right-hand corner of the font section to go to the Font dialog box. Select +Body and the size text you want, then click Set as Default in the lower left-hand corner.
Word will ask whether you want to make this the default for this document only or for all future documents based on the Normal template. Choose the latter and click OK.
Save everything you’ve done by clicking Set as Default on the Design tab (next to the Colors and Fonts buttons).
Now Every New Document You Start in Word Will Use the Microsoft Office Fonts You Prefer
This doesn’t affect documents you receive from others or any existing documents you created. However, once you reset your default fonts, at least your days of adjusting the fonts every time you start a document are behind you.
Click here to read more of Deborah’s Microsoft Office tips.
Illustration ©iStockPhoto.com
Subscribe to Attorney at Work
Get really good ideas every day: Subscribe to the Daily Dispatch and Weekly Wrap (it’s free). Follow us on Twitter @attnyatwork.
Scenario
Your Word template uses the Body Text style for main paragraphs, but your author has used Normal. You’ve determined that they’ve only used Normal for paragraphs, not for bullet lists etc. (see the Notes below), so now you want to change all paragraphs styled Normal to Body Text.
How do you do it in one pass of the document without having to check every paragraph and apply the correct style? Well, there are two methods you can use — both methods work similarly in Word 2003 and Word 2007.
Notes and Warnings:
- If you think that your author has used Normal for more than just the main paragraphs, consider doing this change the slower, but less stressful way by displaying the styles on the left and the Styles pane on the right and checking and applying the correct styles one page at a time. See this earlier blog post for details: https://cybertext.wordpress.com/2010/05/19/word-display-styles-for-each-paragraph/
- The methods below describe GLOBAL changes to your document. Be very sure that this is what you want to do before going ahead; depending on the size of your document and the number of replacements done, you may not be able to undo these changes. You have been warned!
Method 1: Use Find/Replace
- Press Ctrl+H to open the Find and Replace window.
- Click More.
- Click Format.

- Select Style.
- On the Find Style dialog box, scroll down to the style you want to change (in this example, Normal).

- Click OK. Format: Style: Normal displays below the empty Find what field.
- Click in the Replace with field.
- Click Format.
- Select Style.
- On the Replace Style dialog box, scroll down to the style you want to change (in this example, Body Text).
- Click OK. Format: Style: Body Text displays below the empty Replace with field.
- If you are certain that this is what you want to do (see the Notes above), then click Replace All.


Method 2: Use the Styles pane
This method requires you to turn on Keep track of formatting so you can see the number of instances of each style (see this blog post for details on turning on Keep track of formatting: https://cybertext.wordpress.com/2010/06/10/word-show-styles-in-use/).
- Turn on Keep track of formatting.
- Display the Styles pane:
- Word 2003: https://cybertext.wordpress.com/2008/02/28/styles-task-pane-in-word-2003/
- Word 2007: https://cybertext.wordpress.com/2008/09/11/word-2007-what-happened-to-the-styles-and-formatting-task-pane/).
- Click the drop-down arrow next to the style you want to change (in this example, Normal).
- Click Select All [number] Instances.
- Scroll the list of styles and select the style you want to replace all instances with (in this example, Body Text). The replacement may take a few seconds to a minute, depending on how many instances were replaced and how big the document is.
- Turn off Keep track of formatting if you don’t normally keep it turned on.

See also:
- https://cybertext.wordpress.com/2008/06/10/word-2003-replace-a-style/
[Links last checked June 2010]
This tutorial shows how to change the default font in Microsoft Word. Specifically, we will look at how to change the default font for normal body text. Then, we will look at how to restore Word’s original defaults by replacing the normal.dotm template file through the Windows File Explorer.
Quick Links:
- How to Change the Default Font for Body Text
- How to Restore Word’s Default Font Styles
We will change the default fonts for all nine heading levels in a separate tutorial.
This tutorial is available as a YouTube video showing all the steps in real time.
Watch more than 200 other writing-related software tutorials on my YouTube channel.
The images below are from Word for Microsoft 365 and the Windows 10 File Explorer. These steps will also work in Word 2021, Word 2019, Word 2016, and Word 2013. However, your interface may look slightly different in those older versions of the software.
If you are on a Mac, please see “How to Change the Default Font in Word for Mac.”
Important Note: These steps may not work if you are using Word through work or school because you need permission to change the Normal.dotm file.
How to Change the Default Font for Body Text
These steps can be used to change the default font, font size, and font color for regular body text styled as Normal. However, other styles that rely on the Normal style may also be affected.
- Select the Home tab in the ribbon.

- Select the dialog box launcher in the Font group.

- Select your new default font, font size, and font color in the Font dialog box.

- Select the Set As Default button.

- Select the All documents based on the Normal.dotm template? option in the question dialog box.

- Select the OK button.

Your existing body text should change to your new default font immediately. Plus, your new default should appear when you open a new Word document.
How to Restore Word’s Default Font Styles
Your default font choices are stored in the Normal.dotm template file. If you want to restore Word’s default font styles, you can delete the existing Normal.dotm file. Word will then create a new Normal.dotm file the next time you open the software. Be aware that this process will delete any existing custom themes.
Important Note: The location of the Normal.dotm file shown below will be correct for most Windows users. However, there is a chance that your file will be located elsewhere.
- Save any open documents and close Word.
- Press the Windows key + E on your keyboard to open the File Explorer. (Alternatively, you can search for “File Explorer” in the search box in the taskbar.)
- Select the Windows (C:) drive in the File Explorer.

- Select the Users folder.

- Select your username folder. (For example, my username is Erin.)

- Select the View tab.

- Select the Hidden Items option if it is not already selected. This will reveal folders that were previously hidden.

- Select the AppData folder.

- Select the Roaming folder.

- Select the Microsoft folder.

- Select the Templates folder.

- Select the Normal.dotm file, and then select the Delete key on your keyboard. Alternatively, you can right-click the file and select Delete from the shortcut menu.

- Select the X to close the File Explorer.

When you reopen Word, the original defaults should be restored.
Related Resources
How to Change the Font, Font Size, and Font Color in Microsoft Word
How to Create Drop Caps in Microsoft Word
How to Create External Hyperlinks in Microsoft Word
How to Create Custom Bullets in Microsoft Word
Updated February 01, 2023