We use VBA to automate our tasks in excel. The idea of using VBA is to connect the interface of excel with the programming. One of the very most connections between them is by changing the cell values. The change in cell value by programming shows the power of VBA. In this article, we will see how to set, get and change the cell value.
Set Cell Value
Assigning a cell with a value can be achieved by very two famous functions in VBA i.e. Range and Cells function.
Range Function in VBA
The range function helps access the cells in the worksheet. To set the cell value using the range function, we use the .Value.
Syntax: Range(cell_name).Value = value_to_be_assinged.
Set the value to a single cell
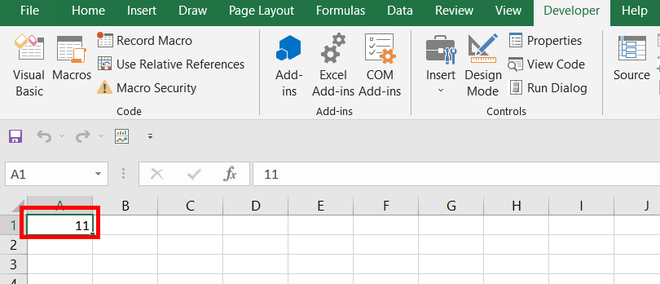
If you want to assign ’11’ to cell A1, then the following are the steps:
Step 1: Use the Range function, in the double quotes type the cell name. Use .Value object function. For example, Range(“A1”).Value = 11.
Step 2: Run your macro. The number 11 appears in cell A1.
Set the value to multiple cells at the same time
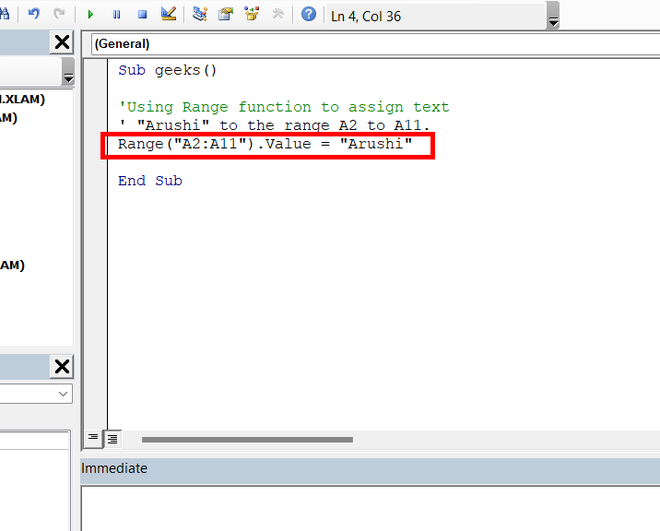
Remember the days, when your teacher gives you punishment, by making you write the homework 10 times, those were the hard days, but now the effort has exponentially reduced. You can set a value to a range of cells with just one line of code. If you want to write your name, for example, “Arushi” 10 times, in the range A2 to A11. Use range function. Following are the steps:
Step 1: Use the Range function, in the double quotes, write “Start_of_cell: End_of_cell”. Use .Value object function. For example, Range(“A2:A11”).Value = “Arushi”.
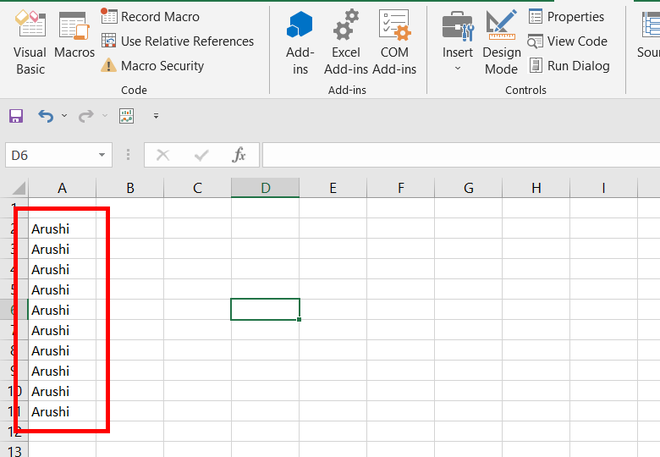
Step 2: Run your macro. The text “Arushi” appears from cell A2 to A11 inclusive.
Cells Function in VBA
The Cells function is similar to the range function and is also used to set the cell value in a worksheet by VBA. The difference lies in the fact that the Cells function can only set a single cell value at a time while the Range function can set multiple values at a time. Cells function use matrix coordinate system to access cell elements. For example, A1 can be written as (1, 1), B1 can be written as (1, 2), etc.
Syntax: Cells(row_number, column_number).Value = value_to_be_assign
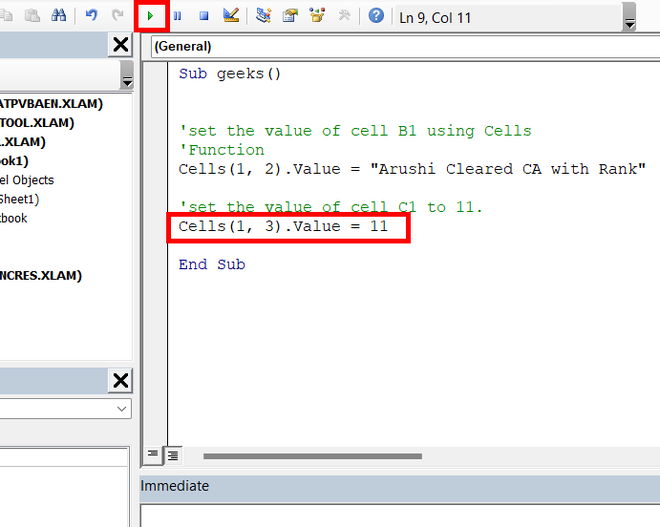
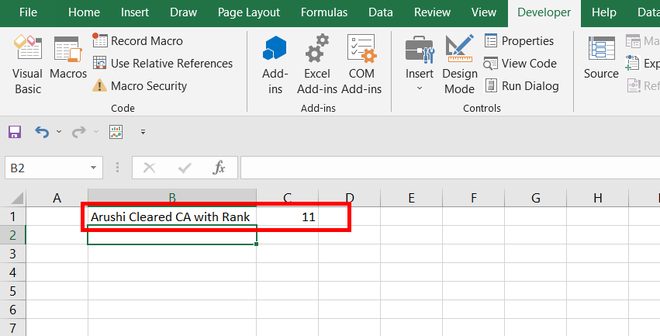
For example, you want to set the cell value to “Arushi cleared CA with Rank “, in cell B1. Also, set cell C1, to ‘1’. Following are the steps:
Step 1: Open your VBA editor. Use cells function, as we want to access cell B1, the matrix coordinates will be (1, 2). Type, Cells(1, 2).Value = “Arushi cleared CA with Rank” in the VBA code.
Step 2: To access cell C1, the matrix coordinates are (1, 3). Type, Cells(1, 3).Value = 1 in the VBA code.
Step 3: Run your macro. The required text appears in cell B1, and a number appears in C1.
Setting Cell values by Active cell and the input box
There are other ways by which you can input your value in the cell in a worksheet.
Active Cell
You can set the cell value of a cell that is currently active. An active cell is the selected cell in which data is entered if you start typing. Use ActiveCell.Value object function to set the value either to text or to a number.
Syntax: ActiveCell.Value = value_to_be_assigned
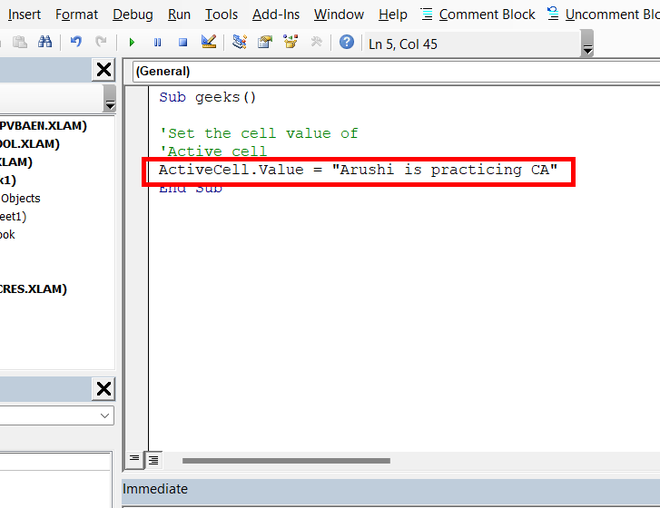
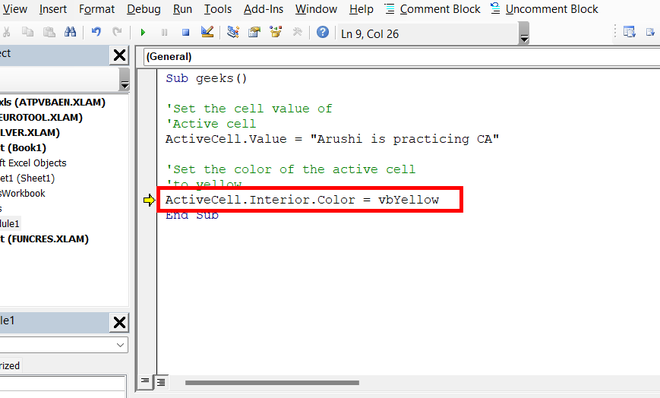
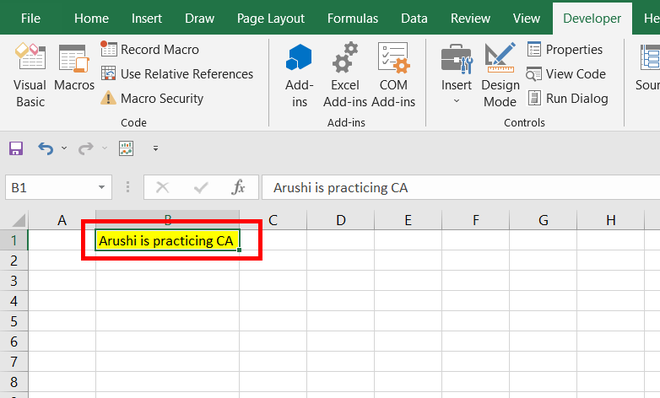
For example, you want to assign the active cell with a text i.e. “Arushi is practicing CA”, also want to change the color of the cell to yellow. Following are the steps:
Step 1: Use the ActiveCell object to access the currently selected cell in the worksheet. Use ActiveCell.Value function object to write the required text.
Step 2: Color the cell by using ActiveCell.Interior.Color function. For example, use vbYellow to set your cell color to yellow.
Step 3: Run your macro. The currently selected cell i.e. B1 has attained the requirements.
Input Box
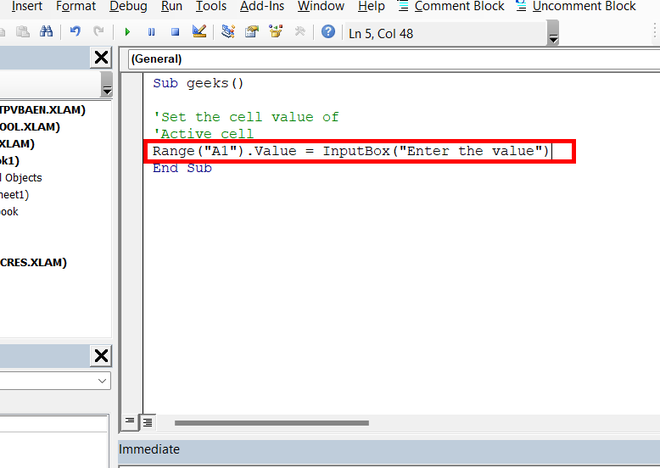
You can use the input box to set the cell value in a worksheet. The input box takes the custom value and stores the result. This result could further be used to set the value of the cell. For example, set the cell value of A1, dynamically by taking input, from the input box.
Following are the steps
Step 1: Open your VBA editor. A sub-procedure name geeks() is created. Use the Range function to store the value given by the input box.
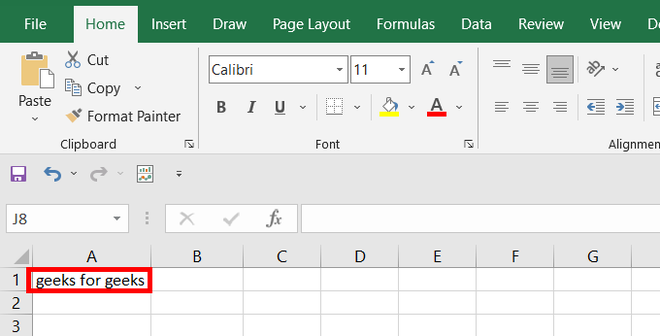
Step 2: Run your Macro. A dialogue-box name Microsoft Excel appears. Enter the value to be stored. For example, “geeks for geeks”. Click Ok.
Step 3: Open your worksheet. In cell A1, you will find the required text is written.
Get Cell Value
After setting the cell value, it’s very important to have a handsome knowledge of how to display the cell value. There can be two ways two get the cell value either print the value in the console or create a message box.
Print Cell Value in Console
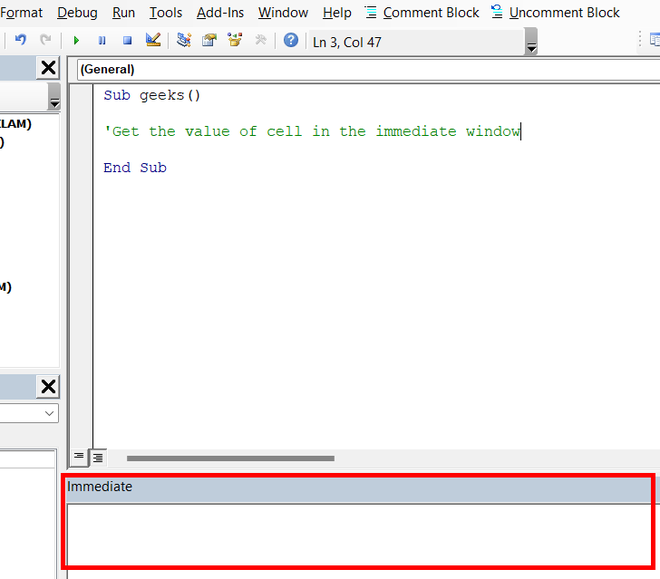
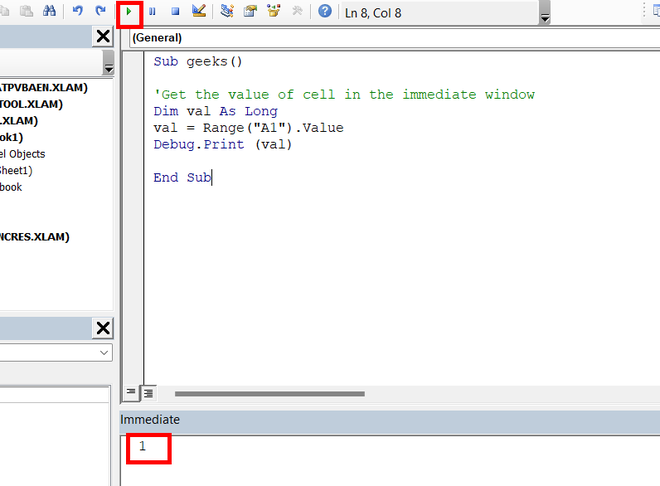
The console of the VBA editor is the immediate window. The immediate window prints the desired result in the VBA editor itself. The cell value can be stored in a variable and then printed in the immediate window. For example, you are given a cell A1 with the value ’11’, and you need to print this value in the immediate window.
Following are the steps
Step 1: Press Ctrl + G to open the immediate window.
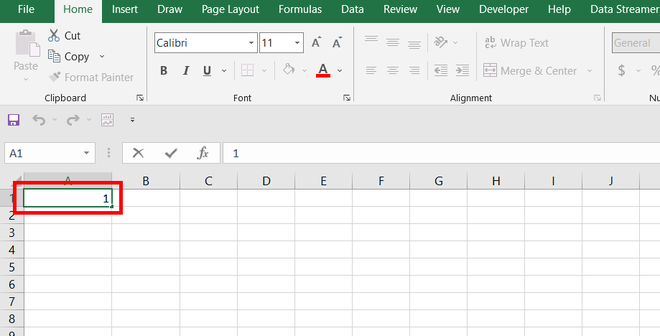
Step 2: The cell value in A1 is 1.
Step 3: Open your VBA editor. Declare a variable that could store the cell value. For example, Val is the variable that stores the cell value in A1. Use the Range function to access the cell value. After storing the cell value in the val, print the variable in the immediate window with the help of Debug.Print(val) function.
Step 4: Run your macro. The cell value in A1 is printed in the immediate window.
Print Cell Value in a Message Box
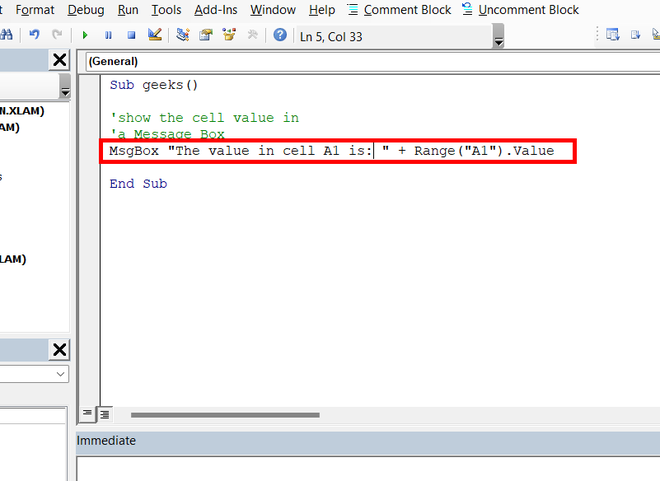
A message box can also be used to show the cell value in VBA. For example, a random string is given in cell A1 of your string i.e. “Arushi studies in Hansraj”. Now, if you want to display the cell value in A1, we can use Message Box to achieve this.
Following are the steps
Step 1: Open your VBA macro. Create a message box by using MsgBox. Use the Range(cell).Value function to access the cell value.
Step 2: Run your macro. A message box appears, which contains the cell value of A1.
Change Cell Values
The value, once assigned to the cell value, can be changed. Cell values are like variables whose values can be changed any number of times. Either you can simply reassign the cell value or you can use different comparators to change the cell value according to a condition.
By reassigning the Cell Value
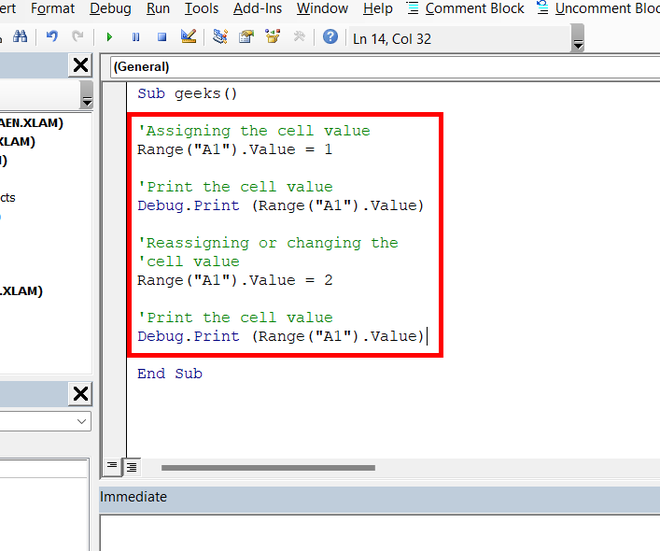
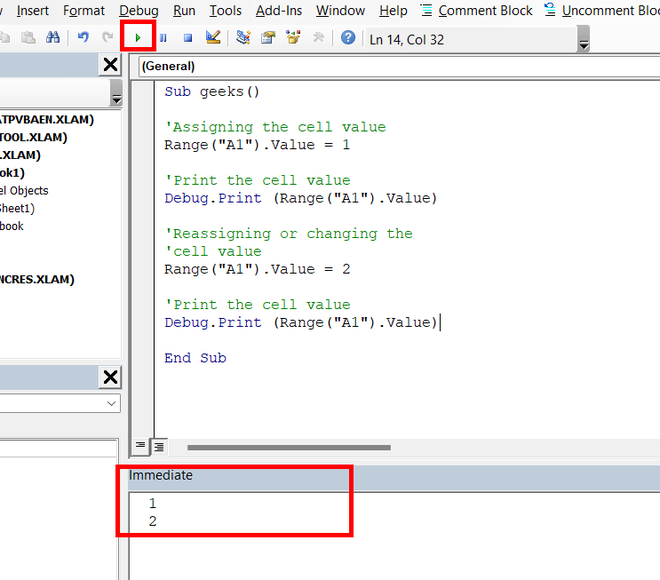
You can change the cell value by reassigning it. In the below example, the value of cell A1 is initially set to 1, but later it is reassigned to 2.
Following are the steps
Step 1: Open your VBA code editor. Initially, the value of cell A1 is assigned to 1. This initial value is printed in the immediate window. After that, we changed the value of cell A1 to 2. Now, if we print the A1 value in the immediate window, it comes out to be 2.
Step 2: The immediate window shows the output as 1 and 2.
Changing cell value with some condition
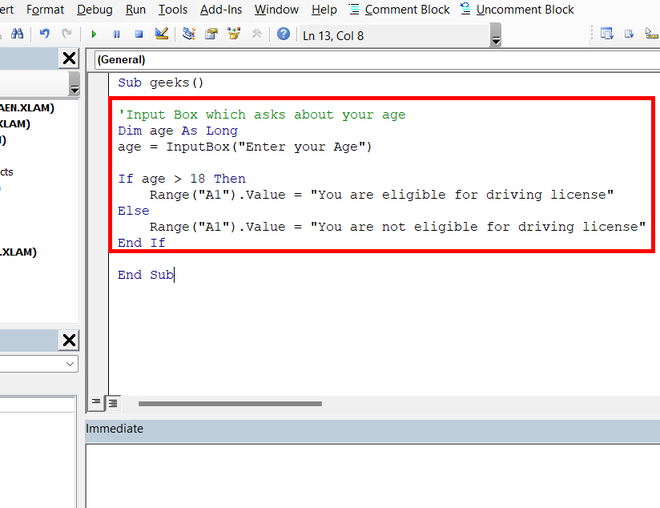
We can use if-else or switch-case statements to change the cell value with some condition. For example, if your age is greater than 18 then you can drive else you cannot drive. You can output your message according to this condition.
Following are the steps
Step 1: A code is written in the image below, which tells whether you are eligible for a driving license or not. If your age is greater than 18 then cell A1 will be assigned with the value, “You are eligible for the driving license”, else A1 will be assigned with “You are not eligible for driving license”.
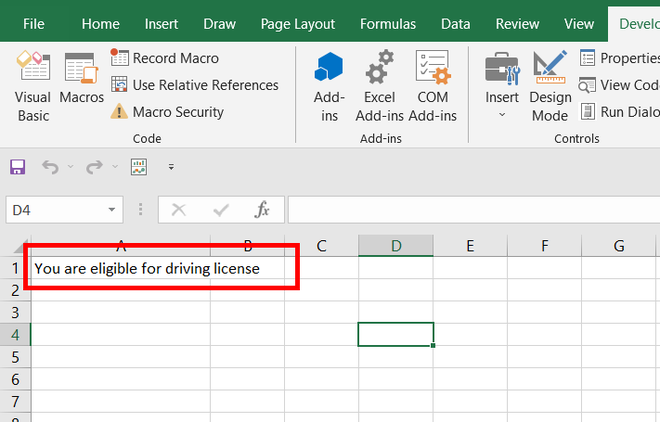
Step 2: Run your macro. An input box appears. Enter your age. For example, 19.
Step 3: According to the age added the cell value will be assigned.
Key Notes
- The value property can be used in both ways (you can read and write a value from a cell).
- You can refer to a cell using Cells and Range Object to set a cell value (to Get and Change also).
To set a cell value, you need to use the “Value” property, and then you need to define the value that you want to set. Here I have used some examples to help you understand this.
1. Enter a Value in a Cell
Let’s say you need to enter the value “Done” in cell A1. In that case, the code would be something like the below:
Range("A1").Value = "Done"
As you can see, I have first defined the cell address where I want to add the value, and then the value property. In the end, I have assigned the value “Done” using an equal “=” sign enclosed in double quotation marks.
You can also use the “Cells” property, just like the following code.
Cells(1, 1).Value = "Done"The above code also refers to cell A1.
Apart from this, there is one more way that you can use and that’s by not using the value property directly assigning the value to the cell.
Cells(1, 1) = "Done"But this is recommended to use the value property to enter a value in a cell.
Now let’s say you want to enter a number in a cell. In that case, you don’t need to use double quotation marks. You can write the code like the following.
Range("A1") = 99You can also DATE and NOW (VBA Functions) to enter a date or a timestamp in a cell using a VBA code.
Range("A1").Value = Date
Range("A2").Value = Now
And if you want to enter a value in the active cell then the code you need would be like:
ActiveCell.Value = Date2. Using an Input Box
If you want a user to specify a value to enter in a cell you can use an input box. Let’s say you want to enter the value in cell A1, the code would be like this:

Range("A1").Value = _
InputBox(Prompt:="Type the value you want enter in A1.")
In the above code, the value from cell A1 assigns to the value returned by the input box that returns the value entered by the user.
3. From Another Cell
You can also set cell value using the value from another cell. Let’s say if you want to add value to cell A1 from the cell B1, the code would be:
Range("A1") = Range("B1").Value
You can also refer to cell B1 without using the value property.
Range("A1") = Range("B1")4. Set Value in an Entire Range
Imagine you want to enter values in multiple cells or a range of cells instead of a single cell, in that case, you need to write code like the below:
Range("A1:A10").Value = Date
Range("B1, B10").Value = Now
In the first line of code, you have an entire range from cell A1 to A10, and in the second line, there are two cells B1 and B10.
Get Cell Value
As I said, you can use the same value property to get value from a cell.
1. Get Value from the ActiveCell
Let’s say you want to get the value from the active cell, in that case, you need to use the following code.
ActiveCell.Value = Range("A1")
In the above code, you have used the value property with the active cell and then assigned that value to cell A1.
2. Assign to a Variable
You can also get a value from a cell and further assign it to a variable.

Now in the above code, you have the variable “i” Which has the date as its data type. In the second line of the code, the value from cell A1 is assigned to the variable.
3. Show in a MsgBox
Now imagine, you want to show the value from cell A1 using a message box. In this case, the code would be like the below.
MsgBox Range("A1").Value
In the above code, the message box will take value from cell A1 and show it to the user.

Change Cell Value
You can also make changes to a cell value, and here I have shared a few examples that can help you to understand this.
1. Add a Number to an Existing Number
Let’s say if you want to add one to the number that you have in cell A1, you can use the following code.
Range("A1").Value = Range("A1").Value + 1The above code assigns value to cell A1 by taking value from cell A1 itself and adding one to it. But you can also use VBA IF THEN ELSE to write a condition to change only when there is a number in the cell.
If IsNumeric(Range("A1").Value) Then
  Range("A1").Value = Range("A1").Value + 1
End If
2. Remove First Character from Cell
Now, the following code removes the first character from the cell value and assigns the rest of the value back to the cell.
Range("A1").Value = Right(Range("A1").Value, Len(Range("A1").Value) - 1)More Tutorials
- Count Rows using VBA in Excel
- Excel VBA Font (Color, Size, Type, and Bold)
- Excel VBA Hide and Unhide a Column or a Row
- Excel VBA Range – Working with Range and Cells in VBA
- Apply Borders on a Cell using VBA in Excel
- Find Last Row, Column, and Cell using VBA in Excel
- Insert a Row using VBA in Excel
- Merge Cells in Excel using a VBA Code
- Select a Range/Cell using VBA in Excel
- SELECT ALL the Cells in a Worksheet using a VBA Code
- ActiveCell in VBA in Excel
- Special Cells Method in VBA in Excel
- UsedRange Property in VBA in Excel
- VBA AutoFit (Rows, Column, or the Entire Worksheet)
- VBA ClearContents (from a Cell, Range, or Entire Worksheet)
- VBA Copy Range to Another Sheet + Workbook
- VBA Enter Value in a Cell (Set, Get and Change)
- VBA Insert Column (Single and Multiple)
- VBA Named Range | (Static + from Selection + Dynamic)
- VBA Range Offset
- VBA Sort Range | (Descending, Multiple Columns, Sort Orientation
- VBA Wrap Text (Cell, Range, and Entire Worksheet)
- VBA Check IF a Cell is Empty + Multiple Cells
⇠ Back to What is VBA in Excel
Helpful Links – Developer Tab – Visual Basic Editor – Run a Macro – Personal Macro Workbook – Excel Macro Recorder – VBA Interview Questions – VBA Codes
In this Article
- Set Cell Value
- Range.Value & Cells.Value
- Set Multiple Cells’ Values at Once
- Set Cell Value – Text
- Set Cell Value – Variable
- Get Cell Value
- Get ActiveCell Value
- Assign Cell Value to Variable
- Other Cell Value Examples
- Copy Cell Value
- Compare Cell Values
This tutorial will teach you how to interact with Cell Values using VBA.
Set Cell Value
To set a Cell Value, use the Value property of the Range or Cells object.
Range.Value & Cells.Value
There are two ways to reference cell(s) in VBA:
- Range Object – Range(“A2”).Value
- Cells Object – Cells(2,1).Value
The Range object allows you to reference a cell using the standard “A1” notation.
This will set the range A2’s value = 1:
Range("A2").Value = 1The Cells object allows you to reference a cell by it’s row number and column number.
This will set range A2’s value = 1:
Cells(2,1).Value = 1Notice that you enter the row number first:
Cells(Row_num, Col_num)Set Multiple Cells’ Values at Once
Instead of referencing a single cell, you can reference a range of cells and change all of the cell values at once:
Range("A2:A5").Value = 1Set Cell Value – Text
In the above examples, we set the cell value equal to a number (1). Instead, you can set the cell value equal to a string of text. In VBA, all text must be surrounded by quotations:
Range("A2").Value = "Text"If you don’t surround the text with quotations, VBA will think you referencing a variable…
Set Cell Value – Variable
You can also set a cell value equal to a variable
Dim strText as String
strText = "String of Text"

Range("A2").Value = strText
Get Cell Value
You can get cell values using the same Value property that we used above.
VBA Coding Made Easy
Stop searching for VBA code online. Learn more about AutoMacro — A VBA Code Builder that allows beginners to code procedures from scratch with minimal coding knowledge and with many time-saving features for all users!
Learn More
Get ActiveCell Value
To get the ActiveCell value and display it in a message box:
MsgBox ActiveCell.ValueAssign Cell Value to Variable
To get a cell value and assign it to a variable:
Dim var as Variant

var = Range("A1").Value
Here we used a variable of type Variant. Variant variables can accept any type of values. Instead, you could use a String variable type:
Dim var as String

var = Range("A1").Value
A String variable type will accept numerical values, but it will store the numbers as text.
If you know your cell value will be numerical, you could use a Double variable type (Double variables can store decimal values):
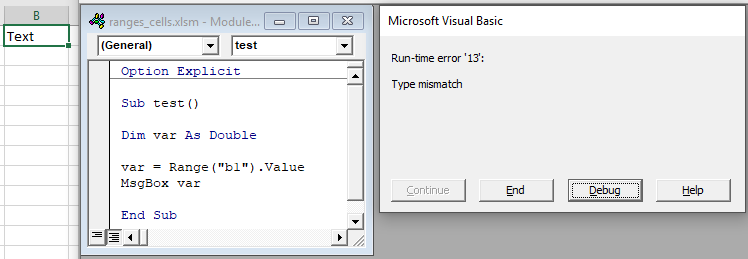
Dim var as Double

var = Range("A1").Value
However, if you attempt to store a cell value containing text in a double variable, you will receive an type mismatch error:
Other Cell Value Examples
VBA Programming | Code Generator does work for you!
Copy Cell Value
It’s easy to set a cell value equal to another cell value (or “Copy” a cell value):
Range("A1").Value = Range("B1").ValueYou can even do this with ranges of cells (the ranges must be the same size):
Range("A1:A5").Value = Range("B1:B5").ValueCompare Cell Values
You can compare cell values using the standard comparison operators.
Test if cell values are equal:
MsgBox Range("A1").Value = Range("B1").ValueWill return TRUE if cell values are equal. Otherwise FALSE.
You can also create an If Statement to compare cell values:
If Range("A1").Value > Range("B1").Value Then

  Range("C1").Value = "Greater Than"

Elseif Range("A1").Value = Range("B1").Value Then

  Range("C1").Value = "Equal"

Else

  Range("C1").Value = "Less Than"

End If
You can compare text in the same way (Remember that VBA is Case Sensitive)
YES, of course, it is possible.
Put this code in Module1 of VBA editor:
Function UDF_RectangleArea(A As Integer, B As Integer)
    Evaluate "FireYourMacro(" & Application.Caller.Offset(0, 1).Address(False, False) & "," & A & "," & B & ")"
    UDF_RectangleArea = "Hello world"
End Function

Private Sub FireYourMacro(ResultCell As Range, A As Integer, B As Integer)
    ResultCell = A * B
End Sub
The result of this example UDF is returned in another, adjacent cell. The user defined function UDF_RectangleArea calculates the rectangle area based on its two parameters A and B and returns result in a cell to the right. You can easily modify this example function.
The limitation Microsoft imposed on function is bypassed by the use of VBA Evaluate function. Evaluate simply fires VBA macro from within UDF. The reference to the cell is passed by Application.Caller. Have fun!
UDF limitation documentation: https://support.microsoft.com/en-us/help/170787/description-of-limitations-of-custom-functions-in-excel
[et_pb_section bb_built=”1″ next_background_color=”#000000″][et_pb_row][et_pb_column type=”4_4″][et_pb_text _builder_version=”3.0.105″ background_layout=”light”]
One of the most foundational things to learn about when using Excel VBA is how to change a cell value, so that you deal with with this blog post.
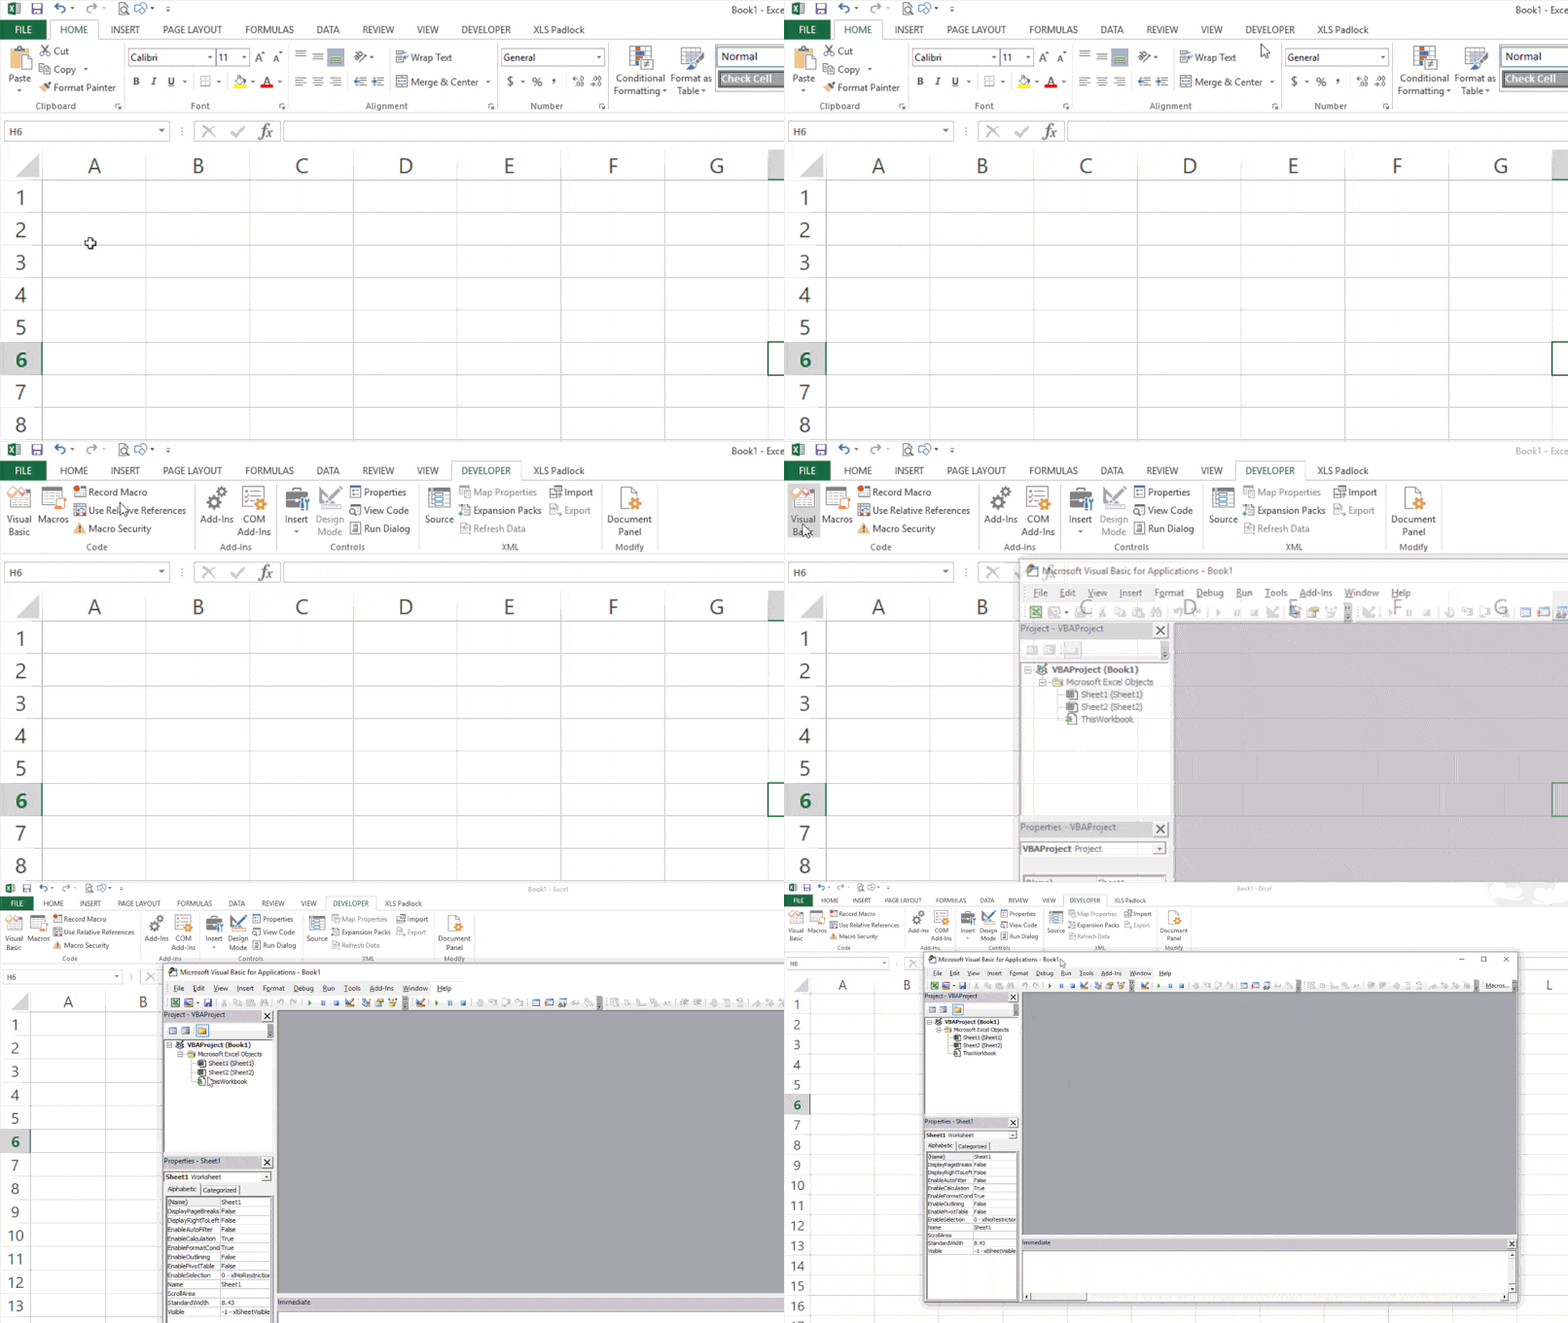
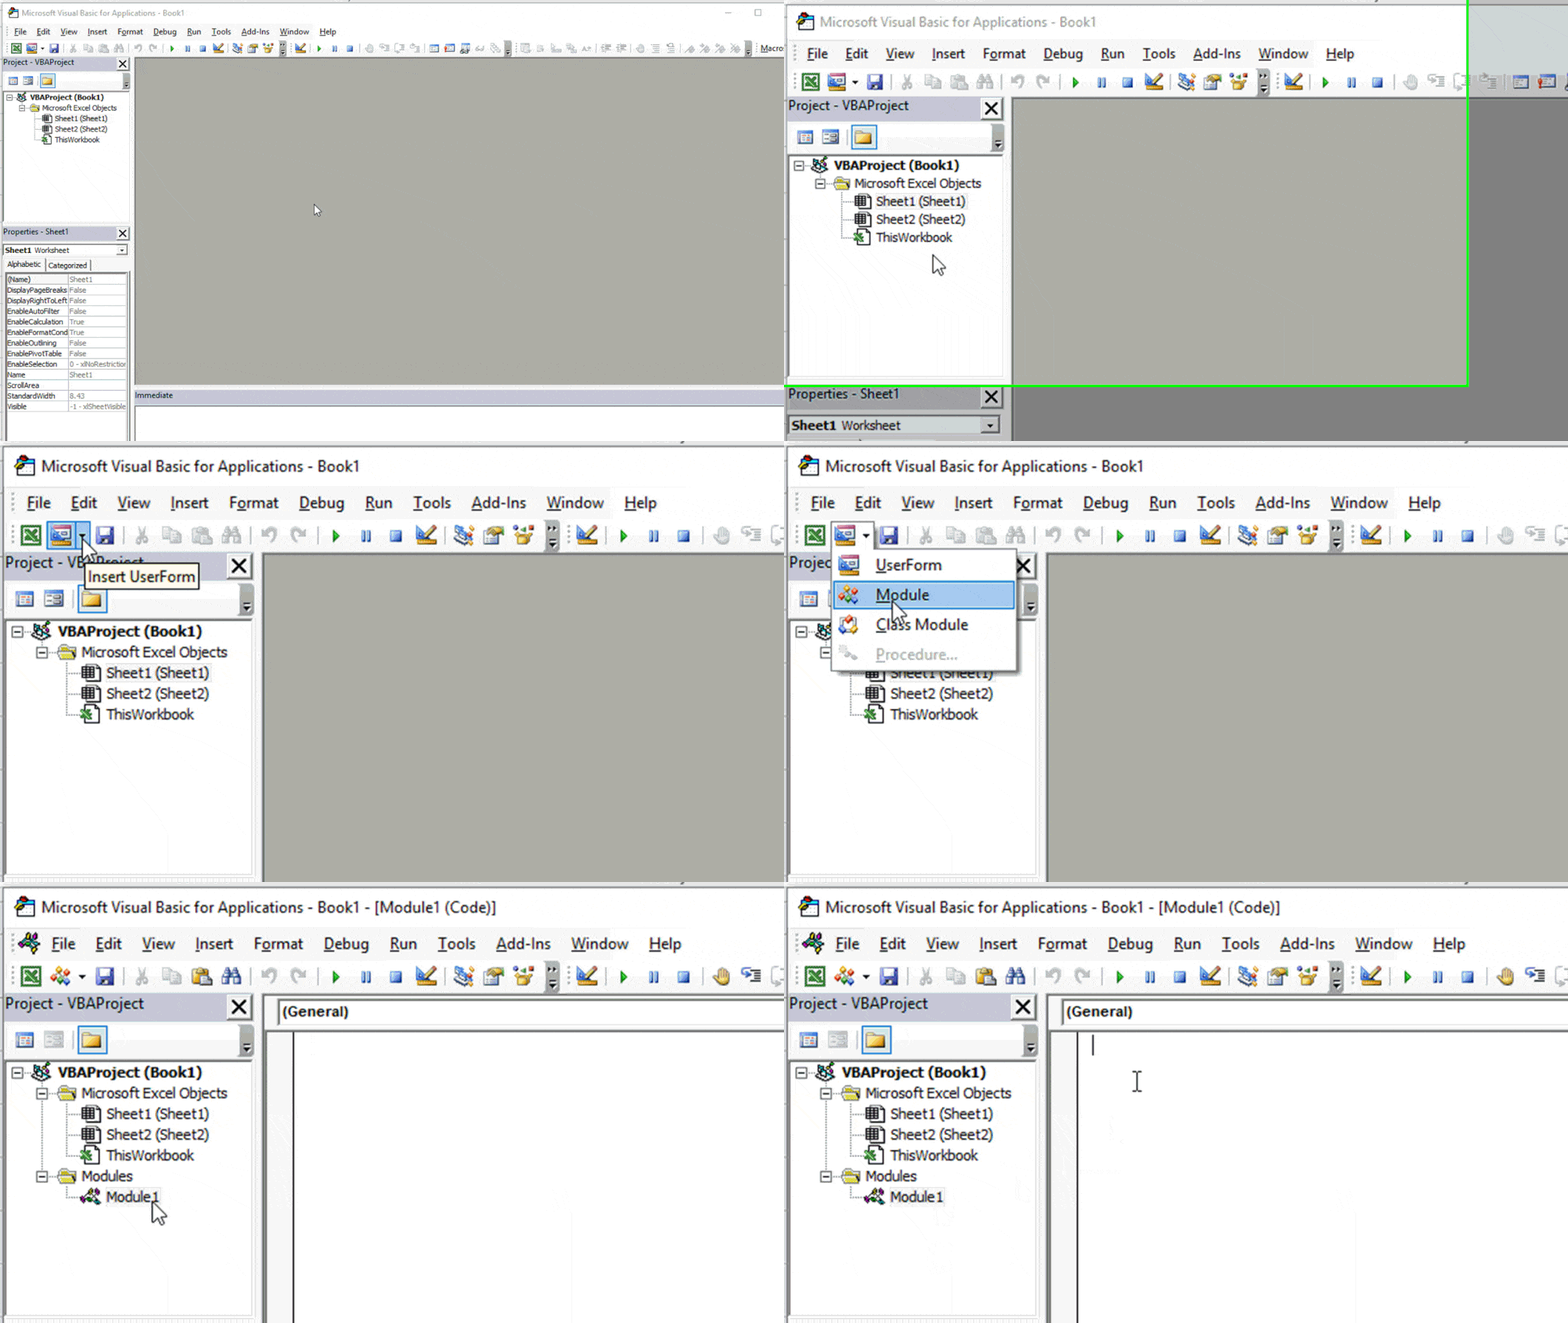
On the most basic level, all you have to do is open up the Visual Basic editor in Excel by going to the developer tab and clicking the visual basic editor button. I prefer to use a keyboard shortcut (Alt + F11) to open up the Visual Basic editor.
To create your first macro, you need to add a new module:
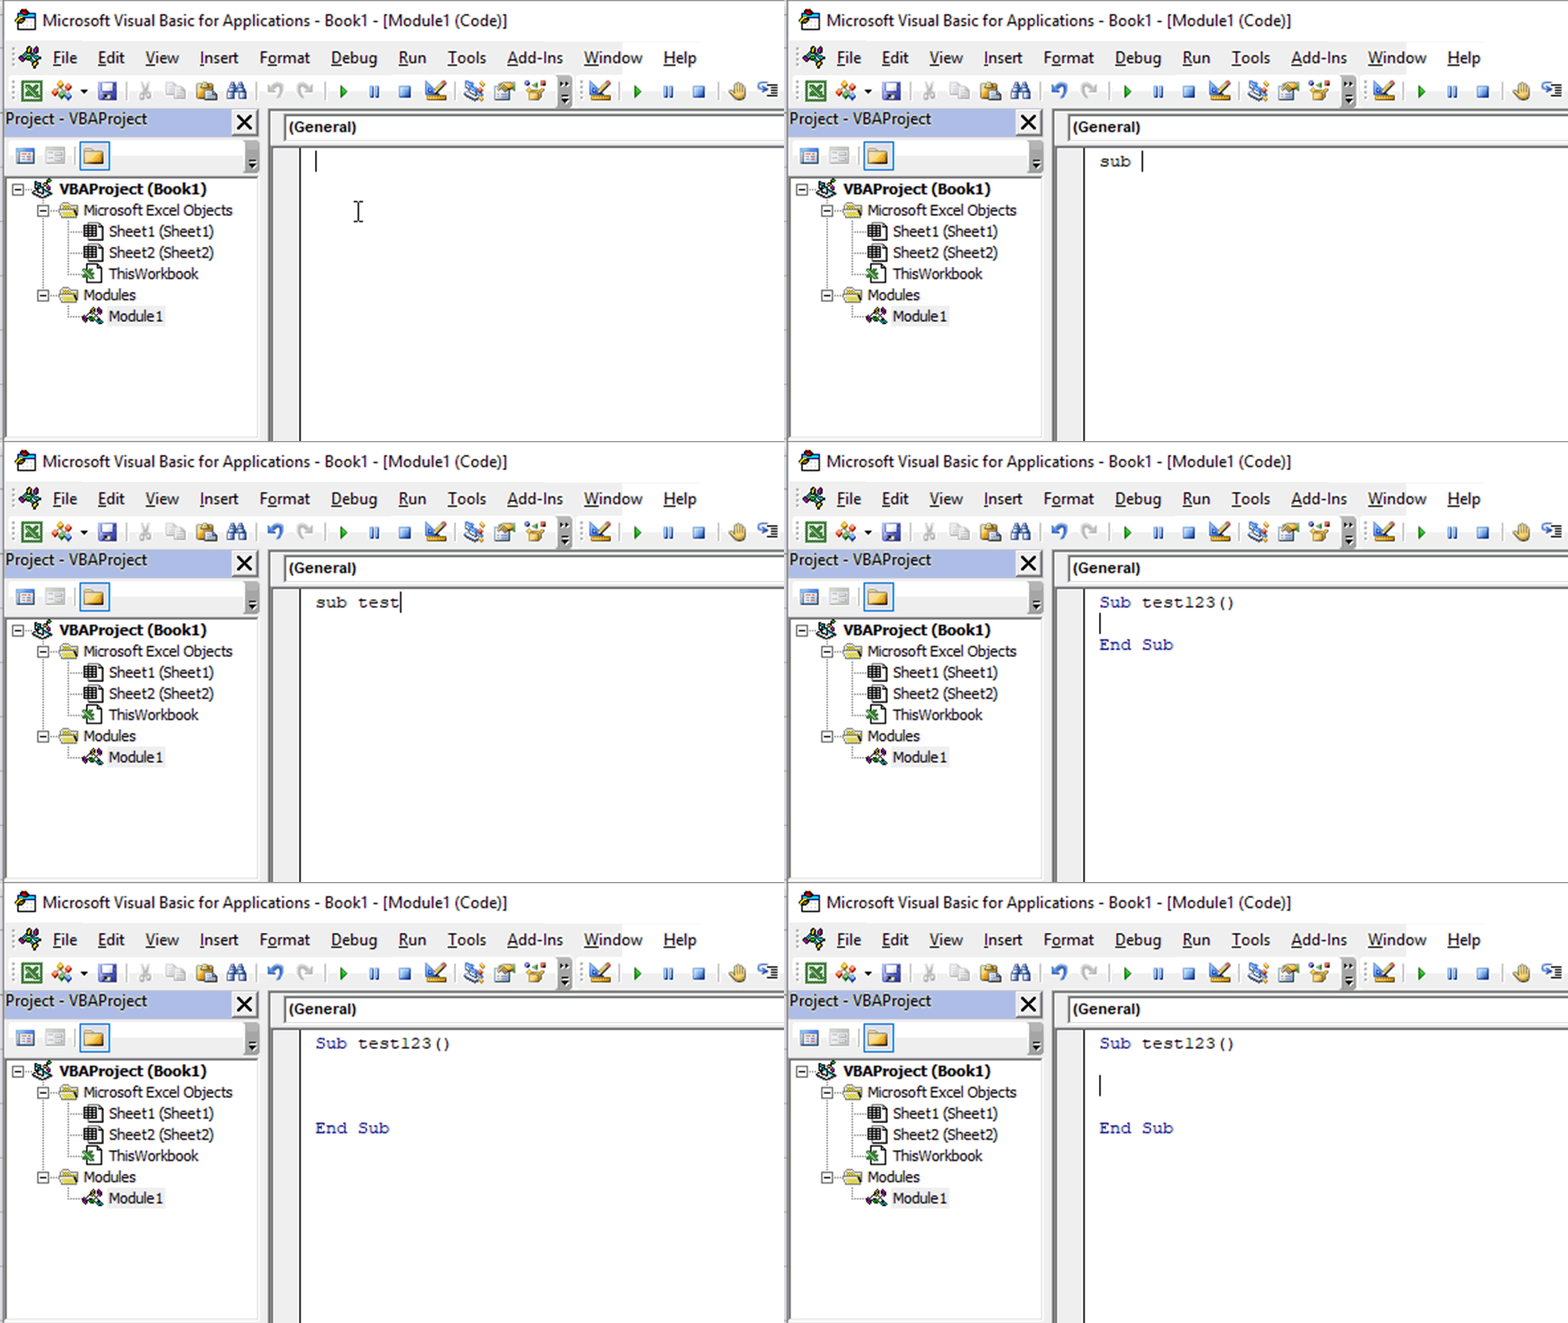
Then, when you’re in the new module, we need to create our first macro. We will call it test123 and hit enter.
Now, let’s add some meaningful code. To make A1 become equal to the value “Hello World!”, we need to use Range() to do it. Try this:
[cc lang=”vbscript” lines=”-1″ width=”100%”]
Sub test123()
Range(“A1”) = “Hello World”
End Sub
[/cc]
When we run the macro (F5), it will make the value change in the actual cell as if someone typed it! Awesome!
This was an example of using a String/Text, by surrounding it with quotes. Here are some other examples of data types you can put into cells:
[cc lang=”vbscript” lines=”-1″ width=”100%”]
‘Text Format
Range(“A1”) = “Hello World”
‘Date Format
Range(“A2”) = #12/25/2018#
‘Number Format
Range(“A3”) = 250
[/cc]
For more info, check out this video to help you further:
[/et_pb_text][/et_pb_column][/et_pb_row][/et_pb_section][et_pb_section bb_built=”1″ admin_label=”You Might Also Like” _builder_version=”3.0.105″ custom_padding=”11px|0px|54px|0px” prev_background_color=”#000000″ global_module=”14500″][et_pb_row global_parent=”14500″ _builder_version=”3.0.105″][et_pb_column type=”4_4″][et_pb_text global_parent=”14500″ _builder_version=”3.0.105″]
You Might Also Like
[/et_pb_text][et_pb_blog admin_label=”You Might Also Like – Blog” global_parent=”14500″ fullwidth=”off” posts_number=”6″ include_categories=”72,73,45,71,46,1,51″ show_comments=”on” use_overlay=”on” _builder_version=”3.0.105″ header_font=”Playfair Display|700|||||||” header_font_size=”20″ header_line_height=”1.4em” body_font=”Poppins||||||||” body_font_size=”16px” body_line_height=”1.5em” meta_font=”Poppins|600||on|||||” meta_font_size=”12px” meta_text_color=”#edbb5f” meta_letter_spacing=”1px” meta_line_height=”2em” pagination_font=”Poppins|600||on|||||” pagination_font_size=”16px” pagination_font_size_tablet=”51″ pagination_text_color=”#edbb5f” pagination_letter_spacing=”1px” pagination_line_height=”2em” text_orientation=”center” animation_style=”flip” custom_css_content=”display: none;” show_content=”off” show_thumbnail=”on” show_more=”off” show_author=”on” show_date=”on” show_categories=”on” show_pagination=”on” background_layout=”light” /][/et_pb_column][/et_pb_row][/et_pb_section]
This website uses cookies to improve your experience. We’ll assume you’re ok with this, but you can opt-out if you wish. Cookie settingsACCEPT


