Word for Microsoft 365 Word for Microsoft 365 for Mac Word 2021 Word 2021 for Mac Word 2019 Word 2019 for Mac Word 2016 Word 2016 for Mac Word 2013 Word 2010 Word for Mac 2011 More…Less
You can have Word align objects—such as pictures, shapes, SmartArt, and charts—in relation to the edges of the page, the margins, or other objects.
Align a picture, shape, text box, SmartArt graphic, or WordArt
-
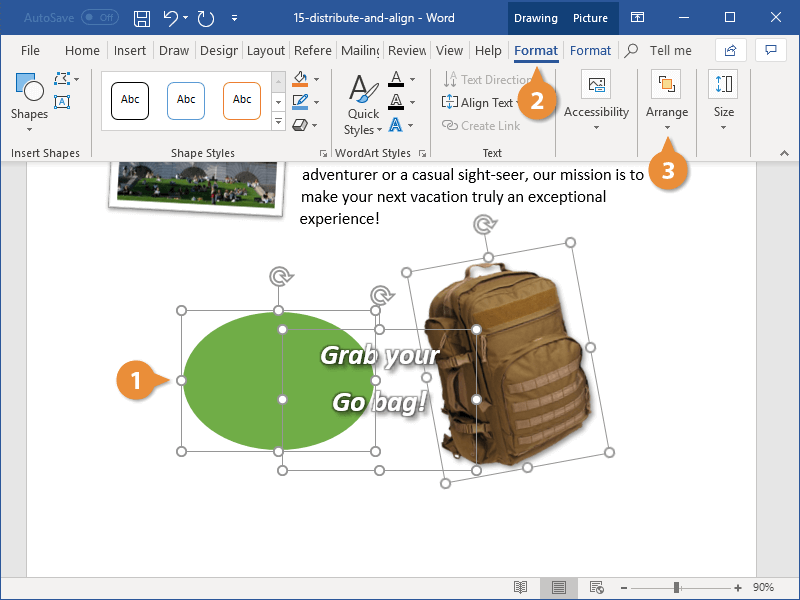
Select the objects to align.
To select multiple objects, select the first object, and then press and hold CTRL while you select the other objects.
-
Do one of the following:
-
To align a picture, select Picture Format or Picture Tools > Format.
-
To align a shape, text box, or WordArt, select Shape Format or Drawing Tools > Format.
-
-
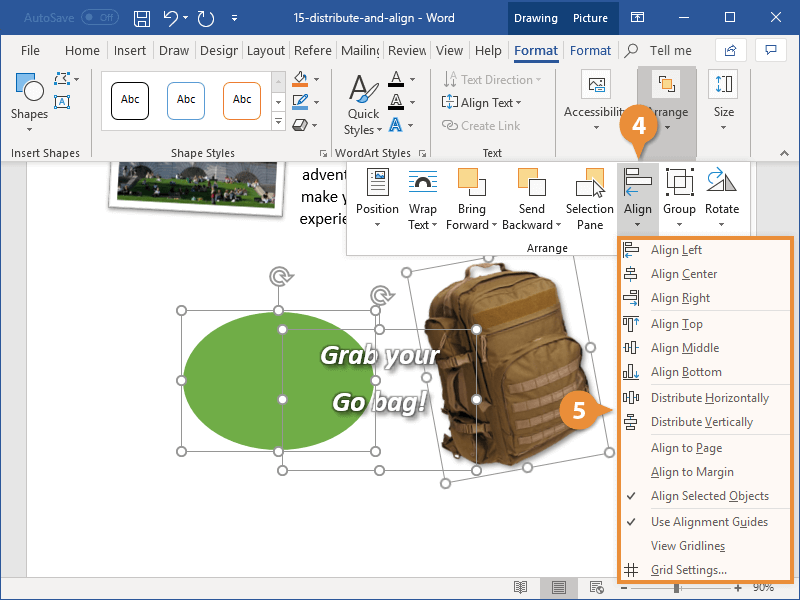
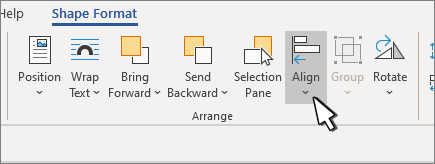
In the Arrange group, select Align.
-
Choose of the following:
Important: If Align options are unavailable, you may only have a single item selected.
-
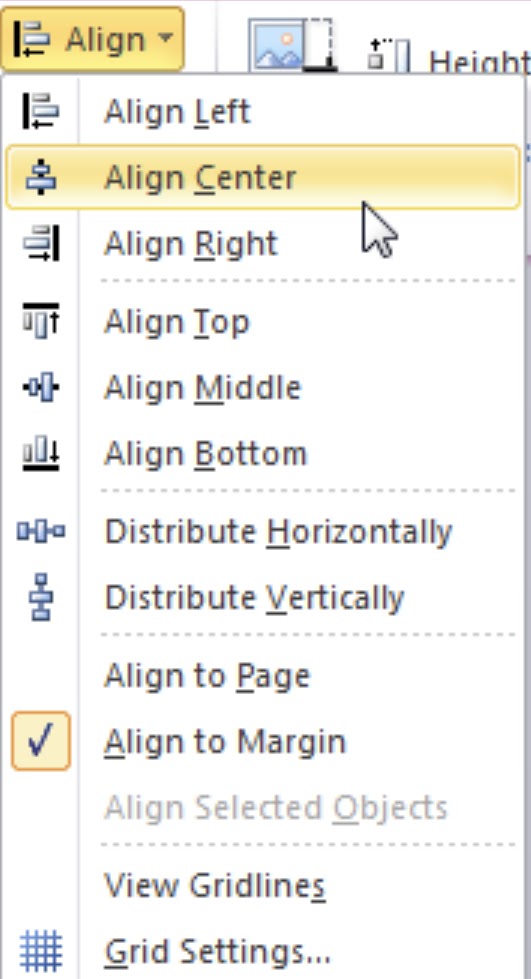
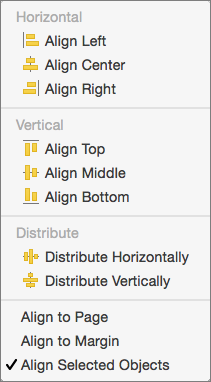
Align Left
To align the edges of the objects to the left. -
Align Center
To align the objects vertically through their centers. -
Align Right
To align the edges of the objects to the right. -
Align Top
To align the top edges of the objects. -
Align Middle
To align the objects horizontally through their middles. -
Align Bottom
To align the bottom edges of the objects.Notes:
-
When you align objects relative to each other by their edges, one of the objects remains stationary.
-
Align Middle aligns objects horizontally through the middles of the objects and Align Center aligns objects vertically through the centers of the objects. When you align objects relative to each other by their middles or centers, the objects are aligned along a horizontal or vertical line that represents the average of their original positions. No object necessarily remains stationary, and all of the objects might move.
-
Depending on the alignment option, objects might cover another object. If this happens, undo the alignment and move the objects to new positions before aligning again.
-
-
Arrange objects equal distances from each other
-
Select at least three objects to arrange. To select multiple objects, select the first object, and then press and hold CTRL while you select the other objects.
To select objects that are hidden, stacked, or behind text, go to Home > Find and Select > Select Objects, and then draw a box over the objects.
-
Do one of the following:
-
To arrange pictures equally, select Picture Format or Picture Tools > Format.
-
To arrange a group with shapes, text boxes, or WordArt equally, select Shape Format or Drawing Tools > Format.
-
-
In the Arrange group, select Align.
-
Choose one of the following:
-
Distribute Horizontally To center the objects horizontally.
-
Distribute Vertically To center the objects vertically.
-
Word can align objects to the left, center, right, top, middle, and bottom. You select whether you want those positions to be relative to the page, the margins, or other objects.
Note: If text wrapping for an object is set to In Line with Text, Word can only align it in relation to the page or the margins. To change it, Control + Click the object, point to Wrap Text, and then pick something other than In Line with Text. To learn more about text wrapping, see Control text wrapping around objects.
Tip: If you have several objects to position on a page, you might want to use a grid to help you.
Align an object with other objects, the margins, or the page
-
Hold down Shift and use the mouse or touchpad to select the objects that you want to align.
-
Select Shape Format or Picture Format.
-
Select Align. If you don’t see Align on the Shape Format tab, select Arrange, and then choose Align.
-
Choose one of the following:
-
Align to Page
-
Align to Margin
-
Align Selected Objects
-
-
To choose whether the selected objects are aligned to the margins, the page, or relative to each other, select Align, and choose one of the following:
-
Align to Page
-
Align to Margin
-
Align Selected Objects
-
-
Select Align again, and then choose the type of alignment from one of the three categories: Horizontal, Vertical, or Distribute.
Tip: After you have objects aligned as you want, you can move them while preserving their relative positions by defining them as a group. For help with using groups, see Group or ungroup shapes, pictures, or other objects.
You can align objects in relation to an anchor, such as the margin, page, and paragraph. You can also enter a precise numeric position for the object in relation to the anchor.
Align an object with other objects, the margins, or the page
-
Select the object.
-
Select Format or Format Picture.
-
To choose whether the selected objects are aligned to the margins, the page, or relative to each other, select Align, and then select one of the following options:
-
Align to Page
-
Align to Margin
-
Align Selected Objects
-
-
Select Align again, and then choose the type of alignment that you want.
Align an object in relation to text
-
Select the object to select it.
-
Select Format or Format Picture.
-
Under Arrange, select Wrap Text, and then choose a style other than In Line with Text (for example, Tight
).
-
In the document, drag the object where you want it.
-
To fine-tune the picture’s position, under Arrange, select Position, and then choose More Layout Options.
-
On the Position tab, select the options that you want for your horizontal and vertical anchors.
Note: To make sure that the selected object moves up or down with the paragraph that it’s anchored to, select Move object with text.
Need more help?
Want more options?
Explore subscription benefits, browse training courses, learn how to secure your device, and more.
Communities help you ask and answer questions, give feedback, and hear from experts with rich knowledge.
Select what you want to center, and from the Page Layout tab, expand the Page Setup section. In the Layout tab, you’ll find a Vertical alignment drop-down menu in the Page section. Select Center from the drop-down menu. Make sure the Apply to drop-down menu has Selected text selected, and click OK.
Contents
- 1 How do you center a picture?
- 2 How do you center something in Word?
- 3 How do you center art?
- 4 How do you center a poster?
- 5 How do you center a picture in Word on a Mac?
- 6 What is the shortcut for center align in Word?
- 7 How do I center a heading in Word?
- 8 Should a picture be centered to the table or wall?
- 9 How do I center an image in CSS?
- 10 How do you center a picture on a door with a wall?
- 11 How do you matte a poster?
- 12 Why can’t I align picture in Word?
- 13 Why can’t I Align Center in Word?
- 14 How do you align pictures in Word 2016?
- 15 How do I center align right in Word?
- 16 Which key is used for Centre alignment?
- 17 How do I turn on alignment guides in Word?
- 18 How do I align an image in a header in Word?
- 19 How do you center a heading?
- 20 How do you arrange art on the wall when the couch is not centered?
How do you center a picture?
To center an image using text-align: center; you must place the inside of a block-level element such as a div . Since the text-align property only applies to block-level elements, you place text-align: center; on the wrapping block-level element to achieve a horizontally centered .
How do you center something in Word?
Use your mouse to select the text you wish to center. Click the Page Layout tab. Click the small Page Setup button at the bottom-right corner of the Page Setup section of the ribbon. Click the dropdown menu to the right of Vertical alignment and choose the Center option.
How do you center art?
Hang your Art by its Center
The artwork’s center should be 57 inches from the ground to match average eye level. People shouldn’t strain themselves to view the artwork. By placing the center of the artwork at eye level, it ensures the art can be admired comfortably.
How do you center a poster?
Space the posters evenly, no less than 1 inch apart and no more than 6 inches apart. The center of the grouping should be about 60 to 66 inches from the floor. If you have an odd number, use a horizontal row; vertical rows look best on narrow walls.
How do you center a picture in Word on a Mac?
Select what you want to center, and from the Page Layout tab, expand the Page Setup section. In the Layout tab, you’ll find a Vertical alignment drop-down menu in the Page section. Select Center from the drop-down menu. Make sure the Apply to drop-down menu has Selected text selected, and click OK.
What is the shortcut for center align in Word?
You can also center-align your text with the shortcut Ctrl+J (Cmnd+J). You can also change the alignment and justification settings in the paragraph dialog box.
How do I center a heading in Word?
Center Text Horizontally
- Triple-click the document’s title to select it.
- Click the “Home” tab in the Word ribbon.
- Click the icon of centered lines in the ribbon’s Paragraph group to center the title without affecting the rest of your text.
- Triple-click the document’s title to select it.
Should a picture be centered to the table or wall?
When hanging your pictures, always hang them in relation to the furniture sitting below. With your couch off-centered on the wall, focus on hanging your painting centered above the couch to create a great focal point for your living room.
How do I center an image in CSS?
This is also the way to center an image: make it into block of its own and apply the margin properties to it. For example: IMG. displayed { display: block; margin-left: auto; margin-right: auto }
How do you center a picture on a door with a wall?
When a wall, doorway, or window separates multiple pieces of artwork, level the centre of the artworks rather than the top or bottom of the frames. If hanging art next to a door, level the frames to be parallel to the side of the door.
How do you matte a poster?
Wear rubber gloves or wash your hands thoroughly to avoid leaving fingerprints on the poster and mat.
- Place the mat (face down) next to cardboard (face up).
- Then put your poster on the cardboard so that it was under a mat.
- Place any heavy objects on your piece, that it does not accidentally shifted.
Why can’t I align picture in Word?
Hold down Shift and use the mouse or touchpad to select the objects that you want to align. Select Shape Format or Picture Format.If you don’t see Align on the Shape Format tab, select Arrange, and then choose Align.
Why can’t I Align Center in Word?
Select the text that you want to center, and then click Paragraph on the Format menu. On the Indents and Spacing tab, change the setting in the Alignment box to Centered, and then click OK.On the Indents and Spacing tab, change the setting in the Alignment box to Centered, and then click OK.
How do you align pictures in Word 2016?
To align two or more objects:
- Hold the Shift (or Ctrl) key and click the objects you want to align. In our example, we’ll select the four shapes on the right.
- From the Format tab, click the Align command, then select one of the alignment options.
- The objects will be aligned based on the selected option.
How do I center align right in Word?
Click anywhere in a paragraph you want to align, or select multiple paragraphs. Click an alignment option in the Paragraph group.
Align a Paragraph
- To align left, press Ctrl + L.
- To align right, press Ctrl + R.
- To align center, press Ctrl + C.
- To justify, Ctrl + J.
Which key is used for Centre alignment?
Ctrl + E
Ctrl + E — Align selected text or line to the centre.
How do I turn on alignment guides in Word?
Turn on the snap-to options
- Select a chart, picture, or object in the document.
- On the right end of the ribbon, select Format > Align > Grid Settings. The Grid and Guides dialog box appears.
- Turn on one or both of these options: Option. Description. Snap objects to grid when the gridlines are not displayed.
Go back to page one and double-click in the header area to open the header/footer area. On the Header & Footer Tools > Design tab, click Insert Alignment Tab. On the Alignment Tab window, select Left then click OK. Leave all other settings as they are.
How do you center a heading?
To set the heading alignment in HTML, use the style attribute. The style attribute specifies an inline style for an element. The attribute is used with the HTML
tag, with the CSS property text-align.
How do you arrange art on the wall when the couch is not centered?
A good technique to use is to add art to each side of the couch, over other items or furnishings. Try to use pieces of artwork that are about the same size and are about the same distance away from the central artwork. While asymmetry can be very appealing, a symmetrical arrangement is often easier to use successfully.
- Free Courses
- Microsoft Word
- How to Center a Picture in Word

How to Distribute and Align Images in Word
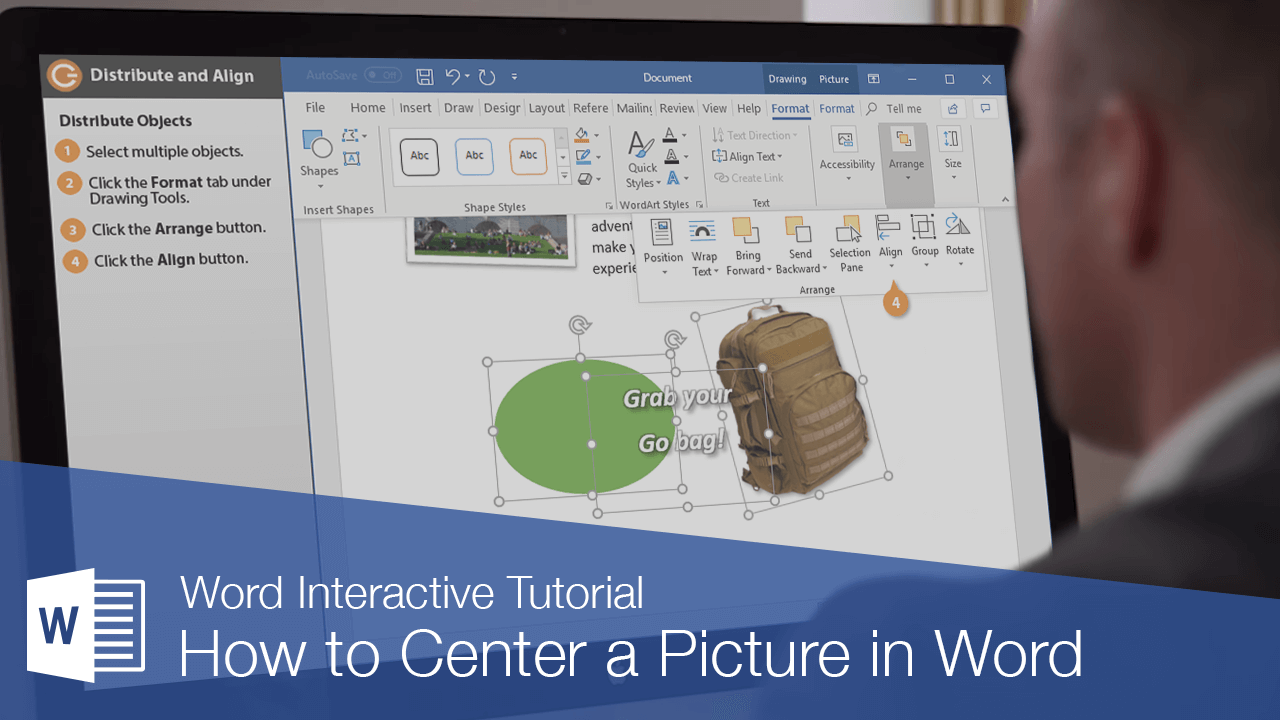
Documents that have pictures and graphics scattered randomly on a page can look unorganized. You can use the Align and Distribute features to organize the objects in your document.
Distribute or Align an Object
The Align command aligns objects relative to one another, while the Distribute command spaces objects evenly.
- Select the objects you want to distribute or align together.
- Click the Format tab.
- Expand the Arrange group, if necessary.
- Click the Align button.
- Select an alignment or distribution option.
The Align commands let you align the objects to the left, right, top, or bottom edge, or to the horizontal center or vertical middle.
The Distribute commands will take three or more selected objects and space them evenly horizontally or vertically.
You can also toggle the Align to Page or Align to Margin options. Select one of these before selecting an alignment option to align the selected objects to the page borders or margins. Select Align to Selected Objects to return to aligning objects amongst themselves.
The selected objects are aligned by the selected setting.
FREE Quick Reference
Click to Download
Free to distribute with our compliments; we hope you will consider our paid training.
Formatting your word document is a crucial part of enhancing its quality level. It also helps readers navigate information as intended by the author. Formatting text, and images and making them aesthetically pleasing creates curiosity for readers. With that said, here are some ways to align photos or images in a word document using different methods.
Method 1: In one columnar layout, how to align the image as center using the Formatting Menu
- The first step is to select the image or object you would like it to align as the center.
- Next, locate the Format Tab

- Under the Format tab, tap the Arrange option only if you feel it is necessary.
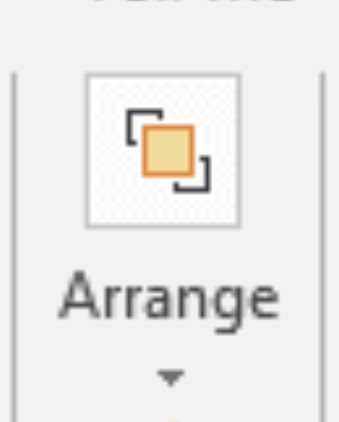
- Tap on the Align option. (this option allows you to align images or various objects according to your requirements, that is, left, right, center.)
NOTE: Here the Distribute option will allow you to space objects or images in a vertical or horizontal manner. The Align to Selected Objects can come in handy to align images or objects among themselves. Align to Page or Align to Margin options are also available on the word.
- According to your preference, choose the Alignment option or the Distribution option.
- Now, you will be able to see the images or objects aligned as per the settings.
- Under the Align option, there are various options to enable using the wrap text option such as:
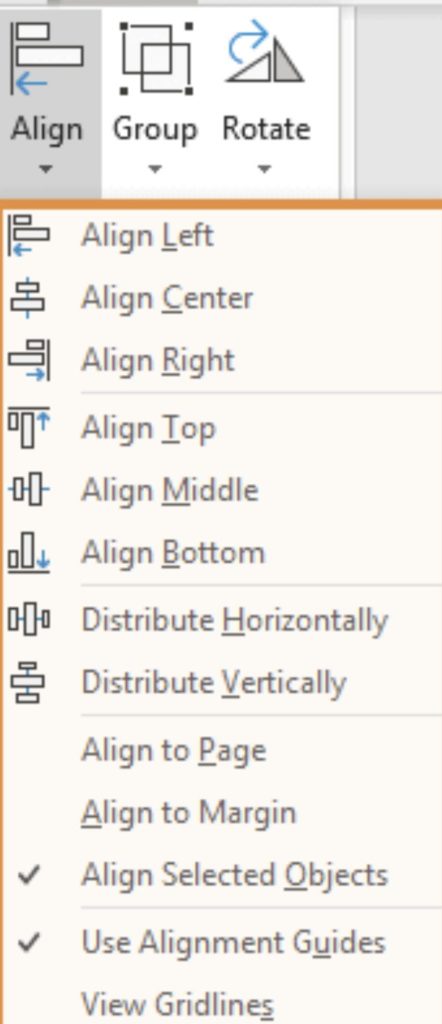
- Originally the only available options in the align menu are “Align to Page” and “Align to Margin”.
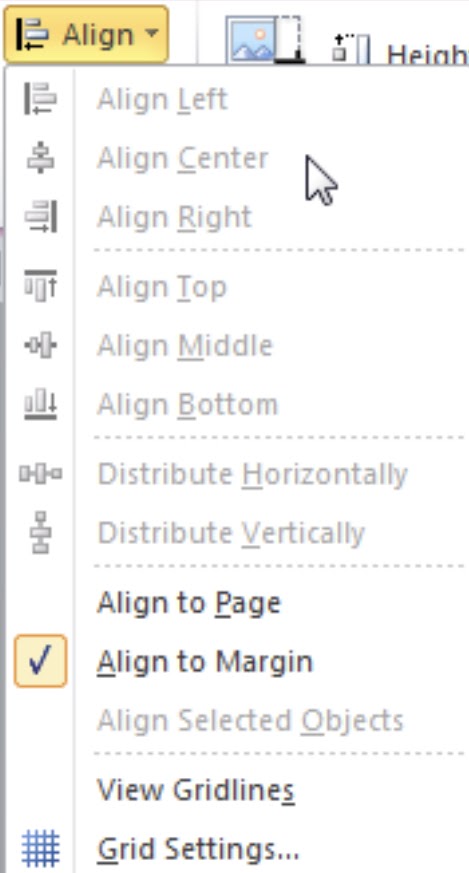
- To enable the other options, go to the wrap text option and choose the Square option from the drop-down list.
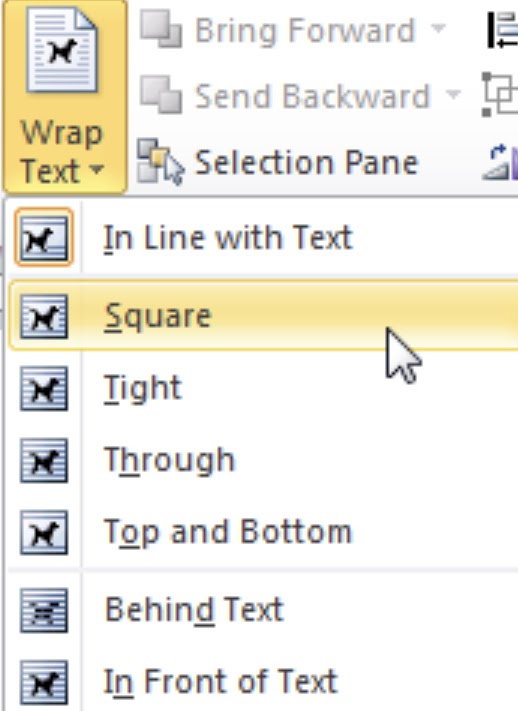
- Now you will notice that if you go back to the Align menu the previously grayed option is now available to use for formatting.
- Now you can select the image and change its alignment using the new palate of settings made available.
Method 2: In 2 columnar layout, how to center an image by using the icon toolbar
NOTE: Steps for Office 2010, although settings are similar to those of Office 2007.
- Start off by inserting the required image into the word document.
- Locate the Insert Tab, then proceed to select the image that needs to be aligned.

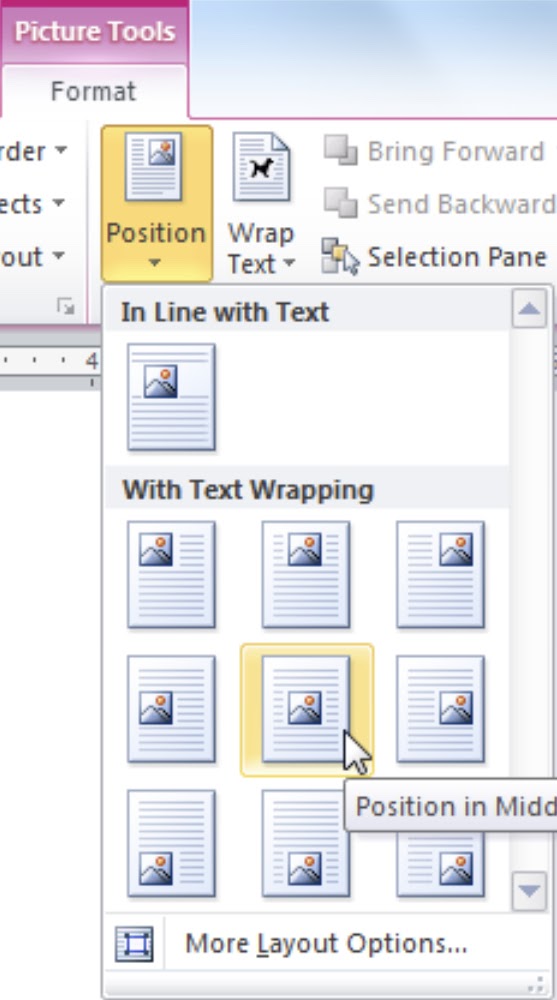
- Go to the positions menu to get quick alignment solutions.
- For advanced alignment, one can go to the Align Tool and select the Align Center option.
Method 3: In 3 columnar layout, how to center an image by using the Layout Button
- Locate the area and place your cursor at which you want to place the image.
- Insert the image into the column above or below the paragraph as you wish.
- Next, tap the Pictures option.
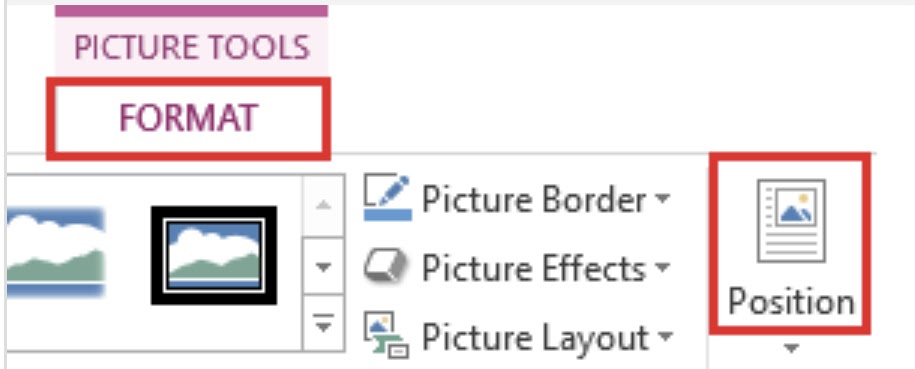
- Once the image is inserted in the word document, select it by clicking on it.
- Under the positions, drop-down box set the Text Wrapping option that fits best in your document.
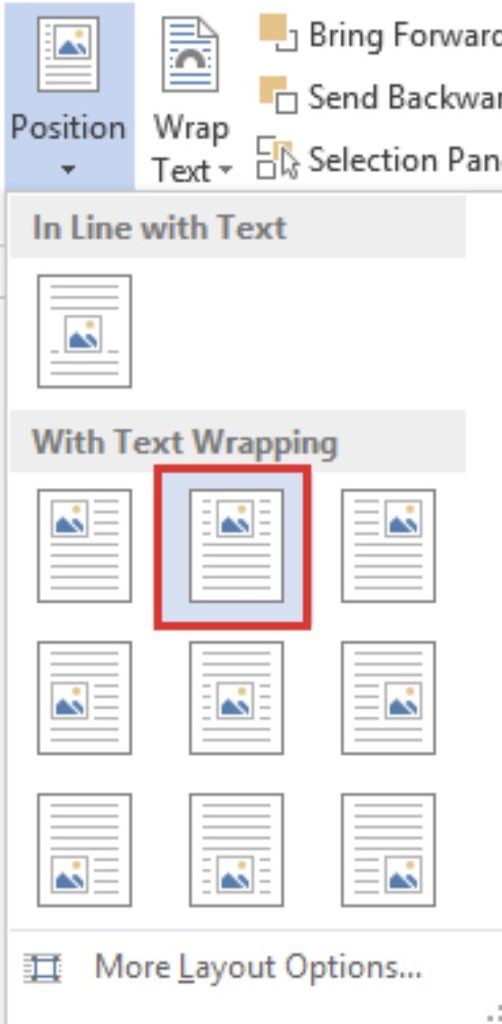
- Then locate the Layout Options that are present on the top right corner of the image.
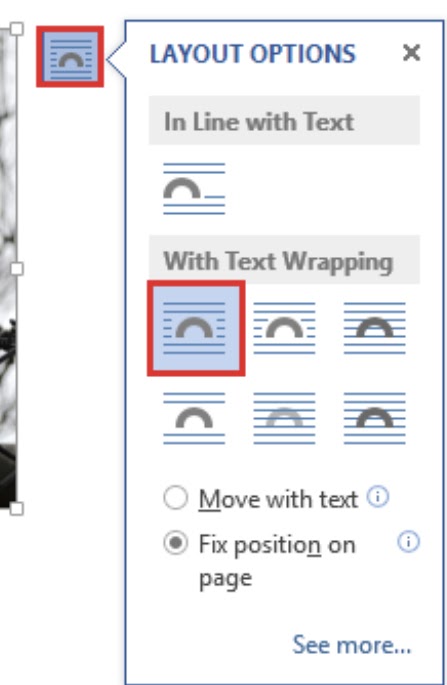
- Again, pick the layout best suited for the document.
- For more advanced options click the “see more” option.
For macOS newer Versions and macOS 2011, the setting pretty much remains the same except for a few changes. Although it is to be noted that if your settings are set to “In-Line with Text” then, Word will only align your images according to your page or its margins. To modify this setting:
- Together push the Control button and select the image.
- Then under the Wrap Text drop-down and change the setting from In Line with Text option to desired option.
In the case of multiple images using the Grid View can be really useful. Formatting images is easy and doesn’t have a high learning curve. Also, these methods come in handy when simply dragging the image doesn’t help in aligning!
Read More: How to Make One Page Landscape in Word
In this article, we would like to introduce you with 2 methods to center all pictures and text boxes in your Word document.
Pictures and shapes, such as text boxes, play vital important in making a wonderful document. With a growing number of images and shapes being inserted, the demand to integrate their formatting, say to center them starts to surface.
What you should know is that all pictures inserted into document is set in “In line with text” layout, while text boxes are flowing shapes. You may change the picture layout as required, but to center them you will have to consider the text wrapping. Because text formatting can be easily tampered, leaving you with a layout you don’t like.
Therefore, we will focus on 2 ways to center “In line with text” pictures and text boxes.
Method 1: Center One Picture or Text Box Manually
To center a “In line with text” picture, follow these steps:
- Firstly, click on the picture to select it.
- Secondly, click “Center” in “Paragraph” group under “Home” tab. Or you can use the shortcuts “Ctrl+ E” instead.
Then to center a text box, go through these instructions:
- Similarly, click on text box to have it in selection.
- Then click “Format” tab under “Drawing Tools”.
- Next click “Align” in “Arrange” group.
- And choose “Align Center” on its drop-down menu.
Method 2: Batch Center Multiple Pictures or Text Boxes Automatically
Most of us would favor an automatic process to save efforts. Here you go.
- First off, press “Alt+ F11” to open the VBA editor.
- Next click “Normal” project.
- Click “Insert” tab and choose “Module”.
- Then double click on the module to bring out the editing space on the right side.
- Next to center pictures, you paste the following codes there:
Sub CenterInLinePictures()
  Dim objInLineShape As InlineShape
  Dim objDoc As Document

  Set objDoc = ActiveDocument

  For Each objInLineShape In objDoc.InlineShapes
    objInLineShape.Select
    Selection.ParagraphFormat.Alignment = wdAlignParagraphCenter
  Next objInLineShape
End Sub
To center all text boxes, you need the bellowing macro:
Sub CenterTextBoxes()
  Dim objDoc As Document
  Dim objTextBox As Shape

  Set objDoc = ActiveDocument

  For Each objTextBox In objDoc.Shapes
    If objTextBox.Type = msoTextBox Then
      objTextBox.RelativeHorizontalPosition = wdRelativeHorizontalPositionPage
      objTextBox.Left = wdShapeCenter
    End If
  Next objTextBox
End Sub
To center both pictures and text boxes, you will have to use this one:
Sub CenterInLinePicturesAndTextBoxes()
  Dim objInLineShape As InlineShape
  Dim objShape As Shape
  Dim objDoc As Document

  Set objDoc = ActiveDocument

  For Each objInLineShape In objDoc.InlineShapes
    objInLineShape.Select
    Selection.ParagraphFormat.Alignment = wdAlignParagraphCenter
  Next objInLineShape

  For Each objShape In objDoc.Shapes
    If objShape.Type = msoTextBox Then
      objShape.RelativeHorizontalPosition = wdRelativeHorizontalPositionPage
      objShape.Left = wdShapeCenter
    End If
  Next objShape
End Sub
- Lastly, click “Run” button or hit “F5”.
Address Document Problems
No matter how reluctant we have to admit that Word is not foolproof. Its breaking down can lead to corruption of documents while inheriting a corrupted docx can be heart-broken for us. In order to ease such anxiety, it’s advisable to get hold of a document recovering tool in advance. Then you won’t have to worry about the data loss.
Author Introduction:
Vera Chen is a data recovery expert in DataNumen, Inc., which is the world leader in data recovery technologies, including xlsx corruption and pdf repair software products. For more information visit www.datanumen.com
Microsoft Word — очень мощный инструмент. И чем новее версия текстового редактора, тем больше возможностей для нашего творчества. Имея навыки и желание, вы можете создавать в нем документы, а также в специализированных программах для публикации печатных брошюр, журналов или книг. Сегодня мы поговорим о вставке картинки в Word. Мы уже рассмотрели, как обернуть текст вокруг изображения в Word, а теперь давайте посмотрим, как вы можете расположить изображение в документе.
Представление изображения в комбинированном документе Word может быть разным. Поскольку изображение обычно ассоциируется с ближайшим текстом, то, как оно расположено, влияет на удобочитаемость документа.
Возможность работы с изображениями очень полезна при создании брошюр или электронных книг.
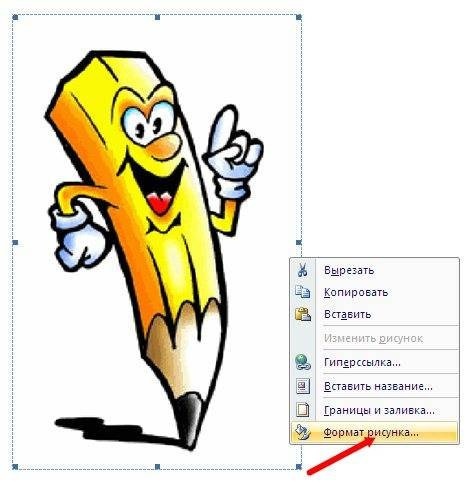
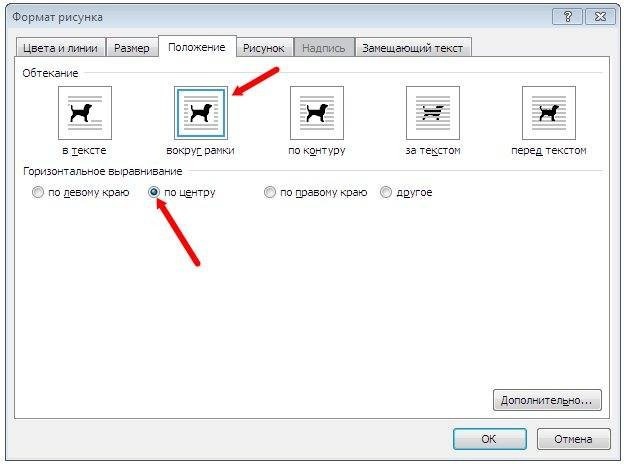
- Чтобы изменить способ размещения изображения, щелкните его правой кнопкой мыши и выберите «Формат изображения» в контекстном меню.
Откроется диалоговое окно «Формат изображения», содержащее несколько вкладок. Нам нужна вкладка Location.
Вы можете выбрать любой текст, которым будет заключено изображение:
- в тексте;
- вокруг рамы;
- по контуру;
- за текстом;
- перед текстом.
Ниже в разделе «Выравнивание по горизонтали» выберите выравнивание изображения относительно текста:
- Выровнено по левому краю;
- Центр;
- Правый край;
- Другой;
Горизонтальное выравнивание доступно для любого плавающего объекта, кроме In Text».
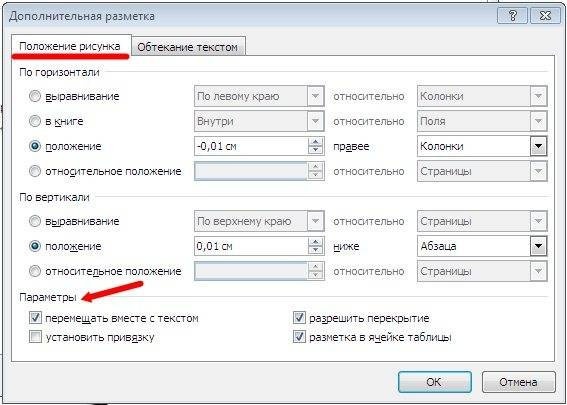
вы можете более точно настроить положение изображения в документе. Для этого нажмите кнопку «Дополнительно» внизу.
Откроется новое окно — Дополнительная разметка. В нем есть две вкладки:
- Положение изображения e
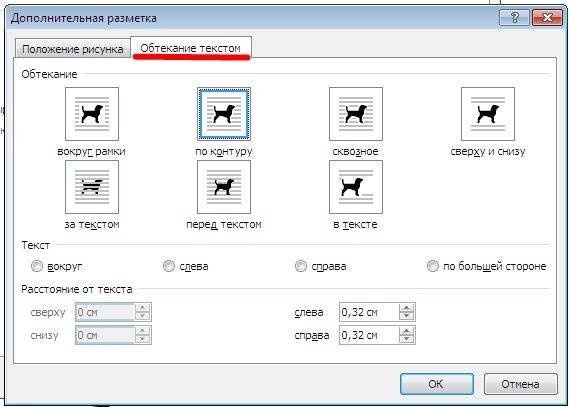
- Завершите текст.
Обычно эти окна используются редко, но если вы хотите точно настроить положение вашего изображения, вы можете его использовать. Флажок в параметрах «Переместить с текстом» привязывает изображение к текстовому элементу, чтобы изображение перемещалось вместе с ним. Если вы также установите флажок «Установить привязку», изображение и текст, к которому оно привязано, всегда будут на одной странице.
Вкладка Перенос по словам определяет, как ведет себя текст рядом с изображением, а также уточняет расстояние от текста.
Вот как будет выглядеть контурный рисунок.
Вот как будет выглядеть изображение за текстом.
Итак, мы посмотрели, что такое вставка изображений в слово, а точнее, как изображение вставляется в документ. Могут быть получены очень интересные результаты. Попробуйте, и у вас все получится.
Sometimes it can be difficult to center a picture in a document just by dragging it dragging it around. Today we show you how to center pictures, images, and other objects perfectly in Word and PowerPoint.
Note: For this tutorial we’re using Office 2010, but the steps are nearly identical in 2007.
Centering a Picture in Word
First let’s insert a picture into our document. Click the Insert tab, and then click Picture.

Once you select the picture you want, it will be added to your document. Usually, pictures are added wherever your curser was in the document, so in a blank document it will be added at the top left. Also notice Picture Tools show up in the Ribbon after inserting an image.
Note: The following menu items are available in Picture Tools Format tab which is displayed when you select the object or image you’re working with.
How do we align the picture just like we want? Click Position to get some quick placement options, including centered in the middle of the document or on the top.
However, for more advanced placement, we can use the Align tool. If Word isn’t maximized, you may only see the icon without the “Align” label.
Notice the tools were grayed out in the menu by default. To be able to change the Alignment, we need to first change the text wrap settings. Click the Wrap Text button, and any option other than “In Line with Text”. Your choice will depend on the document you’re writing, just choose the option that works best in the document.

Now, select the Align tools again. You can now position your image precisely with these options.
Align Center will position your picture in the center of the page widthwise.
Align Middle will put the picture in the middle of the page height-wise.
This works the same with textboxes. Simply click the Align button in the Format tab, and you can center it in the page.
And if you’d like to align several objects together, simply select them all, click Group, and then select Group from the menu.
Now, in the align tools, you can center the whole group on your page for a heading, or whatever you want to use the pictures for.
These steps also work the same with Office 2007.
Center objects in PowerPoint
This works similar in PowerPoint, except that pictures are automatically set for square wrapping automatically, so you don’t have to change anything. Simply insert the picture or other object of your choice, click Align, and choose the option you want.
Additionally, if one object is already aligned like you want, drag another object near it and you will see a Smart Guide to help you align or center the second object with the first. This only works with shapes in PowerPoint 2010 beta, but will work with pictures, textboxes, and media in the final release this summer.
Conclusion
These are good methods for centering images and objects in Word and PowerPoint. From designing perfect headers to emphasizing your message in a PowerPoint presentation, this is something we’ve found useful and hope you will too.
Since we’re talking about Office here, it’s worth mentioning that Microsoft has announced the Technology Guarantee Program for Office 2010. Essentially what this means is, if you purchase a version of Office 2007 between March 5th and September 30th of this year, when Office 2010 is released you’ll be able to upgrade to it for free!
READ NEXT
- › 10 Quick Tips to Get the Most from Microsoft Office
- › The Best How-To Geek Articles About Microsoft Office
- › The New NVIDIA GeForce RTX 4070 Is Like an RTX 3080 for $599
- › Expand Your Tech Career Skills With Courses From Udemy
- › How to Adjust and Change Discord Fonts
- › BLUETTI Slashed Hundreds off Its Best Power Stations for Easter Sale
- › This New Google TV Streaming Device Costs Just $20
- › Google Chrome Is Getting Faster
Размещение рисунка в документе Word
Программа Microsoft Word — это очень мощный инструмент. И чем новее версия текстового редактора, тем больше возможностей для нашего творчества. При умении и желании в нем можно создавать документы ничуть не хуже, чем в специализированных программах для издания печатных брошюр, журналов или книг. Сегодня мы поговорим о размещении рисунка в Word. Мы с вами уже рассматривали Как сделать обтекание текстом рисунка в Word, а теперь посмотрим какими способами можно расположить рисунок в документе при помощи функции Вставка рисунков в word.
Представление рисунка в комбинированном документе Word может быть различным. Так как рисунок обычно связан с каким-то текстом, расположенным неподалёку, способ расположения рисунка влияет на удобочитаемость документа.
Вставка рисунков в word
Умение работать с рисунками вам очень пригодиться при создании брошюр или электронных книг.
- Чтобы изменить способ размещения рисунка, следует щелкнуть на нём правой кнопкой мыши и выбрать в контекстном меню пункт Формат рисунка .
Откроется диалоговое окно Формат рисунка, содержащее несколько вкладок. Нам нужна вкладка Положение .
Вы можете выбрать любое обтекание рисунка текстом:
- в тексте;
- вокруг рамки;
- по контуру;
- за текстом;
- перед текстом.
Ниже, в Горизонтальном выравнивании выбираете выравнивание рисунка относительно текста:
- По левому краю;
- По центру;
- По правому краю;
- Другое;
Горизонтальное выравнивание доступно для любого обтекания, кроме обтекания « В тексте ».
Можно более конкретно настроить размещение рисунка в документе . Для этого щелкните ниже на кнопке Дополнительно .
Откроется новое окно – Дополнительная разметка . В нем есть две вкладки:
- Положение рисунка и
- Обтекание текстом.
Обычно эти окном мало пользуются, но если вы хотите более точно настроить расположение вашего рисунка, то можете его использовать.
Флажок в Параметрах Перемещать вместе с текстом привязывает рисунок к элементу текста, так что рисунок будет перемещаться вместе с ним.
Если также включить флажок Установить привязку , то рисунок и текст, к которому он привязан, всегда будут располагаться на одной и той же странице.
Вкладка Обтекание текстом определяет то, как текст ведёт себя рядом с рисунком, а также уточнить Расстояние от текста .
Вот так будет выглядеть рисунок с обтеканием по контуру.
Вот так рисунок будет выглядеть за текстом.
Вот мы и рассмотрели, что такое вставка рисунков в word, а точнее какими способами рисунок вставляется в документ. Можно добиться очень интересных результатов. Пробуйте и у вас всё получиться.
Видеоролик Вставка рисунков в Word 2007/2010
Выравнивание рисунков, фигур, объектов WordArt и других объектов в Word
Объекты Word, такие как рисунки, фигуры, smartArt и диаграммы, можно выравнивать относительно краев страницы, полей и других объектов.
Выравнивание рисунка, фигуры, надписи, графического элемента SmartArt или объекта WordArt
Вы можете выровнять объекты.
Чтобы выбрать несколько объектов, выберите первый из них, а затем, удерживая нажатой кнопку CTRL, выберем остальные.
Выполните одно из следующих действий:
Чтобы выровнять рисунок, выберите Формат рисунка или Инструменты для > Формат.
Чтобы выровнять фигуру, текстовое поле или wordArt, выберите Формат фигуры или Средства рисования > Формат.
В группе Упорядока выберите выровнять.
Выберите один из следующих вариантов:
Важно: Если параметры выравнивания недоступны, возможно, выбран только один элемент.
Выровнять по левому краю Чтобы выровнять по краям объектов по левую часть.
Выровнять по центру Выравнивание объектов по вертикали по центрам.
Выровнять по правому краю Выравнивание по краям объектов по правому краю.
Выровнять по верхнему Чтобы выровнять объекты по верхнему краю.
Выровнять по середине Чтобы выровнять объекты по горизонтали по середине.
Выровнять по нижнему Выравнивание по нижним краям объектов.
При выравнивание объектов относительно друг друга по краям один из объектов остается стационарным.
Команда Выровнять по середине выравнивает объекты по горизонтали относительно их середины, а команда Выровнять по центру — по вертикали относительно их центра. При выравнивании объектов относительно друг друга по середине или по центру выравнивание выполняется вдоль горизонтальной или вертикальной линии, представляющей среднее от исходных позиций этих объектов. В результате могут измениться положения всех объектов.
В зависимости от варианта выравнивания объекты могут охватывать другие объекты. В этом случае отменять выравнивание и перемещать объекты в новое положение, а затем снова выравнивать.
Расположение объектов на одинаковом расстоянии друг от друга
Вы можете выбрать по крайней мере три объекта для у упорядотки. Чтобы выбрать несколько объектов, выберите первый из них, а затем, удерживая нажатой кнопку CTRL, выберем остальные.
Чтобы выбрать объекты, которые скрыты, наложены или за текстом, перейдите на главная > Найти и выбрать > Выбрать объекты ,а затем нарисуйте поле над объектами.
Выполните одно из следующих действий:
Чтобы расположить рисунки одинаково, выберите Формат рисунка или Инструменты для > Формат.
Чтобы расположить группу одинаково с фигурами, текстовыми полями или wordArt, выберите Формат фигуры или Средства рисования > Формат.
В группе Упорядока выберите выровнять.
Выберите один из указанных ниже вариантов.
Распределить по горизонтали Чтобы выцентрить объекты по горизонтали.
Распределить по вертикали Чтобы выцентрить объекты по вертикали.
Word выравнивать объекты по леву, центру, правому, верхнему, среднему и нижнему. Вы можете задавать эти позиции относительно краев страницы, полей или других объектов.
Примечание: Если для объекта установлено обтекание «В тексте», Word выровнять его только по отношению к странице или полям. Чтобы изменить объект, щелкните объект, нажав control и нажав кнопку Обтекать текст,а затем выберите другое место, кроме В тексте. Дополнительные сведения об обтекании текстом см. в статье Настройка обтекания текста вокруг объектов в Word 2016 для Mac.
Совет: Если вам нужно выровнять несколько объектов на одной странице, для облегчения задачи можно использовать сетку.
Выравнивание объектов по отношению к другим объектам, полям или странице
Удерживая нажатой shift, вы можете выбрать объекты, которые вы хотите выровнять, с помощью мыши или сенсорной панели.
Выберите Формат фигуры или Формат рисунка.
Выберите Выровнять. Если вы не видите выровнять на вкладке Формат фигуры, выберите Упорядоставить ,а затем выберите Выровнять.
Выберите один из указанных ниже вариантов.
Выровнять относительно страницы;
Выровнять по полю;
Выровнять выделенные объекты.
Чтобы выбрать, выровнены ли выбранные объекты по полям, странице или относительно друг друга, выберите Выровнять ивыберите один из следующих вариантов:
Выровнять относительно страницы;
Выровнять по полю;
Выровнять выделенные объекты.
Снова выберите Выровнять, а затем выберите тип выравнивания из трех категорий: По горизонтали, По вертикали или Распределить.
Совет: После выравнивания объектов вы сможете перемещать их, сохраняя их положение относительно друг от друга, если определите их как группу. Сведения об использовании групп см. в статье Группирование и разгруппирование фигур, изображений и других объектов.
Вы можете выравнивать объекты относительно привязки, таких как поля, страницы и абзацы. Можно также ввести точное числовое положение объекта относительно привязки.
Выравнивание объектов по отношению к другим объектам, полям или странице
Выберите Формат или Формат рисунка.
Чтобы выбрать, будут ли выбранные объекты выровнены по полям, странице или относительно друг друга, выберите Выровнять ,а затем выберите один из следующих параметров:
Выровнять относительно страницы;
Выровнять по полю;
Выровнять выделенные объекты.
Еще раз выберите Выровнять, а затем выберите нужный тип выравнивания.
Выравнивание объекта относительно текста
Выберите объект, чтобы выбрать его.
Выберите Формат или Формат рисунка.
В области Упорядока выберите обтекать текст и выберите стиль, который не является В тексте (например, По ).
Перетащите объект в нужное место документа.
Чтобы точно настроить положение рисунка, в областиУпорядотка выберите Положение ,а затем — Дополнительные параметры разметки.
На вкладке Положение выберите нужные параметры для горизонтальной и вертикальной привязки.
Примечание: Чтобы убедиться, что выбранный объект перемещается вверх или вниз вместе с абзацем, к который он прикреплен, выберите Переместить объект с текстом.
Компьютер плюс
Уже имея некоторый опыт работы с документами в программе Ворд, порой не можешь вспомнить самые простые вещи, например как выравнивать текст. Документ становится удобочитаемым, радует глаз, не только за счет использования изящных слов и оборотов, но и за счет правильного и красивого оформления. Одним из факторов этого можно назвать выравнивание текста, будь то на целой странице или в ячейке таблицы. Далее о том как выравнивать текст в приложении Ворд.
По ширине
Глазу читающего человека привычно видеть текст, заполняющий страницу целиком, так как это сделано в любой книжке, газете или журнале. Такое расположение носит название выравнивание по ширине. Расположение текста по ширине используется не только в печатных изданиях, такое оформление обычно требуется для отчетов, рефератов, курсовых и дипломных работ. При этом можно использовать любое оформление абзацев.
По левому краю
Страницы интернет-сайтов, особенно в последнее время, используют выравнивание по левому краю, отличается оно тем, что левый край текста выстаивается ровно, а правый в зависимости от длины слов и предложений. Здесь расстояние между буквами получается одинаковое. Считается, что именно такое расположение символов наиболее удобно при чтении. В официальных документах такое оформление, как правило, не приветствуется.
По центру
Главное применение такое выравнивание имеет при оформлении заголовков. Выравнивание по центру основного текста также можно иногда увидеть, но только в художественных книгах, и то, чаще его используют для подписи названий рисунков и таблиц или других объектов внедренных в текст.
По правому краю
Но наиболее редко применяется выравнивание текста по правому краю. Это когда текст выстраивается ровными рядами по правому краю, а левый край не имеет четкой ровной линии. Можно использовать если, например, есть желание выделить какой-то абзац (ремарку или пример). Часто можно встретить, что по правому краю выравнивают имена выполнившего и проверяющего какую-либо студенческую работу. Штамп утверждения документа также часто выравнивают по правому краю.
Как сделать выравнивание текста
Выравнивание текста тем или иным образом можно выполнить как при предварительной настройке оформления документа, так и после написания самого текста. В последнем случае необходимо установить курсор в абзац, или выделить ряд абзацев, и после этого приступать к созданию нужного «выравнивания».
Все кнопки, изменяющие выравнивание текстов располагаются в меню «Абзац». Они доступны прямо в главной панели инструментов, доступ к ним получают также при открытии окна настройки абзацев.
Выравнивание рисунков
Размещение рисунков, по центру, справа или слева на странице также выполняется при помощи этих кнопок. Для этого нужно выделить рисунок, или поставить курсор в строку, на которой располагается рисунок, и нажать одну из названных выше кнопок.

1. Выделяем картинку
2 Нажимаем на одну из кнопок
Выравнивание в таблицах
Тот или иной способ выравнивания можно использовать не только в обычном тексте, но и при оформлении таблиц. Правильное расположение содержимого ячеек таблицы привлекает внимание читающего, не «оскорбляет» его понимание красоты.
Выравнивание по ширине, по одному из краев страницы, по центру в таблице выполняется точно так же как и для обычного текста и описано абзацах, расположенных выше.
Как правило, текст в шапке таблицы (самой верхней строке) выравнивается по центру. Содержимое крайней левой колонки, в которой обычно размещены показатели, выравнивается по правому краю. Значения показателей выравниваются по центру, они размещаются в остальных ячейках.

Кроме этого, для таблиц доступна возможность выравнивания по вертикали. То есть данные ячеек можно выровнять по вертикали по верхнему, нижнему краям ячейки, а также посередине. Текст выровненный по центру лучше выглядит, если высота ячейки большая, а информации, которую нужно поместить в ячейку мало. В Ворде для этого нужно просто выделить ячейки, в которых нужно изменить выравнивание и вызвать контекстное меню кликом правой кнопки мыши или кнопку меню на клавиатуре. В открывшемся окне нужно выбрать пункт «Выравнивание ячеек» и выбрать требуемый способ выравнивания, который показан в виде нескольких легко узнаваемых значков.

Еще один способ. Как только курсор попадает в одну из ячеек таблицы, автоматически открываются вкладки главного панели «Конструктор» и «Макет», предназначенные для работы с таблицами. Одно из полей меню «Макет» называется выравнивание.
Горячие клавиши: выравнивание
За время накопления опыта работы с компьютером у пользователя возникает потребность в так называемых «Горячих клавишах». Горячие клавиши – это определенные сочетания кнопок клавиатуры, которые нажимаются одновременно и заменяют манипуляции с мышью и главным меню Ворда. Использование горячих клавиш сильно ускоряет работу с документами.
Для выравнивания текста на странице используются сочетания клавиш Ctrl и одной из следующих:
- По левому краю – L
- По центру – E
- По правому краю – R
- По ширине – J
Если часто приходится редактировать тексты, то знание горячих клавиш просто необходимо.
Одна мысль про “Выравнивание в Word”

Удобная вещь это выравнивание. Сам тоже иногда пользуюсь такой фишкой. А вот за горячие клавиши вечно забываю) Теперь вспомнил)


 ).
).
