
If you’d like to realign text in a cell to enhance the visual presentation of your data, here’s how you can do it:
-
Select the cells that have the text you want aligned.
-
On the Home tab choose one of the following alignment options:

-
To vertically align text, pick Top Align
, Middle Align , or Bottom Align . -
To horizontally align text, pick Align Text Left
, Center , or Align Text Right . -
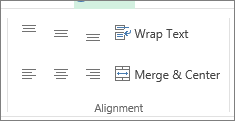
When you have a long line of text, part of the text might not be visible. To fix this without changing the column width, click Wrap Text.
-
To center text spanning several columns or rows, click Merge & Center.
 , Middle Align
  , or Bottom Align
  .
. , Center
  , or Align Text Right
  .
.Undo alignment changes
-
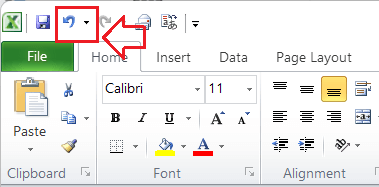
To remove an alignment change immediately after you apply it, click Undo.
-
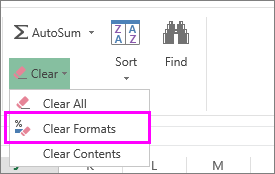
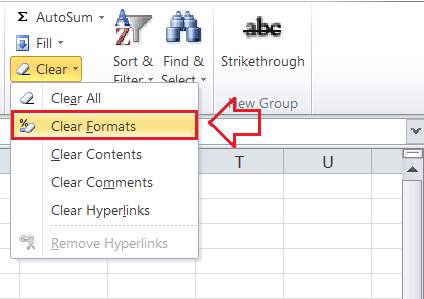
To make alignment changes later, select the cell or cell range you want to change, and click Clear > ClearFormats.
Note: In Excel for the web, you can’t rotate the angle of text in a cell.
There are additional ways to improve the way text displays like applying different fonts or adding a background color to a cell.
Need more help?
How to Center Horizontally & Vertically in Excel
- Click the cell where you want to center the contents.
- Click “Home,” then click the small arrow in the bottom corner of the “Alignment” area of the ribbon.
- Click the drop-down box next to “Horizontal” and choose “Center.” Do the same thing in the box next to “Vertical.”
Contents
- 1 What is center horizontal alignment in Excel?
- 2 How do I change from horizontal to center alignment?
- 3 How do you center align in Excel?
- 4 How do I center align numbers in Excel?
- 5 What is the keyboard shortcut for center alignment?
- 6 How do you center a column heading horizontally and vertically?
- 7 Why won’t my cells Center in Excel?
- 8 How do I apply Heading 2 style in Excel?
- 9 How do I center an object in an Excel cell?
- 10 How do you center across a selection?
- 11 How do I paste horizontal data horizontally in Excel?
- 12 How do I paste vertical data horizontally?
- 13 How do I center horizontally in CSS?
- 14 How do you center a column?
- 15 How do I center align numbers?
- 16 How do you center horizontally in Excel on a Mac?
- 17 How do you center numbers in numbers?
- 18 Which command would you use to Centre align the text in an Excel sheet?
- 19 How do you center a table horizontally?
- 20 Can you Center Across Selection vertically?
In Excel 2010, you can change the horizontal and vertical alignment of cell data.Select the cells you want to align. On the Home tab, select a horizontal alignment: Align Text Left: Horizontally aligns the data along the left edge of the cell. Center: Centers the data horizontally in the middle of the cell.
How do I change from horizontal to center alignment?
To align text horizontally on a page, highlight the text you want to center. Next, click the “Center Alignment” icon in the “Paragraph” group of the “Home” tab. Alternatively, you can use the Ctrl+E keyboard shortcut. Your text will now be horizontally aligned.
How do you center align in Excel?
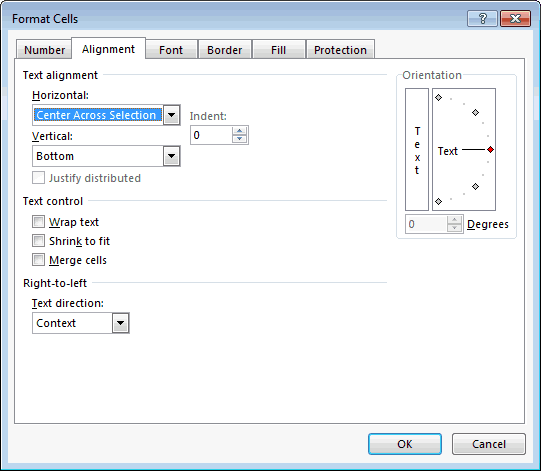
Right-click and then select “Format Cells” from the popup menu. When the Format Cells window appears, select the Alignment tab. Click on “Center Across Selection” in the drop-down box called Horizontal. Now when you return to your spreadsheet, you should see the text centered across the cells that you selected.
How do I center align numbers in Excel?
Align text in a cell
- Select the cells that have the text you want aligned.
- On the Home tab choose one of the following alignment options:
- To vertically align text, pick Top Align , Middle Align , or Bottom Align .
- To horizontally align text, pick Align Text Left , Center , or Align Text Right .
What is the keyboard shortcut for center alignment?
Ctrl+E
Align and format paragraphs
| To do this | Press |
|---|---|
| Center the paragraph. | Ctrl+E |
| Justify the paragraph. | Ctrl+J |
| Align the paragraph to the left. | Ctrl+L |
| Align the paragraph to the right. | Ctrl+R |
How do you center a column heading horizontally and vertically?
There are two ways to center information: horizontally and vertically. Horizontal centering is quite simple. All you need to do is position the insertion point somewhere within the text and then click on the Center button on the Home tab of the ribbon or press Ctrl+E.
Why won’t my cells Center in Excel?
You can achieve this by changing the format in custom format. As shown below, highlight the cells where the Excel numbers won’t left or centre align and:Delete the * in the format, Click OK.
How do I apply Heading 2 style in Excel?
Select the cells that you want to format. For more information, see Select cells, ranges, rows, or columns on a worksheet. On the Home tab, in the Styles group, click the More dropdown arrow in the style gallery, and select the cell style that you want to apply.
How do I center an object in an Excel cell?
Align an object with other objects
- Hold down Shift , click the objects that you want to align, and then click the Shape Format tab.
- Click Arrange > Align > Align Selected Objects. This is selected by default. If Align Selected Objects is not available.
- Click Arrange > Align, and then click the alignment that you want.
How do you center across a selection?
To do this, follow these steps:
- Select the range of cells over which you want to center text.
- Right-click the selected cells, and then click Format Cells.
- Click the Alignment tab.
- In the Horizontal list, click Center Across Selection.
- Click OK.
How do I paste horizontal data horizontally in Excel?
Select the first cell where you want to paste the data, and on the Home tab, click the arrow next to Paste, and then click Transpose.
How do I paste vertical data horizontally?
How to Reconfigure a Horizontal Row to a Vertical Column in Excel
- Select all the rows or columns that you want to transpose.
- Click on a cell in an unused area of your worksheet.
- Click on the arrow below the “Paste” item and select “Transpose.” Excel pastes in your copied rows as columns or your copied columns as rows.
How do I center horizontally in CSS?
Center Align Elements
To horizontally center a block element (like ), use margin: auto; Setting the width of the element will prevent it from stretching out to the edges of its container.
How do you center a column?
To center the items within a column, we use align-items and justify-items instead of the align-content and justify-content in our previous example. Using the item properties, we can align our items just like we did with our columns.
How do I center align numbers?
Click the Inspector toolbar button. Click the Text Inspector button in the Inspector toolbar to display the settings you see here. Click the corresponding alignment button to choose the type of formatting you want to apply. You can choose left, right, center, justified, and text left and numbers right.
How do you center horizontally in Excel on a Mac?
Right-click and then select “Format Cells” from the popup menu. When the Format Cells window appears, select the Alignment tab. Click on “Center Across Selection” in the drop-down box called Horizontal. Now when you return to your spreadsheet, you should see the text centered across the cells that you selected.
How do you center numbers in numbers?
Align and justify text
- Select any portion of the text or click a text box or shape with text; if you’re working in a table, click a table cell or select a row or column.
- In the Format sidebar, click the Text tab.
- Click the Style button near the top of the sidebar, then click the alignment buttons you want.
Which command would you use to Centre align the text in an Excel sheet?
For center alignment, highlight the text and press Ctrl + Shift + E . For right alignment, highlight the text and press Ctrl + Shift + R .
How do you center a table horizontally?
Center a Table Horizontally in Word. Once you have selected the entire table, press “Ctrl” and “E” on the keyboard to center the table between the left and right margins.
Can you Center Across Selection vertically?
Highlight the cells you want centered, then right click and select “Format Cells” then select the “Allignment” tab, select the drop down box for either Horizontal and select center had a select word wrap as well.

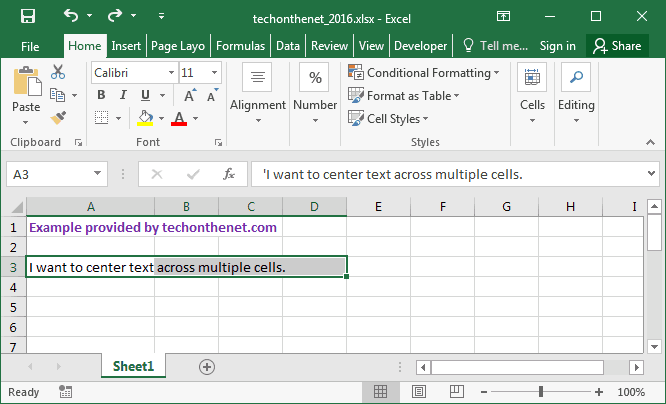
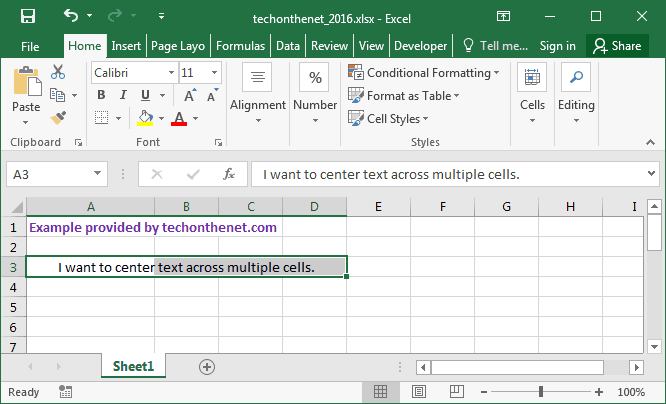
This Excel tutorial explains how to center text across multiple cells in Excel 2016 (with screenshots and step-by-step instructions).
Question: I want to center text across multiple cells in Microsoft Excel 2016 but I don’t want to have to merge the cells. How can I do this?
Answer: Select the cells that you wish to center the text across.
TIP: The text that you are trying to center must be in the left most cell (first cell) of the selected range.
Right-click and then select «Format Cells» from the popup menu.
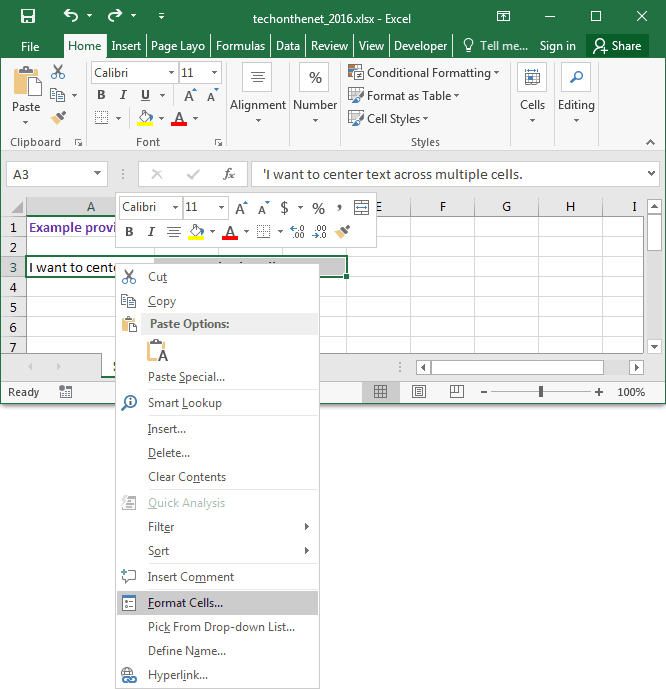
When the Format Cells window appears, select the Alignment tab. Click on «Center Across Selection» in the drop-down box called Horizontal.
Now when you return to your spreadsheet, you should see the text centered across the cells that you selected.
This tutorial shows how to change the alignment of numbers and text in Excel and Google Sheets.
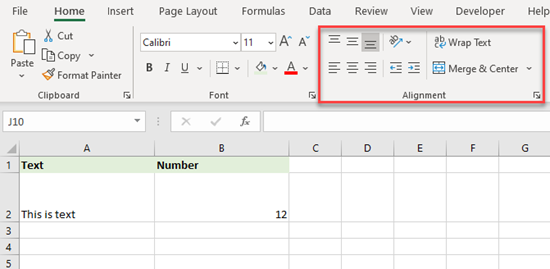
Horizontal and Vertical Alignment
In Excel, all cells are, by default, bottom aligned vertically. Horizontally, text cells are aligned left and number cells right. See this default alignment in the picture above.
To center align cells horizontally:
- Select the range of cells to center (A1:B1).
- In the Ribbon, go to Home > Alignment.
- Click Center.
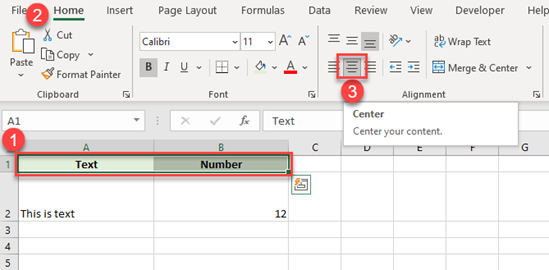
Now cells A1:B1 are center aligned horizontally.
You can also center align cells vertically.
- Select the range of cells (A2:B2).
- Then in the Ribbon, go to Home > Alignment.
- Click Middle Align.
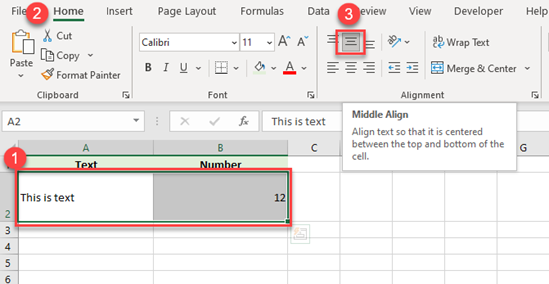
As you can see above, cells A2:B2 are now centered vertically.
Some alignment changes can be made with keyboard shortcuts.
Text Orientation
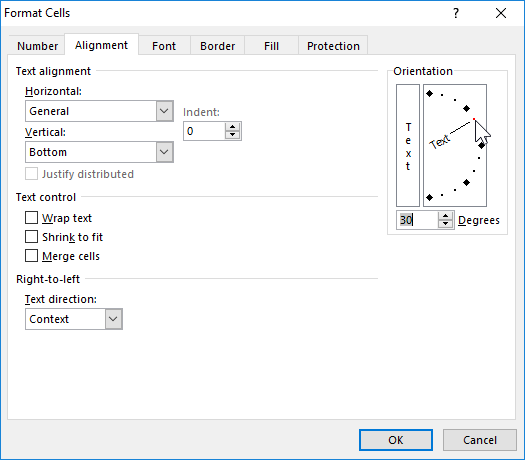
Using alignment options, you can also change text orientation in a cell. You can display text vertically, rotate it up or down, or display it at a certain angle. Say you want to rotate text in cell A2 counterclockwise.
- Select the cell (A2).
- In the Ribbon, go to Home > Alignment.
- Click the Orientation button.
- Choose Angle Counterclockwise from the options offered.
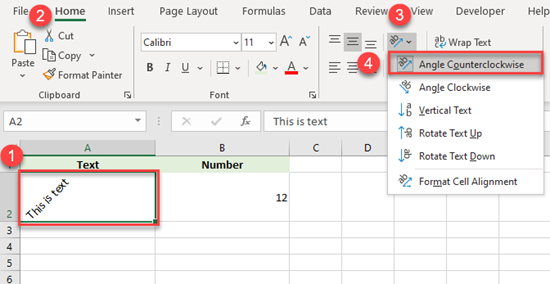
As a result, the text in cell A2 is rotated counterclockwise. If you choose the last option, Format Cell Alignment, you can even define a specific degree of the angle.
Adjust Text Indent
Using the alignment options, you can also adjust the text indent in the cell. You can move the text from the cell border to the left or the right. For example, you can move the text in cell A2 a bit from the left border.
- First, select the cell (A2)
- In the Ribbon, go to Home > Alignment.
- Choose Increase Indent.
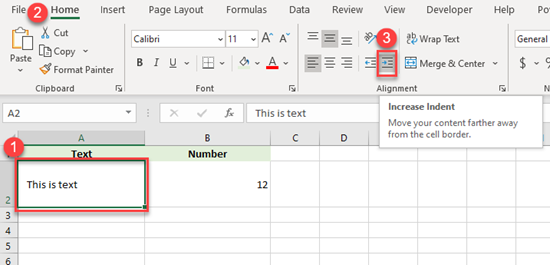
Now, the text in cell A2 is moved a bit from the left border. If you want to get it back to the left, use the Decrease Indent icon.
Wrap Text
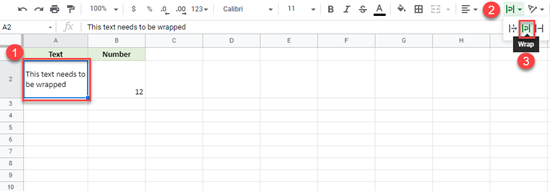
Another useful option in the Alignment tab is text wrapping. This is commonly used when text content is wider than the cell. Let’s look at one example.
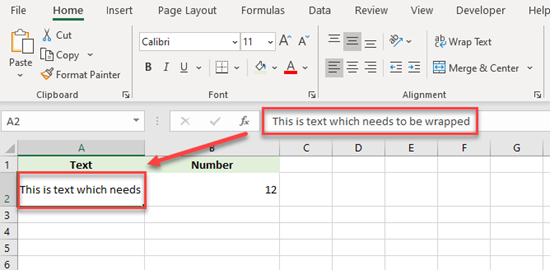
In cell A2 the text is only partially displayed, as there is not enough space in the cell to fit the whole thing. Since there’s enough height in the cell, let’s wrap the text onto two lines.
- Select the text cell (A2).
- In the Ribbon, go to Home > Alignment.
- Click on Wrap Text.
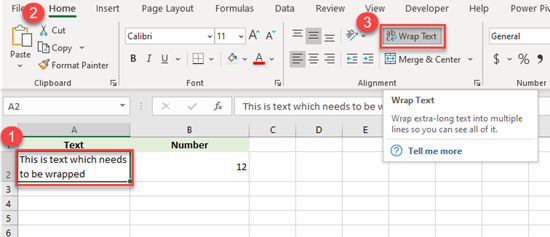
As you can see above, the text is split into two rows and fits the cell width.
Merge and Center
The last option is to merge and center. Using this option, you can merge two or more cells into one. In this case, the content in the upper-left cell is kept and all other content lost. Say you want to merge cells A2 and B2.
- Select the two cells to be merged.
- In the Ribbon, go to Home > Alignment.
- Click on Merge & Center.
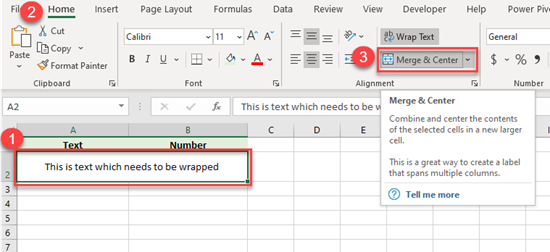
Now, cells A2 and B2 are merged and text from A2 is centered across both cells. As you can see above, text from cell B2 is removed.
Alignment in Google Sheets
All alignment options from Excel are also available in Google Sheets, including horizontal and vertical alignment, text wrapping, merging, and text orientation. Below, we’ll briefly describe how to achieve all of these in Google Sheets.
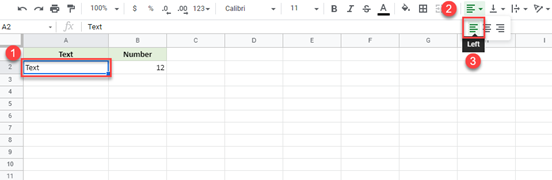
Horizontal and Vertical Alignment
Similarly, you can horizontally align text to the left, right, or center.
- Select the cell (A2).
- Then in the Toolbar, click on the Horizontal Align button.
- Select Left.
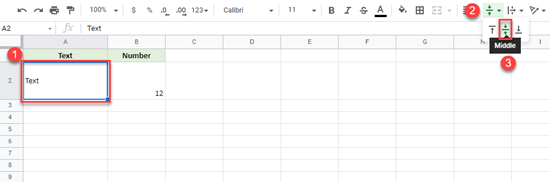
You can also align text vertically.
- Select the cell (A2)
- Then in the Toolbar, click on Vertical Align.
- Click Middle.
Text Wrapping
To allow text to wrap onto a second line:
- Select the cell (A2).
- In the Toolbar, click on Text Wrapping.
- Choose Wrap.
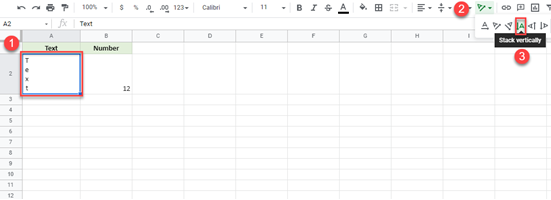
Text Orientation
If you want to change text orientation:
-
- Select the cell (A2).
- Then in the Toolbar, click on Text Rotation.
- Choose Stack Vertically.
Text Merging
In Google Sheets, you can also merge cells.
- Select cells that you want to merge (A2:B2).
- In the Toolbar, click Merge Cells.
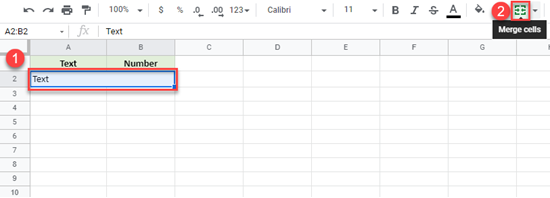
The rules in Google Sheets are the same as those from Excel, so when you merge multiple cells, it only retains content from the upper-left cell; all content from other merged cells is removed.
By default in Excel, the text is on the left side, and the numbers – on the right one. The change in these positions is sometimes justified, but often makes it difficult to distinguish a number from a text.
Treat to the text formatting with moderation. Do not forget, that a stylishly designed document should not contain more than 2 – 3 types of font. There should be no more than 2 – 3 colors, but more shades are allowed.
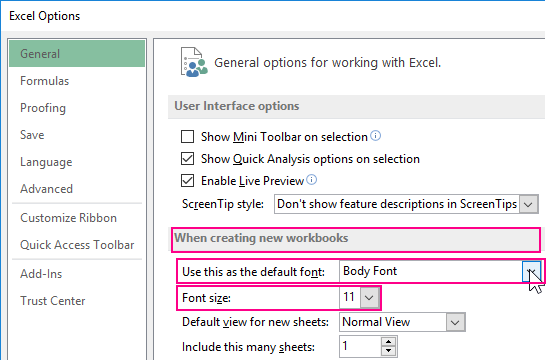
The changing of the default font in Excel
How in Excel to set the default font? For this you need to change 2 parameters in the settings:
- Go to the settings «FILE» – «Options» – «General».
- In the «When creating new workbooks» section, select the required «Font» from the drop-down list.
- Below specify its size and click OK.
The expanding of selected items
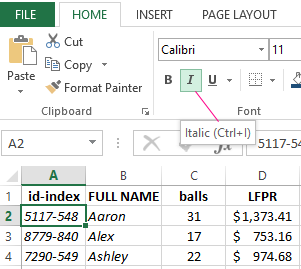
To show how to change the default font in Excel, we will format the text in the cells of the data table. The headings of the columns will be highlighted in bold and increase the size of the characters. The text data will be done in italic italics.
The solution of this task is no different from using the tools that Word has. The sequence of actions is as follows:
- Select the range with the column headings of the table.
- On the «HOME» tool tab, press the «B» (bold) button or the CTRL + B key combination.
- In the font size field, we click the mouse and enter our value – is 12, then click «Etner» (you can also specify the font size from the drop-down list of the field). On the same tab, click the «Align Center» button or the hotkey combination: CTRL + E.
- Now select the text data of table A2:B4 and click on the button «Italic» (CTRL + I).
This task can be solved in another way, using the «Format Cells» dialog box. It has more possibilities for formatting text in Excel.
- Again select the range A1 : D1.
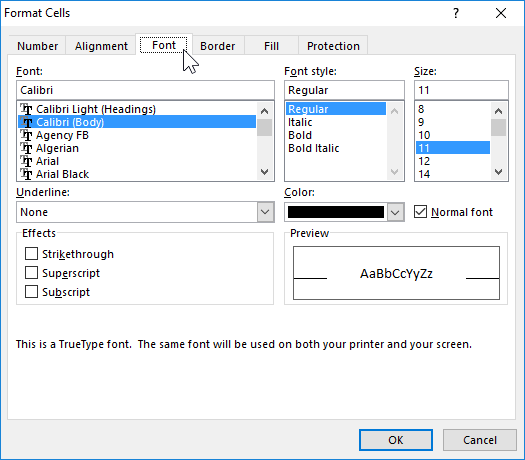
- Call the «Format Cells» dialog box using the corner button on the «HOME» tab in the «Align» tool section or press the CTRL + 1 (or CTRL + SHIFT + P) combination. We are interested in the «Font» tab:
- Here we can customize the text in the «Font» tab. In the «Inscription» field, select «Bold Italic». In the Size field, select or set the size to 14.
- Go to the «Alignment» tab.
- In the drop-down list «horizontally», set the value «centered». In the «vertical» list, specify «at the top».
Increase the height of line 1 approximately 2 times. Now you can see that the text of the table headings is centered and is adjacent to the upper edge of the cells.
The formatting the values of the cells helps us to make the data readable and presentable, that are easier to perceive and assimilate. For example, the number 12 can be formatted as 12 $ or 12% or 12 pcs.
In addition, the standard format «General» looks gray and not presentable, but it’s also not too much to overdo it.
In the next lessons of this section, we’ll take a closer look at the possibilities of formatting in Excel.

If you have a label or heading on a spreadsheet in Excel that you want to center across a certain number of cells, there are couple of ways you can do this, with or without merging cells. We’ll show you both ways.
First, we’ll center text across cells by merging cells. To do this, select the cells you want to merge.

In the “Alignment” section of the “Home” tab, click the “Merge & Center” button.
The cells are merged and the text is centered in the single resulting cell.
If you don’t want to merge the cells, you can still center text across them. Enter your text in the first of the cells across which you want to center the text, select the cells, and click the “Alignment Settings” button in the lower-right corner of the “Alignment” section on the “Home” tab.
NOTE: You can also right click on the selected cells and select “Format Cells” from the popup menu.
Make sure the “Alignment” tab is active. If you opened the “Format Cells” dialog box by right-clicking on the selected cells, you must click on the “Alignment” tab as it’s not the active tab by default.
Select “Center Across Selection” from the “Horizontal” drop-down list.
NOTE: You can also select the “Merge cells” check box on the “Alignment” tab on the “Format Cells” dialog box to merge the selected cells. However, this does not center the text. You must do that separately.
The text is centered across the selected cells, but the cells are not merged into one.
If you center text across a selection without merging the cells often, you can record a macro for the procedure and put a button on the Quick Access Toolbar to quickly center text across selected cells.
READ NEXT
- › Google Chrome Is Getting Faster
- › Expand Your Tech Career Skills With Courses From Udemy
- › This New Google TV Streaming Device Costs Just $20
- › How to Adjust and Change Discord Fonts
- › The New NVIDIA GeForce RTX 4070 Is Like an RTX 3080 for $599
- › BLUETTI Slashed Hundreds off Its Best Power Stations for Easter Sale
How-To Geek is where you turn when you want experts to explain technology. Since we launched in 2006, our articles have been read billions of times. Want to know more?
next →
← prev
MS Excel or Microsoft Excel is currently a powerful and efficient spreadsheet software with various features or tools. It allows users to record values within cells generated by the intersected rows and columns. We can enter values using text, numbers, symbols, and/ or other data types and apply desired functions when necessary. Excel also allows us to manage the formatting and styles of data within cells.

Since we can record values using text, Excel also allows us to adjust text alignment within cells. This article discusses Excel’s various text alignment options and a step-by-step tutorial to use the desired alignment option. Before we discuss the text alignment options and how to use them, let us understand the text alignment feature in a brief introduction.
What is Text Alignment in Excel?
Text alignment is a word processing software feature that helps users to align text within worksheet cells. It enables the composition of text documents with various text positions or alignments on one or more cells within the Excel document. The text alignment feature mainly places the cursor or aligns the text along the various margins of the document.
What are the alignment options in Excel?
If we do not want to use the default alignments in an Excel cell, we can make changes in the alignments of the cell. There are following two ways to adjust text alignments in Excel:
- Horizontal Alignment
- Vertical Alignment
Let us now discuss both in detail:
Horizontal Alignment
The horizontal alignment tools allow users to adjust the text alignments in a horizontal axis, such as left, right, center, etc.
- Left: Clicking the left alignment button aligns the given or typed contents in the left position within the selected cell (s).
- Center: Clicking the center alignment button aligns the given contents to the center position.
- Right: Clicking the right alignment button aligns the given contents in the right position within the selected cell (s).
- Fill: Clicking the fill option repeats the cell’s contents until the cell’s width is filled.
- Justify: Clicking the justify button justifies the cell contents to the left and right sides equally in the horizontal axis. This alignment option is useful only when the corresponding cell (s) is formatted using the wrapped text option, and the cell’s contents are separated into multiple rows.
Vertical Alignment
The vertical alignment tools allow users to adjust the text alignments vertically, such as the top, middle, bottom, etc.
- Top: Clicking the top alignment button aligns the recorded contents to the top position within the selected cell (s).
- Center: Clicking the center alignment button aligns the given contents to the center position, vertically, within the selected cell.
- Bottom: Clicking the bottom alignment button aligns the given contents to the bottom position within the selected cell.
- Justify: Clicking the justify button justifies the cell contents vertically within the cell. This alignment option is useful only when the corresponding cell (s) is formatted using the wrapped text option, and the cell’s contents are separated into multiple rows.
Aligning Text in Excel
As we discussed above, Excel allows us to align text horizontally and vertically. Similarly, we have several methods to implement the desired text alignment in Excel cells. We can easily change the default alignment using the Ribbon Tools, Format Cells dialog box, or keyboard shortcuts.
- Change Text Alignments from Ribbon
- Change Text Alignments from Format Cells
- Change Text Alignments using Shortcut Keys
Let us now discuss the above methods in detail:
Change Text Alignments from Ribbon
The easiest and straightforward way to access text alignment options in Excel is to use ribbon tools. Both horizontal and vertical alignment options can be accessed by going to the Home tab and using the alignments from the Alignment group.
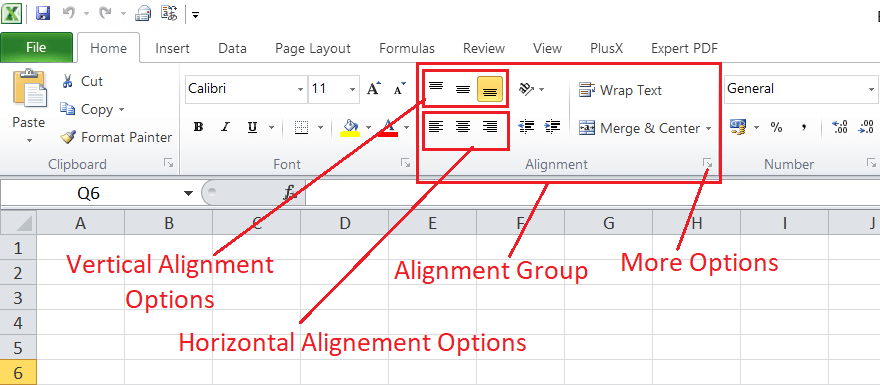
By default, Excel automatically aligns entered text contents to the left position of the cell and numbers to the right position. We can use alignment options from the Alignment group and change them accordingly.
- We can click the tools from the vertical alignment options and pick Top Align, Middle Align, or Bottom Align, respectively.
- We can click the tools from the horizontal alignment options and pick Left Align, Center Align, or Right Align, respectively.
- We can click the ‘More Options’ button to access the Format Cells dialogue box with the Alignment and other formatting options.
Change Text Alignments from Format Cells
The Format Cells dialogue box is another efficient way to change text alignments in Excel cells. According to this method, we need to perform the following steps:
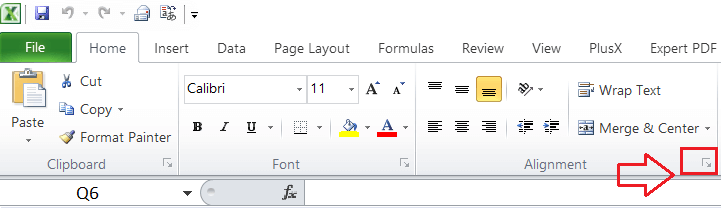
- First, we need to select the cells on which we want to align texts.
-
Next, we need to open a Format Cells dialogue box. We can launch a dialogue box by clicking the arrow at the bottom right corner of the Alignment group under the Home tab.
Alternately, we can press the keyboard shortcut keys combination ‘Ctrl + 1’ to open the Format Cells dialogue box. -
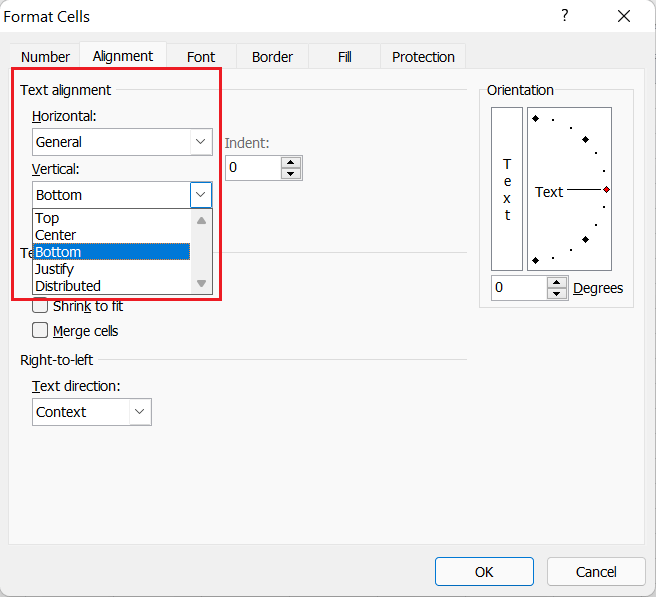
In the Format Cells dialogue box, we must select the ‘Alignment’ tab and choose the desired option from the Horizontal and Vertical drop-down lists. The Horizontal drop-down list contains the following alignments:
The Horizontal drop-down list contains the following alignments:
- Lastly, we must check the preview box and click the OK button to apply the selected alignment style.

Change Text Alignments using Shortcut Keys
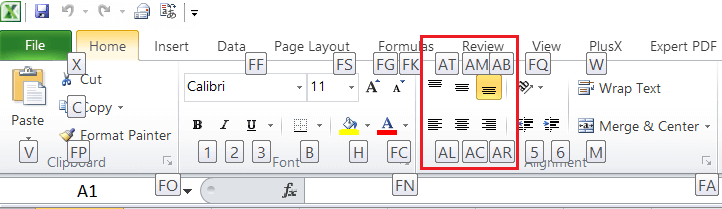
Excel allows users to use keyboard shortcuts for most of the Excel features or operations. Likewise, we can also align text using the keyboard buttons without lifting our fingers off the keyboard. The following table consists of handy keyboard shortcuts for text alignment in Excel:
| Action | Shortcut Key |
|---|---|
| Top Alignment | Alt + H + A + T |
| Middle (Center) Alignment — Vertically | Alt + H + A + M |
| Bottom Alignment | Alt + H + A+ B |
| Left Alignment | Alt + H + A + L |
| Middle (Center) Alignment — Horizontally | Alt + H + A + C |
| Right Alignment | Alt + H + A + R |
Since Excel has many keyboard shortcuts, it is not easy to remember alignment shortcut keys. However, there is a simple way to memorize all the shortcuts displayed in the above table. The first key, ‘Alt’, activates quick shortcuts in Excel. Once we activate the quick shortcuts by pressing the Alt key, Excel displays specific keys to use the displayed options within the Excel window.
The first key combination, ‘Alt + H’, allows us to access the Home tab, while the second part of keys (the remaining keys) activates the desired alignment option. For instance, after pressing the ‘Alt + H’, ‘Alt + T’ denotes ‘align top’, ‘Alt + B’ denotes ‘align bottom’, ‘Alt + L’ denotes ‘align left’ and so on.
Text Alignment Examples
We can select the cells to align and use the above methods to align text within the cells.
The example of the horizontal alignments can be seen in the following sheet:

The recorded text is shifted to left, center, and right positions in the above image.
The example of the vertical alignments can be seen in the following sheet:
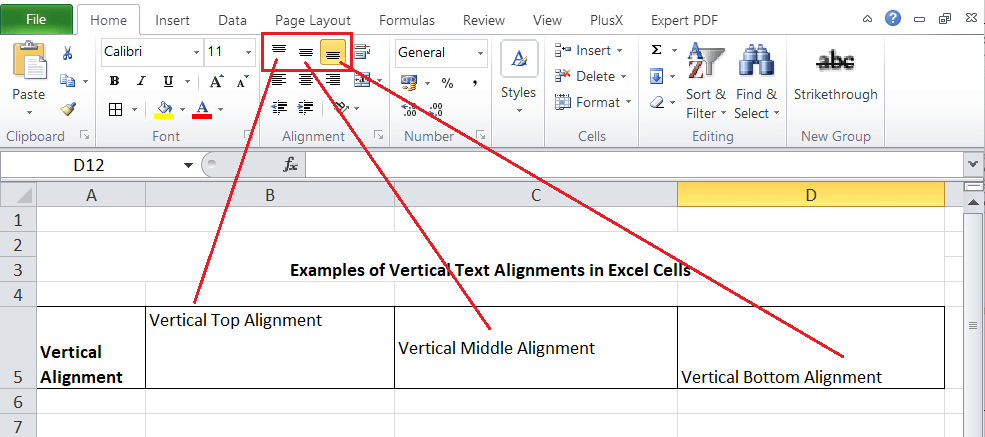
The recorded text is shifted to the top, middle, and bottom positions in the above image.
Undo the Alignments
There are two ways that we can use to undo the alignments changes within the sheet, such as:
-
We can use the Undo feature in Excel to remove alignment changes just after applying them. The shortcut to use Undo in Excel is Ctrl + Z.
-
To remove the alignment changes later, we need to select the specific cell or cell range and navigate to Home > Clear > ClearFormats from the Editing group.
Important Points to Remember
- If we have a long paragraph or a long line of text in continuous cells in a spreadsheet, we might not see the entire text at once. We can fix it and view the entire text within the cell by clicking the Wrap Text option under the Home tab in a group named Alignment, and it typically wraps the text without changing the column width.
- If we want to merge multiple cells and center texts spanning multiple rows and columns, we need to click the Merge & Center button in a group named Alignment under the Home tab.
- The Orientation option allows us to make text vertical, rotate text up and down to 90 degrees and turn text to 45 degrees. This option typically rotates text to a diagonal angle or vertical orientation.
Next TopicParts of MS Excel Window
← prev
next →
Updated: 12/31/2020 by
Below are the steps on how to change text alignment in a cell in popular spreadsheet programs. View the steps for the program you are using by clicking one of the links below.
Align text in Microsoft Excel
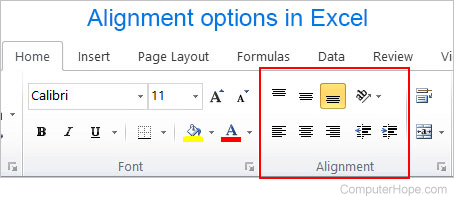
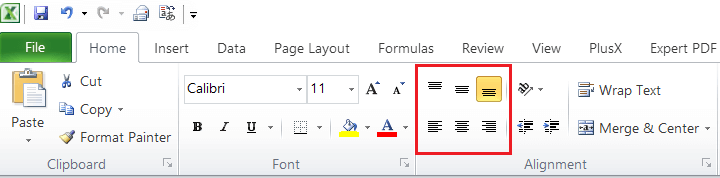
You can change the horizontal alignment of text in a cell using options on the Microsoft Excel Ribbon.
- Select the cell or which you want to change the alignment.
- In the Ribbon, on the Home tab, select the type of alignment you want to use, as shown in the picture above.
For example, if you wanted to center the text in a cell, click the center icon.
To change the alignment of text in a cell using a keyboard shortcut, follow the steps below.
- Select the cell you want to change.
- Press Alt+H.
- Press A.
- Press L for left align, C for center, or R for right align.
Adjusting the vertical alignment
Change the vertical alignment of a cell’s text by following the same steps above, but select Top Align, Middle Align, or Bottom Align.
Tip
You can also use the Orientation button to make the text vertical, at an angle, or any orientation you desire.
How to align text in Google Sheets
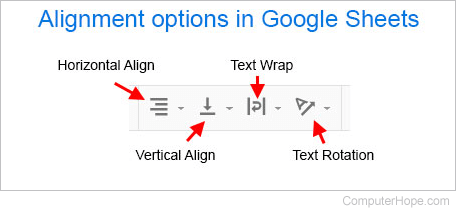
In Google Sheets, to change the horizontal alignment of text in a cell, select the cell and click the Horizontal Align button on the toolbar (shown above). Once done, you’ll have the option to select Left, Center, and Right alignment.
or
Press one of the shortcut keys to adjust the alignment of any selected cell. For left alignment, highlight the text and press Ctrl+Shift+L. For center alignment, highlight the text and press Ctrl+Shift+E. For right alignment, highlight the text and press Ctrl+Shift+R.
Adjusting the vertical alignment
To change the vertical alignment of text in a cell, click the Vertical Align icon in the toolbar (as shown above). Once selected, choose Top, Middle or Bottom, depending on how you want to align the text.
Tip
You can also use the Text Rotation option (shown above) to make the text vertical, a tilt, or at any angle you desire.
Aligning text in OpenOffice Calc
Change the horizontal alignment of cell text in OpenOffice Writer by highlighting the cell and clicking the left, center, or right align icons in the top toolbar. These icons look similar to those shown in the above example picture of Microsoft Excel.
Adjusting the vertical alignment
OpenOffice calc does not show a vertical align option in the top toolbar. However, vertical alignment options are shown in the Properties window appearing to the right of the spreadsheet when a cell is selected. From this window, you can select Align Top, Align Center Vertically, and Align Bottom.