
Type some text in the header at the cursor position (e.g. ‘left align’). At the end of the text you just typed, click Insert Alignment Tab again. On the Alignment Tab window, select Center then click OK. Type some more text (e.g. ‘center align’).
How do I center text horizontally in Word?
Aligning Text Horizontally in Word To align text horizontally on a page, highlight the text you want to center. Next, click the Center Alignment icon in the Paragraph group of the Home tab. Alternatively, you can use the Ctrl+E keyboard shortcut. Your text will now be horizontally aligned.
How do you center a heading?
First, type your heading in the left column of the row you want to center. Select the range of cells where the header should be centered across. Press the Alignment drop-down arrow or press CTRL + 1 to open the Format Cells dialog box. The Format Cells Alignment tab displays.
How do I align text in Word with ruler?
10:50Suggested clip 49 secondsWord 2013 Ruler Tabs and Text Alignment – YouTubeYouTubeStart of suggested clipEnd of suggested clip
How do you align all bullets in Word?
Align bullets by hand to give them a custom look by highlighting one or more bullets, then using the ruler at the top of the Word workspace to drag them into place. Use the top triangle slider bar to align the bullets’ first lines and the bottom triangle slider bar to align the rest of the text in the bullet.
How do you align objects in Word?
Align an object with other objectsHold down Shift , click the objects that you want to align, and then click the Shape Format tab.Click Arrange > Align > Align Selected Objects. This is selected by default. If Align Selected Objects is not available. Click Arrange > Align, and then click the alignment that you want.
How do I align text in a picture in Word?
Align an object in relation to textSelect the object to select it.Select Format or Format Picture.Under Arrange, select Wrap Text, and then choose a style other than In Line with Text (for example, Tight ).In the document, drag the object where you want it.
How do I fix alignment in Word?
Adjusting the vertical alignmentOpen Microsoft Word.Click File and then Page Setup.Click the Layout tab.Under Vertical alignment, click the down arrow and select center, bottom, or the alignment you want to use. If you do not want this setting to affect the whole document, change the “Apply to” to the selected text.
How do I align money in Word?
3:01Suggested clip 83 secondsDon’t line up numbers manually – use decimal tabs in Microsoft Word …YouTubeStart of suggested clipEnd of suggested clip
How do I align the dollar sign left in Word?
The solution is to add a Left Tab to the ruler for the $ sign to align to and a Decimal Tab for the decimal (or where the decimal would be, if there were one) to align to: Start by entering a tab before you type the $. You must press and hold Ctrl + Tab.
How do I do formulas in Word?
On the Table Tools, Layout tab, in the Data group, click Formula. Use the Formula dialog box to create your formula. You can type in the Formula box, select a number format from the Number Format list, and paste in functions and bookmarks using the Paste Function and Paste Bookmark lists.
How do I reduce decimal places in Word?
By using a button: Select the cells that you want to format. On the Home tab, click Increase Decimal or Decrease Decimal to show more or fewer digits after the decimal point.

![]()
Written by Allen Wyatt (last updated February 25, 2023)
This tip applies to Word 2007, 2010, 2013, 2016, 2019, Word in Microsoft 365, and 2021
Patsy has a document that has headers and footers in it. Each has information at three places: left, centered, and right. If she later changes the margins of the document, the previously centered portion is no longer centered. (The center-aligned tab was set based upon the old line width, which is no longer valid after the margin change.) Patsy wonders if there is a way to set up the header or footers so that the centered information remains centered, even if she needs to change margins.
The traditional way to solve this problem is to put a three-celled, single-row table in the header or footer. You can put text in the left, center, and right cells and then format or align that text any way you like within the cell. As long as the table width is set to 100%, it will adjust automatically to any changes in the overall line width.
There is an even better way to get the desired result: through the use of alignment tabs. Follow these steps:
- Open the header or footer area, depending on which one you want to change. (Simply double-click in the header or footer area to open it to editing.)
- Type the text you want left-aligned in the header or footer.
- Display the Header & Footer tab of the ribbon or, in Word 2007, the Design tab of the ribbon.
- In the Position group, click the Insert Alignment Tab tool. Word displays the Alignment Tab dialog box. (See Figure 1.)
- Click the Center radio button.
- Make sure the Align Relative To drop-down list is set to Margin.
- Click OK to close the Alignment tab dialog box.
- Type the information you want centered in the header or footer.
- Again click the Insert Alignment Tab tool, as you did in step 4. Word again displays the Alignment Tab dialog box.
- Click the Right radio button.
- Make sure the Align Relative To drop-down list is set to Margin.
- Click OK to close the Alignment tab dialog box.
- Type the information you want right-aligned in the header or footer.
- Close the header or footer area by clicking in the main document.
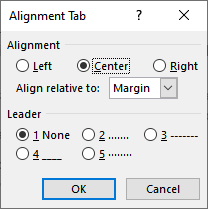
Figure 1. The Alignment Tab dialog box.
If you have non-printing characters visible on your screen, you’ll notice that Word displays the alignment tab using the familiar arrow character it normally uses for tabs. While alignment tabs, in this respect, look like regular tabs, they are very different. Regular tabs are set at a particular distance from the left margin, while alignment tabs are set at a relative position (left, center, or right) to both margins. This means that if you later make a formatting change that adjusts those margins (such as Patsy did), change paper size, or even change from portrait to landscape orientation, the alignment tabs adjust the information that follows them relative to the margin change. This is very powerful!
I noted that if you have non-printing characters visible then alignment tabs look like regular tabs. If you need (for some reason) to determine whether a tab character is a normal tab or an alignment tab, one way to do so is to try deleting it. Position the insertion point just to the left of the tab character and press the Delete key. If the tab disappears, then it was a regular tab. If the symbol for the tab character (the arrow) is, instead, simply selected, then that is an alignment tab.
Since alignment tabs were introduced in Word 2007, they are only viable in documents saved in the DOCX or DOCM formats (or templates saved in the newer file format). If you are working on a document using the older DOC file format or you are working in compatibility mode, then alignment tabs have no efficacy—they are treated as regular tabs.
WordTips is your source for cost-effective Microsoft Word training.
(Microsoft Word is the most popular word processing software in the world.)
This tip (13426) applies to Microsoft Word 2007, 2010, 2013, 2016, 2019, Word in Microsoft 365, and 2021.
Author Bio
With more than 50 non-fiction books and numerous magazine articles to his credit, Allen Wyatt is an internationally recognized author. He is president of Sharon Parq Associates, a computer and publishing services company. Learn more about Allen…
MORE FROM ALLEN
Sharing AutoText Entries
AutoText entries can make your writing more productive, if used effectively. Because of this, it can be advantageous for …
Discover More
Drawing Borders
Adding borders around cells is a common formatting task. You can make the task more intuitive by actually drawing the …
Discover More
Hyperlinks that Open in a Different Browser Window
When you click a link in a browser, the target of that link might open in the same window or in a new window. Getting an …
Discover More
I didn’t know you could do this!! Not until I read this article, anyway.
One of the annoyances with earlier versions of Word was what happened to left-, centre-, and right-aligned text in headers and footers when you inserted a landscape section. The workaround that many people used to control the placement was borderless tables in the headers/footers combined with ‘AutoFit to Window’.
Well, you don’t have to anymore! It seems this ‘new’ feature has been around since Word 2007, but I must have missed it.
Here’s how to set up a test document to show you how it works; it works the same for headers and footers — I only describe it for headers in these steps:
- Start a new (blank) Word document.
- Press Enter a couple of times to add some empty paragraphs.
- Insert a ‘Next Page’ section break (Page Layout tab > Breaks > Next Page).
- Press Enter a couple more times, then insert another Next Page section break. You should now have three blank pages in your test document.
- Place your cursor anywhere in page two prior to the section break, then make change this section to landscape orientation (Page Layout tab > Orientation > Landscape).
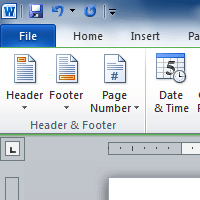
- Go back to page one and double-click in the header area to open the header/footer area.
- On the Header & Footer Tools > Design tab, click Insert Alignment Tab.

- On the Alignment Tab window, select Left then click OK. Leave all other settings as they are.
- Type some text in the header at the cursor position (e.g. ‘left align’).
- At the end of the text you just typed, click Insert Alignment Tab again.
- On the Alignment Tab window, select Center then click OK.
- Type some more text (e.g. ‘center align’). Look what happens — the text you just typed automatically goes to the center position in the header!
- At the end of the text you just typed, click Insert Alignment Tab again.
- On the Alignment Tab window, select Right then click OK.
- Type some more text (e.g. ‘right align’). The text you just typed automatically goes to the right position in the header.
- Now check what’s happened on page two — the text you just typed and the tabs you inserted using this method have automatically adjusted for the dimensions of the landscape page.
- Now go to page three — this is a portrait page, and the header text has readjusted back to suit that orientation.


Note: If you adjust the margins for the page, the header/footer text alignment also adjusts to suit.
Clever, huh?
See also:
- http://www.addbalance.com/usersguide/sections2007.htm#Portrait&Landscape
[Link last checked July 2014]
Apply and Customize Headings in Word Documents
by Avantix Learning Team | Updated April 19, 2022
Applies to: Microsoft® Word® 2010, 2013, 2016, 2019, 2021 or 365 (Windows)
You can create headings in Microsoft Word documents by applying Word’s built-in heading styles (such as Heading 1 or Heading 2). After you have applied styles, you can modify them and change the font, size, color, and other formatting attributes so the entire document will update. Once you have applied heading styles, you’ll be able to navigate to the headings using the Navigation Pane and create a table of contents.
Recommended article: How to Hide Comments in Word (or Display Them)
Do you want to learn more about Microsoft Word? Check out our virtual classroom or in-person classroom Word courses >
Heading styles are very important because they create structure in your documents and are readable by screen readers or assistive technology programs used by people with vision impairments. They can also save you a lot of time formatting and reformatting documents.
In addition to creating structure, heading styles are also used to:
- Generate a table of contents
- Reformat a document using Style Sets
- Navigate using the Navigation Pane (select Navigation Pane on the View tab in the Ribbon)
- Rearrange a document using the Outline View
- Create a structured PDF (portable document format) file with heading tags
Note: Screenshots in this article are from Word 365 but are very similar in previous versions of Word.
Creating headings by applying Word heading styles
To create or designate headings, you will need to apply the built-in heading styles in order (Heading 1, Heading 2, Heading 3, and so) to paragraphs. There are 9 levels of headings available in Word.
Heading styles are technically available as paragraph and character styles, but it’s important to apply them as paragraph styles to entire paragraphs. A paragraph in Word is anything with a hard return after it (you have pressed Return or Enter).
Heading styles are affected by your theme choices (overall theme, color theme, and font theme). You can change theme options using the Design tab in the Ribbon.
To create headings by applying heading styles:
- Click in the paragraph (title or subheading) you want to designate or format as a heading.
- Click the Home tab in the Ribbon.
- Click the heading style you want in the Styles Gallery (such as Heading 1) in the Style group. You may need to click the More arrow on the bottom right of the Styles Gallery to view more styles and then click the style you want to use.
All available heading styles do not appear initially in the Styles Gallery. When you apply a heading level (such as Heading 3), an additional heading level should appear in the Gallery (such as Heading 4).
The Styles Gallery appears on the Home tab in the Ribbon and typically displays top level headings:

If you click the More arrow on the bottom right of the Styles Gallery, an expanded gallery appears:

Modifying or customizing heading styles using the Styles task pane
If you modify heading styles, every instance of the modified style will change in your document. Not only will this save time, but it will also ensure consistency. There are many ways to customize heading styles in Word. In this article, we will modify heading styles using the Styles task pane.
The Styles task pane appears with styles in the document (you can change this display by clicking Options at the bottom of the task pane):

To modify or customize a heading style:
- Click the Home tab in the Ribbon.
- Click the dialog box launcher (diagonal arrow) on the bottom right in the Styles group. You can also press Ctrl + Alt + Shift + S. The Styles task pane will appear. If the task pane is floating, double-click the title bar.
- Click in a paragraph using the style you want to modify.
- Click the arrow to the right of the heading you want to modify in the Styles task pane and then select Modify from the drop-down menu. You can also right-click the heading style in the task pane and select Modify. A dialog box appears.
- In the Modify Style dialog box, select the desired options such as font, font size, font color, alignment, and line spacing. Buttons in this dialog box are comparable to those in the Ribbon.
- If you want to change some other formatting options (such as paragraph formats), select Format at the bottom of the dialog box and select other options from the drop-down menu.
- Select Only in this document so that the style is modified in the current document only.
- Do not select Automatically Update unless you want the document styles to update when a user changes heading formatting in the document. It’s typically best to leave this option unchecked.
- Click OK or press Enter. The entire document will change unless a heading has been manually formatted (which overrides the style). You can simply reapply the style if this occurs.
The Modify Styles dialog box displays the style name, the type of style and options for modifying the style:

When you save the document, the modified styles are also saved.
Styles are the most important formatting feature in Word to automate formatting in longer documents. Heading styles also have the added benefit of creating structured documents and are integrated with several other Word features such as generated tables of contents.
This article was first published on May 15, 2021 and has been updated for clarity and content.
Subscribe to get more articles like this one
Did you find this article helpful? If you would like to receive new articles, join our email list.
More resources
How to Create a Table of Contents in Word
14+ Word Selection Shortcuts to Quickly Select Text
How to Copy Styles Between Microsoft Word Documents Using the Organizer
How to Insert Reusable Text Snippets in Word with Quick Parts (Great Timesaver)
How to Convert a PDF to Word in Microsoft Word (for Free – No Third Party Programs Needed)
Related courses
Microsoft Word: Intermediate / Advanced
Microsoft Excel: Intermediate / Advanced
Microsoft PowerPoint: Intermediate / Advanced
Microsoft Word: Long Documents Master Class
Microsoft Word: Styles, Templates and Tables of Contents
Microsoft Word: Designing Dynamic Word Documents Using Fields
VIEW MORE COURSES >
To request this page in an alternate format, contact us.
Our instructor-led courses are delivered in virtual classroom format or at our downtown Toronto location at 18 King Street East, Suite 1400, Toronto, Ontario, Canada (some in-person classroom courses may also be delivered at an alternate downtown Toronto location). Contact us at info@avantixlearning.ca if you’d like to arrange custom instructor-led virtual classroom or onsite training on a date that’s convenient for you.
Copyright 2023 Avantix® Learning
Microsoft, the Microsoft logo, Microsoft Office and related Microsoft applications and logos are registered trademarks of Microsoft Corporation in Canada, US and other countries. All other trademarks are the property of the registered owners.
Avantix Learning |18 King Street East, Suite 1400, Toronto, Ontario, Canada M5C 1C4 | Contact us at info@avantixlearning.ca
Microsoft Word 2010 has many options for customizing your header. For example, we have previously covered removing a page number from the header of a Word 2010 document. You can add images or text to the header, and you can add those items to the left, center or right portion of the header. But what you may not be aware of is the fact that you can also change the position of the header in Word 2010. By default, a header in a Word 2010 document is .5 inches from the top of the page, but that amount is customizable. By using the options on the Word 2010 header menu, you can easily change the header position in Word 2010.
See also
- How to insert a check mark in Microsoft Word
- How to do small caps in Microsoft Word
- How to center text in Microsoft Word
- How to merge cells in Microsoft Word tables
- How to insert a square root symbol in Microsoft Word
Moving a Header Up or Down in Word 2010
The only limitation that you will encounter when adjusting the position of your header in Word 2010 are the limitations that are imposed on your document by your printer. However, since all printers are different, it is hard to say with conviction what a general amount of space is that you need to leave at the top of your documents. You will need to do some experimenting with your own printer to determine what the minimum distance is for the position of your header in Word 2010. But, with that information in hand, you can proceed with moving your header up and down to suit the needs of your Word 2010 document.
Step 1: Open the Word document for which you want to change the header position.
Step 2: Double-click the header section of the document.

Step 3: Word should now switch the items in the ribbon at the top of the window to the Header & Footer Tools – Design tab.

Step 4: Locate the Header from Top option in the Position section of the ribbon, then use the arrows to increase or decrease the distance of the header from the top of the page.

As you increase or decrease the distance, you will note that the header position moves automatically. This will not affect the document if you are decreasing the distance but, if you increase the distance, it will push down the body of your document. This can increase the length of your document, and might also create some problems if you have manually inserted page breaks near the bottom of a page. After changing the position of your header in Word 2010, be sure to go through the entire document to ensure that is has not negatively impacted any of the information contained with the document.

Matthew Burleigh has been writing tech tutorials since 2008. His writing has appeared on dozens of different websites and been read over 50 million times.
After receiving his Bachelor’s and Master’s degrees in Computer Science he spent several years working in IT management for small businesses. However, he now works full time writing content online and creating websites.
His main writing topics include iPhones, Microsoft Office, Google Apps, Android, and Photoshop, but he has also written about many other tech topics as well.
Read his full bio here.
Things You Should Know
- Adding a header in Microsoft Word will add text to the top of your pages.
- When adding a header, you can choose between pre-made templates or blank.
- In Header settings, you can toggle «Different First Page» and «Header Position».
-
1
Open Microsoft Word. It’s a blue app with a white «W» on it.
- You can also open an existing document by double-clicking it.
-
2
Click Blank Document. This will open a new document in Word.
Advertisement
-
3
Click the Insert tab. You’ll see it near the top of the Word window, directly to the right of the Home tab.
-
4
Click Header. It’s in the «Header & Footer» section that’s on the right side of the row of options near the top of the screen. You’ll see a list of header options in a drop-down menu.
- These options will vary depending on your Office subscription type and version of Word.
-
5
Click a header option. In most cases, you’ll just click the Blank option, since it will apply to the majority of Word documents necessitating a header. Selecting an option will add it to your document.
-
6
Type in your header’s text. This is the text that will appear at the top of every page.
-
7
Click Close Header and Footer. Doing so will apply it to your document; you’ll see your header text at the top of each page.


Advertisement
-
1
Double-click your header text. Doing so will open the Header options menu in the bar near the top of the Word window.
-
2
Review the header’s basic settings. There are a couple of aspects of the header that you can edit in the «Options» and «Position» sections:
- Different First Page — Check this box to customize your document’s first page’s header. It will appear different than the header on the rest of the pages.
- Header Position — Change the number in the «Header from Top» box to raise or lower the header’s position on the page.
-
3
Click and drag your cursor across the header text. This will select it, which will allow you to modify it as needed.
- If you’re using the «Different First Page» option, you’ll need to do this on a page other than the first for your changes to apply across your document (first page aside).
-
4
Click the Home tab. Doing so will allow you to edit the header by using options in the following sections:
- Font — Edit your text’s font, size, color, and general formatting (e.g., bolding or underlining).
- Paragraph — Change your header’s orientation (e.g., centered).
-
5
Double-click the «Header» tab. It’s below your header’s text; doing so will save your changes and close the header section.


Advertisement
Add New Question
-
Question
How do I make the header show up in the document?

To make a header appear, double-click (left mouse key) the highest part of the «page» and a new box will appear, with a dotted line indicating the «header» boundaries. You can then select the font/sizing/etc. for the header. When you’ve finished writing your header, double-click (left mouse key again) to return to the normal page, and leave the header at the top. Note that the header will fade out slightly and will seem to have a greyish tint. Your header will appear at the top of every page.
-
Question
How can I have page numbers inserted sequentially?
Once you add page numbers in the header options, they will automatically be inserted sequentially.
-
Question
How do I add another header in Microsoft Word if I already have one?
Go to the «Design» tab in the menu across the top. You’ll see an option to «Link to Previous.» That is where you turn headers on and off.
Ask a Question
200 characters left
Include your email address to get a message when this question is answered.
Submit
Advertisement
Video
Thanks for submitting a tip for review!
About This Article
Article SummaryX
1. Open a new or existing document in Microsoft Word.
2. Click Insert.
3. Click Header.
4. Click a header template.
5. Enter your preferred text.
6. Click Close Header and Footer.
Did this summary help you?
Thanks to all authors for creating a page that has been read 300,868 times.
Is this article up to date?
Lesson 19: Working with Headers and Footers
/en/word2010/styles-and-themes/content/
Introduction
You can make your document look professional and polished by utilizing the header and footer sections. The header is a section of the document that appears in the top margin, while the footer is a section of the document that appears in the bottom margin. Headers and footers generally contain information such as the page number, date, and document name.
In this lesson, you will learn how to insert and edit headers and footers.
Headers and footers
Headers and footers can help keep longer documents organized and make them easier to read. Text entered in the header or footer will appear on each page of the document.
To insert a header or footer:
- Select the Insert tab.
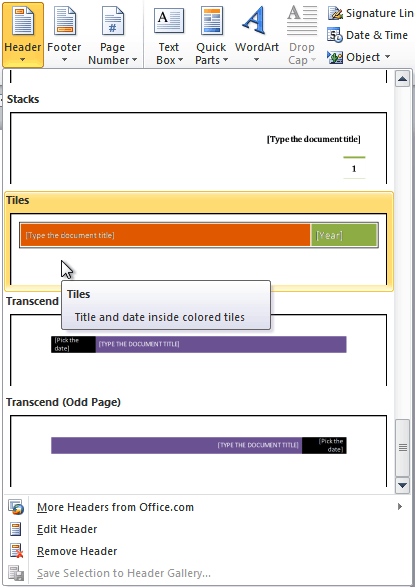
- Click either the Header or Footer command. A drop-down menu will appear.
- From the drop-down menu, select Blank to insert a blank header or footer, or choose one of the built-in options.
Inserting a header
- The Design tab will appear on the Ribbon, and the header or footer will appear in the document.
- Type the desired information into the header or footer.
Typing text into a header
- When you’re finished, click Close Header and Footer in the Design tab, or hit the Esc key.

After you close the header or footer, it will still be visible, but it will be locked. To edit it again, just double-click anywhere on the header or footer, and it will become unlocked.
To insert the date or time into a header or footer:
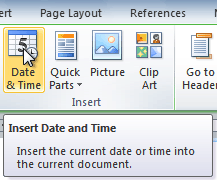
- Double-click anywhere on the header or footer to unlock it. The Design tab will appear.
- From the Design tab, click the Date & Time command.
The Date & Time command
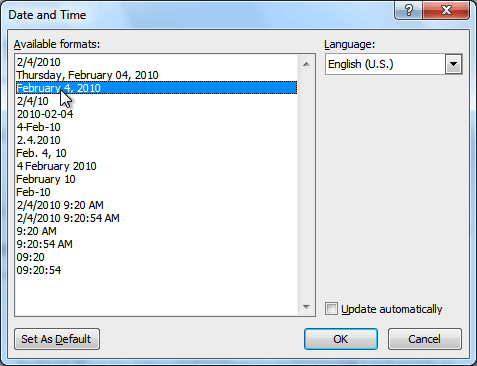
- Select a date format in the dialog box that appears.
Selecting a date format
- Place a check mark in the Update Automatically box if you would like it to always reflect the current date. Otherwise, it will not change when the document is opened at a later date.
- Click OK. The date and time now appears in the document.
To remove content controls:
By default, some of the built-in headers and footers have snippets of text that are called content controls. Content controls can contain information such as the document title or company name, and they allow you to enter this information into a form field.
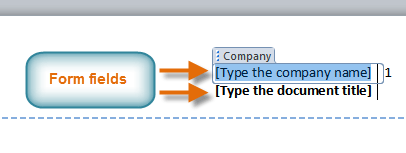 Form fields
However, you’ll often just want to type a normal header without any content controls. To do this, you’ll need to remove any content control fields from the header or footer.
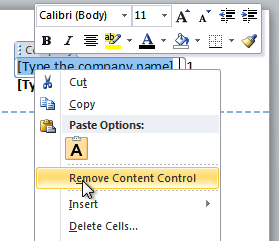
- With the header or footer section active, right-click the content control field you want to remove. A drop-down menu will appear.
- Click Remove Content Control. The content control field will disappear.
Removing Content Control
Other header and footer options
There are many other header and footer options you can use to design these sections of your document. You can review the Header & Footer Tools Design tab to view and explore these options.
 The Design Tab
Adding page numbers
Word can automatically label each page with a page number and place it in a header, footer, or side margin. You can add page numbers to an existing header or footer, or you can insert page numbers into a new header or footer.
To add page numbers to an existing header or footer:
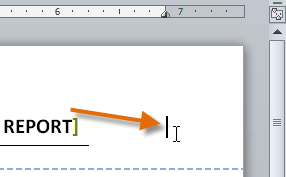
- Select the header or footer. The Design tab will appear.
- Place the insertion point where you want the page number to be. You can place it anywhere except inside a content control field.
The insertion point
- From the Design tab, select the Page Number command.
- Click Current Position, then select the desired style. The page number will appear in the document.
Selecting a page number
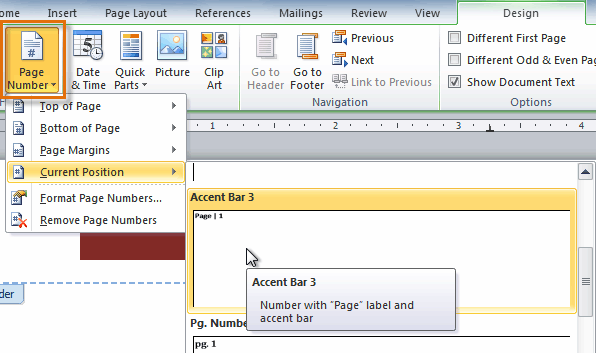
If you’ve already typed information into your header or footer, it’s important to place the page number at the Current Position to avoid losing anything. If you select a page number from Top of Page or Bottom of Page, it will delete anything you’ve already added to the header or footer.
To insert page numbers into a new header or footer:
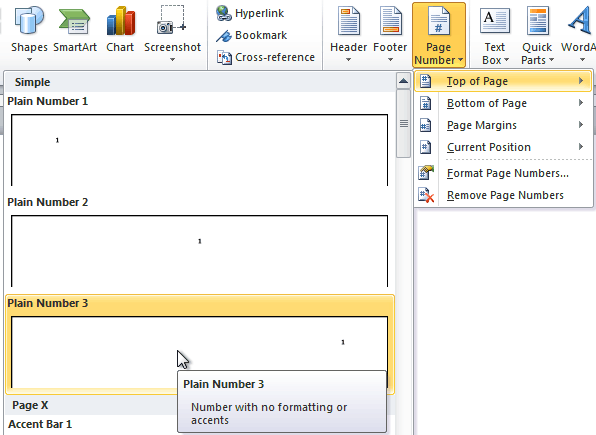
- From the Insert tab, click Page Number. A drop-down menu will appear.
- Select the desired page number style, and it will appear in your document.
Inserting a page number at the top of the page
To hide the page number on the first page:
In some documents, you may not want the first page to show the page number. You can hide the first page number without affecting the rest of the pages.
- Select the header or footer that contains the page number.
- From the Design tab, place a check mark next to Different First Page. The header and footer will disappear from the first page. If you want, you can type something new in the header or footer, and it will only affect the first page.
Hiding the page number on the first page
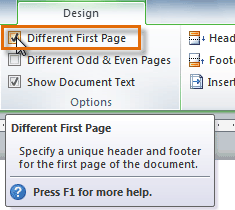
If you’re unable to select Different First Page, it may be because an object within the header or footer is selected. Click in an empty area within the header or footer to make sure nothing is selected.
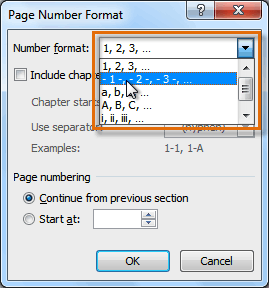
To format page numbers:
- Select the header or footer that contains the page number.
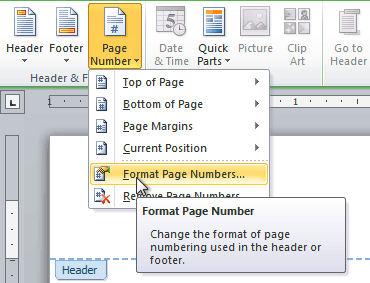
- From the Design tab, select the Page Number command.
- Click Format Page Numbers.
Clicking Format Page Numbers
- From the dialog box, select the desired Number format.
Selecting a number format
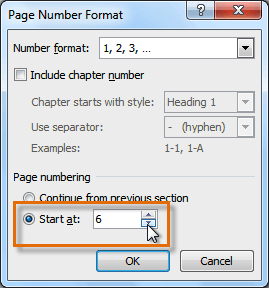
- Next to Start at, enter the number you want the page numbers to start with.
Selecting a starting page number
If you’ve created a page number in the side margin, it’s still considered part of the header or footer. You won’t be able to select the page number unless the header or footer is selected.
An alternative way to modify your page numbering is by using section breaks. To learn how to do this, read our article on Modifying Page Numbers in Word.
Challenge!
- Create a new Word document.
- Create a blank header.
- Add your name in the header of a document.
- Right-align the text in the header.
- Select a built-in footer.
/en/word2010/reviewing-documents/content/