
This happened to me some time ago as well, so when I stumbled across this question I thought I might share my experience.
Approach #1: Deleting rows and columns
As Matt B mentions in his answer, the first thing to try is to delete the columns which are taking up place.
Let us assume that your data uses columns A to T and rows 1 to 20.
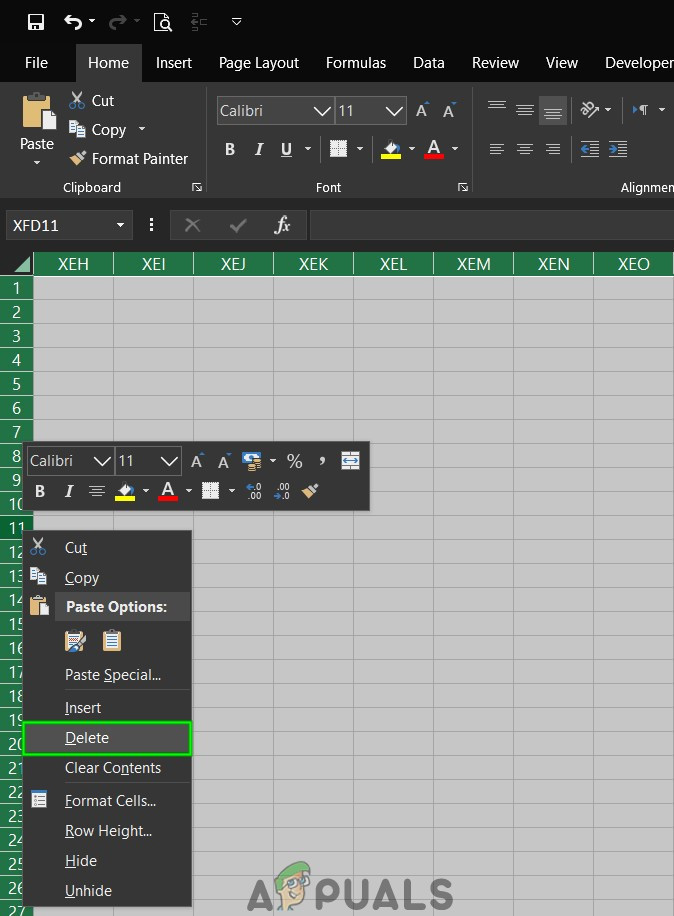
First off, select cell U1 and press CTRL+SHIFT+RIGHT to mark all cells from T1 to XFD1 (the right-most column Excel can display). Right-click any cell, choose «Delete» and «Entire column». Now you have gotten rid of the columns.
Next, select cell A21 and press CTRL+SHIFT+DOWN to mark all cells from A21 to A1048576 (the highest row number Excel displays). Right-click any cell, choose «Delete» and «Entire row». This will remove the rows.
Now it should work, as you have gotten rid of all excess columns and row.
Approach #2: using VBA
When I encountered this issue, the above solution did not work for me. However, I eventually found a solution that did work.
- Right-click the sheet that is causing problems.
- Choose «View Code»
- Press CTRL+G to open box «Immediate»
- Type in
ActiveSheet.UsedRange. This will force Excel to «drop» all cells not currently in use, thus freeing up the space you need to create new columns or rows.
I hope this helps you or any other soul out there desperate to create new rows or columns in Excel.
Microsoft Excel causes issues when adding new ceels because of cell protection, too long filename path, merged rows/columns and because of other internal Excel components. This is a very common phenomenon and can be resolved by following some very simple steps as listed below.
What causes Microsoft Excel Not to Add New Cells?
- Cell Protection: Users apply different types of cell protection to protect their data and sheets/files. If any type of cell protection is applied to the sheet/file, then it can cause the current issue.
- Applied Formatting to the Whole Row/ Column: Users tend to unintentionally apply formatting to the whole row/column which isn’t allowed by Excel.
- Contents in the Last rows/columns: If the last row/column of the sheet holds some content which you are trying to replace, then to avoid data loss, Excel will restrict you from adding new cells.
- Too Long File Name Path: The filename path is the address of your file for Windows and if it is too long, then it can cause the issue you are facing.
- Merge Rows/Columns: If the users merges the whole row/column into a single cell, then Excel will not let you insert new rows/columns and show the current problem.
- Freeze Panes: Freeze panes on the sheet help a user in data insertion and management. If a user has applied freeze panes, then the user will face the current problem.
- Range Format as Table: Numerous cases have come forward where adding new cells in a selected area which involved blank space and a table causes the issue of not being able to add new cells.
- File Format Limitations: Excel has different file formats for different versions and different purposes, and each format has its limitations. If you are using a version that has limited functionality then you may encounter the current problem.
- Untrusted Source: Excel by default restricts the execution of files from untrusted sources. If the file you are using is not from a trusted source, then it can force Excel into the current error.
How to Fix not being able to Add new Cells in Excel?
Before trying the solutions, unhide rows and columns that are hidden in the sheet. Also, if you are using any macros on the sheet that is reporting to another hidden spreadsheet then make sure that the hidden sheet has not reached the max number of rows/columns.
1. Remove Cell Protection
Excel has built-in cell protection functionality which enables users to protect their data and sheet. If there is any type of protection applied to the sheet, then it can cause Excel to prevent adding of new cells to preserve the existing data. In that case, removing the protection of the cells may solve the problem.s
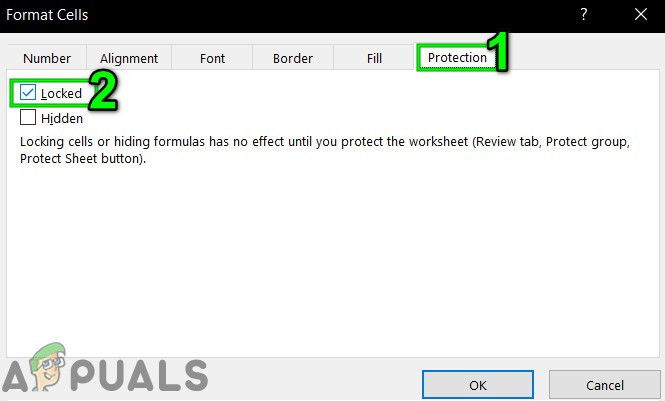
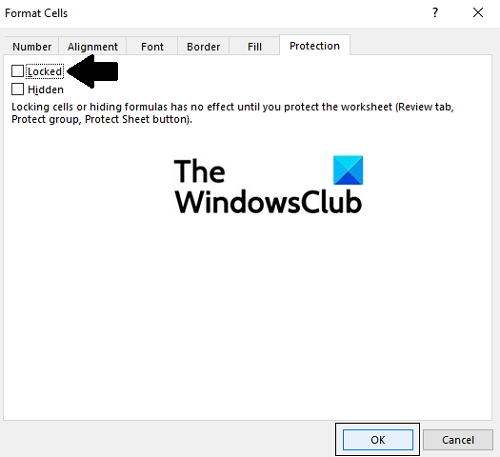
- Press Ctrl+A to select all the cells of the sheet and then on the Home tab click on Format and then in the drop-down menu click on Format Cells.
- Now click on the Protection tab and then uncheck on the Locked

Uncheck Locked Cells in Protection - Now click on the Review tab and click on Protect Sheet or Protect Workbook and enter the desired password to unprotect the sheet or workbook.
- Save and close the file and reopen the file and check if you can insert new rows/columns.
2. Reduce Long File Name Path
The filename path is the address of a file in Windows. If the Excel file name pathname is too long then it can force the Excel to restrict you from adding new cells. In that case, saving the file to a place where the filename path is not too long may solve the problem.
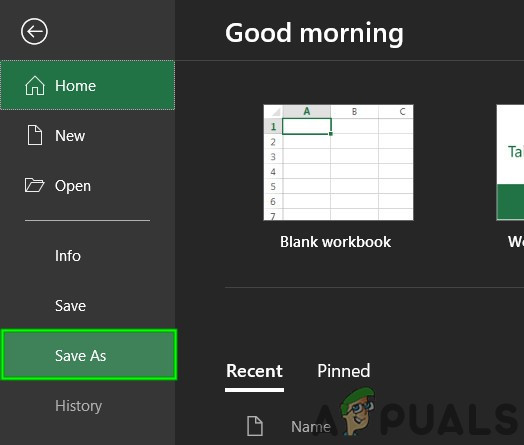
- Open the problematic file.
- Click on the File tab and then in the right pane click on Save as.

Save As Excel File - Now in the save as dialogue box, go to a convenient location, for testing preferably to the desktop.
- Close the Excel and open the file saved to the newer location and check if you can insert rows/columns to the sheet.
3. Unmerge the Rows/Columns
Users tend to unintentionally merge the complete row and column to a single file whereas they want to merge just a few cells. This merging of whole row/column can cause the Excel to restrict the adding of new cells with a justification of “To prevent possible loss of data” because when you have merged all cells in one row (then another column could not be added) or you have merged all cells in one column (then another row could not be added). In that case, unmerging the row/column may solve the problem.
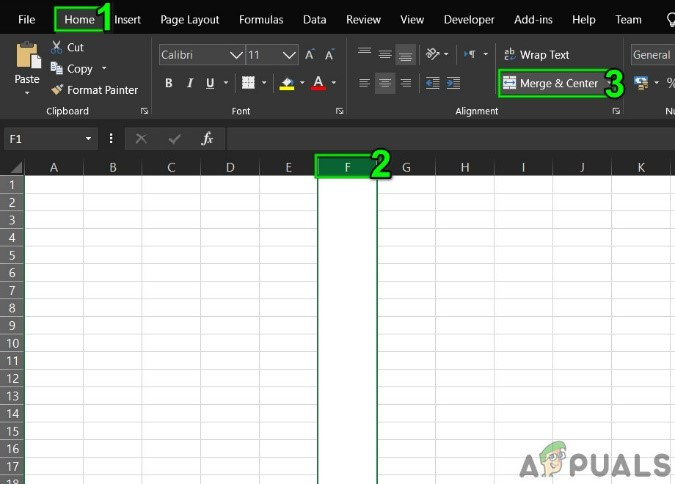
- Find the merged rows/columns. You might have to look through your worksheet to find the merged column/row.
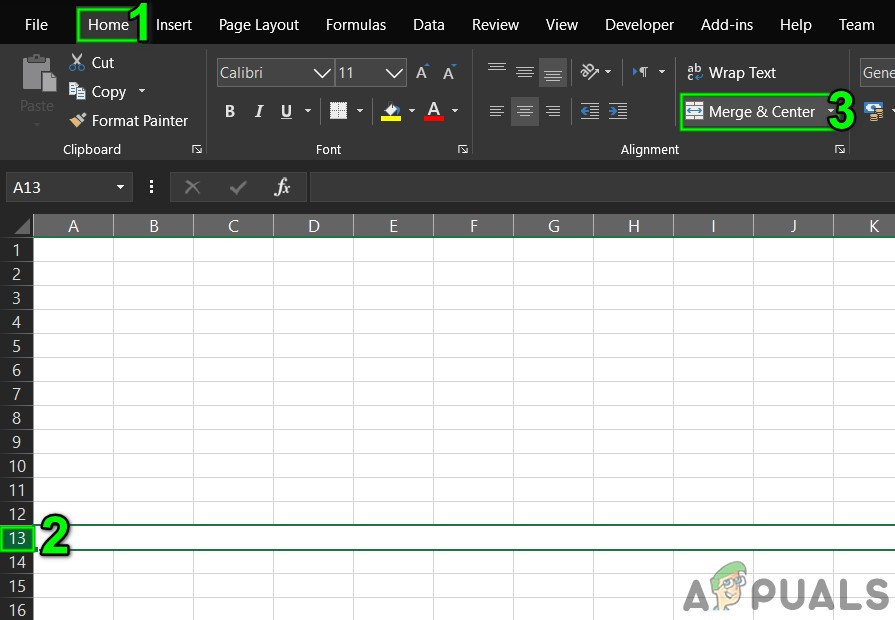
- For column, click on the top Heading cell of the merged column and then on the Home tab click on Merge and Center, which will un-merge the column. Repeat the process on any other merged columns.

UnMerge Column - For row, click on the left Heading cell of the merged row and then on the Home tab click on Merge and Center, which will un-merge the row. Repeat the process on any other merged rows.

Unmerge Rows - Now save and close the file. Then open the file and check if you can insert new rows/columns in the sheet.
4. Unfreeze Panes
Freezing panes help user in achieving greater results with their data. If you are using freeze panes functionality of Excel then it will not let insert new rows and columns to the sheet. Unfreezing the panes may solve the problem.
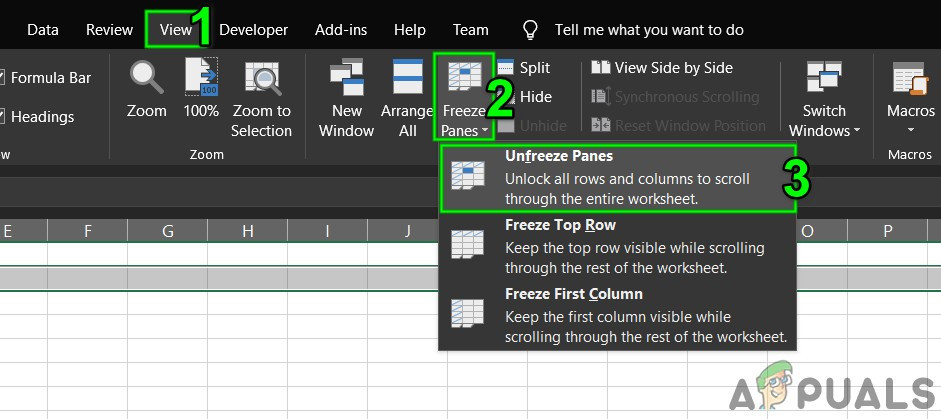
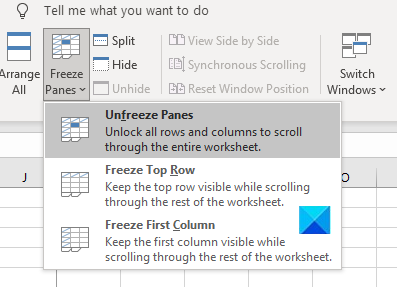
- Click on the View tab and then on the Freeze Panes.
- Now in the drop-down list, click on Unfreeze Panes.

Unfreeze Panes - Save and close the file.
- Reopen the file and check if you can insert new rows/columns.
5. Format Table as Range
Tables are a great way to store data in Excel. If you are using Table in the Excel sheet then in some scenarios the user cannot add or delete the rows/columns in the sheet. In that case, converting the table to the range may solve the problem.
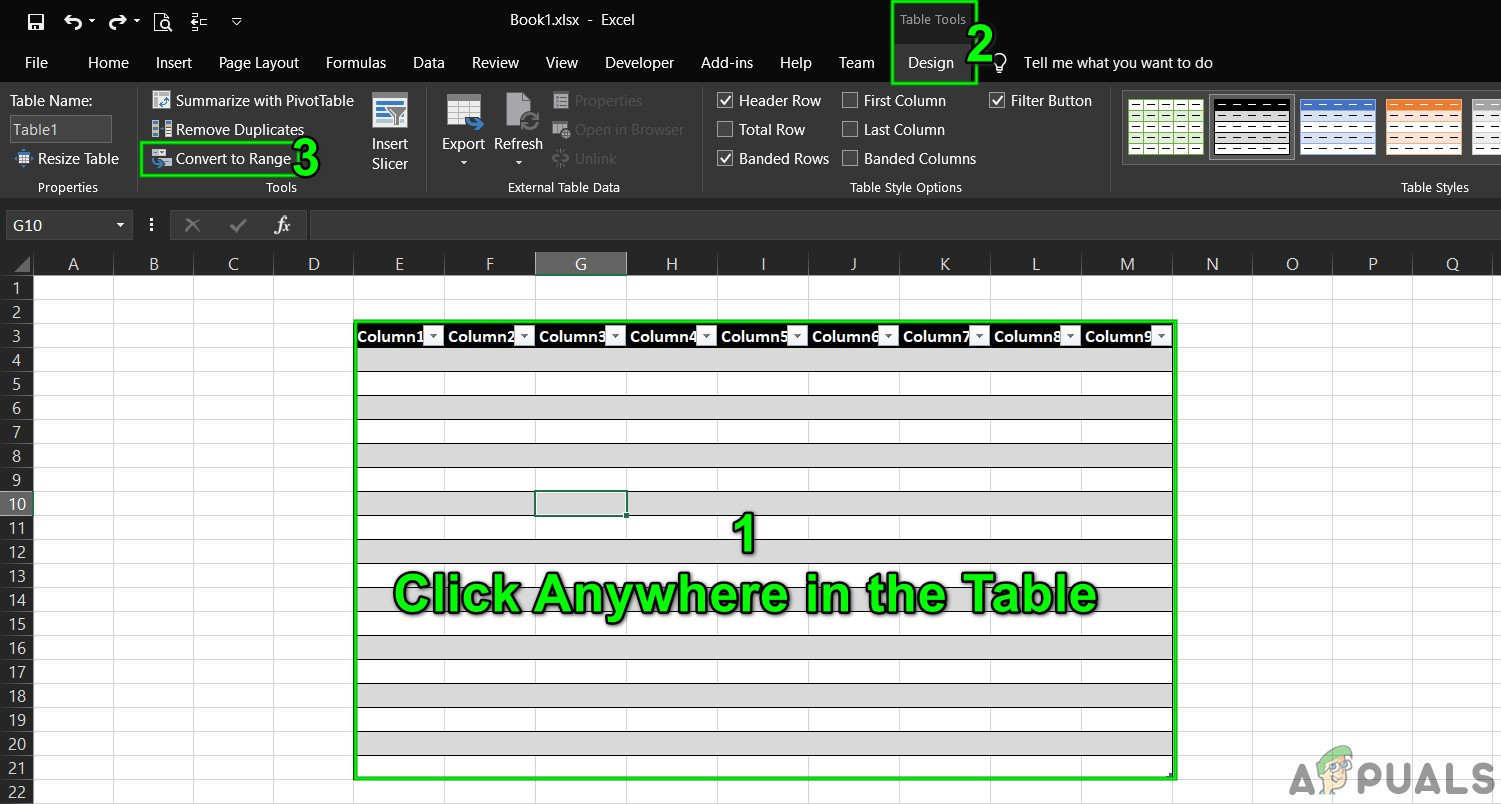
- Click anywhere in the table than in the Table Tools click on Design.
- Now in the Tools group, click Convert to Range.

Convert Table to Range - Save and close the file.
- Reopen the file and check if you can insert new rows/columns without any problem.
6. Clear Content and Formats From Non Used Rows/Columns
Although you think you have no data in the last row/column, Microsoft Excel does not “think” that way. Users sometimes unintentionally block the whole row/column by clicking the “Row/column Number” on the left/top side of the worksheet and then applying formatting either changing color or by applying a border etc. And when users try to insert a new row/column then the current issue occurs. This happens because of formatting used on the whole row/column as Excel is forced in “thinking” that this row/column is not empty. In that case, clearing the formatting from the whole rows/columns may solve the problem.
For column insertion
- Open the problematic workbook.
- Click at the heading cell (The heading cell is the first cell in each column, and indicates which column you are in).of the column next to your last data column and then press Shift+Ctrl+Right Arrow to make selection up to the last column of the sheet.
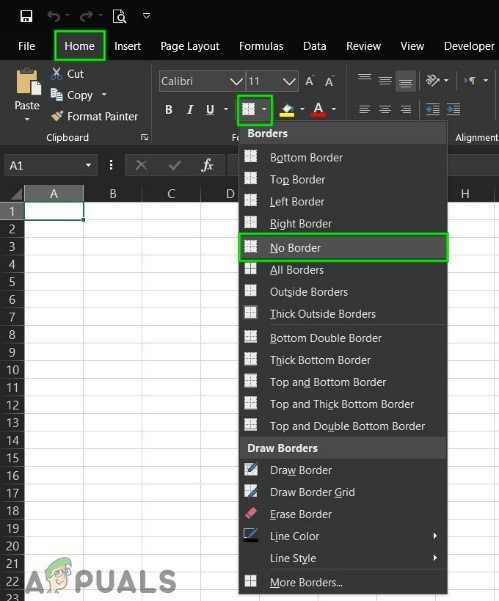
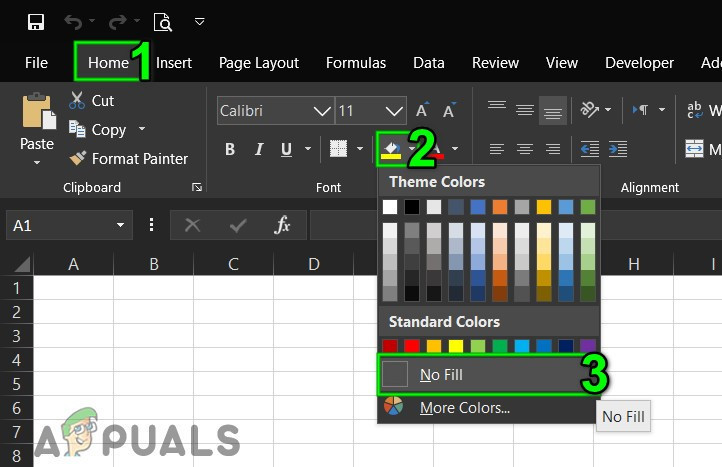
- On the Home tab, click on Borders and then click on “No Border“.

Applied No Border Formatting - On the Home tab, click on Theme Colors and then click on “No Fill“.

Applied No Fill to the Cells - Press “DELETE” in the keyboard to clear any value from cells.
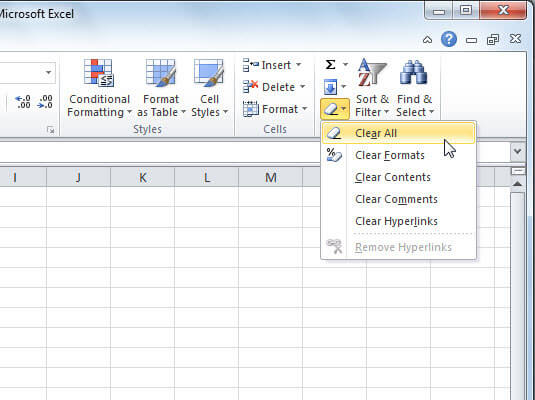
- On the “Home” tab, click on the Clear and then click on Clear Formats.
- Again, click on the Clear and then click on Clear All.

Clear Formats and All - Now right-click on top of any column so that the selection remains intact. And in the resulting menu, click on the Delete.

Delete Columns - Save and close the file and then open the file again.
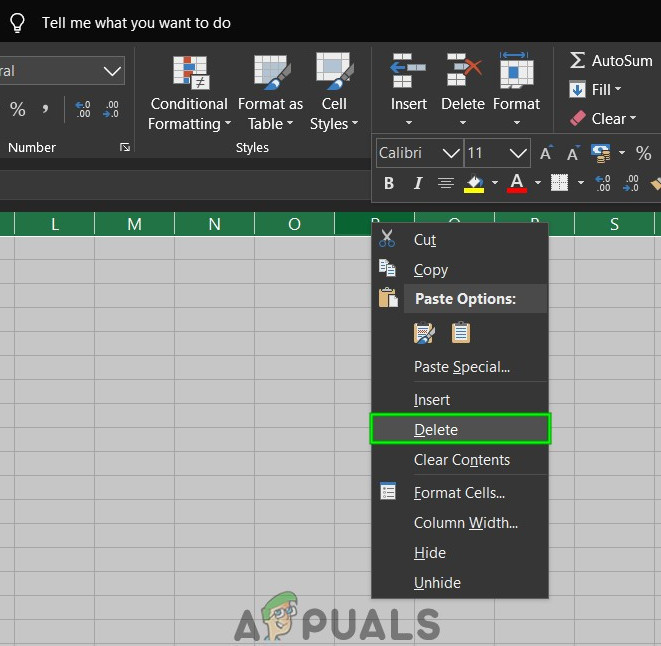
For Row insertion
- Open the problematic sheet.
- Click at the left heading cell (which indicates which row you are in) of the row next to your last data row and then press Shift+Ctrl+Down Arrow to make selection up to the last row of the sheet.
- Follow step 3 to step 7 of the column insertion method.
- Now right-click on Left of any row so that are selection remains intact. And in the resulting menu, click on the Delete.

Delete Rows Contents - Save and close the file and then open the file again. And check if you can insert the new row/column in the sheet.
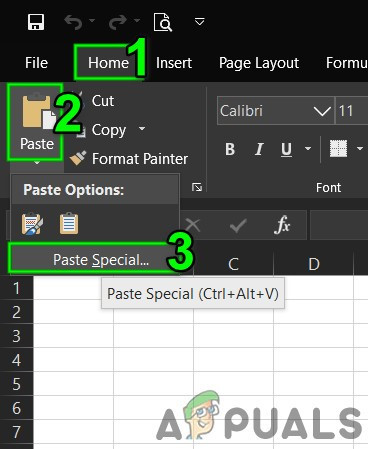
Also, to avoid problems of similar nature, it is always a good idea to not paste data in a spreadsheet using Ctrl + V if feasible otherwise. Then follow the steps below:
- On the Home tab, click on Paste
- Now click on Paste Special
- Then click on Values.

Paste Special - Press OK
7. Change the File Format
This error may also be occurring due to the format limitation of the Excel file you are using for example if you are using XLS, then convert it to XLSX, XLSM or CSV or vice versa. Thus, changing the Excel file format may solve the problem.
- Open the problematic file.
- Click on the File tab and then in the right pane of the window click on Save as.
- In Save as dialogue box, click on Save as Type drop-down and then select a different file format that the file is currently using for example if you are using XLS then choose XLSX file format and then click on Save button.

Select File Format to Save As - Now close the file and Excel and then open the newly saved file and check if you can insert new rows/columns in the sheet.

8. Trust the Source
Excel has a built-in functionality to stop the execution of Excel files from untrusted sources. If the file you are using is from the Untrusted source then Excel’s built-in security functionality will display the error message when the user will try to insert new rows/columns. In that case, adding the location of the file in the Trusted location may solve the problem.
- Open the problematic file and click on the File tab and then click on Options.

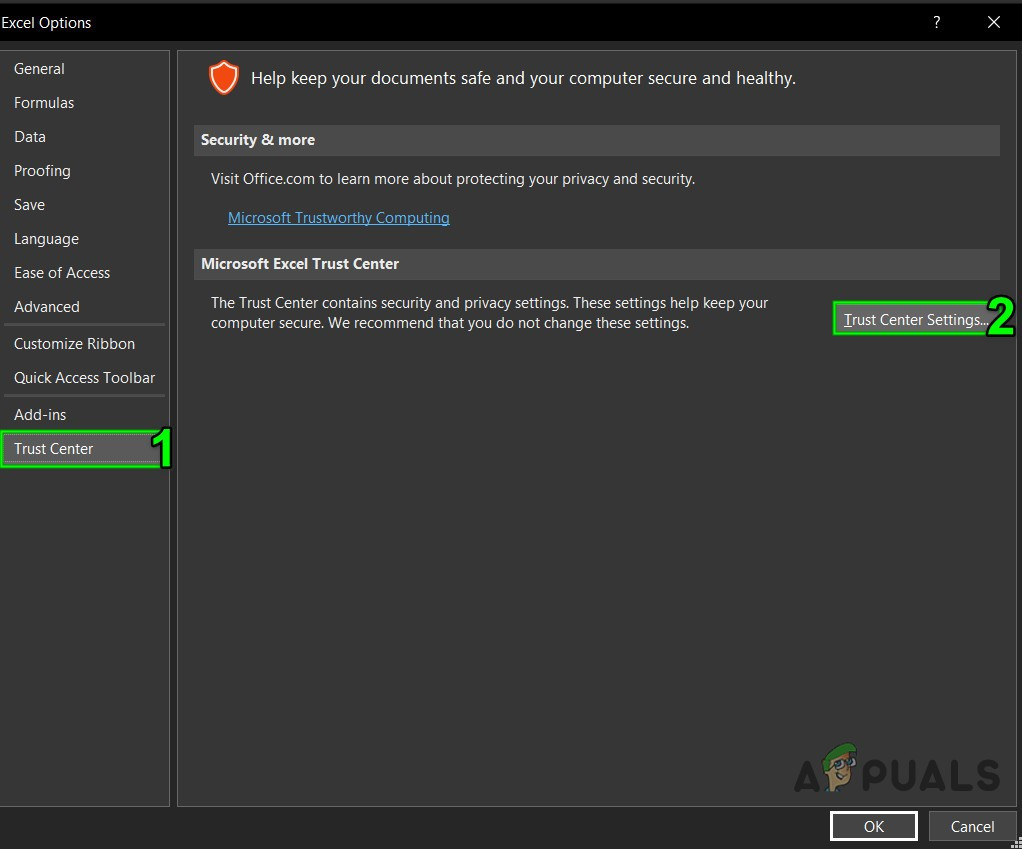
Open Excel Options - Now click on Trust Center and then click on Trust Center Settings.

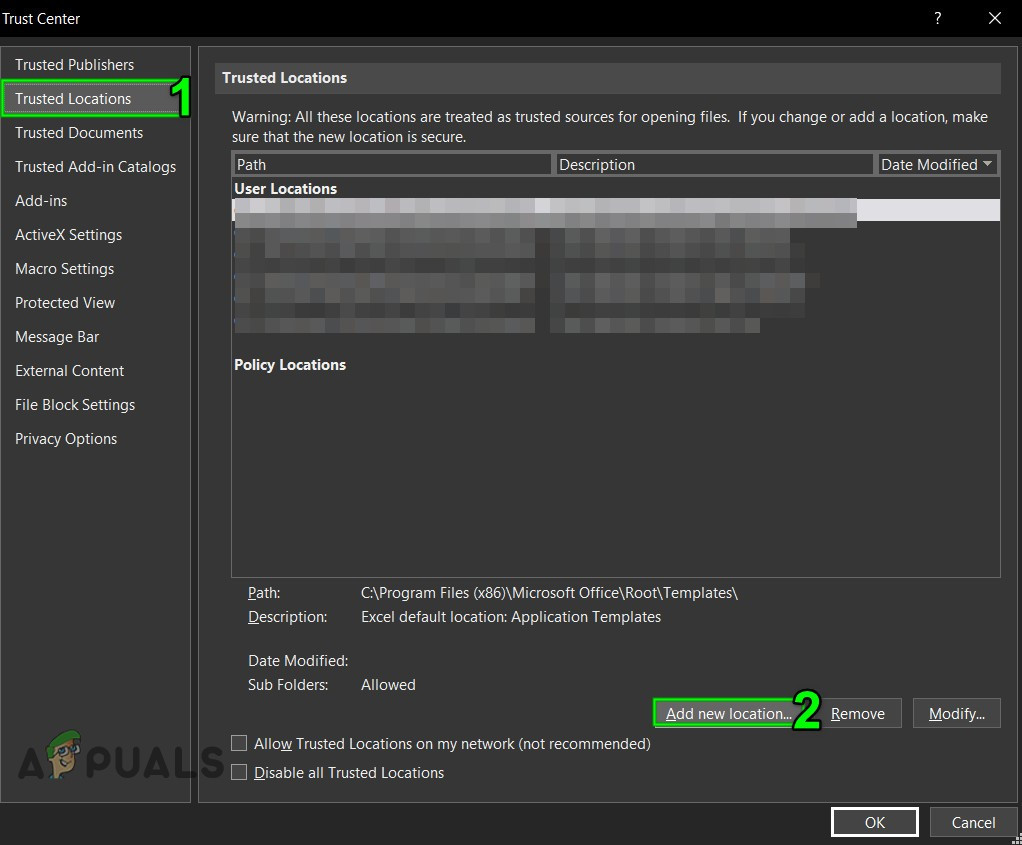
Trust Center Settings - Now click on the Trusted Locations and then click on Add New Location.

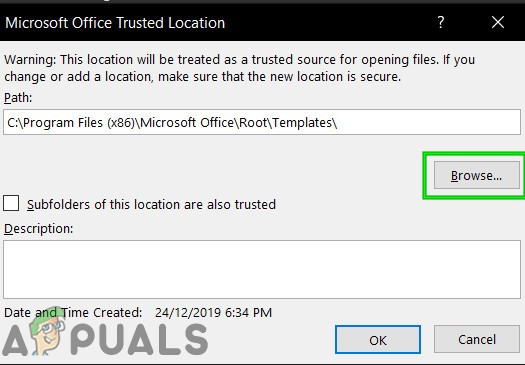
Add New Trusted Location - Now in the Trusted Location window, click on Browse.

Browse to Location - Now navigate to the location of the Excel file and then click Ok.
- Again, click Ok and once again click Ok.
- Now close the file and Excel and then Reopen the file and check if you can add new rows/columns to the sheet.
9. Use VBA to Force Used Range
If due to a glitch, Excel is not able to add new rows or columns and nothing has helped us so far, then it is time to get our hand dirty with some VBA. Do not worry! Steps are quite simple and straight forward.
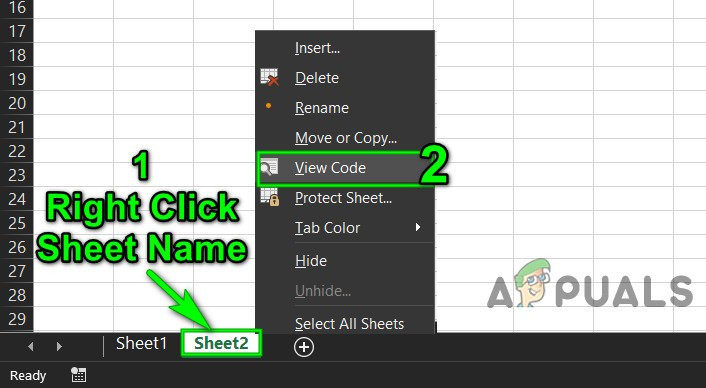
- Open the worksheet where you cannot add new rows/columns and then Right-click on the worksheet tab (name of the sheet at the bottom) and in the resulting menu click on View Code.

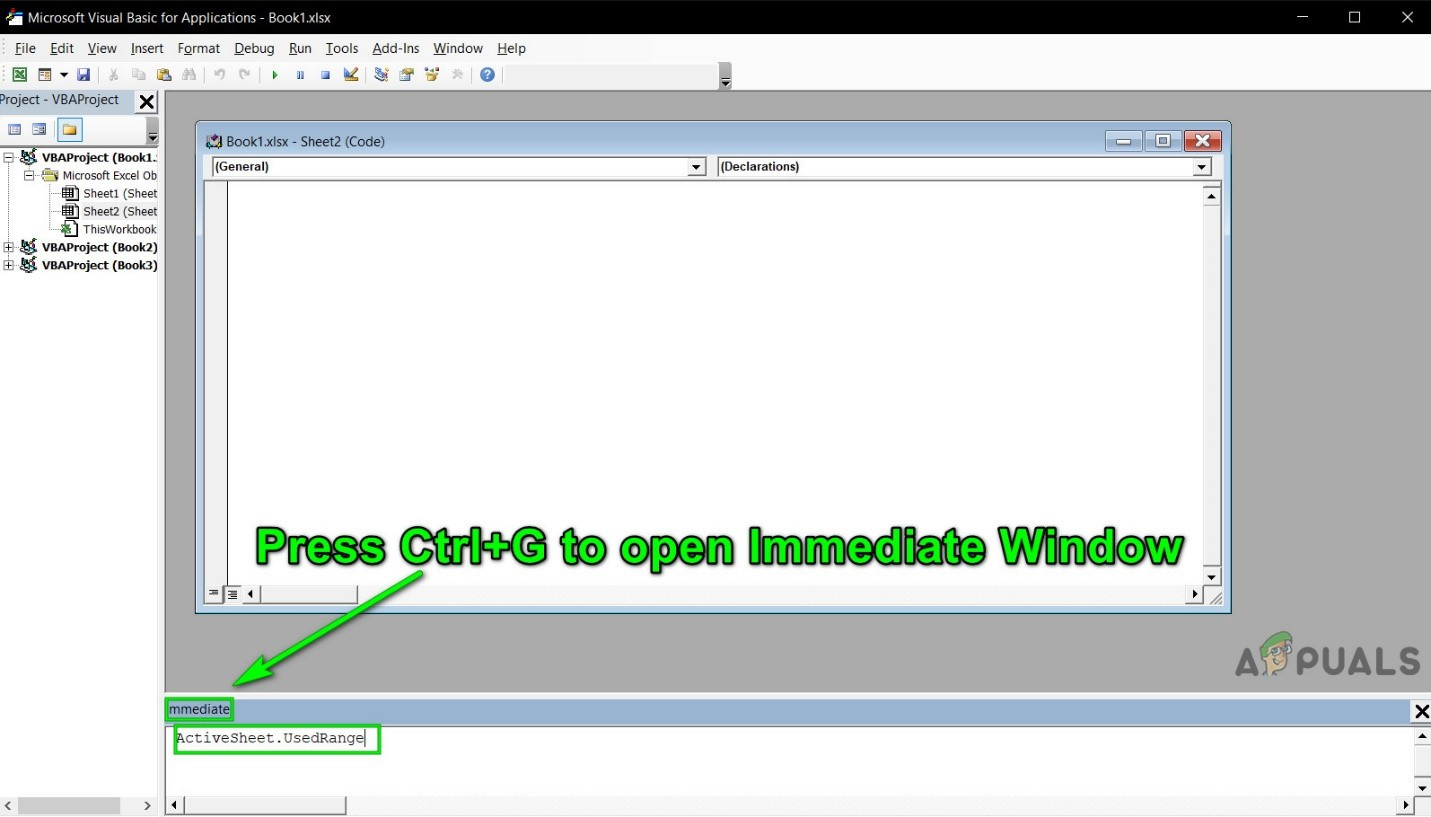
View Code after Right Click Excel Sheet Name - In VBA Editor, press Ctrl+G, which will show the Immediate window.
- In the Immediate window, type UsedRange and then press Enter.

Open Immediate Window - Although nothing will be shown after running the above command, it forces Excel to change the Used Range of the problematic worksheet to conform to just the area where the user data is.
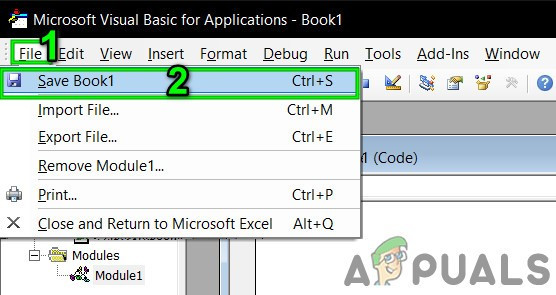
- Now click on File and then click on Close and Return to Microsoft Excel.

Save the VBA File - Save and close the file and Excel and then reopen the file and check if you can add new rows or columns to the file.
10. Copy to the New Sheet
If nothing has helped you, then most probably, the file you are editing is corrupt. In that case, copying data from this file to a new one is the solution left for us.
- Open the problematic sheet and select and copy your required data.
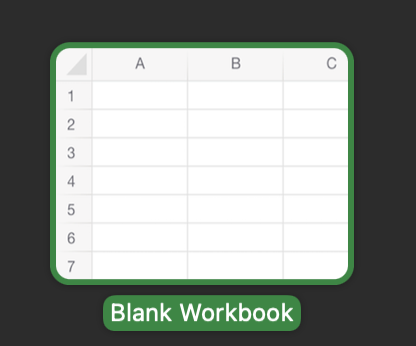
- Now click on the File tab and click on New and then click on Blank Worksheet.

Create New Blank Workbook - Now paste the copied data.
- Save and close the new file and reopen the new file and check if you can insert new rows/columns to the sheet.
11. Use the Office Online
If none of the above methods worked for you, then using Office Online may solve the problem as the problem may be due to some issue with your system.
- Open and log in to your OneDrive in an internet browser.
- Click on the Upload button and then click on files.

Upload File to OneDrive - Now navigate to and select your problematic Excel file and then click on Open.
- Now in OneDrive, click on your recently uploaded Excel file to open it in Excel Online.

Open Excel File in OneDrive - Now try to add new rows/columns to the file.
- If succeeded, then download the file and use it on your system


Kevin Arrows
Kevin Arrows is a highly experienced and knowledgeable technology specialist with over a decade of industry experience. He holds a Microsoft Certified Technology Specialist (MCTS) certification and has a deep passion for staying up-to-date on the latest tech developments. Kevin has written extensively on a wide range of tech-related topics, showcasing his expertise and knowledge in areas such as software development, cybersecurity, and cloud computing. His contributions to the tech field have been widely recognized and respected by his peers, and he is highly regarded for his ability to explain complex technical concepts in a clear and concise manner.
Download PC Repair Tool to quickly find & fix Windows errors automatically
Excel is one of the most extensively used applications of the Microsoft Suite, almost at par with Word and Excel. The app provides a wide range of uses, from managing your personal finance to creating professional models. This is done by imputing data on rows and columns of cells. Sometimes, though, you may face errors with these cells. A very common one is where Excel says that it cannot add or create any new cells, which can be a problem if you’re in the middle of developing a spreadsheet. In this article, we will be demonstrating how you can fix this error.
Below are some of the fixes you can implement if Microsoft Excel cannot Add or Create New Cells:
- Remove cell protection
- Unmerge the Rows
- Use the VBA to Force Used Range
- Clear content from unused rows and columns
- Unfreeze the panes
1] Remove cell protection
- Open Excel and press Ctrl+A to select all the cells. Now, click on the Format option under the Home tab, and from the drop-down, select Format Cells
- Here, under the Protection tab, uncheck the Locked box and save the change by clicking on Ok
- Then, visit the Review tab and click on the Protect Sheet option
- Enter the password to unprotect your spreadsheet and save these settings
2] Unmerge the Rows
Sometimes, it’s possible that users can merge rows and columns unintentionally and, in such cases, Excel may impose restrictions on adding new cells to the sheet. Thus, you can try unmerging rows and columns to solve the issue.
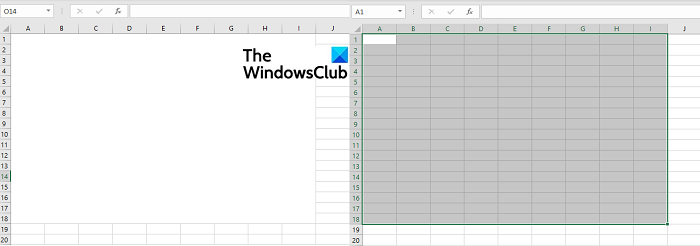
- Firstly, locate the set of rows and/or columns you’ve merged. Here, I have merged the first 18 rows and 9 columns into one cell
- Click on the merged cell and from under the Home tab, click on Merge and Center
- Repeat the process till you’ve unmerged all, or at least most of your merged cells, and check if you can add cells to the sheet thereafter
3] Use the VBA to Force Used Range

You can also use the Visual Basic Applications editor to restrict the used range of the spreadsheet that you’re facing the issue in only to the area where the data is spread out. Here’s how that can be done:
- On the bottom slab where all the active worksheets are tabbed, right-click on the problematic one and click on View Code
- Now, press Ctrl + G keys together to open the Immediate Window
- In the Immediate Window, type ‘ActiveSheet.UsedRange’ and press Enter
- There won’t be a visible change but there’s a good chance that the error will be rectified by this
4] Clear content from unused rows and columns

Although you may not be instantly aware of it, there may be cells that don’t hold any data but comprise some content like a different format or some borders. These cells may be taking up some space, thus not allowing Excel to add any more cells to your current spreadsheet. You can clear the content from these cells by following the steps below:
- Select the column to the right of the last column that holds any data in your spreadsheet. Then, press Ctrl + Shift + Right arrow key to highlight all the cells that don’t hold any data but you may have formatted in some way
- In the Home tab, click on the border menu, and from the drop-down select No Border
- Next to Borders is the option to fill colors. Click on its drop-down and select No Fill
- Remove all the data you may have unintentionally entered on your worksheet by pressing the Delete key
5] Unfreeze the panes
Freezing your spreadsheet into quarters or panes can help make referencing the data in it easier, but this may result in the error in question. Here’s how you can unfreeze panes.
- Click on the View tab from the top
- Open the Freeze Panes drop-down
- Select Unfreeze Panes
- Save your current work and then reopen to check if the issue has been resolved
It is highly unlikely for the issue to persist after implementing all of the aforementioned workarounds but in case it does, your best bet is to move all your data to a new spreadsheet.
How do you have multiple lines in an Excel cell?
It is possible to input multiple lines of data in one single Excel cell by following these simple steps:
- Select the cell you want to input data in
- Enter your first line
- Once done, press the Alt and Enter keys together. This will make space for a new line in the same cell
- Repeat the process if you want to add multiple lines to a cell.
How do I allow people to only edit certain cells in Excel?
If you want your spreadsheet to be only partly editable i.e., only some of its cells can be edited, you can do that by locking the portion of the spreadsheet that you don’t want to be messed around with. In order to do that, you simply have to select the cells that you want unchanged, press Ctrl+1 keys to open the Format cells dialog box and from the Protection tab, check the Locked box.
Hope this helps!

Shiwangi loves to dabble with and write about computers. Creating a System Restore Point first before installing new software, and being careful about any third-party offers while installing freeware is recommended.
Contents
- Why Can’t I Create New Cells in Excel on Windows 10?
- Any of the following factors can prevent the creation of new cells in Microsoft Excel:
- How to Fix “Cannot Add New Cells in Excel”
- Here are the solutions to the problem:
- Fix 1: Remove Cell Protection
- Fix 2: Unmerge the Rows/Columns
- Fix 3: Unfreeze the Panes
- Fix 4: Copy Your Data to a New Sheet
- Fix 5: Choose a Shorter File Path
- Fix 6: Change the File Format
- Fix 7: Format the Table as a Range
- Fix 8: Set the File Source as Trusted
- Fix 9: Clear the Formatting in Unused Rows/Columns
- Fix 10: Customize the Used Range Using VBA
- Fix 11: Use Office Online
![Microsoft Excel cannot add new cells [Fixed]](https://www.auslogics.com/en/articles/wp-content/uploads/2020/07/fix-excel-cant-add-new-cells.jpg)
While working on an Excel spreadsheet, you may run into the problem of not being able to add new cells. This issue is very common and can be easily resolved. Keep reading to find out how.
Why Can’t I Create New Cells in Excel on Windows 10?
In most cases, the supposed ‘problem’ serves the purpose of preventing the loss of data on your sheet. However, exceptions do exist, such as in the case of corrupt files or due to the file format you are using.
Any of the following factors can prevent the creation of new cells in Microsoft Excel:
- Cell protection: In Excel, there are different types of cell protection for your data. If you have one active, it could be the reason why you cannot create a new cell.
- Merged rows/columns: When you merge entire rows or columns to make a single cell, you won’t be able to insert a new row/column.
- Formatting applied to an entire row/column: You may have unintentionally formatted an entire row/column. This could be the cause of the problem you are facing.
- Freeze Panes: The Freeze Panes option helps facilitate data entry and management. However, it can prevent you from adding new cells.
- Entries in the last rows/columns: If you are trying to replace entries in the last row/column of the sheet, Excel will restrict the addition of new cells so as to avoid data loss.
- A data range formatted as a table: You may experience the problem in question when you try to add cells in a selected area that includes a table and a blank space.
- File format limitations: Different file formats are available in different versions of Excel. Each file format has its unique purpose and limitations. You may thus encounter a problem when trying to add new cells if you are using a file format with limited functionality.
- Files from untrusted sources: For your protection, Excel often prevents the execution of files from untrusted sources. It may well be that the error you are currently facing stems from the file itself.
Now that we have seen the various reasons why you can’t add a column or line in Microsoft Excel, let us now go ahead and dive into how to get the issue resolved.
How to Fix “Cannot Add New Cells in Excel”
Here are the solutions to the problem:
- Remove cell protection
- Unmerge the rows/columns
- Unfreeze the panes
- Copy your data to a new sheet
- Choose a shorter file path
- Change the file format
- Format the table as a range
- Set the file source as trusted
- Clear the formatting in unused rows/columns
- Customize the used range using VBA
- Use Office Online
By the time you have tried the solutions listed above, you are sure to get on with your work without further trouble. So let’s get started:
Fix 1: Remove Cell Protection
The cell protection functionality in Excel preserves the current state of your sheet or workbook by locking the cells so that your data can’t be wiped or edited. Therefore, if you have cell protection active, the creation of new cells will not be allowed in order to preserve your existing data. So all you have to do is deactivate the functionality. Follow these easy steps to get it done:
- Select all the cells on your worksheet by pressing Ctrl + A on your keyboard.
- On the Home tab, click the Format drop-down.
- Select Format Cells under Protection at the bottom of the menu.
- In the window that opens, click on the Protection tab and unmark the option that says ‘Locked.’
- Click OK.
- Now, go to the Review tab and click on Protect workbook or Protect Sheet.
- Enter your password to remove protection from the sheet or workbook.
- Press Ctrl + S to save your file. Close the window and then open it again. You can now try inserting a new row/column. See if it works.
Fix 2: Unmerge the Rows/Columns
As already mentioned, you may have merged an entire row or column rather than just a few cells. In this case, Excel is programmed to restrict the addition of new cells so as to keep your data from getting lost. Merging all the cells in a row prevents the addition of another column, and merging all the cells in a column prevents the addition of new rows. Unmerging the columns/rows can resolve the issue. Here’s what you should do:
- Look through your worksheet and locate the merged rows/columns.
- If it is a column that is merged, click the column header (for example A, B, C, etc.).
- Now, on the Home tab, click on Merge and Center to unmerge the highlighted column.
- Repeat Steps 2 and 3 for any other merged column(s).
- If there is any merged row, click on the row header (for example 1, 2, 3, etc.) and then click Merge and Center displayed in the Home tab.
- Press Ctrl + S on your keyboard to save your file. Close the workbook and then open it again. You can now check whether the issue in question has been resolved.
Fix 3: Unfreeze the Panes
The Freeze Panes feature makes referencing easier by keeping a selected area of your worksheet visible as you scroll to other areas of the worksheet. However, the functionality can prevent the addition of new rows or columns to the sheet. Follow these steps to unfreeze the frozen panes:
- Go to the View tab.
- Click the Freeze Panes drop-down.
- Select Unfreeze Panes from the menu.
- Save your file by pressing Ctrl + S and then close it.
- Reopen the file and see if the problem has been fixed.
Fix 4: Copy Your Data to a New Sheet
It could well be that the file you are working with is corrupt. Thus, try copying your data to a new file. Here’s how:
- Open the sheet you are having problems with.
- Press Ctrl + A to select your data and then press Ctrl + C to copy it.
- Go to the File tab.
- Click on New and select Blank Workbook.
- Click Create.
- Click the Paste drop-down arrow in the Home tab.
- Click ‘Paste Special…’
- Click on ‘Values’ and then click OK.
- Save the new file and then close it. Reopen the file and check whether the problem you are facing has been resolved.
Fix 5: Choose a Shorter File Path
The address of your file in your OS is referred to as the file’s path. When it is too long, it could prevent the creation of new cells. Save the file in a location where the file path will be shorter. Follow these steps:
- Open the file you are having trouble with.
- Click on the File tab and select Save as.
- In the dialogue box that opens, select Desktop as the location for the file to be saved and then click the Save button.
- Close the workbook.
- Open the newly saved file and check whether the problem you were facing will occur again.
Fix 6: Change the File Format
The file format you are using may be the cause of the error. Using a different format may help resolve the issue. For instance, you can switch from XLSM to CSV, XLS, or XLSX. Let’s take a look at how to do that:
- Open the file you are having trouble with.
- Go to the File tab and click on Save as.
- In the Save as dialogue box that opens, expand the ‘Save as type:’ drop-down and choose a different file format. For instance, you can choose XLS if CSV is the current format.
- Click the Save button.
- Close the workbook.
- Reopen the newly saved file and see if the issue has been resolved.
Fix 7: Format the Table as a Range
Although Excel supports the creation of tables, in some cases, tables can cause the problem of not being able to add or delete rows/columns in a worksheet. When that happens, try converting the table to a range. Follow these easy steps to do so:
- Click on any area in the table you created.
- Go to Design, which is under Table Tools, and click on Convert to Range.
- Press Ctrl + S on your keyboard to save the file.
- Close the file and reopen it.
- Check whether you can now successfully create a new cell.
Fix 8: Set the File Source as Trusted
Excel is programmed not to support the execution of files from untrusted sources. This built-in functionality is meant to enhance your security and display an error message when you try to create new rows/columns in a sheet. The solution available to you is to set the location of the file as trusted. Here’s how:
- Open the file you are having problems with.
- Go to the File tab and click on Options.
- Click on Trust Center. It is the last item in the left-hand pane of the Excel Options page.
- Click on ‘Trust Center Settings…’ displayed on the right-hand side of the page.
- In the left-hand pane of the new page that opens, click on Trusted Locations.
- Now click the “Add new location…” button displayed on the right-hand side of the page. You will now be presented with the Microsoft Office Trusted Location window.
- Click the ‘Browse…’ button and then navigate to the location where your Excel file is saved.
- Click OK.
- Click OK and then click OK once again.
- Close Excel and then reopen the file you were having problems with. See if you can now add new cells to the sheet.
Fix 9: Clear the Formatting in Unused Rows/Columns
Does it seem that you have no content in the last row/column of your worksheet? That may not be the case. If you have highlighted the entire row/column by clicking the header and then applied some formatting (for example, introduced color or cell borders), Excel will assume that there’s content in the row/column and will therefore prevent you from creating new cells so as to prevent the loss of data. You can fix this by clearing the formatting in the entire row/column.
To insert a new column, here’s what you have to do:
- Open the problematic file.
- Go to the column on the right-hand side of the last column that contains data in your sheet. Click the header to highlight the entire column and then press Shift + Ctrl + Right Arrow on your keyboard. This will highlight all the columns that do not contain data on your sheet but may have formatting.
- In the Home tab, under Font, click the drop-down arrow to reveal the Borders menu.
- Select ‘No Border.’
- While still under Font in the Home tab, click the drop-down arrow for Theme Colors and then select ‘No fill.’
- Press the Delete key on your keyboard to wipe any data that you may have mistakenly entered in the unused cells.
- Now, under the Editing category in the Home tab, click the Clear drop-down arrow and select Clear Formats.
- Click the Clear drop-down arrow again and select Clear All.
- Click Ctrl + S on your keyboard to save the file.
- Close Excel and then reopen the file.
To insert a new row, here’s what you have to do:
- Open the sheet you are having problems with.
- Go to the row next to the last row that contains data. Click the header to highlight it and then press Shift + Ctrl + Down Arrow to highlight all the unused rows right to the end of the sheet.
- In the Home tab, under Font, click the drop-down arrow to reveal the Borders menu.
- Select ‘No Border.’
- While still under Font in the Home tab, click the drop-down arrow for Theme Colors and then select ‘No fill.’
- Press the Delete key on your keyboard to wipe any data that you may have mistakenly entered in the unused cells.
- Now, under the Editing category in the Home tab, click the Clear drop-down arrow and select Clear Formats.
- Click the Clear drop-down arrow again and select Clear All.
- Click Ctrl + S on your keyboard to save the file.
- Close Excel and then reopen the file. See if you can now insert a new row.
There’s a suggestion that one should not use the Ctrl + V shortcut to paste data into an Excel sheet as that might cause a number of problems, including not being able to add new rows/columns. Instead, use this method:
- Click the Paste drop-down arrow in the Home tab.
- Click ‘Paste Special…’
- Click on ‘Values’ and then click OK.
Fix 10: Customize the Used Range Using VBA
Don’t lose heart if you have come this far and you are still unable to create new rows/columns on your Excel worksheet. VBA (Visual Basic for Applications) is Excel’s (and other Microsoft Office programs’) programming language. We can use it to solve the issue you are currently facing. Simply follow these easy steps:
- Open the problematic file.
- Right-click on the worksheet tab at the bottom of the screen (for example Sheet 1).
- Click on View Code from the context menu.
- In the page that opens, press Ctrl + G on your keyboard to display the ‘Immediate’ window.
- Now type ‘ActiveSheet.UsedRange’ (don’t include the inverted commas) and press Enter. This ensures that the used range of your worksheet will lie only within the area where your data is.
- Now, click on the File tab and select ‘Close and Return to Microsoft Excel.’
- Press Ctrl + S to save the file. Close Excel and then reopen the file. Check whether you can now add new columns or rows.
Fix 11: Use Office Online
If the problem persists after you’ve tried all the above fixes, there’s one more option left. It could be that there is an issue with your system. You can use Office Online to get rid of the setback you are facing. Follow these easy steps:
- Go to your browser and log in to OneDrive.
- Click the Upload button.
- Click on Files.
- Navigate to the location where your problematic Excel file is stored.
- Select the file.
- Click Open.
- Try adding new rows/columns to the sheet.
- If successful, you can then download the file to your system.
There you have it. By the time you’ve tried these fixes, you will have succeeded in fixing the ‘Microsoft Excel Cannot Add New Cells’ problem.
If you have any further suggestions, questions, or comments, please feel free to leave them in the comments section below. We’ll be glad to hear from you.
To ensure that you don’t run into unnecessary problems while trying to complete important tasks on your PC, we recommend you run regular scans with a trusted antivirus program. Get Auslogics Anti-Malware today and be rest assured that your system is in good hands.
Avoid pasting content with Ctrl + V in the future
by Teodor Nechita
Eager to help those in need, Teodor writes articles daily on subjects regarding Windows, Xbox, and all things tech-related. When not working, you may usually find him either… read more
Updated on August 31, 2022
Reviewed by
Vlad Turiceanu

Passionate about technology, Windows, and everything that has a power button, he spent most of his time developing new skills and learning more about the tech world. Coming… read more
- Microsoft Excel users sometimes get the Can’t insert new cells error.
- The error message appears when you copy-paste content with formatting to your Excel file.
- The Can’t insert new cells error appears when you have an entire row merged in your sheet.
- We will show you how to easily fix this error and avoid it in the future.

The Microsoft Office Suite is a host of programs that covers pretty much all of the most basic needs you may have when working in an office environment.
You have your dedicated program that handles text documents, another program that does presentations, etc.
You even have a program specially made to act like a spreadsheet, called Microsoft Excel, which can handle information that spans hundreds of cells of data.
However, some users have reported that sometimes they get an error message in Microsoft Excel where it states that the program cannot add any more cells.
Just FYI, I had the same problem occur when trying to insert a column. […]
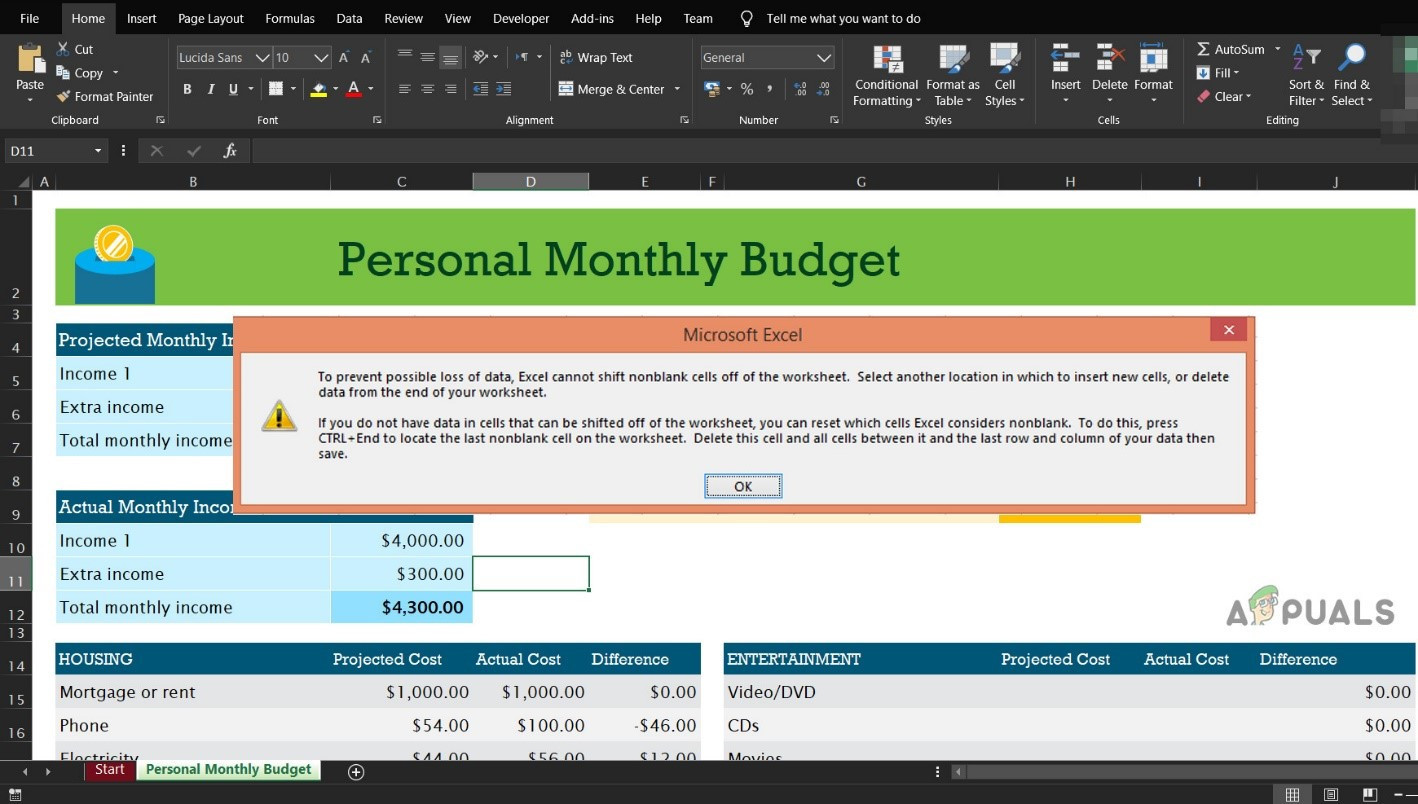
The full error message I was getting was:
Microsoft Excel can’t insert new cells because it would push non-empty cells off the end of the worksheet. These cells might appear empty but have blank values, some formatting, or a formula. Delete enough rows or columns to make room for what you want to insert and then try again.
What causes Excel can’t add any new cells error?
Thankfully, unlike many other messages that you would normally receive, this one pretty much comes with an explanation as to why it is happening.
This Excel error message happens when you have an entire row merged. This means that when inserted the content in the workbook (most probably via Copy/ Paste), you somehow have added content on the last row of the sheet.
How to fix the Microsoft Excel can’t insert new cells error
Because this Excel error happens when you have a merged row, you will need to clear that content before you can add new rows. You do not have to delete the data in the cells, but rather the formatting you may have copied along with the values.
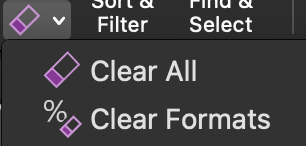
1. Select all the data that was copied.
2. Find the Clear tool on the toolbar.
3. Open the drop-down menu and select Clear Formats.
4. After following these steps, you should be able to insert data without any further issues.
5. More so, to avoid any similar problems in the future, do not paste data in a spreadsheet using Ctrl + V.
- Microsoft Excel is trying to recover your information error
- Microsoft Excel is waiting for another application to complete ole action
- FIX: Not enough memory error in Microsoft Excel
What is the alternative to pasting data with Ctrl + V?
- Right-click on an open area of the spreadsheet
- Select Paste Special
- Select Values
- Press OK
By following all of the steps mentioned above, you should be able to insert cells in an Excel worksheet without any more issues.
If you have any other suggestions or questions, don’t hesitate to leave them in the comments section below.
Still having issues? Fix them with this tool:
SPONSORED
If the advices above haven’t solved your issue, your PC may experience deeper Windows problems. We recommend downloading this PC Repair tool (rated Great on TrustPilot.com) to easily address them. After installation, simply click the Start Scan button and then press on Repair All.
![]()
Newsletter
This tutorial solves a problem where Excel won’t allow you to insert new rows or columns in a worksheet. When you try this, Excel displays the message “Microsoft Excel can’t insert new cells because it would push non-empty cells off the end of the worksheet. Those non-empty cells might appear empty but have blank values, some formatting or a formula. Delete enough rows or columns to make room for what you want to insert and then try again.”
5 FREE EXCEL TEMPLATES
Plus Get 30% off any Purchase in the Simple Sheets Catalogue!
METHOD 1: Clear Last Row or Column
The most probable reason you are getting this message is that in the last row or column of your worksheet, there is either formatting, data or a formula. This might not be easy to spot, but by following the instructions below you can easily clear the offending cells.
A quick way to navigate to the last column in your worksheet is to:
- Click somewhere in the first empty column in your worksheet (to the right of any data)
- Use the key combination CTRL ⇒ (CTRL and the right-arrow key)
A quick way to navigate to the last row in your worksheet is to:
- Click somewhere in the first empty row in your worksheet (below any data)
- Use the key combination CTRL ⇓ (CTRL and the down-arrow key)
If you can see either data, a formula or formatting in the last row or column, this is probably where the problem lies.
Here is a fairly reliable way to clear all cells to the right of or below your data (including the last column and row):
- Select the whole of the first empty column in your worksheet (to the right of any data). You can quickly select the whole column by clicking on the column letter that appears at the top of the worksheet
- Use the key combination CTRL SHIFT ⇒ to select all columns to the right
- On the ribbon’s Home tab, in the Editing group, click the Clear button and then Clear All
- Now select the first empty row in your worksheet (below your data). You can quickly select the whole row by clicking on the row number that appears on the left of your worksheet
- Use the key combination CTRL SHIFT ⇓ to select all rows below
- On the ribbon’s Home tab, in the Editing group, click the Clear button and then Clear All
Once you have completed these steps, try inserting a row or column. You may get a warning message titled ‘Large Operation’. The warning indicates that inserting new cells may take a significant amount of time to complete. You can ignore the warning and click on OK.
METHOD 2: Copy to a New Worksheet
If the method above does not work, try this method:
- Create a new worksheet in your workbook
- Copy and paste your data into the new worksheet
- Insert the new column or row in the copy of your data
- Copy the copy of the data that now includes a new row or column
- Navigate back to the original worksheet
- Select the top left cell of the data that you originally copied
- Paste
You will need to repeat these steps for each column or row you need to insert.
METHOD 3: Clear the ‘Used Range’
If method 1 and 2 fail, Try method 3.
Method 3 requires you to reset the ‘used range’ in your worksheet. To do this:
- Use the key combination ALT F11 to open the Visual Basic Editor (VBE)
- Use the key combination CTRL G to open the Immediate window. The Immediate window appears near the bottom of the VBE with the title ‘Immediate’
- In the Immediate window type the following code: activesheet.usedrange.select
- Press ENTER on your keyboard
- Use the key combination ALT Q to close the VBE
- Now try inserting a new column or row in your worksheet
Приложение Microsoft Excel популярно среди офисных работников благодаря своим простым и расширенным функциям. Вы можете использовать его для множества задач, таких как составление отчета о бюджете, отчета о расходах и упорядоченного размещения большого количества данных.
Но пользователи жаловались, что не могут вставлять новые ячейки в Microsoft Excel. Если вы столкнулись с той же проблемой с Excel, не волнуйтесь. В этой статье мы собираемся обсудить различные решения для решения проблемы Excel не может добавить новые ячейки.

Оглавление
- 1 Почему Microsoft Excel не может добавлять новые ячейки?
-
2 Как решить проблему Excel не может добавить новые ячейки?
- 2.1 Решение 1. Разъединение строк / столбцов
- 2.2 Решение 2. Отключите защиту ячеек
- 2.3 Решение 3: разморозить панели
- 2.4 Решение 4. Создайте копию на новом листе
- 2.5 Решение 5. Изменение формата файла
- 2.6 Решение 6. Измените путь к файлу
- 2.7 Решение 7. Преобразование таблицы в диапазон
- 2.8 Решение 8. Используйте VBA (Visual Basic для приложений)
- 2.9 Решение 9. Используйте онлайн-офис
- 2.10 Решение 10. Надежный источник файла
- 2.11 Решение 11. Очистите неиспользуемую строку / столбец
Почему Microsoft Excel не может добавлять новые ячейки?
В сообщении об ошибке Microsoft Excel объясняет, что если вы добавляете новые ячейки, непустые ячейки выталкиваются с конца рабочего листа. Тогда эти ячейки могут показаться пустыми, но будут иметь пустые значения, некоторое форматирование или формулу. Но за этой проблемой могут быть и другие проблемы, такие как:
- Защита ячейки включена.
- Неосознанно вы отформатировали всю строку или столбец
- Путь к файлу слишком длинный
- Объединенные строки / столбцы
- Функция заморозить панель активна
- Вы поместили данные в последнюю строку / столбец
- Формат файла не принимается
- Excel предполагает, что ваш файл не из надежного источника.
Как решить проблему Excel не может добавить новые ячейки?
Решение 1. Разъединение строк / столбцов
Если вы объединили все ячейки в строке, вы не сможете создать еще один столбец. Точно так же, если вы объединили все ячейки в столбце, вы не сможете создать другую строку. Чтобы решить эту проблему, вам необходимо разделить строки / столбцы.
- Проверьте свой рабочий лист и найдите объединенные строки / столбцы.
- Для объединенного столбца выберите столбецзаголовок. И нажмите на Слияние и центр на вкладке «Главная».
- Вам необходимо повторить этот шаг, если у вас более одного объединенного столбца.
- Для объединенной строки выберите заголовок строки. И нажмите на Слияние и центр на вкладке «Главная».
- Повторите вышеуказанный шаг для других объединенных строк.
- Нажмите Ctrl + S.
- Сохраните ваш файл.
- Снова откройте книгу, чтобы проверить наличие ошибки.
Решение 2. Отключите защиту ячеек
Защита сотовой связи необходима для обеспечения безопасности ваших данных. Но если вы хотите добавить новые ячейки, вам нужно отключить функцию защиты ячеек. Вот краткое руководство по отключению защиты ячеек.
- Нажмите Ctrl + A, чтобы выбрать все ячейки в книге.
- Выберите Формат вариант присутствует на Главная
- Под Защита вкладку, нажмите на Формат ячеек параметры.
- Затем выберите Защита таб.
- Снимите флажок «Заблокировано“.
- Нажмите Войти.
- Нажми на Обзор вкладка и выберите Защитить книгу или защитить лист.
- Вы должны ввести свой пароль, чтобы снять защиту с книги.
- Нажмите Ctrl + S.
- Сохраните файлы и закройте окно.
- Снова откройте Excel, чтобы вставить новую строку / столбец.
Решение 3: разморозить панели
Функция Freeze pane позволяет сохранять выбранную область видимой во время прокрутки других областей. Но это мешает создавать новые клетки. Чтобы решить эту проблему, вам просто нужно разморозить панель.
- Выбрать Вкладка «Просмотр».
- Нажми на Замерзшие оконные стекла.
- Вы найдете опцию «Разморозить стекла»В раскрывающемся меню.
- Нажми на Разморозить стекла вариант.
- Теперь сохраните файл и закройте окно Excel.
- Затем снова откройте файл и посмотрите, сможете ли вы снова добавить новые ячейки.
Решение 4. Создайте копию на новом листе
Возможно, файл, над которым вы работаете, поврежден. Чтобы решить эту проблему, вам необходимо выполнить следующие шаги и создать копию файла на новом листе.
- Нажмите Ctrl + A чтобы выбрать все ваши данные, затем нажмите Ctrl + C скопировать это.
- Откройте вкладку «Файл» и выберите «Новый»И выберите Пустая книга.
- Выберите Создайте кнопка.
- Когда вы используете обычный метод копирования и вставки, данные попадают в ненужные строки / столбцы, что впоследствии создает проблемы.
- Так что используйте вместо этого этот метод. На вкладке «Главная» выберите «Вставить»Вариант.
- Выбрать «Специальная вставка“
- Нажмите на «Ценности, », А затем нажмите«в порядке.”
- Теперь сохраните новый файл.
- Закройте окно Excel.
- Откройте новый файл и посмотрите, можете ли вы добавить сюда новые ячейки.
Решение 5. Изменение формата файла
Иногда ваш формат файла не поддерживается Excel. Чтобы решить эту проблему, вы можете изменить формат файла на другой. Выполните следующие действия, чтобы изменить формат файла.
- Нажми на файл вкладка и выберите «Сохранить как»Вариант.
- Затем разверните значок «Сохранить как тип:“
- Выберите формат файла, отличный от исходного формата файла. (Например, текущий формат — переключение CSV на XLS)
- Выбрать «Сохранить“
- Выйдите из окна Excel и снова откройте его, чтобы проверить, решена ли проблема.
Решение 6. Измените путь к файлу
Когда путь к файлу слишком длинный, для файла трудно создавать новые ячейки. Расположение вашего файла называется путем к файлу. Чтобы решить проблему с новыми ячейками, вы можете изменить путь к файлу, изменив местоположение вашего файла.
- Нажми на файл таб.
- Выбрать «Сохранить как»Вариант.
- Когда откроется диалоговое окно, установите Рабочий стол в качестве места для файла.
- Выберите «Сохранить».
- Выйдите из окна Excel.
- Откройте вновь обнаруженный файл в Excel и проверьте, можете ли вы добавить новые ячейки.
Решение 7. Преобразование таблицы в диапазон
Иногда, когда вы используете таблицу в Excel, вы не можете добавлять или удалять строки / столбцы. В этом случае вам необходимо преобразовать таблицу в диапазон и устранить проблему.
- Сначала вам нужно щелкнуть в любом месте таблицы.
- выберите дизайн в Настольные инструменты.
- Нажмите «Преобразовать в диапазон»В группе« Инструменты ».
- Затем сохраните файл. И закрой окно.
- Откройте его снова, чтобы проверить, можете ли вы на этот раз добавить новые ячейки.
Решение 8. Используйте VBA (Visual Basic для приложений)
VBA — это язык программирования для таких приложений, как Excel. Если у вас по-прежнему возникают проблемы с созданием новых ячеек, вы можете использовать VBA для решения проблемы. Следуй этим шагам.
- Во-первых, откройте проблемный лист.
- Щелкните правой кнопкой мыши вкладку рабочего листа.
- Нажми на Просмотреть код вариант.
- Вы должны нажать Ctrl + G отображать Немедленно окно на следующей странице.
- Тип «ActiveSheet. UsedRange»И нажмите Войти.
- Выберите файл таб.
- Затем вам нужно нажать на «Закройте и вернитесь в Microsoft Excel“
- Сейчас, Сохранить файл. Закройте файл Excel, затем снова откройте файл, чтобы проверить, можете ли вы добавить строку / столбец.
Решение 9. Используйте онлайн-офис
Если вы обнаружите проблемы с офлайн-версией Office, вы можете переключиться на онлайн-версию. Вы можете добавить новые ячейки в файл Excel с помощью онлайн-офиса, а затем загрузить его в свою систему.
- Сначала войдите в свой Учетная запись OneDrive.
- Выберите Загрузить кнопку, а затем выберите Файлы.
- Перейдите в папку с файлом, который хотите загрузить.
- Щелкните файл, затем щелкните открыто.
- Добавьте новые строки / столбцы.
- Затем загрузите файл Excel в свою систему.
Решение 10. Надежный источник файла
Excel создает защитную среду, разрешая файлы только из надежных источников. Возможно, Excel блокирует добавление новых строк / столбцов в ваш файл, утверждая, что файл не из надежного источника. Чтобы этого избежать, вы должны указать расположение файла в качестве надежного.
- Сначала откройте проблемный файл в Excel.
- Выберите «файлВкладка и выберите «Параметры“.
- После Страница параметров Excel открывается, выберите Центр доверия.
- Выберите «Настройки центра управления безопасностью»На правой панели.
- Затем на левой панели выберите Надежные места
- Нажми на «Добавить новое место»Вариант.
- Откроется окно с Надежное расположение Microsoft Office.
- Выберите «Просматривать»И перейдите в папку с файлом Excel.
- Нажмите «в порядке“.
- Нажмите «в порядке»И снова нажмите«В ПОРЯДКЕ»
- Затем закройте Excel.
- После этого снова откройте его, чтобы проверить, можете ли вы добавить новые ячейки.
Решение 11. Очистите неиспользуемую строку / столбец
Иногда пользователи выбирают / выделяют заголовок строки или столбца, чтобы добавить границу или цвет. Если вы ошибочно отформатировали (добавили границу или цвет) всю строку / столбец, Excel предполагает, что там присутствуют некоторые данные. Таким образом, он предотвращает добавление новых ячеек в строку / столбец. Чтобы предотвратить эту проблему, необходимо очистить всю строку / столбец.
Для столбца:
- Откройте проблемную книгу и перейдите к столбцу рядом с последним столбцом, в котором есть данные.
- Затем щелкните заголовок (чтобы выделить весь столбец) и нажмите Shift + Ctrl + стрелка вправо чтобы выделить все столбцы с форматированием.
- Теперь в Главная вкладка, вы найдете Границы меню под Шрифт.
- Выберите «Без границ“
- Затем щелкните стрелку раскрывающегося списка для Цвета темы.
- Выберите «Без заливки“.
- Вы также можете нажать кнопку «удалять», Чтобы стереть данные, ошибочно присутствующие в неиспользуемых ячейках.
- Перейти к Редактирование категория.
- Расширяя «ОчиститьВариант, выберите «Очистить форматы“.
- Затем снова нажмите на Очистить стрелка раскрывающегося списка, чтобы выбрать «Очистить все“.
- Сохраните изменения, которые вы внесли в свою книгу.
- Закройте окно Excel, а затем снова откройте его, чтобы проверить, можете ли вы добавить новые столбцы.
Для строки:
- Откройте проблемную книгу и перейдите к строке рядом с последней строкой, в которой есть данные.
- Затем щелкните заголовок (чтобы выделить всю строку) и нажмите Shift + Ctrl + стрелка вниз чтобы выделить все неиспользуемые строки до конца листа.
- Теперь в Главная вкладка, вы найдете Границы меню под Шрифт.
- Выберите «Без границ“
- Затем щелкните стрелку раскрывающегося списка для Цвета темы.
- Выберите «Без заливки“.
- Вы также можете нажать кнопку «удалять», Чтобы стереть данные, ошибочно присутствующие в неиспользуемых ячейках.
- Перейти к Категория редактирования.
- Расширяя «ОчиститьВариант, выберите «Очистить форматы“.
- Затем снова нажмите на Очистить стрелка раскрывающегося списка, чтобы выбрать «Очистить все“.
- Сохраните изменения, которые вы внесли в свою книгу.
- Закройте окно Excel, а затем снова откройте его, чтобы проверить, можете ли вы добавить новые строки.
При использовании Excel многие пользователи сталкиваются с проблемой невозможности добавления новых ячеек в книгу. У этой проблемы очень много причин. Но не волнуйтесь, потому что мы рассмотрели их все.
Хотя Excel является наиболее часто используемым приложением для создания электронных таблиц, время от времени оно может показывать некоторые ошибки. Пройдя через все решения, вы сможете найти лучшее решение для добавления новых ячеек в Excel. Мы надеемся, что эта статья позволила вам узнать больше об Excel. Если у вас есть какие-либо вопросы или отзывы, напишите комментарий в поле для комментариев ниже.
Please click here for our new and improved resource covering how to fix this Excel error.
Excel spreadsheets have become larger over time when it comes to entering data. An Excel sheet has 16,384 columns and 1,048,576 rows where you can add data. However, despite this, people still manage to fill the sheet up with enormous amounts of data, so much so that Excel physically can’t add any more cells in the worksheet — upon the addition of new cells the error “Microsoft Excel can’t insert new cells because it would push non-empty cells off the end of the worksheet” will show, inhibiting your ability to add new cells to the sheet.
However that may not always be the case — cells that appear visually empty may still have some bits of data still within; you need to clear the cells of this data before you could add more in.
In this blog, we will be looking at solutions to help users resolve the error “Microsoft Excel can’t insert new cells because it would push non-empty cells off the end of the worksheet” and find possible solutions to help prevent the error from occurring again.
- Firstly, open the sheet the sheet that shows this error.
- Than ensure there is content in cell A1.
- After that click on cell “B1”.
- Now click on “CTRL + SHIFT + RIGHT” or “CMD + SHIFT + RIGHT”.
- Now select the column “XFD” (last column on the sheet).
- Now go to the “Home” tab.
- From the “Clear” dropdown, select “Clear Formats”.
- Now select the cell “XFD1”.
- Now click on “CTRL + SHIFT + LEFT” or “CMD + SHIFT + LEFT”.
- Finally, test the fix by inserting a new column.
What this process does is remove all the formatting from cells towards the end which make way for new columns to take their place. This process can be replication for rows; if row 1,048,576 has some content or even formats, you can use the process above however this time to go to cell 1,048,576 — you will need to click on “CTRL + SHIFT + DOWN” or “CMD + SHIFT + DOWN”.
  |
|
 Compatible with Windows, Mac OS, and Android. Compatible with Windows, Mac OS, and Android. |
FROM $6.00 user/month |
What is Conditional Formatting, and how does it help to insert new cells in Excel?
You may have noticed we stated conditional formatting in cells to be a cause for this particular error to form. You need to remove conditional formatting from cells in order to make them fully empty so Excel sheets will accept a new row or column. In Excel, conditional formatting is a tool that allows you to apply particular formatting to cells that satisfy certain conditions. It’s most commonly used to highlight, emphasise, or distinguish facts and information in a spreadsheet using colour-based formatting.
Users of spreadsheets may accomplish a variety of things with conditional formatting. First and foremost, it highlights critical information such as deadlines, high-risk assignments, and budget items. It may also break up a wall of statistics with a visual organising component, making big data sets more consumable. Finally, conditional formatting may turn your spreadsheet (which was previously simply used to store data) into a reliable “alert” system that emphasises important facts and keeps you on top of your task.


If-Then Thinking
All conditional formatting rules are based on basic if-then logic: if X requirements are met, Y formatting is applied (commonly expressed as p q, or if p is met, apply q). However, you won’t have to hard-code any logic – You may choose the conditions you want the rules to fulfil using the built-in parameters in Excel and other spreadsheet programmes. Advanced users can utilise the built-in formulae in the software to create logic rules.
Conditions that have been set
Excel includes a large library of pre-programmed rules that cover virtually all of the tasks that novice users would need. In the next part, we’ll go through a few of the more common ones.
Application of multiple conditions
Multiple rules can be applied to a single cell or a group of cells. However, keep in mind rule hierarchy and precedence; throughout the walk-through, we’ll show you how to manage stacked rules.
Overall, conditional formatting is a simple method to keep you and your team informed about your data. For example, highlighting significant dates and deadlines, projects and assignments, financial limitations, and anything else you want to draw attention to visually. Conditional formatting, when used appropriately, will increase your productivity by decreasing time spent manually integrating data and making it simpler to detect trends, allowing you to focus on the major choices.
Step by step process – How to fix Excel error “Microsoft Excel can’t insert new cells because it would push non-empty cells off the end of the worksheet”

Step by step breakdown
- Firstly, open the sheet the sheet that shows this error.
- Than ensure there is content in cell A1.
- After that click on cell “B1”.

- Now click on “CTRL + SHIFT + RIGHT” or “CMD + SHIFT + RIGHT”.
![]()
- Now select the column “XFD” (last column on the sheet).

- Now go to the “Home” tab.
- From the “Clear” dropdown, select “Clear Formats”.
- Now select the cell “XFD1”.
- Now click on “CTRL + SHIFT + LEFT” or “CMD + SHIFT + LEFT”.

- Finally, test the fix by inserting a new column.
That’s it for this Blog thank you for taking time out to read our content, please feel free to email our team about how it went if you followed the steps or if you need more help with the questions we answered in this Blog.