
Table Properties are used to change or set table options in Microsoft Word or Outlook. The Table Properties are used to control different table options. In the Table Properties, dialog box users can change Table, Column, Row, and Cell settings.
How do I open the Table Properties dialog box in Word?
To open the Properties dialog box is easy to open. This tutorial will discuss opening the Table Properties dialog box to modify the table to your desired look.
What Type of settings is in the Table Properties dialog box?
In the Table Properties dialog box, there are several settings, such as:
- Table: This is used to apply settings to your entire table.
- Row: changes the settings for the rows of the table.
- Column: changes the settings of the columns of the table.
- Cell: change settings for the cells of the table.
- Alt-Text: creates alternative text, especially for people with poor visions or cognitive impairments who cannot see or understand the object.
To display and modify table properties in Microsoft Word, follow the steps below.
- Launch Word
- Create Table Properties
- Create Row Properties
- Create Column Properties
- Create Cell Properties
- Create Alt-Text.
1] Table Properties
Launch Microsoft Word.
Create a table or use an existing table

Right-click the table in the document and select Table Properties from the context menu.
A Table Properties dialog box will appear.
You can change the Table, Row, Column, Cell, and Alt-text settings in the Table Properties dialog box by clicking their tabs.
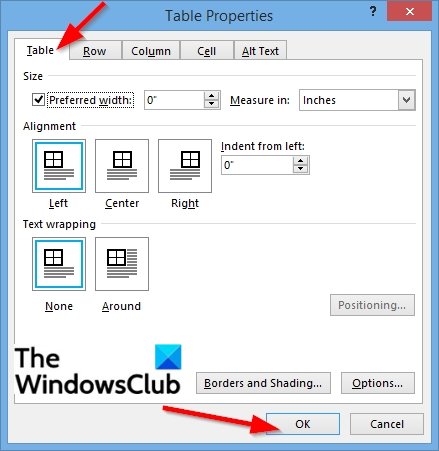
We will discuss the Table tab.
You can set the overall table width on the table settings by clicking the checkbox for Preferred width and choosing a size from the box by clicking the arrows within the box.
In the Measuring in box, you can measure the table’s width in Inches or a Percentage of the page.
Under the Alignment section, you can align the table Left, Right, and Center of the page.
If you choose to select Left, you can select an indentation distance in the Indent from left box.
Under the Text Wrapping, if you want the nearby text to wrap around your table, you can select Around.
If you want the Text Wrapping to be more detailed, click the Positioning button and then choose the options you want from the Table Positioning dialog box.
If you do not want a Text Wrapping, click None.
You can change the table’s Border style, Line color, and Line width by clicking the Border and Shading button.
To set more table properties, including Top and Bottom Cell margins, Cell spacing, and Automatic resizing of cell contents, click the Options button.
Click OK.
2] Row Properties
Click the row or highlight rows you want to change and then right-click and select Table Properties.
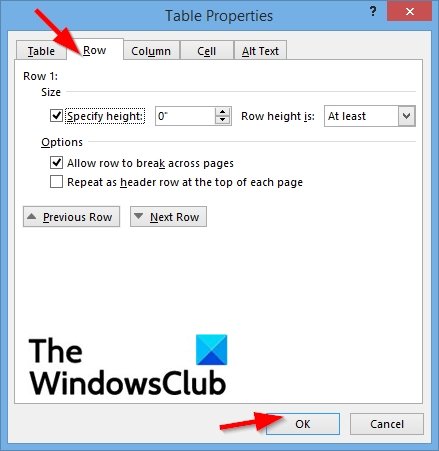
A Table Properties dialog box will pop up.
Click the Row tab to change the settings of the rows.
Under the Size section, check the checkbox for Specify height to set the height of the row.
Choose the height from the Specify height box.
You can choose an option from the Row height box, which includes At least and Exactly.
Under Options, you choose to check the checkboxes for Allow row to break across pages or Repeat as header row at the top of each page.
To navigate between rows in your table without leaving the Table Properties dialog box, you can click the Previous row and Next row buttons.
Then click OK.
3] Column Properties
Click the column or highlight columns you want to change and then right-click and select Table Properties.
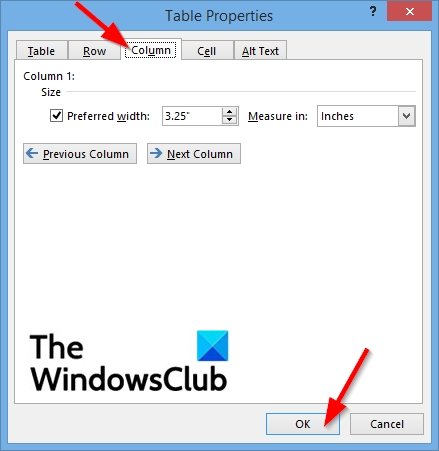
A Table Properties dialog box will appear.
Click the Column tab to change the settings of the columns.
Under Size, check the checkbox for Preferred width and choosing a size from the box.
Within the Measuring in the box, you can choose an option such as Inches or Percent.
To navigate between columns in your table without leaving the Table Properties dialog box, you can click the Previous column and Next column buttons.
Click OK.
4] Cell Properties
Click the cell you want to change, then right-click and select Table Properties from the context menu.
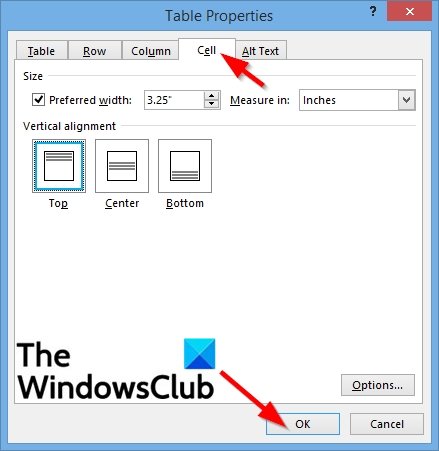
A Table Properties dialog box will appear.
Then click the Cell tab
Under Size, check the checkbox for Preferred width and choose a size from the box.
Within the Measuring box, you can choose an option such as Inches or Percent.
Under Vertical alignment, you can choose an alignment option for the cell contents, such as Top (default), Center, and Bottom.
To set more cell properties, including Top and Bottom cell margins and options such as Text Wrapping and Fit, click the Options button on the bottom right.
Then click OK.
5] Alt-Text
To create alternative text, especially for people with poor visions or cognitive impairments who cannot see or understand the object.
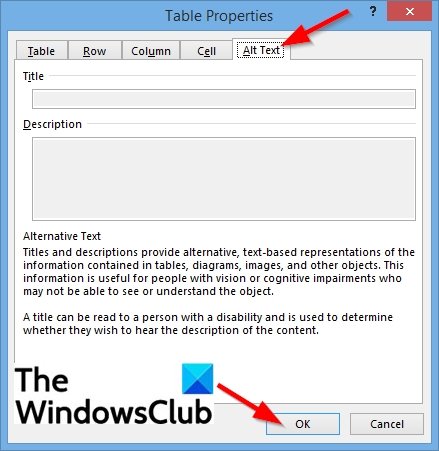
Click the Alt Text tab.
In the Title box, enter a summary of the table.
In the Description box, enter an explanation of the table.
Then click OK.
We hope this tutorial helps you understand how to display and modify table properties in Word; if you have questions about the tutorial, let us know in the comments.
After creating a table and filling it, the main task is to format the data and the table itself. The data in a table is formatted like any other text in Word by changing the font, aligning the text, etc.
A table is a collection of information or data, usually represented in horizontal rows and vertical columns. The box at the junction of each column and row is a cell that contains data such as text, numeric information, or images. You can select the cell, row, column, or entire table and apply formatting to the selected region.
Note that you can sort data in a table, perform calculations on numbers in a Word table, insert some formulas and functions. You can use a cell address to refer to a cell in the formula.
Select table elements
To select table a single cell:
- Using the mouse: Click the left edge of the cell:

- Using the keyboard: Position the cursor on the cell and select its content by pressing Shift+arrow (left or right).
To select multiple cells:
- Using the mouse: Click the left or right edge of the highest or lowest left cell in the range and move the mouse pointer diagonally to other cells to the right or left, down or up:

- Using the keyboard: Click the first cell you want to select, and then do one of the following:
- To select adjacent cells, hold down the Shift key, and click the last cell you want to select. The first, last, and all the cells in between will be selected.
- To select non-adjacent cells, hold down the Ctrl key, and click each additional cell you want to select. All the cells you clicked will be selected.

To select a single table column:
- Using the mouse: Click the column’s top gridline or top border:

- Using the keyboard: Point to the top of the column. When the cursor changes to a downward-pointing arrow, click the column.

To select multiple columns:
- Using the mouse: Click the column’s top gridline or top border and move the mouse pointer to the right or left.
- Using the keyboard: When the cursor changes to a downward-pointing arrow, click the first column. Then do one of the following:
- To select adjacent columns, hold down the Shift key, and then click to select the last column.
- To select non-adjacent columns, hold down the Ctrl key, and then click to select each additional column.
To select a single table row:
- Using the mouse: Click to the left of the row:

- Using the keyboard: Point to the left edge of the row. When the cursor changes to an upward-pointing arrow, click to select the row.
To select multiple rows:
- Using the mouse: Click to the left of the row and move the mouse pointer to the rows above or below.
- Using the keyboard: When the cursor changes to an upward-pointing arrow, click the first row. Then do one of the following:
- To select adjacent rows, hold down the Shift key, and then click to select the last row.
- To select non-adjacent rows, hold down the Ctrl key, and then click to select each additional row.
See also how to select the entire table.
Format table elements
After creating a table, you can format individual cells (spaces formed by the intersection of a row and a column) or entire rows and columns by aligning text in cells, resizing columns and rows, and adding borders, shading, or colors.
Merge and split cells
You can merge multiple cells into one cell that spans multiple columns or rows. For example, if you want to enter a heading for multiple table columns in the first row, you can merge cells in the first row (see example above).
To merge cells, select them and do one of the following:
- On the Table Layout tab, in the Merge group, click the Merge Cells button:

- Right-click the selection and select Merge Cells in the popup menu:


In addition to merging multiple cells to create one cell, you can split one cell to create multiple cells.
To split the cell, select it, then do one of the following:
- On the Table Layout tab, in the Merge group, click the Split Cells button:
- Right-click the selection and select Split Cells… in the popup menu:

Note: The Split Cells… item in the popup menu is displayed if only one cell is selected or the cursor is positioned inside the cell. If you select multiple cells, you won’t see Split Cells… in the popup menu.


In the Split Cells dialog box, specify the number of columns and rows created in place of the split cell:

Note: If you select several cells, the Merge cells before split check box in the Split Cells dialog box is selected by default:
- The selected Merge cells before split check box to force Word to merge selected cells into one, then split that one cell into the specified number of rows and columns.
- The deselected Merge cells before split check box to force Word to split every cell into the specified number of rows and columns.
Resize a table and table elements
- Using the mouse:
To resize individual rows and columns, do one of the following:
- Hover your pointer over a row or column border until your pointer becomes two lines with two arrows:

Click and hold as you drag the border to resize the row or column.
- Drag the sliders in the Table Ruler to set to desired height and width. E.g.:

See how to resize an entire table.
- Hover your pointer over a row or column border until your pointer becomes two lines with two arrows:
- Using the keyboard:
- Select what you need to change:
- Position the cursor in a cell in the row or the column, or
- Select entire row or column, or multiple rows or columns.
- Do one of the following:
- On the Layout tab, in the Cell Size group, change the values in the Height and Width fields:

- Open the Table Properties dialog box by doing one of the following:
- On the Table Layout tab, in the Table group, click the Properties button:

- Right-click the table and select Table Properties… in the popup menu:

In the Table Properties dialog box:
- On the Row tab, under Size, select the Specify height check box, then:
- In the Specify height field, type or select the value you need,
- In the Row height is dropdown list, select one of the items:
- At least to specify the minimal height,
- Exactly to fix the row height:

Note: To specify a height for other rows, click the Previous Row and Next Row buttons. Word highlights the appropriate row.
- On the Column tab, under Size, select the Preferred width check box, then:
- In the Preferred width field, type or select the value you need,
- In the Measure in dropdown list, select one of the items:
- Percent to specify the percentage of the table width,
- Inches to fix the column width:
Note: To specify a width for other columns, click the Previous Column and Next Column buttons. Word highlights the appropriate column.
- On the Cell tab, select the Preferred width check box to specify the width for the current column:
- On the Table Layout tab, in the Table group, click the Properties button:
- On the Layout tab, in the Cell Size group, change the values in the Height and Width fields:
- Select what you need to change:


Note: See more about formatting a table.
Align text in a Word table cell
To align the text in one or more cells, select them, and then on the Table Layout tab, in the Alignment group, choose one of the nine proposed alignments:

- Align Top Left (the default alignment),
- Align Top Center,
- Align Top Right,
- Align Center Left,
- Align Center,
- Align Center Right,
- Align Bottom Left,
- Align Bottom Center,
- Align Bottom Right:

Modify text Direction
To change the text direction, select a cell or several cells, and then on the Table Layout tab, in the Alignment group, click the Text Direction button multiple times to cycle through the available directions:

Change the cell margins
When you fill a table, you can change the cell spacing using the Paragraph options. Word offers the options to change the cell margins:

To customize cells margins, select a cell or several cells, then do one of the following:
- On the Table Layout tab, in the Alignment group, click the Cell Margins button:

In the Table Options dialog box:
- To specify cell margins, in the Default cell margins section, type or select the values for Top, Bottom, Left, and Right margins:

- If you prefer to resize the table according to cell margins and specified spacing, leave the Automatically resize to fit contents check box selected.
If you prefer to leave the table without changes, clear the Automatically resize to fit contents check box.
- To specify cell margins, in the Default cell margins section, type or select the values for Top, Bottom, Left, and Right margins:
- Open the Table Properties dialog box.
In the Table Properties dialog box, on the Cell tab, click the Options… button:
In the Cell Options dialog box:
- Clear the Same as the whole table check box,
- To specify cell margins, in the Default cell margins section, type or select the values for Top, Bottom, Left, and Right margins:


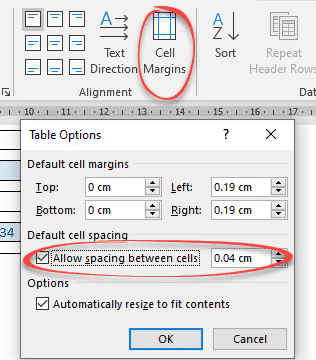
Change the space between cells
To increase or decrease the spacing between cells, select a cell or several cells, then do the following:
- On the Table Layout tab, in the Alignment group, click the Cells Margins button:
In the Table Options dialog box:
- To specify the spacing between cells, in the Default cell spacing section, select the Allow spacing between cells check box, then type or select the value for spacing:
- If you prefer to resize the table according to cell margins and specified spacing, leave the Automatically resize to fit contents check box selected.
If you prefer to leave the table without changes, clear the Automatically resize to fit contents check box.
- To specify the spacing between cells, in the Default cell spacing section, select the Allow spacing between cells check box, then type or select the value for spacing:

For example, spacing between cells = 0.2 inches:

AutoFit features
After filling a table, editing the content, or inserting a text, it is possible to autoformat a table for the perfect look.
To use the Word AutoFit features, do the following:
1. Select a table.
2. On the Table Layout tab, in the Size group:
- To make all columns the same width, click the Distribute Columns button.
- To make each row the same height, click the Distribute Rows button.
- Click the AutoFit button, then choose one of the options:

- To fit the columns to the text (or page margins if cells are empty), select AutoFit Contents.
- To fit the table to the document content, select AutoFit Window.
- To keep Word from automatically adjusting the column size, select Fixed Column Width.

Wordprocessing Tables
Cell Properties
Cell-level properties are specified in <tcPr>. Each property is a child element of <tcPr>, and the cell properties take precedence over table and row properties.
<w:tcPr>
<w:tcMar>
<w:start w:w=»1440″ w:type=»dxa»/>
</w:tcMar>
</w:tcPr>
Reference: ECMA-376, 3rd Edition (June, 2011), Fundamentals and Markup Language Reference § 17.4.70.
The most commonly used properties are shown below:
Elements/Properties:
| Element | Description |
|---|---|
| gridSpan | This element defines the number of logical columns across which the cell spans. It has a single attribute w:val. See the discussion of <w:tblGrid> at Table Grid/Column Definition. Reference: ECMA-376, 3rd Edition (June, 2011), Fundamentals and Markup Language Reference § 17.4.17. |
| hideMark | See Hide End of Table Cell Mark.
Reference: ECMA-376, 3rd Edition (June, 2011), Fundamentals and Markup Language Reference § 17.4.21. |
| noWrap | This element will prevent text from wrapping in the cell under certain conditions. It is a boolean property. E.g., <w:noWrap/>.
If the cell width is fixed, then noWrap specifies that the cell will not be smaller than that fixed value when other cells in the row are not at their minimum. If the cell width is set to auto or pct, then the content of the cell will not wrap. Reference: ECMA-376, 3rd Edition (June, 2011), Fundamentals and Markup Language Reference § 17.4.30. |
| shd | See Table Cell Properties — Shading.
Reference: ECMA-376, 3rd Edition (June, 2011), Fundamentals and Markup Language Reference § 17.4.33. |
| tcBorders | See Table Cell Properties — Borders.
Reference: ECMA-376, 3rd Edition (June, 2011), Fundamentals and Markup Language Reference § 17.4.67. |
| tcFitText | Text within a cell can be contracted or expanded to fit the width of the cell using the <w:tcFitText w:val=»true»/>. It has a single attribute val with boolean values of true/false.
Reference: ECMA-376, 3rd Edition (June, 2011), Fundamentals and Markup Language Reference § 17.4.68.
|
| tcMar | See Table Cell Properties — Margins.
Reference: ECMA-376, 3rd Edition (June, 2011), Fundamentals and Markup Language Reference § 17.4.69. |
| tcW | See Table Cell Properties — Width.
Reference: ECMA-376, 3rd Edition (June, 2011), Fundamentals and Markup Language Reference § 17.4.72. |
| vAlign | See Table Cell Properties — Vertical Alignment.
Reference: ECMA-376, 3rd Edition (June, 2011), Fundamentals and Markup Language Reference § 17.4.84. |
| vMerge | This element specifies that the cell is part of a vertically merged set of cells. defines the number of logical columns across which the cell spans. It has a single attribute w:val which specifies how the cell is part of a vertically merged region. The cell can be part of an existing group of merged cells or it can start a new group of merged cells. Possible values are:
If omitted, the value is assumed to be continue. Reference: ECMA-376, 3rd Edition (June, 2011), Fundamentals and Markup Language Reference § 17.4.85. |


Related Open Document Format (ODF) Property:
Table cell properties are specified in the <style:table-cell-properties> element.
<style:style style:name=»Table1.B2″ style:family=»table-cell»>
<style:table-cell-properties fo:background-color=»#00ffff» fo:padding=»0.0382in» fo:border-left=»0.0007in solid #000000″ fo:border-right=»none» fo:border-top=»none» fo:border-bottom=»0.0007in solid #000000″>
<style:background-image/>
</style:table-cell-properties>
</style:style>
Reference: Open Document Format for Office Applications Version 1.2 (May, 2011) § 17.18.
The <style:table-cell-properties> element can have the following attributes:
| Attributes | Description |
|---|---|
| fo:background-color |
Specifies a color for the background of the cell. |
| fo:border, fo:border-bottom, fo:border-left, fo:border-right, fo:border-top |
Specifies a border for the cell. |
| fo:padding, fo:padding-bottom, fo:padding-left, fo:padding-right, fo:padding-top |
Specifies padding for the cell. |
| fo:wrap-option |
Specifies whether text is to be wrapped. Possible values are no-wrap and wrap. |
| style:border-line-width, style:border-line-width-bottom, style:border-line-width-left, style:border-line-width-right, style:border-line-width-top |
Specifies the width of borders where the border property is double. The value is a list of three white space-separated lengths. Thie first value specifies the width of the inner line, the second specifies the distance between the two lines, and the third specifies the width of the outer line. |
| style:cell-protect |
Specifies how a cell is protected. Possible values are hidden-and-protected, none, protected and formula-hidden. |
| style:shadow |
Specifies a shadow effect for the cell. |
| style:vertical-align |
Specifies the vertical alignment of text. Possible values are automatic, bottom, middle, and top. |
| style:writing-mode |
Specifies how the content should be written. Possible values are lr-tb, rl-tb, tb-rl, tb-lr, lr, rl, tb, and page. |
Note that <style:table-cell-properties> can also contain a <style:background-image> element.
Multiple objects Cells
Cells CellMultiple objects
Represents a single table cell. The Cell object is a member of the Cells
collection. The Cells collection represents all the cells in the specified object.
Using the Cell Object
Use Cell(row, column), where row is the row number and column is the column number, or Cells(index), where index is the index number, to return a Cell object. The following example applies shading to the second cell in the first row.
Set myCell = ActiveDocument.Tables(1).Cell(Row:=1, Column:=2)
myCell.Shading.Texture = wdTexture20Percent
The following example applies shading to the first cell in the first row.
ActiveDocument.Tables(1).Rows(1).Cells(1).Shading _
    .Texture = wdTexture20Percent
Use the Add
method to add a Cell object to the Cells collection. You can also use the InsertCells
method of the Selection object to insert new cells. The following example adds a cell before the first cell in myTable.
Set myTable = ActiveDocument.Tables(1)
myTable.Range.Cells.Add BeforeCell:=myTable.Cell(1, 1)
The following example sets a range (myRange) that references the first two cells in the first table. After the range is set, the cells are combined by the Merge method.
Set myTable = ActiveDocument.Tables(1)
Set myRange = ActiveDocument.Range(myTable.Cell(1, 1) _
    .Range.Start, myTable.Cell(1, 2).Range.End)
myRange.Cells.Merge
Remarks
Use the Add method with the Rows or Columns collection to add a row or column of cells.
Use the Information
property with a Selection object to return the current row and column number. The following example changes the width of the first cell in the selection and then displays the cell’s row number and column number.
If Selection.Information(wdWithInTable) = True Then
    With Selection
        .Cells(1).Width = 22
        MsgBox "Cell " & .Information(wdStartOfRangeRowNumber) _
            & "," & .Information(wdStartOfRangeColumnNumber)
    End With
End If
Cell Margins and Cell Spacing are two important settings in any Microsoft Word Table but they aren’t used much and not well understood.
Cell margins are the spaces between your text and the edge of the cell. They can be set separately for the top, bottom, and either side of the cells.
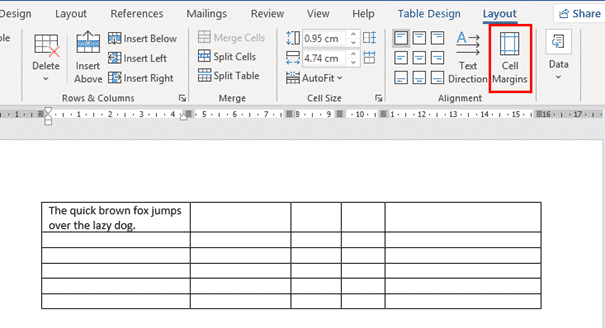
To change the cell margins, we again click in the table and go to the Layout tab on the right. Then click Cell Margins in the Alignment group.
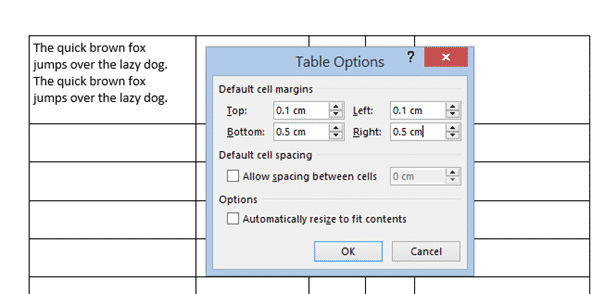
In the Table Options dialog that opens, use the spinners to incrementally change each of the four margins, or simply type in the margin that you want into each field; Top, Bottom, Left or Right.

The margins we’ve selected above are quite large, just to show you clearly how his setting changes your table. Here’s the large cell margins (left) compared to zero cell margins (right).

You can, of course have different margins on different sides:
Individual, Row or Column Cell Margins
Table cell margins can be changed for a row, column or even a single cell, but it’s nowhere near the main Cell Margins ribbon button.
Select the column, row or cell you want to change then go to Table Layout | Table | Properties | Cell | Options. UNcheck the box ‘Same at the whole table’ then change the margin settings.

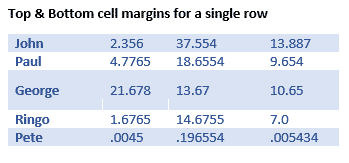
Here’s a single row, highlighted a little by increasing the top & bottom cell margins.
Why Adjust Table Cell Margins?
Cell margins are useful to separate lines in a table, especially when there’s no gridlines. Change the Top & Bottom cell margins to separate the lines and improve readability.

When space is tight, reducing the default left & right cell margins can help fit a table or contents into the available space.
Cell Spacing Tricks in Word Tables
Word’s Table Options have an interesting choice, Cell Spacing. While cell margins are the space between the text and the edge of the cell, cell spacing puts space around each of the cells.
Cell spacing has a surprising effect on the look of a Word Table with single line borders.
Go to Table | Alignment | Cell Margins | Default cell spacing | Allow spacing between cells.
The default is OFF with no spacing.
Here’s how a Table looks using a standard single line border but increasing the cell spacing from the default, Zero.

Changes to Table Borders
As you can see, the single line table border becomes a twin gridline just by adding cell spacing to the same table.

Word table with Footnotes
Merge Cells in Word tables
Word tables for formatting magic
Indexing ‘bug’ in Word tables