
Содержание
- Starting with macros – Connecting CATIA V5 and Excel
- macro to export catia parameters to excel
- Senthil Kumar Ramanathan
- Cliff Johnson, Cliff
- Eric Neuville
- Jeff Alan Turczynski
- Contact US
- Come Join Us!
- Posting Guidelines
- Related Projects
- Script to export properties to Excel?
- Script to export properties to Excel?
- Script to export properties to Excel?
- RE: Script to export properties to Excel?
- RE: Script to export properties to Excel?
- RE: Script to export properties to Excel?
- RE: Script to export properties to Excel?
- RE: Script to export properties to Excel?
- RE: Script to export properties to Excel?
- RE: Script to export properties to Excel?
- RE: Script to export properties to Excel?
- RE: Script to export properties to Excel?
- RE: Script to export properties to Excel?
- RE: Script to export properties to Excel?
- RE: Script to export properties to Excel?
- Red Flag Submitted
- Reply To This Thread
- Posting in the Eng-Tips forums is a member-only feature.
Starting with macros – Connecting CATIA V5 and Excel

When you’re starting to become comfortable with designing in CATIA V5 you might realize that you spend a lot of time performing repetitive tasks that could be more suited for a machine. You would like to focus on innovation and creativity, and preferably have all the routine tasks be performed by someone else. Luckily for you this can be done, the “someone else” will be CATIA and Excel.
In this blog post I will show you how to connect CATIA V5 to Excel, and write a simple VBA macro, in order to take our first trembling steps towards design automation. We will look at adding automation in order to remove repetitive tasks connected to creating differently sized variants of a part.
The process will look like this:
1. Initial set-up of Excel
2. Create a master part
3. Define with parameters how the master part should be able to change
4. Write a VBA macro that controls the parameters
5. Create an Excel spreadsheet to use as Human/Machine-interface
6. Create as many variants of the master part as you wish
In order to get access to the Visual Basic editor we must make sure that the Developer tab is visible, do this by going to File>Options>Customize Ribbon and check the box next to Developer. 
While still in the options window, go to Trust Center>Trust Center Settings…>Macro Settings and enable all macros as well as check the Trust access… box. OK your way out and we can get into the Visual Basic editor.
Open the Visual Basic editor from the Developer tab and choose Tools>References, here we will have to check all the boxes that start with CATIA, there’s a lot of them so patience will be required. When all those boxes are checked we are ready to write a VBA macro and apply it to our part. 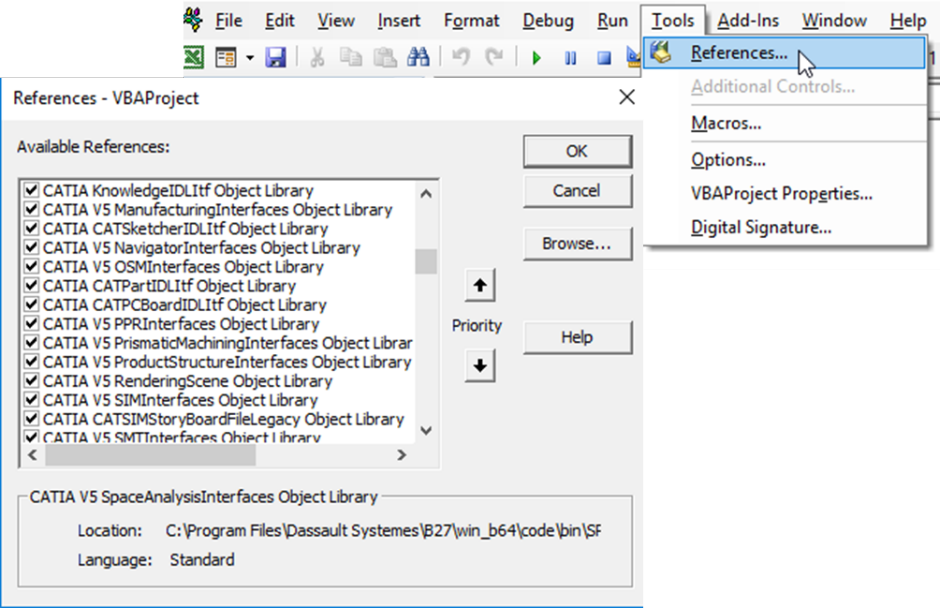
The part I will be using is a type of T-connection, its size and position of the interfaces are of interest, as well as how many screw lugs we want to use. In the picture below you can see which parameters I have defined to control the design. 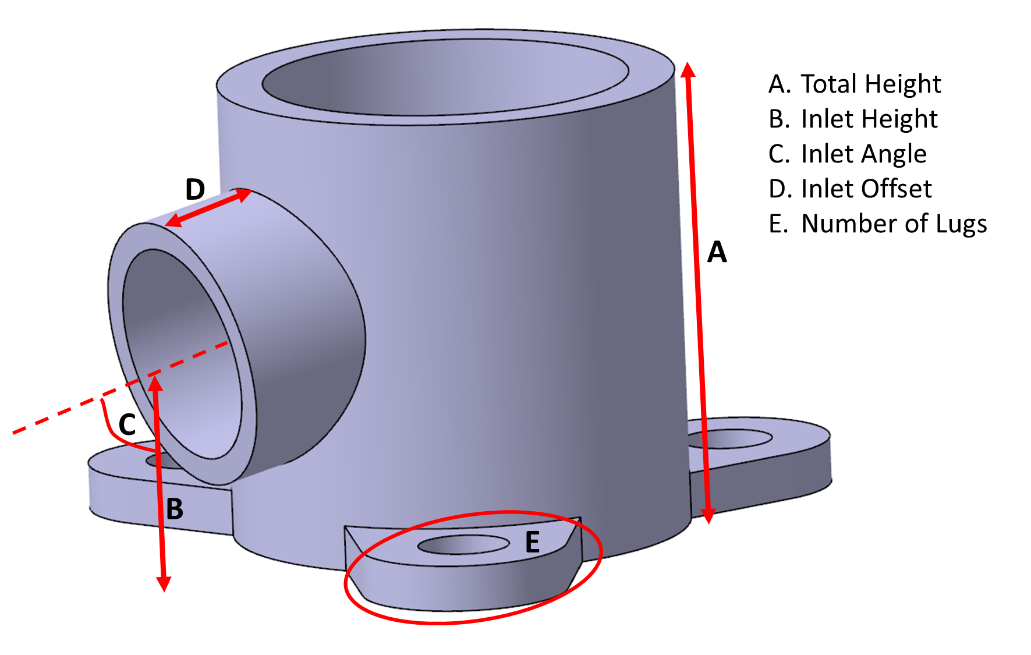
With the Excel connection set up and the master part prepared we can start writing our macro. The procedure is quite simple, we insert a new module in the editor by right-clicking and selecting Insert…>Module. Then we need a couple of lines that direct the macro to the correct CATPart and then we can add all the modifications that we want. The code can be seen below. 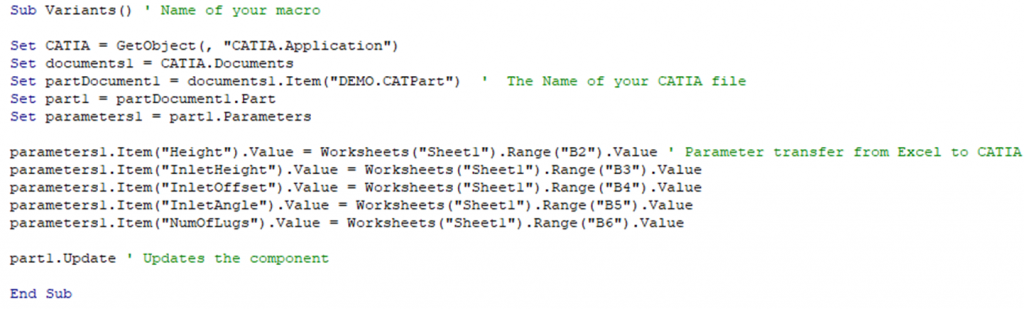
The lines with the Set prefix create the necessary environment, the following lines assign values to the CATIA parameters by retrieving values from specific cells in an Excel spreadsheet, last the part is updated. If you want to assign values to specific cells in the spreadsheet from the CATIA parameters, i.e. retrieve an output, you just swap the positions relative to the equal sign.
The spreadsheet interface looks like below, the cells specified in the macro is used as our input boxes and as a nice touch you could add a button to run the macro instead of switching between the spreadsheet and editor window. 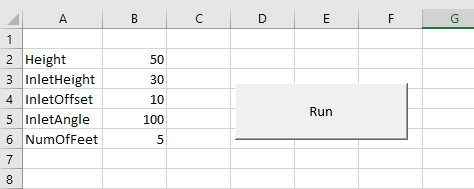
Now I can create all the variants I need by only changing the values in the spreadsheet. The more parameters we add, the more we can control. You only have to remember that in order to give more of the repetitive tasks to macros, the more robust the model needs to be. 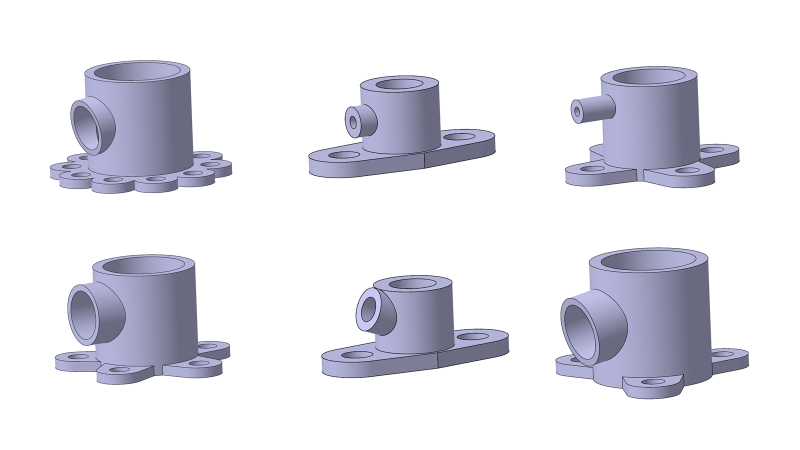
If I wanted to get more value out of this macro connection, not only the time saved by not having to design the different variants of the part manually. But also use the connection to find a better design, I could let an optimization software take control of the parameters and run the macro to find the optimal trade-off between my key performance metrics, for example weight and internal volume.
Источник
macro to export catia parameters to excel
Senthil Kumar Ramanathan
Could someone please provide a macro to export the parameters created in the CATIA V5 to export it to excel.
Cliff Johnson, Cliff
If you need such a spreadsheet, just make a design table «using current parameters» and you will have your excel file.
If you need a macro, please try to do it yourself. We will be happy to answer questions about problems you might have but will not do your work for you. Also, please ask in the correct forum; for macros that forum would be «Develop and Deploy».
Eric Neuville
moved to Develop and Deploy as it is a script question.
Jeff Alan Turczynski
Here is an example of a CatVBA macro that lists all the parameters for the selected Manufacturing Operations in a Process File. Change the file path in the StrFilePath variables to location where you want to store the CSV file on your computer.
Dim MoName As String
Dim MoType As String
Dim StrFilePath As String
StrFilePath = «C:temptestfile.csv»
‘Get the selection object
Dim oSel As Selection
Set oSel = CATIA.ActiveDocument.Selection
‘Clear the selection
Call oSel.Clear
‘Set up the selection array and variables
Dim oSelArray(0)
oSelArray(0) = «ManufacturingOperation»
Dim sMessage As String
sMessage = «Please select MO’s, then select the green ball. Hit to exit. »
Dim sAnswer As String
‘Create an array to hold the user-selected MO’s and some other variables used later
Dim oMOArray() As ManufacturingOperation
Dim iNumberOfMO As Integer
Dim i As Integer
Dim dummy
‘Get the process and the process parameters
Dim ProcDoc As ProcessDocument
Set ProcDoc = CATIA.ActiveDocument
Dim x As PPRActivity
Set x = ProcDoc.GetItem(«Process»)
Dim ProcessParams As Parameters
Set ProcessParams = x.Parameters
‘Run the selection algorithm
Set dummy = oSel
sAnswer = dummy.SelectElement3(oSelArray, sMessage, False, 2, False)
If sAnswer = «Normal» Then
iNumberOfMO = oSel.Count2
ReDim oMOArray(iNumberOfMO)
‘Fill the array of MO’s
For i = 1 To iNumberOfMO
Set oMOArray(i) = oSel.Item2(i).Value
Next i
‘Clear the selection
Call oSel.Clear
Set fs = CreateObject(«Scripting.Filesystemobject»)
Set A = fs.createtextfile(StrFilePath, True)
A.writeline («MO Name» & «,» & «MO Type» & «,» & «Param» & «,» & «Value»)
‘Loop through the selected MO’s
Dim oParm As Parameter
Dim oCoords(2)
For i = 1 To iNumberOfMO
Dim CurrentActivity As ManufacturingActivity
Set CurrentActivity = oMOArray(i)
If CurrentActivity.Type <> «ToolChange» And _
CurrentActivity.Type <> «PPInstruction» And _
CurrentActivity.Type <> «MfgTracutOperation» And _
CurrentActivity.Type <> «MfgTracutEnd» And _
CurrentActivity.Type <> «MfgCopyBegin» And _
CurrentActivity.Type <> «MfgCopyEnd» And _
CurrentActivity.Type <> «MfgCopyOrder» And _
CurrentActivity.Type <> «MfgCopyOperation» Then
‘Find the name of the operation
MoName = oMOArray(i).Name
MoType = CurrentActivity.Type
Dim NeObject As AnyObject
Set NeObject = oMOArray(i)
Источник
Thanks. We have received your request and will respond promptly.
Come Join Us!
- Talk With Other Members
- Be Notified Of Responses
To Your Posts - Keyword Search
- One-Click Access To Your
Favorite Forums - Automated Signatures
On Your Posts - Best Of All, It’s Free!
Posting Guidelines
Promoting, selling, recruiting, coursework and thesis posting is forbidden.
Script to export properties to Excel?
Script to export properties to Excel?
Script to export properties to Excel?
RE: Script to export properties to Excel?
Yes, it can be done.
Bellow there is something similar, I don’t have time to modify for Excel. Is also a text file, not Excel, is saving file name and extension in txt title file and inside. Other properties can be saved also. Is a CATScript.
To export spec tree in a text file is enough to save as text file (a product).
Dim partDoc As PartDocument
Set partDoc = CATIA.ActiveDocument
Dim partProd As Product
Set partProd = partDoc.Product
Dim filename As String
filename = CATIA.ActiveDocument.Name
Dim path As String
path = CATIA.ActiveDocument.Path
Set Datos = CATIA.FileSystem.CreateFile(path & «» & CATIA.ActiveDocument.Name & «.txt» , True)
Set ostream = Datos.OpenAsTextStream(«ForAppending»)
ostream.Write CATIA.ActiveDocument.Name & Chr(10)
ostream.Close
MsgBox «Check results in folder » & chr(10) & path & «» & chr(10) & chr(10) &»File:» & chr(10) & partDoc.Name & «.txt» & chr(10)
RE: Script to export properties to Excel?
Alright, I figured out how to export properties from a single part into an Excel file. Now I would like to be able to open a product and run a macro which would then basically run this script on every part and export the properties into the same Excel sheet. Any ideas how to add on to my code to accomplish this?
Here’s my code to export properties from a part:
Dim myDocuments As Documents
Set myDocuments = CATIA.Documents
Dim myDocument As PartDocument
Set myDocument = CATIA.ActiveDocument
Dim myPart As Part
Set myPart = myDocument.Part
Dim myProduct As Product
Set myProduct = myDocument.GetItem(myPart.Name)
Dim myParameters As Parameters
Set myParameters = myProduct.UserRefProperties
Dim getThickness As String
getThickness = myParameters.Item(myPart.Name & «PropertiesThickness»).ValueAsString
Dim getMaterial As String
getMaterial = myParameters.Item(myPart.Name & «PropertiesMaterial»).ValueAsString
Dim getMass As String
getMass = myParameters.Item(myPart.Name & «PropertiesMass»).ValueAsString
Dim partName As String
partName=myProduct.name
Dim Excel As Object
Dim workbooks As workbooks
Dim workbook As workbook
Dim Sheets As Object
Dim Sheet As Object
Dim worksheet As Excel.worksheet
Dim myworkbook As Excel.workbook
Dim myworksheet As Excel.worksheet
On Error Resume Next
Set Excel = GetObject(, «EXCEL.Application»)
If Err.Number <> 0 Then
Err.Clear
Set Excel = CreateObject(«EXCEL.Application»)
Else
Err.Clear
MsgBox «Please note you have to close Excel», vbCritical
Exit Sub
End If
Set workbooks = Excel.Application.workbooks
Set myworkbook = Excel.workbooks.Add
Set myworksheet = Excel.ActiveWorkbook.Add
Set myworksheet = Excel.Sheets.Add
‘download the properties
‘row one
Excel.Cells(1,1)=»Part Number»
Excel.Cells(1,2)=»Thickness»
Excel.Cells(1,3)=»Material»
Excel.Cells(1,4)=»Mass»
‘row 2
Excel.Cells(2,1)= partName
Excel.Cells(2, 2) = getThickness
Excel.Cells(2, 3) = getMaterial
Excel.Cells(2, 4) = getMass
RE: Script to export properties to Excel?
I would suggest to use a custom Bill of Materials in Assembly Workbench, something like in attachment (of course it can be improved).
Using BoM is much easier to do what you want.
RE: Script to export properties to Excel?
RE: Script to export properties to Excel?
If you have symbols for nut, bolts, etc in a body (or Geometrical Set ? ), symbols (wireframe) cannot be inserted in BoM as far as I know (there is a special workbench called Holes and Fasteners which can do this but I don’t know if its your case). If they are solids then you can do a work around, meaning you can transform your part in a catproduct and then you can run BoM.
If I remember correctly there is such a macro in my CATIA Portable Script Center.
Anyway, what you have for those fasteners?
RE: Script to export properties to Excel?
RE: Script to export properties to Excel?
This is what I would do it to have also the fastners in BoM
Convert the CATPart with dummies in a CATProduct with that macro mentioned above, replace this CATPart with the CATProduct, then get the BoM.
RE: Script to export properties to Excel?
RE: Script to export properties to Excel?
You can batch convert the CATParts in CATProduct and then batch replace the CATParts with corresponding CATProducts. Is not so nice but it can be done. If you find that this method is not good for you, I can understand but unfortunately I don’t have any other idea.
If you have a specific application (I mean, if you’ve done an exe file in vb6 or something else) , you can launch from there other CATScripts which can do the job.
RE: Script to export properties to Excel?
I finally figured it out. I basically have two loops, the first loop goes through each part and the second loop goes through all the bodies of the part. Here’s a small piece of the code:
Dim i As Integer
For i=1 to partcount
Dim j As Integer
bodyNumber=part1.Bodies.Count
For j=1 to bodyNumber
Dim body1 As Body
Set body1=part1.Bodies.Item(j)
namebody=body1.name
‘row 3
Excel.Cells(RwNum+1,1)= namebody
RwNum = RwNum + 1
Now onto the next issue. There are a few bodies named «FINAL_BODY» which I want to delete. I know in Excel I can run a macro which will delete an entire row in the spreadsheet based upon a given condition. Here’s the macro which works in Excel:
For r = Range(«A» & Rows.Count).End(xlUp).Row to 1 Step -1
If UCase(Left(Cells(r, «A»).Text, 10)) = «FINAL_BODY» Then Rows(r).Delete
Is there a way to run this Excel macro directly inside my catscript at the end? So it would export a list to Excel of all of my parts, bodies, and desired properties as described before but would then delete any rows with «FINAL_BODY» in column A. Is it possible?
RE: Script to export properties to Excel?
I figured it out. I simply add a If Then statement. Alright, hopefully this is my last question and then the script will be perfect. Currently, my properties exporter script only works if you’ve got one product open. But I have situations where I may have a product within a product within a product. How can I change my code to basically go to the last level product and then run what I already have (of running through each part, body, etc.)? Here’s my current code:
Dim productDocument1 As Document
Dim product1 As Product
Dim products1 As Products
Set productDocument1 = CATIA.ActiveDocument
Set product1 = productDocument1.Product
Set products1 = product1.Products
msgbox»number of parts is :»&partcount
‘some Excel info then I go into my first loop through the parts:
Dim RwNum as Integer
Dim i As Integer
For i=1 to partcount
Dim partDoc1 As PartDocument
What’s the best way to deal with multiple products or products within products?
RE: Script to export properties to Excel?
My script to export information to Excel has been working well but I’ve recently run into an issue. Currently, the script loops through every part within a product and then loops through every body within each part. Well, I have a few assemblies I need to run the script on but there are cgrs included within the product and my script is skipping right over them.
For i=1 to partcount
Dim partDoc2 As PartDocument
Set partDoc2 = partdoc1.GetMasterShapeRepresentation(True)
Dim part1 as Part
Set part1 = partDoc2.Part
How do you differientiate a cgr from a part file?
Red Flag Submitted
Thank you for helping keep Eng-Tips Forums free from inappropriate posts.
The Eng-Tips staff will check this out and take appropriate action.
Reply To This Thread
Posting in the Eng-Tips forums is a member-only feature.
Click Here to join Eng-Tips and talk with other members! Already a Member? Login
Источник
CATIA Batch Import Export Data в Excel
- Предисловие
- Во-первых, точки данных Excel импортируются в Catia
- Во-вторых, CATIA Data Point Patch Import в Excel
- В-третьих, VB объемная выходная точка для Excel
Предисловие
В работе, из-за несоответствия ориентира измерений и моделирования ориентира, мы часто сталкиваемся с большим количеством измерительных данных для импорта CATIA, по сравнению с моделью через координатное преобразование. Эта макро-программа может быть решена, но поскольку большинство людей не понимают программирования, эта проблема сделает всех проблемных, и введено следующее, чтобы решить вышеуказанные проблемы.
Во-первых, точки данных Excel импортируются в Catia
- Откройте CATIA, создайте новый файл детали, передайте в созданный модуль дизайна профиля, создайте новый геометрический графический набор;
- Откройте D: Programfiles Dassault Systems B21 Win_B64 Code Commands gsd_pointsplinaloftfromexcel _beforev5r21.excel Файл (в зависимости от версии установки);
- Установите макрос в самый низкий, нажмите на инструмент разработки в Macro, выберите Feuil1.main;
- Enter 1 Нажмите OK в всплывающем окне (2 и 3 представляют собой кривые и поверхности соответственно);
Во-вторых, CATIA Data Point Patch Import в Excel
- Нажмите на таблицу дизайна инженерии знаний, выберите таблицу дизайна с текущим значением параметра, нажмите OK;
- Введите X, извлечь параметры точки x в имени фильтра, а затем выберите, щелкните стрелку на рисунке, введите вставную область параметра справа;
- Нажмите OK, нажмите Сохранить. Нажмите OK, вы можете сохранить значение координатного значения точки данных x. Аналогично, значение координаты Y и Z может быть выведена.
В-третьих, VB объемная выходная точка для Excel
// An highlighted block
Sub CATMain()
Dim lApp, lBook, lSheet,lESlct
Dim lDoc, lPrt, lHybody,lPoint, Coord(2)
Set lApp =CreateObject("excel.application")«Создание объекта Excel
lApp.visible = Правда 'пусть Excel видна
Set lBook =lApp.workbooks.Добавить «Создает новый файл Excel
Set lSheet =lBook.Sheets.Добавить «Добавить новый лист
lSheet.Name = "PointCoordinates"«Дайте вам просто добавлено к листу
Set lDoc =CATIA.ActiveDocument 'CATIAВ настоящее время активирован файл
Set lPrt = lDoc.Часть 'Получает часть файла
Set lHybody =lPrt.hybridbodies.Item("ToBeExport")«Получить часть геометрического набора графического набора Partexport» ниже добавлена для добавления информации заголовка
lSheet.Cells(1, 1) ="Point Name"«Первая строка первая стоимость столбца» - «PointName»
lSheet.Cells(1, 2) ="x"«Второй столбец первой строки -« X », который одинаков ниже
lSheet.Cells(1, 3) ="y"
lSheet.Cells(1, 4) ="z"
i = 2«Инициализация переменной, представляющая первую строку, поскольку первая строка устанавливается на голову, поэтому начиная со второй строки
For Each lPoint In lHybody.Hybridshapes 'Traverses Геометрические графические элементы
lPoint.GetCoordinates Coord 'получает координату точечной координаты и назначает координацию, а координат определяется перед ним. Это трехмерный массив.
lSheet.Cells(i, 1) =lPoint.Имя "Нет, Нет.1Значение списка - это имя точки
lSheet.Cells(i, 2) =Coord(0)Нет линию,2Значение столбца - координата строки, следующее одинаково
lSheet.Cells(i, 3) =Coord(1)
lSheet.Cells(i, 4) =Coord(2)
i = i + 1«Я сами1Следующая ценность приобретенного цикла будет заполнена следующей строкой
Next
lSheet.Columns("A:D").EntireColumn.Автоматическая настройка автоматической регулировки столбца в соответствии с содержанием ячейки
lSheet.Columns("B:D").NumberFormatLocal= "0.000_ "'Нс2прибыть4Формат отображения столбца находится три за десятичной точкой.
End Sub
| July 30, 2015 | Excel, Quick Tips |
One of the biggest reasons for learning CATIA macro programming is to be able to automatically export properties from CATIA to an Excel spreadsheet. Export to Excel is highly useful as you can create custom bills of material (BOMs) or part lists at the click of a button.
The first step to exporting any information from inside CATIA is to be able to launch or open Excel. Use the code shown below or download it here.
Sub CatMain()
Dim Excel As Object

     On Error Resume Next

'if Excel is already running, then get the Excel object
            Set Excel = GetObject(, "Excel.Application")


            If Err.Number <> 0 Then
'If Excel is not already running, then create a new session of Excel

                Set Excel = CreateObject("Excel.Application")

                  Excel.Visible = True

            End If

            'add a new workbook
                        Excel.Workbooks.Add

'set the workbook as the active document
        Set WBK = Excel.ActiveWorkbook.Sheets(1)

End Sub
About The Author
Emmett
Hey! I’m Emmett, and I’ve been called a CATIA V5 «guru». How can I help you? Download my Ten Best Macros here.
This website uses cookies to improve your experience. We’ll assume you’re ok with this, but you can opt-out if you wish. Cookie settingsACCEPT
Exporting Data from CATIA
- Switch to Electrical Wire Routing workbench .
- Click the Tools > Export Wires… menu item and select the Export Wires in IXF Format . …
- Click a node in the specification tree. …
- Navigate to select the folder where you want to store your file and enter the name of the file.
- Click Save .
How do I copy a table from Catia to excel?
It works great on Catia generated Tables.
…
- Open a new workbook that has only one worksheet in it.
- Right-click the worksheet tab and select View Code from the resulting Context menu. …
- Paste (or type) the above macro into the code window.
- Close the VBA Editor.
- Locate the XLStart folder on your system. …
How do I Export from Catia BOM to excel?
1. Export your BOM structure from Catia to Excel either manually or using a script. In Assembly Design Workbench, Analyze -> Bill of Material. Reorder whatever properties and additional properties you have for your parts and assemblies and then save as excel format.
How do I Export dataset to excel?
Export Data
- Click the File tab.
- At the left, click Export.
- Click the Change File Type.
- Under Other File Types, select a file type. Text (Tab delimited): The cell data will be separated by a tab. …
- Click Save As.
- Specify where you want to save the file.
- Click Save. …
- Click Yes.
How do I save a Catia file as DXF?
This task quickly shows you how to export the data contained in a CATDrawing document into a DXF file.
…
Open a CATDrawing document.
- Select the File, Save As item. The Save As dialog box is displayed:
- Change the Format type into DXF type.
- Enter the file name.
- Click Save.
How do I edit a bill of material in Catia v5?
Editing Advanced Bill of Material Properties
- Right-click the Bill of Material and select Properties . …
- Select the BOM Format tab. …
- Select the Reported Properties tab. …
- Add more properties Material and Weight .
- Reorder the properties as shown using the up and down arrows and click OK . …
- Select Edit > Working Views .
How do I automatically export data from access to Excel?
Click “Export All” if you want to export the entire table. For Access 2007, click on the “External Data” tab in the ribbon. Click “Excel” under the “Export” section. Follow the wizard to export the data you want to an Excel file.
How do I import data into Excel?
You can import data from a text file into an existing worksheet. Click the cell where you want to put the data from the text file. On the Data tab, in the Get External Data group, click From Text. In the Import Data dialog box, locate and double-click the text file that you want to import, and click Import.
How do I import data from Access to Excel?
Import Access Data
- Click From Database, From Microsoft Access Database.
- Select the Access file.
- Click Import. Select a table on the left side of the Navigator window and click Load.
- Result. Your database records in Excel.
- When your Access data changes, you can easily refresh the data in Excel.
- By Training
- on 7 January, 2020
- in Blog

When you’re starting to become comfortable with designing in CATIA V5 you might realize that you spend a lot of time performing repetitive tasks that could be more suited for a machine. You would like to focus on innovation and creativity, and preferably have all the routine tasks be performed by someone else. Luckily for you this can be done, the “someone else” will be CATIA and Excel.
In this blog post I will show you how to connect CATIA V5 to Excel, and write a simple VBA macro, in order to take our first trembling steps towards design automation. We will look at adding automation in order to remove repetitive tasks connected to creating differently sized variants of a part.
The process will look like this:
1. Initial set-up of Excel
2. Create a master part
3. Define with parameters how the master part should be able to change
4. Write a VBA macro that controls the parameters
5. Create an Excel spreadsheet to use as Human/Machine-interface
6. Create as many variants of the master part as you wish
In order to get access to the Visual Basic editor we must make sure that the Developer tab is visible, do this by going to File>Options>Customize Ribbon and check the box next to Developer.
While still in the options window, go to Trust Center>Trust Center Settings…>Macro Settings and enable all macros as well as check the Trust access… box. OK your way out and we can get into the Visual Basic editor.
Open the Visual Basic editor from the Developer tab and choose Tools>References, here we will have to check all the boxes that start with CATIA, there’s a lot of them so patience will be required. When all those boxes are checked we are ready to write a VBA macro and apply it to our part.
The part I will be using is a type of T-connection, its size and position of the interfaces are of interest, as well as how many screw lugs we want to use. In the picture below you can see which parameters I have defined to control the design.
With the Excel connection set up and the master part prepared we can start writing our macro. The procedure is quite simple, we insert a new module in the editor by right-clicking and selecting Insert…>Module. Then we need a couple of lines that direct the macro to the correct CATPart and then we can add all the modifications that we want. The code can be seen below.
The lines with the Set prefix create the necessary environment, the following lines assign values to the CATIA parameters by retrieving values from specific cells in an Excel spreadsheet, last the part is updated. If you want to assign values to specific cells in the spreadsheet from the CATIA parameters, i.e. retrieve an output, you just swap the positions relative to the equal sign.
The spreadsheet interface looks like below, the cells specified in the macro is used as our input boxes and as a nice touch you could add a button to run the macro instead of switching between the spreadsheet and editor window.
Now I can create all the variants I need by only changing the values in the spreadsheet. The more parameters we add, the more we can control. You only have to remember that in order to give more of the repetitive tasks to macros, the more robust the model needs to be.
If I wanted to get more value out of this macro connection, not only the time saved by not having to design the different variants of the part manually. But also use the connection to find a better design, I could let an optimization software take control of the parameters and run the macro to find the optimal trade-off between my key performance metrics, for example weight and internal volume.