
Excel for Microsoft 365 Excel 2021 Excel 2019 Excel 2016 Excel 2013 More…Less
You might want to split a cell into two smaller cells within a single column. Unfortunately, you can’t do this in Excel. Instead, create a new column next to the column that has the cell you want to split and then split the cell. You can also split the contents of a cell into multiple adjacent cells.
See the following screenshots for an example:
Split the content from one cell into two or more cells
-
Select the cell or cells whose contents you want to split.
Important: When you split the contents, they will overwrite the contents in the next cell to the right, so make sure to have empty space there.
-
On the Data tab, in the Data Tools group, click Text to Columns. The Convert Text to Columns Wizard opens.

-
Choose Delimited if it is not already selected, and then click Next.
-
Select the delimiter or delimiters to define the places where you want to split the cell content. The Data preview section shows you what your content would look like. Click Next.
-
In the Column data format area, select the data format for the new columns. By default, the columns have the same data format as the original cell. Click Finish.
See Also
Merge and unmerge cells
Merging and splitting cells or data
Need more help?
Want more options?
Explore subscription benefits, browse training courses, learn how to secure your device, and more.
Communities help you ask and answer questions, give feedback, and hear from experts with rich knowledge.
There can be situations when you have to split cells in Excel. These could be when you get the data from a database or you copy it from the internet or get it from a colleague.
A simple example where you need to split cells in Excel is when you have full names and you want to split these into first name and last name.
Or you get address’ and you want to split the address so that you can analyze the cities or the pin code separately.
How to Split Cells in Excel
In this tutorial, you’ll learn how to split cells in Excel using the following techniques:
- Using the Text to Columns feature.
- Using Excel Text Functions.
- Using Flash Fill (available in 2013 and 2016).
Let’s begin!
Split Cells in Excel Using Text to Column
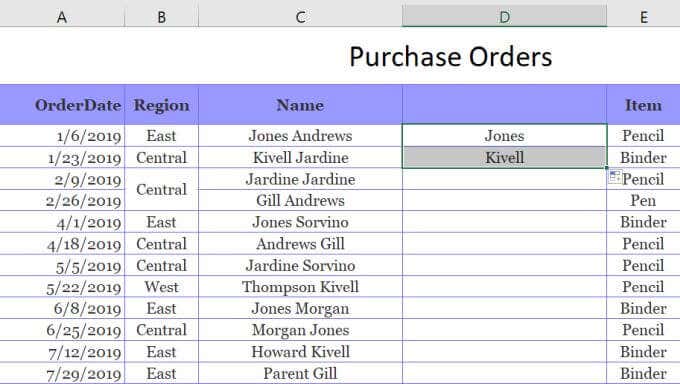
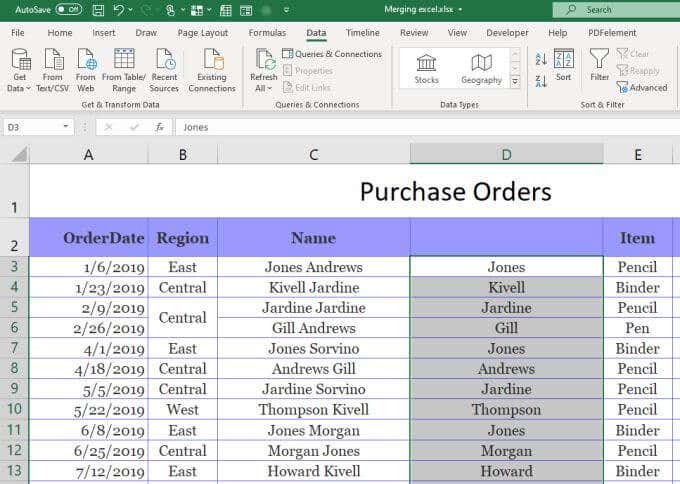
Below I have a list of names of some of my favorite fictional characters and I want to split these names into separate cells.:

Here are the steps to split these names into the first name and the last name:
- Select the cells in which you have the text that you want to split (in this case A2:A7).
- Click on the Data tab
- In the ‘Data Tools’ group, click on ‘Text to Columns’.
- In the Convert Text to Columns Wizard:

This will instantly split the cell’s text into two different columns.

Note:
- Text to Column feature splits the content of the cells based on the delimiter. While this works well if you want to separate the first name and the last name, in the case of first, middle, and last name it will split it into three parts.
- The result you get from using the Text to Column feature is static. This means that if there are any changes in the original data, you’ll have to repeat the process to get updated results.
Split Cells in Excel Using Text Functions
Excel Text functions are great when you want to slice and dice text strings.
While the Text to Column feature gives a static result, the result that you get from using functions is dynamic and would automatically update when you change the original data.
Splitting Names that have a First Name and Last Name
Suppose you have the same data as shown below:

Extracting the First Name
To get the first name from this list, use the following formula:
=LEFT(A2,SEARCH(" ",A2)-1)
This formula would spot the first space character and then return all the text before that space character:

This formula uses the SEARCH function to get the position of the space character. In the case of Bruce Wayne, the space character is in the 6th position. It then extracts all the characters to the left of it by using the LEFT function.
Extracting the Last Name
Similarly, to get the last name, use the following formula:
=RIGHT(A2,LEN(A2)-SEARCH(" ",A2))

This formula uses the search function to find the position of the spacebar using the SEARCH function. It then subtracts that number from the total length of the name (that is given by the LEN function). This gives the number of characters in the last name.
This last name is then extracted by using the RIGHT function.
Note: These functions may not work well if you have leading, trailing or double spaces in the names. Click here to learn how to remove leading/trailing/double spaces in Excel.
Splitting Names that have a First Name, Middle Name, and Last Name
There may be cases when you get a combination of names where some names have a middle name as well.

The formula in such cases is a bit complex.
Extracting the First Name
To get the first name:
=LEFT(A2,SEARCH(" ",A2)-1)
This is the same formula we used when there was no middle name. It simply looks for the first space character and returns all the characters before the space.
Extracting the Middle Name
To get the Middle Name:
=IFERROR(MID(A2,SEARCH(" ",A2)+1,SEARCH(" ",A2,SEARCH(" ",A2)+1)-SEARCH(" ",A2)),"")
MID function starts from the first space character and extracts the middle name by using the difference of the position of the first and the second space character.
In cases there is no middle name, the MID function returns an error. To avoid the error, it is wrapped within the IFERROR function.
Extracting the Last Name
To get the Last Name, use the below formula:
=IF(LEN(A2)-LEN(SUBSTITUTE(A2," ",""))=1,RIGHT(A2,LEN(A2)-SEARCH(" ",A2)),RIGHT(A2,LEN(A2)-SEARCH(" ",A2,SEARCH(" ",A2)+1)))
This formula checks whether there is a middle name or not (by counting the number of space characters). If there is only 1 space character, it simply returns all the text to the right of the space character.
But if there are 2, then it spots the second space character and returns the number of characters after the second space.
Note: These formula works well when you have names that have either the fist name and last name only, or the first, middle, and last name. However, if you have a mix where you have suffixes or salutations, then you’ll have to modify the formulas further.
Split Cells in Excel Using Flash Fill
Flash Fill is a new feature introduced in Excel 2013.
It could be really handy when you have a pattern and you want to quickly extract a part of it.
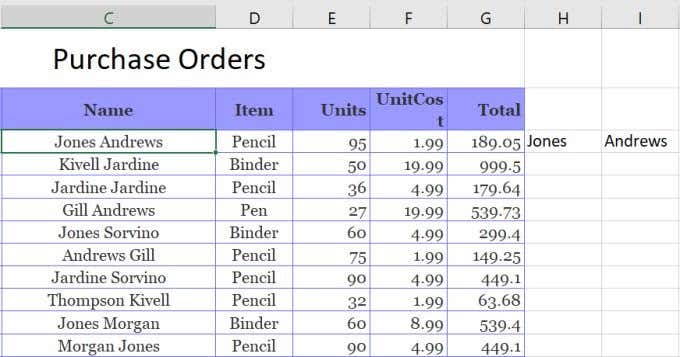
For example, let’s take the first name and the last name data:
Flash fill works by identifying patterns and replicating it for all the other cells.
Here is how you can extract the first name from the list using Flash Fill:
How Flash Fill Works?
Flash Fill looks for the patterns in the data set and replicates the pattern.
Flash Fill is a surprisingly smart feature and works as expected in most of the cases. But it also fails in some cases too.
For example, if I have a list of names that has a combination of names with some having a middle name and some don’t.
If I extract the middle name in such a case, Flash Fill will erroneously return the last name in case there is no first name.

To be honest, that’s still a good approximation of the trend. However, it is not what I wanted.
But it still is a good enough tool to keep in your arsenal and use whenever the need arises.
Here is another example where Flash Fill works brilliantly.
I have a set of addresses from which I want to quickly extract the city.

To quickly get the city, enter the city name for the first address (enter London in cell B2 in this example) and use the autofill to fill all the cells. Now use Flash Fill and will instantly give you the name of the city from each address.
Similarly, you can split the address and extract any part of the address.
Note that this would need the address to be a homogenous data set with the same delimiter (comma in this case).
In case you try and use Flash Fill when there is no pattern, it will show you an error as shown below:

In this tutorial, I have covered three different ways to split cells in Excel into multiple columns (using Text to Columns, formulas, and Flash Fill)
Hope you found this Excel tutorial useful.
You May Also Like the Following Excel Tutorials:
- How to Quickly Combine Cells in Excel.
- How to Extract a Substring in Excel Using Formulas.
- How to Count Cells that Contain Text Strings.
- Extract Usernames from Email Ids in Excel [2 Methods].
- How to Split Multiple Lines in a Cell into Separate Cells/Columns.
If you’re working with data in Excel that you’ve imported from other sources, sometimes you have to work with data that isn’t in a format that you want. This is especially true with comma-delimited text that comes into single cells.
The only way to deal with that data is to split a cell in Excel. There are different ways to do this, depending on the format of the data.

In this article you’ll learn how to split a cell, how to roll that out to an entire column, and when you should choose each option.
Convert Text To Columns
One of the most common methods to split a cell in Excel is using the Text to Columns tool. This lets you split an entire column of cells using whatever rules you like.
The feature also includes an easy-to-use wizard, which is why most people prefer using it. It also handles any text format, whether the separating text is a space, a tab, or a comma.
Let’s look at an example of how to use the Text to Columns feature in Excel.

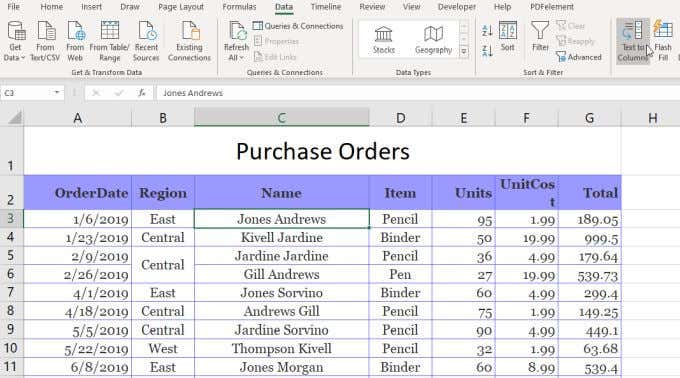
In this example, we want to split the Name column into two cells, the first name and the last name of the salesperson.
To do this:
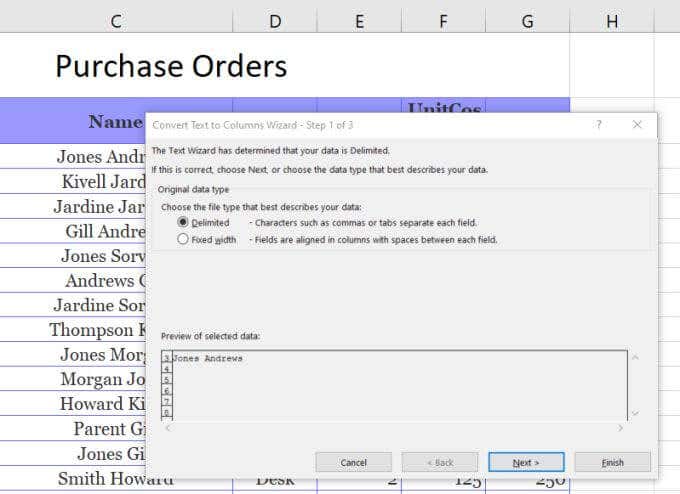
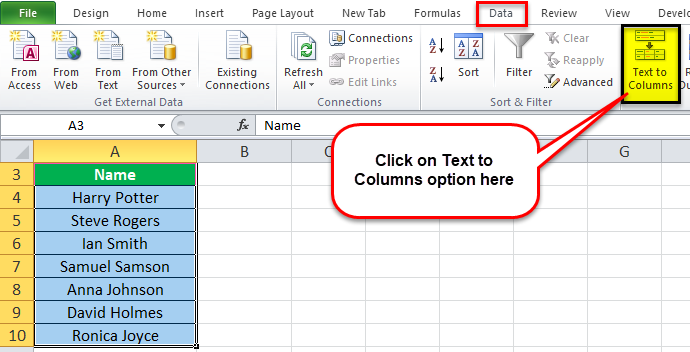
1. Select the Data menu. Then select Text to Columns in the Data Tools group on the ribbon.
2. This will open a three-step wizard. In the first window, make sure Delimited is selected and select Next.
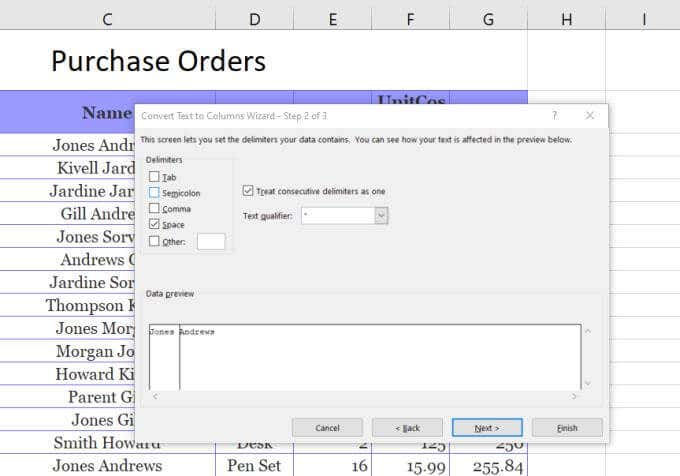
3. On the next Wizard window, deselect Tab and make sure Space is selected. Select Next to continue.
4. On the next window, select the Destination field. Then, in the spreadsheet, select the cell where you want the first name to go. This will update the cell in the Destination field to where you’ve selected.
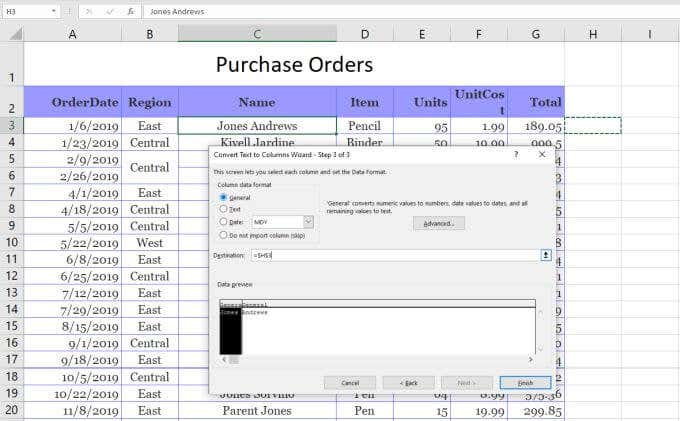
5. Now, select Finish to complete the Wizard.
You’ll see that the single cell that contained both the first name and last name has been split into two cells that contain each one individually.
Note: The process above works because the data to split in the cell had a space separating the text. This text-to-column feature can also handle splitting a cell in Excel if the text is separated by a tab, semicolon, comma, or any other character you specify.
Use Excel Text Functions
Another way to split a cell in Excel is by using different text functions. Text functions let you extract pieces of a cell that you can output into another cell.
Text functions in Excel include:
- Left(): Extract a number of characters from the left side of the text
- Right(): Extract a number of characters from the right side of the text
- Mid(): Extract a number of characters from the middle of a string
- Find(): Find a substring inside of another string
- Len(): Return the total number of characters in a string of text
To split cells, you may not need to use all of these functions. However, there are multiple ways you can use these to accomplish the same thing.
For example, you can use the Left and Find function to extract the first name. The Find function helps because it can tell you where the delimiting character is. In this case, it’s a space.
So the function would look like this:
=LEFT(C3,FIND(” “,C3))
When you press enter after typing this function, you’ll see that the first name is extracted from the string in cell C3.
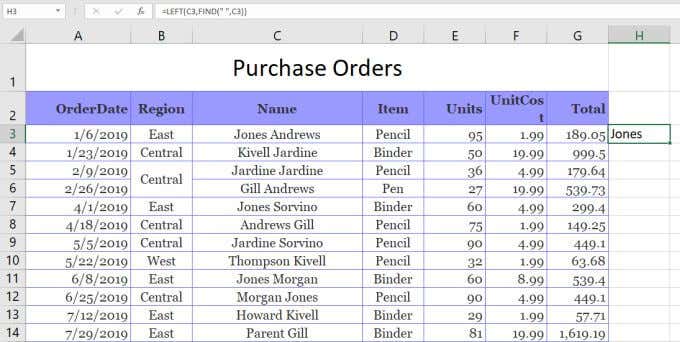
This works, because the Left function needs the number of characters to extract. Since the space character is positioned at the end of the first name, you can use the FIND function to find the space, which returns the number of characters you need to get the first name.
You can extract the last name either using either the Right function or the Mid function.
To use the Right function:
=RIGHT(C3,LEN(C3)-FIND(” “,C3))
This will extract the last name by finding the position of the space, then subtracting that from the length of the total string. This gives the Right function the number of characters it needs to extract the last name.
Technically, you could do the same thing as the Right function using the Mid function, like this:
=MID(C3,FIND(” “,C3),LEN(C3)-FIND(” “,C3))
In this case the Find function gives the Mid function the starting point, and the Len combined with Find provides the number of characters to extract. This will also return the last name.
Using Excel text functions to split a cell in Excel works as well as the Text-To-Column solution, but it also lets you fill the entire column beneath those results using the same functions.
Split Cell in Excel Using Flash Fill
The last option to split a cell in Excel is using the Flash Fill feature. This requires that the cells you’re splitting the original one into are right beside it.
If this is the case, all you have to do is type the part of the original cell that you want to split out. Then drag the lower right corner of the cell down to fill the cell beneath it. When you do this, you’ll see a small cell fill icon appear with a small plus sign next to it.
Select this icon and you’ll see a menu pop-up. Select Flash Fill in this menu.
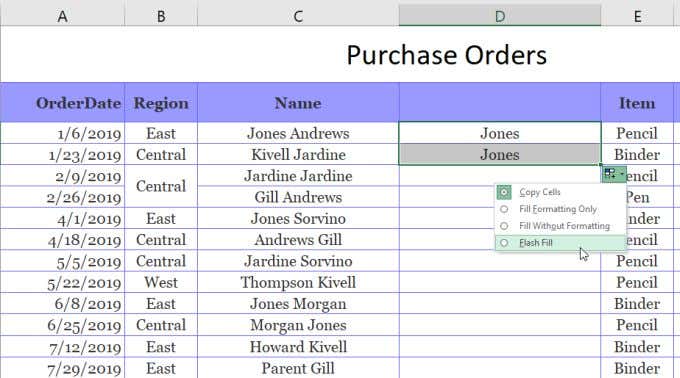
When you do this, you’ll see that the Flash Fill feature automatically detects why you typed what you typed, and will repeat the process in the next cell. It’ll do this by detecting and filling in the first name in the original cell to the left.
You can actually do this same procedure when you fill the entire column. Select the same icon and select Flash Fill. It’ll fill the entire column with the correct first name from the cells to the left.
You can then copy this entire column and paste it into another column, then repeat this same process to extract the last names. Finally, copy and paste that entire column where you want it to go in the spreadsheet. Then delete the original column you used to perform the Flash Fill process.
Splitting Cells in Excel
As you can see there are a few ways to accomplish the same thing. How you split a cell in Excel boils down to where you want the final result to go and what you plan to do with it. Any options works, so choose the one that makes the most sense for your situation and use it.
Last Update: Jan 03, 2023
This is a question our experts keep getting from time to time. Now, we have got the complete detailed explanation and answer for everyone, who is interested!
Asked by: Dr. Mustafa Mante
Score: 5/5
(44 votes)
Split cells
In the table, click the cell that you want to split. Click the Layout tab. In the Merge group, click Split Cells. In the Split Cells dialog, select the number of columns and rows that you want and then click OK.
Can you split a cell within a cell in Excel?
Unfortunately, you can’t do this in Excel. Instead, create a new column next to the column that has the cell you want to split and then split the cell. You can also split the contents of a cell into multiple adjacent cells.
How do I split a cell into multiple cells?
Split cells
- Click in a cell, or select multiple cells that you want to split.
- Under Table Tools, on the Layout tab, in the Merge group, click Split Cells.
- Enter the number of columns or rows that you want to split the selected cells into.
How do you split a cell in Excel formula?
Split Unmerged Cell Using a Formula
- Step 1: Select the cells you want to split into two cells.
- Step 2: On the Data tab, click the Text to Columns option.
- Step 3: In the Convert Text to Columns Wizard, if you want to split the text into the cells based on a comma, space, or other characters, select the Delimited option.
Is there a split function in Excel?
The Microsoft Excel SPLIT function will split a string into substrings based on a delimiter. The result is returned as an array of substrings. The SPLIT function is a built-in function in Excel that is categorized as a String/Text Function. It can be used as a VBA function (VBA) in Excel.
19 related questions found
How do I split a string by a certain length in Excel?
Split string by certain length with Text to Columns feature
- Select the cells with regular text string you need to split, then click Data > Text to Columns.
- In the first Convert Text to Columns Wizard, select the Fixed width option, and then click the Next button.
How do you separate an alphanumeric in Excel?
Split text and numbers
- Generic formula. =MIN(FIND({0,1,2,3,4,5,6,7,8,9},A1&»0123456789″))
- To separate text and numbers, you can use a formula based on the FIND function, the MIN function, and the LEN function with the LEFT or RIGHT function, depending on whether you want to extract the text or the number. …
- Overview.
How do I split a column into two in Excel?
Turn One Data Column into Two in Excel 2016
- Select the data that needs dividing into two columns.
- On the Data tab, click the Turn to Columns button. …
- Choose the Delimited option (if it isn’t already chosen) and click Next.
- Under Delimiters, choose the option that defines how you will divide the data into two columns.
How do you split a cell in Excel by Delimiter?
Try it!
- Select the cell or column that contains the text you want to split.
- Select Data > Text to Columns.
- In the Convert Text to Columns Wizard, select Delimited > Next.
- Select the Delimiters for your data. …
- Select Next.
- Select the Destination in your worksheet which is where you want the split data to appear.
What is breaking a single cell into more than one cell called?
The process of breaking a single cell into multiple cells in a table is called Cell division.
How do I make multiple lines in one cell in Excel?
5 steps to better looking data
- Click on the cell where you need to enter multiple lines of text.
- Type the first line.
- Press Alt + Enter to add another line to the cell. Tip. …
- Type the next line of text you would like in the cell.
- Press Enter to finish up.
How do I split a cell into two rows in sheets?
Select a cell or cells with the data to be split. Open the Data menu and select Split text to columns. Once you pick a Separator, the data will be split into fragments.
How do I split a cell diagonally in Excel?
Split a cell diagonally in Excel
- Right-click the specified cell you will split diagonally, and select Format Cells from the context menu. …
- In the Format Cells dialog box, please click to enable the Border tab, click to highlight button in the Border section, and then click the OK button.
What cells Cannot be merged in a table?
Explanation: The cells can be merged in a table. The contiguous cells only can be merged in a table. Cells in an identical row or column in a table can be merged into a single cell.
How do you split a table?
Split a table
- Put your cursor on the row that you want as the first row of your second table. In the example table, it’s on the third row. …
- On the LAYOUT tab, in the Merge group, click Split Table. The table splits into two tables.
How do I split a column in sheets?
Split data into columns
- On your computer, open a spreadsheet in Google Sheets. …
- At the top, click Data. …
- To change which character Sheets uses to split the data, next to «Separator» click the dropdown menu.
- To fix how your columns spread out after you split your text, click the menu next to «Separator»
What is the shortcut key to split a table?
The shortcut key to split a table in ms-word is ctrl + shift + enter.
What is Ctrl E in Excel?
The shortcut Ctrl+E is to automatically recognize the pattern and «Flash Fill» the current column. Flash fill is a new feature since Excel 2016. It is super useful when creating a new column based on the current data. … Step 4: Press and hold the «Ctrl» key from the keyboard, then press the letter «E».
How do I split a name and surname in Excel?
Split Names tool — fastest way to separate names in Excel
- Select any cell containing a name you want to separate and click the Split Names icon on the Ablebits Data tab > Text group.
- Select the desired names parts (all of them in our case) at click Split.
How do you combine text in Excel?
Combine text from two or more cells into one cell
- Select the cell where you want to put the combined data.
- Type = and select the first cell you want to combine.
- Type & and use quotation marks with a space enclosed.
- Select the next cell you want to combine and press enter. An example formula might be =A2&» «&B2.
How do you split a string in python with number of characters?
Use range() and slicing syntax to split a string at every nth character. Use a for-loop and range(start, stop, step) to iterate over a range from start to stop where stop is the len(string) and step is every number of characters where the string will be split.
How do you skip lines in sheets?
Manually add a new line in the same cell (Keyboard Shortcut)
- Double-click on the cell in which you want to add a line break (or select it and then press F2).
- Place the cursor where you want to insert the line break.
- Hold the ALT key and then press the Enter key (or Control + Option + Enter if you’re using a Mac)
How do I split text into rows?
The easiest method is to follow these steps:
- Select one cell in your data and press Ctrl+T to convert the data to a table.
- In the Power Query tools, choose From Table. …
- Select the column with your products. …
- In the Split Column dialog, click on Advanced Options.
- In the Split Into section, choose Rows.
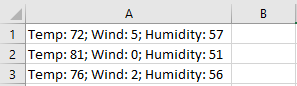
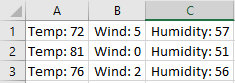
Splitting Cells in Excel refers to dividing its content into two or more separate cells. Splitting cells is often required when large datasets are imported in excel from external sources. In such cases, there is a need to create separate columns for similar data values.
For example, a journalist, Mr. D, wants to evaluate the number of awards won by the players of his country in an international sporting event. Further, he wants to present this data on a news channel in order to encourage the next generation to opt for a career in sports.
For this purpose, Mr. D has been given the following dataset:
- Column A lists the names of players, the countries they represent, and the games they are associated with.
- Column B displays the number of medals and trophies won by every player.
However, since all entries in column A are separated by a comma, it is difficult for Mr. D to comprehend the information. Moreover, the data is not presentable for the audience.
Hence, Mr. D wants to split the values of column A into separate columns in order to arrange the data neatly. This is where the splitting of cells property is applied.
The purpose of splitting excel cells is to organize, structure, and filter data to make it fit for analysis and decision-making. In addition, the splitting of cells helps to analyze every column independently.
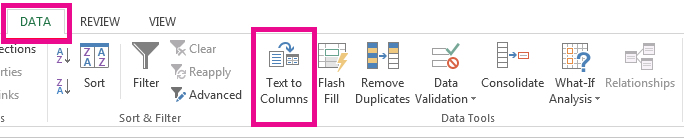
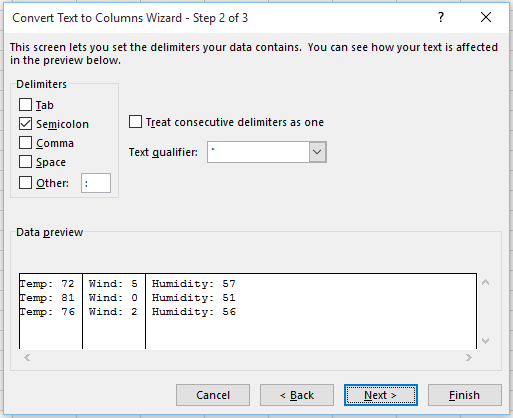
To split cells in excel, the text to columns wizard is used, which consists of the following options:
- Delimited: It splits the excel cells based on a specified separator (delimiter) used in the source data file.
- Fixed width: It splits the excel cells based on the position at which the break line (vertical line) is inserted in the dataset. This property works well when all the substrings have a fixed length.
The text to columns wizard can be accessed either from the Data tab or the shortcut “Alt+A+E” (press one by one).
Table of contents
- How to Split a Cell in Excel?
- Example #1–Split by “Delimited” Option
- Example #2–Split by “Fixed Width” Option
- Frequently Asked Questions
- Recommended Articles
How to Split a Cell in Excel?
Let us consider some examples to understand the splitting of cells with the help of the Text to columns in excel is used to separate text in different columns based on some delimited or fixed width. This is done either by using a delimiter such as a comma, space or hyphen, or using fixed defined width to separate a text in the adjacent columns.read moretext to columnsText to columns in excel is used to separate text in different columns based on some delimited or fixed width. This is done either by using a delimiter such as a comma, space or hyphen, or using fixed defined width to separate a text in the adjacent columns.read more wizard.
You can download this Split a Cell Excel Template here – Split a Cell Excel Template
Example #1–Split by “Delimited” Option
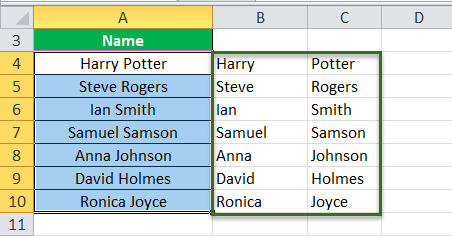
The following table shows the full names of seven people. We want to split the first and the last name into separate columns. Use the “delimited” option of the text to columns wizard.

The steps to split cells in excel with the help of the delimiter character are listed as follows:
- Select the cell range A3:A10, which is to be split. The same is shown in the following image.

- In the Data tab, click the “text to columns” option under the “data tools” group.

- The “convert text to columns wizard” dialog box appears, as shown in the following image.

- Choose the “delimited” option, which is selected by default. This option helps separate the data strings based on a particular delimiter character. Click “next.”
- Under “delimiters,” select the checkbox for space. Deselect the other delimiters (if selected), as shown in the following image. Click “next.”

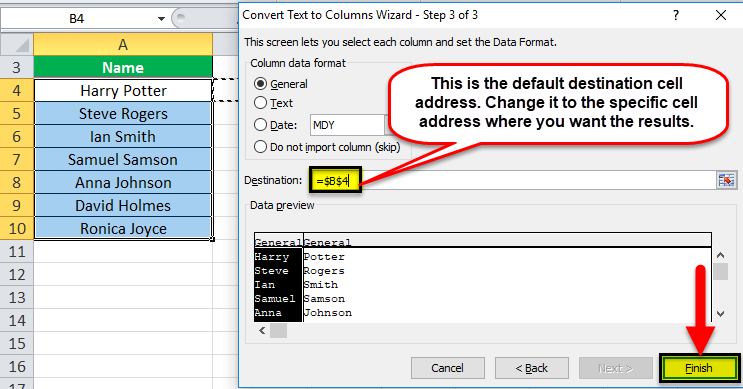
- Under “destination,” specify the cell in which the output is required. Enter “$B$4” and click “finish.”
Note: If you proceed with the default cell address under “destination,” the output will replace the original dataset. To retain the initial data as is, select a cell to its right as the “destination.”

- The output is shown in the following image. The names of column A have been split into the first name (column B) and the last name (column C).
Note: The results of the “text to columns” property are static. This means that any change made to the source data is not reflected in the results. Hence, to include the changes, the whole process has to be repeated.


Example #2–Split by “Fixed Width” Option
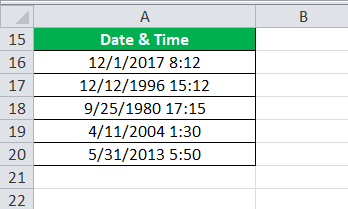
The following list shows the date and time of specific days. We want to split the date and time into separate columns. Use the “fixed width” option of the text to columns wizard.
Step 1: Select the range A16:A20, as shown in the following image. In the Data tab, click “text to columns” under the “data tools” group.

Step 2: The “convert text to columns wizard” dialog box appears. Select the option “fixed width,” as shown in the following image. Click “next.”

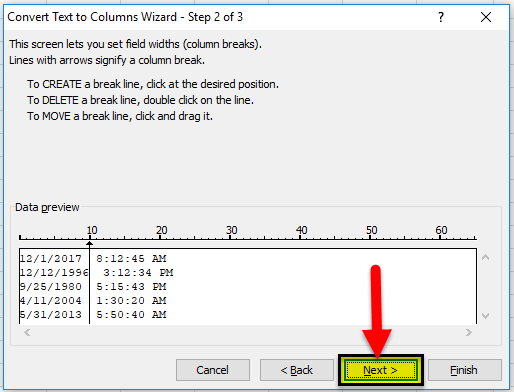
Step 3: Under “data preview,” place a break line (on the text) at the position where splitting is to be carried out.
Since we want to split the date and time, we insert the break line between these two data strings. Click “next.”
Note: To remove the break line, double-click on it.
Step 4: Under “column data format,” select date, as shown in the following image. In “destination,” enter the cell address where the results are required. Click “finish.”
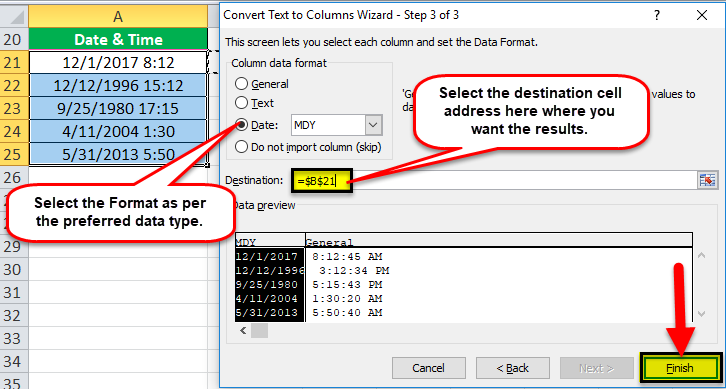
Step 5: The output is shown in the following image. The data strings of column A have been split into the dates (column B) and the time (column C).

Frequently Asked Questions
1. What is the splitting of cells and how is it done in Excel?
When a cell is split, its components are divided into separate cells. Splitting is often done when there is a need to sort and re-arrange the existing data. Since the substrings of data are moved to new cells, splitting helps to analyze the resulting columns.
To split an excel cell, the text to columns feature is used. This separates the data of a cell, based on either the delimiter character or the fixed length of a substring.
The steps to split cell in excel are listed as follows:
a. Select the cells to be divided. In the Data tab, click “text to columns” under the “data tools” group.
b. Select the option “delimited” or “fixed width.” Click “next.”
c. If “delimited” is selected, enter the required separator in “delimiters.” If “fixed width” is selected, insert the break line at the desired position.
d. Select the “column data format” and specify the “destination.” Click “finish.”
The content of the selected cells is split into different excel columns.
2. How to split a cell’s content separated by commas into multiple cells of Excel?
Let us split column A which consists of data strings separated by a comma and space.
The entries in the range A1:A5 are listed as follows:
• Jack Adams, Chicago, USA, 2016
• Peter Smith, Houston, USA, 2019
• Ella Taylor, Glasgow, UK, 2018
• Lily Brown, Birmingham, UK, 2015
• Birdie Evans, Paris, France, 2020
The steps to split data into multiple cells using the “delimited” option are stated as follows:
a. In the Data tab, select the option “text to columns.” This is under the “data tools” group.
b. The “convert text to columns wizard” dialog box appears. Select “delimited” under “choose the file type that best describes your data.” Click “next.”
c. Select the checkboxes for both comma and space. Select the checkbox for “treat consecutive delimiters as one.” Click “next.”
d. Select “general” under the “column data format.” Enter “$B$1” under “destination.” Click “finish.”
Five separate columns (columns B to F) are created containing the first names, last names, cities, countries, and years respectively.
Note 1: Before the procedure begins, ensure that there are empty columns to the right of the destination cell. This prevents overwriting the source data.
Note 2: It is recommended to glance through the “data preview” before clicking “finish” in the last step. This ensures that the splitting of data is executed properly.
3. How to split cells in Excel automatically?
The flash fill feature helps to split cells automatically. When the user enters the split up text in a few cells one by one, Excel senses a pattern and fills the remaining cells.
Let us split the first and the last names of column A containing Jack Adams, Peter Smith, Ella Taylor, Lily Brown, and Birdie Evans (in the range A1:A5).
The steps of splitting excel cells with the help of flash fill are listed as follows:
a. In column B, enter the first name “Jack” in cell B1.
b. Enter “Peter” in the subsequent cell B2.
c. Excel detects a pattern and displays the first names for the remaining cells B3, B4, and B5. Press the “Enter” key.
Column B is filled with the first names (in the range B1:B5).
Note 1: Ensure that the first names in cells B1 and B2 are entered without the double quotation marks.
Note 2: Alternatively, after the first step (step a), click “flash fill” under the “data tools” group of the Data tab. This populates similar data in the remaining cells.
Recommended Articles
This has been a guide to splitting a cell in Excel. Here we discuss how to split a cell in Excel by using the text to columns wizard (delimited and fixed-width method) along with Excel examples and downloadable Excel templates. You may also look at these useful functions of Excel–
- Convert Excel Text to Numbers
- Combine Cells in Excel
- Merge Cells in Excel
- Unmerge Cells in Excel
- Change Case in Excel