
Your handwritten signature gives your document a personal touch. You can scan your signature and store it as a picture to insert in the document.
You can also insert a signature line to indicate where a signature should be written.
Create and insert a handwritten signature
You need a scanner to do this.
-
Write your signature on a piece of paper.
-
Scan the page and save it on your computer in a common file format: .bmp, .jpg, or .png.
For information on how to use your scanner, use the manufacturer’s manual or Web site.
-
Open the image file in Word.
-
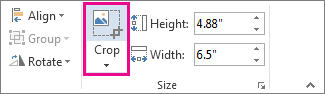
Select the image and on the Picture Format tab, click Crop and use the handles to crop the image.

-
Right-click the image, and choose Save as Picture to save as a separate file.
-
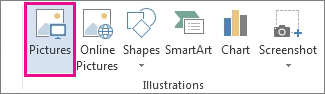
To add the signature to a document, click Insert > Picture s.
Include typewritten text with your reusable signature
If you want information like your job title, phone number, or email address to be part of your signature, save it along with the picture as AutoText.
-
Type the text you want under the inserted picture.
-
Select the picture and the typed text.
-
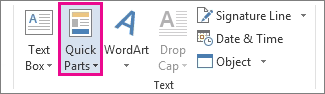
Click Insert > Quick Parts.
-
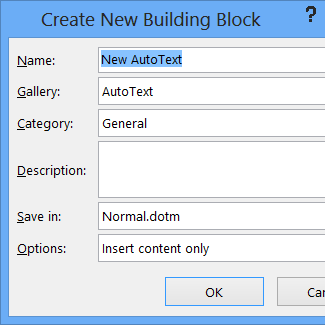
Click Save Selection to Quick Part Gallery. The Create New Building Block box opens.
-
In the Name box, type a name for your signature block.
-
In the Gallery box, select AutoText.
-
Click OK.
-
When you want to use this signature, place the insertion point where you want to insert the signature block.
-
Click Insert > Quick Parts > AutoText, and then click the name of your signature block.
Insert a signature line
Use the Signature Line command to insert a signature line with an X by it to show where to sign a document.
-
Click where you want the line.
-
Click Insert > Signature Line.
-
Click Microsoft Office Signature Line.
-
In the Signature Setup box, you can type a name in the Suggested signerbox. You can also add a title in the Suggested signer’s title box.
-
Click OK. The signature line appears in your document.


Your handwritten signature gives your document a personal touch. You can scan your signature, store it as a picture, and then insert your signature in Word documents.
Scan and insert a picture of your handwritten signature
You need a scanner to do this.
-
Write your signature on a piece of paper.
-
Scan the page and save it on your computer in a common file format: .BMP, .GIF, .JPG, or .PNG.
Tip: For information on how to use your scanner, use the manufacturer’s manual or Web site.
-
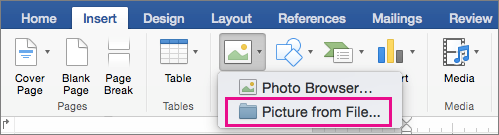
On the Insert tab, click Pictures > Picture from File.
-
Browse to the picture you want to insert, select it, and then click Insert.
-
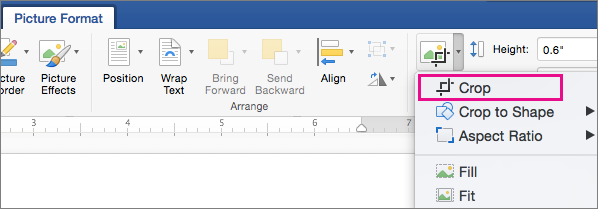
Click the picture to show the Picture Format tab.
-
On the Picture Format tab, click Crop, and then crop the signature.
-
Right-click the picture, and then click Save as Picture to save it as a separate file you can use in other documents.
Include text with your reusable signature
If you want information, such as your job title, phone number, or email address to be part of your signature, save it along with the picture as AutoText.
-
Type the text you want under the inserted picture.
-
Select the picture and the typed text.
-
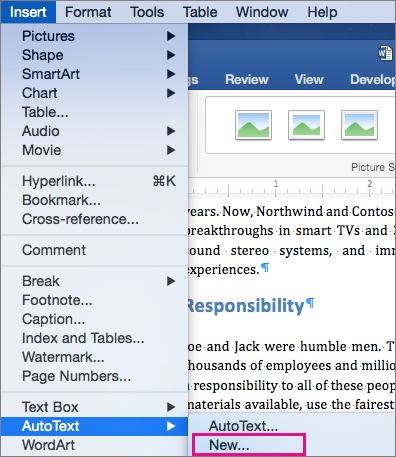
On the Insert menu, click AutoText > New.
-
The Create New AutoText box opens.
Next to Name, type a name for your signature block and click OK.
-
When you want to use this signature, place the insertion point where you want to insert the signature block.
-
On the Insert menu, click AutoText > AutoText, and then click the name of your signature block.

Did you recently receive an NDA (non-disclosure agreement) or the rent agreement in a Word document to sign? You can print it out, sign the document using a pen and then scan it using a printer to send it back. It’s a time-consuming and unproductive way to get things done though. We have a better solution. You can open the document in Microsoft Word on PC or Mac and add a signature digitally. Here’s how to do it.
Add Signature in Microsoft Word
There are three ways to add a signature in Microsoft Word. Let’s discuss all of them.
1. Use the Drawing Tool
Microsoft Word comes with a built-in drawing tool to doodle on a Word document. Using the drawing tool, one can draw a digital signature and add it anywhere in the Word document. Follow the steps below to do so:
1. Open the document that you want to sign in Microsoft Word.
2. Select Draw from the above menu bar.
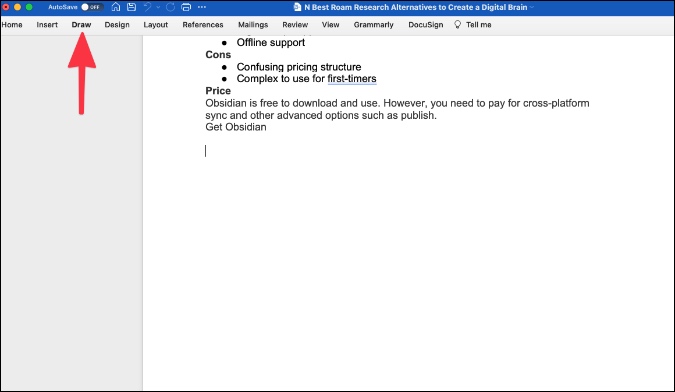
3. Select the Pen tool that you want to use to sign a document.
4. You can also click on the little down arrow beside the pen and change the thickness of the pointer, color, and even add glittering effects (irrelevant here).

5. For better results, use a thinner pointer and choose Black, Green, or Red color.
Here, we are going to sign a document using the trackpad. Doing the same thing with a mouse won’t get you desired results. Enable the Draw with Trackpad toggle.
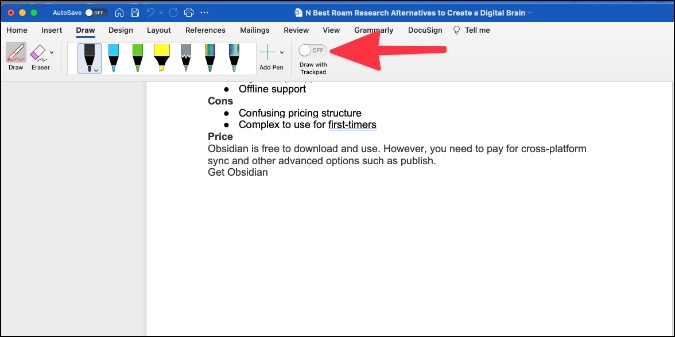
6. It will open a little dialog box. Use one finger to add a signature. Use two fingers to change the position. And finally, press any key to exit the preview.

Using the drawing tool won’t deliver a professional outcome that you might look for. For that, you will have to use a built-in add-on to sign a document in Microsoft Word.
2. Use Third-Party Add-ons
Using third-party add-ons like Adobe Sign, DocuSign, and Panda Sign, you can easily sign a document in Word. DocuSign is one of the most popular services out there to sign documents. Let’s learn how to use it in Microsoft Word.
1. Open the document that you want to sign in Microsoft Word.
2. Select Insert > Get Add-ins.
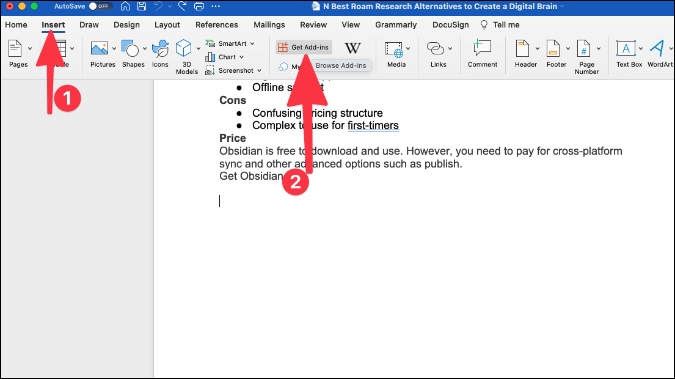
3. It will open the Add-in store inside Microsoft Word. Search for DocuSign and install the add-in in Microsoft Word.

4. Select the Add-in and create a DocuSign account.
5. Whenever you want to sign a document, select DocuSign from the menu bar.
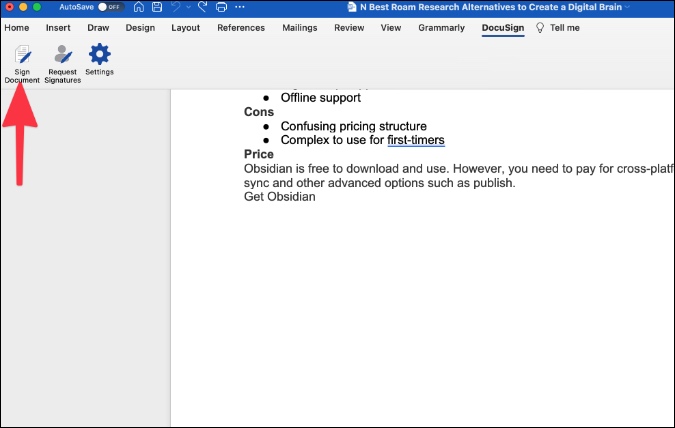
6. Click on Sign Document and DocuSign will upload the document to the cloud and open the default interface to sign a document.
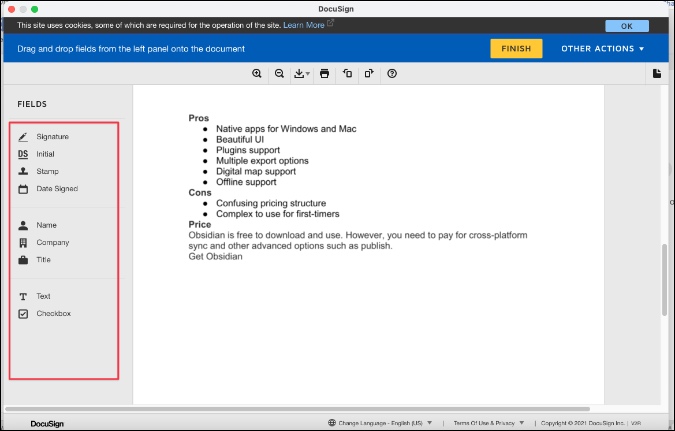
Here, you can sign documents, add initials, stamp, text, check box, and even company details to a document.
Using a third-party add-on allows you to use the same signature across all services. We are saying all services here as DocuSign is available as a mini-app across various apps like Google Docs, Microsoft Word, Zoom, and even Microsoft Teams.
The idea is to sign a document without leaving the current interface.
3. Add Image Signature
If you have saved your signature in a white background as a PNG or JPG file on the PC, it’s time to insert it to the Word document.
1. Open the Word document that you want to sign.
2. Select Insert > Picture > Picture from File.
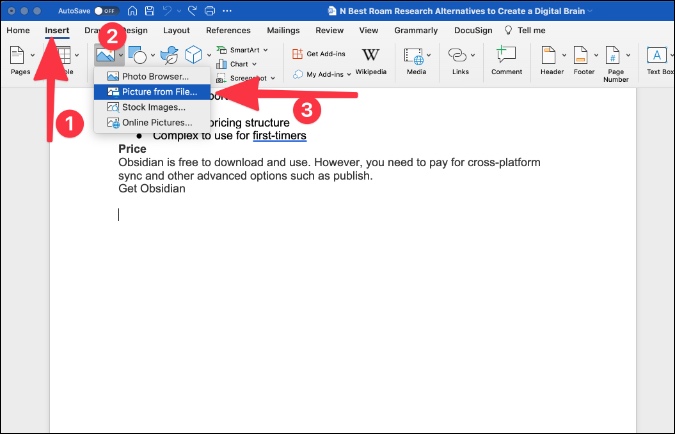
3. Select the image from the device and insert it in the Word file.
4. Resize the image and place it at a relevant place in the file.
This is just a temporary workaround though. Let’s say the document has some other color background then the image signature with a white background looks unprofessional and out of place. You would need to remove that ugly background for a better outcome.
Wrapping Up: Sign Word Documents on the Go
The methods above will save a lot of time figuring out how to add a signature to Word documents quickly and effortlessly. Our favorite method is the second one using third-party add-ins. You can also opt for the drawing tool if you accurately figure it out using the trackpad to add a signature.
Parth Shah
Parth previously worked at EOTO.tech covering tech news. He is currently freelancing at TechWiser, Android Police, and GuidingTech writing about apps comparisons, tutorials, software tips and tricks, and diving deep into iOS, Android, macOS, and Windows platforms.
Need to add your electronic signature to a contract, offer letter or non disclosure agreement from a Word document? It’s easy to create an electronic signature on a Microsoft Word document without ever leaving the application.
How to sign a Word document
Read on to discover how to add an electronic signature to a Word document in just a few steps with this easy guide.
1. First, install the DocuSign add-in. Go to the Insert tab in the Menu bar and navigate to “Get Add-ins. This will open up the Office Store (or Store on Mac). Type “DocuSign” in the search bar. Click “Add” DocuSign for Word and confirm the installation. This is free.
2. Find DocuSign in your Menu tab. Once the add-in has loaded successfully, you will see a new menu option called “DocuSign.” Click on that and choose “Sign Document.”

3. Log into your DocuSign account or click “Create Account” for a free DocuSign account. Signing up for a free trial will allow you to create a free electronic signature in Word. You can also send forms and contracts to others for signature for 30 days — no credit card required.
4. Add Signature to your document. You can now drag and drop the Signature field to add your electronic signature to the Word document. Simply click “Signature” on the left side of the page, then click the spot in your document where you want to insert your signature. You’re also able to add your Initials, Date Signed, Name and other information if you choose.

5. Click the yellow “Adopt and Sign” button at the bottom of the window. Your signature will appear in the desired place on the document. Then click the “Finish” button at the top of the page.
Your signed document is ready to send and download.
If you need to send the document to another party, enter the recipient’s name and email address in the “Full Name” and “Email Address” fields in the pop-up menu, then click “Send and Close”.
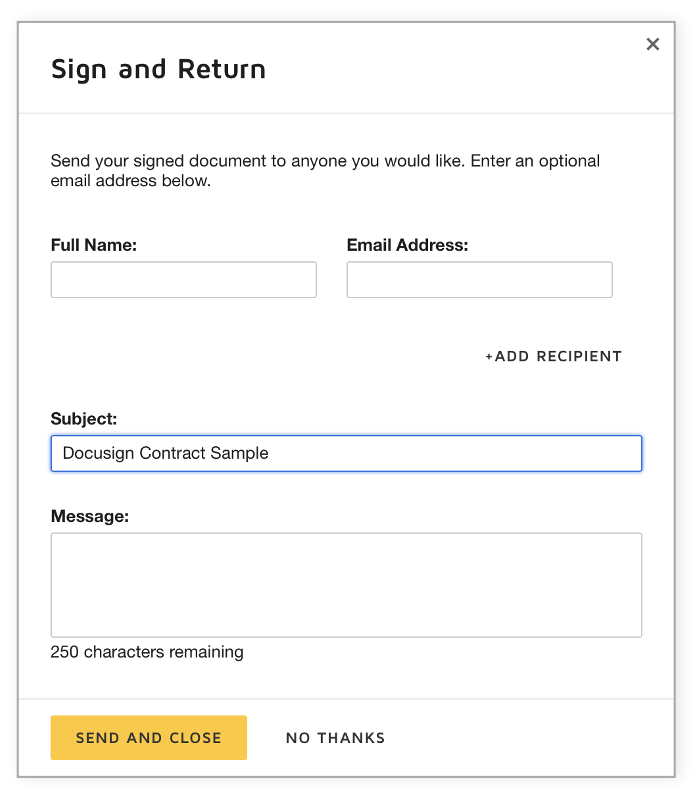
And you’re done. You can then log in to your DocuSign account to see all the documents you’ve signed and sent.
Creating your own electronic signature
When adding an electronic signature to any document, you can choose to simply adopt a DocuSign pre-made signature using your name. If you love your unique autograph, you can also choose to upload or draw your own electronic signature:
1. Log in to your DocuSign account. Click the Profile Image, then click “Signatures.”
2. To change your signature, click “Edit” and select “Draw”.

3. To draw a signature in word, click and hold within the “Draw your signature” box, then draw the desired signature with your cursor or on your touch screen.
4. Click and hold within the “Draw your initials” box to draw the desired initials. Click “Create” to save your signature.
Try eSignature Now for Free
Ready to get started with DocuSign eSignature? Try now for free.
-
Try now
Related:
- How to Electronically Sign Documents in Google Docs
- What is a Wet Signature vs. an Electronic Signature?
- Are Electronic Signatures Legal?
Learn more about DocuSign eSignature and other ways to digitally transform how you do business with the DocuSign Agreement Cloud.
Microsoft Word does indeed have a handy built-in feature that allows users to create and add electronic signatures to documents for free.
Despite its popularity, however, Word is somewhat limited concerning wider functionality when it comes to electronic signatures.
This makes Microsoft an outdated software choice for many organisations, those who would otherwise benefit by switching to more dedicated eSigning platforms.
On the bright side, there’s still a lot that can be done with Word. In this article, we’ll take you through the ins and outs of electronic signatures in Word, and we’ll teach you how to electronically sign a Word document.
What is an electronic signature?
An electronic signature, also known as an eSignature, is merely a digitised form of a traditional physical signature, making the document-signing process a fast-moving activity.
Like a standard handwritten signature, electronic signatures are mostly there to serve as proof that the signer has approved the document in question.
Why use electronic signatures?
Before we explore this subject further, it’s essential to know the what, why, and how of electronic signatures. Since we’re already done with the “what,” it’s about time we discover the “why.”
For starters, eSignatures are a lot faster to use than traditional signatures, since you don’t have to print, physically sign, scan the document, and then have it sent back to the sender.
Another handy feature of eSignatures is that they only need to be created once, and then the copy signature can be added quickly and easily to any future document.
For anyone needing to send out signed documents frequently, eSignatures can significantly improve their workflow. Teams like sales, admin, accounts, etc., as well as many business owners, can profoundly benefit from its use.
For the most part, an electronic signature is just as legally binding as a real signature (read: certain countries consider written signatures as taking higher precedence over eSignatures).
Oh, and before we forget: they are also encrypted — so rest assured, electronic signatures are safe to use even with critical and sensitive documents.
Leverage your business with electronic signatures
When partnering with a brand, you ideally need an application that is more than just an eSignature software.
At the same time, it should be a brand that understands the importance and benefits of using electronic signatures. These eSignature benefits should include:
- Getting instant updates.
- Being able to deploy automation for signature tracking.
- Easy accessibility of signing different file types.
- Access to enhanced security.
PandaDoc has all these features and then some. You can scan, view, and sign a document, all at the same time, and easily.
If you’re interested in exploring further, send yourself a (free) sample copy to view the eSignature journey from the eyes of your customers.
Does it make sense to add a digital signature in Word?
Microsoft Word is the universal word processing software used by businesses and individuals across the world to create documents.
Because it is so widely used, many people choose to add eSignatures to documents in Word to increase the speed of their document processes. (It often might do otherwise, but more on that later.)
The main advantage of adding digital signatures in Word documents is the very fact that most businesses already use the software to create and edit their documents.
However, while this may be the most obvious benefit, just make a note if your organisation can indeed support the use-case of electronic signatures before moving forward with a solution.
How to add an electronic signature to a Word document
At this step, perhaps you may ask, “How do I write my signature on a Word document?” Well then, you’ve come to the right place.
Follow these necessary steps to add a digital signature to a Word document (“word” of caution, no pun intended): these steps are only relevant on the Microsoft Word versions 2007, 2010, 2013, 2016, 2019, and Word in Office 365):
1. Place the cursor where you’d like to add a signature to a Word document.
2. Go to the Insert tab, and under “Text,” click “Signature List,” followed by “Microsoft Office Signature Line“.
3. Complete the fields about signature details in the setup box that pops up and select your preferences for the signature box.
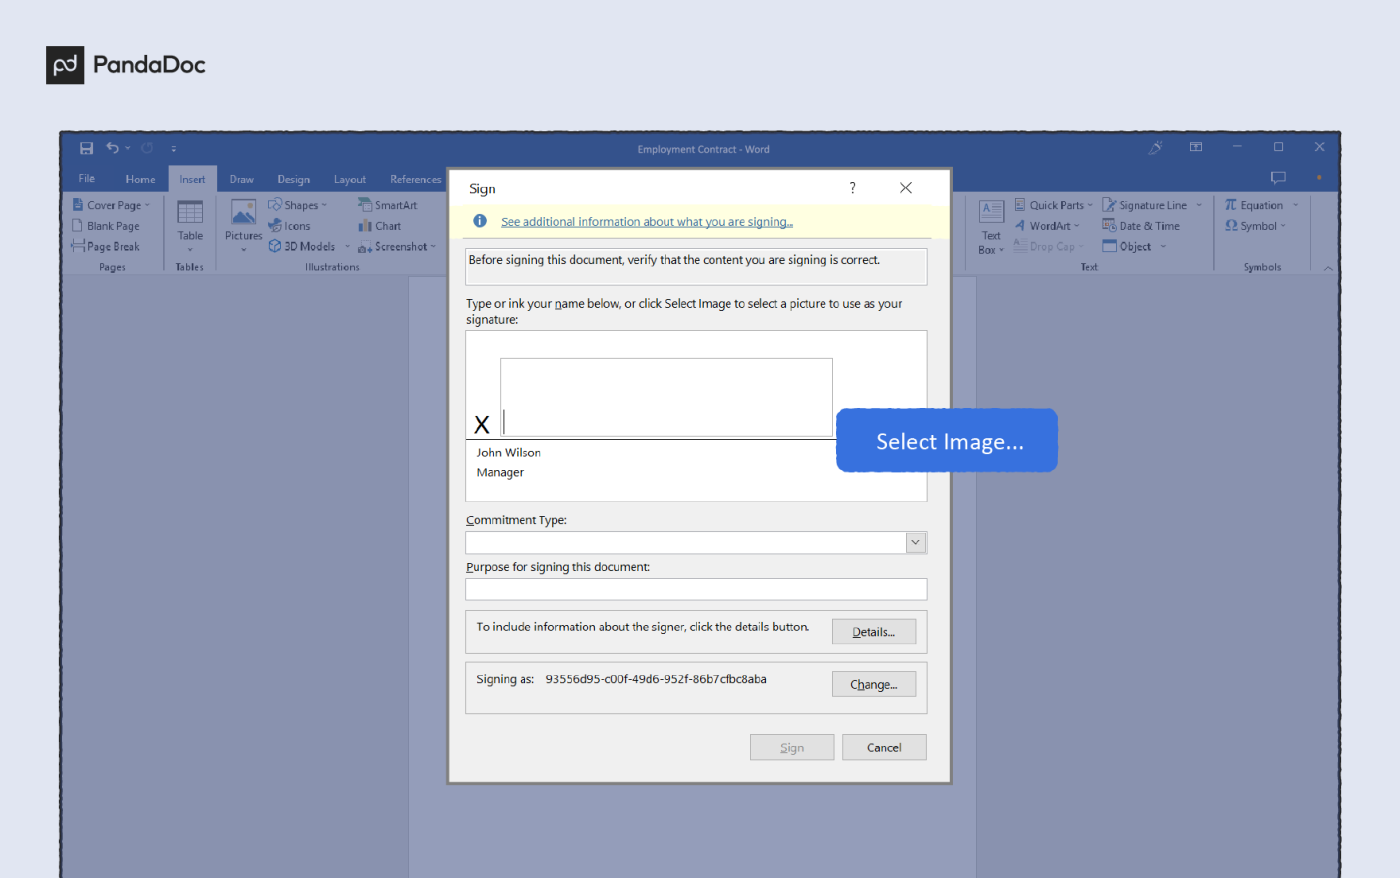
4. Right-click on the signature box in the document.
5. After this, click “Select Image” to choose an image of a signature that you have already saved.
Alternatively, if you’re using a touch screen, you can hand draw your signature into the box. You can also type a printed version of your name directly into the box.
While it’s entirely possible to eSign documents using Word, the signature setup can be a convoluted process.
Every person who’s signing the document will need to download the document, open it in Word, and follow step 4 to add their signature.
Note: if digital signatures are not your thing, then you can print and hand-sign them as well. But with this method, you’ll need to save the document and send it back to the sender, which only wastes time and potentially opens up room for human error.
How to add a signature line in the Word doc
1. Place your cursor where you would like to add the signature line.
2. Go to the “Insert” tab, and select “Signature line.”
3. A dialogue box will pop up — fill in the required details (name of the signer, work title of the signer, and email ID of the signer).
4. Mention the instructions you would like the recipient to read.
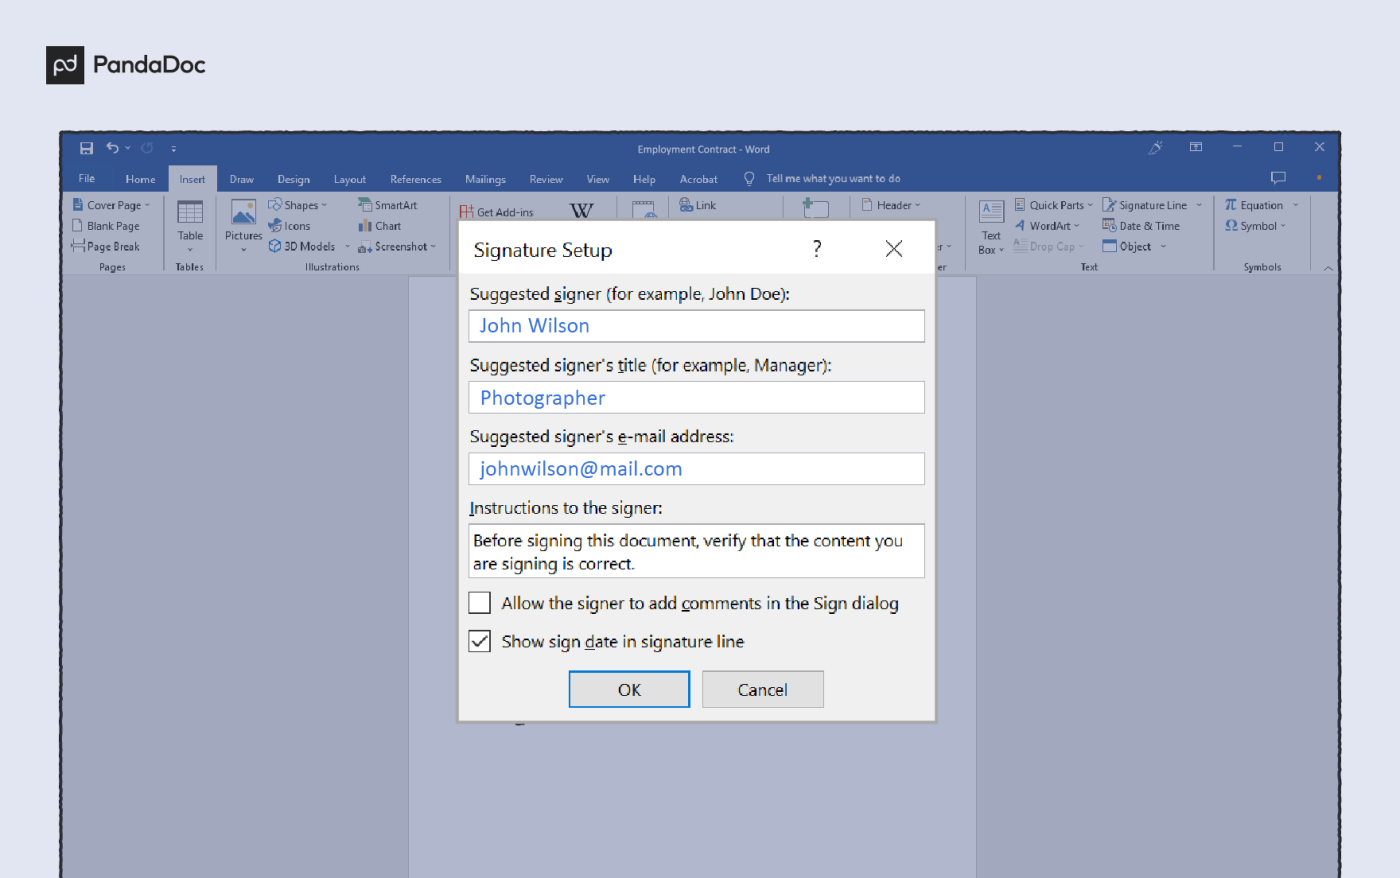
5. Allow the recipient to add comments (if you’d like), and select “show sign date.”
6. Click “OK.”
Why switch from using Word for electronic signatures?
Microsoft Word is not designed to be used as electronic signature software, and while it can be used to add signatures digitally, there are some gaps in functionality that limit its potential benefits.
The biggest limitation of using Word is that it is not comprehensive in nature. Imagine your client sends you a PDF document or a ppt file. You can’t use Microsoft Word to sign those documents.
Apps like PandaDoc, that have an eSignature function, are compatible with multiple file types, including Word, ppt, pdf, xls, jpg, and more.
Another drawback is that you need to consider the client’s journey when they sign a document. Logically, these recipients need to read the document, decide if they’re interested, sign it themselves and then send it back.
As a business owner, your goal should be to make the signing process as easy as possible.
This can be done only when you have insights that tell you how and where did your recipient(s) interact with the documents you sent them. Unfortunately, this isn’t possible with Word.
Another big drawback of Word is that it is not the fastest way to eSign documents. The thing is, anytime you want to sign a document on Word, you’d have to create a digital ID.
When you click on the X to sign, a dialog box would appear. For some users, this dialog box redirects them to Microsoft support from where they can read the instructions to create a digital ID.
Whereas for others, you have to manually go to the Microsoft website to obtain a digital ID from one of Microsoft’s partners.
It’s important to note that the partners Microsoft mentions (GlobalSign and IdenTrust) require you to pay money to obtain a digital ID. So, overall, Microsoft is not the most effortless software when it comes to eSigning.
What can other platforms offer that Word can’t?
There are many other examples of software that are dedicated to creating, sending and signing business documents digitally, such as PandaDoc and DocuSign.
PandaDoc and DocuSign have both been consistently ranking as the top-performing eSignature softwares.
While DocuSign has made a name for itself by launching first, PandaDoc has been giving it some serious competition with the help of its product offerings (unlimited audit trail, 24/7 support, dynamic pricing, and more).
The comparisons are numerous, and very much worth evaluating for yourself. If you’re still interested in exploring further, you can compare both these softwares here.
The point that remains is both these softwares provide services that offer a much broader range of useful features, generally making it straightforward to create signature fields and eSignatures.
PandaDoc, for example, provides users with a vast database of templates tailored to a wide range of business use cases that can easily be signed at the click of a button, as well as different types of quotes, proposals, or legal documents, that can be quickly uploaded to keep all information in one place.
Overall, this speeds up the creation of high-quality, professional documents.
Adding an eSignature is painless on these dedicated platforms, with intuitive interfaces and one-click addition often supported.
Once signed, documents can be sent to a list of recipients quickly and easily, directly through the software itself, and a secure signing certificate may be created as soon as the recipient signs the document.
Once sent, documents can then be tracked. Viewer metrics like time spent on each page, how often the recipient viewed the document, the number of views, comments, and eSignatures on the document, and other similar data are gathered and presented to the sender automatically.

This information provides a microscopic view of what works and what doesn’t, allowing companies to fine-tune their sales documents and improve their effectiveness over time.
These powerful features mean that adopting a specialised eSignature and sales document platform can revolutionise the way you eSign. It also means that you can dramatically streamline your entire sales process.
PandaDoc has integrated with Word to make limitations a thing of the past
It could be that you’re a Word loyalist, or maybe you’re just not looking to fully switch to a new software (after all, who doesn’t love comfort?).
But there is one thing that we guarantee you’ll love more: a smoother eSigning process.
And for the very same reason, PandaDoc has integrated with Word, making limitations of digital signatures a problem of the past. You can now have the best of both worlds.
With this integration, you can send your document quickly to a list of prospects and/or internal team members (PandaDoc will open in a separate tab to not disturb your workflow).
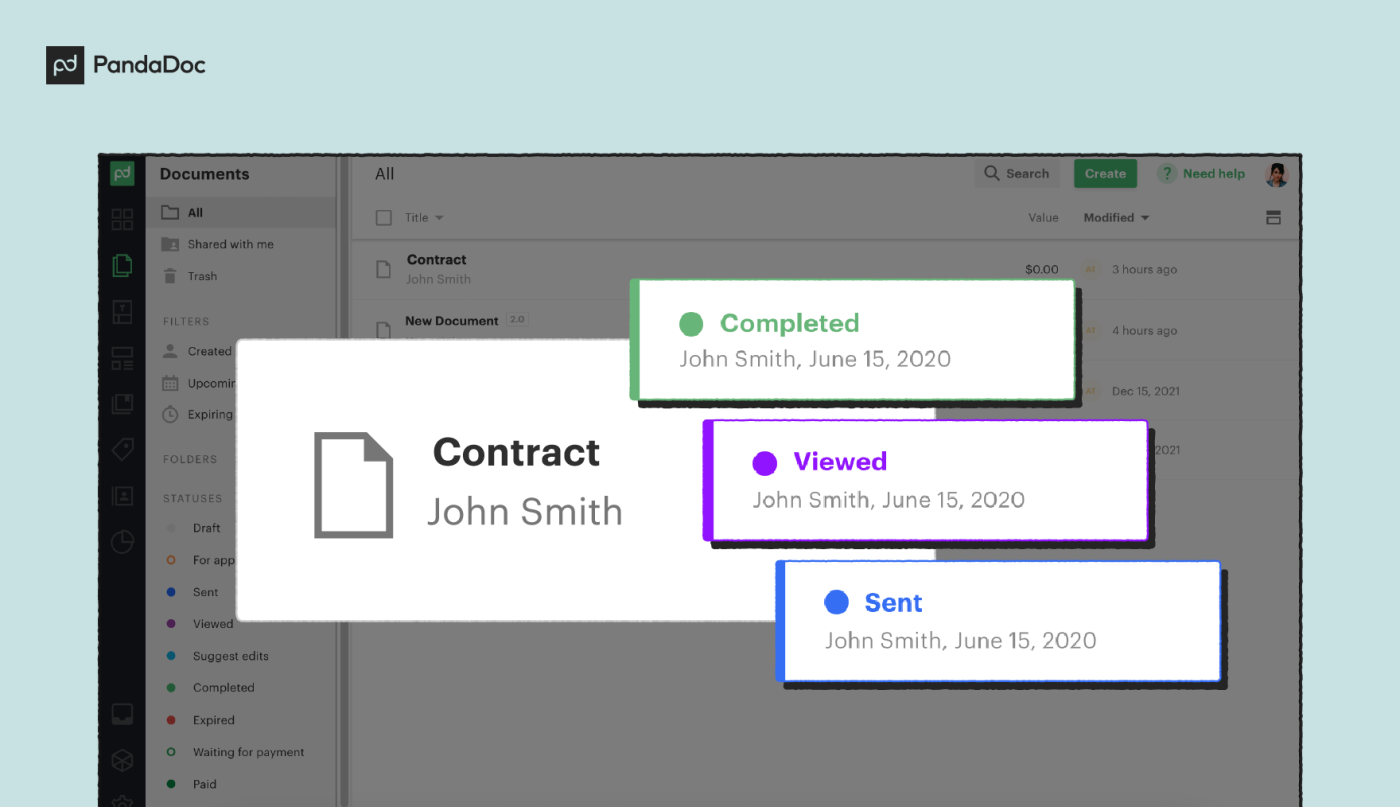
You can also see if your recipient received your document with status updates letting you know whether they’ve signed or not.

This integration makes it possible to sign existing Word documents, request eSignatures from multiple recipients, and check the status of your document — all at the click of a button.

Even more, the integration is simple and uploads the documents directly to your PandaDoc account, making them easy to access from anywhere.
If interested, you can download the integration from Microsoft Marketplace.
How to add an eSignature to a Word document using PandaDoc
PandaDoc makes it a breeze to add electronic signatures to any document.
Just follow these steps:
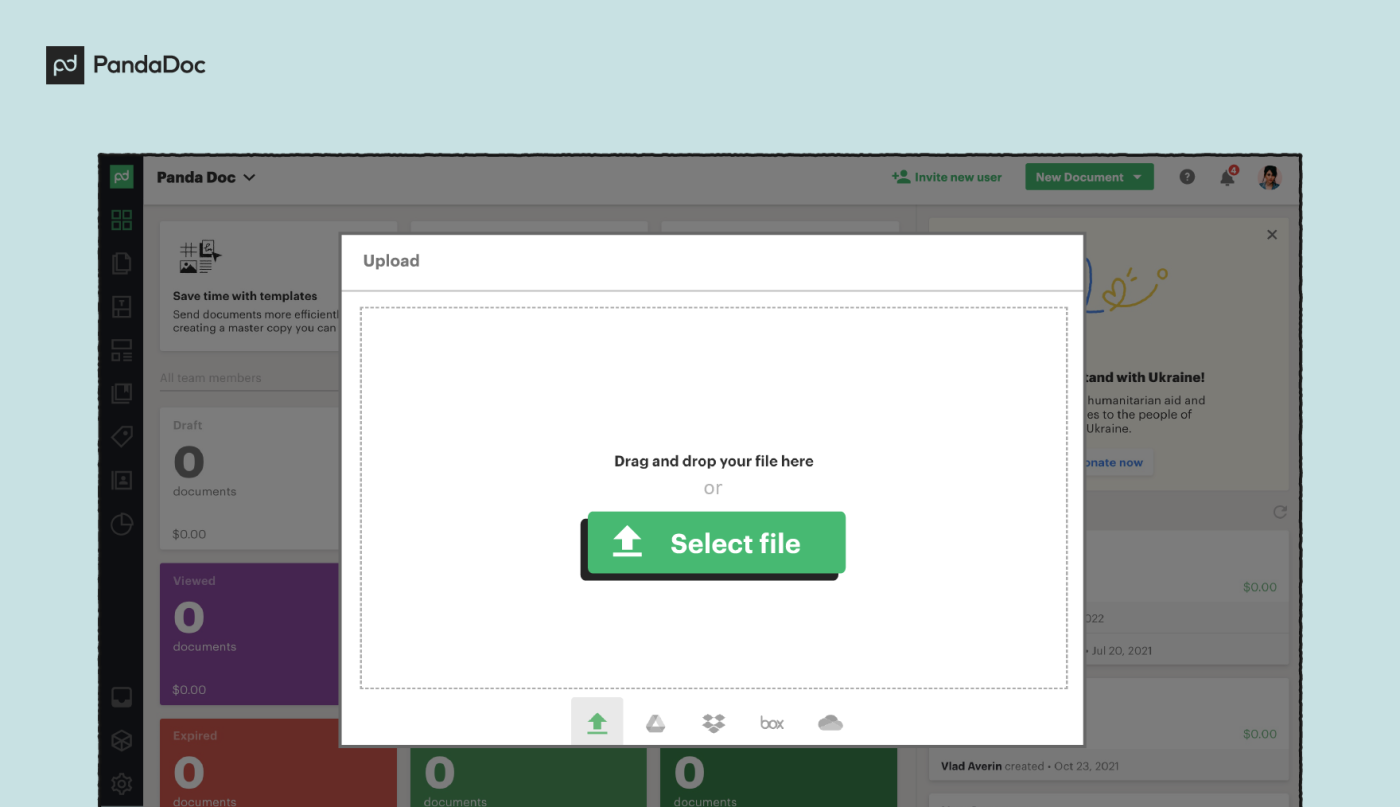
1. Start a free trial account with PandaDoc and open your document (either by choosing a saved file from PandaDoc, or uploading a file from your computer or cloud storage app).
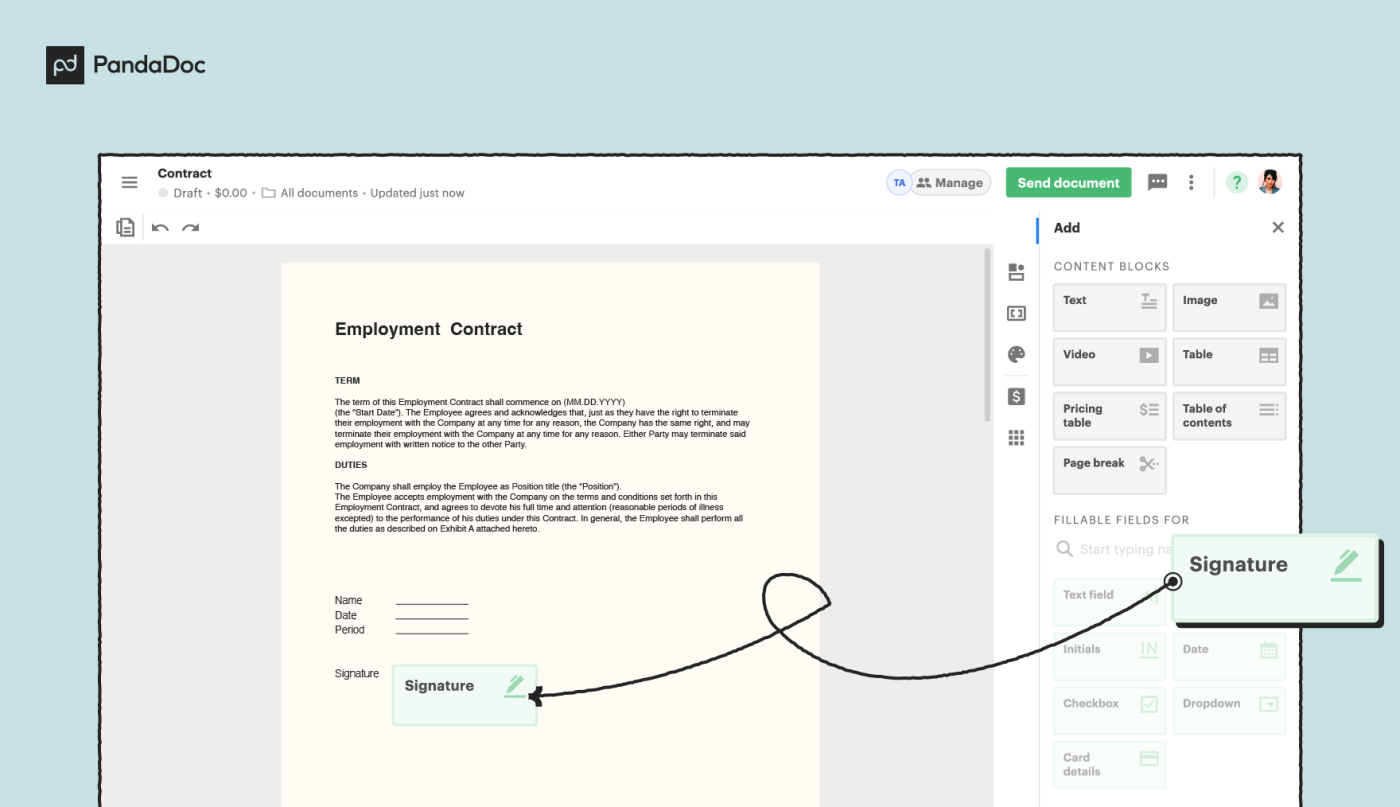
2. Drag and drop a signature field into the document and add any extra fields or text you want.
3. Choose your recipients and click send.
4. Recipients will get an email notification linking them directly to an online version of the document. They need to click the signature field and choose to draw, upload or type their electronic signature.

5. The sender’s copy of the document is automatically updated as signatures are added. Document activity can be tracked conveniently, and follow-ups are sent accordingly.
PandaDoc also creates a signature certificate that shows the signing date, IP address, location, and the time stamp ensuring the document’s legitimacy.
A better way to eSign your business and sales documents
Microsoft Word may be the most popular word processing software for both businesses and individuals, but that doesn’t always make it the best choice for electronic signatures.
There now exists a massive array of softwares dedicated to improving the document signing process.
Alternatives to Word like PandaDoc not only make the eSigning process incredibly simple, but they also come with a wide range of other tools that can enhance your ability to create, send, sign and track a large number of important business documents with ease.
So, what’s stopping you from hopping on the PandaDoc train and creating an illustrious document signing experience?
Signing a document makes it easy to prove your identity and authenticity of the document. Here is how to sign a Word document (add signature).
For document creation, there is no other better software as popular or feature-rich as MS Word. Whether you are writing a book, contract letters, official documents, or general notes, MS Word has everything for you and can do it all.
After creating a document, you can further personalize it with a digital signature. In fact, you can even add an image or picture signature in Word. As an added benefit, a signature will prove your identity and the document’s authenticity, just like in real life. It also discourages others from editing the manuscript. Any changes made to the document after signing will invalidate the signature.
As you can guess, Word document signing is very useful in several cases where you don’t want others changing the document content in any way.
Let me show you how to sign a Word document in simple steps.
There are two significant steps to sign a Word document. First, we need to create or insert a signature line in the document. Second, you or the target user can add a signature on the signature line in the document. Though it sounds complicated, it is pretty easy to do. Here is how.
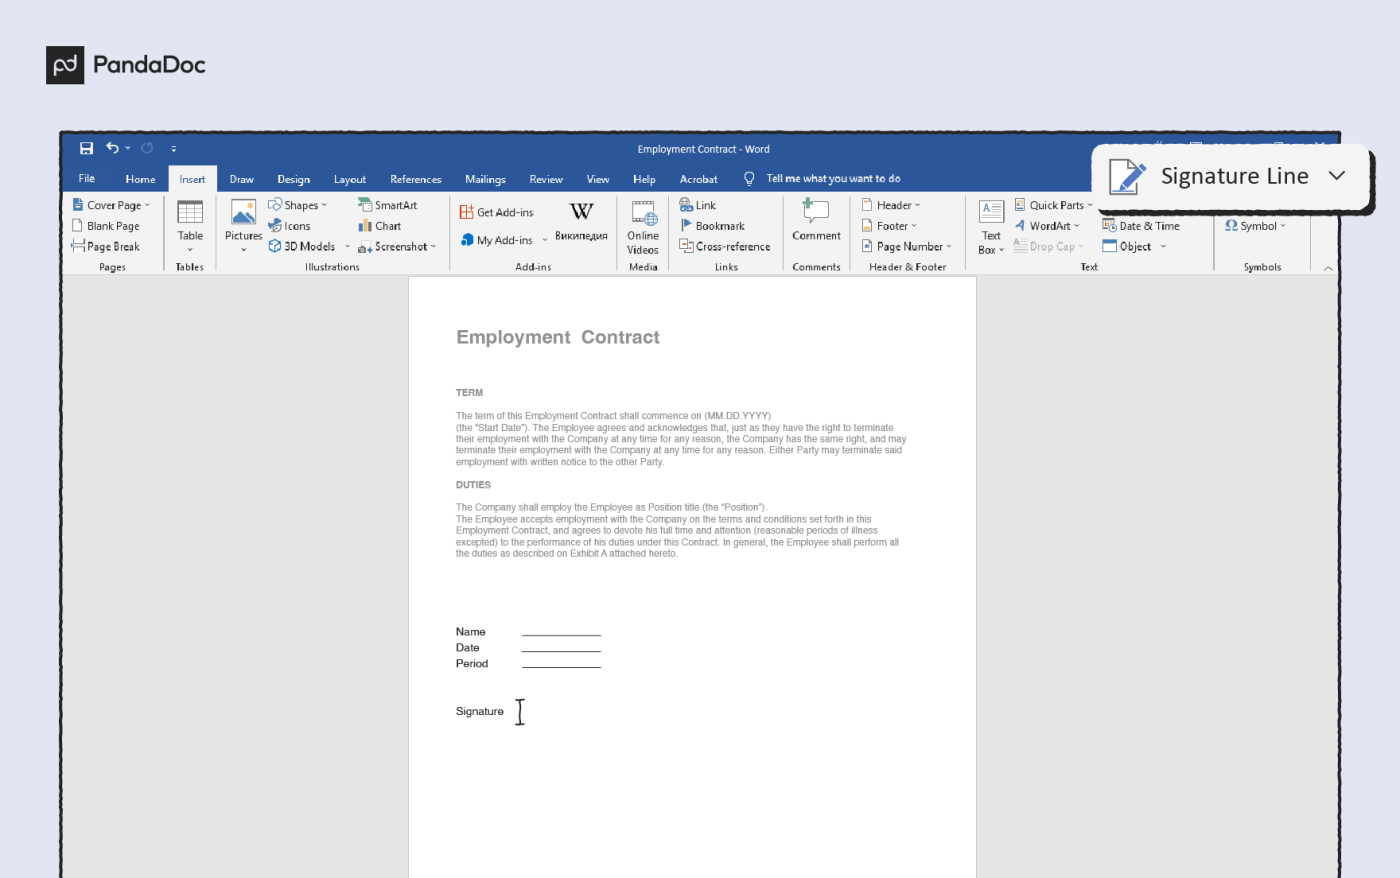
First, open the Word document you want to sign. Ensure the document is fully ready and requires no more editing or changes. Once you sign the document, you cannot edit it without invalidating the signature.
In the document, place the cursor where you want to insert the signature. In my case, I want to add it to the bottom left of the page.
Next, go to the “Insert” tab.

Click on the “Signature Line” dropdown menu and select the “Microsoft Office Signature Line” option.

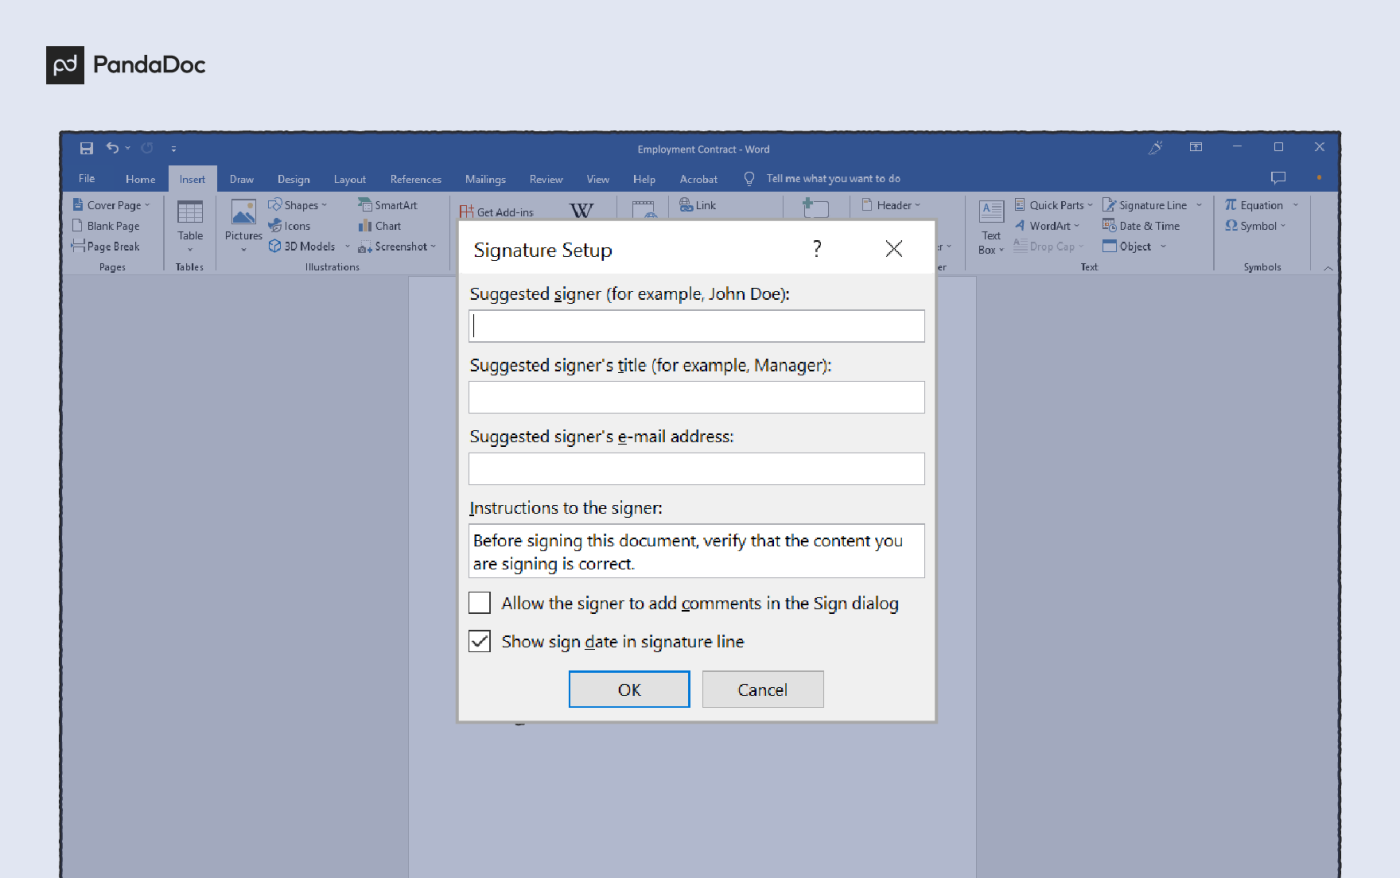
The above action will open the Signature Setup window. Here, fill in the following fields.
- Suggested signer: Who should sign the document.
- Suggested signer’s title: What is the title of the person signing the document.
- Signer’s email address: Signer’s email address.
- Instructions for the signer: Any special instructions you need to tell the person signing the document.
Select the “Show sign date in signature line” checkbox. If you want to allow the signer to add their own comments to the signature, select the “Allow the signer to add comments in the Sign dialog” checkbox.
After filling the fields, click the “Ok” button to save changes in the Signature Setup window.

As soon as you click the Ok button, the signature line is added to the document. You can sign the document yourself or send it to the user who needs to sign it.

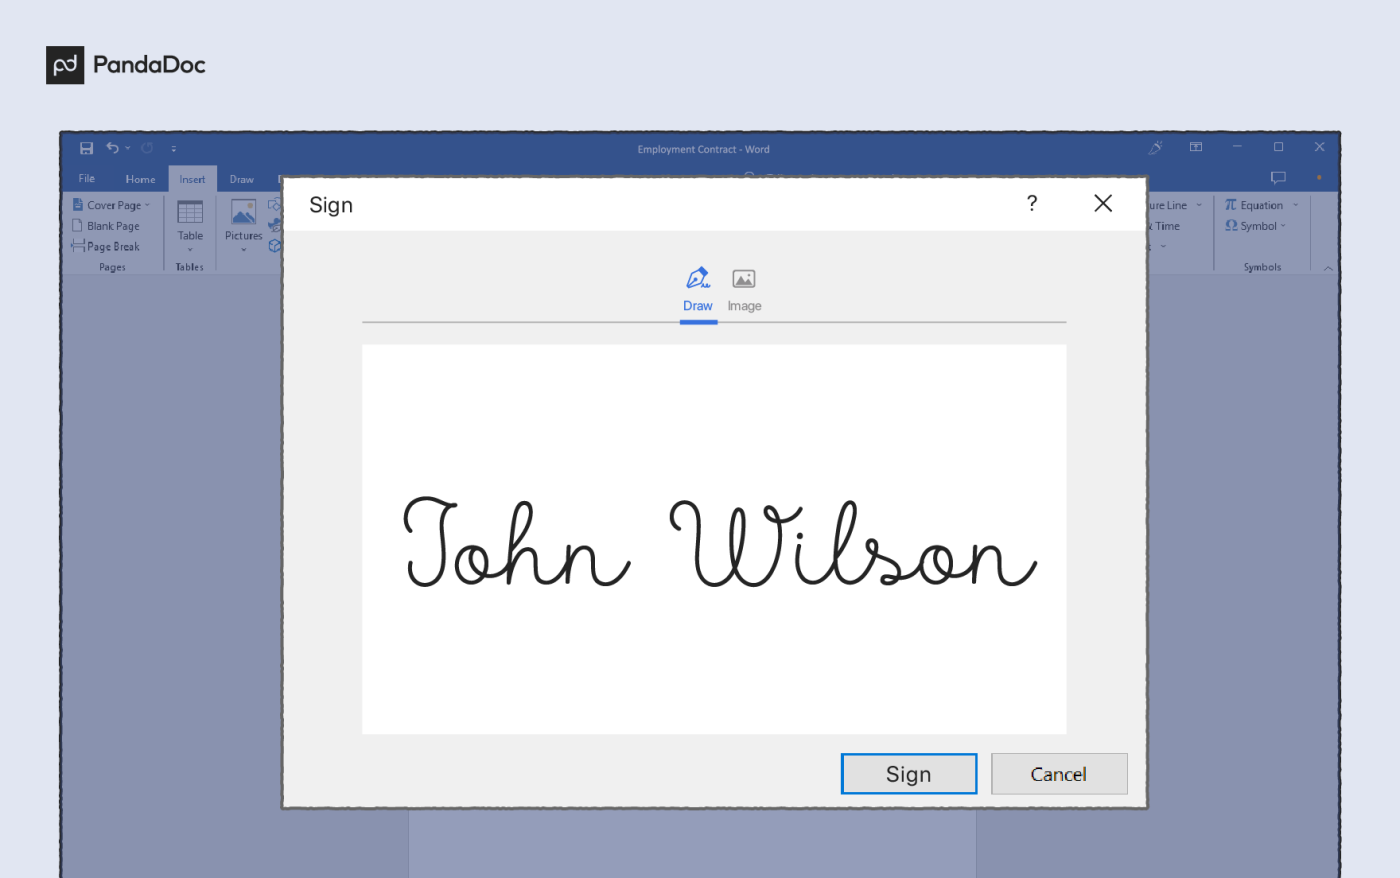
Double-click on the signature line or right-click on it and select the “Sign” option to sign the document.
In the Sign window, type your signature in the big box. If you have your signature in image format, click on the “Select image” button, select the image, and add it.

If you want to add additional information, like full name, address, etc., to your signature, then click on the “Details” button and add those details.

Finally, click on the “Sign” button.

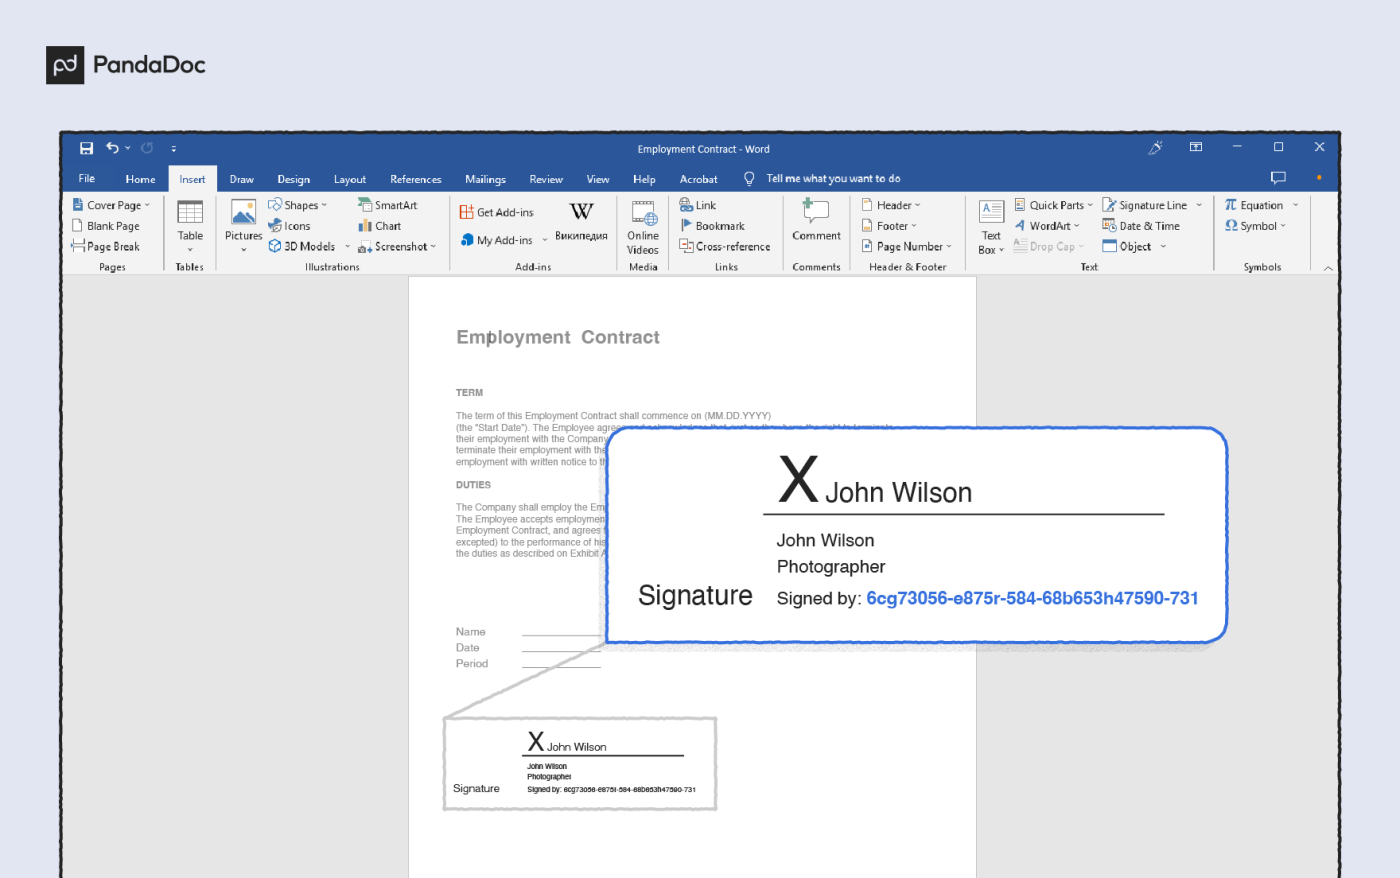
As soon as you click the button, the document will be signed with the signature and details you provided.


The signed document is considered final from this point forward, and no edits or changes are allowed. You will even see a yellow warning bar telling you the same.

Edit signed Word document
Of course, one can still edit the document, but it will invalidate the signature and removes it. If you click on the “Edit Anyway” button, you will see the “Editing will remove signatures in this document. Do you want to continue?” message. Clicking “Yes” will remove the signature and allows you to edit the document.

That is all. It is that simple to add or insert a signature in the Word document.
I hope that helps.
If you like this article, check out how to convert PDF to editable Word document.