
Word documents are for word processing while Excel files are for data processing. But what if you need to combine the two? What if you need to display a part of your Excel data in, say a sales report that’s in a Word file?
You’re probably aware of the easiest technique that involves copying the table from Excel and pasting it into Word.
This technique, though quick and easy, has certain limitations.
However, there are other techniques to insert an Excel file into your Word document that allow for a lot more flexibility.
In this tutorial we will look at three ways to insert an Excel file into Word:
- By simple copy-pasting
- By Inserting as an embedded object
- By inserting as a linked object
Inserting an Excel File into Word by Simple Copy-Pasting
This first copy-paste method is the easiest. It’s just like copy-pasting data from one sheet in Excel into another.
In fact, you have probably already used this technique plenty of times. The method simply involves the following steps:
- Select the part of the Excel file that you want to insert into your Word file
- Press CTRL+C to copy (or right-click on the selection and then click on Copy)

- Open the Word file where you want to insert this data
- Place your cursor where you want to insert the Excel table
- Press CTRL+V to paste

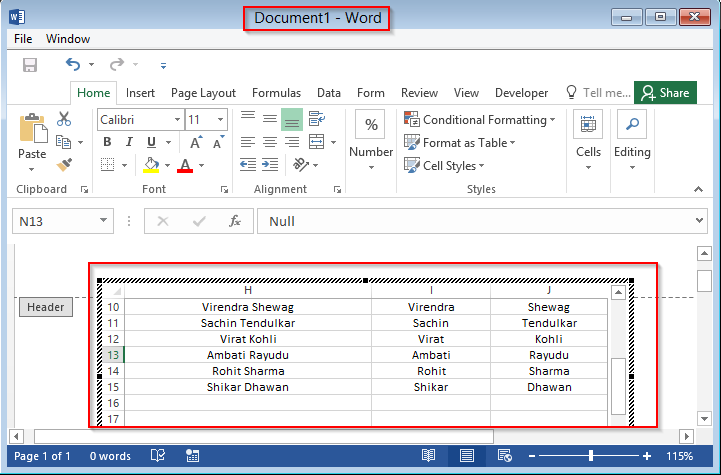
Once you’ve pasted the data into Word, you get a table with the data that you copied. This works the same way as a regular Word table.
You can press the tab key to navigate through the table, you can edit the contents, you can delete rows and columns, or insert new rows and columns.
However, the changes you make to the pasted table do not get reflected in the original Excel file.
Moreover, any changes you make to the original Excel file will not automatically get reflected in your pasted table, unless you paste it again.
This method, though easy, does not offer much in terms of flexibility. It’s best used when you have a final table/data in Excel and you want it in Word (as a static table).
While this method works as expected in most cases, there are some minor issues you may face when using the simple copy paste to insert Excel data into Word:
- You might lose some of the formatting from your original table structure
- It will not be possible to copy larger tables
- If you have any formulas in the original Excel file, they will get pasted as values. So you cannot use Excel formulas in the table once it is pasted to Word
If you want to take advantage of Excel formulas inside Word, then the next two methods might work better for you.
Also read: Get File Names from a Folder into Excel
Inserting an Excel File into Word as an Embedded Object
An alternative way to insert an Excel file into Word is by inserting it as an embedded object.
An embedded object is an object that is created with one application and then embedded into a document that is created by another application.
For example when you embed an object or file created in Excel into a document created in Microsoft Word.
This is made possible by the Windows OLE technology (Object Linking and Embedding).
Embedding the object, rather than just pasting it, ensures that the object retains its original format.
Moreover, you get to alter the embedded object using the original program. This means that you can open the embedded Excel file from Word itself and make changes in it.
To embed an Excel file into a Word file, follow the steps below:
- Select the part of the Excel file that you want to insert into your Word file
- Press CTRL+C to copy (or right-click on the selection and then click on Copy)
- Open the Word file where you want to insert this data
- Place your cursor where you want to insert the Excel table.
- Under the Home tab, click on the dropdown of the Paste button (in the Clipboard group).
- Select the ‘Paste Special’ option.

- This will open the Paste Special dialog box. From this box, select Microsoft Excel Worksheet Object (in the group of options under ‘As’).

- Click OK
This will insert the copied cells into your Word doc.

The size of the embedded object might not fit correctly to your Word doc’s margins. So you can go ahead and resize it as required.

Note: The inserted table is not a regular Word table. It is, in fact, an Excel table. So you can apply formulas and work on it as a regular excel table.
If you want to edit the table, simply double-click inside the object. It will open the spreadsheet in an Excel interface (felt like pure magic when I first used it).

You can come out of edit mode when you click outside the object window.
It is important to note, however, that any changes you make to the object will not get reflected to the original Excel file. Similarly, any changes you make to the original Excel file will not get reflected in this object.
This is because the object is basically just a copy of the original file. It is not linked to it. If you want even more flexibility, the next method may be helpful for you.
Inserting an Excel File into Word as a Linked Object
You will get the most flexibility if you insert your Excel data into Word as a linked object.
A linked object is different from an embedded object in that the embedded object is like a snapshot or copy of the original file, while a linked object maintains an active connection between both files.
This means that editing the source file will cause the changes to also get reflected in the target file and vice-versa, provided that both documents are open.
So if I use this method and then change anything in the original Excel file, it would be reflected in the Word data as well.
To insert an Excel file into a Word file as a linked object, follow the steps below:
- Select the part of the Excel file that you want to insert into your Word file.
- Press CTRL+C to copy (or right-click on the selection and then click on Copy)
- Open the Word file where you want to insert this data
- Place your cursor where you want to insert the Excel table.
- Under the Home tab, click on the dropdown of the Paste button (in the Clipboard group).
- Select the ‘Paste Special’ option.
- This will open the Paste Special Dialog box. From this box, select Microsoft Excel Worksheet Object (in the group of options under ‘As’).
- Make sure that the ‘Paste link’ radio button (on the left side of the window) is checked.

- Click OK.
- This will insert the copied cells from MS Excel as a linked object into your MS Word document.
- Once again, resize the object in your Word doc as required.

You will notice that other than the addition of step 8, the procedure is more or less the same as inserting an embedded object.
The linked object works more or less like an embedded object, with an important difference.
When you double click the table in Word, the file will open in Excel.

If you make a change to the original file in Excel, the changes get updated to the table in Word, even if you don’t save the changes in the Excel file.
In case the changes are not updating automatically, right click on the table in Word and then click on Update Link.
Also, remember that for this method to work, it’s important that the source Excel file is also open. If you make any changes to the Excel file and close it, and it doesn’t get updated in the Word file, trying to update it by right-clicking and using the Update Link option wouldn’t work.
In this way, the linked object works almost like a live view of the Excel file from Word.
This method is especially useful if you’re trying to create something like a real-time dashboard in Word, displaying important tables from multiple Excel files.
These are three different ways in which you can insert an Excel file into Word.
As you must have noticed, all these methods have their pros and cons. Personally, if like the second method where we embedded Excel as an object into Word. That allows me to be a lot more flexible and use all the functionality of Excel from within the Word document.
Also, the methods covered here can also be used to insert an Excel file into other MS applications such as PowerPoint.
I hope this tutorial was useful and easy to follow.
Other Excel tutorials you may also like:
- How to Move a Chart to a New Sheet in Excel
- How to Start Excel in Safe Mode (3 Easy Ways)
- How to Find out What Version of Excel You Have (Easy Way)
- How to Open Excel File [xls, xlsx] Online (for FREE)
- Why does Excel Open on Startup (and How to Stop It)
- How to Convert a Text File to Excel?
- How to Merge Two Excel Files?
- How to Insert Sheet Name into Header or Footer in Excel?
- How to Convert PDF to Excel without Software?
Содержание
- Insert Excel file into Word
- How to insert an Excel spreadsheet into Word
- Insert document into Word
- How to insert Excel into Word
- Insert Excel spreadsheet into Word
- How to insert a document in Word
- Insert PDF into Word document
- How to Insert an Excel file into MS Word?
- Inserting an Excel File into Word by Simple Copy-Pasting
- Inserting an Excel File into Word as an Embedded Object
- Inserting an Excel File into Word as a Linked Object
- How to add an Excel worksheet into a Word 365 or 2019 document?
- Embed an Excel table in Word
- Embed a “live” spreadsheet in Word
- Insert an Excel file as an attachment
- Edit an inserted Excel range in Word
- Adding other files into Word
- Inserting spreadsheets in Word for macOS
Insert Excel file into Word
How to insert an Excel spreadsheet into Word
Inserting a Microsoft Excel spreadsheet in a Word document is pretty simple. In short, use the INSERT > Text > Object > Object. menu, select Create from File, select the file on the computer, and click OK. That’s it, you have an embed Excel in Word!
Insert document into Word
This works with all Microsoft Office products, to embed any kind of file in a Word, Excel, PowerPoint document.
In detail, starting from a Microsoft Excel file, save it locally on computer, as works in progress cannot be used to embed Excel file in Word.
In the Microsoft Word document, open the INSERT > Text > Object > Object. menu, is how to insert an Excel file into Word, by following the guided options that will be displayed.
How to insert Excel into Word
Go to the Create from File tab if your file already exists, and click on Browse to have the opportunity of inserting spreadsheet into Word, as the file must be already existing and saved locally on the computer.
Select the file on the computer to be the embed document in Word, and click on Open to insert file into Word document.
Then, check the Display as icon box, so the link to open the Excel file in Word will be nicely displayed as an icon. Click on Change Icon.
Insert Excel spreadsheet into Word
There, option is given to select another icon, and, most important, change the name to display – for example a description instead of the local file name, this is up to you and the use you will have of this file.
And voilà ! The Excel file is now inserted in the Word document, which can be shared across, by email for example to all your colleagues and clients.
How to insert a document in Word
This trick actually works for all kind of documents, to be inserted in all Microsoft Office products. For example, use it to insert PDF into Excel, insert Excel into Word, have embed Word document in Excel, insert Word document into Excel, and much more.
All combinations are possible! The only requirement, is to have the file saved on the hard drive, and accessible by the Microsoft Office application in which an object have to be embed.
Insert PDF into Word document
To insert a PDF document into a Word file, follow the following steps:
— select menu insert > object,
— select create from file option,
— click browse and select the PDF file on computer,
— select display as icon to display an icon linking to the file, otherwise the PDF first page will be displayed.
Источник
How to Insert an Excel file into MS Word?
Word documents are for word processing while Excel files are for data processing. But what if you need to combine the two? What if you need to display a part of your Excel data in, say a sales report that’s in a Word file?
You’re probably aware of the easiest technique that involves copying the table from Excel and pasting it into Word.
This technique, though quick and easy, has certain limitations.
However, there are other techniques to insert an Excel file into your Word document that allow for a lot more flexibility.
In this tutorial we will look at three ways to insert an Excel file into Word:
- By simple copy-pasting
- By Inserting as an embedded object
- By inserting as a linked object
Table of Contents
Inserting an Excel File into Word by Simple Copy-Pasting
This first copy-paste method is the easiest. It’s just like copy-pasting data from one sheet in Excel into another.
In fact, you have probably already used this technique plenty of times. The method simply involves the following steps:
- Select the part of the Excel file that you want to insert into your Word file
- Press CTRL+C to copy (or right-click on the selection and then click on Copy)
- Open the Word file where you want to insert this data
- Place your cursor where you want to insert the Excel table
- Press CTRL+V to paste
Once you’ve pasted the data into Word, you get a table with the data that you copied. This works the same way as a regular Word table.
You can press the tab key to navigate through the table, you can edit the contents, you can delete rows and columns, or insert new rows and columns.
However, the changes you make to the pasted table do not get reflected in the original Excel file.
Moreover, any changes you make to the original Excel file will not automatically get reflected in your pasted table, unless you paste it again.
This method, though easy, does not offer much in terms of flexibility. It’s best used when you have a final table/data in Excel and you want it in Word (as a static table).
While this method works as expected in most cases, there are some minor issues you may face when using the simple copy paste to insert Excel data into Word:
- You might lose some of the formatting from your original table structure
- It will not be possible to copy larger tables
- If you have any formulas in the original Excel file, they will get pasted as values. So you cannot use Excel formulas in the table once it is pasted to Word
If you want to take advantage of Excel formulas inside Word, then the next two methods might work better for you.
Inserting an Excel File into Word as an Embedded Object
An alternative way to insert an Excel file into Word is by inserting it as an embedded object.
An embedded object is an object that is created with one application and then embedded into a document that is created by another application.
For example when you embed an object or file created in Excel into a document created in Microsoft Word.
This is made possible by the Windows OLE technology (Object Linking and Embedding).
Embedding the object, rather than just pasting it, ensures that the object retains its original format.
Moreover, you get to alter the embedded object using the original program. This means that you can open the embedded Excel file from Word itself and make changes in it.
To embed an Excel file into a Word file, follow the steps below:
- Select the part of the Excel file that you want to insert into your Word file
- Press CTRL+C to copy (or right-click on the selection and then click on Copy)
- Open the Word file where you want to insert this data
- Place your cursor where you want to insert the Excel table.
- Under the Home tab, click on the dropdown of the Paste button (in the Clipboard group).
- Select the ‘Paste Special’ option.
- This will open the Paste Special dialog box. From this box, select Microsoft Excel Worksheet Object (in the group of options under ‘As’).
This will insert the copied cells into your Word doc.
The size of the embedded object might not fit correctly to your Word doc’s margins. So you can go ahead and resize it as required.
Note: The inserted table is not a regular Word table. It is, in fact, an Excel table. So you can apply formulas and work on it as a regular excel table.
If you want to edit the table, simply double-click inside the object. It will open the spreadsheet in an Excel interface (felt like pure magic when I first used it).
You can come out of edit mode when you click outside the object window.
It is important to note, however, that any changes you make to the object will not get reflected to the original Excel file. Similarly, any changes you make to the original Excel file will not get reflected in this object.
This is because the object is basically just a copy of the original file. It is not linked to it. If you want even more flexibility, the next method may be helpful for you.
Inserting an Excel File into Word as a Linked Object
You will get the most flexibility if you insert your Excel data into Word as a linked object.
A linked object is different from an embedded object in that the embedded object is like a snapshot or copy of the original file, while a linked object maintains an active connection between both files.
This means that editing the source file will cause the changes to also get reflected in the target file and vice-versa, provided that both documents are open.
So if I use this method and then change anything in the original Excel file, it would be reflected in the Word data as well.
To insert an Excel file into a Word file as a linked object, follow the steps below:
- Select the part of the Excel file that you want to insert into your Word file.
- Press CTRL+C to copy (or right-click on the selection and then click on Copy)
- Open the Word file where you want to insert this data
- Place your cursor where you want to insert the Excel table.
- Under the Home tab, click on the dropdown of the Paste button (in the Clipboard group).
- Select the ‘Paste Special’ option.
- This will open the Paste Special Dialog box. From this box, select Microsoft Excel Worksheet Object (in the group of options under ‘As’).
- Make sure that the ‘Paste link’ radio button (on the left side of the window) is checked.
- Click OK.
- This will insert the copied cells from MS Excel as a linked object into your MS Word document.
- Once again, resize the object in your Word doc as required.
You will notice that other than the addition of step 8, the procedure is more or less the same as inserting an embedded object.
The linked object works more or less like an embedded object, with an important difference.
When you double click the table in Word, the file will open in Excel.
If you make a change to the original file in Excel, the changes get updated to the table in Word, even if you don’t save the changes in the Excel file.
In case the changes are not updating automatically, right click on the table in Word and then click on Update Link.
Also, remember that for this method to work, it’s important that the source Excel file is also open. If you make any changes to the Excel file and close it, and it doesn’t get updated in the Word file, trying to update it by right-clicking and using the Update Link option wouldn’t work.
In this way, the linked object works almost like a live view of the Excel file from Word.
This method is especially useful if you’re trying to create something like a real-time dashboard in Word, displaying important tables from multiple Excel files.
These are three different ways in which you can insert an Excel file into Word.
As you must have noticed, all these methods have their pros and cons. Personally, if like the second method where we embedded Excel as an object into Word. That allows me to be a lot more flexible and use all the functionality of Excel from within the Word document.
Also, the methods covered here can also be used to insert an Excel file into other MS applications such as PowerPoint.
I hope this tutorial was useful and easy to follow.
Other Excel tutorials you may also like:
Источник
How to add an Excel worksheet into a Word 365 or 2019 document?
Here’s a question from Dana:
Working on a quarterly operational report for management. I have a nice spreadsheet with some sales information that i would like to insert into a Word document that i am authoring. Any ideas?
Thanks for the question, Dana. See below for the details. I assumed you are using Windows, but just in case, i have added some pointers for macOS users below.
If you are looking at inserting Word files into Excel, take a look at our tutorial on embedding Word objects into a spreadsheet.
The entire step-by-step details can be found in the following video we created:
Embed an Excel table in Word
Note: This option will allow you to embed a screenshot of your spreadsheet, which you won’t be able to later on edit/modify. For a “live” spreadsheet option, kindly scroll down.
- Open your Excel document.
- Select the area / range that you would like to add into Word, right click and hit Copy or press CTRL+C.
- Now, go ahead and open the Word document in which you would like to insert the Excel range, then right click and hit paste or go ahead and press CTRL+V.
Embed a “live” spreadsheet in Word
- Open your Word document, where your Excel spreadsheet has to be placed.
- Click on the Insert in the ribbon and select Object in the Text section.

- Select the Create from file and browse to your excel document which has to be inserted.
- Click OK.

Insert an Excel file as an attachment
In a similar fashion you can embed a link to your Excel file into your Word document:
- Navigate to the place in your document that you want to place the link to your workbook.
- Hit Insert.
- Then select Object.
- Using the Browse button , navigate and point to the file stored in your computer that you would like to attach.
- Then hit the Link to File and Display as Icon check boxes, to embed a link to your file into your doc.
- Hit OK.
Edit an inserted Excel range in Word
- In your Word document, double click on the Excel table you inserted before.
- Adjust the range height and width to fit your table into your Word page and edit the content as needed.
Adding other files into Word
So far, we have learnt how to embed Excel workbooks and ranges into Microsoft Word. That said, you are able add additional file types into your document, such as: Presentations, diagrams and another documents. Read further for ta simple example:
- Open your Word document.
- In the Ribbon, hit the Insert tab and select Object.

- In the Create New option, pick the required Object type to embed into your Word document.
- In our case, we’ll go ahead and insert a PowerPoint presentation.
- Once, you select the object you would like to insert, hit OK.

- Now we can edit with the new presentation slide embedded in Word 2016.
Inserting spreadsheets in Word for macOS
If you are using Word fin your MAC, you can insert existing spreadsheets into your documents as well. Procedure is similar to the one we outlined before for Windows.
- Open Microsoft Word and navigate to your document.
- Pick the location into which you would like to add your spreadsheet content.
- Hit Insert, and select Object.
- Hit From file… and select the Excel workbook that has the content you would like to embed.
- Hit Insert.
- Now go ahead and adjust the placement, height and weight of your embedded worksheet.
- Once done, save your spreadsheet (File>>Save or Command + S).
Note that on Word for macOS you are not able to embed “live” PowerPoint Presentations, however you can embed other documents into your Word files.
Источник
You can open or import a surprising number of file formats into Microsoft Word. Not to be confused with file formatting, which—in most programs—refers to the design of a page, file formats are little encoded programs that tell computers how to handle the files used in specific programs. Look for the three or four letters after the period that follows the file name—that’s the file extension revealing the associated program.
Not all file formats are compatible with all programs, especially those that are radically different, such as a word processor vs. a programming language, or a music file and a graphic file. However, many programs that are similar, such as Word and WordPerfect, are generally compatible.
Word is flexible enough even to bring in spreadsheets from Excel or slides from PowerPoint, as well as text from other word processors. Weird line breaks and other issues can arise, however, so follow these instructions for the smoothest results.
Notice how many file formats Word can open with its (hidden) built-in conversion utility.
1. Select File > Open
2. Click the down arrow beside the File Types list box (above the Open and Cancel buttons)
3. Select All Files from the list, and Word displays a long list of conversion-compatible file formats.
Select All Files from the MS Word file format list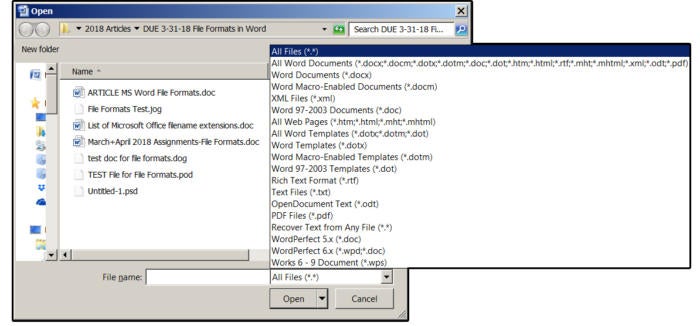 JD Sartain / PC World
4. Choose a format from the drop-down list—for our example, we’ll choose Text Files (TXT).
5. Navigate to the appropriate folder. Word displays a list of all the .TXT files available in the target folder.
6. Select the applicable file, and click Open.
7. If the text encoding is questionable, Word displays a dialog that asks you to choose the correct one (such as Windows Default). Click the appropriate button, then click OK, and the text file opens.
Choose the Text Files–TXT format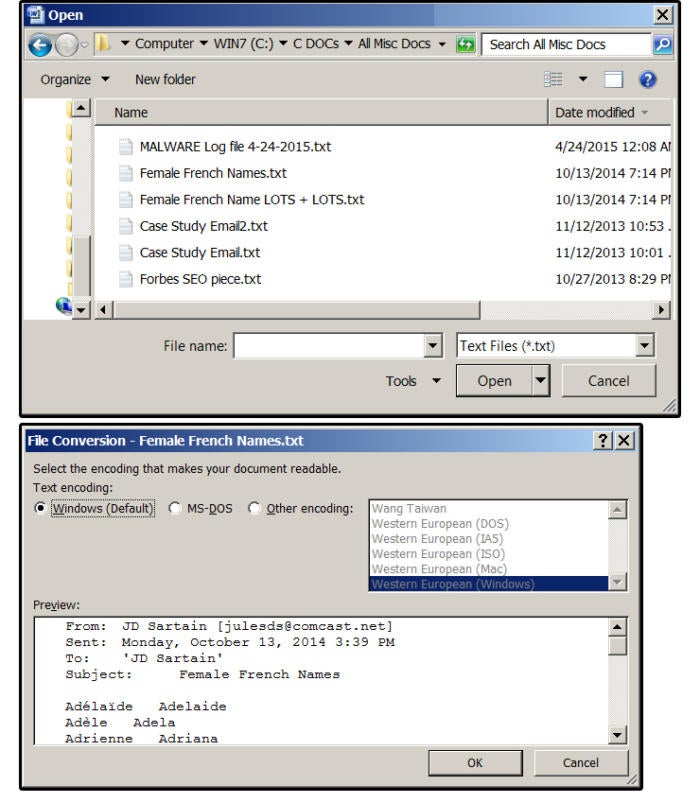 JD Sartain / PC World
Note: The first line on the All Files list says “All Word Documents,” which are NOT All Word documents but, in fact, all documents that can be opened with Word’s (behind the scenes) conversion utility, such as HTML, HTM, XML, ODT, PDF, and several more. For example, if you save your Word document as a webpage (File > Save as Web Page), Word uses its (hidden) conversion program to automatically convert your document page to an HTML webpage, and vice versa.
8. ODT files are part of the Open Document Format (ODF) files, which are XML-based, Open Source file formats. .ODT files are for word processing programs. Also included are .ODS for spreadsheets, .ODP for presentations, .ODG for graphics, and .ODF for formulas or other mathematical equations.
If you want to open an ODT file, it’s at the end of this first line that says All Word Documents (far right), which is not visible on most monitors. So, scroll down the All Files list and select ODT (Open Document Text) from the drop-down list of files.
9. The All Files list also shows Text files (.TXT), which includes ASCII files, Rich Text Format files (RTF), and Word Perfect files versions 5x through 9x (.DOC, .WPD, .WPS). Again, just select the format you need, navigate to the appropriate folder, and select a file from the list.
10. What about the Adobe Acrobat PDF file format? The PDF format is available on the All Files list in versions 2013 and 2016. Prior Word versions did not provide this option. If you don’t have Word 2013 or 2016, you can export the file to Word from Adobe Acrobat; however, older versions and some Reader versions do not provide this feature. But you can save your Word document as a PDF file (since Word 2000). Just choose File > Save As and select Adobe PDF from the submenu.
Save As Adobe PDF JD Sartain / PC World
How to open an Excel spreadsheet in Word
1. If you want to open an Excel spreadsheet in Word, first confirm that the spreadsheet is smaller than your screen (that is, no wider than your Word document minus margins). Otherwise, the cells will wrap to the next line and create a visual mess. You can change the margins or change the page orientation to landscape (Page Layout > Orientation > Landscape), and that will accommodate a few more columns. Or, make the columns in Excel smaller.
2. The easiest way to get a spreadsheet into Word is to highlight the spreadsheet in Excel, then copy and paste it in at your cursor’s location.
3. Another (more complicated way) is to position your cursor inside the Word document where you want the Excel spreadsheet to drop in.
4. Select Insert > Object > Object (from the Insert > Text group, click Object, then Object again).
5. In the Object dialog box, select the Create from File tab and then browse to the file’s location.
6. Select the appropriate file from the folder’s list and click Insert. The Object dialog box appears again. Click the checkbox Link to File if you want to link to the inserted spreadsheet file, so any changes you make on the spreadsheet are automatically updated in your Word document. Double-click anywhere on the inserted spreadsheet to open and edit the Excel file.
g. If your spreadsheet is too large to paste into Word, or if you’d prefer not to display the spreadsheet but still want others to see it and/or access it, click the checkbox Display as Icon. When you click the icon, notice the hint at the bottom of your screen. It says: “Double-click to edit the Microsoft Excel worksheet.”
04 Link to File or Display as Icon![]() JD Sartain / PC World
JD Sartain / PC World
Note: You won’t see any changes until you save both files, then re-open your Word document.
How to open PowerPoint slides in Word
1. Open one of your PowerPoint slideshow presentations.
2. Current versions: Select File > Export > Create Handouts, then press the Create Handouts button. Older versions: Select File > Publish > Create Handouts in Microsoft Word
3. All versions 2007–2016: The Send to Microsoft Word dialog box opens.
4. Click the radio button for one of the five formats you prefer, such as Notes Next To Slides, or Notes Below Slides.
5. Next, choose Paste or Paste Link.
Create Handouts in Microsoft Word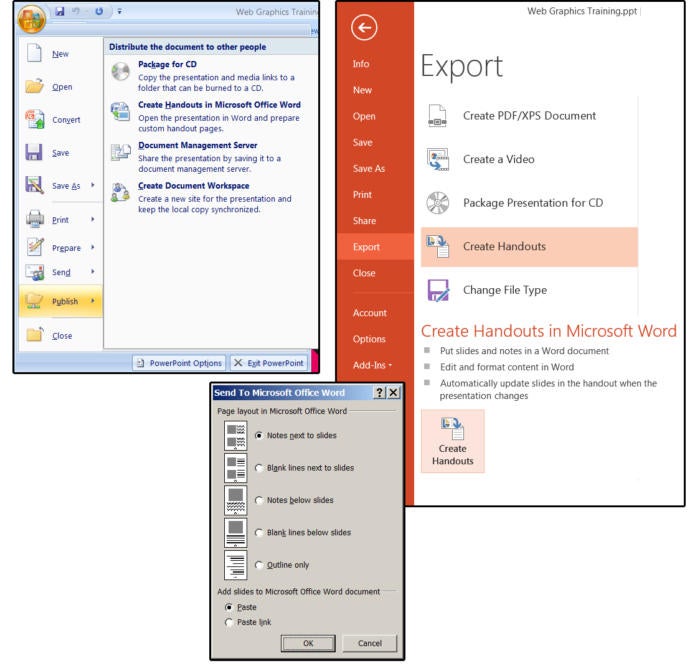 JD Sartain / PC World
6. Both Paste and Paste Link open Microsoft Word and paste all the slides from your presentation into Word. Paste places the larger slides on separate pages. Paste Link pastes several smaller slides on each page.
7. Paste allows you to edit the slides in Word (double-click the slide). Link opens PowerPoint and allows you to edit the slide in PowerPoint (also, double-click the slide). You can also edit the text, titles, fonts, page layout, and more in Word to customize your handouts for each audience.
Paste Link or Paste PowerPoint slides into Word JD Sartain / PC World
8. Once satisfied with your changes, choose File > Print, then click the Print button to make paper copies of your handouts for distribution.
9. You can also Copy and Paste the slides from PowerPoint to Word. Just open both programs, select the slide you want to copy from PowerPoint to Word and choose Home > Copy (or Ctrl+ C); then in Word select Home > Paste (or Ctrl+ V). But, this only works for one slide at a time.
07 Double-click to edit Microsoft PowerPoint slide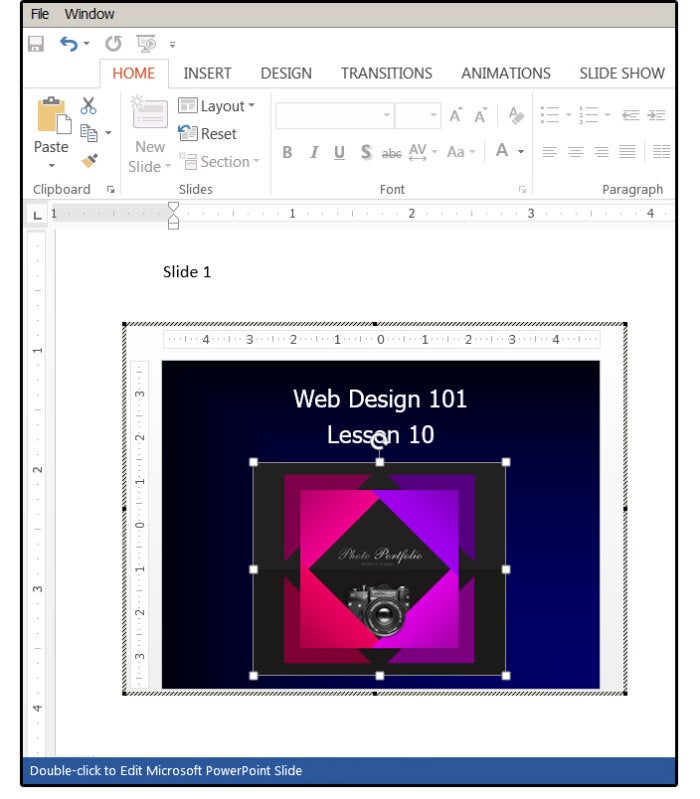 JD Sartain / PC World
Important Note: There are numerous articles on the Internet that instruct users how to copy and paste multiple slides (as opposed to the entire slide show presentation) from PowerPoint into Word. I have researched and tested this thoroughly and, using the Shift key to select a range of consecutive slides (1, 2, 3, 4, 5) or using the Ctrl key to select a range of non-consecutive slides (2, 4, 8, 9, 11) does not work. Every test (using many different methods) failed to copy and paste multiple slides. Each time, PowerPoint only copied one slide at a time (the first slide selected in the range you defined). I tested this process on PowerPoint/Word versions 2007, 2003, 2010, 2013, and 2016 and it failed on each of these versions. But there is a work-around.
Copy/paste multiple slides from PowerPoint to Word
1. Open Word and PowerPoint. In Word, open the clipboard: Under the File tab, click the tiny arrow beside Clipboard.
2. Go back to PowerPoint and select the first slide you want to copy from PowerPoint to Word, then press Ctrl+ C.
3. Still in PowerPoint, select the next slide you want and press Ctrl+ C again. Switch back to Word and notice that there are now two slides in your Clipboard.
4. Back to PowerPoint: Select the next slide and press Ctrl+ C, then another slide and press Ctrl+ C again.
5. Stay in PowerPoint until you have copied all the slides you want from this presentation into your Clipboard. But remember, you must select and copy one slide at a time.
6. When finished, move back to Word. Check to ensure that all your slides are in your Clipboard, then click the Paste All button.
08 Copy and Paste multiple slides work-around JD Sartain / PC World
Note: Go directly to Word after you have copied all of your slides. If you type or copy anything else, it will show up in Word’s Clipboard, (which you can always delete). Also, don’t worry if the Clipboard fails to display some of your slides (and says Preview Not available). It’s just a memory thing. They paste into your document without issue.
7. You can also paste individual slides one at a time. Hover over the target slide in the Clipboard and click the down arrow. A drop-down list appears that says Paste or Delete.
If you select the Paste All button at the top of the Clipboard, the slides will paste into the document one after the other, with no space in between. Scroll down through the pages and either enter a line/paragraph break between slides, or enter a page break between slides if you want only one slide per page.
How to import graphic files into Word
This one is easy. Just copy and paste, or Select Insert > Picture and choose an image from an internal or external source. You can also select Insert > Clip Art and chose an image from the Internet.
Import Linked or Unlinked Excel Worksheet Data into Word Files
by Avantix Learning Team | Updated February 1, 2021
Applies to: Microsoft® Excel® and Word® 2010, 2013, 2016, 2019 or 365 (Windows)
You can easily copy or import Excel worksheet data into Word documents. When you import from an Excel file, you can choose to import linked or unlinked data. If it’s linked, you will be able to update, change and remove the links.
The following are three easy ways to import Excel data into Word by copying and pasting:
- Copy the data in the Excel file, switch to the Word document and then paste the data where you want it to appear as a static copy.
- Import the Excel data into the Word document as a linked OLE (Object Linking and Embedding) object so that when the Excel file changes, the Word document will update as well.
- Create links to the Excel data in a Word table so that when the Excel file changes, the table will update.
If you choose the second or third method, you will need to ensure that the Excel file remains in the same location with the same name or manage the link(s) using Edit Links.
Recommended article: How to Create a Table of Contents in Word
Do you want to learn more about Microsoft Word? Check out our virtual classroom or live classroom Word courses >
Inserting unlinked Excel data
You can easily copy data from Excel and paste it into a Word document. Use this method if you do not need to update the Word file when the Excel data changes.
To insert unlinked Excel data into Word:
- Open the Excel file.
- Select the data you want to copy into the Word file.
- Press Ctrl + C or right-click and select Copy from the drop-down menu.
- Open the Word file.
- Position the insertion point where you want the Excel data to appear.
- Press Ctrl + V or right-click and choose Paste Values from the drop-down menu.
With this method, the Excel data will be copied into Word as a table and the Word file will not update when the Excel file changes. Because the data is pasted into a table, you can use Word’s table tools to format it and the file will be smaller because the data is not linked.
Inserting Excel data as a linked OLE object
You can insert an OLE (Object Linking and Embedding) object when you want to insert a linked copy of Excel data. However, one of the problems with this method is that the OLE object is like a picture of the cells and you would need to format the data in Excel to appear the way you want in the Word file.
To insert Excel data into Word as a linked OLE object:
- Open the Excel source workbook.
- Select the data you want to place in the Word file.
- Press Ctrl + C or right-click and choose Copy from the drop-down menu.
- Open the Word destination document.
- Position the insertion point where you want the linked Excel data to appear.
- Click the Home tab in the Ribbon and select the arrow below Paste. A drop-down menu appears.
- Select Paste Special. A dialog box will appear.
- Click Paste Link.
- Under As, select Microsoft Excel Worksheet Object.
- Click OK.
Note the Paste link option on the left of the Paste Special dialog box:

You can double-click an OLE object to jump to the source Excel file.
Inserting linked Excel data into a Word table
You can insert Excel data as a table in Word where each cell is linked to the Excel data source. This is a great method because you can maintain links but format the data the way you want in Word.
To insert linked Excel data into a Word table:
- Open the Excel source workbook.
- Select the data you want to place in the Word file.
- Press Ctrl + C or right-click and choose Copy from the drop-down menu.
- Open the Word destination document.
- Position the insertion point where you want the linked Excel data to appear.
- Click the Home tab in the Ribbon and select the arrow below Paste. A drop-down menu appears.
- Select Paste Special. A dialog box will appear.
- Click Paste Link.
- Under As, select HTML Format.
- Click OK.
HTML format is selected by default in the Paste Special dialog box:

Click in the table in the Word document. As long as Field Shading When Selected is set in Word Options, each cell will appear with gray shading indicating that it is a field linked to Excel. You can format the table in Word.
Updating or managing links
One of the benefits of linking data is that information in a destination document updates when you change information in the source document. This typically occurs automatically if both documents are open. However, if you open a Word document with links and the Excel file is not open, Word should prompt you to update the links. You may also need to update links yourself or re-establish a link if the original Excel file has been moved or renamed.
To update or manage links:
- Right-click a linked object or HTML table. A drop-down menu appears.
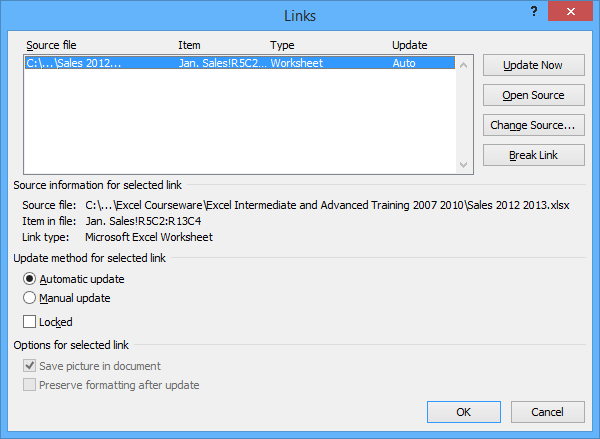
- Choose Linked Worksheet Object and then Edit Links. A dialog box appears.
- Under Update method for selected link, Automatic update is selected by default. You can choose Manual update if you do not want the data to update automatically. You would then need to click the link and click Update Now to update.
- Make any other changes (such as breaking a link of changing the source for a link).
- Click OK.
The Links dialog box below displays one link:
It’s not difficult to import Excel data into Word. Typically, the biggest issue occurs when other users move or rename the source Excel file but this can be managed using Edit Links and changing the source.
This article was first published on March 13, 2016 and has been updated for clarity and content.
Subscribe to get more articles like this one
Did you find this article helpful? If you would like to receive new articles, join our email list.
More resources
How to View Word Count in Word (4 Ways)
14+ Word Selection Shortcuts to Quickly Select Text
How to Superscipt or Subscript in Word (with Shortcuts)
How to Format Microsoft Word Tables Using Table Styles
How to Insert a Check Mark or Tick Mark in Word (5 Ways)
Related courses
Microsoft Word: Intermediate / Advanced
Microsoft Excel: Intermediate / Advanced
Microsoft PowerPoint: Intermediate / Advanced
Microsoft Word: Long Documents Master Class
Microsoft Word: Styles, Templates and Tables of Contents
Microsoft Word: Designing Dynamic Word Documents Using Fields
VIEW MORE COURSES >
Our instructor-led courses are delivered in virtual classroom format or at our downtown Toronto location at 18 King Street East, Suite 1400, Toronto, Ontario, Canada (some in-person classroom courses may also be delivered at an alternate downtown Toronto location). Contact us at info@avantixlearning.ca if you’d like to arrange custom instructor-led virtual classroom or onsite training on a date that’s convenient for you.
Copyright 2023 Avantix® Learning
Microsoft, the Microsoft logo, Microsoft Office and related Microsoft applications and logos are registered trademarks of Microsoft Corporation in Canada, US and other countries. All other trademarks are the property of the registered owners.
Avantix Learning |18 King Street East, Suite 1400, Toronto, Ontario, Canada M5C 1C4 | Contact us at info@avantixlearning.ca
How to Insert Excel Data Into Word (Tables, Files, Spreadsheets)
Microsoft Word is great for working on documents—but not so great with tables of data.
If you want to put a table into a Microsoft Word document, you can work with Word’s built-in table tools, or you can insert data directly from Excel.
Guess which one is better?
Getting your Excel data into Word is easy, makes it look better, and automatically updates. It’s a no-brainer💡
There are multiple ways of getting data from Excel into Word.
I’ll walk you through the best ones, step-by-step.
Please download my free sample workbook if you want to tag along.
Free video on inserting Excel data in a Word document
Watch my video and learn how to easily copy and paste data from an Excel file to Word.
This video walked you through how to insert an Excel table in Word so it becomes a Microsoft Word table instead.
It’s done with all the classic copy-and-paste options: keep source formatting, match destination styles,
But there are other ways of getting things from Excel to Word.
Let’s dive into those below 🤿
What is an Excel Worksheet object?
Recent versions of Microsoft Office include the capability to insert objects into documents. These objects are either embedded or linked.
Embedded objects don’t update. If you include an embedded Excel object and change data in the Excel sheet you copied it from, no changes will be applied.
Linked objects update automatically. A linked Excel object will update to reflect changes in the original Excel sheet.
You can embed and link things other than Excel worksheets, but we’ll focus on Excel objects here.
It’s worth noting that the linked spreadsheet needs to remain available for this to work.
Also, this process works in reverse, as well: you can link to Word document objects from an Excel spreadsheet and insert them there in a matter of seconds.
Embedding Excel objects in Word
We’ll start with the simpler of the two: embedding an Excel object. Let’s take a look at the example workbook to see how it works.
Open the example workbook and a blank Word document.
On the first worksheet in the Excel file, you’ll see a small table. Select and copy it.

Go to your Word document, and paste the table with Ctrl + V.
You’ll see a table like this one:

If you click into this table, nothing notable will happen—you can edit the names of the months or the numbers, and they’ll change.
If you try inputting an Excel formula, however, it will only display as text.
Head back to the Excel worksheet and copy the table again.
In Word, click the Home tab of the Ribbon, and select Paste > Paste Special. In the resulting pop-up window, click on the Worksheet Object, and click OK.

You’ll now see a table that looks a bit different:

At first, it looks like the distinguishing feature of this table is gridlines.
But if you double-click the table, you’ll get a surprising new interface:

As you can see, this gives you an embedded version of Excel within Microsoft Word.
All because it’s a linked object. Pretty cool, huh?😎
You can do all the things you’re used to in Excel: use and edit formulas, apply conditional formatting, add new rows and columns, sort and filter data, and everything else you’ve come to expect from Excel.
And source formatting (from the Excel worksheet) is transferred to the Word document.
In short, it gives you a lot more table-editing power than you get with the standard Microsoft Word interface.
To exit the Excel interface, click outside of the table, and you’ll go back to the regular editor for your document.
If you go back to the Excel spreadsheet and make an edit in the table, you’ll see that the Excel object doesn’t update. So if your calculations change, or you get new data and add it to the spreadsheet, you’ll need to update your Word document manually.
Let’s fix that.
Linking Excel objects in Word
As I mentioned before, embedded objects don’t automatically update. Linked objects, on the other hand, do.
And this can save you a lot of time.
Fortunately, linking an Excel object in Microsoft Word is easy.
The example workbook we used previously is the source Excel file.
Copy the table from the example workbook, and head back to the Word file. Again, click Paste > Paste Special in the Home tab. Again, select Microsoft Excel Worksheet Object.
This time, however, you’ll need one more click. On the left side of the window, you’ll see two radio buttons. One says Paste, and the other says Paste Link. Click the button next to Paste Link:

After hitting OK, you’ll get another table in your Word document. This one looks the same as the previous one:

There’s an important difference, however ⚠️
Let’s go back to the original Excel file and change one of the values.
We’ll change May’s value from 9 to 10.
Here’s what happens:
It might not be super clear in the GIF above, but the linked table automatically updates to match the Excel spreadsheet, while the embedded table doesn’t.
In other words, the Excel file changes are automatically applied to the Word document.
Insert an Excel worksheet in a Word document
Linking an Excel worksheet is the best way to get Excel data into Word because Excel is the best tool for working with spreadsheets.
If you want to insert a new object, you can insert a new spreadsheet into your Word document and work on it with the in-Word Excel tool.
To be completely honest, I don’t understand why you wouldn’t just work in Excel first, but I thought you might want to know anyway!
To insert a blank Excel worksheet object into the Word file, go to the Insert tab on the Ribbon.
Click the Object button in the Text group, then find the Microsoft Excel Worksheet object option.
This opens up the trusty ol’ object dialog box.

Hit OK, and you’ll get a blank worksheet in your Word document.
When you want to edit it, double-click the worksheet and you’ll open the Excel editor right inside of Word.

As before, you can do all the things you usually do in Excel right from Word in this worksheet.
And that’s an easy way of getting data from Excel to Word by making it an embedded object in the Word doc.
That’s it – Now what?
Linking data from Excel to Word documents is a simple automation that can save you a lot of time.
But obviously, it’s just a small part of Excel vast arsenal of functions and features.
The most important functions, though, are: IF, SUMIF, and VLOOKUP.
You learn all those 3 functions + how to effectively clean data in my free 30-minute Excel course sent straight to your inbox in just a few minutes.
Other relevant resources
If you want to automate your work between Word and Excel, you most definitely need to take a look at my guide to mail merge (I love mail merge💖).
Kasper Langmann2023-01-27T21:19:47+00:00
Page load link