
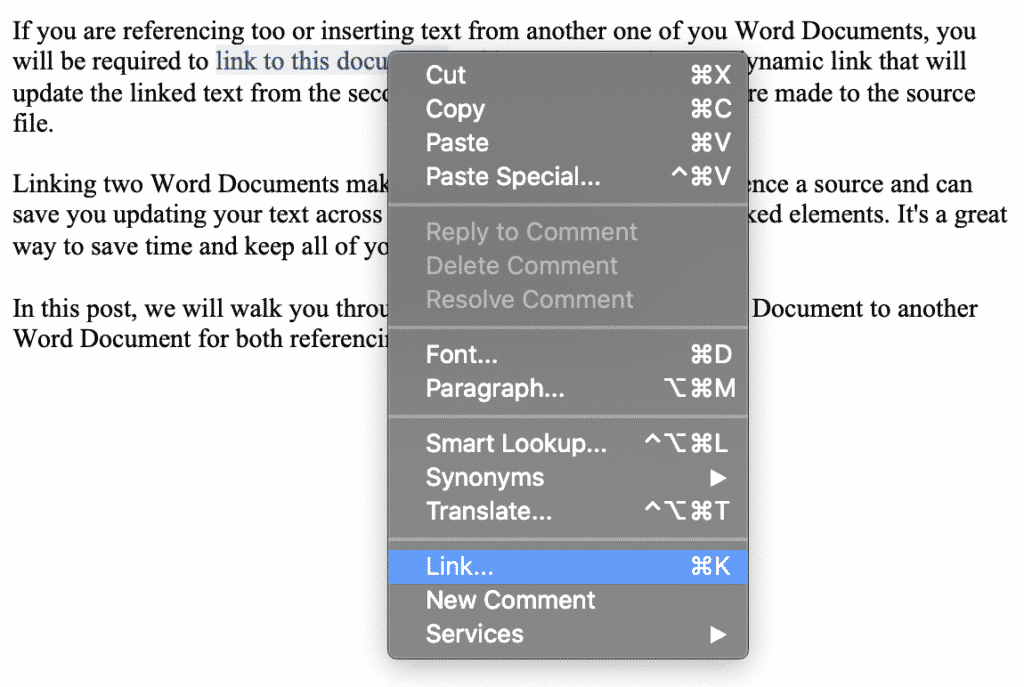
If you are referencing to another Word document from another one of your Word Documents, you will be required to link to this document.
Placing a link in your Word Documents makes it easy for the reader to acquire additional information on a certain point, that you have already written a piece on that topic. Or makes it easy for the reader to see the reference file you are speaking of or quoting from.
In this post, we will walk you through how to link a Microsoft Word Document to another Word Document as well as linking to another file or webpage.
Linking to another Word Document
- Open your Word Document
- Highlight and position the mouse pointer over the word or text you want to link

- Right click on the highlighted word
- Click Link
- Select Web Page or File tab
- Press Select

- Select the document you with to link
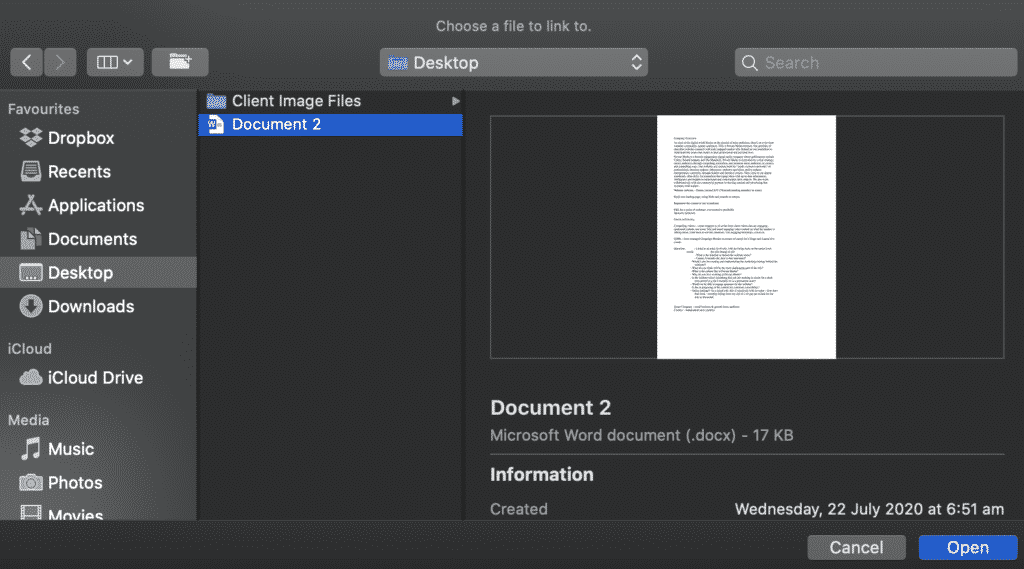
- Press Open
- When you press Open, the file source will automatically drop into the address window
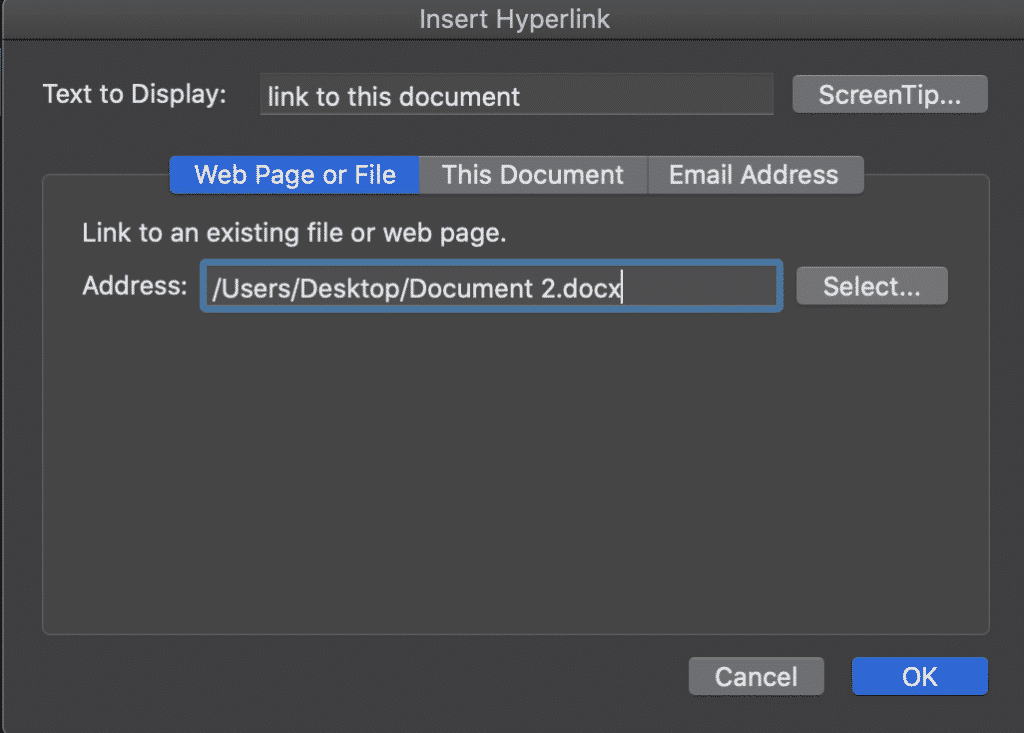
- Press OK

You have now successfully linked your Microsoft Word Document.
On the hunt for an easier way to manage version control?
If you’re collaborating on Microsoft Word Documents and need to keep track of each new version along the way, it is likely that you (like so many of us) have a messy shared drive full of cluttered, badly named versions and no real way of knowing which one if the most recent and who made changes to what.
The endless scrolling through what feeling like 500 versions to figure out if Report_v9_edited_final_FINALFINAL_2 is actually the most recent version.
Is it the final one? Let’s say it is, now you have added your edits and are ready to save a new version, do you just add a _updated onto the end of the already long file name, or the current date – hoping no body else edits and saves on the same day?
Its a mind-field out there!
Then just to add another hidden bomb to the field, there is always one person in the team that saves a version in a different spot and it’s near impossible to figure out where it went.

Collaborating in Word can be challenging, with Version control the number one frustration for most small to large corporations who collaborate regularly and do not have an automatic version control tool on hand.
A tool that manages version control for you, such as Simul Docs will take all of the file naming and searching out of your job description leaving you to spend more time to edit.
Simul Docs manages version control for you. When you open a new file, Simul will save it as file 0.0.1, then John from Marketing opens your file, makes some changes and presses save – this becomes file 0.0.2 and so on.
It’s version control that makes sense.
Then you want to go back and see what changes John has made over the course of the documents life. Well that’s easy, because Simul not only tracks the versions for you with the edits saved in each it places the authors name next to the document so you know who owns which version at a glance.
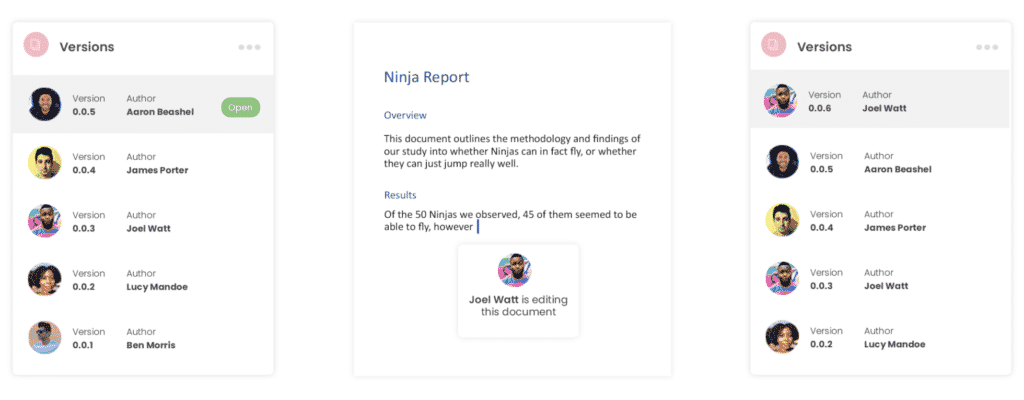
So now it’s your turn to edit the Word Document, which one is the most recent one?
Simul lists all of the versions in an easy to view ‘versions list’ at the side of your dashboard. The most recent version will be listed at the top, with the highest version number, e.g 0.0.5.
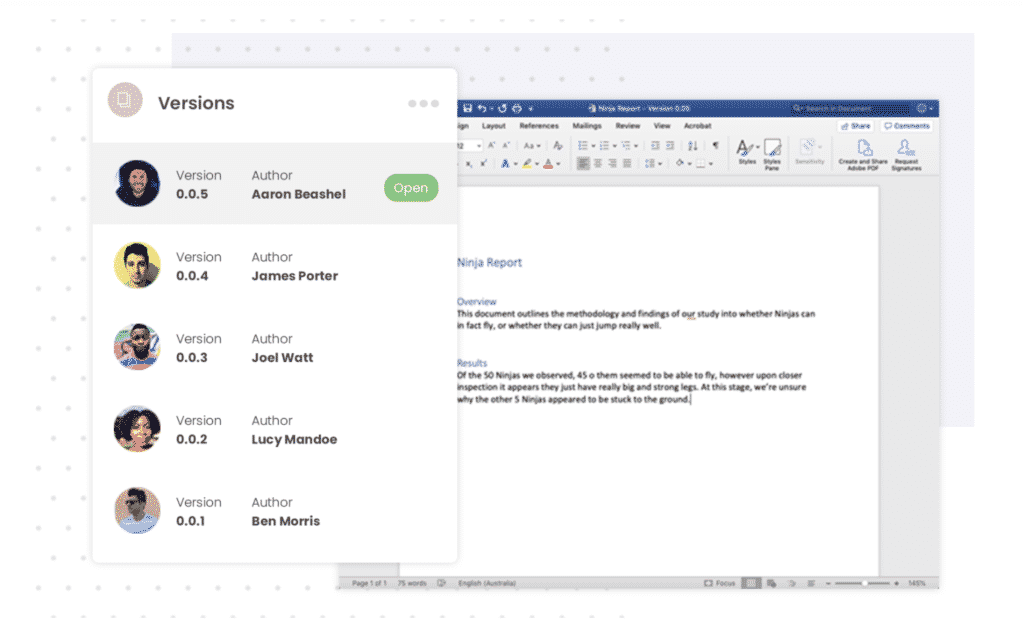
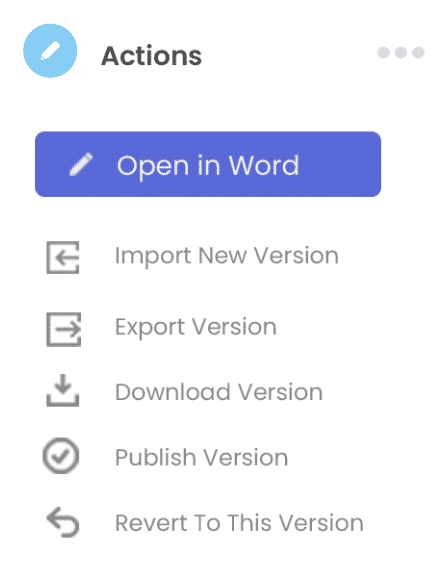
You can open version 0.0.5 at the click of a button, edit it directly in Simul or open it in Microsoft Word, depending on which interface you personally prefer working within.
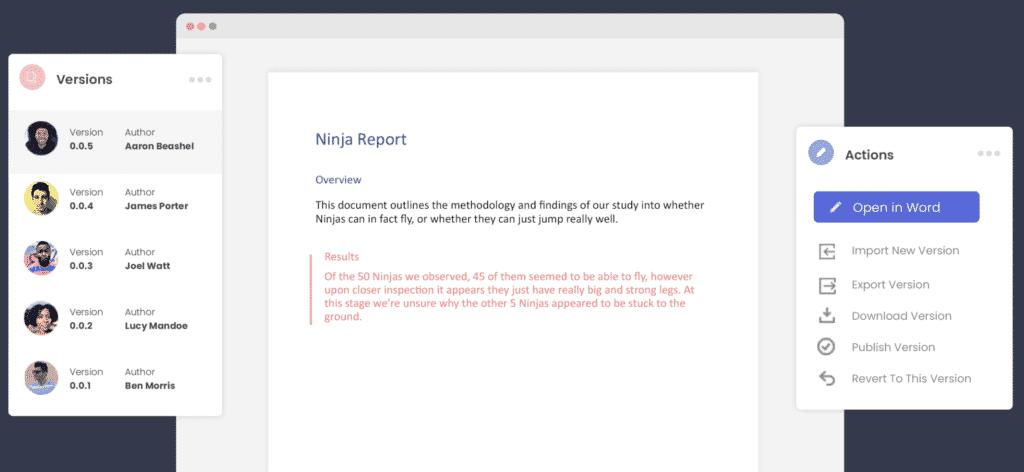
Now that you are editing away, Simul also knows that you are going to want your changes tracked, so tracked changes are automatic, every, single, time you open the document. Because collaborating can be stressful enough without having to remember to turn on tracked changes or save the document as a new version before you start editing to avoid saving over the last file.
So now you’ve made your edits, with all of your changes tracked (thanks Simul!) and are ready to press save and share your file and let your team know you have finished. Simul has you covered again – when you press save Simul automatically sends an email to the document owner letting them know a new version is available for their review.
If you did want to share your document directly, Simul allows you to share via a directly link, email or to any of the popular cloud storage systems such as Dropbox, GoogleDrive, OneDrive and more.
Save, export and download the document out of Simul docs at the click of a button. Simul gives you the option to do so in the original Word Document format or as a PDF.
With collaboration in mind, purpose built tools such as Simul Docs were built to make collaboration easy. From version control, to tracking changes, saving, editing, merging and more – Simul has you covered!
If you find yourself wasting time searching through a messy shared drive, we suggest you give Simul Docs a go.
With free trials available, you’ve got nothing to loose.

Fizzio
Chief Torturer
- Local time
- Today, 22:04
- Joined
- Feb 21, 2002
- Messages
- 1,885
-
#2
It depends on how you display the data. If it is in a form, look up the FollowHyperlink method/action. If it is directly in the table, I think you can set the field property to hyperlink but I know this has limitations so I have never used it myself.
HTH
ElsVanMiert
Registered User.
- Local time
- Today, 22:04
- Joined
- Dec 14, 2000
- Messages
- 152
-
#3
You could also store the DOC-file inside the table, but in order to avoid the bloating of the MDB you need a special wizard. I use Word!With ACCESS from Universal Software since 2 years but there might be others.
Guest
-
#1
I am using Office 2003. I need to be able to open AND MODIFY a specific
existing word document for each client when using access.
eg In access, I select a client from a query, then I need to «click a
button» which will open the Word document specific to that client. I will
then add text to that doc, save and close, and be returned to the original
access screen.
Can this be done?
Ian
Advertisements
Albert D.Kallal
Advertisements
Guest
-
#3
Thank you, Albert,
I tried numerous code samples to get Word to open a specific document and
populate it with data from an Access form. What worked on one PC, didn’t on
another. Your solution works beautifully.
ancient_hilly
Want to reply to this thread or ask your own question?
You’ll need to choose a username for the site, which only take a couple of moments. After that, you can post your question and our members will help you out.
Ask a Question

For quick access to a file, to create an email, or to jump to a different spot, you can create a link in a Word document easily.
To make things easier for yourself or your reader, you can link text to items in your Word document. You may already know that you can create a hyperlink to a web page. But you can also link text to another file, an email address, or a different spot in your document.
This is handy for quickly accessing a file related to your current document, giving your reader a fast way to send your company an email, or jumping to a specific location in the document.
The process for adding these links is similar, with only some small adjustments on Windows versus Mac. So if you’re ready to make your Microsoft Word document more functional and useful, let’s get to it!
Access the Link Tool
To link a file, email, or document location, you’ll follow the same initial process to open the Insert Hyperlink tool.
On Windows, select the text and then do one of the following:
- Right-click and pick Link.
- Go to the Insert tab, click Links, and choose Link.

On Mac, select the text and then do one of the following:
- Right-click and pick Hyperlink.
- Go to the Insert tab, click Links, and choose Link.
- Click Insert > Hyperlink from the menu bar.

Open a file related to your document without having to stop what you’re doing and navigate to it each time. You can link right to it!
With the Insert Hyperlink tool open, click Existing File or Web Page on the left.
Below Look In, you can select Current Folder or Recent Files. But you can also use the drop-down list, Up One Folder, or Browse for File buttons to the right.
After selecting the file from one of the above spots, you’ll see its exact location appear in the Address box. If this is the file you want, click OK.

You’ll see your text linked as indicated by the blue underlined font. To open the file, hold your Control key and click the link.

On Mac, pick Web Page or File, click Select to browse for and choose the file, and hit OK when you’re ready. You don’t have to hold the key to follow the link on Mac; just click it.

Link to an Email in a Word Document
If you link to an email address in the document, the user can then click the link, and a compose email window will open with their default email client or allow them to choose, depending on their platform.
In the Insert Hyperlink tool, click E-mail Address on the left. Complete the E-mail address field or choose a Recently used e-mail address.
Optionally, enter a Subject line which will prepopulate in the sender’s email. This can be helpful so that the recipient knows it’s related to this particular document or about a certain topic. Just note, the sender can change the subject line.
Click OK.

Like with the link to a file above, the user holds Control as they click the link to compose their email.

On Mac, the fields for linking to an email are the same, and you can click the link in the text to compose the email.

Link to a Location in a Word Document
Linking to a spot in your Word document is also convenient. The options for this type of link are a bit limited, however. You can choose the top of the document, a heading, or a bookmark.
In the Insert Hyperlink tool, click Place in This Document on the left. On the right, choose a document location. If you use headings, those will appear as selectable items. Click OK.

And as you’ve probably already guessed, hold Control and click to follow the link.

On Mac, select This Document, choose the location, and hit OK. Once more, you can click the link to follow it in Word on Mac.

More Resources With a Click in Word
Linking text in your Word document to files, emails, and locations can save you and your reader a lot of time.
For some helpful related tutorials, check out how you can follow these types of links in Word without using the Control key or how to stop Word from creating a link when you type a URL.
![]()

Share Documents in Word: Overview
One way to share documents in Word is to use the co-authoring features of Word as part of an Office 365 subscription. To use co-authoring in Word, you must also save the shared document to an online site like OneDrive, OneDrive for Business, or SharePoint Online. Co-authoring lets you to work on shared Word documents at the same time as other users.
Alternatively, if available, you can also share a Word document to an internally shared network drive, just like any other type of file. Word also provides other sharing options that let you share a document via email using a sharing link or even present your document online. However, these options do not allow for real-time document updates when changes occur.
Share Documents in Word Using Co-authoring
To share a document using co-authoring in Word as part of Office 365 if you haven’t yet saved the document online, open the document to share. Then click the “Share” button in the upper-right corner of the Ribbon to open a “Share” pane. This pane lists the connected online OneDrive and SharePoint sites to which you can share the document. Click the desired choice in the “Share” pane to upload a copy of the document to that site.
After doing that, the “Share” pane then turns into the “Send Link” pane. Alternatively, if you clicked the “Share” button within a document you had already saved online, then the “Send Link” pane appears right away, instead. The “Send Link” pane lets you choose the users to invite to co-author the document via a link you send to their email addresses.
By default, Word wants to send a link that lets anyone with the link edit the document. To configure this link, click the “Anyone with this link can edit >” button in the “Send Link” pane to change it into the “Link settings” pane. Then click the button that shows the users with whom you want to share the link. Choices include “Anyone with the link,” “People in (Your Organization’s Name) with the link,” “People with existing access,” or “Specific people.”
For most choices, you can also check or uncheck the “Allow editing” checkbox at the bottom of the pane to choose whether or not to also allow editing access, if desired. You must allow editing access if you want users to co-author the document with you. Otherwise, they can only read the document, but not edit it.

Share Documents in Word – Instructions: A picture of a user changing sharing settings in the “Link settings” pane in Word.
For many sharing choices, if you uncheck the “Allow editing” checkbox, you can also enable the “Block download” switch by clicking it to block downloading, too, if desired. Additionally, if you select the “Anyone with the link” option, you can click into the “Set expiration date” field at the bottom of this pane to select an expiration date for the sharing link, if desired.
You can also password protect the document file if you choose the “Anyone with the link” option by clicking into the “Set password” field and then typing the desired file password. Note that you will need to provide this password to anyone with this link so they can access the file. After changing your link settings, click the “Apply” button to continue and return to the “Send Link” pane again.
Then enter the users’ names or email addresses, as needed, into the “Enter a name or email address” field, which is above the blue line in this pane. Then select the names from the drop-down that appears to add them to the list. Continue doing this until you have added all the users with whom to share the document.
To enter an optional message within the email, type it into the “Add a message (optional)” field. To then email the invitations, click the “Send” button in the “Send Link” pane. Then click the “x” button in the upper-right corner of the confirmation message box that appears to tell you the email is sent.
Share Documents in Word Using a Link
Alternatively, you can instead get a sharing link to either view or edit the shared document, which you can then send to other users in emails or other kinds of messaging apps. To share documents in Word using a link, edit the sharing link settings, as usual. Then click the “Copy link” button instead of the “Send” button at the bottom of the “Send Link” pane.
The link is then copied and appears within a “Link to (Document Name) copied” pane. You can also click the link’s adjacent “Copy” button to copy the link to your clipboard, if needed. You can then send the link to your desired recipients using whatever application you want. Then click the “x” button in the upper-right corner of the “Link to (Document Name) copied” pane to close it, when finished.
Alternatively, you can also send the link via your desktop Outlook application, if available. To do this, edit the link settings, as usual. Then click the “Outlook” button instead of the “Send” button at the bottom of the “Send Link” pane. Your desktop version of Outlook then opens and creates an email with the link that you can send to the recipients.
You can also choose to share a non-collaborative copy of the document as a Word document or PDF attachment via Outlook by clicking the “Send a Copy” button at the bottom of the “Send Link” pane. Then select either “Word Document” or “PDF” from the pop-up menu that appears. Your desktop version of Outlook then opens and attaches a copy of the shared document to an email, using the file type you selected. You can then send this to the recipients, as usual. Note this is not a shared document, however; they are simply sent a copy of the document.
Stop Sharing Documents in Word or Change Sharing
To stop sharing a document or change its sharing settings, open the “Send Link” pane again by clicking the “Share” button at the right end of the Ribbon. To add more users, repeat the sharing process again. To remove users from sharing the document, click the ellipsis mark button to the right of the “Send Link” label in the pane. Then select the “Manage Access” command from the pop-up menu that appears to change the pane into the “Manage Access” pane. Any users given access or links created for sharing then appear in a list within this pane.
To remove a link, click the ellipsis mark button to the right of the link to see its link options. Then click the “x” button to the right of the link to delete it. Then click the “Delete link” button in the confirmation message box that appears to confirm the link’s deletion. Alternatively, note that you can also click the “Back” arrow button in the upper-left corner of the “Manage Access” pane if you want to return to the “Send Link” pane again without making any changes.
After you finish co-authoring the Word document, if needed, you can then save a local copy of the shared document to your computer by clicking the “File” tab in the Ribbon and selecting the “Save a copy” command from the left side of the Backstage view. After confirming you have saved the copy, you can then safely delete the file from its shared network or online location, if needed.
Share Documents in Word: Instructions
How to Share Documents in Word Using Co-authoring
- To use co-authoring in Word, you must also save the shared document to an online site like OneDrive, OneDrive for Business, or SharePoint Online.
- To share a document using co-authoring in Word as part of Office 365 if you haven’t yet saved the document online, open the document to share.
- Then click the “Share” button in the upper-right corner of the Ribbon to open a “Share” pane, which lists the connected online OneDrive and SharePoint sites to which you can share the document.
- Click the desired choice in the “Share” pane to upload a copy of the document to that site.
- After doing that, the “Share” pane then turns into the “Send Link” pane.
- Alternatively, if you clicked the “Share” button within a document you had already saved online, then the “Send Link” pane appears right away, instead.
- The “Send Link” pane lets you choose the users to invite to co-author the document via a link you send to their email addresses.
- By default, Word wants to send a link that lets anyone with the link edit the document.
- To configure this link, click the “Anyone with this link can edit >” button in the “Send Link” pane to change it into the “Link settings” pane.
- Then click the button that shows the users with whom you want to share the link. Choices include “Anyone with the link,” “People in (Your Organization’s Name) with the link,” “People with existing access,” or “Specific people.”
- For most choices, to choose whether or not to also allow editing access, if desired, you can also check or uncheck the “Allow editing” checkbox at the bottom of the pane.
- You must allow editing access if you want users to co-author the document with you. Otherwise, they can only read the document, but not edit it.
- To block downloading, too, if you uncheck the “Allow editing” checkbox for many sharing choices, enable the “Block download” switch by clicking it.
- To select an expiration date for the sharing link, if desired and if you select the “Anyone with the link” option, click into the “Set expiration date” field at the bottom of this pane and set the desired date.
- To password protect the document file if you choose the “Anyone with the link” option, click into the “Set password” field and then type the desired file password. Note that you will need to provide this password to anyone with this link so they can access the file.
- After changing your link settings, click the “Apply” button to continue and return to the “Send Link” pane again.
- Then enter the users’ names or email addresses, as needed, into the “Enter a name or email address” field, which is above the blue line in this pane.
- Then select the names from the drop-down that appears to add them to the list.
- Repeat steps #17 and #18 until you have added all the users with whom to share the document.
- To enter an optional message within the email, type it into the “Add a message (optional)” field.
- To then email the invitations, click the “Send” button in the “Send Link” pane.
- Then click the “x” button in the upper-right corner of the confirmation message box that appears to tell you the email is sent.
Share Documents in Word Using a Link
- Alternatively, to instead get a sharing link to either view or edit the shared document, which you can then send to other users in emails or other kinds of messaging apps, edit the sharing link settings, as shown in the instructions above.
- Then click the “Copy link” button instead of the “Send” button at the bottom of the “Send Link” pane.
- The link is then copied and appears within a “Link to (Document Name) copied” pane.
- To copy the link to your clipboard, if needed, click the link’s adjacent “Copy” button.
- You can then send the link to your desired recipients using whatever application you want.
- Then click the “x” button in the upper-right corner of the “Link to (Document Name) copied” pane to close it, when finished.
- Alternatively, to send the link via your desktop Outlook application, if available, edit the link settings, as shown in the instructions above.
- Then click the “Outlook” button instead of the “Send” button at the bottom of the “Send Link” pane.
- Your desktop version of Outlook then opens and creates an email with the link that you can send to the recipients.
- To share a non-collaborative copy of the document as a Word document or PDF attachment via Outlook, click the “Send a Copy” button at the bottom of the “Send Link” pane.
- Then select either “Word Document” or “PDF” from the pop-up menu that appears.
- Your desktop version of Outlook then opens and attaches a copy of the shared document to an email, using the file type you selected.
- You can then send this to the recipients, as usual.
- Note that this is not a shared document, however, and they are simply being sent a copy of the document.
Stop Sharing Documents in Word or Change Sharing
- To stop sharing a document or change its sharing settings, open the “Send Link” pane again by clicking the “Share” button at the right end of the Ribbon.
- To add more users, repeat the sharing process again.
- To remove users from sharing the document, click the ellipsis mark button to the right of the “Send Link” label in the pane.
- Then select the “Manage Access” command from the pop-up menu that appears to change the pane into the “Manage Access” pane.
- Any users given access or links created for sharing then appear in a list within this pane.
- To remove a link, click the ellipsis mark button to the right of the link to see its link options.
- Then click the “x” button to the right of the link to delete it.
- Then click the “Delete link” button in the confirmation message box that appears to confirm the link’s deletion.
- Alternatively, to return to the “Send Link” pane again without making any changes, note that you can also click the “Back” arrow button in the upper-left corner of the “Manage Access” pane if you want.
- To save a local copy of the shared document to your computer after you finish co-authoring the Word document, if needed, click the “File” tab in the Ribbon.
- Then select the “Save a copy” command from the left side of the Backstage view.
- After confirming you have saved the copy, you can then safely delete the file from its shared network or online location, if needed.
Share Documents in Word: Video Lesson
The following video lesson, titled “Sharing Documents in Word Using Co-authoring,” shows you how to share documents in Word. This video lesson is from our complete Word tutorial, titled “Mastering Word Made Easy v.2019 and 365.”