
Copy a Word table into Excel
Excel for Microsoft 365 Word for Microsoft 365 Excel 2021 Word 2021 Excel 2019 Word 2019 Excel 2016 Word 2016 Excel 2013 Word 2013 Excel 2010 Word 2010 Excel 2007 Word 2007 More…Less
When you want to move data from a Word table to Excel, you can avoid having to retype that data by copying it from Word directly. When you copy data from a Word table into an Excel worksheet, the data in each Word table cell is pasted in an individual cell on the worksheet.
Important: After pasting the data, you may have to clean it up so that you can take advantage of the calculation features in Excel. For example, there may be unwanted extra spacing in cells, numbers may have been pasted as text rather than as numeric values that you can calculate, or dates are not displayed correctly. For help with formatting numbers as dates, currency, percentages, etc., see Format numbers. For help with formatting the style of your table, see Format an Excel table.
-
In a Word document, select the rows and columns of the table that you want to copy to an Excel worksheet. Make sure there aren’t any extra carriage returns in the cells of the table, otherwise this may cause extra rows in Excel.
-
To copy the selection, press CTRL+C.
-
In the Excel worksheet, select the upper-left corner of the worksheet area where you want to paste the Word table.
Note: Make sure that the paste area is empty before you paste the data. Data in Word table cells will replace any existing data in worksheet cells in the paste area. If necessary, review the table first in Word to verify its dimensions.
-
Press CRL+V.
-
To adjust the formatting, click Paste Options
 next to the data that you pasted, and then do the following:
-
To use the formatting that is applied to the worksheet cells, click Match Destination Formatting.
-
To use the formatting of the Word table, click Keep Source Formatting.
-
Note: Excel pastes the contents of each Word table cell into a single cell. After you paste the data, you can distribute the data across additional cells in a column (for example, to divide first and last names so that they appear in separate cells) by using the Text to Columns command. For more information, see Distribute the contents of a cell into adjacent columns.
Need more help?
This article is a detailed step-by-step guide to converting or exporting Word to Excel. We will look at different methods to export or convert a Word file to an Excel file in this article. So, read till the end to know multiple ways to convert your files.
Let’s get started!
Also read: How to Convert Excel to PDF?
Steps to export Word to Excel
Let’s get started with exporting an existing Word file on your system to Excel. Note that we’re not converting a Word file to an Excel spreadsheet here. We will discuss converting Word files later in this tutorial.
We already have unstructured data created in MS Word as an example.

Here are the steps to export an unstructured Word file to Excel.
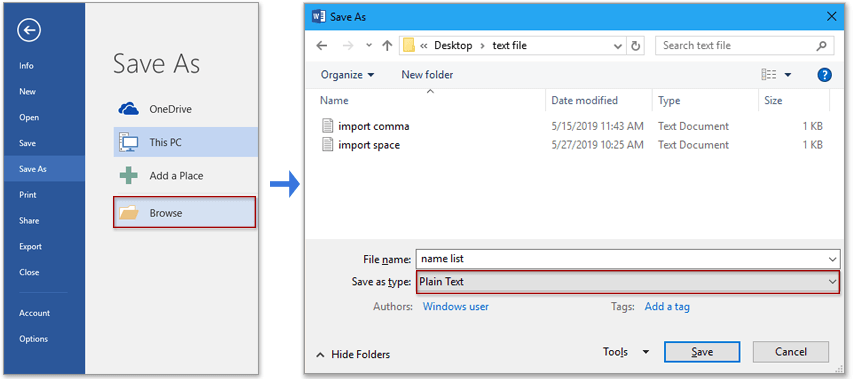
- Go to the File tab.
- Click Save As.
- Click Browse.
- Choose Plain Text in the Save As type field.

- Click OK when the File Conversion window appears.

Now, import this text file into Excel.
- Open a blank Excel workbook or worksheet.
- Go to the Data tab.
- Click on From Text/CSV in the Get &Transform Data section.

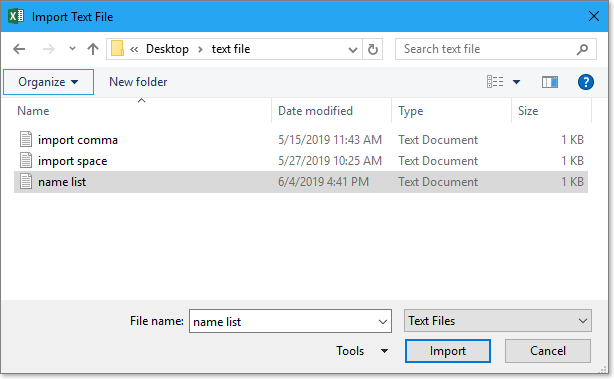
- Choose the saved text file from the file location.

- Click on the Word file saved as a text file.
- Click Import.

- Check if your data is properly formatted. If you’re satisfied with the results click Load.
- If you’re unsatisfied with the format, like this data above, click Transform Data.
- Notice that there are two empty columns that we do not need. So, we will click Transform Data to fix this.

- The Power Query editor opens to help you manage the imported data.
- Right-click on the columns you want to delete.
- Press Remove.
- Once you’re done, click Close & Load in the Home tab.


You can see that the unstructured data from Word is exported to Excel in a structured format.
Let’s learn how to export structured or tabular data from Word to Excel.

To convert the data into a table.
- Select the entire data in Word.
- Go to the Insert tab.
- Click on Table.
- Click Insert Table.
- Right-click on the columns you want to delete.
- Press Delete Columns.
Your table is ready. Let’s export it to Excel.
This step is best for you if you don’t have Power Query in Excel.
- Select the entire data table in Word. CTRL+A to Select All.
- Copy the table. CTRL+C
- Paste the table (CTRL+V) in Excel.
Your structured data is successfully exported.
If you’re on an older version of Office like 2007, 2010, 2013, or 2016, then follow these steps.
The initial step to export Word to Excel is the same in the older versions.
- Save the Word file as a text file.
- Go to the File tab.
- Click Save As.
- Click Browse.
- Choose Plain Text in the Save As type field.
- Click OK when the File Conversion window appears.
Now, import this text file into Excel.
- Open a blank Excel workbook or worksheet.
- Go to the Data tab.
- Click on From Text/CSV in the Get &Transform Data section.
- Choose the saved text file from the file location.
- Click Open.
The Text Import Wizard opens with a few options.

- Choose Delimited if you want to separate each field with existing commas, spaces, or tabs.
- Choose Fixed Width if your fields are aligned properly.
- Click Next.
You can see your data is separated with lines between them.
- Double-click on a line to add or remove it.

- Click Next.
- Click Finish in the next step.
- Click on a cell where you wish to export the data.
- Click OK.

Your data is exported successfully.
Steps to converting Word to Excel online
You can also convert a Word file to Excel by following the steps below.
- Go to Online2PDF.
- Choose the Word file.
- Choose the Excel version you want to convert.

- Click Convert.
Note that you cannot export to the Excel 365 version here.
Conclusion
This tutorial was a detailed step-by-step guide to converting and exporting Word files to Microsoft Excel. We walked through the different methods of exporting data from Word for both newer and older versions of Excel. Stay tuned for more interesting tutorials like these!
References- Computer Hope
In a scenario where you have a data table set up in a Word document, you can convert the table into an Excel sheet, by simply importing it – no need to recreate the table in Excel!
Likewise, you can also easily import a text Word document into Excel.
- Import Word document into Excel as an embedded object.
- Import Word data into multiple cells in Excel.
- Import Word data as a text file into Excel.
We will show you in simple step-by-step instructions how you can do this.
Let us start.
Method #1: Import Word Document as an embedded object into Excel
This is useful to create a central access point to various Word documents. By embedding the document into Excel, the Word document itself will open when you double click on it.
Step #1: Open an Excel spreadsheet
Open an Excel spreadsheet into which you want to import the Word data.
Step #2: Navigate to a cell
Navigate to the cell where you want to import the data.
Step #3: Import the data
Click on the ‘Insert’ tab in the top menu bar to change the ribbon.

In the section ‘Text’, click on Object.

This opens the ‘Insert Object’ dialog box.
Click on the option ‘Create from file’.
Ensure the options ‘Link to file’ and ‘Display as icon’ boxes are not ticked.
Click on the Browse… button.

This will open the File Manager/Explorer window.
Navigate to the Word document that you want to import.
Once you have selected it, click on the Insert button.

The name of the Word document will now appear in the ‘Insert Object’ dialog box.

Click on the OK button at the bottom.
Excel embeds the Word document as an object.

Method #2: Import Word Data into Multiple Cells in Excel
Step #1: Open a Word document
Open the Word document that contains the data you want to import.
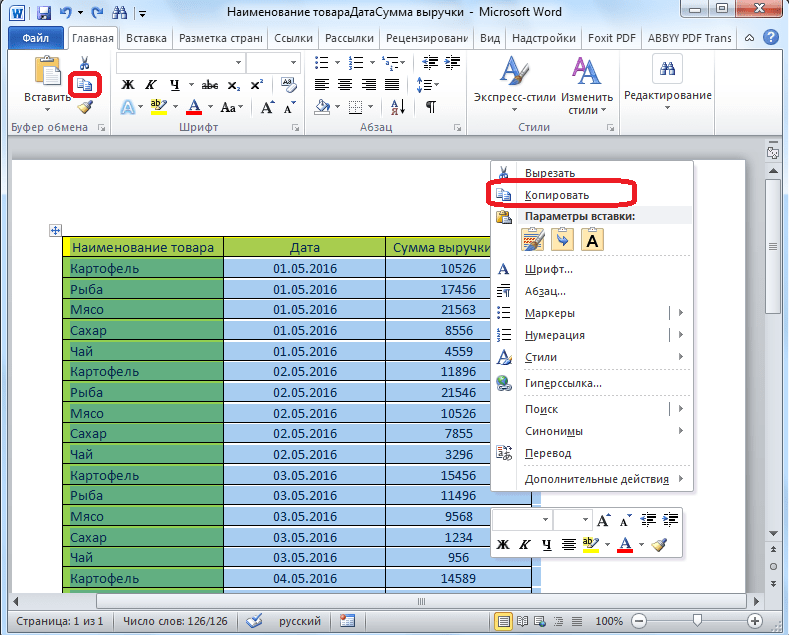
Click on the cross symbol in the top left corner of the table to select it.

Press CTRL+C on the keyboard to copy the data into the clipboard, OR click right and select ‘Copy’ from the menu that opened.
Step #2: Close the Word document
Close the Word document. (Optional)
Step #3: Open the Excel spreadsheet
Open the Excel spreadsheet into which you want to import the Word data.
Step #4: Navigate to a cell
Navigate to the cell from where you want to start importing the data. The cell you select will be the upper left starting point of the data you want to import.
Step #5: Import the data
Right-click on this cell to open a menu.
Excel offers you two Paste Options:
- Keep Source Formatting (K) — Paste the data as it appeared in Word (lines, font, and text size will remain the same as it was originally)
- Match Destination Formatting (M) — Paste the data as it should appear in Excel (the font, text size, etc. will become the same as the rest of the spreadsheet)
Pick one of the choices to import the data.

Excel imports the data into multiple cells. In our example below, we chose Match Destination Formatting.

Method #3: Import Word Data as a Text File into Excel
This is useful if you have a simple Word document that only contains text – no images or graphs or tables.
If you have already created a project capturing information, but realize a spreadsheet will work better than a document, then this tool is for you to ensure you don’t have to redo your hard work.
Step #1: Open a Word document
Open the Word document that contains the data you want to import.
Click on the ‘File’ tab in the top menu bar.

This opens the ‘File’ menu.
In the left pane, click on the ‘Export’ option.

In the pane that opens, under Export, click on ‘Change File Type.’
Under the ‘Change File Type’ menu, select Plain Text.
Click on Save As.

Step #2: Save as a plain text document
This opens the File Manager.
Save your file as plain text type with an appropriate name. In some instances you will now see it saved as document_name.txt

Step #3: Close the Word document
Close the Word document. (Optional)
Step #4: Open the Excel spreadsheet
Open the Excel spreadsheet where you want to import the data.
Click on the ‘Data’ tab in the top menu bar to change the ribbon.

Step #5: Import the data
In the section ‘Get External Data’, click on the ‘From Text’ icon.

This opens the File Manager.
Navigate to the plain text file you have saved in step #2.
Click on the name of the plain text file.
Click on the Open button.

This opens the first dialog box of the Text Import Wizard.
Under the option ‘Choose the file type…’, click and select Delimited.

Make other changes if necessary.
Click on Next at the bottom of the dialog box.
This will open the second dialog box.
Click and select the ‘Tab’ option under ‘Delimiters’.

Make other changes if necessary.
Click on Next at the bottom of the dialog box.
This will open the third dialog box.
Under ‘Column data’ format, click and select ‘General’.
Make other changes if necessary.
Click on the Finish button at the bottom of the dialog box.

This opens the ‘Import Data’ dialog box.
Select the worksheet and the cell where Excel will import the data.

Click the OK button.
Excel imports the text data.

Step #6: Format the data
Right-click on the cell containing the data.
A menu opens.
Select ‘Format Cells…’

This opens the ‘Format Cells’ dialog box.
Click on the ‘Alignment’ tab.
Under ‘Text control’, click and select ‘Wrap Text’.

Make other changes if necessary.
Click on OK at the bottom of the dialog box.
Excel formats the text data to fit into one cell.

Conclusion
We have shown you three methods of inserting Word data into Excel, depending on your needs and the type of data in your Word document.
Need to shift or convert MS Word data into Excel Worksheet? At the same time looking for some easy fixes to import Word documents into Excel without any software?
Even I also think that the task of importing Word document into Excel is best. As it keep you aside from the headache of Excel file recreation from the beginning.
Suppose you need to make a spreadsheet from the list or form which you have already made in MS Word. In that case the method of copy –paste every pinch of information from doc to xls gets quiet hectic.
Isn’t it…!
For such cases it’s better to have an idea of importing data from word to excel. As, this method will transform such bulky task into a simple one.
So, today through this post you are going to get easy and quick idea on how to import word to Excel.
To learn more advanced Excel functions visit Become Excel Master.
Here are some easy tricks to import word document into Excel.
1. Single Cell Import
2. Import Data Cell by Cell
3. Convert Word To Excel Using “From Text” Option
Let’s discuss them on by one.
Method 1. Single Cell Import
- Start the Microsoft Excel > open Excel spreadsheet you need importing the word data into.
- After that click Insert tab > on the ribbon click Object button
- Now on the object window click “Create from File” > browse MS Word document to import.
- Double-click the file name > click OK to close Object window. Now you are brought back to Excel spreadsheet with Word file merged into it.
Please Note: Below the ribbon the cell text box shows =EMBED (“Document”,””).
- Next double click within the Word document for opening it and making it editable. Here the users can perform entire word features, even in the Excel-like modifying or reformatting text.
- Click File tab > choose Save As > rename existing Excel spreadsheet in place of saving over it (doing this will keep the non-merged version accessible) > click Save button
Method 2. Import Data Cell by Cell
By importing the data cell by cell, follow the steps given below.
- Open MS Word > open document with data table to import into Excel
- No click the small hatch marks in the table > press Ctrl + C to copy table > close Word document.
- Now open Excel > click cursor into the first cell grid > hit Ctrl + V keys to paste the Word table’s contents. From Word into Excel with similar cell layout, the data is exported. (For instance: if the Word table has two rows with three columns, then the Excel spreadsheet will show two rows with three columns. )
Well, this is all about how to import data from Microsoft word to MS Excel
Method 3. Convert Word To Excel Using “From Text” Option
If you are an Excel 2016 user then importing word data to excel is really going to get easy for you. Excel 2016 application offers one very helpful feature i.e “from text” to import or convert Word to Excel.
- Open your MS Word application first of all. After then go to the File option from the menu bar and then to the Save As option;
- From the drop down list of output format select the “Plain Text” format.
- After that tap to the “Save” option for saving up your Word documents just like a new text file;
- Now run your MS Excel application. From the toolbar select the “Data” and tap to the “From Text” option for importing off the Word text;

- After that select the “Delimited” option from the Import Wizard.

- Make changes in the setting as per your need and then tap to the “Finish” option.
- Choose any of your new worksheet or already existing spreadsheet. For importing word document data to excel and tap to the OK

- At last save your Excel file.
Note:
Above solution is recommended only when your word document is not filled with too much of data or table. As, this may take a lot of your time to make formatting and adjustments.
Bonus Tips:
- The Microsoft Word document is pasted into the single Excel cell, in the single cell import process.
- And the Excel resizes the grid to fit the cell that might be larger and display the data within the grid.
- This process is best for importing the whole Word document like proposals and you don’t require opening the Word document for performing the particular task.
- Well, the cell by cell data import process goes best for tables within the Word document.
- You can even edit the table’s contents, after pasting into Excel application.
Final Verdict
These are some quick ways through which you can import data from Word to Excel. Implement the given steps and make your work easy and as well save your precious time. This is very helpful to maintain data and other data in cells and rows.
So, whenever you need to transfer data from Word document to Excel, follow the given steps and make your data more presentable and easily understandable.
Excel is an essential application and used in daily life, so it is recommended to handle the Excel file properly and follow best preventive steps to protect your Excel files from getting corrupted.
Despite it, always create a valid backup of your crucial Excel data and as well scan your system with good antivirus program for virus and malware infection.
If, in case you have any additional questions concerning the ones presented, do tell us in the comments section below.
Good Luck….!


Priyanka is an entrepreneur & content marketing expert. She writes tech blogs and has expertise in MS Office, Excel, and other tech subjects. Her distinctive art of presenting tech information in the easy-to-understand language is very impressive. When not writing, she loves unplanned travels.
Содержание
- Copy a Word table into Excel
- How to insert a Word document into Excel
- 3 ways to Insert Word Document into Excel
- Method #1: Import Word Document as an embedded object into Excel
- Step #1: Open an Excel spreadsheet
- Step #2: Navigate to a cell
- Step #3: Import the data
- Method #2: Import Word Data into Multiple Cells in Excel
- Step #1: Open a Word document
- Step #2: Close the Word document
- Step #3: Open the Excel spreadsheet
- Step #4: Navigate to a cell
- Step #5: Import the data
- Method #3: Import Word Data as a Text File into Excel
- Step #1: Open a Word document
- Step #2: Save as a plain text document
- Step #3: Close the Word document
- Step #4: Open the Excel spreadsheet
- Step #5: Import the data
- Step #6: Format the data
- Conclusion
- Вставка таблицы из программы Word в Microsoft Excel
- Обычное копирование
- Импорт таблицы
Copy a Word table into Excel
When you want to move data from a Word table to Excel, you can avoid having to retype that data by copying it from Word directly. When you copy data from a Word table into an Excel worksheet, the data in each Word table cell is pasted in an individual cell on the worksheet.
Important: After pasting the data, you may have to clean it up so that you can take advantage of the calculation features in Excel. For example, there may be unwanted extra spacing in cells, numbers may have been pasted as text rather than as numeric values that you can calculate, or dates are not displayed correctly. For help with formatting numbers as dates, currency, percentages, etc., see Format numbers. For help with formatting the style of your table, see Format an Excel table.
In a Word document, select the rows and columns of the table that you want to copy to an Excel worksheet. Make sure there aren’t any extra carriage returns in the cells of the table, otherwise this may cause extra rows in Excel.
To copy the selection, press CTRL+C.
In the Excel worksheet, select the upper-left corner of the worksheet area where you want to paste the Word table.
Note: Make sure that the paste area is empty before you paste the data. Data in Word table cells will replace any existing data in worksheet cells in the paste area. If necessary, review the table first in Word to verify its dimensions.
To adjust the formatting, click Paste Options  next to the data that you pasted, and then do the following:
To use the formatting that is applied to the worksheet cells, click Match Destination Formatting.
To use the formatting of the Word table, click Keep Source Formatting.
Note: Excel pastes the contents of each Word table cell into a single cell. After you paste the data, you can distribute the data across additional cells in a column (for example, to divide first and last names so that they appear in separate cells) by using the Text to Columns command. For more information, see Distribute the contents of a cell into adjacent columns.
Источник
How to insert a Word document into Excel
In a scenario where you have a data table set up in a Word document, you can convert the table into an Excel sheet, by simply importing it – no need to recreate the table in Excel!
Likewise, you can also easily import a text Word document into Excel.
3 ways to Insert Word Document into Excel
- Import Word document into Excel as an embedded object.
- Import Word data into multiple cells in Excel.
- Import Word data as a text file into Excel.
We will show you in simple step-by-step instructions how you can do this.
Method #1: Import Word Document as an embedded object into Excel
This is useful to create a central access point to various Word documents. By embedding the document into Excel, the Word document itself will open when you double click on it.
Step #1: Open an Excel spreadsheet
Open an Excel spreadsheet into which you want to import the Word data.
Step #2: Navigate to a cell
Navigate to the cell where you want to import the data.
Step #3: Import the data
Click on the ‘Insert’ tab in the top menu bar to change the ribbon.
In the section ‘Text’, click on Object.
This opens the ‘Insert Object’ dialog box.
Click on the option ‘Create from file’.
Ensure the options ‘Link to file’ and ‘Display as icon’ boxes are not ticked.
Click on the Browse… button.
This will open the File Manager/Explorer window.
Navigate to the Word document that you want to import.
Once you have selected it, click on the Insert button.
The name of the Word document will now appear in the ‘Insert Object’ dialog box.
Click on the OK button at the bottom.
Excel embeds the Word document as an object.
Method #2: Import Word Data into Multiple Cells in Excel
Step #1: Open a Word document
Open the Word document that contains the data you want to import.
Click on the cross symbol in the top left corner of the table to select it.
Press CTRL+C on the keyboard to copy the data into the clipboard, OR click right and select ‘Copy’ from the menu that opened.
Step #2: Close the Word document
Close the Word document. (Optional)
Step #3: Open the Excel spreadsheet
Open the Excel spreadsheet into which you want to import the Word data.
Step #4: Navigate to a cell
Navigate to the cell from where you want to start importing the data. The cell you select will be the upper left starting point of the data you want to import.
Step #5: Import the data
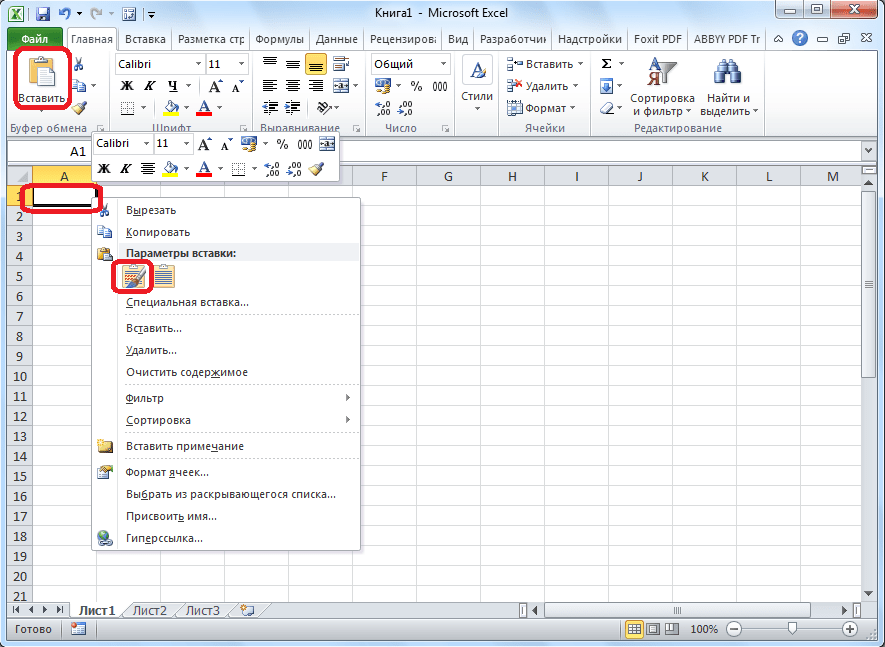
Right-click on this cell to open a menu.
Excel offers you two Paste Options:
- Keep Source Formatting (K) — Paste the data as it appeared in Word (lines, font, and text size will remain the same as it was originally)
- Match Destination Formatting (M) — Paste the data as it should appear in Excel (the font, text size, etc. will become the same as the rest of the spreadsheet)
Pick one of the choices to import the data.
Excel imports the data into multiple cells. In our example below, we chose Match Destination Formatting.
Method #3: Import Word Data as a Text File into Excel
This is useful if you have a simple Word document that only contains text – no images or graphs or tables.
If you have already created a project capturing information, but realize a spreadsheet will work better than a document, then this tool is for you to ensure you don’t have to redo your hard work.
Step #1: Open a Word document
Open the Word document that contains the data you want to import.
Click on the ‘File’ tab in the top menu bar.
This opens the ‘File’ menu.
In the left pane, click on the ‘Export’ option.
In the pane that opens, under Export, click on ‘Change File Type.’
Under the ‘Change File Type’ menu, select Plain Text.
Click on Save As.
Step #2: Save as a plain text document
This opens the File Manager.
Save your file as plain text type with an appropriate name. In some instances you will now see it saved as document_name.txt
Step #3: Close the Word document
Close the Word document. (Optional)
Step #4: Open the Excel spreadsheet
Open the Excel spreadsheet where you want to import the data.
Click on the ‘Data’ tab in the top menu bar to change the ribbon.
Step #5: Import the data
In the section ‘Get External Data’, click on the ‘From Text’ icon.
This opens the File Manager.
Navigate to the plain text file you have saved in step #2.
Click on the name of the plain text file.
Click on the Open button.
This opens the first dialog box of the Text Import Wizard.
Under the option ‘Choose the file type…’, click and select Delimited.
Make other changes if necessary.
Click on Next at the bottom of the dialog box.
This will open the second dialog box.
Click and select the ‘Tab’ option under ‘Delimiters’.
Make other changes if necessary.
Click on Next at the bottom of the dialog box.
This will open the third dialog box.
Under ‘Column data’ format, click and select ‘General’.
Make other changes if necessary.
Click on the Finish button at the bottom of the dialog box.
This opens the ‘Import Data’ dialog box.
Select the worksheet and the cell where Excel will import the data.
Click the OK button.
Excel imports the text data.
Step #6: Format the data
Right-click on the cell containing the data.
Select ‘Format Cells…’
This opens the ‘Format Cells’ dialog box.
Click on the ‘Alignment’ tab.
Under ‘Text control’, click and select ‘Wrap Text’.
Make other changes if necessary.
Click on OK at the bottom of the dialog box.
Excel formats the text data to fit into one cell.
Conclusion
We have shown you three methods of inserting Word data into Excel, depending on your needs and the type of data in your Word document.
Источник
Вставка таблицы из программы Word в Microsoft Excel

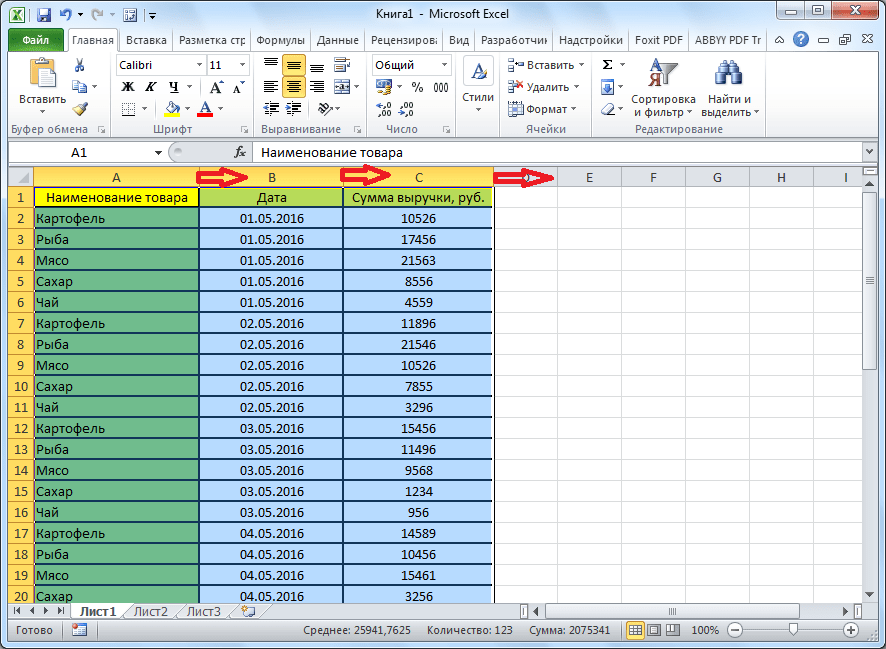
Чаще приходится переносить таблицу из программы Microsoft Excel в приложение Word, чем наоборот, но все-таки случаи обратного переноса тоже не столь редки. Например, иногда требуется перенести таблицу в Excel, сделанную в Ворде, для того чтобы, воспользовавшись функционалом табличного редактора, рассчитать данные. Давайте выясним, какие способы переноса таблиц в данном направлении существуют.
Обычное копирование
Самый простой способ переноса таблицы выполняется методом обычного копирования. Для этого, выделяем таблицу в программе Word, кликаем правой кнопкой мыши по странице, и в появившемся контекстном меню выбираем пункт «Копировать». Можно, вместо этого, нажать на кнопку «Копировать», которая размещена вверху на ленте. Ещё один вариант предполагает, после выделения таблицы, нажатие на клавиатуре клавиш Ctrl+C.
Таким образом, мы скопировали таблицу. Теперь нам нужно вставить её на лист Excel. Запускаем программу Microsoft Excel. Кликаем по ячейке в том месте листа, где хотим разместить таблицу. Нужно заметить, что эта ячейка станет крайней левой верхней ячейкой вставляемой таблицы. Именно из этого нужно исходить, планируя размещения таблицы.
Кликаем правой кнопкой мыши по листу, и в контекстном меню в параметрах вставки выбираем значение «Сохранить исходное форматирование». Также, можно вставить таблицу, нажав на кнопку «Вставить», расположенную на левом краю ленты. Или же, существует вариант набрать на клавиатуре комбинацию клавиш Ctrl+V.
После этого, таблица будет вставлена на лист Microsoft Excel. Ячейки листа могут не совпадать с ячейками вставленной таблицы. Поэтому, чтобы таблица выглядела презентабельно, их следует растянуть.
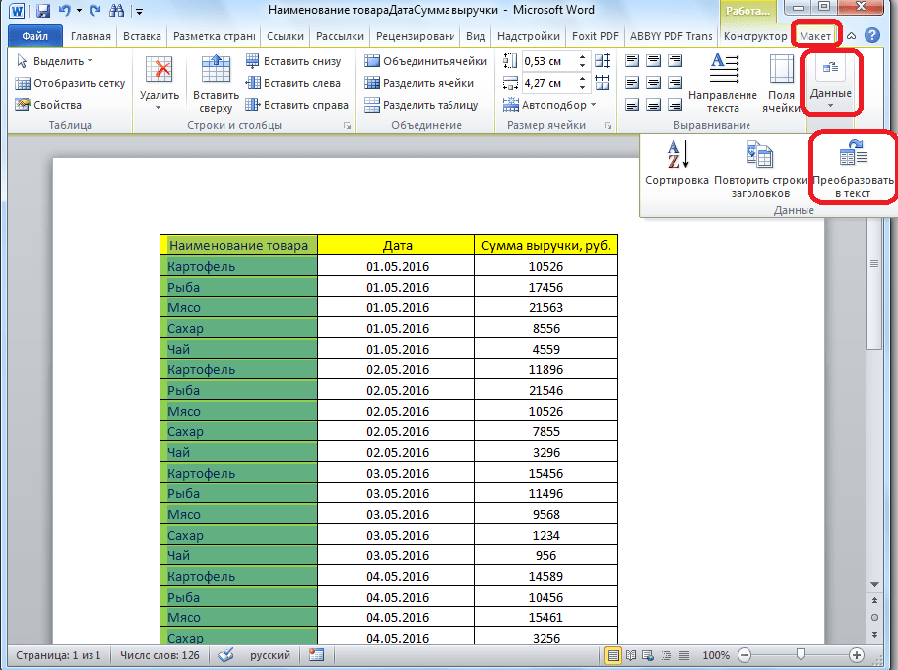
Импорт таблицы
Также, существует более сложный способ переноса таблицы из Word в Excel, путем импорта данных.
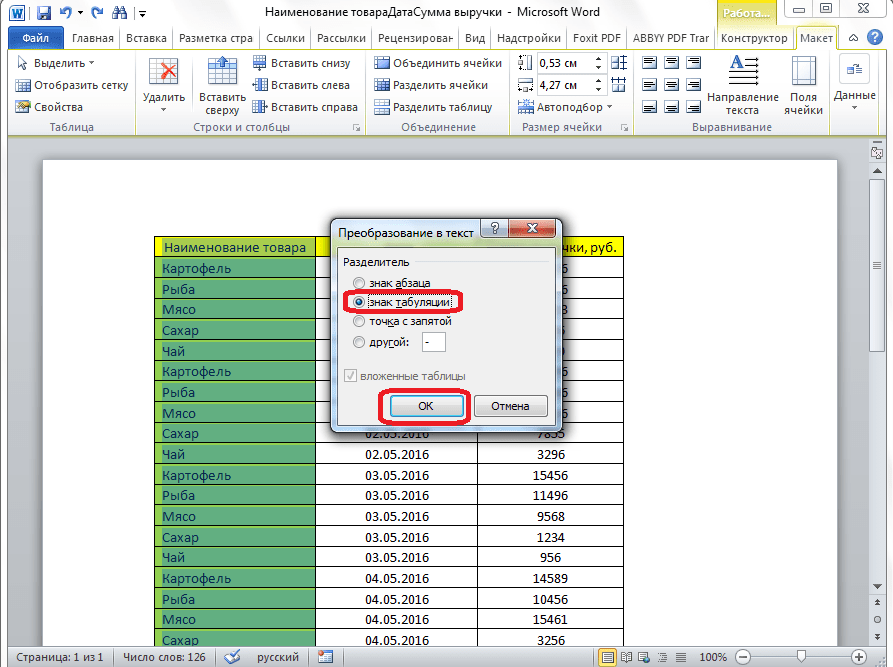
Открываем таблицу в программе Word. Выделяем её. Далее, переходим во вкладку «Макет», и в группе инструментов «Данные» на ленте жмем на кнопку «Преобразовать в текст».
Открывается окно параметров преобразования. В параметре «Разделитель» переключатель должен быть выставлен на позицию «Знак табуляции». Если это не так, переводим переключатель в данную позицию, и жмем на кнопку «OK».
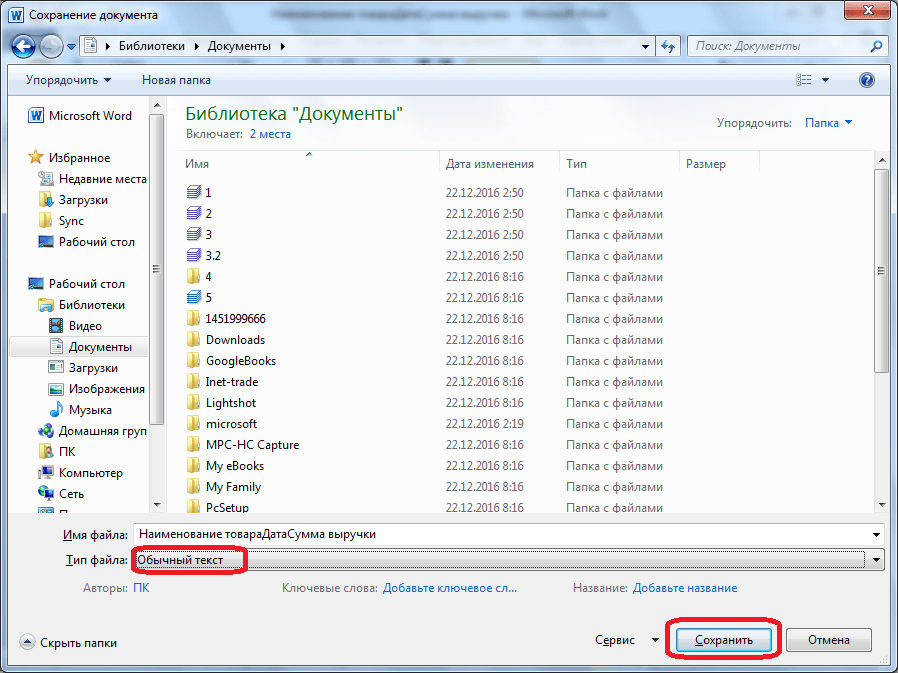
Переходим во вкладку «Файл». Выбираем пункт «Сохранить как…».

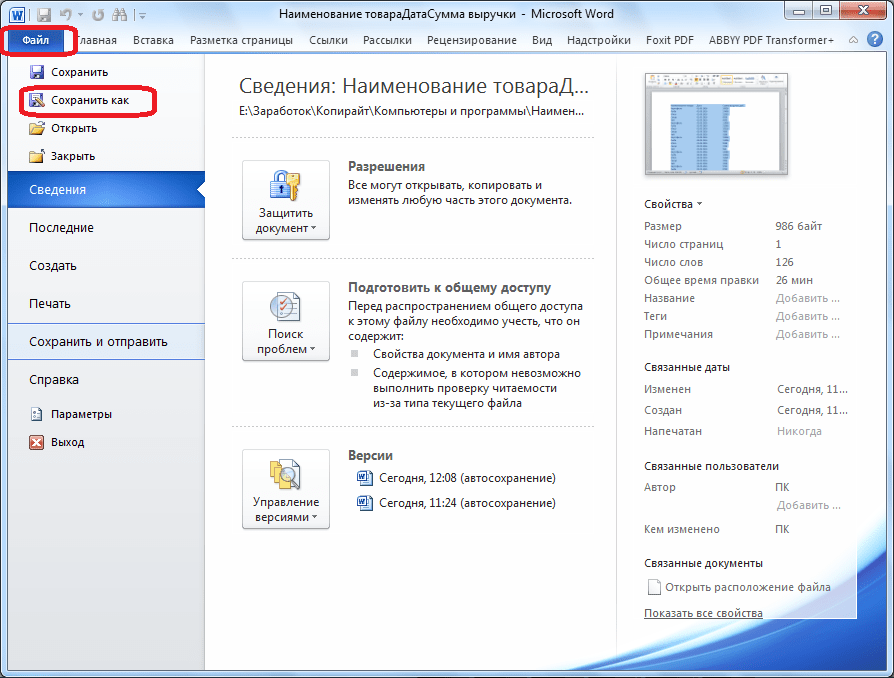
В открывшемся окне сохранения документа, указываем желаемое место расположения файла, который собираемся сохранить, а также присваиваем ему название, если название по умолчанию не удовлетворяет. Хотя, учитывая, что сохраненный файл будет являться лишь промежуточным для переноса таблицы из Word в Excel, особого смысла менять наименование нет. Главное, что нужно сделать – это в поле «Тип файла» установить параметр «Обычный текст». Жмем на кнопку «Сохранить».
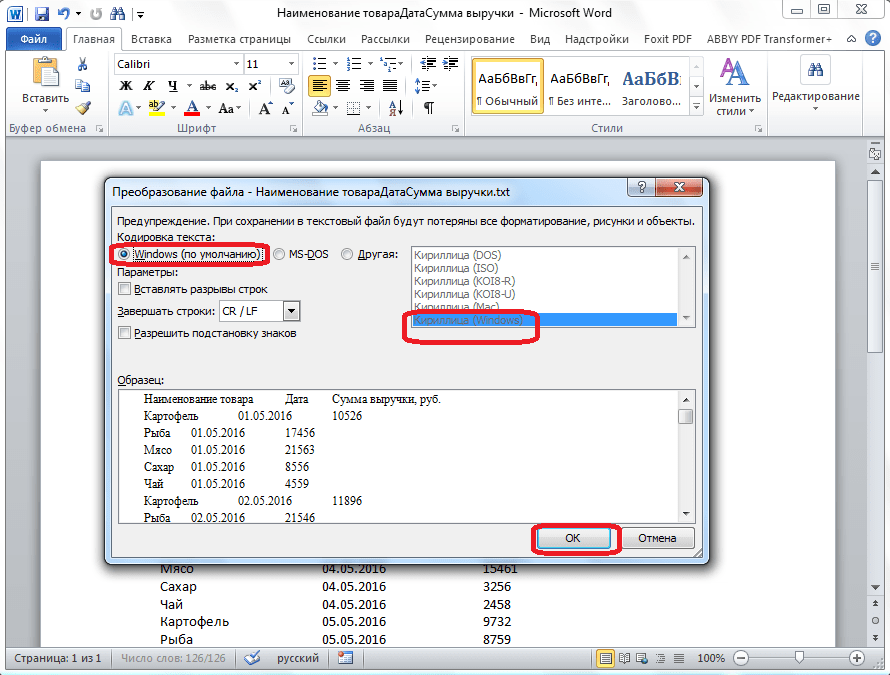
Открывается окно преобразования файла. Тут делать никаких изменений не нужно, а только следует запомнить кодировку, в которой вы сохраняете текст. Жмем на кнопку «OK».
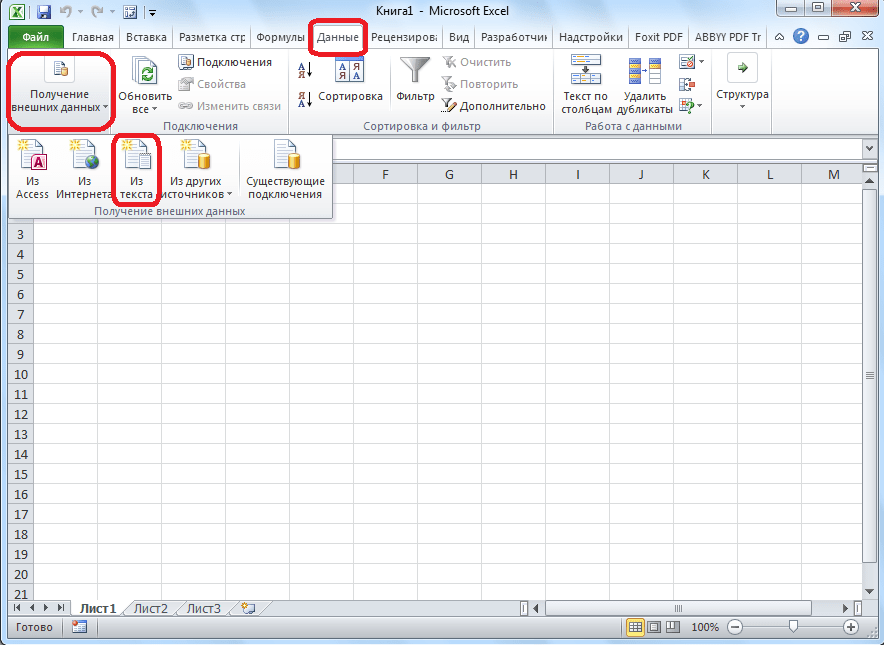
После этого, запускаем программу Microsoft Excel. Переходим во вкладку «Данные». В блоке настроек «Получить внешние данные» на ленте жмем на кнопку «Из текста».
Открывается окно импорта текстового файла. Ищем тот файл, который сохранили ранее в Ворде, выделяем его, и жмем на кнопку «Импорт».

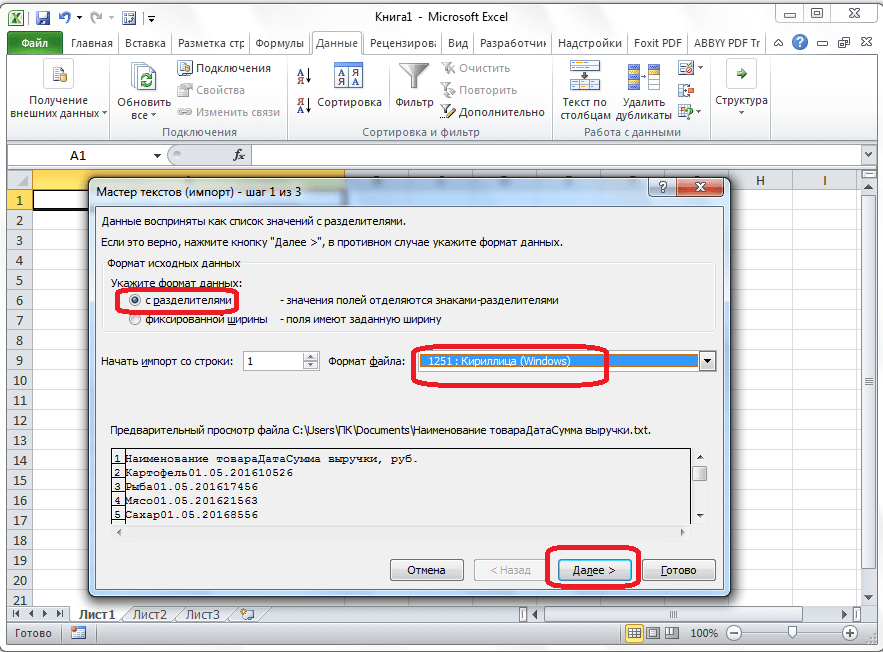
После этого, открывается окно Мастера текстов. В настройках формата данных указываем параметр «С разделителями». Устанавливаем кодировку, согласно той, в которой вы сохраняли текстовый документ в Ворде. В большинстве случаев это будет «1251: Кириллица (Windows)». Жмем на кнопку «Далее».
В следующем окне в настройке «Символом-разделителем является» устанавливаем переключатель в позицию «Знак табуляции», если он не установлен по умолчанию. Жмем на кнопку «Далее».

В последнем окне Мастера текста можно отформатировать данные в столбцах, с учетом их содержимого. Выделяем конкретный столбец в Образце разбора данных, а в настройках формата данных столбца выбираем один из четырёх вариантов:
Подобную операцию делаем для каждого столбца в отдельности. По окончанию форматирования, жмем на кнопку «Готово».

После этого, открывается окно импорта данных. В поле вручную указываем адрес ячейки, которая будет являться крайней верхней левой ячейкой вставленной таблицы. Если вы затрудняетесь это сделать вручную, то жмем на кнопку справа от поля.
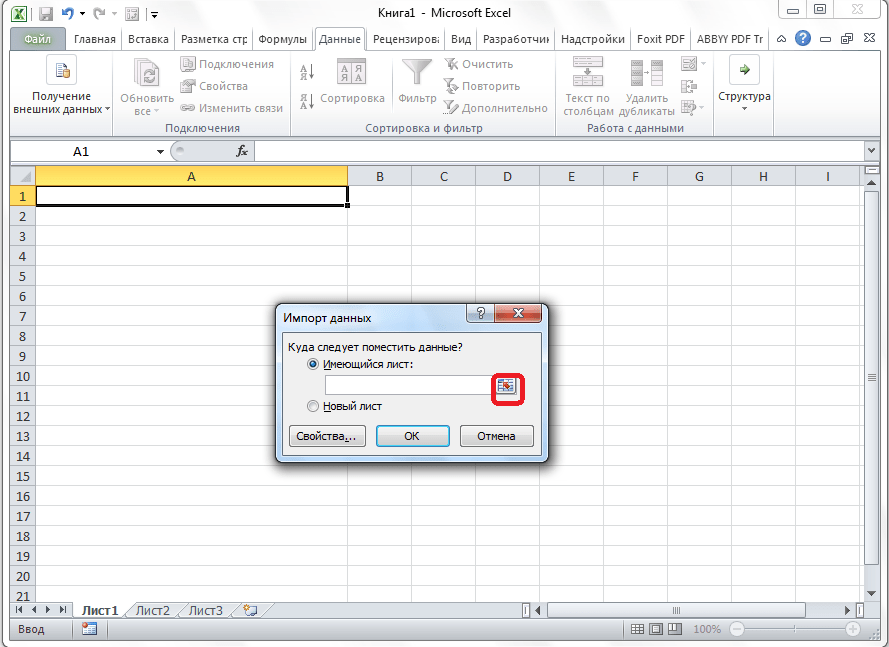
В открывшемся окне, просто выделяем нужную ячейку. Затем, кликаем по кнопке справа от введенных в поле данных.
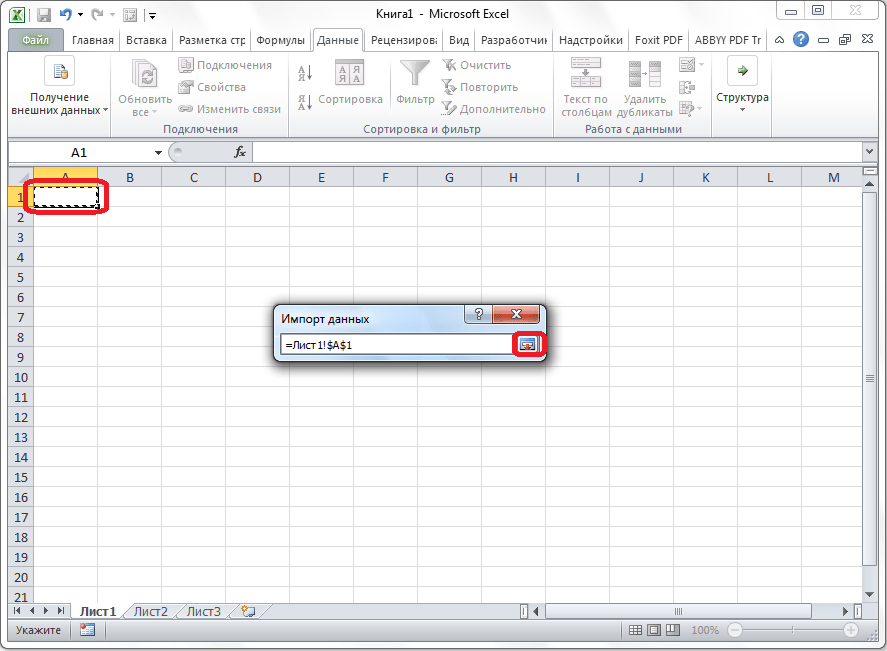
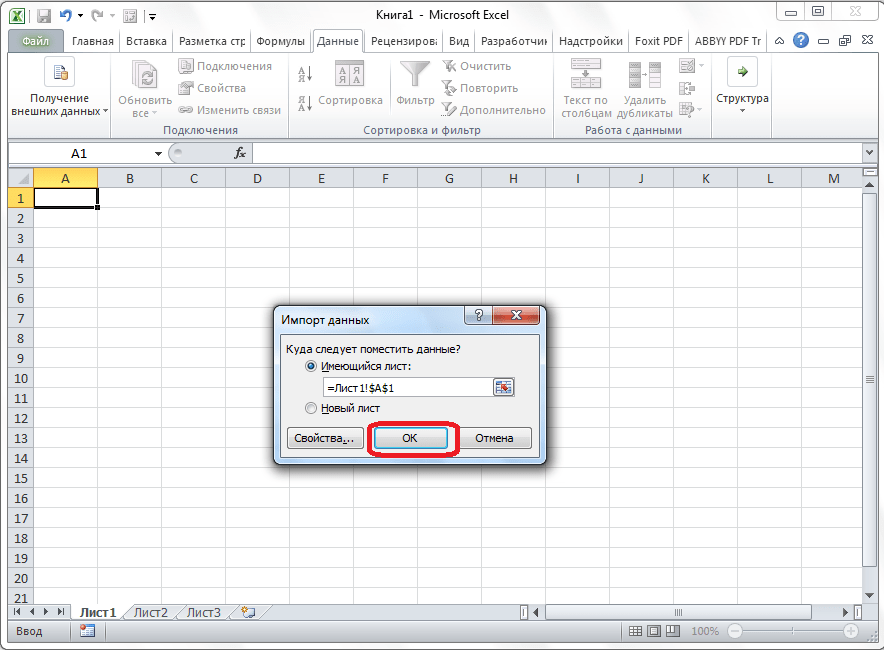
Возвратившись в окно импорта данных, жмем на кнопку «OK».
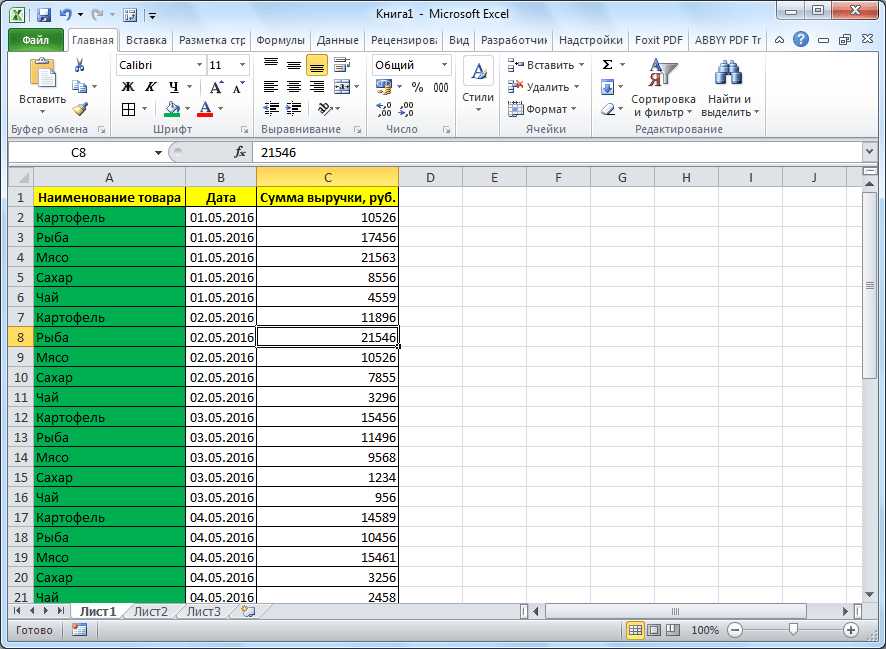
Как видим, таблица вставлена.

Далее, при желании, можно установить для неё видимые границы, а также отформатировать стандартными способами Microsoft Excel.
Выше были представлены два способа переноса таблицы из Word в Excel. Первый способ намного проще второго, и на всю процедуру уходит гораздо меньше времени. В то же время, второй способ гарантирует отсутствие лишних символов, или смещения ячеек, что вполне возможно при переносе первым способом. Так что, определяться с вариантом переноса, нужно отталкиваясь от сложности таблицы, и её предназначения.
Источник