
Table of Contents
- What is a better word for group?
- How do you use group by expression?
- Why can’t I group things in Word?
- Can you group a table and picture in Word?
- How do I fix shapes in Word?
- How do I select a picture and caption?
- How do you add a caption to a photo?
- How do you make a picture stay in one place in Word?
- How do I put one picture on top of another in Word?
- How do I move an image with mouse in Word?
- How do you move an object in Word?
- Where is the position command in Word?
- How do I select a style set in Word?
- Where is lime accent 3 on word?
- How do I stop text from moving in Word?
- Why does text jump to next page in Word?
- How do I stop text from moving in pages?
- What is keep with next in Word?
- What is the difference between keep with next and keep lines together in Word?
- How do you create a new AutoCorrect entry?
- How do I keep a table next in Word?
Hold the Shift (or Ctrl) key and click the objects you want to group. Click the Group command on the Format tab, then select Group. The selected objects will now be grouped.
What is a better word for group?
What is another word for group?
| batch | bunch |
|---|---|
| boodle | party |
| gathering | consort |
| crowd | series |
| conglomeration | quantity |
How do you use group by expression?
The GROUP BY statement groups rows that have the same values into summary rows, like “find the number of customers in each country”. The GROUP BY statement is often used with aggregate functions ( COUNT() , MAX() , MIN() , SUM() , AVG() ) to group the result-set by one or more columns.
Why can’t I group things in Word?
The Group button is unavailable Only one shape or picture is selected. Make sure you have multiple shapes or pictures selected. If your selection includes a table, worksheet, or GIF image, the Group button will not be available.
Can you group a table and picture in Word?
Press and hold CTRL while you select the shapes, pictures, or objects that you want to group. , and then click Group. If you do not see the Drawing Tools or Picture Tools tabs, make sure that you selected a shape, picture, or other object. You might have to double-click the object to open the Format tab.
How do I fix shapes in Word?
Follow these steps to anchor an object in Word:
- Select an object.
- On the Ribbon’s Format tab, go to the Arrange group and choose Position→More Layout Options.
- Click the Position tab.
- (Optional) Set the position of an object precisely using controls in this dialog.
- Under Options, select the Lock Anchor check box.
How do I select a picture and caption?
Click inside the text box and type the text you want to use for a caption. Select the picture and text box, and then on the Picture Tools Format tab, click Group.
How do you add a caption to a photo?
Add Captions to Photos on Mobile Devices If you have an Android device, use the Google Photos app to add captions. Open the photo and tap the “Edit” icon at the bottom. On the bottom of the screen, scroll past Suggestions, Crop, Adjust and the other options and select “More.” Tap “Markup” and then tap the “Text” icon.
How do you make a picture stay in one place in Word?
Open Layout Options
- Select a picture.
- Select the Layout Options icon.
- Choose the layout options you want: To bring your picture in front of the text and set it so it stays at a certain spot on the page, select In Front of Text (under With Text Wrapping), and then select Fix position on page.
How do I put one picture on top of another in Word?
Right-click the larger picture and select Wrap Text > Square. Right-click the smaller picture and select Wrap Text > Square. Drag the smaller photo on top of the larger photo, dropping it where you want it to be.
How do I move an image with mouse in Word?
Position the mouse over the image so that the cursor shape turns into a 4-way arrow, then click and drag the image. Be careful that you don’t drag the resize handles!
How do you move an object in Word?
Move a picture, shape, text box, or WordArt
- Drag it to the new location.
- Press and hold Ctrl while pressing an arrow key to move in small increments.
- Press and hold Shift while you drag it to move the object horizontally or vertically only.
Where is the position command in Word?
In your document, select the object with which you want to work, switch to the “Layout” menu, and then click the “Position” button. That button also appears on the “Format” menu of the Ribbon and works the same way. The Position drop-down menu is divided into two sections: “In Line With Text” and “With Text Wrapping.”
How do I select a style set in Word?
To apply a Style set:
- From the Design tab, click the More drop-down arrow in the Document Formatting group. Clicking the More drop-down arrow.
- Choose the desired style set from the drop-down menu. Choosing a Style Set.
- The selected style set will be applied to your entire document. The applied Style Set.
Where is lime accent 3 on word?
1. Open Word > Design > Colors > “Green” color theme. 2. Then click Home > color icon > we can find the Lime in the Accent 3.
How do I stop text from moving in Word?
Make sure the Move Object With Text check box is selected. Make sure the Lock Anchor check box is selected. Make sure the Allow Overlap check box is selected. If you are working in the Advanced Layout dialog box, click on OK to dismiss it.
Why does text jump to next page in Word?
Right-click on the paragraph at the top of the second page and select Paragraph. On the Line and Page Breaks tab of the Paragraph dialog, make sure that “Page break before” is not checked. If it is not, probably “Keep with next” is.
How do I stop text from moving in pages?
Anchor an object to the page or to text Click the object to select it. In the Format sidebar, click the Arrange tab. Click one of the following buttons in the Object Placement section: Stay on Page: The object stays wherever you position it on the page; it doesn’t move as you add text or other objects.
What is keep with next in Word?
Keep with next paragraph binds the last line of a paragraph to the first line of the next. It ensures no page break happens between the two paragraphs. It’s like keep lines together, except it works between paragraphs instead of within a paragraph. Always use this option with headings.
What is the difference between keep with next and keep lines together in Word?
“Keep with next” is used to prevent Word from inserting automatic page breaks between paragraphs. In contrast, “Keep lines together” will prevent Word from inserting an automatic page break within a paragraph.
How do you create a new AutoCorrect entry?
Create an AutoCorrect Entry
- To create an AutoCorrect Entry, In Word, on the “File” tab, choose Options.
- Choose the “Proofing” category.
- Choose “AutoCorrect Options.” The “AutoCorrect” dialog box appears.
- In the “Replace” box, enter an abbreviation.
- In the With box, enter our company name.
- Then click Add.
How do I keep a table next in Word?
Click the Line and Page Breaks tab. Check Keep lines together to keep the lines of each paragraph together in the cell or cells you’ve selected. Check Keep with next to keep each paragraph in the cell or cells you’ve selected with the next paragraph.
Hold the Shift (or Ctrl) key and click the objects you want to group. Click the Group command on the Format tab, then select Group. The selected objects will now be grouped.
Related Posts:
- How do you group a table in Excel?
— Select the data (including any summary rows… (Read More) - How do I make a table fit on one page?
— Keeping Tables on One PageSelect all the… (Read More) - How do you resize a table of contents in Word?
— Format the text in your table of… (Read More) - How do I make a table fit in Word?
— Automatically adjust your table or columns to… (Read More) - How do I compress a table in Word?
— Select the table. The contextual tabs, Table… (Read More) - How do you insert Excel table into Word and make it fit?
— Open a new or existing document in… (Read More) - How do you center text vertically and horizontally in a table?
— Horizontal centering is quite simple. All you… (Read More) - How do I align text in a table of contents in Word?
— 1 AnswerAccess the paragraph formatting window. …… (Read More) - How do you center a table vertically in Word?
— Centering text vertically is almost as easy:Right-click… (Read More) - How do I center a table in Word 2020?
— Centering a TableRight-click on the table. Word… (Read More)
Tables in Word are useful in so many situations. In this post you’ll discover how to create tables, then manipulate and design them in the quickest and easiest way to provide that visual punch.
Clickable Table of Contents
Enhance your Word tables with these advanced features
1. What are tables in Word good for?
Tables are useful for 2 distinct reasons.
- To show an actual table of data, or
- To organise and postion text, images and other elements on the page.
Many years ago, typewriters ruled the world. And a feature of a good typewriter was the tab stop, which was a device that essentially let you control indentation.
Over the years many people have continued to use tabs to indent text, because of its convenience, but they are hard work to set up properly.
Tables provide a much easier way to organise content on a page.
1. Select the Insert tab.
2. Click the Tables icon in the Tables group.
3. Move your mouse pointer into the table grid until the required number of rows and columns are highlighted orange, then left-click.

An empty table is inserted into the document.
Two new tabs, Design and Layout are also added to the ribbon area, under the banner of Table Tools.


3. MOVING AROUND A Word TABLE
- While the table is empty, you can use the cursor keys to move around the cells. However, when the cells contain information, using the cursor keys will move through the cell content first before moving to the next cell
- You can left-click in any cell to position the cursor.
- Press Tab to move to the next cell. The cursor will move across and then down the table.
- Press Shift + Tab to move to the previous cell.

NB. Using Tab is better than using the cursors as it will move to the next/previous cell regardless of whether there is information in the cells.
NB2. If you press Tab while you are in the last cell, a new row will be added to the bottom of your table
4. SELECTING A CELL, ROW, COLUMN OR THE ENTIRE TABLE
To select a cell:
1. Position the mouse pointer inside the cell on the bottom-left corner of the cell.
The pointer will change shape to a solid black arrow that points up and right.
2. Left-click.

To select a row of a table:
1. Position the mouse pointer in the left margin in line with the row you want to select.
The mouse pointer will change to a white arrow that points up and right.
2. Left-click.

To select a column
1. Position the mouse pointer so that it rests on the top border of the table, above the column you want to select.
The mouse pointer will change to a solid black arrow pointing down.
2. Left-click.

To select the entire table:
1. Position your mouse pointer over the 4-headed arrow icon situated at the top-left of the table.
2. Left-click.

5. INSERTING AN EXTRA ROW OR COLUMN
To insert an extra row:
1. Position the cursor in a cell.
2. Select the Layout tab, under the Table Tools banner.
3. Click Insert Above or Insert Below in the Rows and Columns group

Here is a quick way to insert new rows:
1. Position the cursor to the left of the table, but in close proximity.
2. A plus symbol will appear above or below the mouse pointer indicating where the new row will be added.

3. Nudge the mouse pointer up or down to move the plus sign above or below.
4. Left-click to insert the new row,
To insert an extra column:
1. Position the cursor in a cell.
2. Select the Layout tab, under the Table Tools banner.
3. Click Insert Left or Insert Right in the Rows and Columns group

Here is a quick way to insert a new column:
1. Position the cursor above a column, but in close proximity to the table.
2. A plus symbol will appear to the left or right of the mouse pointer indicating where the new column will be added.
3. Nudge the mouse pointer left or right to move the plus sign to the left or the right of the column.
4. Left-click to insert the new column,

6. DELETING A ROW OR COLUMN
To delete the current row or column:
1. Position the cursor in any cell of the row you want to delete.
2. Select the Layout tab, under the Table Tools banner.
3. Click the Delete icon in the Rows and Columns group.

4. Choose Delete Row or Delete Column from the drop-down menu.
7. Quickly fORMATTING tables in Word
Word provides you with a number of pre-set table designs. This means that it formats the headings and the data, applies a variety of borders and colours the cells in a way that makes it look like a professionally produced table. As a beginner this simple technique will give you a good-looking table.
1. Position the cursor in any cell in the table.
2. Select the Design tab under the Table Tools banner.
The Table Styles group lists a number of table designs. To get the full list, click the More button beneath the table styles scroll bar
The default table style is Table Grid in the Plain Tables category which adds simple gridlines but no shading to your table.
Live Preview allows you to hover over a design and see it applied to your table. If you like what you see, click to select the table design.

In the Table Style Options group of the Design tab, tick the components that you have in your table. For example, if your table has column headings, tick Header Row. In doing this, the various parts of your table are formatted accordingly

Header Row
This will emphasise the header row by making the text bold or applying a different cell colour (depending on the table style selected.
Total Row
This will emphasise the bottom table row by making the text bold or applying a different cell colour (depending on the table style selected.
First Column
This will emphasise the first column (for labels etc.) by making the text bold or applying a different cell colour (depending on the table style selected.
Last Column
This will emphasise the last column (for row totals etc.) by making the text bold or applying a different cell colour (depending on the table style selected.
Banded Rows
This will make odd rows one colour and even rows a different colour. This helps readability.
Banded Columns
This will make odd columns one colour and even columns a different colour. This helps readability.
8. SETTING THE BORDERS AND SHADING
The Table Styles Gallery allows you to completely format a table with one click. Whereas you used to need some nous, anybody can now create a professional looking design.
However, you will often still need to apply your own border and shading, and manually change a table design. With a little effort can add a lot of flavour to your page and dramatically enhance the overall appearance of the document.
To set the borders for tables in Word:
1. Select the portion of the table that you wish to set the borders for. This may be the entire table, a row or rows, a column or columns or a selection of cells.
2. Select the Design tab under the Table Tools banner.
3. Select the Borders icon. A drop-down list appears. This list shows every combination of border that can be turned on or off. The icons with a shaded background are currently switched on. The rest are switched off.
4. Click any icon to switch the border on or off. The border style that is applied is the default style (½ pt solid black line ) or the last style that was used.

5. To apply customised borders, with different colours, styles and widths, click the Borders & Shading option at the bottom of the list to display the Borders and Shading dialog box.


Your selection will always have an outer border, and if you selected more than one cell, you will have some inside borders as well. The easiest way to use the dialog box is to start on the bottom-middle and work your way up and right.
1. Select the colour and width (thickness) that you would like for your border.

2. Choose a style (e.g. dotted, dashed, double, solid etc.)

3. Paint your borders. There are two ways to do this.
- The first way is to click directly on a border in the Preview itself.
- The second way is to click the appropriate icon around the edge of the Preview section that represents each border. Depending on which cells you selected in your table, some of these icons may not be available.

On the left-hand side of the dialog box, there are some pre-defined border combinations which you can use to save yourself some time. Depending on your selection of cells, the pre-defined options may differ. Here’s a run-down:

To shade the cells of tables in Word:
1. Select the portion of the table that you wish to shade. This may be the entire table, a row or rows, a column or columns or a selection of cells.
2. Select the Design tab under the Table Tools banner.
3. Click the Shading icon.
The colours that you see displayed match the current them of the document. Themes were discussed earlier in the course.
4. Click a colour in the palette.
While you can pick any colour, it is recommended to stick with the light colour shades, otherwise your tables will appear very loud and ugly, like they’re shouting in your face. Subtle is the order of the day. The exception to this is column headings or other cells that you wish to differentiate. Under these circumstances, you can use a dark colour, but use a light font with it.

If you cannot find the exact colour you need,
- Click the More Colours link underneath the palette. This displays a larger, more accurate colour palette.
- And if that’s not enough, click the Custom tab and you’ll get a really fine selection of colours (you can even enter your own RGB settings if you know them)

9. REPEATING table HEADINGS ON EVERY PAGE WHEN PRINTING
When you have large tables that occupy two or more pages, many people insert manual page breaks, then copy and paste their table header rows at the top of each page.
When rows are added or removed from tables in Word, the table headers end up half way down the page.
There is a simple tool that will eliminate this problem
1. Ensure that the table is a single table, with no manual page breaks in the middle, and one header at the top. The table header may occupy more than one row, it doesn’t affect the way this feature works.
2. Position the cursor somewhere in the top row of the table.
3. Select the Layout tab under the Table Tools banner.
4. Click the Repeat Header Rows icon ion the Data group.

Now, it doesn’t matter how many rows tables in Word contain, if the table ever spills across into another page, the header row (which normally displays the column headings) will always appear at the top of the table.
10. All the key points again
- Tables in Word serve 2 distinct purpose: to display a table of data and to organise and position items on the page
- To create table, select 2 tabs — Design and Layout under the Table Tools banner.
- There are 2 tabs — Design and Layout under the Table Tools banner.
- You can press the TAB key to move direct to the next cell and SHIFT and TAB together to move backwards through a table.
- The four elements of a table are cells, rows, columns and the whole table. Each can be selected.
- Rows can be inserted by selecting the Layout tab under Table Tools, then clicking the Insert Above or Insert Below icons. Alternatively, hover to the left of a row and click the plus symbol that appears above or below the mouse pointer.
- Columns can be inserted by selecting the Layout tab under Table Tools, then clicking the Insert
Left or Insert Right icons. Alternatively, hover above a table column and click the plus symbol that appears to the left or right of the mouse pointer. - Columns and rows and be removed from the table, by positioning the cursor in the row or column to be removed, then clicking the Delete icon on the Layout tab of Table Tools and choosing Delete
Row or Delete Column. - Tables can be formatted using the Table Style gallery or by manually setting the shading and borders manually. Both sets of tools are found on the Design ribbon of the Table Tools.
- When using the Microsoft Table Styles, you can control the behaviour of the formatting by setting the Table Style options – 6 tick boxes that define the structure of your table.
- For long tables that spill across onto subsequent pages, the top row, which normally contains the column headings can be set to repeat automatically. So there is no excuse for cutting and pasting headings midway through your table or taping pages together to make sense of the table!
I hope you found plenty of value in this post. I’d love to hear your biggest takeaway in the comments below together with any questions you may have.
Have a fantastic day.


About the author
Jason Morrell
Jason loves to simplify the hard stuff, cut the fluff and share what actually works. Things that make a difference. Things that slash hours from your daily work tasks. He runs a software training business in Queensland, Australia, lives on the Gold Coast with his wife and 4 kids and often talks about himself in the third person!
SHARE
Many documents present some data in the form of figures or tables. Creating tables is often more efficient than describing the data in the paragraph text, especially when the data is numerical or large. The tabular data presentation makes it easier to read and understand.
A table is a collection of information or data, usually represented by horizontal rows and vertical columns. Each column and each row can have a header. Some tables have only column headings or only row headings. The box at the junction of each column and row is a cell that contains data such as text, numeric information, or images. Some cells can be merged or split (see more about formatting tables). E.g.:

Microsoft Word has many features that make working with tables simple and convenient.
Create a table
There are several ways how to insert or create a table:
- Create a blank table of up to 10 columns and 8 rows,
- Create a blank table with more than 10 columns or more than 8 rows,
- Create a blank table manually (Draw a table),
- Create a table using predefined templates (Quick Tables),
- Create a table from the existing data (Convert Text to Table),
- Insert a Microsoft Excel spreadsheet.
To create a blank table in a Word document, do the following:
1. Place your cursor where you want to insert the table.
2. On the Insert tab, in the Tables group, click the Table button:

3. Do one of the following:
Create a blank table of up to 10 columns and 8 rows
- To create a table of up to 10 columns and 8 rows, move the cursor right (to select columns) and down (to select rows) the grid to select as many cells as you need. E.g., the table of 5 columns and 3 rows (selected cells will turn orange):

Click on a cell in the grid with the expected number of rows and columns (or press Enter) to insert an empty table to fit the width of the text (paragraph).
The table has the specified number of single-line text rows in the current paragraph and equal-width columns. E.g., the table of 3 rows and 5 columns:


Create a blank table with more than 10 columns or more than 8 rows
- To create a table with more than 10 columns or more than 8 rows, do one of the following:
- Create a table with exactly 10 columns or 8 rows, then add as many columns or rows as you need (see below how to customize table).
- Click the Insert Table… option:
In the Insert Table dialog box:

- In the Table size group, specify the number of columns and rows,
- In the AutoFit behavior group, specify the width of the table and its columns:
- Select the Fixed column width option to customize width in the appropriate field: select Auto (used by default) or specify width. E.g., 0.75″:

- Select the AutoFit contents option to adjust cell sizes to the document content. E.g.:

- Select the AutoFit to window option to adjust the table’s width to the document content width. E.g.:

- Select the Remember dimension for new tables check box if you want to create tables with the same options later. Word will remember your customization.


Create a blank table manually
- To manually create an empty table, click the Draw Table option:
After clicking that option, the cursor changes to the pencil
 that allows drawing cells directly in the Word document to create a table:
Click anywhere in a document but the table itself by the pencil to stop drawing a table.
Notes:
- To draw additional lines, select a table, then on the Table Layout tab, in the Draw group, click the Draw Table button:

- If you draw a line in the wrong position, click the Eraser button in the Draw group of the Table Layout tab:
- We recommend displaying the rulers or gridlines to help you place the lines correctly.
- To draw additional lines, select a table, then on the Table Layout tab, in the Draw group, click the Draw Table button:


Create a table using predefined templates
To create a table using predefined Word templates of tables and calendars, do the following:
1. Place your cursor where you want to insert the table.
2. On the Insert tab, in the Tables group, click the Table dropdown list, then select Quick Tables list:

3. From the Quick Tables gallery, select the template you prefer.
For example:

Create a table from the existing data
To create a table from the existing data in a document data (either as regular text or as a tabbed list), do the following:
1. Select the document data you want to shape into a new table.
2. On the Insert tab, in the Tables group, click the Table dropdown list, then select Convert Text to Table…:

3. In the Convert Text to Table dialog box:

- In the Table size group, specify the number of columns,
- In the AutoFit behavior group, specify whether the width of the columns should be fixed (see details above),
- In the Separate text at group, select the character that separates text into columns in the selected text: paragraph marks, commas, tabs, or some other character.
E.g.:

Insert a Microsoft Excel spreadsheet
Note: It is possible to insert a Microsoft Excel spreadsheet in a document. To do so, on the Insert tab, in the Tables group, click the Table dropdown list, then select Excel Spreadsheet:

Word opens the Excel spreadsheet where you can enter the data. You can use Excel features such as functions and formulas to create or manipulate the data. Note that it is not a Word table.
Add rows and columns
To add a row and a column to a table, do the following:
1. Position the cursor:
- to a cell in a row above or below which you need to insert a row,
- to a cell in a column left or right which you need to insert a column.
2. Do one of the following:
- Click the Insert dropdown list in the Mini toolbar:

- On the Table Layout tab, in the Rows & Columns group:

- Click the Insert Above button to insert a row above the row with the cursor,
- Click the Insert Below button to insert a row below the row with the cursor,
- Click the Insert Left button to insert a column left to the column with the cursor,
- Click the Insert Right button to insert a column right to the column with the cursor.
- Right-click and select the Insert list:


Notes:
- To insert rows or columns, move the mouse over the table or left of the table until you see the Insertion indicator, then click the icon:
 and
and
- You can choose the option Insert -> Insert Cells… from the popup menu; Word opens the Insert Cells dialog box:

After selecting the option and clicking the OK button, Word adds an entire row or column, not a cell. Word just moves cells according to the selection.
 and
and 

Delete a table element
To delete a table element, do the following:
1. Select the cell, multiple cells, the entire column or multiple columns, the entire row, or multiple rows.
2. Do one of the following:
- Click the Delete dropdown list in the Mini toolbar:

- On the Table Layout tab, in the Rows & Columns group, click the Delete dropdown list, then select one of the options:


3. Select one of the proposed options:
- Delete Cells… opens the Delete Cells dialog box, in which select the option you need:
- Delete Columns
- Delete Rows
- Delete Table

Note: You can select the element you want to delete, right-click on the selection and select the appropriate item in the popup menu. For example, if the entire table is selected or the column is selected:
 and
and

Convert a table into text
To convert a table into text in Word, follow the next steps:
1. Click anywhere in the table.
2. On the Layout tab, in the Format group, click the Convert to Text button:

3. In the Convert Table to Text dialog box, select the charter to separate cells data in the text:

4. Click OK.
Creating a table in the word is very simple, but what if you want to create multiple tables and want to place them side by side?
There are several ways to create multiple tables side by side. Here we show the two easiest ways to create more than one table side by side.
1. Create Multiple Tables Side by Side in Word With Table Caption.
By using word table caption we put multiple tables side by side. Now we show the live preview below. And follow those tricks step by step.
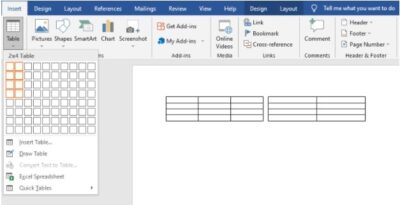
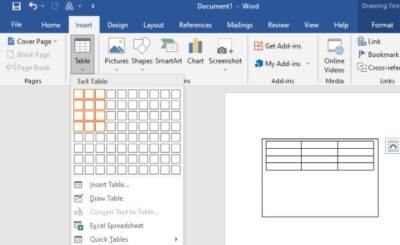
Step 1: Go to the insert option.

Step 2: Click on the table and select how much you want rows and columns. Here we select 2 rows and 1 column.

Step 3: On the table left corner see a box. Click the box with the right button and select table properties. And click the borders and shading option.

Step 4: Now select none to remove the out-of-borders of the tables and click ok. And insert two tables into individual cells.
Step 5: Select table 1 and right-click to go for insert caption. The caption will be auto-generated. Similarly, you can add captions to the 2nd table.

Step 6: Now you can edit your caption to bold, italic, underline, and also can change the text color. Now you show two tables side by side in word.

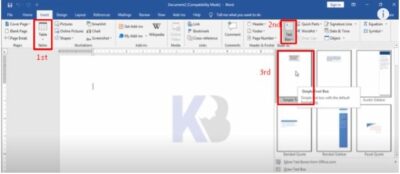
2. Generate the Movable and Multiple Tables Side by Side in Word.
Step1: Here we share the tricks on how you can do this easily. First, you have to go to the insert option and click the text box to select a simple text box.
Step 2: Now we add a table to this box. As like 1st method you can select the row and column as you need. You move and resize it easily. Similar way you can add tables with a text box.
Step 3: Here we create three tables. But show the box outline.

Step 4: To remove the box outline at first select it and go to the format option. Now select the none(no fill and no outline) option from shape fill and shape outline.

Step 5: Similar way, remove the text outline from other tables. That’s why we create multiple tables and can move them as we want.
