
Word for Microsoft 365 Outlook for Microsoft 365 Word 2021 Outlook 2021 Word 2019 Outlook 2019 Word 2016 Outlook 2016 Word 2013 Outlook 2013 Word 2010 Outlook 2010 More…Less
In a Word document, or in an email message you are writing, you can draw lines (and other shapes) to illustrate what you’re saying.
-
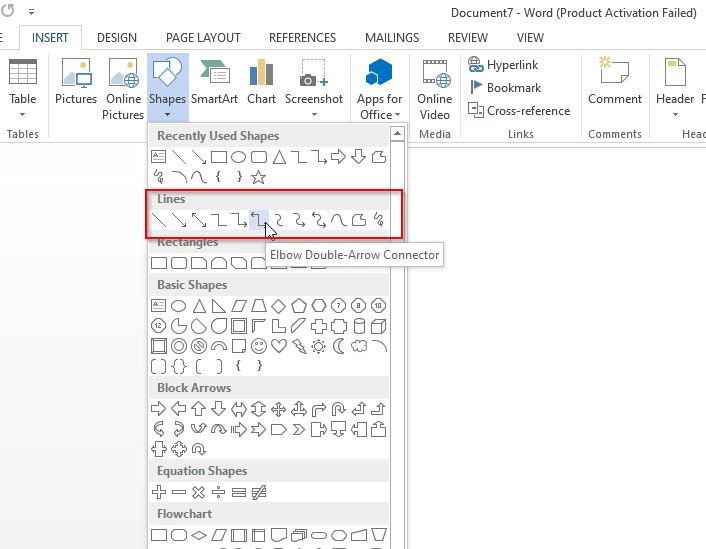
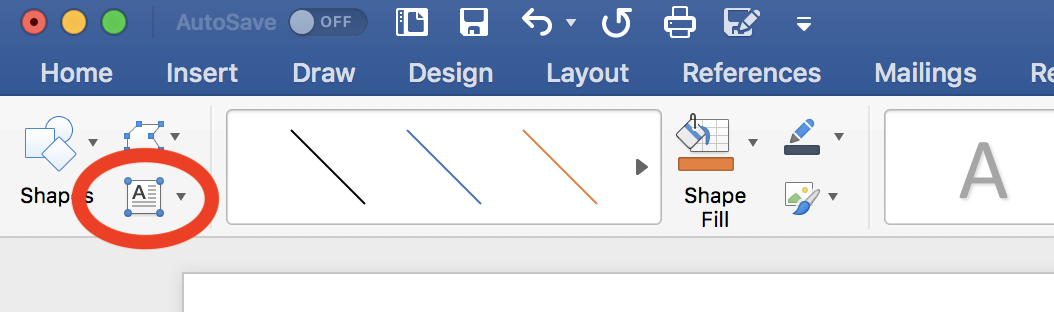
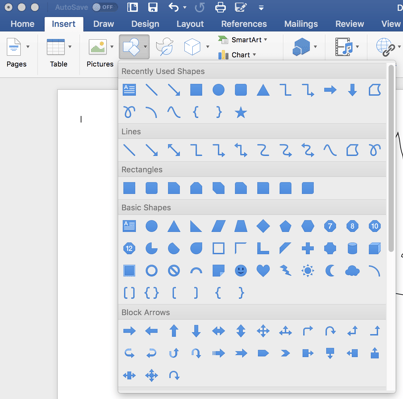
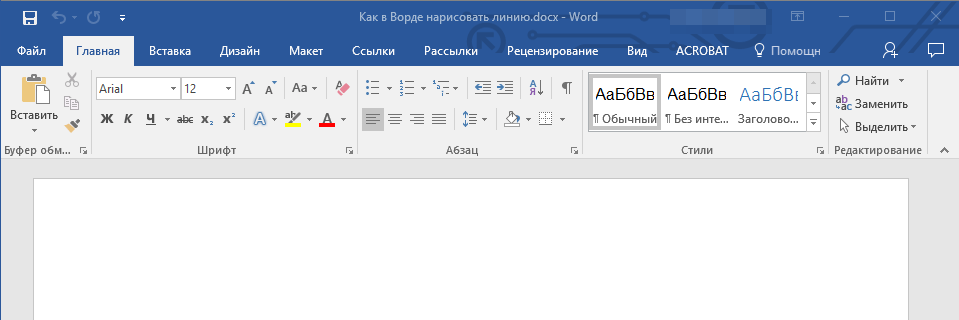
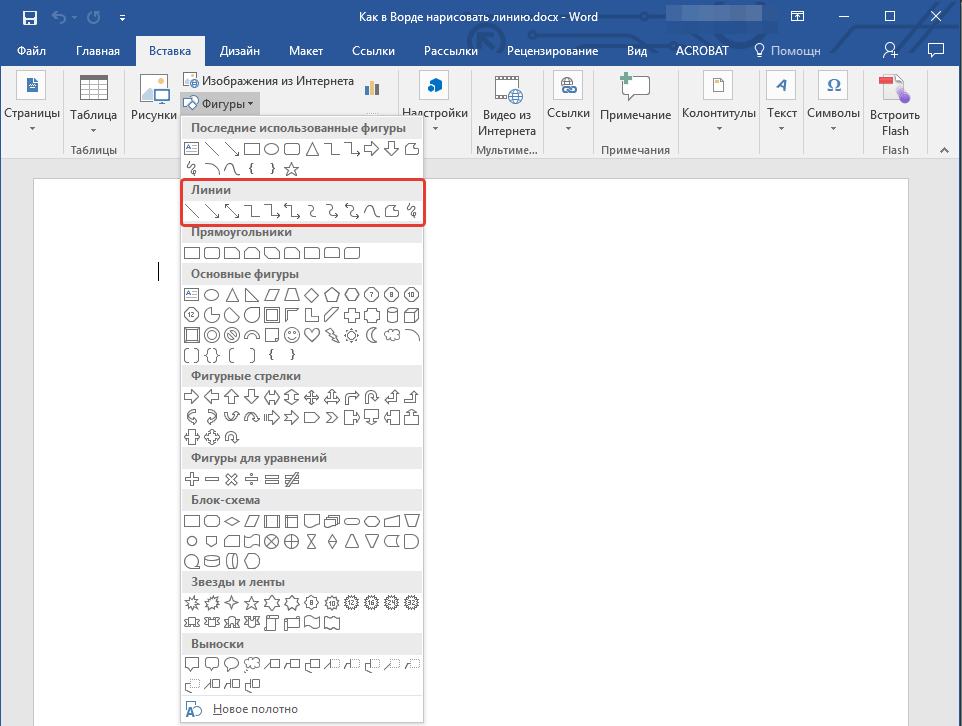
On the ribbon, select Insert > Shapes.
(In Outlook, if you don’t see the Insert tab, you’re likely using the reading pane. Select
 Pop Out at the top of the message to open a standalone window that includes the Insert tab.)
 -
From the Lines gallery, select the kind of line you want to draw.
-
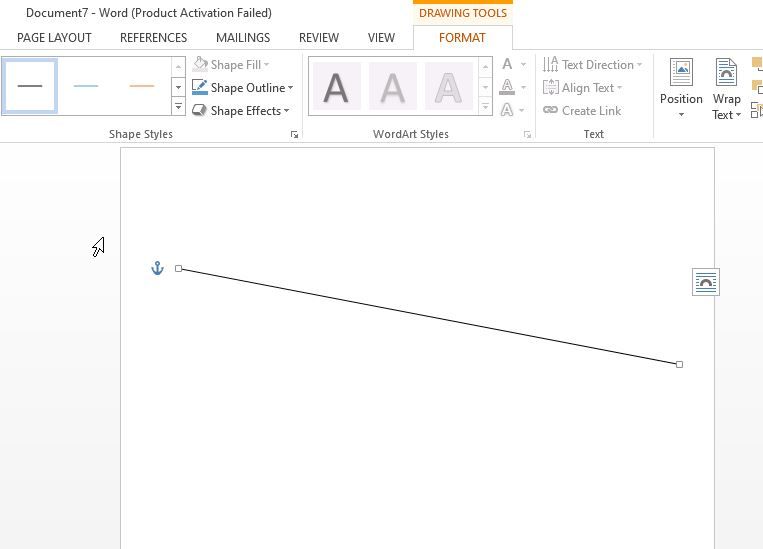
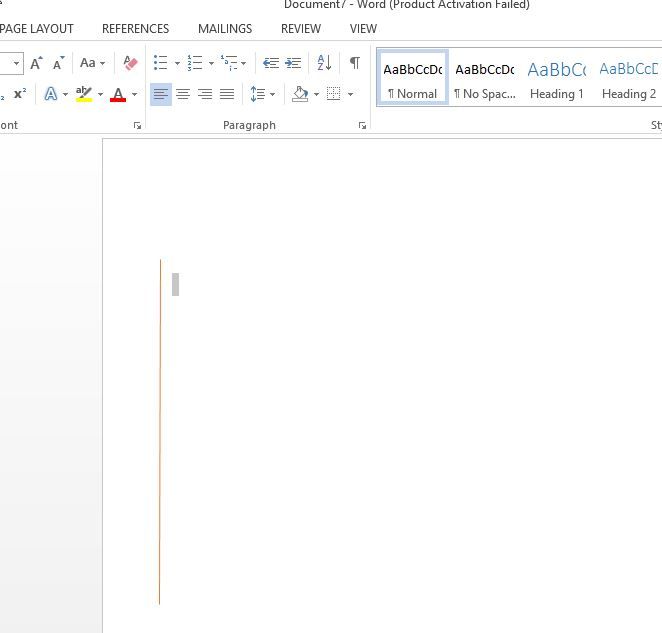
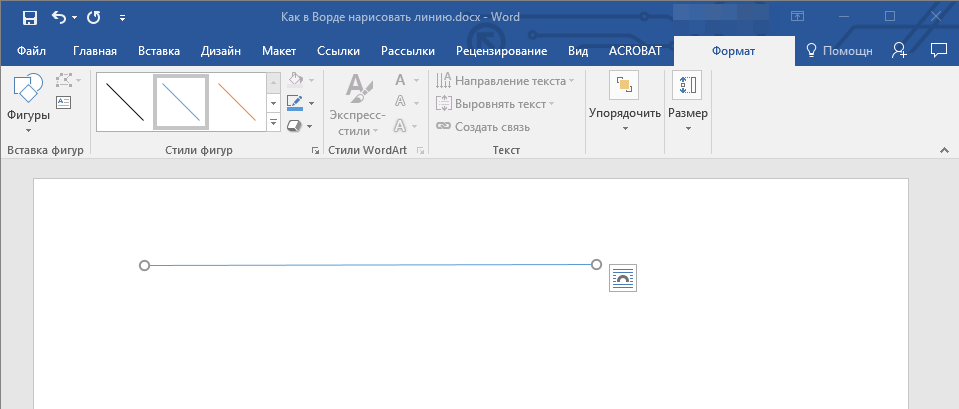
On the canvas, click and drag your mouse to draw the line.
Tip: To draw a perfectly horizontal or vertical line, press and hold the Shift key while you draw.
-
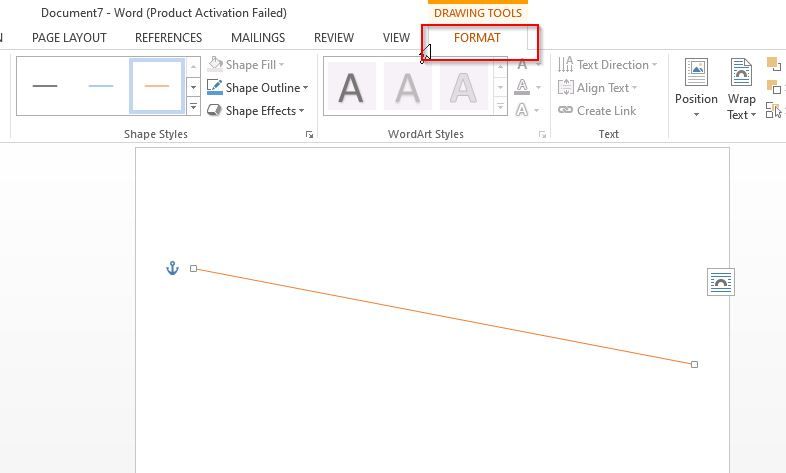
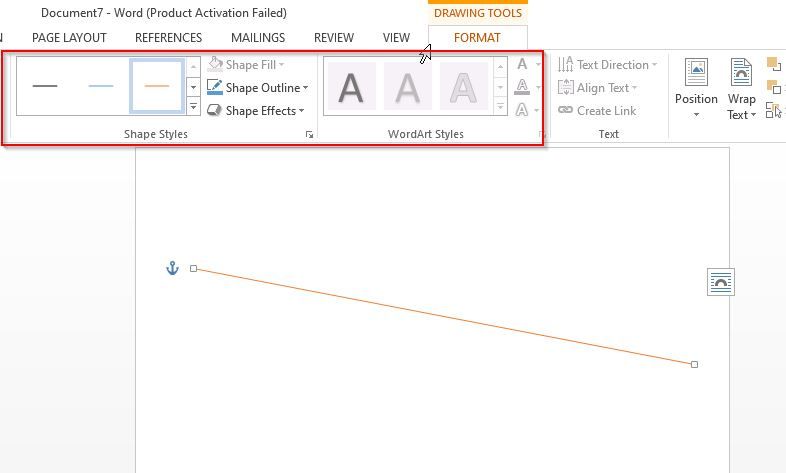
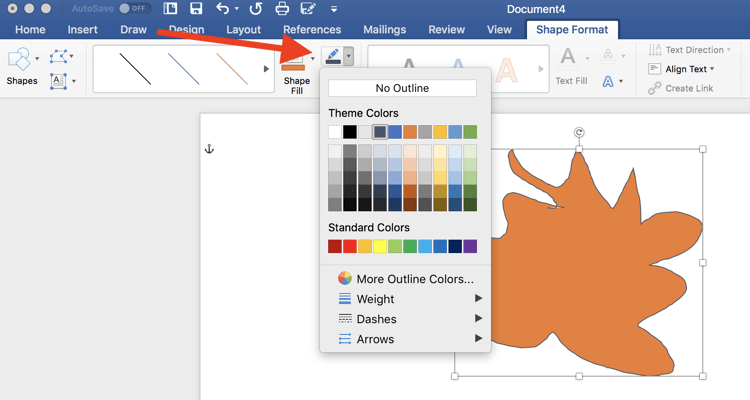
With the line still selected, on the ribbon, on the Shape Format tab, select Shape Outline. From that menu, you can choose a color, a weight (line thickness), and line styling (such as dashes or arrowheads).
 Pop Out at the top of the message to open a standalone window that includes the Insert tab.)
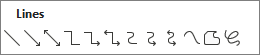
Need more help?
![]()
Download Article
![]()
Download Article
This wikiHow teaches you how to draw inside of a Microsoft Word document. You can do this on both Windows and Mac versions of Word.
Steps
-
1
Open Microsoft Word. Double-click the Word icon, which resembles a white «W» on a dark-blue background.
- If you want to draw on an existing document, double-click the document instead, then skip the next step.
-
2
Click Blank document. It’s in the upper-left side of the window. Doing so will open a brand-new document.
- If you’re on a Mac, a new, blank document will likely load by default. If so, skip this step.
Advertisement
-
3
Click the Insert tab. This option is in the left side of the blue ribbon that’s at the top of the Word window. Clicking it causes a toolbar to display below the blue ribbon.
- If you’re on a Mac, make sure you click Insert in the blue ribbon and not in the menu bar.
-
4
Click Shapes. It’s in the «Illustrations» section of the Insert toolbar. Clicking Shapes prompts a drop-down menu.
-
5
Select a line option from the drop-down menu. In the «Lines» heading, select a line type from the drop-down menu by clicking on it.
- You can select a pre-determined line by clicking one of the straight line icons or select the «freeform line» by clicking on the squiggly line icon on the far-right under the «Lines» heading.
-
6
Draw a line in your document. Click and drag to draw, then release the mouse button to cement the shape.
- You can click and drag the line around after it’s cemented.
- To delete a line, click it to select it and then press the Delete key.
-
7
Add more lines. To add another line once the one you created is cemented, simply select a line template from the Shapes menu and repeat the drawing process.


Advertisement
Add New Question
-
Question
How do I keep the line horizontal? I only want to place a short line for a signing position.

If you’re talking about keeping a line level while drawing it, press and hold the shift key while you draw the line.
-
Question
How do I draw lines on a phone?
With Word 2016 for iPhone you would click on the three dots on the right over the keyboard. Then on the left (where it says «Home»), go to «Insert.» Then choose «Shapes» and the line you want.
-
Question
Can I draw several lines without going back and forth to the insert shapes drop-down?
Draw one line, then copy that line and paste it. Modify as/if you wish, then again paste, and so on.
Ask a Question
200 characters left
Include your email address to get a message when this question is answered.
Submit
Advertisement
Video
-
Once you have a line in your Word document, you can type around or over it.
Thanks for submitting a tip for review!
Advertisement
-
Make sure you save your work before exiting Word.
Advertisement
About This Article
Article SummaryX
1. Open a new Microsoft Word document.
2. Click Insert
3. Click Shapes
4. Click a line type.
5. Click and drag your cursor over your document.
Did this summary help you?
Thanks to all authors for creating a page that has been read 476,245 times.
Is this article up to date?
On the Insert tab, in the Illustrations group, click Shapes. Under Lines, right-click the line or connector that you want to add, and then click Lock Drawing Mode. Click where you want to start the line or connector, and then drag the cursor to where you want the line or connector to end.
Contents
- 1 How do I draw freehand in Word?
- 2 Can you make a Word document have lines?
- 3 Which tool helps you draw freehand?
- 4 Can you write freehand in Word?
- 5 How do I insert comment lines in Word?
- 6 Which tool is used to draw lines?
- 7 Which tool is used to draw free form lines?
- 8 Which tool lets you draw straight lines?
- 9 Is there a drawing tool on word?
- 10 How do I use drawing tools in Word?
- 11 How do I use the pen in Word 2016?
- 12 How do I make dotted lines in Word?
- 13 How do you insert multiple lines in Word?
- 14 How do you draw a line on the computer?
- 15 How do you draw a straight line in paint?
- 16 Which three tools can help us to draw lines in Paint?
- 17 Which of the following tool is used to draw a custom shape?
- 18 Which tool is used to save a drawing in one word?
- 19 Which tool will you use to draw a ball?
- 20 Where is the Drawing toolbar in Word 2019?
How do I draw freehand in Word?
Draw a freeform shape
Click anywhere in the document, and then drag to draw. To draw a straight segment with the Freeform tool, click one location, move your pointer to a different location, and then click again; to draw a curved segment, keep your mouse button pressed as you drag to draw.
Can you make a Word document have lines?
Click the Insert tab, then click the “Shapes” button on the ribbon. Choose the first option, “Line,” under the “Lines” group. If you hover the cursor over the shapes, you’ll see the title of each shape pop up.
Which tool helps you draw freehand?
Explanation: pencil tool is used to draw free hand drawing in computer.
Can you write freehand in Word?
Yes, you can freehand draw whatever you want
She has 30 years’ experience writing for Adobe, Boeing, Microsoft, and many others. When you can’t find the right clip art for your Word document, draw your own.
To create the lines in the document set the paragraph line style to the Note Line style and hit the Tab key one.
To do that:
- Click on the Home tab.
- Click the little arrow to the right of ‘Styles’
- Click the drop down arrow next to the Note Line style.
- Choose Modify.
Which tool is used to draw lines?
Answer: Ruler is used to draw straight line.
Which tool is used to draw free form lines?
explanation: The Pencil tool enables you to draw freeform lines and shapes.
Which tool lets you draw straight lines?
Answer:Ruler is used to draw straight line.
Is there a drawing tool on word?
You can draw freely in Microsoft Word using the “Draw” feature whether you have Word for Mac or Windows. You can also insert customizable shapes into your document, or draw using the “Scribble” feature. The process of drawing in Word varies based on which version of Word and device you’re using.
How do I use drawing tools in Word?
Click in your document where you want to create the drawing. On the Insert tab, in the Illustrations group, click Shapes.
Add a drawing to a document
- Insert a shape.
- Change a shape.
- Add text to a shape.
- Group selected shapes.
- Draw in the document.
- Adjust the size of the shapes.
How do I use the pen in Word 2016?
To use inking in Word 2016, go to the Review tab and click on the Start inking icon. When you do that, Word will display a Pens tab, similar to the one shown in the previous figure. You can use this tab to choose ink color, pen thickness, etc. Inking is a little bit more straightforward in Word Mobile.
How do I make dotted lines in Word?
To use a line shortcut, first, open your document with Microsoft Word. Next, place your cursor where you want to add a dotted line in your document. Type the asterisk sign (“*”) three times in your document. Now, press Enter, and Word will convert your asterisks into a dotted line automatically.
How do you insert multiple lines in Word?
Hold down the “Shift” key and press the “Underline ( _ )” key three times. Release both keys then press “Enter” to place a heavier line across the Word document.
How do you draw a line on the computer?
You can draw a perfectly horizontal, vertical line by holding down Shift key while dragging. Press TAB to Cycles through the available line style.
Presentation Assistant allows you to draw a straight line on screen.
- In the Drawing Tools Pane, click Line .
- Select a line type.
- Drag the pointer to draw the line on screen.
How do you draw a straight line in paint?
As a workaround, you may hold Shift key + left click of the mouse to draw a straight line.
Which three tools can help us to draw lines in Paint?
Figure 14.38.
Pencil, Paintbrush, and Airbrush are called “basic painting tools” or brush tools.
Which of the following tool is used to draw a custom shape?
Polygon Tool – To create polygons (minimum 3 sides) Line – To draw lines. Custom Shapes – To create custom shapes that can be accessed from the custom shapes lisame properties as of Shape tools is the Pen Tool.
Which tool is used to save a drawing in one word?
On your computer, go to Google Keep. At the top, click New note with drawing . To start drawing, click and drag in the drawing area. To save the drawing, click Back  .
Which tool will you use to draw a ball?
Because there’s a lot of geometry going on in these drawings, you’ll need some precise tools: ruler. compass. pencil.
Where is the Drawing toolbar in Word 2019?
Click View > Toolbars > Drawing. The Drawing toolbar is displayed or hidden. The Drawing toolbar contains a collection of icon buttons that allows the user to draw shapes and images in the document.
If you want to add a horizontal line inside a Word document, you can do it by using the formatting tools. But inserting a vertical line is a little trickier. You have to insert the line as a shape. Word lets you tweak the line’s color, shape, style, angle, thickness and alignment. You can also add visual effects such as 3-D styles, outlines and shadows.
In this tutorial, you will learn the different ways to draw a line inside a Word document.
Method 1: Using Shapes Menu
The very basic method to draw a line inside a Word document is to draw it. You can do this by using the Shapes menu. This menu has several options such as lines with arrow points on one or both the ends. You can also customize the appearance and color of the line after drawing it.
Please follow the steps below:
- Open Ms Word, Double-click a Word document that you want to edit, or double-click the Word App Icon and click Blank document to open a new document.
- Now place the cursor where you want to insert a line and click Insert
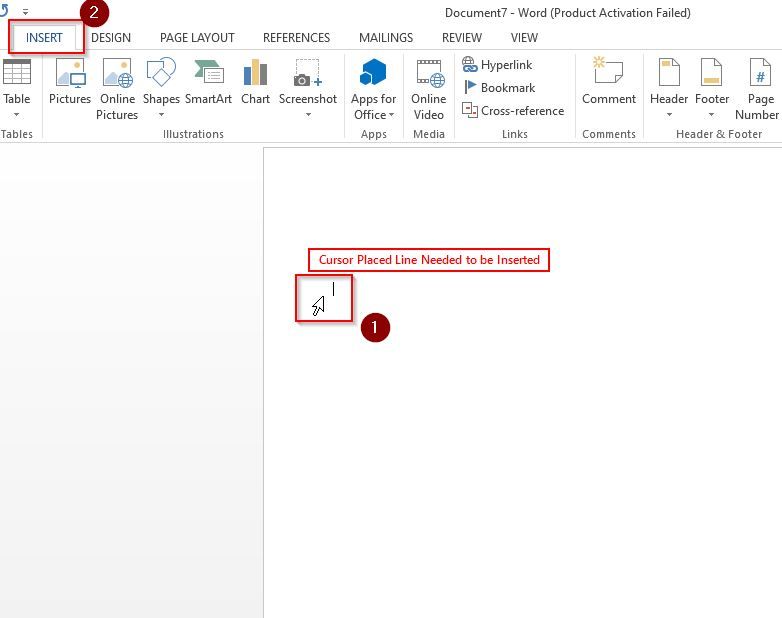
- Click on Shapes drop-down arrow available in In the Illustrations group.
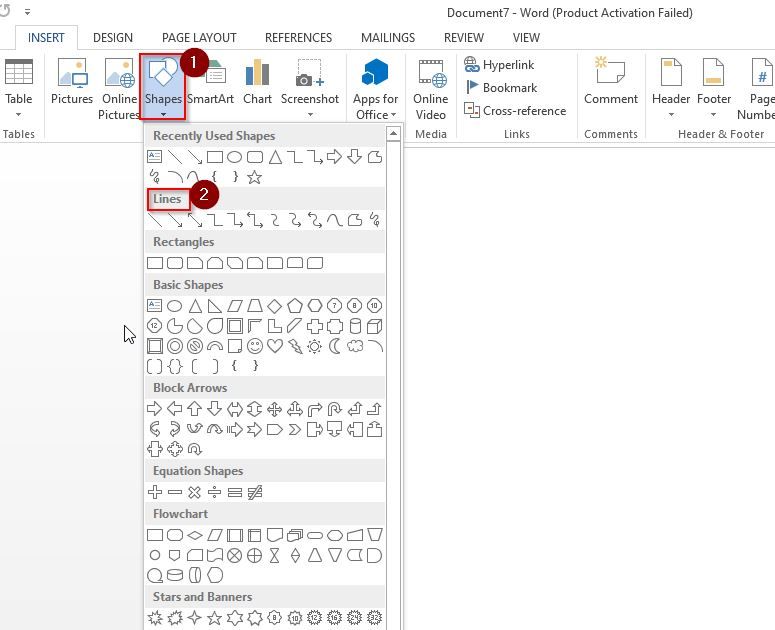
- Next,choose the shape of the line from the line group
- Inside the document, click on the shape and drag across the area where you wish the line to be placed.
Creating Vertical Line
- Put your cursor where you want the line to begin. Then, drag it to the area where you want the line to end.
Note: If you press the Shift key and drag the mouse while drawing the line, you can easily get an absolute horizontal or vertical orientation.
Change Style of Line
- You can change the style of the line, for that select the line and then click Format tab (Shape Format for some versions).
- In this Format tab you change the color, style or apply effects to the line.
Method 2: Using the Horizontal Line Tool
Another easy way to insert a line in the Word document is by using the Horizontal Line Tool present already. Let us see how you can use it.
Please follow the steps below in order to insert a line Horizontal Line Tool:
- Place the cursor in the word document where you want to draw a line and click Home Tab
Note: When you open a New Word document or an existing one, the Home tab is selected by default.
- Now go to Paragraph group and click on the Border drop-down and select Horizontal Line.
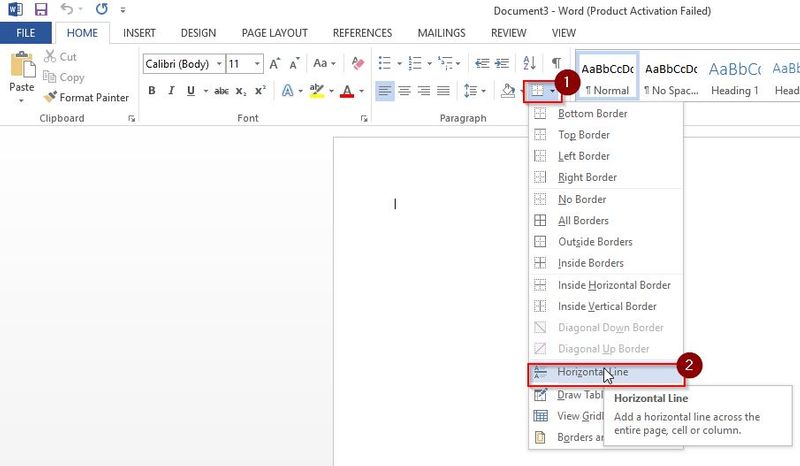
- A Horizontal Line will be inserted to your word document.
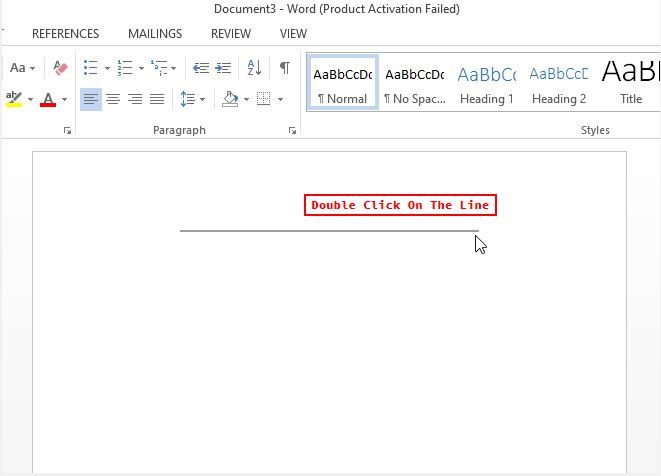
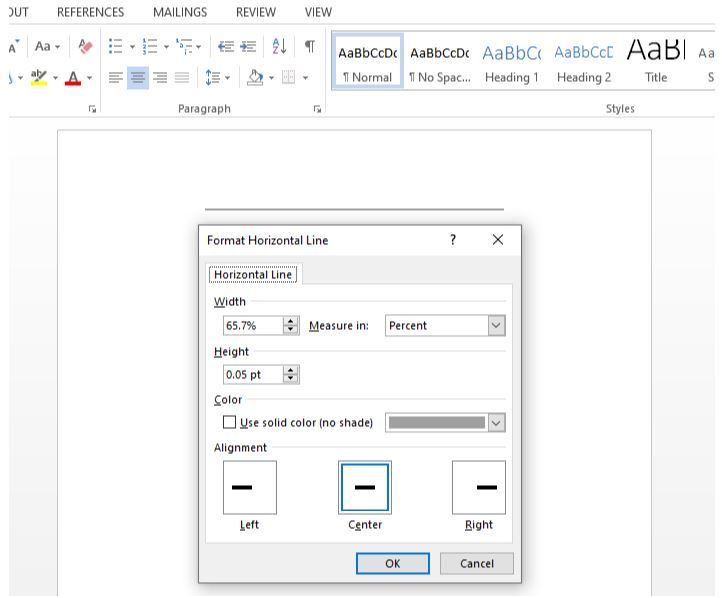
Change Style of the Line
In order to change the style (look) of the horizontal line, double click on the line
A Format Horizontal Line dialog box will appear where you can change the width, height, color and alignment of the line.
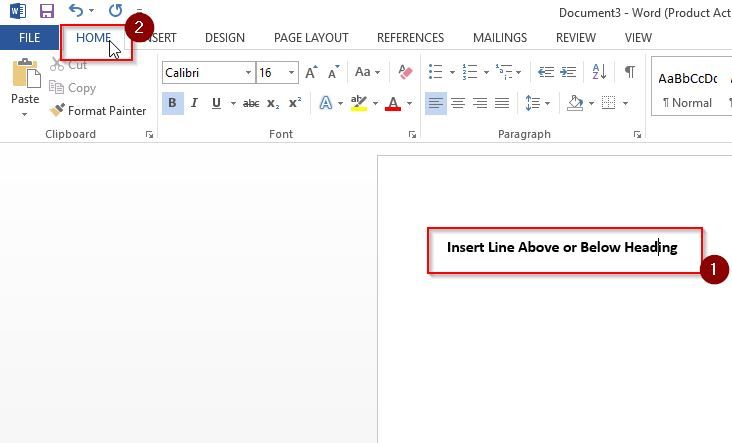
Method 3: Insert Line Above or Below Heading
Lines are commonly used in Word to decorate a heading or a subheading. It decorates the text and makes it eye-cathy, and also helps to divide the document into sections.
Please follow the steps below
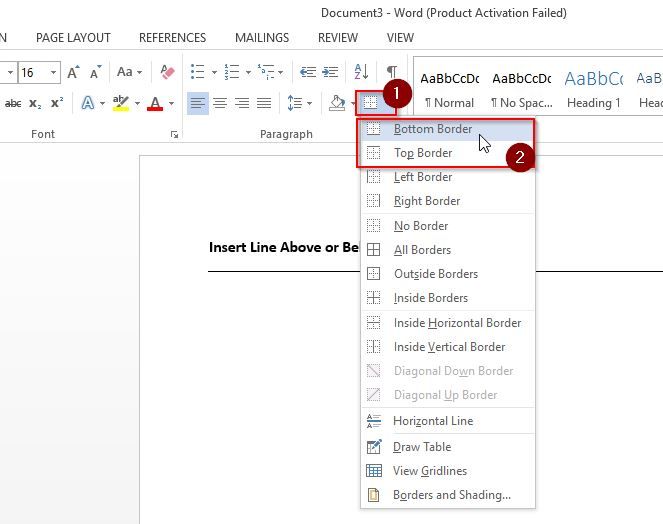
- First place the cursor on the heading (where you want to add line) and click on Home Tab.
- Now go to Paragraph group and click on the Border drop-down and select Bottom Border to add line below Heading or Top Border to add line above Heading.
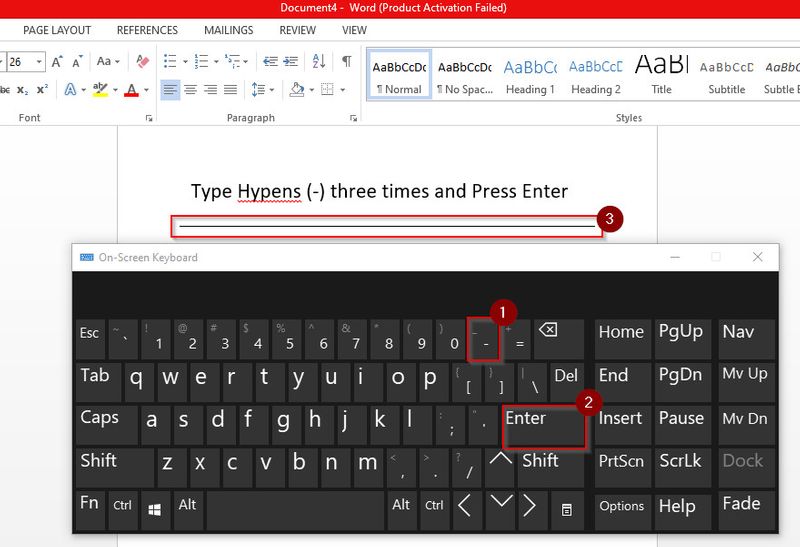
Method 4: Create Lines Using Keyboard
Another easy way to create a line in Word is to press the hyphen key 3 times and hit the Enter key. This will automatically create a straight line. You can also replace the hyphen key with an underscore or the equals symbol. This will give you thicker lines and doubles lines respectively. Hash signs can be used to drawing triple lines with thick centers.
You can use the Asterisk symbol to create a dotted line or use tildes to draw some wavy lines.
Using Hyphens (—)
- Just type three hyphens and press Enter on your Keyboard.
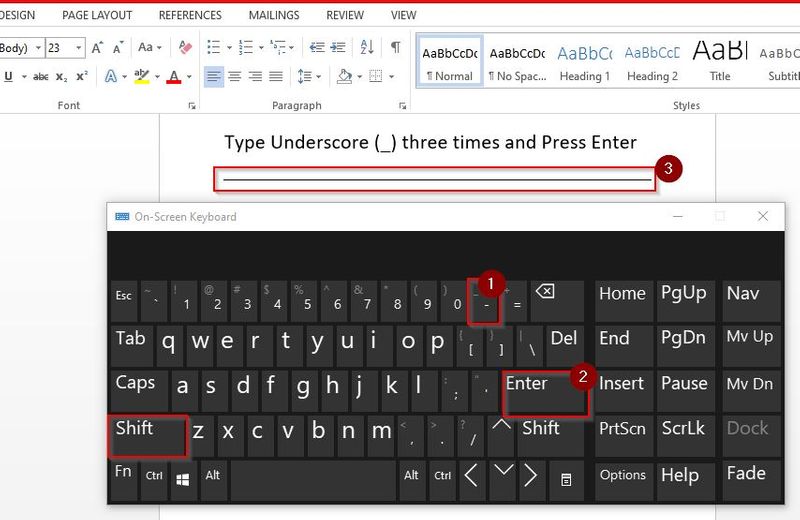
Using Underscore (___)
- Just type three underscore and press Enter on your Keyboard for thicker line.
Note: Press Shift + Hyphen to type Underscore
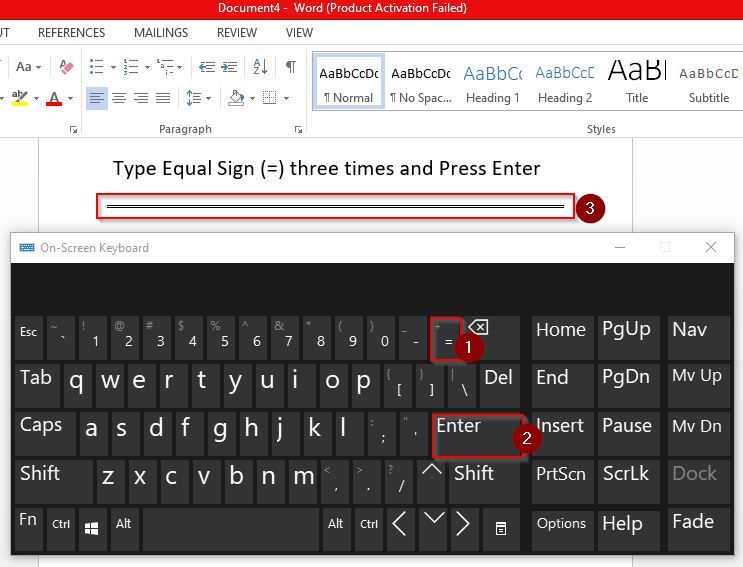
Using EqualTo Sign (===)
- Just type three EqualTo sign and press Enter on your Keyboard for double line.
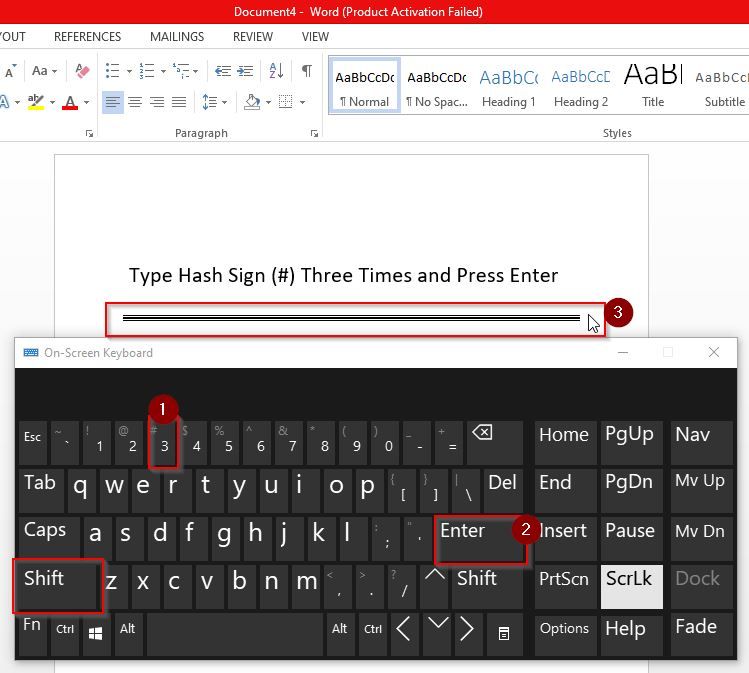
Using Hash Sign (###)
- Just type three hash signs and press Enter to create triple line with a thick center
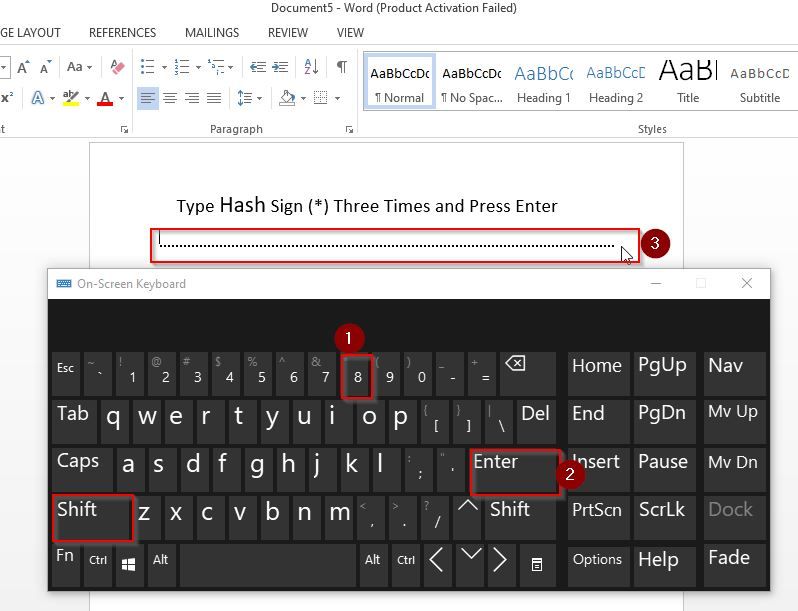
Using Asterisk Sign (***)
- Just type three asterisk Sign and press Enter to create a broken or dotted line.
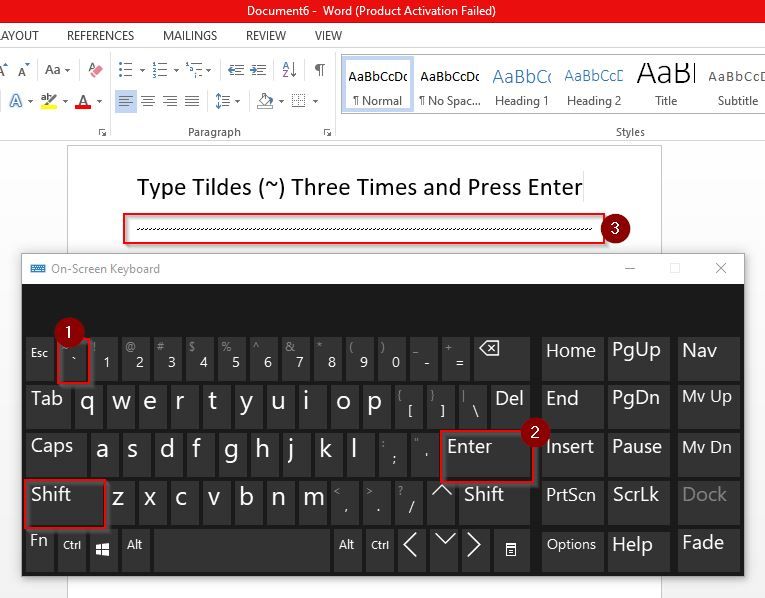
Using Tildes (~)
- Just type three tildes and press Enter to create a wavy line
Conclusion
All of the methods described above are simple and easy to insert your desired lines in a Word document. Modification of the styles, colors and alignments is also easy with Word’s in-built line formatting tools. So, go ahead and play around with these methods a bit until you find the one that suits you the best.
Sometimes, you can’t express yourself in words and numbers alone.
Sometimes, you need to express yourself through art. Luckily, Microsoft Word recognizes this need and gives users the option to draw on a document.
If you want a new way to showcase your ideas, give drawing a try! It’s easy, adds some flair to your document and might be a more effective way to communicate your thoughts.
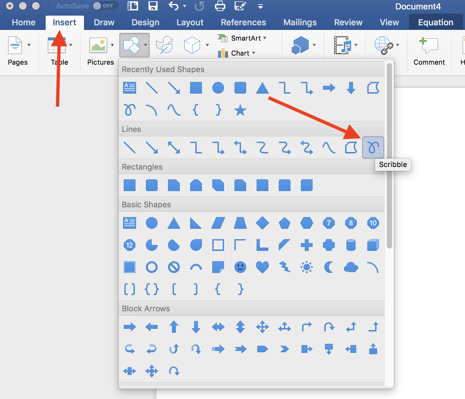
- In the ‘Insert tab,’ click the ‘Shapes’ button, and in the drop-down menu select ‘Scribble’
- Click and hold down your mouse to draw the shape you want
- Release the mouse when you’ve finished drawing
- Go to the ‘Shape Format’ tab to edit your shape

How to draw in Word
For all my visual learners in the house, follow along as I go through the drawing process step-by-step. I also include some formatting and editing tips and tricks to consider.
1. Click the ‘Shapes’ button and select ‘Scribble’
Open up your Microsoft Word document. It can be an empty document or it can be filled with an essay — you can draw over words if you want.
Navigate to the ‘Insert’ tab. From there, select ‘Shapes.’ A drop-down menu will appear. Under the ‘Lines’ options, select the very last button. It looks like a scribble and is aptly named ‘Scribble.’
2. Hold down your mouse to draw
Click and hold down your mouse to draw. Admittedly, this isn’t the most intuitive thing in the world and your drawings probably won’t look like they do on paper. That’s okay, you do get a chance to tweak and sculpt your drawing later — as well as adjust the line coloring, width, fill color, and more.
Here’s the strange shape I chose to draw (don’t ask me what it is):
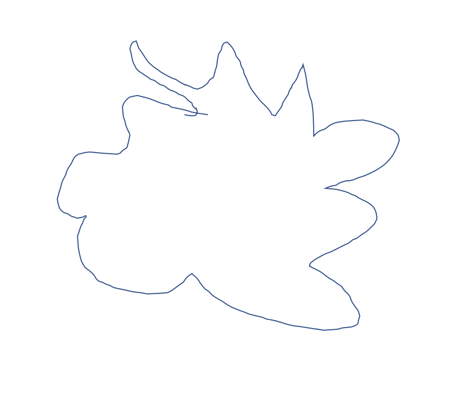
3. Release the mouse
As soon as you release your mouse, the drawing will be finished. You’ll no longer be able to continue drawing, like you would if it were pen and paper.
If you released the mouse too early, you can delete the shape and start over. If you want to add another shape to complement the one you just drew, go ahead and click the ‘Scribble’ button and go through the drawing process once more.
If you have the basic idea of the drawing done but it’s not exactly what you wanted, you can tweak the lines a bit. Double-click on the drawing. Click on the small ‘Edit Shape’ button in the top left corner. Then, select ‘Edit Points.’

A bunch of, you guessed it, points will appear on your drawing. Dragging a point out, in, or sideways effectively drags the line of the drawing with it. When you click off of the point, the drawing will be altered accordingly.
4. Edit your drawing
Double-click your drawing. A new tab will appear in the menu banner called ‘Shape Format.’ Now you can resize your shape by dragging the corners of the box around it. You can use the ‘Shape Fill’ button to add color inside your shape.
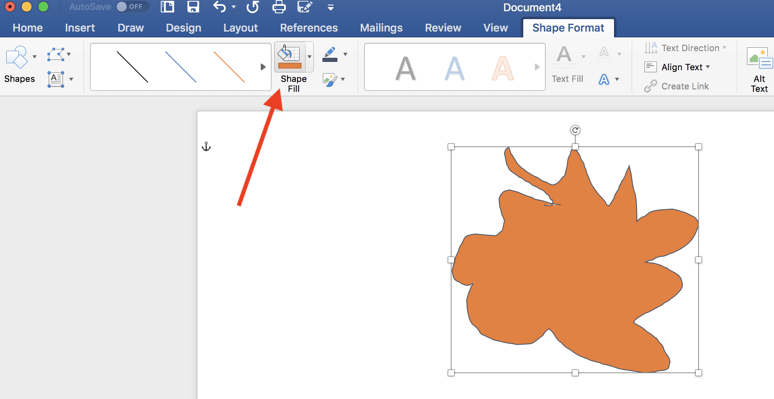
You can change the color of the outline by clicking the pencil button, located next to the ‘Shape Fill’ button. You can also choose to have ‘No Outline’ if you want.
Another way to make your drawing stand out is by adding text to it. Click on the ‘Draw a Text Box’ icon located next to the ‘Shapes’ button.
Drag your mouse over where you want the text box to live inside your shape. You can play with all the text editing options and include hanging indents, if you want.
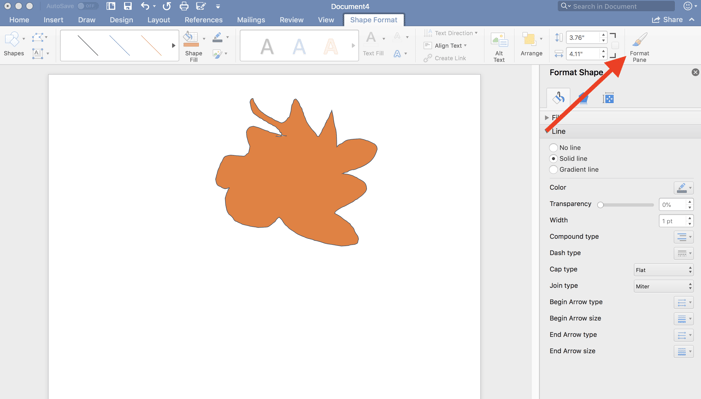
To unlock more editing options, select the ‘Format Pane’ on the far right. This will open a sidebar where you can edit the line type of the outline, play with color effects for the fill color, and more!
Once you’ve manipulated your shape into a final product that you’re happy with, go ahead and ‘Save As.’ Now you’re ready to share your creativity with the world!

Other things to know about drawing in Word
It will be very difficult for you to draw straight lines in Word. That’s simply due to the impossibility of dragging a mouse precisely. If that’s frustrating you to no end, there are work arounds.
How to draw a line in Word
If you want to have a very straight line, maybe the ‘Scribble’ tool is not the right one for you. Go back to the ‘Shapes’ drop-down menu under the ‘Insert’ tab and go through the different line options available to you. Select what’s best for your vision and go from there!
You’ll also notice that Word offers a variety of pre-made shapes to choose from. If you’re struggling to draw a star that doesn’t look like a sad blob, maybe try select the pre-made star shape. You can still play with the coloring, size, lines and more.
TIP: If you are dead-set on drawing freehand but Word isn’t working out for you, try drawing in Microsoft Paint. You can always insert that image into Word later on.
Want to put your artistry to the test in other ways? Discover how to make a brochure in Word.

Holly is the director of content marketing at G2. An avid reader and writer, Holly graduated from the University of Missouri with a dual major in Journalism and English. She firmly believes in the power of content and is constantly seeking ways to better engage and delight readers.
Если вы хотя бы иногда пользуетесь текстовым редактором MS Word, наверняка знаете о том, что в этой программе можно не только набирать текст, но и выполнять ряд других задач. О многих возможностях этого офисного продукта мы уже писали, при необходимости, вы можете ознакомиться с этим материалом. В этой же статье мы расскажем о том, как в Ворде нарисовать линию или полоску.
Уроки:
Как создать диаграмму в Word
Как сделать таблицу
Как создать схему
Как добавить шрифт
Создаем обычную линию
1. Откройте документ, в котором необходимо нарисовать линию, или создайте новый файл и откройте его.
2. Перейдите ко вкладке “Вставка”, где в группе “Иллюстрации” нажмите кнопку “Фигуры” и выберите подходящую линию из списка.
Примечание: В нашем примере используется Ворд 2016, в предыдущих версиях программы во вкладке “Вставка” есть отдельная группа “Фигуры”.
3. Нарисуйте линию, нажав левую кнопку мышки в ее начале и отпустив в конце.
4. Линия заданной вами длины и направления будет нарисована. После этого в документе MS Word появится режим работы с фигурами, о возможностях которого читайте ниже.
Рекомендации по созданию и изменению линий
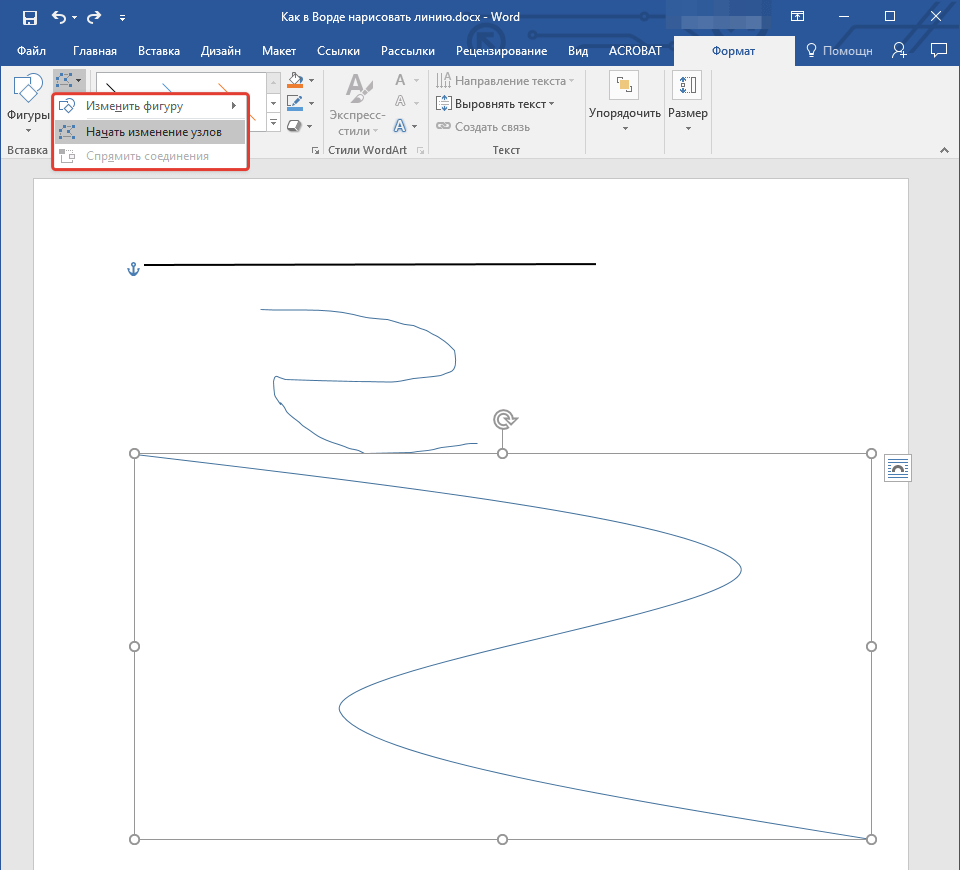
После того, как вы нарисуете линию, в Ворде появится вкладка “Формат”, в которой вы сможете изменить и отредактировать добавленную фигуру.
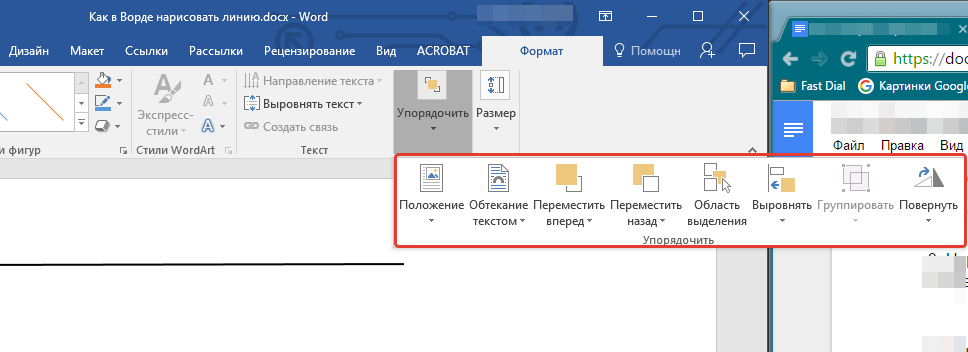
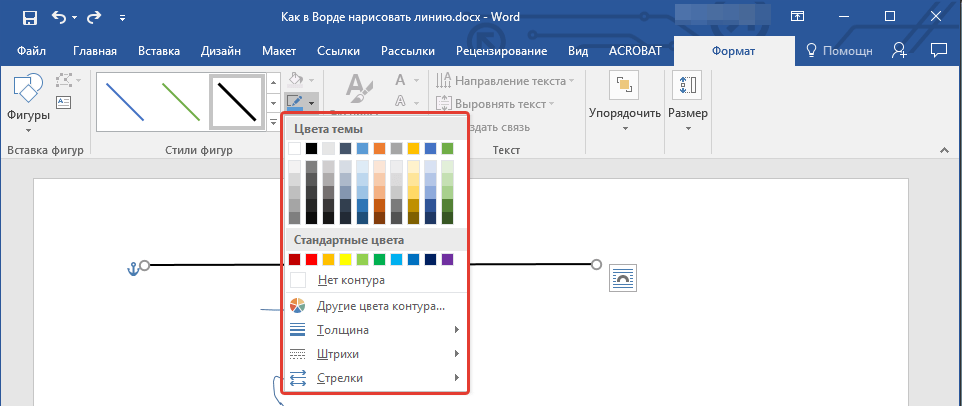
Чтобы изменить внешний вид лини, разверните меню пункта “Стили фигур” и выберите тот, который вам нравится.
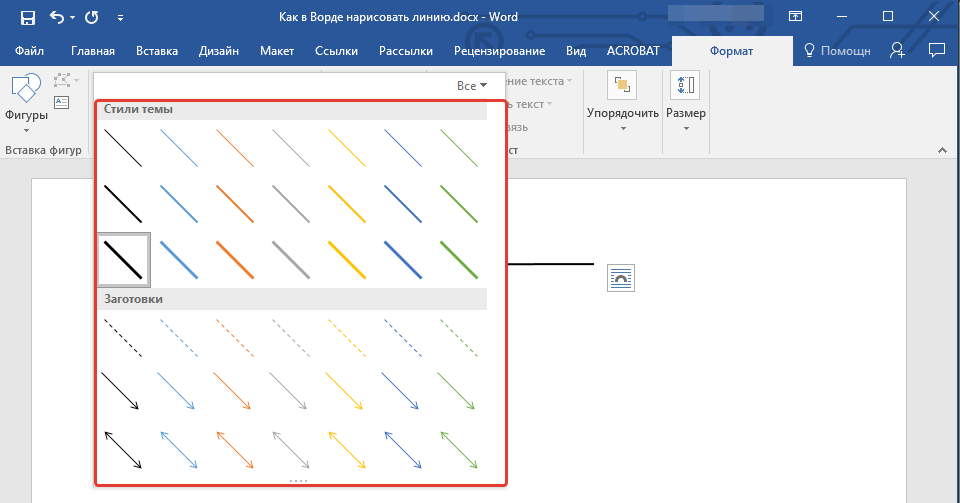

Чтобы сделать пунктирную линию в Word, разверните меню кнопки “Стили фигур”, предварительно кликнув на фигуру, и выберите необходимый тип линии (“Штрих”) в разделе “Заготовки”.
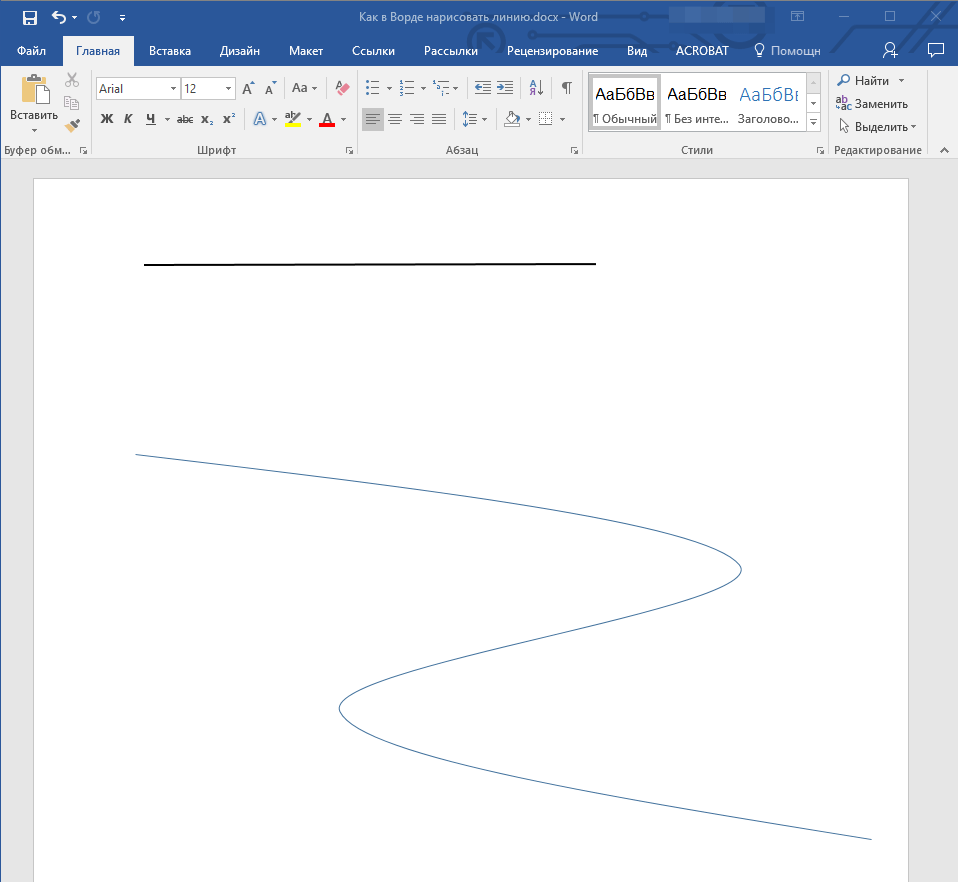
Чтобы нарисовать не прямую, а кривую линию, выберите соответствующий тип линии в разделе “Фигуры”. Кликните один раз левой кнопкой мышки и потяните ее, чтобы задать один изгиб, кликните второй раз для следующего, повторите это действие для каждого из изгибов, а затем дважды кликните левой кнопкой мышки, чтобы выйти из режима рисования линии.
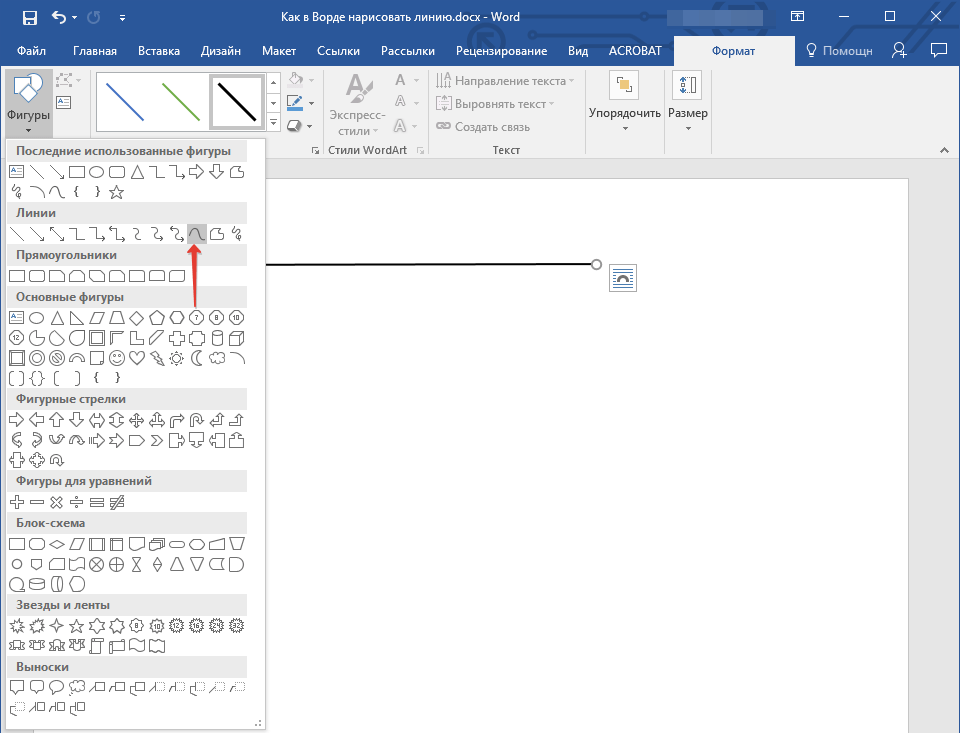
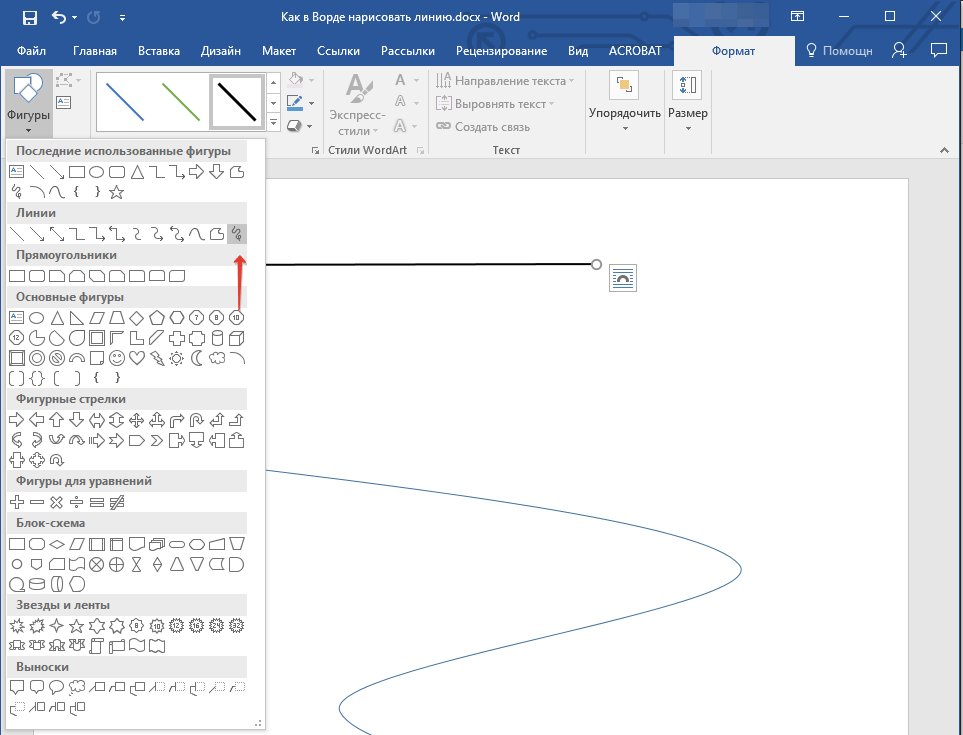
Чтобы нарисовать линию свободной формы, в разделе “Фигуры” выберите “Полилиния: рисованная кривая”.
Чтобы изменить размер поля нарисованной линии, выделите ее и нажмите на кнопку “Размер”. Задайте необходимые параметры ширины и высоты поля.
-
Совет: Изменить размер области, которую занимает линия можно и с помощью мышки. Кликните по одному из кружков, обрамляющих ее, и потяните в нужную строну. Если это необходимо, повторите действие и с другой стороны фигуры.
Для фигур с узлами (например, кривая линия) доступен инструмент их изменения.
Чтобы изменить цвет фигуры, нажмите на кнопку “Контур фигуры”, расположенную в группе “Стили”, и выберите подходящий цвет.
Чтобы переместить линию, просто кликните по ней, чтобы отобразилась область фигуры, и переместите ее в желаемое место документа.
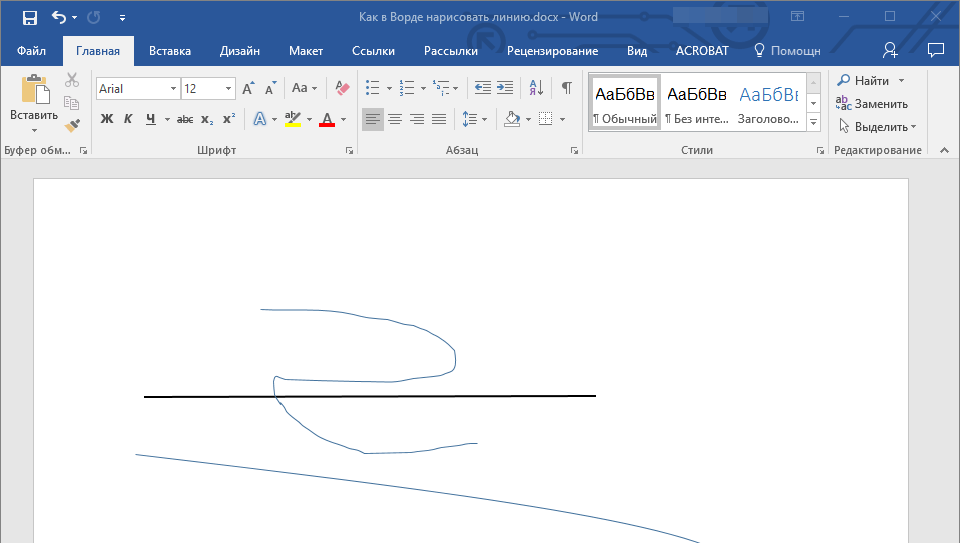
На этом все, из этой статьи вы узнали, как нарисовать (провести) линию в Ворде. Теперь вы знаете немного больше о возможностях этой программы. Желаем вам успехов в ее дальнейшем освоении.
Еще статьи по данной теме:
Помогла ли Вам статья?
We can quickly draw a straight vertical or horizontal line in MS Word by using a keyboard shortcut. This can be done wherever we want and at the length we want. Similarly, it is very useful for creating anything like a biodata form faster.
Table of Contents
Straight Vertical and Horizontal Line/Border
There are six ways to draw lines and borders in any direction you like, these are all explained below
1. Magic for Drawing a Straight Horizontal Line
Right-click within a blank document
Then select the “Paragraph” option to launch its formatting dialogue box

Click “Tabs” which locates in the lower left corner of the dialogue box

Enter the measurement value of a line’s width where you want to stop it. By default, the ruler width is 18 cm. For example, if you want to control the line at the end (before the margin), its value is 15 cm. So enter 15 under the “Tab stop position“.
Since we are starting to type text from the left, keep the alignment selection “Left“
Now select one of the line styles options under the “Leader“
Then click “Set” → And then click “OK“

Whether you type text or not, draw a straight horizontal line by pressing the Tab key.
Now we can format a Bio Data form using the horizontal line:

Type the word “Name” and press the “Tab” key on the keyboard to draw a straight horizontal line
Then continue typing the required fields and drawing the straight lines as explained above
Then go to the Insert tab and insert a table with the number of rows and columns you want.
For example, follow the screenshot to complete the bio data form.
2. Draw different formatted lines using the Keyboard Shortcuts

Press the minums – key more than 3 times to draw a straight thin line
Press the = (equal) key more than 3 times to draw double thin lines
Press and hold down the “Shift” key, then press the underscore ” _ ” key more than 3 times and hit the “Enter” key to draw a straight thin line
Press the (tiled) ~ key more than 3 times to draw a straight curved line
Press the asterisk( * ) key more than 3 times to draw a straight dotted line
Press and hold down the “Shift” key, and then press the “#” key more than three times to draw a line with a thick line between the two thin lines.
Turn Off the Automatic Line Drawing Feature
Follow the steps below to prevent horizontal lines from being inserted when you type 3 or more shortcut characters related to these features in Microsoft Word, or Outlook.
Click File, and then Options to launch a Word Options dialogue box.
In the dialogue box, Select Proofing → AutoCorrect Options → AutoFormat As You Type → Uncheck Border Lines options → Lastly, click OK.
3. Draw a line in Word for Signature
To draw a signature line in Word for Signature, do one of the following:
Press and hold down the “Shift” key, then press the underscore ” _ ” key more than 3 times and hit the “Shift +Enter” key to draw a straight thin line.
Select the line shape → press and hold down the “Shift” key, then draw a straight line as long as desired.

4. Draw Borders in Word
You can create any directional border on a blank document or on a document with text by following the steps below.
Go to the Paragraph group on the Home tab, click the border drop-down arrow, and then select the border that works best for you.

Formatting horizontal lines
After inserting the borders or lines, using the shortcut keys described above. You can change the look of these by using the border options; follow the steps below.
Go to the Home Tab in MS Word (In Outlook, go to the Format Text tab), then select the drop-down arrow next to the borders icons in the Paragraph group.
Select Borders and Shading at the bottom of the drop-down menu to launch the dialogue box

In the dialogue border and shading dialogue box, select any line style you want to change and then click OK

Again, click the drop-down arrow of the Borders and select Bottom Borders to apply.

5. Draw Vertical or Horizontal Lines using Shapes
You can draw any lines horizontally, vertically, horizontally up right and left:
Go to the “Insert” tab, click “Shapes,” and select “Line.”
Then Press and hold down the Shift key, and then click and draw lines in any direction you like.

Video Tutorial
-
Is it possible to draw a verticle line in Word?
Yes, it is possible to draw verticle lines in Microsoft Word.
Last Update: Jan 03, 2023
This is a question our experts keep getting from time to time. Now, we have got the complete detailed explanation and answer for everyone, who is interested!
Asked by: Lillian Bergnaum
Score: 4.8/5
(17 votes)
You can draw freely in Microsoft Word using the «Draw» feature whether you have Word for Mac or Windows. You can also insert customizable shapes into your document, or draw using the «Scribble» feature.
Can you draw freehand in Word?
There are two sets of drawing tools available to Microsoft Word users. If you want to draw basic, block-like images, you can insert shapes or lines into your Word document and group them together. … To insert shapes, you’ll need to press the Insert tab on the ribbon bar. For freehand drawings, press the Draw tab instead.
How do I insert a draw in Word?
Adding the Draw tab to the Ribbon
- Right-click the Ribbon and select Customize the Ribbon.
- Check the box next to Draw, then click OK.
- The Draw tab will now be available in the Ribbon.
Is there a pen tool in Word?
On the Draw tab of the Ribbon, tap a pen to select it. In Word, you must be in Print layout to draw with ink. If the Draw tab is grayed out so that you can’t select a pen, go the View tab and select Print Layout. ; then you can select a pen to draw with.
How do I draw in Word 2020?
How to draw in Word
- Click the ‘Shapes’ button and select ‘Scribble’ Open up your Microsoft Word document. …
- Hold down your mouse to draw. Click and hold down your mouse to draw. …
- Release the mouse. As soon as you release your mouse, the drawing will be finished. …
- Edit your drawing. Double-click your drawing.
41 related questions found
How do I draw in Word 2021?
How to draw on Microsoft Word using default tools
- Open an existing document or create a blank document in Word.
- Click on the «Insert» tab, then select «Shapes.» …
- You’ll be shown a long list of shapes you can add to your document. …
- Once you’ve selected the «Scribble» icon, your cursor will turn into a crosshair.
Why is draw disabled in Word?
In Word, you must be in Print layout to draw with ink. If the Draw tab is grayed out so that you can’t select a pen, go the View tab and select Print Layout. Tap again to open the menu of Thickness and Color options for the pen. Select your preferred size and color.
How can I make a signature in Word?
Insert a signature line
- Click where you want the line.
- Click Insert > Signature Line.
- Click Microsoft Office Signature Line.
- In the Signature Setup box, you can type a name in the Suggested signerbox. You can also add a title in the Suggested signer’s title box.
- Click OK. The signature line appears in your document.
Which tool is used to draw curved lines?
The curved line drawing tool is used to create curved or straight lines. The curved line tool provides greater control over the shape of a polyline than the straight line tool (see Drawing With the Straight Line Tool).
What is the best signature font in Word?
The best Microsoft Word cursive font is something that is going to vary based on personal preference, so it’s hard to consider any specific font as the “best” one.
…
Some Default Microsoft Word Cursive Fonts
- Segoe Script.
- Lucida Handwriting.
- Edwardian Script.
- Kunstler Script.
How can I make my signature?
Your signature should be easy to write and reproduce. It should feel good coming off of your hand, and it should be simple enough that you can dash it off in a matter of seconds. Your signature should suit your purpose and personality. If you want to show your dramatic side, use a signature with flair.
How do I create an electronic signature in Word for Mac?
On the Insert menu, click AutoText > New. The Create New AutoText box opens. Next to Name, type a name for your signature block and click OK. When you want to use this signature, place the insertion point where you want to insert the signature block.
Where is Print Layout in Word?
Click the view icons in the bottom-right corner of your document window. The only view icons in the bottom-right corner of the document window are Read Mode, Print Layout, and web Layout. Click the View tab and then click the view you want to use, such as Print Layout or Draft view.
How do you draw free in Word?
Draw or edit a freeform shape
- On the Insert tab, in the Illustrations group, click Shapes.
- Under Lines, do one of the following: To draw a shape that has both curved and straight segments, click Freeform . …
- Click anywhere in the document, and then drag to draw. …
- To finish drawing the shape, do one of the following:
How do I draw in Word 365?
Add a drawing to a document
- Click in your document where you want to create the drawing.
- On the Insert tab, in the Illustrations group, click Shapes.
- When you find the shape you want to insert, double-click to insert it automatically, or click and drag to draw it in your document.
How do I convert text to ink in Word?
To convert handwriting to text, do the following:
- On the Draw tab, choose the Lasso Select button.
- On the page, drag a selection over the handwriting you want to convert.
- On the Draw tab, choose Ink to Text.
How do you draw a line in Microsoft Word 2010?
Draw a line without connection points
- On the Insert tab, in the Illustrations group, click Shapes.
- Under Lines, click any line style you like.
- Click one location in the document, hold and drag your pointer to a different location, and then release the mouse button.
How do I draw a parallel line in Word?
1 — Draw two parallel lines from the insert > shapes palette. Format them as you wish then select both and save as an autotext entry (Alt+F3) or formatted autocorrect erntry. 2. Draw two lines format them as you wish, then drag one to the end of the other.
How do you draw a straight arrow in Word?
On the “Insert” tab on the Ribbon, click the “Shapes” button. In the Lines group on the drop-down menu, click the “Line Arrow” option. A crosshair symbol will display. Press and hold your mouse button, then drag to draw the arrow.
Insert Lines in Microsoft Word Documents
by Avantix Learning Team | Updated October 9, 2021
Applies to: Microsoft® Word® 2010, 2013, 2016, 2019 and 365 (Windows)
You can insert a line in Word using the Ribbon or by using keyboard shortcuts. It’s best to avoid drawing lines and instead insert border lines in Microsoft Word (normally paragraph borders) so the line or lines will move as you edit the document.
In this article, we’ll focus on inserting lines using borders attached to paragraphs. In Microsoft Word, anything with a hard return after it is a paragraph. If you use border lines, you can customize the type of border, line thickness and color. You can also include paragraph border lines in styles so they will appear throughout your document. If you draw lines using Insert Shapes, you’ll have to worry about the line being inline or floating.
You can insert a line in Word in 3 ways using borders:
- Use the Borders command on the Home tab in the Ribbon
- Select and apply different types of lines using the Borders and Shading dialog box
- Insert different types of lines using keyboard shortcuts (which add lines using AutoCorrect)
Recommended article: How to Keep Text Together in Microsoft Word
Do you want to learn more about Microsoft Word? Check out our virtual classroom or live classroom Word courses >
Inserting a line using the Borders button
To insert a line in Word above and / or below a paragraph using the Borders button:
- Select the paragraph(s) to which you want to add a line.
- Click the Home tab in the Ribbon.
- Click Borders in the Paragraph group. A drop-down menu appears.
- Select the line you want to use.
Below is the Borders command in the Ribbon in Word:
![]()
Removing lines using the Borders command
To remove a border line or lines from one or more paragraphs:
- Select the paragraph(s) with the border lines you want to remove.
- Click the Home tab in the Ribbon and then click Borders. A drop-down menu appears.
- Choose No Border from the drop-down menu.
Inserting a line using the Borders and Shading dialog box
You can apply a line or custom border lines to one or more paragraphs using the Borders and Shading dialog box.
To insert a line in Word above and / or below a paragraph using the Borders and Shading dialog box:
- Select the paragraph(s) to which you want to add a line.
- Click the Home tab in the Ribbon.
- Click Borders in the Paragraph group. A drop-down menu appears.
- Select Borders and Shading. A dialog box appears.
- Select a border style, color and width.
- Click between the guides in the sample area on the right (above or below the sample).
- Click Options (if required), enter any offset amounts to control the distance between the line and the paragraph and click OK.
- In Apply to, ensure Paragraph is selected.
- Click OK.
Below is the Borders and Shading dialog box where you can add a line or lines to paragraphs:

Removing lines using the Borders and Shading dialog box
To remove lines from one or more paragraphs using the Borders and Shading dialog box:
- Select the paragraph(s) with the lines you want to remove.
- Click the Home tab in the Ribbon and click Borders. A drop-down menu appears.
- Select Borders and Shading. A dialog box appears.
- Click None in the Setting area.
- In Apply to, ensure Paragraph is selected.
- Click OK.
Inserting a line using keyboard shortcuts
You can also insert a horizontal line using keyboard shortcuts (which insert border lines as AutoCorrect entries).
Type the following characters and then press Enter or Return to insert lines:
- To insert a plain single line, type three hyphens (—).
- To insert a plain double line, type three equal signs (===).
- To insert a dotted line, type three asterisks (***).
- To insert a bold single line, type three underlines (___).
- To insert a wavy line, type three tildes (~~~).
- To insert a triple line, type three number signs or hash tags (###).
To remove these lines, select the paragraph with the line, click the Borders button on the Home tab and select No Border.
Subscribe to get more articles like this one
Did you find this article helpful? If you would like to receive new articles, join our email list.
More resources
How to Double Space in Word (4 Ways)
14 Shortcuts to Quickly Select Text in Microsoft Word
4 Ways to Insert or Type the Pound Symbol in Word (£)
How to Create a Hanging Indent or First Line Indent in Microsoft Word
How to Insert an Em or En Dash in Microsoft Word (4 Ways with Shortcuts)
Related courses
Microsoft Word: Intermediate / Advanced
Microsoft Excel: Intermediate / Advanced
Microsoft PowerPoint: Intermediate / Advanced
Microsoft Word: Long Documents Master Class
Microsoft Word: Styles, Templates and Tables of Contents
Microsoft Word: Designing Dynamic Word Documents Using Fields
VIEW MORE COURSES >
Our instructor-led courses are delivered in virtual classroom format or at our downtown Toronto location at 18 King Street East, Suite 1400, Toronto, Ontario, Canada (some in-person classroom courses may also be delivered at an alternate downtown Toronto location). Contact us at info@avantixlearning.ca if you’d like to arrange custom instructor-led virtual classroom or onsite training on a date that’s convenient for you.
Copyright 2023 Avantix® Learning
Microsoft, the Microsoft logo, Microsoft Office and related Microsoft applications and logos are registered trademarks of Microsoft Corporation in Canada, US and other countries. All other trademarks are the property of the registered owners.
Avantix Learning |18 King Street East, Suite 1400, Toronto, Ontario, Canada M5C 1C4 | Contact us at info@avantixlearning.ca
You can draw freely in Microsoft Word using the “Draw” feature whether you have Word for Mac or Windows. You can also insert customizable shapes into your document, or draw using the “Scribble” feature. The process of drawing in Word varies based on which version of Word and device you’re using.
Furthermore, How do I create a signature in Word?
Insert a signature line
- Click where you want the line.
- Click Insert > Signature Line.
- Click Microsoft Office Signature Line.
- In the Signature Setup box, you can type a name in the Suggested signerbox. You can also add a title in the Suggested signer’s title box.
- Click OK. The signature line appears in your document.
Simply so How do I draw in Word 2020?
How to draw in Word
- Click the ‘Shapes’ button and select ‘Scribble’ Open up your Microsoft Word document. …
- Hold down your mouse to draw. Click and hold down your mouse to draw. …
- Release the mouse. As soon as you release your mouse, the drawing will be finished. …
- Edit your drawing. Double-click your drawing.
Also, How do I enable the pen in Word? Select File > Options > Advanced. In the Pen section, select the box next to Use pen to select and interact with content by default.
How do you create an electronic signature?
How do I create an electronic signature?
- Draw your signature using your finger or a stylus. …
- Upload an image of your signature. …
- Use your cursor to draw your signature. …
- Use your keyboard to type in your signature.
How can I create a signature? Create a signature
On the Message tab, in the Include group, click Signature, and then click Signatures. On the E-mail Signature tab, click New. Type a name for the signature, and then click OK. In the Edit signature box, type the text that you want to include in the signature.
How can I make my handwritten signature online?
Signature Maker
- Go to the Signature Maker website;
- Click on “Create My Signature”;
- Select your pen width and your pen color;
- Use the live signature tool to draw your signature;
- Click on “Save”;
- Click on “Download Signature”.
How do I draw diagrams in Word?
Click in your document where you want to create the drawing. On the Insert tab, in the Illustrations group, click Shapes .
…
Add a drawing to a document
- Insert a shape. …
- Change a shape. …
- Add text to a shape. …
- Group selected shapes. …
- Draw in the document. …
- Adjust the size of the shapes.
How do you draw free in Word?
Draw a freeform shape
Click anywhere in the document, and then drag to draw. To draw a straight segment with the Freeform tool, click one location, move your pointer to a different location, and then click again; to draw a curved segment, keep your mouse button pressed as you drag to draw.
How do I draw an angle in Word?
Draw a curve
- On the Insert tab, click Shapes.
- Under Lines, click Curve.
- Click where you want the curve to start, drag to draw, and then click wherever you want to add a curve.
- To end a shape, do one of the following: To leave the shape open, double-click at any time. To close the shape, click near its starting point.
Where is the pen tool in Microsoft Word 2010?
Where is the pen tool in Microsoft Word 2010? Find the drawing tools Go to the Review tab and select Start Inking to display the Ink Tools and Pens tab.
Can I use surface pen in Microsoft Word?
Go into Settings on your Surface device, open Devices, and select Pen. … In Microsoft Word, you can also jot handwritten notes on a report or other text document with your Surface Pen or even write a full letter by hand.
How do I insert a signature in Word 2010?
Step 1: Open the document to which you wish to add a signature. Step 2: Position your cursor at the point in the document where you wish to add the signature. Step 3: Click the Insert tab at the top of the window. Step 4: Click the Signature Line button in the Text section of the Office ribbon.
How can I create an electronic signature for free?
How to eSign a Document
- Drag & drop document. Drag and drop your file into the area above or click on the link to choose your document. …
- eSign document. To eSign document online, click on it, select an eSignature type, create your eSignature, and add it to the document.
- Download document. Click DONE to save your changes.
How do I get a nice signature?
Try the following ideas:
- Use repeating elements. The three large ovals in this signature create an echo effect and help tie the whole design together.
- Allow your capital letters to encircle the lowercase letters. …
- Encircle the signature with loops. …
- Enlarge the bottoms of your letters.
How do I make my signature unique?
Three Quick Steps To Improve Your Signature
- Find A Font You Like. The first step is deciding what kind of style you want. …
- Practice Only The Capital Letters. Now that you have a font you like, focus on the first letter of both your first and last names to practice. …
- Write Your New Signature Over And Over.
Does a signature have to be your full name?
Usually, a signature is simply someone’s name written in a stylized fashion. However, that is not really necessary. All that needs to be there is some mark that represents you. … As long as it adequately records the intent of the parties involved in a contractual agreement, it’s considered a valid signature.
Does a signature have to be in cursive?
Traditionally, signatures are in cursive, but it can be argued that it’s not a requirement. One of the most important things about a signature and its authenticity is the signer’s intention when they provide their signature. … A distinct signature in cursive can be harder to forge than most symbols.
How do I insert a shape in Word 2020?
To add a shape, click Insert, click Shapes, select a shape, and then click and drag to draw the shape. After you add one or more shapes, you can add text, bullets, and numbering to them, and you can change their fill, outline, and other effects on the Format tab.
How can I draw a line in Word?
On the Insert tab, in the Illustrations group, click Shapes. Under Lines, right-click the line or connector that you want to add, and then click Lock Drawing Mode. Click where you want to start the line or connector, and then drag the cursor to where you want the line or connector to end.
What is a free form shape?
a shape having an irregular contour, chiefly used in nonrepresentational art and industrial design. Linguistics. a linguistic form that can occur by itself, as fire, book, or run.
Which tool is used to draw curved lines?
20) The curve tool is used to draw a curved line.
What angle is 45?
A 45-degree angle is exactly half of a 90-degree angle formed between two rays. It is an acute angle and two angles measuring 45 degrees from a right angle or a 90-degree angle. We know that an angle is formed when two rays meet at a vertex.