Sometimes, you can’t express yourself in words and numbers alone.
Sometimes, you need to express yourself through art. Luckily, Microsoft Word recognizes this need and gives users the option to draw on a document.
If you want a new way to showcase your ideas, give drawing a try! It’s easy, adds some flair to your document and might be a more effective way to communicate your thoughts.
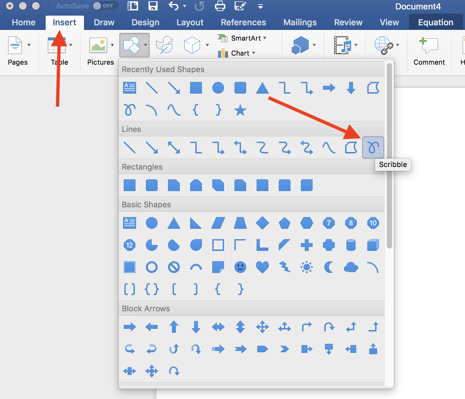
- In the ‘Insert tab,’ click the ‘Shapes’ button, and in the drop-down menu select ‘Scribble’
- Click and hold down your mouse to draw the shape you want
- Release the mouse when you’ve finished drawing
- Go to the ‘Shape Format’ tab to edit your shape
How to draw in Word
For all my visual learners in the house, follow along as I go through the drawing process step-by-step. I also include some formatting and editing tips and tricks to consider.
1. Click the ‘Shapes’ button and select ‘Scribble’
Open up your Microsoft Word document. It can be an empty document or it can be filled with an essay — you can draw over words if you want.
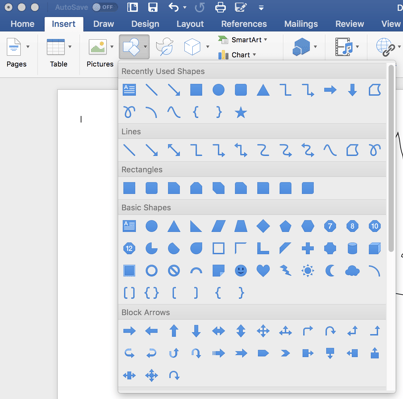
Navigate to the ‘Insert’ tab. From there, select ‘Shapes.’ A drop-down menu will appear. Under the ‘Lines’ options, select the very last button. It looks like a scribble and is aptly named ‘Scribble.’
2. Hold down your mouse to draw
Click and hold down your mouse to draw. Admittedly, this isn’t the most intuitive thing in the world and your drawings probably won’t look like they do on paper. That’s okay, you do get a chance to tweak and sculpt your drawing later — as well as adjust the line coloring, width, fill color, and more.
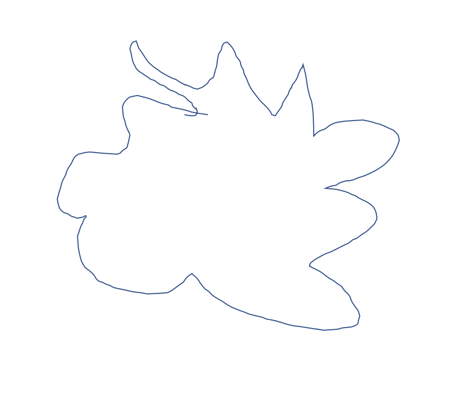
Here’s the strange shape I chose to draw (don’t ask me what it is):
3. Release the mouse
As soon as you release your mouse, the drawing will be finished. You’ll no longer be able to continue drawing, like you would if it were pen and paper.
If you released the mouse too early, you can delete the shape and start over. If you want to add another shape to complement the one you just drew, go ahead and click the ‘Scribble’ button and go through the drawing process once more.
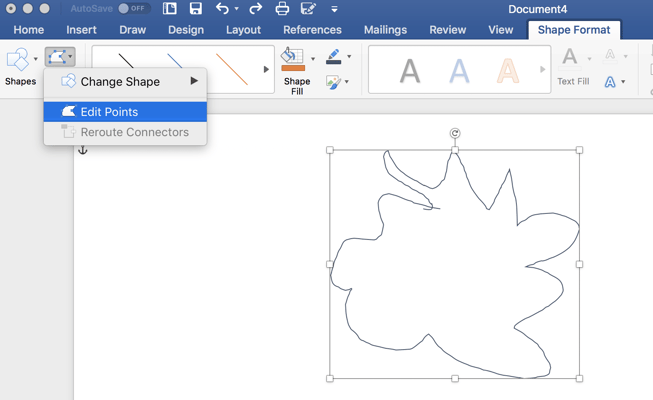
If you have the basic idea of the drawing done but it’s not exactly what you wanted, you can tweak the lines a bit. Double-click on the drawing. Click on the small ‘Edit Shape’ button in the top left corner. Then, select ‘Edit Points.’
A bunch of, you guessed it, points will appear on your drawing. Dragging a point out, in, or sideways effectively drags the line of the drawing with it. When you click off of the point, the drawing will be altered accordingly.
4. Edit your drawing
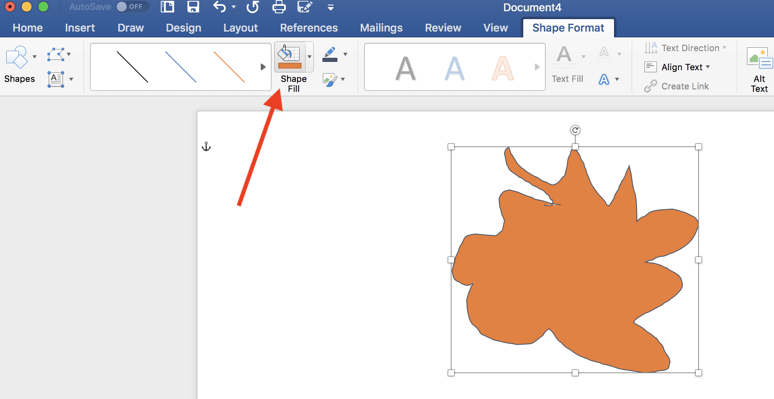
Double-click your drawing. A new tab will appear in the menu banner called ‘Shape Format.’ Now you can resize your shape by dragging the corners of the box around it. You can use the ‘Shape Fill’ button to add color inside your shape.
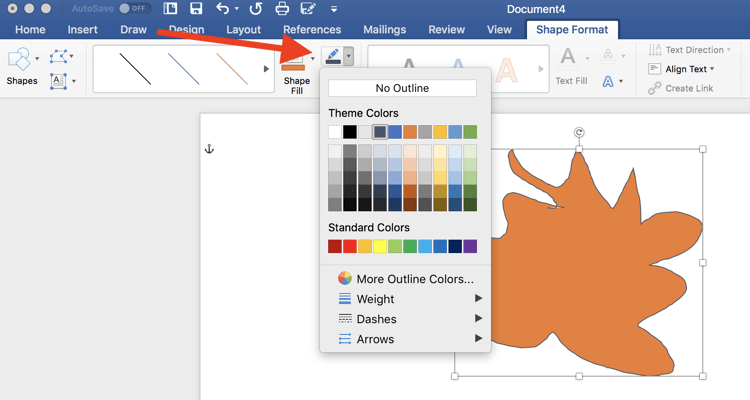
You can change the color of the outline by clicking the pencil button, located next to the ‘Shape Fill’ button. You can also choose to have ‘No Outline’ if you want.
Another way to make your drawing stand out is by adding text to it. Click on the ‘Draw a Text Box’ icon located next to the ‘Shapes’ button.
Drag your mouse over where you want the text box to live inside your shape. You can play with all the text editing options and include hanging indents, if you want.
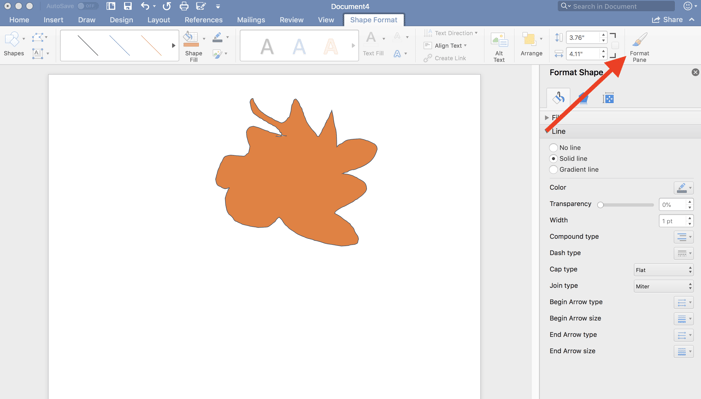
To unlock more editing options, select the ‘Format Pane’ on the far right. This will open a sidebar where you can edit the line type of the outline, play with color effects for the fill color, and more!
Once you’ve manipulated your shape into a final product that you’re happy with, go ahead and ‘Save As.’ Now you’re ready to share your creativity with the world!
Other things to know about drawing in Word
It will be very difficult for you to draw straight lines in Word. That’s simply due to the impossibility of dragging a mouse precisely. If that’s frustrating you to no end, there are work arounds.
How to draw a line in Word
If you want to have a very straight line, maybe the ‘Scribble’ tool is not the right one for you. Go back to the ‘Shapes’ drop-down menu under the ‘Insert’ tab and go through the different line options available to you. Select what’s best for your vision and go from there!
You’ll also notice that Word offers a variety of pre-made shapes to choose from. If you’re struggling to draw a star that doesn’t look like a sad blob, maybe try select the pre-made star shape. You can still play with the coloring, size, lines and more.
TIP: If you are dead-set on drawing freehand but Word isn’t working out for you, try drawing in Microsoft Paint. You can always insert that image into Word later on.
Want to put your artistry to the test in other ways? Discover how to make a brochure in Word.
Holly is the director of content marketing at G2. An avid reader and writer, Holly graduated from the University of Missouri with a dual major in Journalism and English. She firmly believes in the power of content and is constantly seeking ways to better engage and delight readers.
Word for Microsoft 365 Word 2021 Word 2019 Word 2016 Word 2013 Word 2010 Word 2007 More…Less
These are the basic types of graphics that you can use to enhance your Word documents: drawing objects, SmartArt, charts, pictures, and clip art. Drawings refer to a drawing object or a group of drawing objects.
Drawing objects include shapes, diagrams, flowcharts, curves, lines, and WordArt. These objects are part of your Word document. You can change and enhance these objects with colors, patterns, borders, and other effects.
Note: It is no longer necessary to insert a drawing canvas to work with drawing objects in Word. However, you may still use a drawing canvas as an organizational aid when working with several drawing objects, or if you want to add connectors between shapes. To insert a drawing canvas, on the Insert tab, click Shapes, and then click New Drawing Canvas.
What do you want to do?
-
Add a drawing to a document
-
Delete all or part of a drawing
Add a drawing to a document
-
Click in your document where you want to create the drawing.
-
On the Insert tab, in the Illustrations group, click Shapes.
-
You can do any of the following on the Format tab, which appears after you insert a drawing shape:
-
Insert a shape. On the Format tab, in the Insert Shapes group, click a shape, and then click somewhere in the document.
-
Change a shape. Click the shape you want to change. On the Format tab, in the Insert Shapes group, click Edit Shape, point to Change Shape, and then choose a different shape.
-
Add text to a shape. Click the shape you where you want text, and then type.
-
Group selected shapes. Select several shapes at a time by pressing CTRL on your keyboard and clicking each shape you want to include in the group. On the Format tab in the Arrange group, click Group so that all of the shapes will be treated like a single object.
-
Draw in the document. On the Format tab, in the Insert Shapes group, expand the shapes options by clicking the arrow. Under Lines click Freeform or Scribble.
Tip: To stop drawing with the Freeform or Scribble lines, double-click.
-
Adjust the size of the shapes. Select the shape or shapes you want to resize. On the Format tab, in the Size group, click the arrows or type new dimensions in the Height and Width boxes.
-
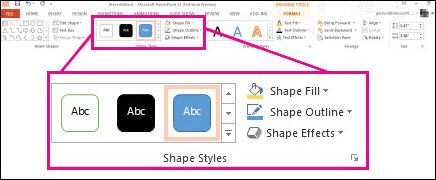
Apply a style to a shape. In the Shape Styles group, rest your pointer over a style to see what your shape will look like when you apply that style. Click the style to apply it. Or, click Shape Fill or Shape Outline and select the options that you want.
Note: If you want to apply a color and gradient that aren’t available in the Shape Styles group, select the color first, and then apply the gradient.
-
Add flow charts with connectors. Before you create a flow chart, add a drawing canvas by clicking the Insert tab, clicking Shapes in the Illustrations group, and then clicking New Drawing Canvas. On the Format tab, in the Insert Shapes group, click a Flow chart shape. Under Lines, choose a connector line such as the Curved Arrow Connector.
-
Use shadow and three-dimensional (3-D) effects to add interest to the shapes in your drawing. On the Format tab, in the Shape Styles group, click Shape Effects, and choose an effect.
-
Align the objects on the canvas. To align the objects, press and hold CTRL while you select the objects that you want to align. On the Format tab, in the Arrange group, click Align to choose from an assortment of alignment commands.
-
Delete all or part of a drawing
-
Select the drawing object that you want to delete.
-
Press DELETE.
See also
Add shapes
Draw a curve or circle shape
Insert pictures
Crop a picture
Add clip art to your file
What do you want to do?
-
Add a drawing to a document
-
Delete all or part of a drawing
Add a drawing to a document
-
Click in your document where you want to create the drawing.
-
On the Insert tab, in the Illustrations group, click Shapes.
-
When you find the shape you want to insert, double-click to insert it automatically, or click and drag to draw it in your document.
You can do any of the following on the Format tab, which appears after you insert a drawing shape:
-
Insert a shape. On the Format tab, in the Insert Shapes group, click a shape, and then click somewhere in the document.
-
Change a shape. Click the shape you want to change. On the Format tab, in the Shape Styles group, click Change Shape, and then choose a different shape.
-
Add text to a shape. Right-click the shape, click Add Text, and then type.
-
Group selected shapes. Select several shapes at a time by pressing CTRL on your keyboard and clicking each shape you want to include in the group. On the Format tab in the Arrange group, click Group so that all of the shapes will be treated like a single object.
-
Draw in the document. On the Format tab, in the Insert Shapes group, expand the shapes options by clicking the arrow. Under Lines click Freeform or Scribble.
-
Adjust the size of the shapes. Select the shape or shapes you want to resize. On the Format tab, in the Size group, click the arrows or type new dimensions in the Shape Height and Shape Width boxes.
-
Apply a style to a shape. In the Shape Styles group, rest your pointer over a style to see what your shape will look like when you apply that style. Click the style to apply it. Or, click Shape Fill or Shape Outline and select the options that you want.
Note: If you want to apply a color and gradient that aren’t available in the Shape Styles group, select the color first, and then apply the gradient.
-
Add flow charts with connectors. Before you create a flow chart, add a drawing canvas by clicking the Insert tab, clicking Shapes in the Illustrations group, and then clicking New Drawing Canvas. On the Format tab, in the Insert Shapes group, click a Flow chart shape. Under Lines, choose a connector line such as the Curved Arrow Connector.
-
Use shadow and three-dimensional (3-D) effects to add interest to the shapes in your drawing. On the Format tab, choose an option in either the Shadow Effects or the 3-D Effects group.
-
Align the objects on the canvas. To align the objects, press and hold CTRL while you select the objects that you want to align. On the Format tab, in the Arrange group, click Align to choose from an assortment of alignment commands.
-
Delete all or part of a drawing
-
Select the drawing object that you want to delete.
-
Press DELETE.
See also
Draw a curve or circle shape
Insert pictures
Crop a picture
Add clip art to your file
Need more help?
Want more options?
Explore subscription benefits, browse training courses, learn how to secure your device, and more.
Communities help you ask and answer questions, give feedback, and hear from experts with rich knowledge.
Содержание
- Включение вкладки «Рисование»
- Средства рисования
- Инструменты
- Перья
- Преобразовать
- Воспроизведение
- Рисование с помощью фигур
- Добавление области для рисования
- Инструменты для рисования
- Вставка фигур
- Стили фигур
- Стили WordArt
- Текст
- Упорядочить
- Размер
- Вопросы и ответы
MS Word — это, в первую очередь, текстовый редактор, однако, рисовать в этой программе тоже можно. Таких возможностей и удобства в работе, как в специализированных программах, изначально предназначенных для рисования и работы с графикой, ждать от Ворда, конечно, не стоит. Тем не менее, для решения базовых задач стандартного набора инструментов будет достаточно.
Урок: Как нарисовать линию в Word
Прежде, чем рассмотреть то, как сделать рисунок в Ворде, следует отметить, что рисовать в данной программе можно двумя разными методами. Первый — вручную, подобно тому, как это происходит в Paint, правда, немного проще. Второй метод — рисование по шаблонам, то есть, с использованием шаблонных фигур. Обилия карандашей и кистей, цветовых палитр, маркеров и прочих инструментов в детище Майкрософт вы не найдете, но создать простой рисунок здесь все же вполне возможно.
Включение вкладки «Рисование»
В Microsoft Word есть набор средств для рисования, которые подобны таковым в стандартном Paint, интегрированном в Windows. Примечательно, что о существовании этих инструментов многие пользователи даже не догадываются. Все дело в том, что вкладка с ними по умолчанию не отображается на панели быстрого доступа программы. Следовательно, прежде, чем приступить к рисованию в Ворде, нам с вами предстоит эту вкладку отобразить.
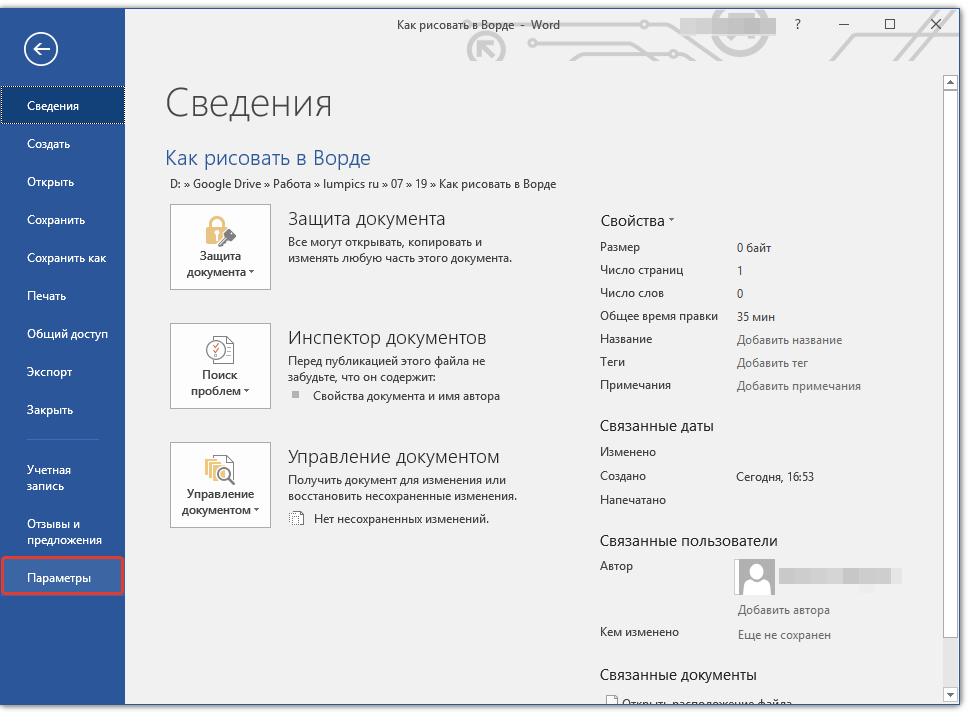
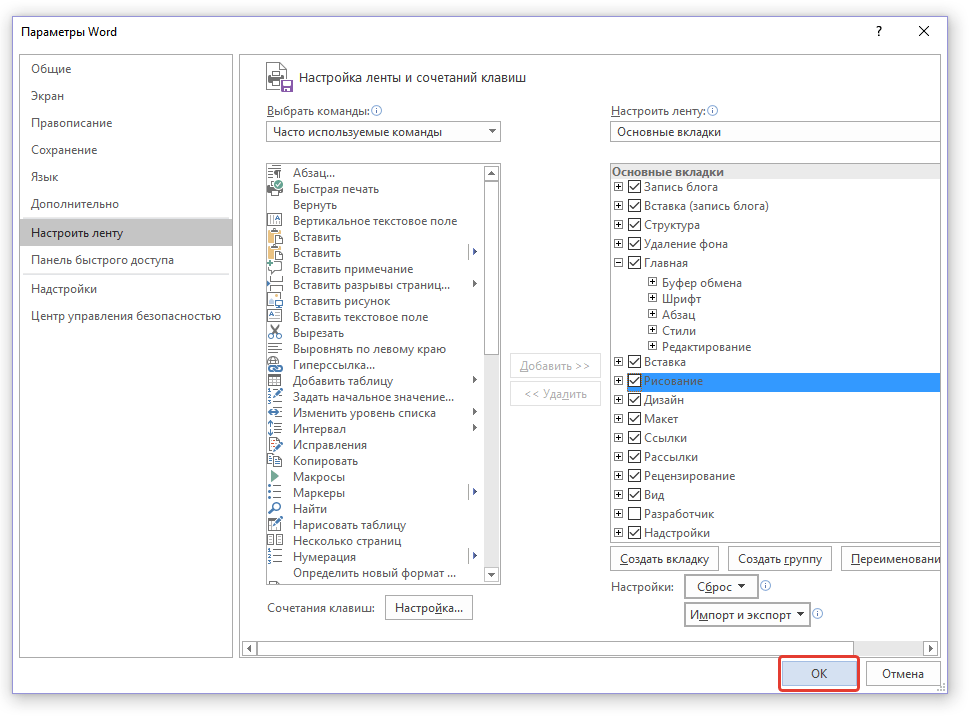
1. Откройте меню «Файл» и перейдите в раздел «Параметры».
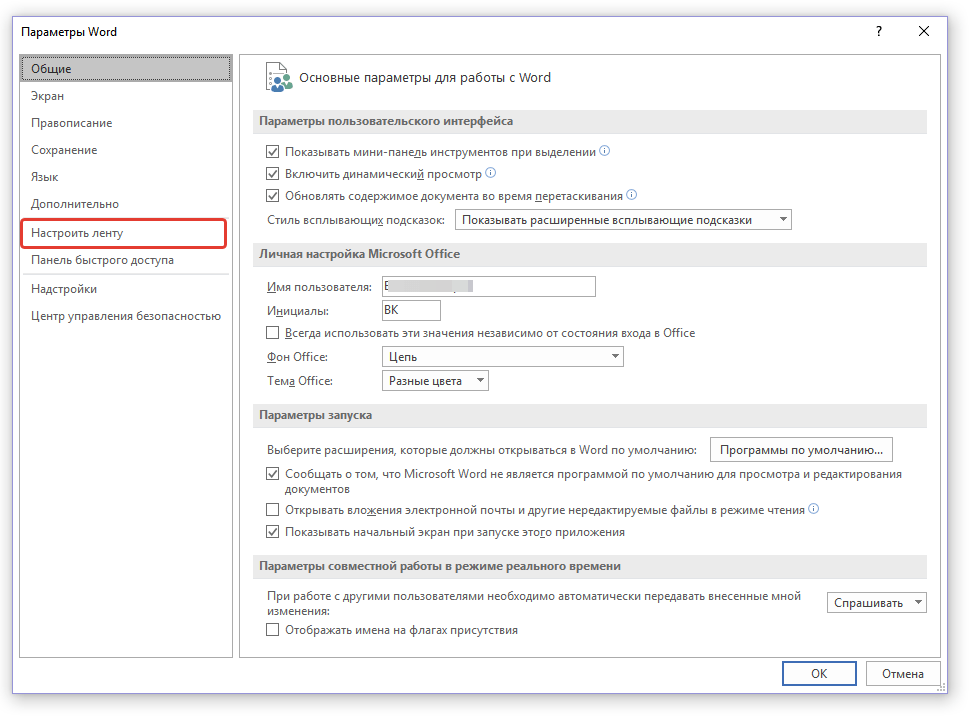
2. В открывшемся окне выберите пункт «Настроить ленту».
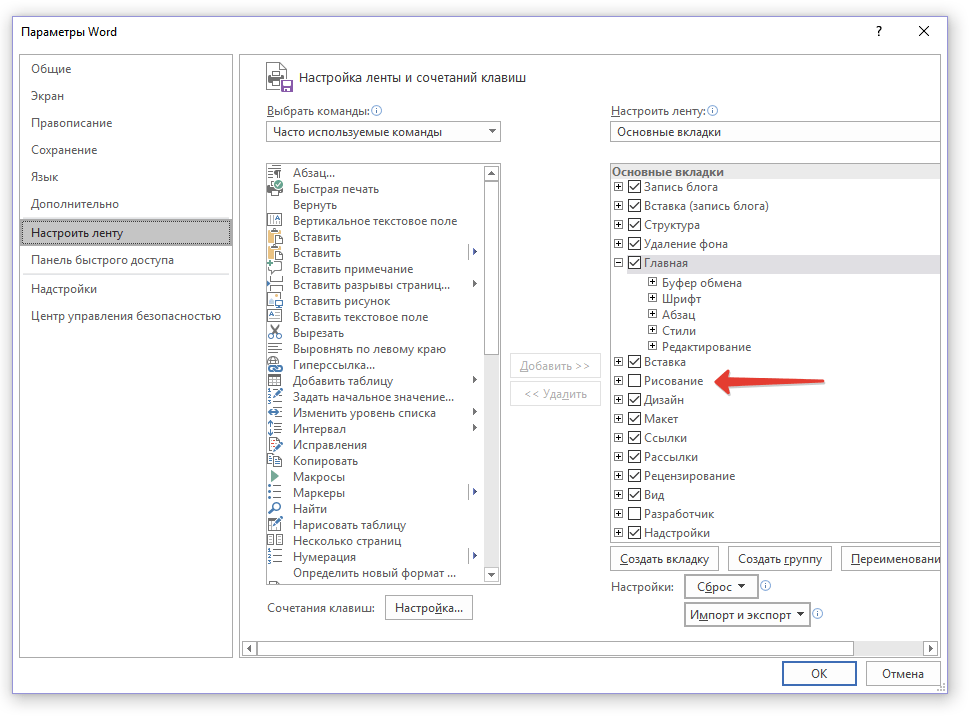
3. В разделе «Основные вкладки» установите галочку напротив пункта «Рисование».
4. Нажмите «ОК», чтобы внесенные вами изменения вступили в силу.
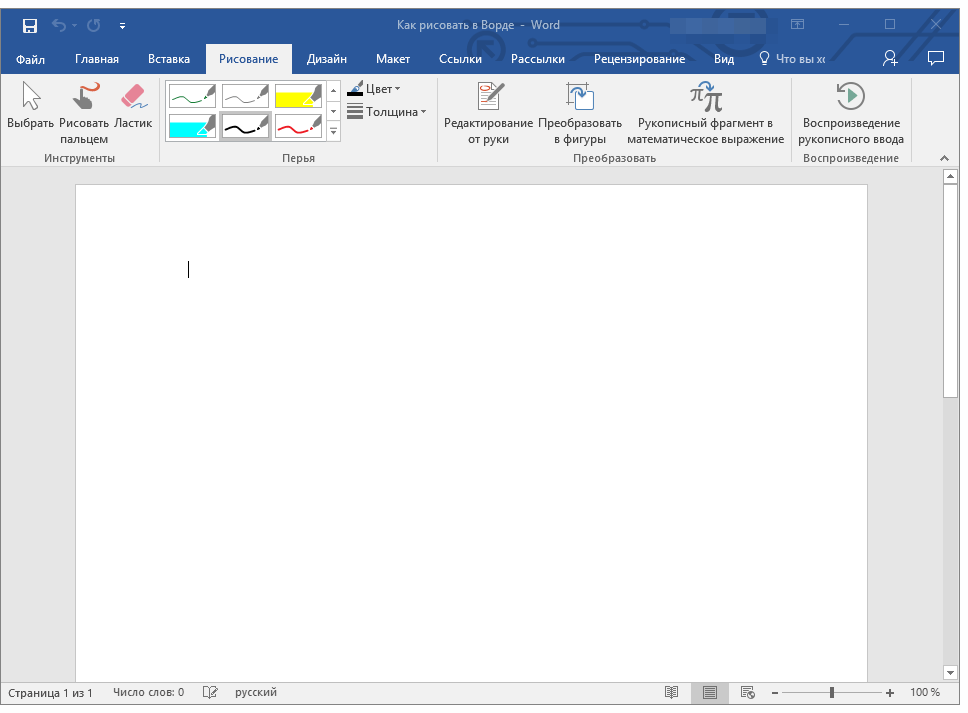
После закрытия окна «Параметры» на панели быстрого доступа в программе Microsoft Word появится вкладка «Рисование». Все инструменты и возможности этой вкладки мы рассмотрим ниже.
Средства рисования
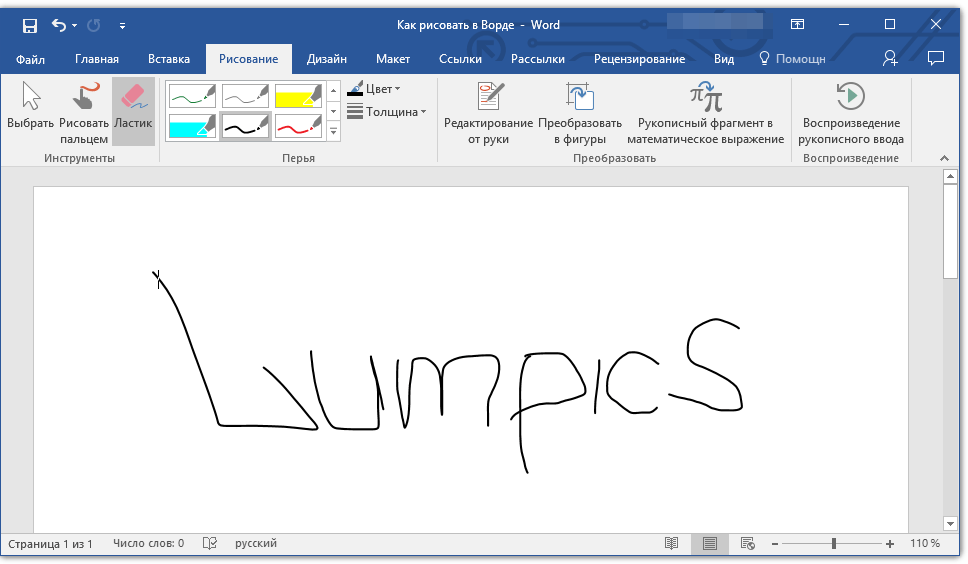
Во вкладке «Рисование» в Ворде, вы можете видеть все те инструменты, с помощью которых можно рисовать в этой программе. Давайте подробно рассмотрим каждый из них.
Инструменты
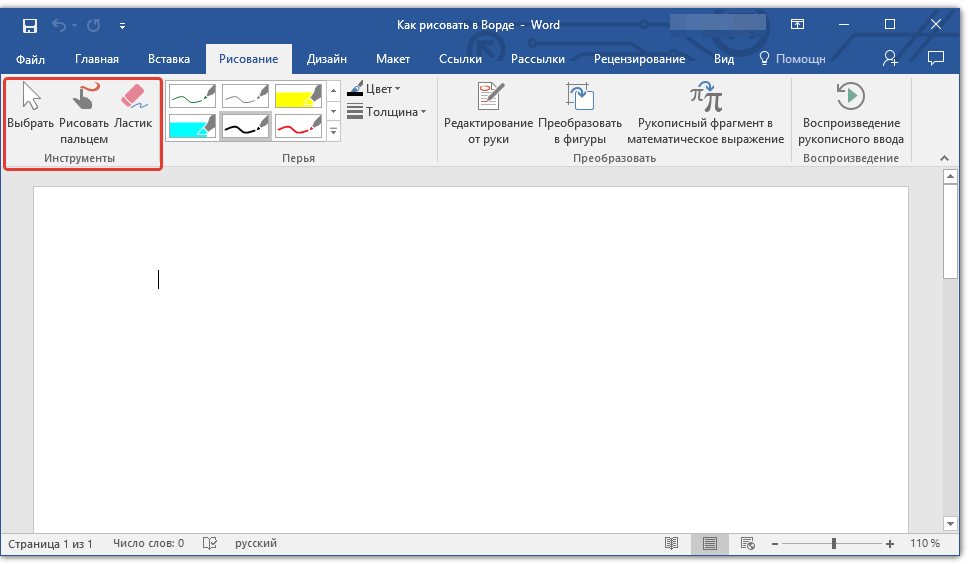
В этой группе расположились три инструмента, без которых рисование попросту невозможно.
Выбрать: позволяет указать на уже нарисованный объект, расположенный на странице документа.
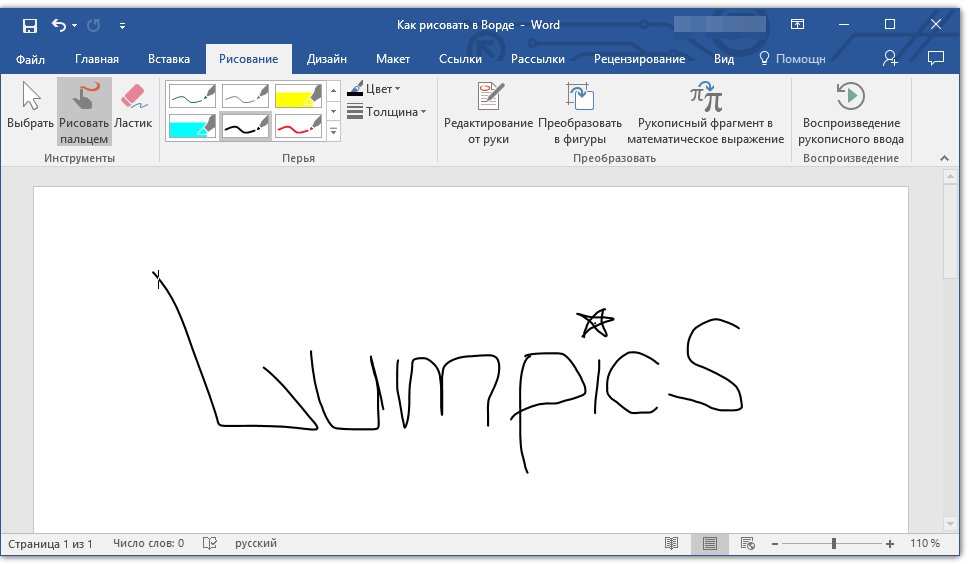
Рисовать пальцем: предназначен, в первую очередь, для сенсорных экранов, но может использоваться и на обычных. В таком случае вместо пальца будет использоваться указатель курсора — все как в Paint и других подобных программах.
Примечание: Если вам необходимо изменить цвет кисти, которой вы рисуете, сделать это можно в соседней группе инструментов — «Перья», нажав на кнопку «Цвет».
Ластик: этот инструмент позволяет стереть (удалить) объект или его часть.
Перья
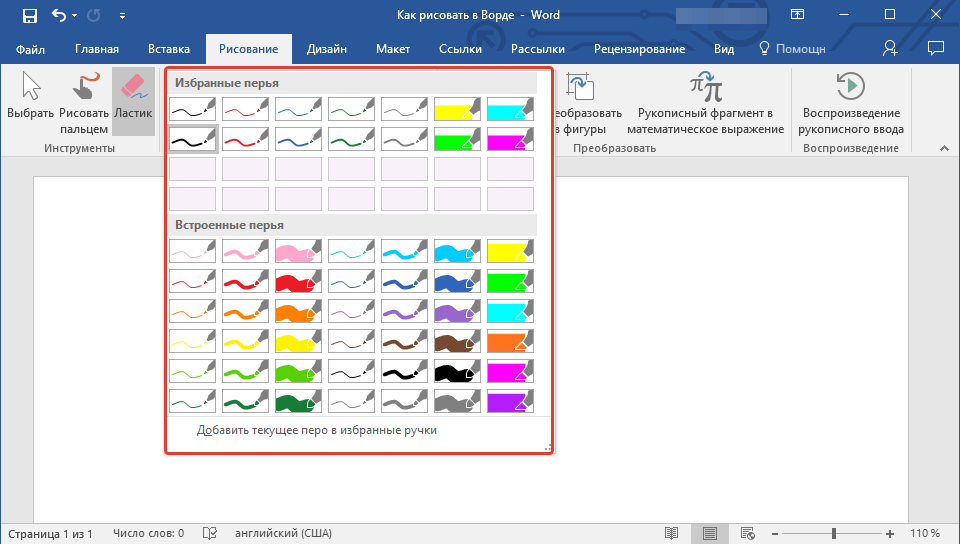
В этой группе вы можете выбрать одно из множества доступных перьев, которые отличаются, в первую очередь, по типу линии. Нажав на кнопку «Больше», расположенную в правом нижнем углу окна со стилями, вы сможете увидеть предпросмотр каждого доступного пера.
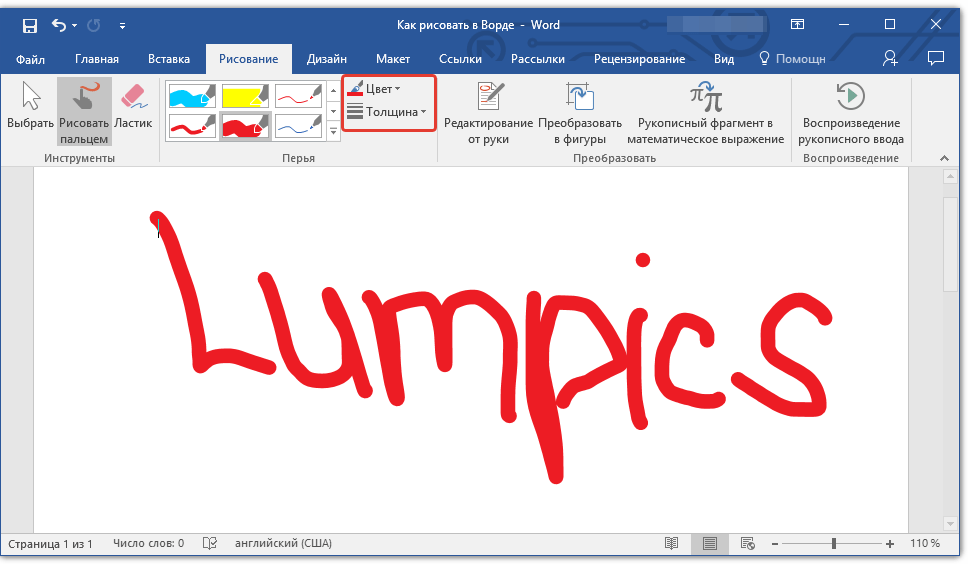
Рядом с окном стилей расположены инструменты «Цвет» и «Толщина», позволяющие выбрать цвет и толщину пера, соответственно.
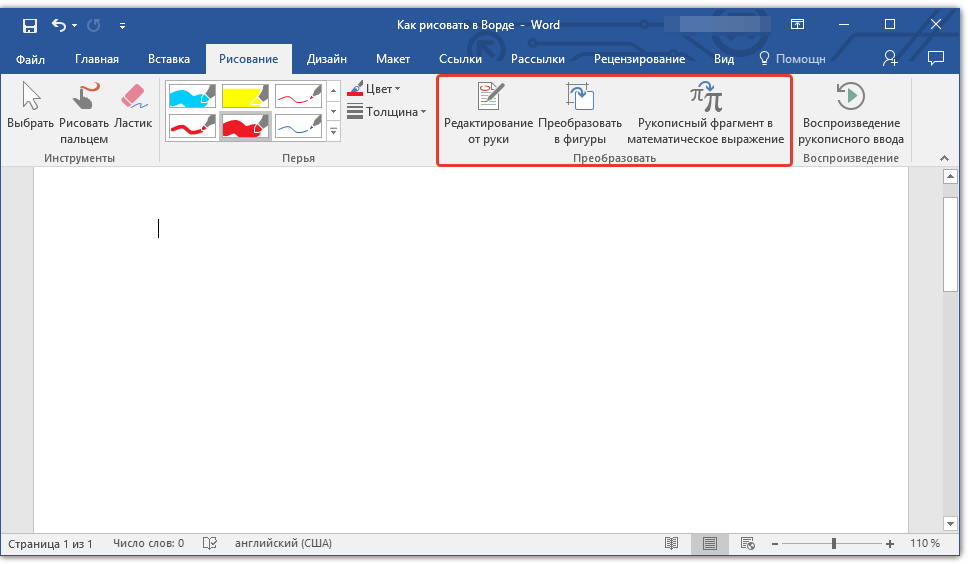
Преобразовать
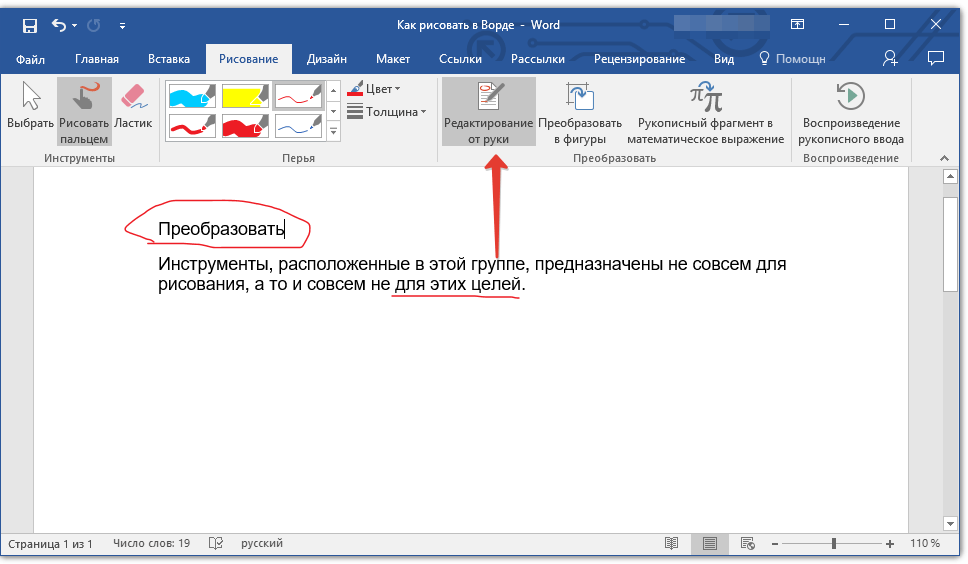
Инструменты, расположенные в этой группе, предназначены не совсем для рисования, а то и вовсе не для этих целей.
Редактирование от руки: позволяет выполнять редактирование документов с помощью пера. Используя этот инструмент, можно вручную обводить фрагменты текста, подчеркивать слова и фразы, указывать на ошибки, рисовать указательные стрелки и т.д.
Урок: Рецензирование текста в Word
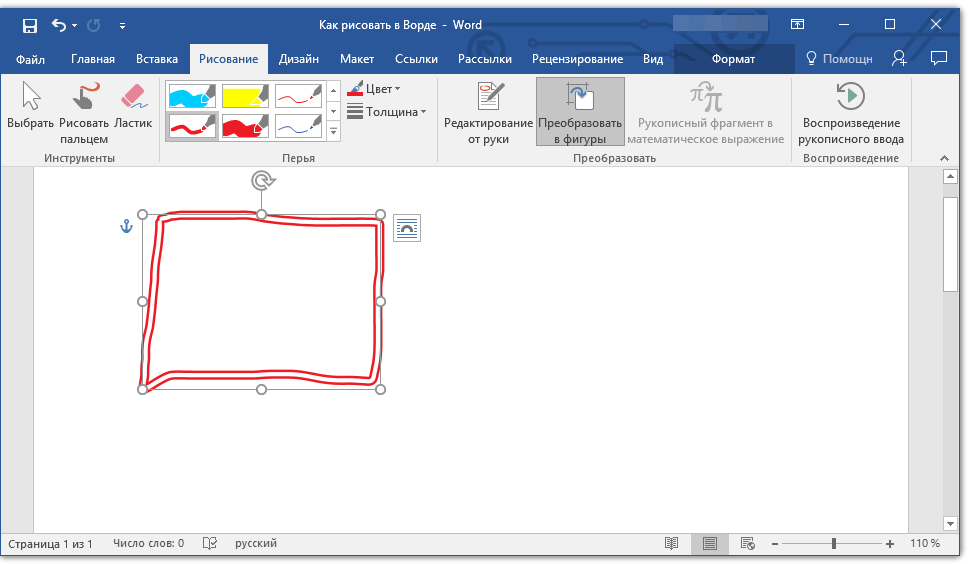
Преобразовать в фигуры: сделав набросок какой-либо фигуры, вы можете преобразовать ее из рисунка в объект, который можно будет перемещать по странице, можно будет изменять его размер и выполнять все те манипуляции, которые применимы для других рисованых фигур.
Для преобразования наброска в фигуру (объект) необходимо просто указать на нарисованный элемент, воспользовавшись инструментом «Выбрать», а затем нажать кнопку «Преобразовать в фигуры».
Урок: Как сгруппировать фигуры в Ворде
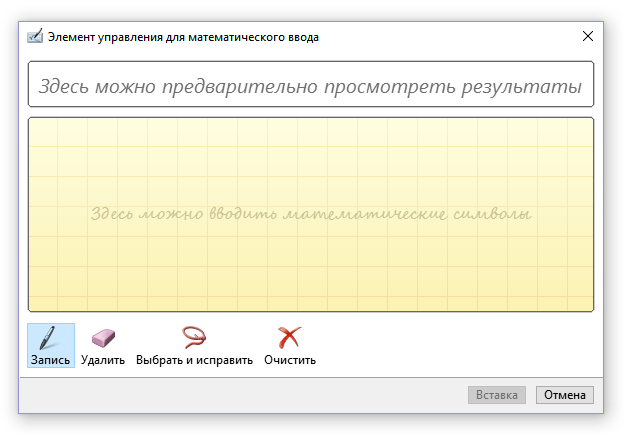
Рукописный фрагмент в математическом выражении: мы уже писали о том, как добавлять математические формулы и уравнения в Word. С помощью данного инструмента группы «Преобразовать» вы можете вписать в эту формулу символ или знак, которого нет в стандартном наборе программы.
Урок: Вставка уравнений в Ворде
Воспроизведение
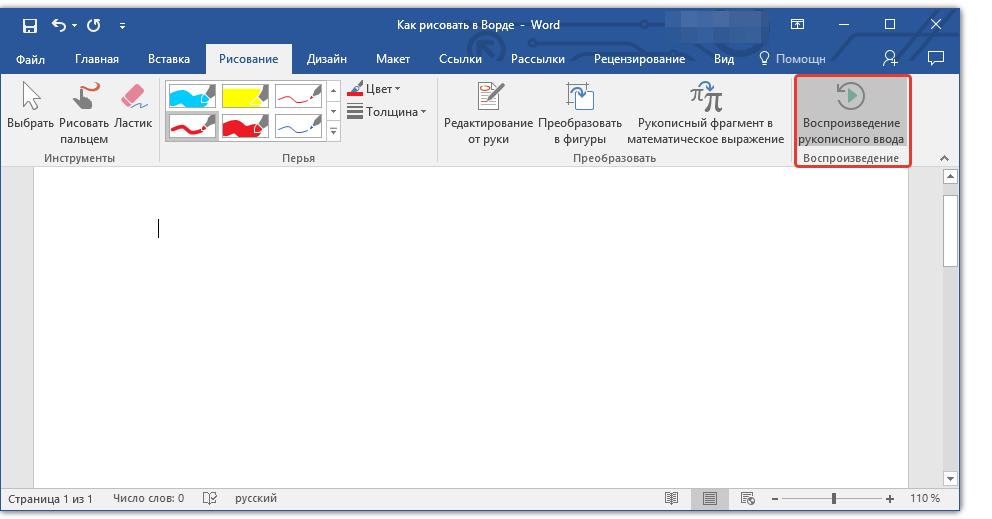
Нарисовав или написав что-то с помощью пера, вы можете включить визуальное воспроизведение этого процесса. Все, что для этого требуется, нажать кнопку «Воспроизведение рукописного ввода», расположенную в группе «Воспроизведение» на панели быстрого доступа.
Собственно, на этом можно было бы и закончить, так как мы с вами рассмотрели все инструменты и возможности вкладки «Рисование» программы Microsoft Word. Вот только рисовать в этом редакторе можно не только от руки, но и по шаблонам, то есть, используя для этого готовые фигуры и объекты.
С одной стороны такой подход может оказаться ограниченным в плане возможностей, с другой стороны — он предоставляет куда более широкий выбор средств для редактирования и оформления создаваемых рисунков. Более подробно о том, как в Ворде рисовать фигуры и рисовать с помощью фигур, читайте ниже.
Рисование с помощью фигур
Создать рисунок произвольной формы, со скруглениями, пестрыми цветами с плавными переходами, оттенками и прочими деталями этим методом практически невозможно. Правда, зачастую столь серьезный подход и не требуется. Проще говоря, не выдвигайте к Word высокие требования — это не графический редактор.
Урок: Как в Ворде нарисовать стрелку
Добавление области для рисования
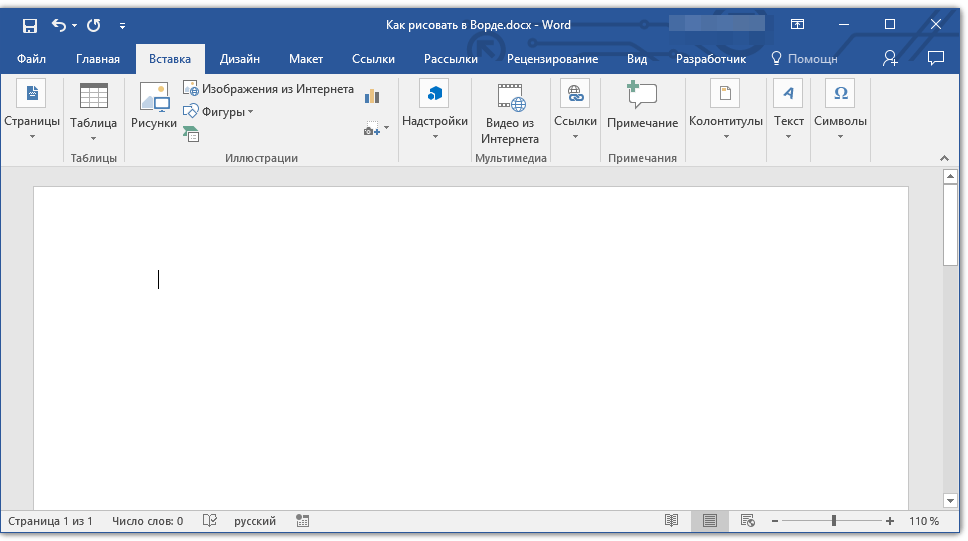
1. Откройте документ, в котором нужно сделать рисунок, и перейдите во вкладку «Вставка».
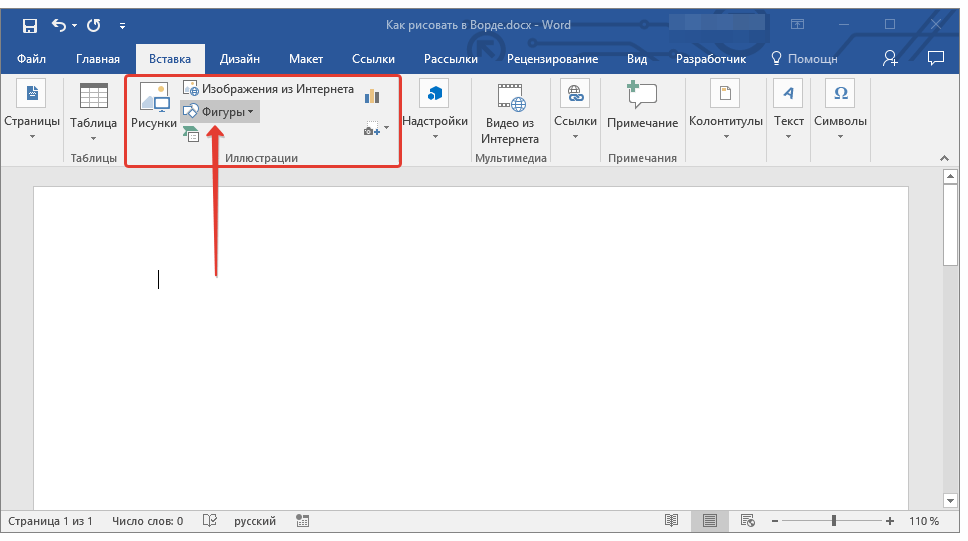
2. В группе иллюстрации нажмите на кнопку «Фигуры».
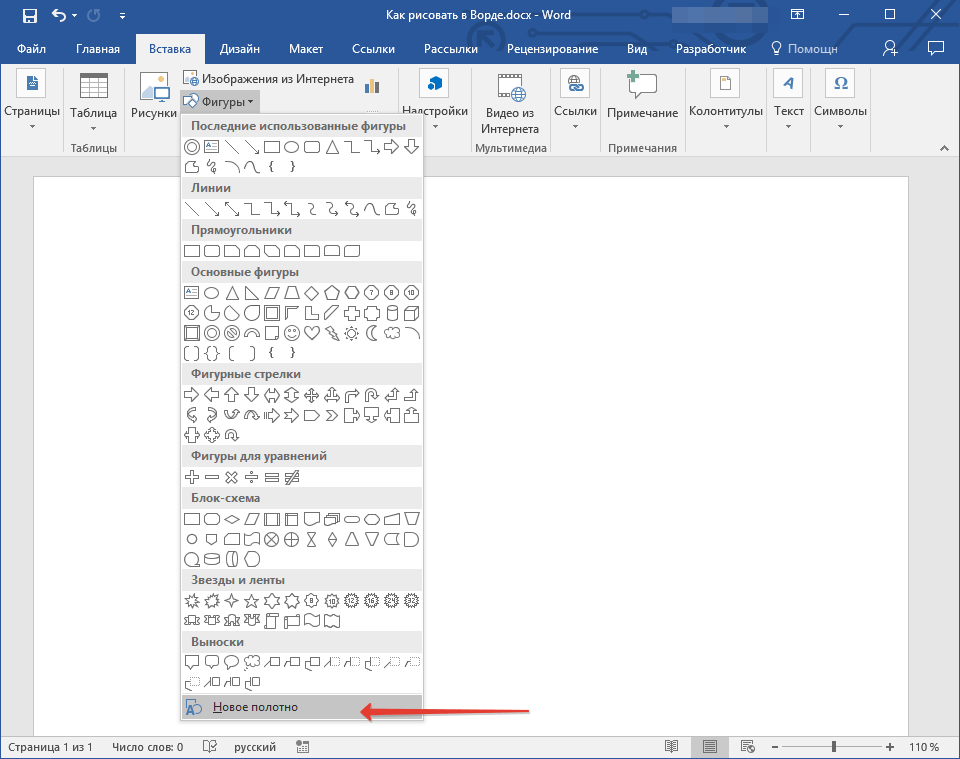
3. В выпадающем меню с доступными фигурами выберите последний пункт: «Новое полотно».
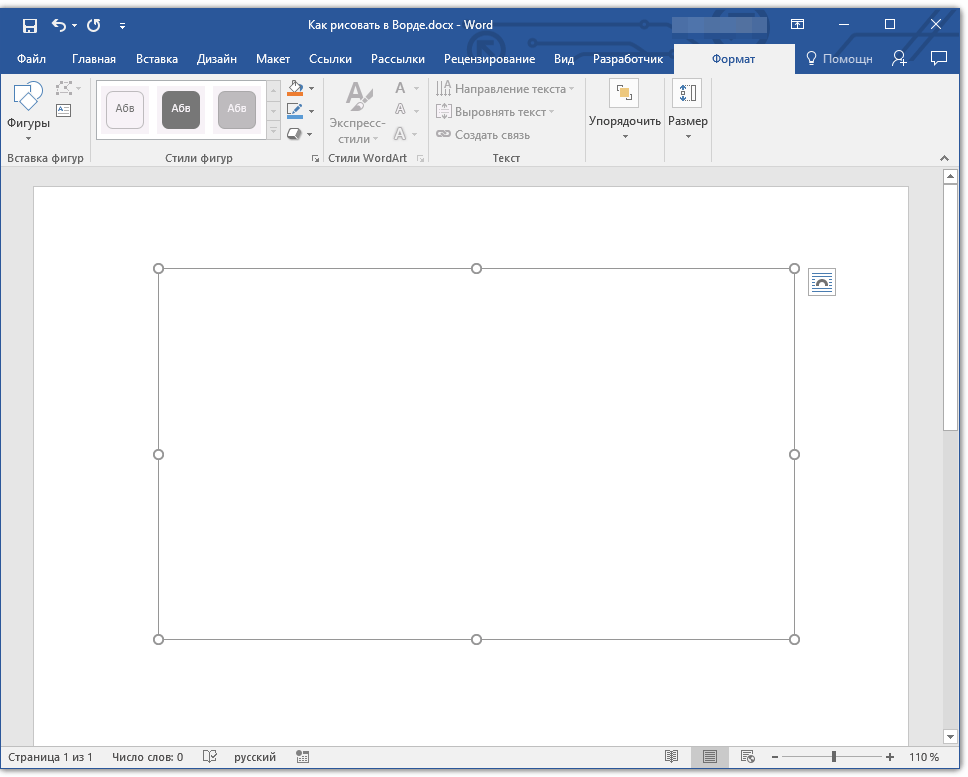
4. На странице появится прямоугольная область, в которой и можно начать рисовать.
Если это необходимо, измените размеры поля для рисования. Для этого потяните в нужном направлении за один из маркеров, расположенных на его границе.
Инструменты для рисования
Сразу после добавления нового полотна на страницу, в документе откроется вкладка «Формат», в которой и будут находиться основные инструменты для рисования. Рассмотрим детально каждую из групп, представленных на панели быстрого доступа.
Вставка фигур
«Фигуры» — нажав на эту кнопку, вы увидите большой перечень фигур, которые можно добавить на страницу. Все они разделены по тематическим группам, название каждой из которых говорит само за себя. Здесь вы найдете:
- Линии;
- Прямоугольники;
- Основные фигуры;
- Фигурные стрелки;
- Фигуры для уравнений;
- Блок-схемы;
- Звезды;
- Выноски.
Выберите подходящий тип фигуры и нарисуйте ее, задав левым кликом мышки точку начала. Не отпуская кнопку, укажите конечную точку фигуры (если это прямая) или область, которую она должна занимать. После этого отпустите левую кнопку мышки.
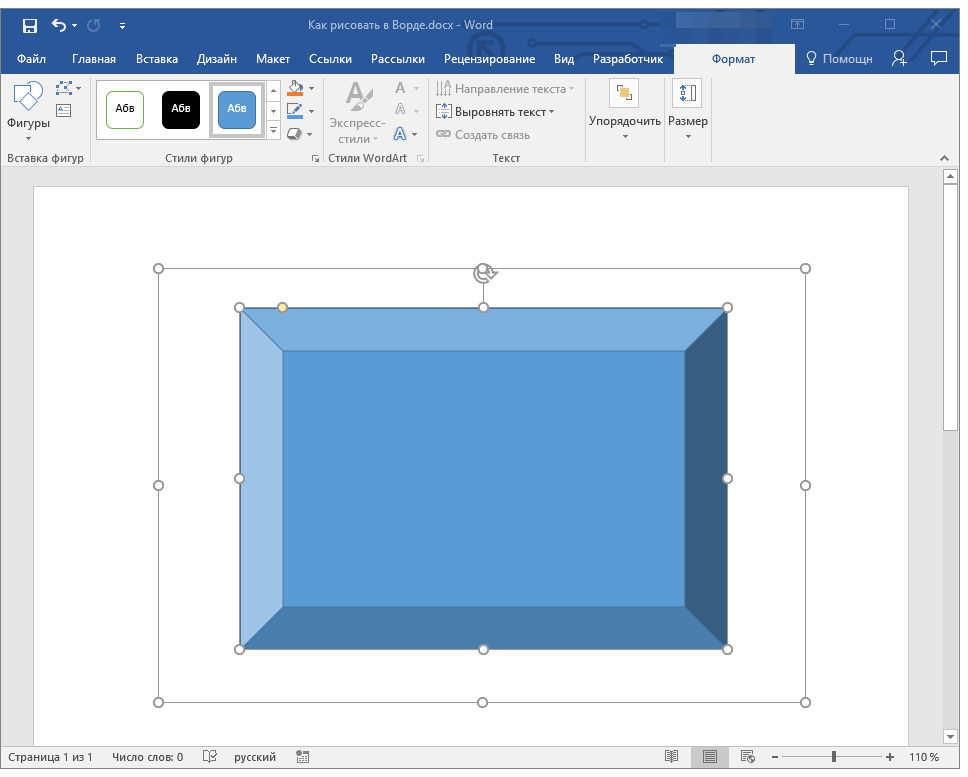
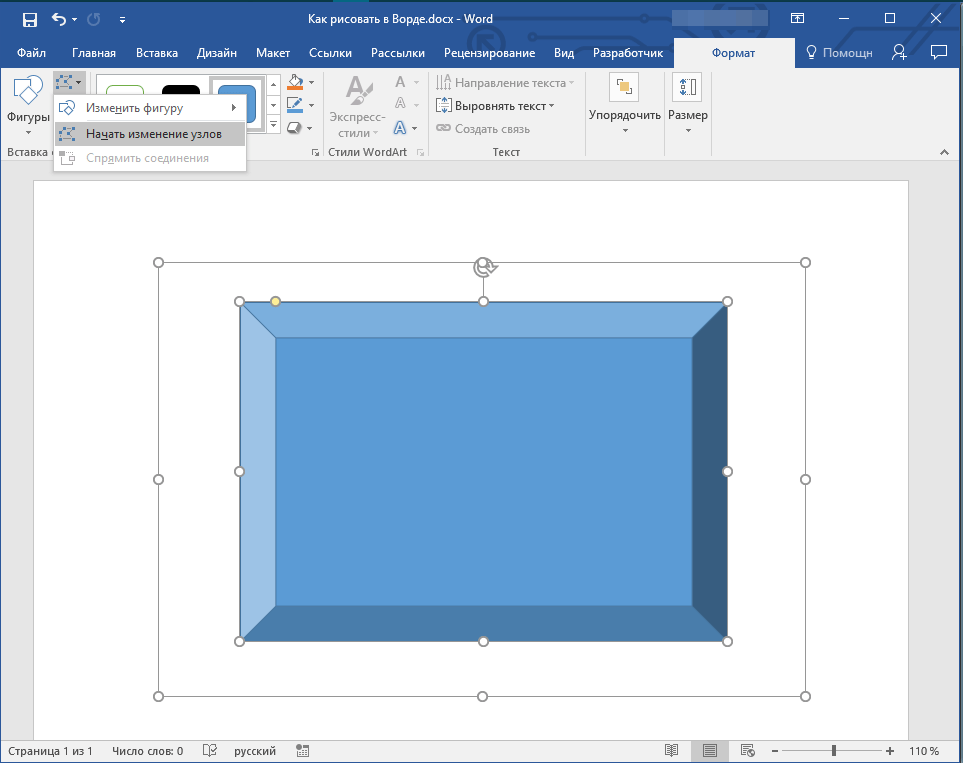
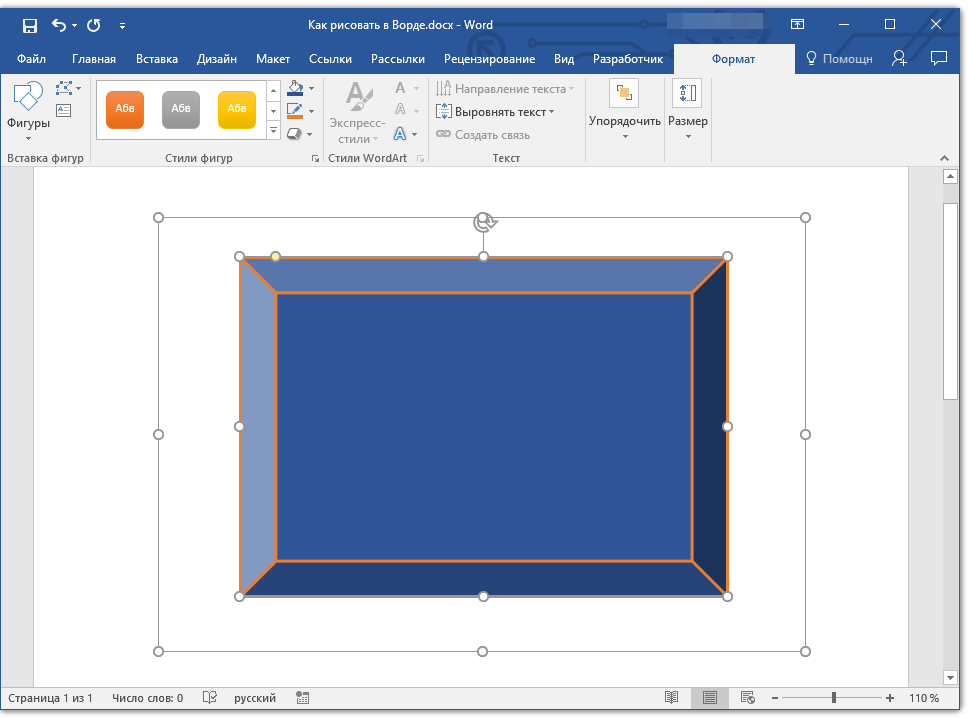
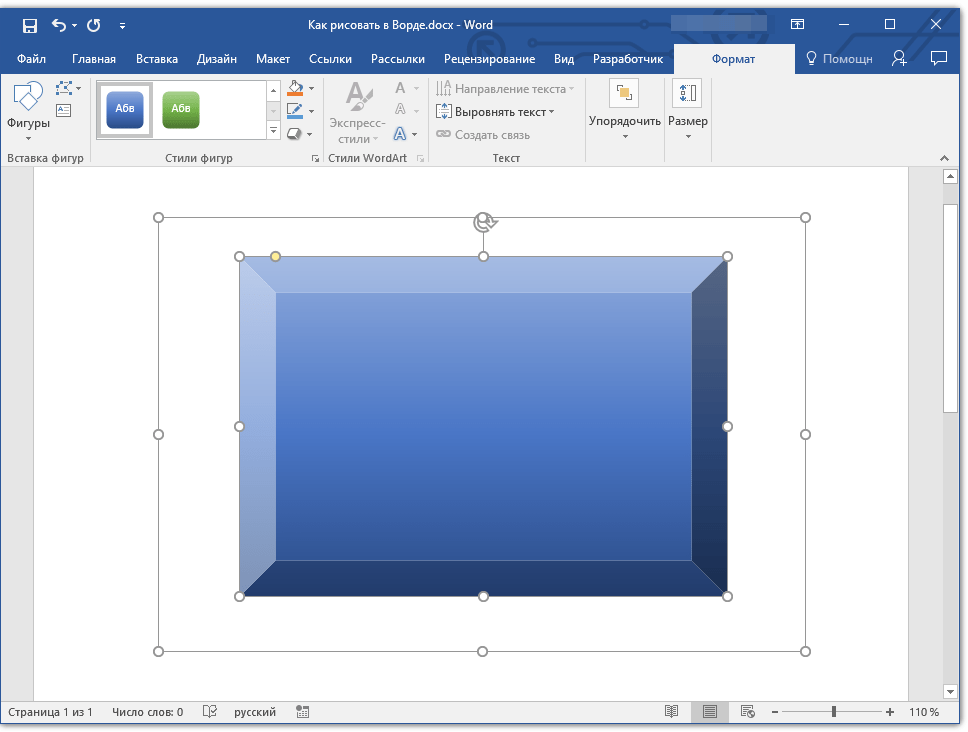
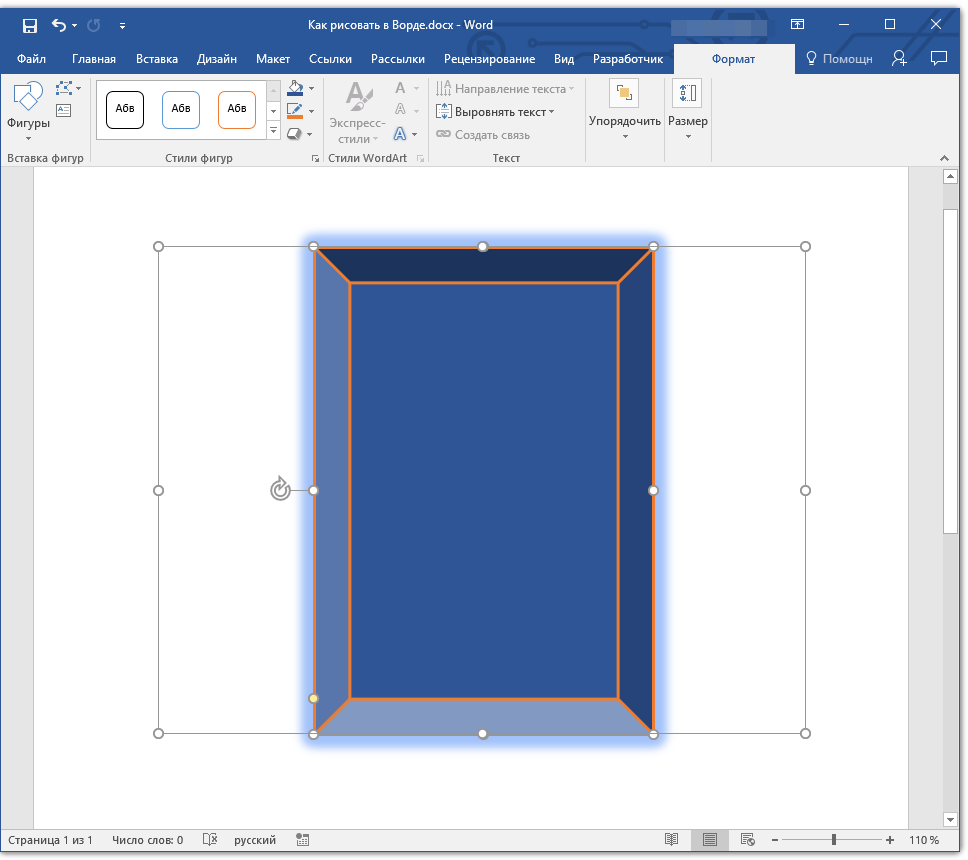
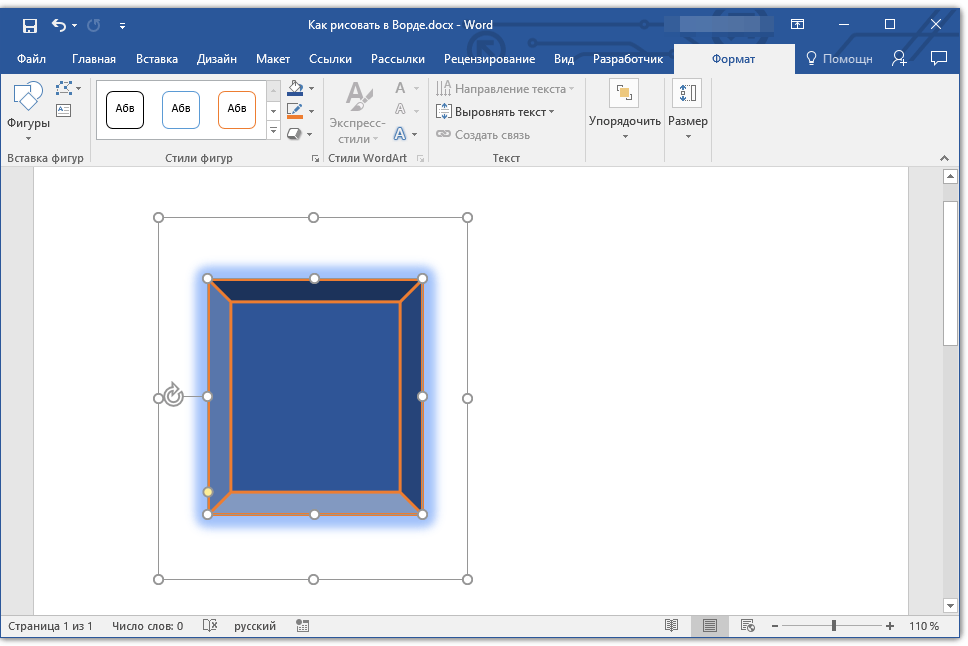
«Изменить фигуру» — выбрав первый пункт в меню этой кнопки, вы можете, в буквальном смысле, изменить фигуру, то есть, вместо одной нарисовать другую. Второй пункт в меню этой кнопки — «Начать изменение узлов». Выбрав его, вы можете изменить узлы, то есть, точки привязки конкретных мест фигуры (в нашем примере это внешние и внутренние углы прямоугольника.
«Добавить надпись» — эта кнопка позволяет добавить текстовое поле и вписать в него текст. Поле добавляется в указанном вами месте, однако, при необходимости его можно свободно перемещать по странице. Рекомендуем предварительно сделать поле и его грани прозрачными. Более подробно о том, как работать с текстовым полем и что можно сделать с его помощью, вы можете прочесть в нашей статье.
Урок: Как в Word перевернуть текст
Стили фигур
С помощью инструментов данной группы вы можете изменить внешний вид нарисованной фигуры, ее стиль, текстуру.
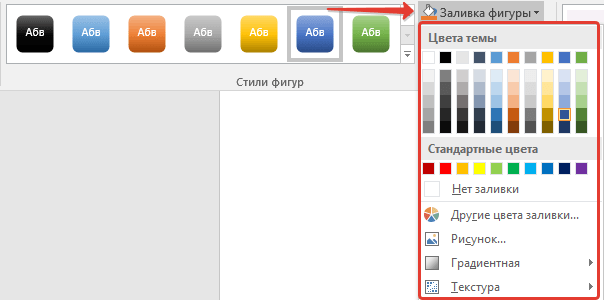
Выбрав подходящий вариант, вы можете изменить цвет контура фигуры и цвет заливки.
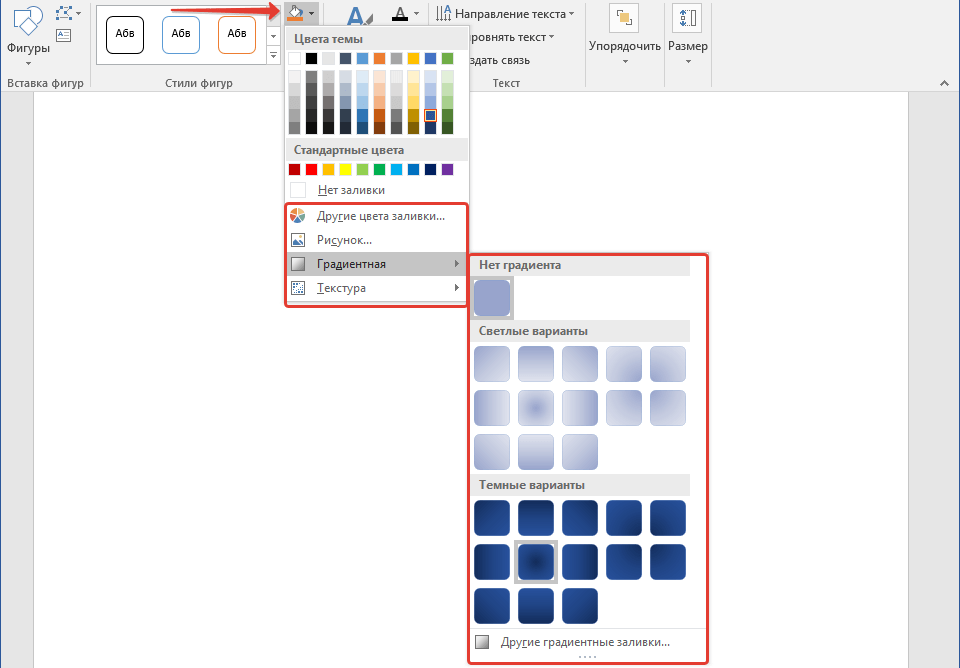
Для этого выберите подходящие цвета в выпадающем меню кнопок «Заливка фигуры» и «Контур фигуры», которые расположены справа от окна с шаблонными стилями фигур.
Примечание: Если стандартные цвета вас не устраивают, вы можете изменить их с помощью параметра «Другие цвета». Также, в качестве цвета заливки можно выбрать градиент или текстуру. В меню кнопки «Цвет контура» можно регулировать толщину линии.
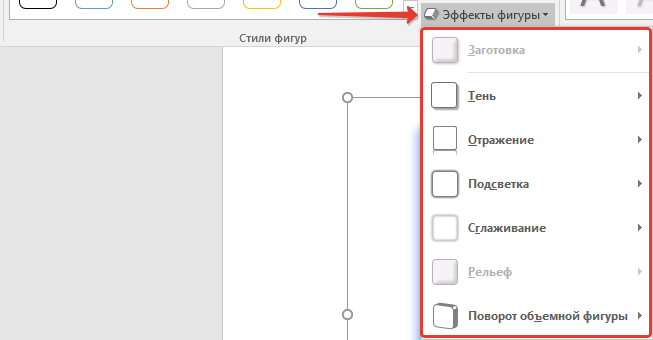
«Эффекты фигуры» — это инструмент, с помощью которого можно еще больше изменить внешний вид фигуры, выбрав один из предложенных эффектов. В числе таковых:
- Тень;
- Отражение;
- Подсветка;
- Сглаживание;
- Рельеф;
- Поворот.
Примечание: Параметр «Поворот» доступен только для объемных фигур, некоторые эффекты из вышеперечисленных разделов тоже доступны только для фигур определенного типа.
Стили WordArt
Эффекты из данного раздела применяются исключительно к тексту, добавленнуму с помощью кнопки «Добавление надписи», расположенной в группе «Вставка фигуры».
Текст
Аналогично стилям WordArt, эффекты применяются исключительно к тексту.
Упорядочить
Инструменты этой группы предназначены для изменения положения фигуры, ее выравнивания, поворота и других подобных манипуляций.
Поворот фигуры выполняется точно так же, как и поворот рисунка — на шаблонное, строго заданное или произвольное значение. То есть, можно выбрать стандартный угол поворота, указать свой или просто повернуть фигуру, потянув за круговую стрелку, расположенную непосредственно над ней.
Урок: Как в Ворд повернуть рисунок
Кроме того, с помощью данного раздела можно наложить одну фигуру на другую, подобно тому, как это можно сделать с рисунками.
Урок: Как в Word наложить одну картинку на другую
В этом же разделе можно сделать обтекание фигуры текстом или сгруппировать две и более фигур.
Уроки по работе с Ворд:
Как сгруппировать фигуры
Обтекание картинки текстом
Примечание: Инструменты группы «Упорядочить» в случае работы с фигурами абсолютно идентичны таковыми при работе с рисунками, с их помощью можно выполнять ровно такие же манипуляции.
Размер
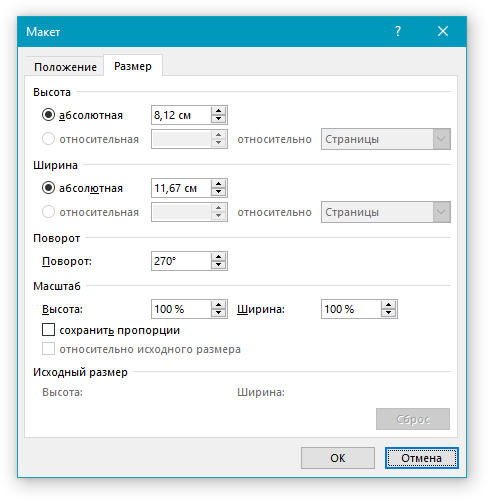
Возможность единого инструмента данной группы всего одна — изменение размера фигуры и поля, в котором она находиться. Здесь можно задать точное значение ширины и высоты в сантиметрах или изменить его пошагово с помощью стрелок.
Кроме того, размер поля, как и размер фигуры, можно менять вручную, используя для этого маркеры, расположенные по контуру их границ.
Урок: Как обрезать рисунок в Word
Примечание: Для выхода из режима рисования нажмите клавишу «ESC» или же кликните левой кнопкой мышки в пустом месте документа. Чтобы вернуться к редактированию и открыть вкладку «Формат», дважды кликните по рисунку/фигуре.
Вот, собственно, и все, из этой статьи вы узнали, как рисовать в Ворде. Не забывайте о том, что данная программа является в первую очередь текстовым редактором, поэтому не стоит возлагать на нее слишком серьезных задач. Используйте для таких целей профильный софт — графические редакторы.
Hi, welcome back to a new tutorial. Today, we will learn how to draw in Microsoft Word. Microsoft Word is a widely used word-processing software that is commonly associated with typing and formatting text documents. since Google Docs has its built-in drawing feature, now Microsoft is also in the ground and has launched its new Draw feature within the Word application. Many people are not aware that Microsoft Word can also be used for drawing and creating simple illustrations.
Drawing on Microsoft Word is a useful skill to have for creating diagrams, flowcharts, or other visual aids for your documents. In this article, we will provide a step-by-step guide on how to draw on Microsoft Word using its built-in Shapes feature and Draw Menu. Whether you are a student, a professional, or simply looking to add some creativity to your documents, this guide will help you get started with drawing on Microsoft Word.
Importance of using drawing tool on Microsoft Word
Drawing on Microsoft Word is a useful skill to have if you frequently create documents that require visual elements, such as diagrams or flowcharts. Instead of having to switch to a separate drawing program, you can create these elements directly in Word, saving you time and effort.
Adding visual elements to a document can make it more engaging and easier to understand. By learning how to draw on Microsoft Word, you can create eye-catching graphics that help to convey your message more effectively.
Learning how to draw on Microsoft Word can also be helpful in a professional setting. If you work in a field that requires creating presentations or reports, knowing how to create custom graphics in Word can set you apart from others who only use pre-made templates.
Even if you don’t have a specific need for drawing on Microsoft Word, it’s still a valuable skill to have in your arsenal. Being able to create simple graphics quickly and easily can be helpful in many situations, from creating flyers for a local event to designing a personalized card for a loved one.
Learning how to draw on Microsoft Word can help you to create more engaging and effective documents, while also giving you a valuable skill that can come in handy in many different situations.
How to Draw on Microsoft Word?
This guide is mainly divided into two main parts, first, we will see the drawing tool from the shapes, and then we will learn something that is recently added. The entire new Draw menu is inside the Microsoft Word main menu ribbon. So, let’s get started with the first method.
Draw on Microsoft Word – Using Shape
In this section, we will learn how to draw on Microsoft word using shapes. The shapes are a very traditional tool inside Microsoft word and have a lot of shapes inside it, we have a drawing tool as well inside this bunch which can be used as a pen tool to draw on our document. Let’s see it in detail with some examples for practical understanding.
Step 1
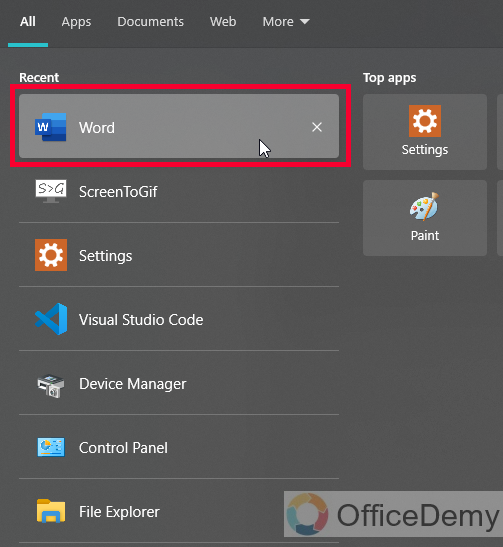
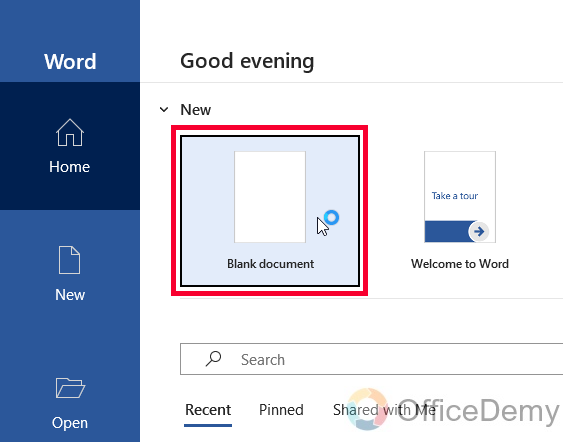
Open Microsoft Word and create a new document
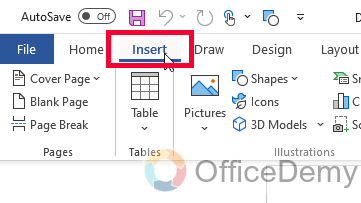
Step 2
Click on the Insert tab at the top of the screen
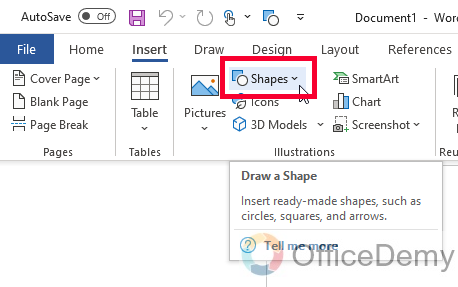
Step 3
Click on the “Shapes” button, which is in the “Illustrations” section of the ribbon
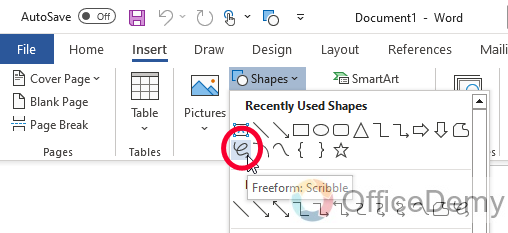
Step 4
Select the “Freeform: Scribble” shape, which is in the Lines section of the drop-down menu
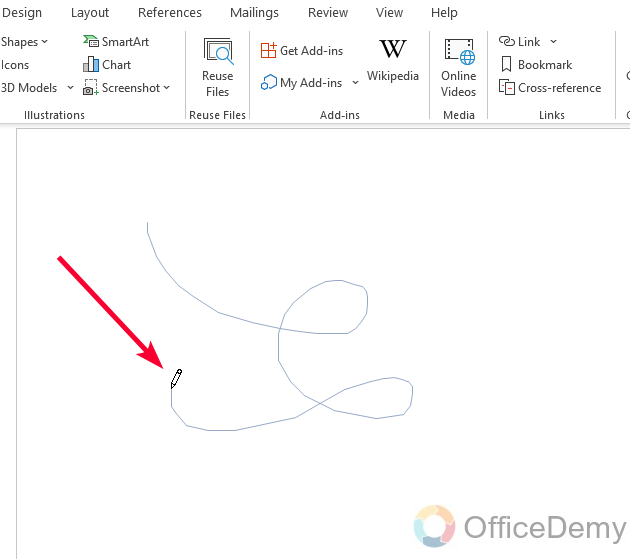
Step 5
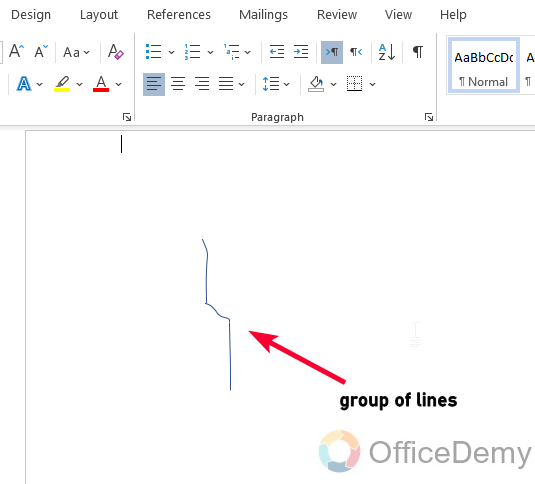
Click and drag your mouse to draw a line or shape on your document.
Step 6
To create a curved line, simply draw a series of short, straight lines close together to create the curve
Step 7
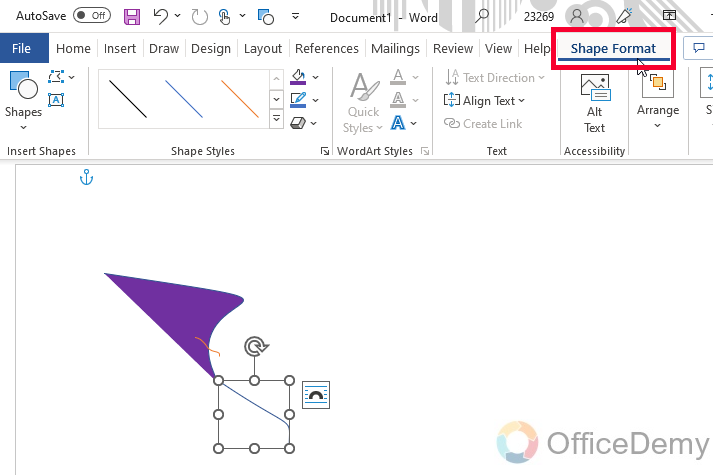
To switch to a different color or line style, click on the “Format” tab in the ribbon. You can select from a variety of colors, line thicknesses, and line styles to customize your drawing
Step 8
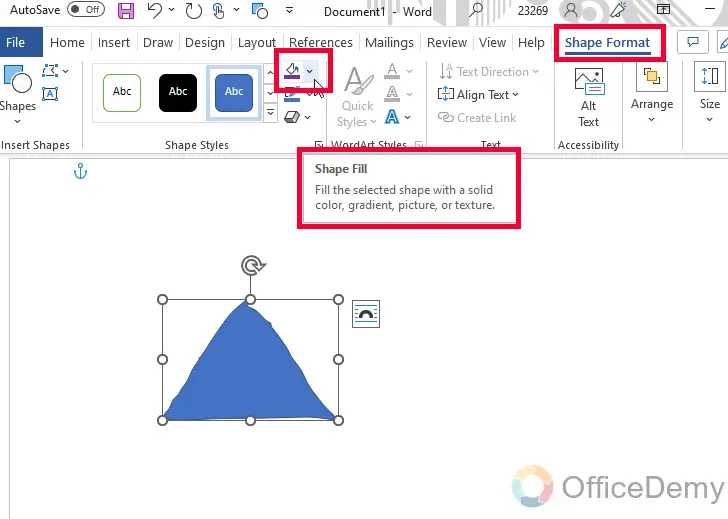
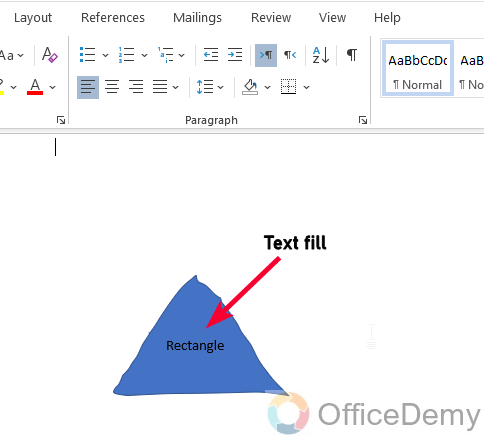
To draw a closed shape, such as a rectangle or triangle, draw the shape as normal, and then click on the “Shape Fill” button in the “Format” tab.
Select a color to fill the shape with
Step 9
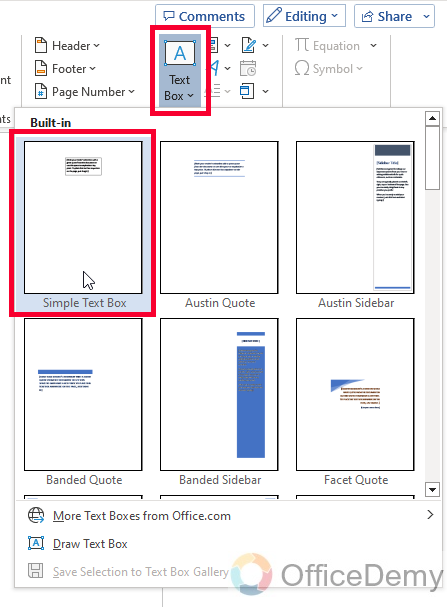
To add text to your drawing, click on the “Insert” tab, and then click on the “Text Box” button.
Step 10
Click and drag your mouse to draw a text box on your document, and then type in your text
Step 11
To move or resize your drawing, click on it and then use the sizing handles that appear.
Tip: You can also use the arrow keys on your keyboard to adjust the drawing position
Step 12
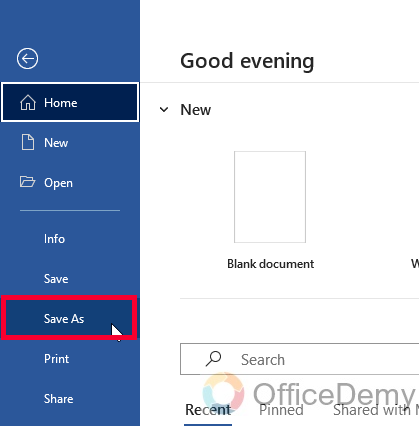
To save your drawing, click on the File tab and then select “Save As”
Step 13
Choose a file name and location, and then click “Save” in your desired directory.
That’s all.
Draw on Microsoft Word – Using Draw Menu
We also have another and more advanced method to draw on Microsoft word and it’s the whole new Draw menu in the main menu.
Step 1
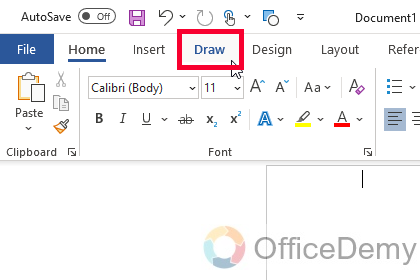
Click on the “Draw” tab in the main menu at the top of the screen
Step 2
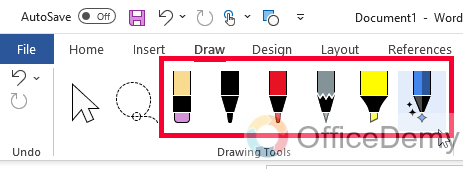
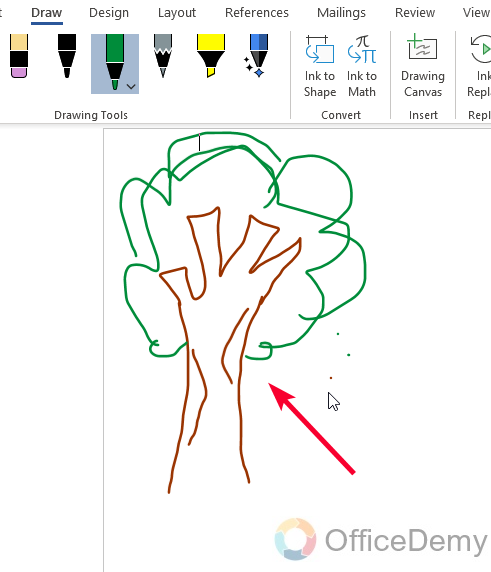
Click on any of the given drawing tools depending on the type of drawing you want to create.
Step 3
Click and drag your mouse to draw on your document.
Step 4
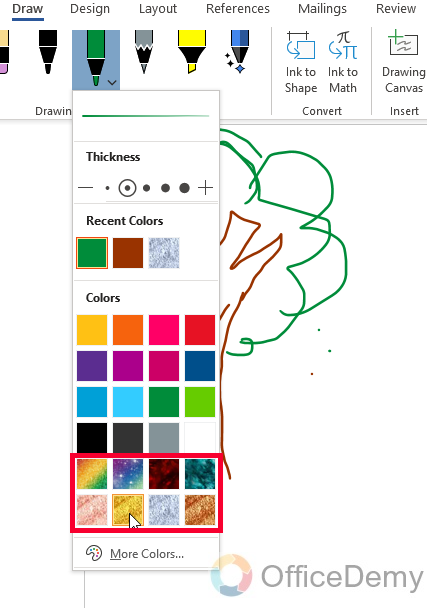
To change the tool color, simply click on the dropdown at the selected tool and then pick your color
Step 5
You can also use some backgrounds as your color.
Step 6
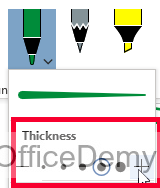
To increase or decrease the brush size you can use the range meter inside the color box
Step 7
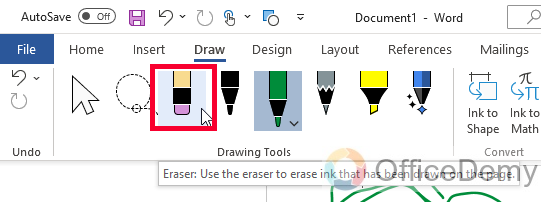
You can also select the “Eraser” button to remove any mistakes you make. (Or simply press Ctrl + Z to undo)
Step 8
To move or resize your design on your page, you have “Select” and “Lasso Select” options
Note: I will recommend using Lasso select, it’s very accurate.
This is how Lasso Select works.
Experiment with the Draw menu as much as you want to master it. The above guide is only an overview of this newly added feature, you can explore it more by practicing.
I hope you find this article helpful.
Frequently Asked Questions
Can I use a digital pen to draw in Microsoft Word?
Yes, you can use a stylus or digital pen to draw in Microsoft Word. This can make it easier to draw precise lines and shapes.
Can I create complex drawings in Microsoft Word?
While Microsoft Word has some basic drawing tools, it is not a professional drawing program. You may find it difficult to create complex or detailed drawings using Word. But, it’s very good for simple designs mainly for educational purposes.
How to add color to my drawings in Microsoft Word?
You can add color to your drawings in Microsoft Word by selecting a colored pen or brush, or by using the “Shape Fill” option to fill in shapes with color.
How to erase mistakes in my drawing in Microsoft Word?
You can use the eraser tool or the undo button to erase mistakes in your drawing in Microsoft Word (Ctrl + Z is the universal undo shortcut key)
Conclusion
That’s all about how to draw on Microsoft word, we learned two good methods that are enough to draw anything on Microsoft word. I hope you find this guide helpful and now you don’t need any external software or tool to make quick diagrams and illustrations in your document. Thanks for reading this guide. Keep learning with Office Demy.
Last Update: Jan 03, 2023
This is a question our experts keep getting from time to time. Now, we have got the complete detailed explanation and answer for everyone, who is interested!
Asked by: Lillian Bergnaum
Score: 4.8/5
(17 votes)
You can draw freely in Microsoft Word using the «Draw» feature whether you have Word for Mac or Windows. You can also insert customizable shapes into your document, or draw using the «Scribble» feature.
Can you draw freehand in Word?
There are two sets of drawing tools available to Microsoft Word users. If you want to draw basic, block-like images, you can insert shapes or lines into your Word document and group them together. … To insert shapes, you’ll need to press the Insert tab on the ribbon bar. For freehand drawings, press the Draw tab instead.
How do I insert a draw in Word?
Adding the Draw tab to the Ribbon
- Right-click the Ribbon and select Customize the Ribbon.
- Check the box next to Draw, then click OK.
- The Draw tab will now be available in the Ribbon.
Is there a pen tool in Word?
On the Draw tab of the Ribbon, tap a pen to select it. In Word, you must be in Print layout to draw with ink. If the Draw tab is grayed out so that you can’t select a pen, go the View tab and select Print Layout. ; then you can select a pen to draw with.
How do I draw in Word 2020?
How to draw in Word
- Click the ‘Shapes’ button and select ‘Scribble’ Open up your Microsoft Word document. …
- Hold down your mouse to draw. Click and hold down your mouse to draw. …
- Release the mouse. As soon as you release your mouse, the drawing will be finished. …
- Edit your drawing. Double-click your drawing.
41 related questions found
How do I draw in Word 2021?
How to draw on Microsoft Word using default tools
- Open an existing document or create a blank document in Word.
- Click on the «Insert» tab, then select «Shapes.» …
- You’ll be shown a long list of shapes you can add to your document. …
- Once you’ve selected the «Scribble» icon, your cursor will turn into a crosshair.
Why is draw disabled in Word?
In Word, you must be in Print layout to draw with ink. If the Draw tab is grayed out so that you can’t select a pen, go the View tab and select Print Layout. Tap again to open the menu of Thickness and Color options for the pen. Select your preferred size and color.
How can I make a signature in Word?
Insert a signature line
- Click where you want the line.
- Click Insert > Signature Line.
- Click Microsoft Office Signature Line.
- In the Signature Setup box, you can type a name in the Suggested signerbox. You can also add a title in the Suggested signer’s title box.
- Click OK. The signature line appears in your document.
Which tool is used to draw curved lines?
The curved line drawing tool is used to create curved or straight lines. The curved line tool provides greater control over the shape of a polyline than the straight line tool (see Drawing With the Straight Line Tool).
What is the best signature font in Word?
The best Microsoft Word cursive font is something that is going to vary based on personal preference, so it’s hard to consider any specific font as the “best” one.
…
Some Default Microsoft Word Cursive Fonts
- Segoe Script.
- Lucida Handwriting.
- Edwardian Script.
- Kunstler Script.
How can I make my signature?
Your signature should be easy to write and reproduce. It should feel good coming off of your hand, and it should be simple enough that you can dash it off in a matter of seconds. Your signature should suit your purpose and personality. If you want to show your dramatic side, use a signature with flair.
How do I create an electronic signature in Word for Mac?
On the Insert menu, click AutoText > New. The Create New AutoText box opens. Next to Name, type a name for your signature block and click OK. When you want to use this signature, place the insertion point where you want to insert the signature block.
Where is Print Layout in Word?
Click the view icons in the bottom-right corner of your document window. The only view icons in the bottom-right corner of the document window are Read Mode, Print Layout, and web Layout. Click the View tab and then click the view you want to use, such as Print Layout or Draft view.
How do you draw free in Word?
Draw or edit a freeform shape
- On the Insert tab, in the Illustrations group, click Shapes.
- Under Lines, do one of the following: To draw a shape that has both curved and straight segments, click Freeform . …
- Click anywhere in the document, and then drag to draw. …
- To finish drawing the shape, do one of the following:
How do I draw in Word 365?
Add a drawing to a document
- Click in your document where you want to create the drawing.
- On the Insert tab, in the Illustrations group, click Shapes.
- When you find the shape you want to insert, double-click to insert it automatically, or click and drag to draw it in your document.
How do I convert text to ink in Word?
To convert handwriting to text, do the following:
- On the Draw tab, choose the Lasso Select button.
- On the page, drag a selection over the handwriting you want to convert.
- On the Draw tab, choose Ink to Text.
How do you draw a line in Microsoft Word 2010?
Draw a line without connection points
- On the Insert tab, in the Illustrations group, click Shapes.
- Under Lines, click any line style you like.
- Click one location in the document, hold and drag your pointer to a different location, and then release the mouse button.
How do I draw a parallel line in Word?
1 — Draw two parallel lines from the insert > shapes palette. Format them as you wish then select both and save as an autotext entry (Alt+F3) or formatted autocorrect erntry. 2. Draw two lines format them as you wish, then drag one to the end of the other.
How do you draw a straight arrow in Word?
On the “Insert” tab on the Ribbon, click the “Shapes” button. In the Lines group on the drop-down menu, click the “Line Arrow” option. A crosshair symbol will display. Press and hold your mouse button, then drag to draw the arrow.
While Microsoft Word isn’t the best drawing tool, you can create basic drawings or scribbles in Word directly. Here’s how.
Microsoft Word isn’t essential software for graphics designers, and for a good reason. It’s true—Microsoft Word isn’t best suited for drawing, but it does have some built-in drawing tools you can use, should you need to.
For simple drawings, you can draw in Word directly using shapes, lines, or pen tools. If you want to draw in Microsoft Word, here’s what you’ll need to do.
These instructions have been designed with Microsoft Office 2019 in mind. Note that Microsoft 365 (formerly O365) is the Office suite with 1 TB of OneDrive per user. While the steps may work for older versions of Word, there may be some variations or missing features.
Using Microsoft Word Drawing Tools
There are two sets of drawing tools available to Microsoft Word users. If you want to draw basic, block-like images, you can insert shapes or lines into your Word document and group them together. You might want to do this if you’re creating a diagram or flow chart, for instance.
Alternatively, you can turn Word into your own personal canvas using pen drawing tools. If you have a touchscreen device or a graphics tablet, you can create freehand drawings.
To insert shapes, you’ll need to press the Insert tab on the ribbon bar. For freehand drawings, press the Draw tab instead.
Inserting Shapes into Microsoft Word
If you’re not confident of your freehand drawing ability, or you want to create diagrams in Word, you can insert shapes.
There are hundreds of pre-set shapes available. You can draw typical shapes like squares or circles or insert arrows, stars, speech bubbles, and more. To insert a shape, press the Insert tab on the ribbon bar, then press the Shapes button.
This will list the various shape options in a drop-down menu for you to choose from.
Press on one of the pre-set shapes or line options to select it—your cursor will change at this point.
Once this happens, draw onto your Word document directly to insert the shape or line you selected. This allows you to select the appropriate size for your shape.
With the shape inserted and selected, Word will switch to the Format tab on the ribbon bar. From here, you can format your shape.
For instance, add text to your shape and begin typing with the shape selected–the text will be inserted inside the shape.
You can also change the color and style of your shape, as well as the position and alignment of any inserted text, using the options listed in the Format tab.
Creating Freehand Drawings in Word
If you want to create more original Word drawings, you can use various pen drawing tools to draw onto a Word document. You can do this using a mouse or trackpad, or more precisely, using a touchscreen device or graphics tablet.
To start, press the Draw tab on the ribbon bar. This will display the pen drawing tool options for you to use.
Three drawing options are available under the Tools section. Press Draw with Touch to begin drawing with one of the pen tools, Eraser to switch to the eraser tool, or Select to select your drawings as objects to move, copy, or delete them.
A list of available pens to draw with is shown under the Pens category. There are three drawing pens available—Pencil, Pen, and Highlighter.
As you’d expect, using the Pencil tool inserts a finer, less precise drawing line to your document. The Pen tool is the opposite—lines are clearer, thicker, and more defined. The Highlighter tool can be used for emphasis, adding color to your drawings.
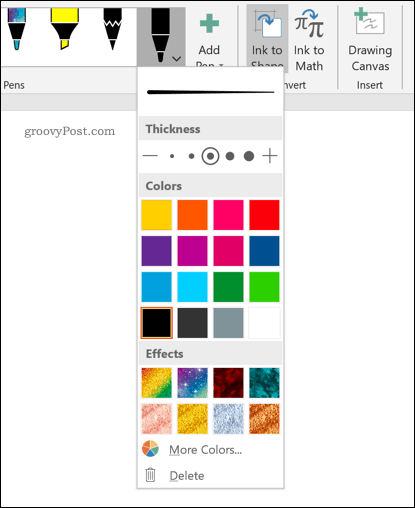
Several pre-set colors and designs are available already in the Pens category—select one of these to begin drawing. Alternatively, you can create your own by pressing the Add Pen button and selecting one of the tools listed in the drop-down menu.
This will add a new pen design to the Pens category, with a settings drop-down menu. From here, you can set the thickness and color of the pen tool, with a preview of the pen design at the top.
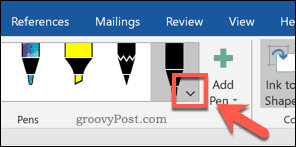
You can edit these in the future by hovering over a pen design and press the arrow icon in the bottom-left corner.
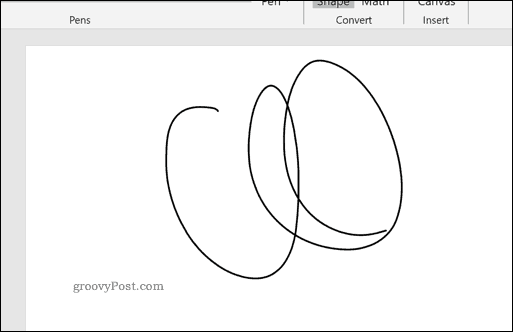
With your drawing pen tool selected and configured, you can begin drawing onto your Word document directly.
Creating a Drawing Canvas in Word
Word allows you to draw onto a Word document without constraints. If you’d prefer to draw onto a much smaller area of your Word document, however, you can insert a drawing canvas.
A drawing canvas groups your drawing into a single object which can then be moved, resized, or copied elsewhere. To do this, press the Drawing Canvas button in the Insert section of the Draw tab.
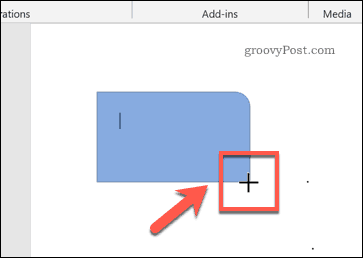
This will insert the canvas into your Word document. You will only be able to draw inside the canvas object’s borders– anything drawn outside of this will be ignored.
Designing Microsoft Word Documents
While it hasn’t been designed with drawing in mind, you can still use shapes, lines, and freehand pen drawings to create simplistic images in Microsoft Word. You can use shapes to create a flow chart or diagram or use free-hand drawings to show your artistic drawing skills.
You can insert and edit images in Microsoft Word too, but don’t forget Word’s main purpose. If you’re designing new documents, you may prefer to use building blocks to help you create them more quickly.
- You can draw freely in Microsoft Word using the «Draw» feature whether you have Word for Mac or Windows.
- You can also insert customizable shapes into your document, or draw using the «Scribble» feature.
- The process of drawing in Word varies based on which version of Word and device you’re using.
If you’ve ever wanted to express an idea visually rather than with words, you can do so in Microsoft Word with the «Draw» feature.
Word lets you create your own custom drawings using the mouse or touch tools. Or, if you’re not the best artist, you can insert pre-set shapes and illustrations that can be customized to your liking. Here’s how to do both in Word.
How to draw on Microsoft Word using touch tools or the mouse
The steps for creating a custom drawing in Word are different depending on what kind of device and what version of Word you have.
If you have a Windows computer with Microsoft 365 or Office 2019:
1. Open an existing document or create a blank document in Word.
2. The «Draw» tab may be already available on your ribbon if you have a touch-enabled device. If «Draw» is not an available tab on your ribbon, you’ll need to add it. To do so, click «File» at the top of your screen, then «Options,» and select «Customize Ribbon.» In the Customize screen, click on «Draw» to add it to the ribbon.
How to draw on Microsoft Word 5, Click on «Draw» under the customize the ribbon Main Tabs menu.
3. Once «Draw» is in the ribbon, click on it.
4. Click on whichever drawing tool you want to use. To change the size or color of the drawing tool, click on it again and select from the dropdown list of options.
5. Use your mouse or trackpad to begin drawing.
How to draw on Microsoft Word 6, Select whichever tool you want to draw freely on your Word document.
If you have a Windows computer with Office 2016 or Office 2013:
1. Open an existing document or create a blank document in Word.
2. In the Word ribbon, click the «Review» tab and choose «Start Inking.»
3. Under «Ink Tools,» select «Pens» and then choose «Pen» again.
4. Choose the ink color and pen thickness you want and begin drawing.
If you have a Mac computer with Microsoft 365 or Office 2019:
Unlike Windows computers, the Draw feature is only available on Macs if you have either Microsoft 365 or Office 2019.
1. Open an existing document or create a blank document in Word.
2. Click the «Draw» tab on the ribbon at the top of Word.
3. You’ll see a list of pens to choose from. Once you’ve clicked on one, click on it again to change the ink color or pen thickness.
4. You can also select «Draw with Trackpad» to use your finger to draw on your trackpad, instead of dragging your cursor to draw.
How to draw on Microsoft Word using default tools
1. Open an existing document or create a blank document in Word.
2. Click on the «Insert» tab, then select «Shapes.»
Ryan Ariano/Business Insider
3. You’ll be shown a long list of shapes you can add to your document. You can pick one of the pre-defined shapes, but if you want to draw, click on the icon that looks like a scribble under the «Lines» header. It’ll be the last option.
Ryan Ariano/Business Insider
4. Once you’ve selected the «Scribble» icon, your cursor will turn into a crosshair. Click and drag your mouse to draw with it, and release the mouse when you’re done. Your drawing will be turned into an image, and you can move or resize it like any other image.
5. Once you’ve added the shape, you can refine it using the tools at the top of the screen. You can adjust the color in «Shape Fill,» adjust the outline of it in «Shape Outline,» or add «Shape Effects» like shadows to the shape.
Ryan Ariano/Business Insider
Related coverage from Tech Reference:
-
How to convert PDFs into Word files and edit them on a Mac computer
-
How to convert a Word document to a Google Doc on desktop or mobile
-
‘Can you get Microsoft Word on an iPad?’: Yes, you can — here’s how to download and set it up
-
How to use the find and replace feature in Microsoft Word on your Mac in 2 different ways
-
How to view, add, or edit alt text on an image in Microsoft Word to help users with screen readers
Ryan Ariano grew up in Baltimore when the Macintosh was cutting edge, lived in Los Angeles as Blackberries gave way to iPhones, and now lives in Jackson Hole where his life is held together by Bluetooth. He writes on a wide range of topics but especially loves nerding out across the tech spectrum.
Learn more about how our team of experts tests and reviews products at Insider here.
Read more
Read less
Microsoft Word offers many features for the benefit of its users. With those amazing options, you can make your word document more eye catchy and compact.
Suppose you want to say something interesting to your recipient but don’t want to express it in words, then creating a drawing can help you. With this drawing feature in MS Word, you can give a visual representation to your viewer.
But many of you don’t know how to add a drawing to your MS Word. Don’t be troubled in this article; I will show the way of adding a drawing in Word. Also, there are some guidance pictures for your aid.
Don’t miss out on anything from this article if you want to increase your MS Word skill.
Let’s start!
Check out our separate post on how to Fix MS Word Problem Sending Command to the Program
Is there a Draw Tool in MS Word?
Yes, there is a Draw tool function in MS Word, and you can use this feature to add freehand drawings to your Word document. Attaching a visual art is possible due to this drawing option. Your MS Word skill will definitely improve if you know how to use this feature.
Sometimes the graphical representation of an idea can be more detailed and easy to understand for users. Developers of Microsoft also know that hence they implement the Draw option in their product.
You can see different types of pens and functions when you hover through the Draw section on MS Word. Select the Pen with which you want to draw and start drawing; it’s as simple as that. But for some users, there is no Draw section on their Microsoft Word.
If you want to know how to activate this Draw option on your MS Word, read through this article.
Also, check out our separate post on how to Why is my Word Screen Black with White Text
How to Draw on MS Word with the Draw Function
There is an inbuilt Draw Function in Microsoft Word. This option helps to add a unique drawing to the Word document. However, for some users, this feature doesn’t appear. If that’s the case with you, activate the Draw option and use them afterward.
Here are the steps to draw on MS Word with the draw function:
1. Activate the Draw Function on MS Word
If you don’t have any Draw section on your MS Word, click on the File section and open the Word option. Choose the Customize Ribbon and enable the Draw section.
Here are the steps to activate the Draw function on Microsoft Word:
Immediately you will notice the Draw section is added to the MS Word top-down menu.
Here’s a complete guide on how to Find and Replace Text in Microsoft Word
2. Use the Draw Function to Add Drawing to Your MS Word Document
There are different pen sections in Draw mode on MS Word. You can select a pencil, highlighter, and many more options from there to illustrate your drawing.
Here are the steps to use the Draw function on MS Word:
Now you know how to activate the Draw feature and use it to illustrate your desired drawing. If you want to know other easy ways, follow through the next portion of this article.
Check out our separate post on how to Double Space in Microsoft Word
How to Draw in Microsoft Word Using the Insert Shape Tool
With the help of the Insert section on MS Word, you can quickly draw your specific pictures without falling into a hassle. The Insert feature includes several options such as Shapes, Icons, 3D models, SmartArt, etc. You can use them to draw beautiful pictures in Microsoft Word.
Here are the steps to use the Insert option on MS Word:
After combining all the necessary items from the Insert section, you can create a marvelous piece of drawing. If you use different MS Word versions, read the next heading.
Read more on why Microsoft Word Read Aloud Stopped Working
How to Draw on Different Versions of MS Office
You can use the Draw feature of Microsoft Office on different versions. How to apply the Draw feature on MS Office 16,13 and 07 is given below.
1. Draw on MS Office 16 and 13
Microsoft Office 16 and 13 are comparatively new; as a result, some features resemble the latest versions of Office.
Here are the steps to Draw on MS Office 13 and 16:
- Launch the MS Word program.
- Move to the Word Ribbon and select the Review tab.
- Choose the Start Inking option.
- Click on the Pens, then select your Pen from the menu.
- Select the Color and Thickness of your pen and start drawing.
- Finish the drawing when you feel like it’s done.
You can make your desired art with the help of this method.
Also, check out our separate post on how to Unlock Selection in Word
2. Add Drawing on Microsoft Office 2007
The drawing feature is available on MS Office 2007. Click on the Insert section and choose the Shapes option to draw on your Word document.
Here are the steps to add drawing on Microsoft Office 2007:
- Open the MS Word app.
- Move to the Insert section.
- Click on the Shapes option under the Illustrations menu.
- Select your required shapes and drag them into the document.
- Change the Shapes Formats if necessary.
- Choose the Scribble or Freeform: Shape under the Shapes Lines section.
- Include the Canvas and 3D effects when you feel like it.
- Combine all the essential functions from the Insert feature and finish your art.
With the help of these steps, you can create your very own unique art.
Check out our separate post on how to Fix Export to PDF Error in Word
How to Add Drawing on a Mac with MS 365 or MS Office 2019
MS Office 365 and Microsoft Office 2019 are available on Mac. So, if you want to draw on a Word document with a Mac, follow the steps below.
Here are the steps to add drawing on a Mac with MS 365 or MS Office 19:
- Open the specific MS Word File or create a New Blank Document.
- Select the Draw section.
- Choose your Pen from various Pens options and select its Color and Thickness.
- Click on the Draw with Trackpad option if you want to draw on the trackpad instead of the Mouse Cursor.
- Use the Eraser to remove unwanted drawing parts.
- Apply the Highlighter where it is necessary.
- Finish the drawing.
As you can see from the method, it is pretty easy to draw on a Mac using MS Word.
Check out our separate post on how to Fix: Find and Replace Not Working On Microsoft Word
FAQs
How do I freehand Draw in Word?
To apply the freehand draw mode in MS Word, you must follow the Insert > Shapes > Freeform: Shape options.
Why can’t I Draw in Microsoft Word?
When your Draw option is not activated, then you can’t draw in MS Word. To apply Draw on Word, follow the File > Options > Customize Ribbon options and enable the Draw checkbox.
Is there a pen in Microsoft Word?
Yes, a Pen option is available in the Draw section of Microsoft Office.
Afterthought
Drawing in a Microsoft Word document is a straightforward process. Also, this visual representation can enhance your MS Word proficiency.
There are two straight-cut ways to draw on MS Word. The first one is applying the Insert Shape option, and the second one is the Draw Pen section. If you read my article thoroughly, you already knew that, and now is the time for you to apply the Draw feature to your Word file.
As usual, it’s time to say goodbye. If you have any questions regarding this article, let us know in the comment.
Do you need to add something to your Word 2013 document, but the only way that you can accurately express the information is through a drawing? Fortunately you can draw in Microsoft Word 2013 with the Scribble shape.
The scribble shape allows you to make a freehand drawing directly in your document. Word will then convert the drawing to a shape object, where you can adjust the appearance of the shape that you just drew.
Note that Word will create a new shape every time that you let go of your mouse with the scribble shape, so you will need to re-select it after letting go. You can also select one of the other shapes on the menu in our guide below, if your needs require a specific shape or straight lines.
This article will show you how to draw in Word and provide you with a new way to express your ideas and information that might have otherwise required you to use a different program.
How to Make Drawings in Word
- Click Insert.
- Click the Shapes button, then click the Scribble icon in the Lines section.
- Click and hold down the mouse button, then move the mouse cursor to draw.
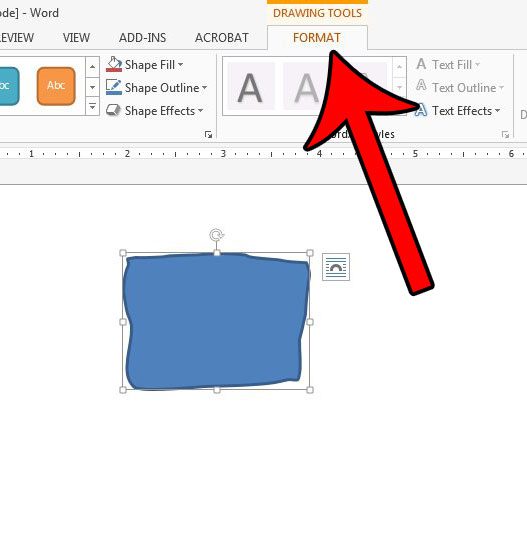
- Click the Format tab under Drawing Tools to make any changes to your drawing.
Our article continues below with additional information on how to draw on Word, including pictures of these steps.
How to Make a Freehand Drawing in Microsoft Word 2013 (Guide with Pictures)
The steps in this article will show you how to do freehand drawing in a Microsoft Word document. You will be selecting the “Scribble” shape, which gives you complete control over what is output on your screen. You can also draw freely anywhere in the document, even on top of text that has already been entered.
Please note that drawing in Microsoft Word can be very difficult. If you find that you are having trouble achieving your desired result, then you may have more luck with Microsoft Paint, or with a more advanced tool like Adobe Photoshop.
Step 1: Open a document in Microsoft Word 2013.
Step 2: Click the Insert tab at the top of the window.

Step 3: Click the Shapes button in the Illustrations section of the navigational ribbon, then click the Scribble button in the Lines section.
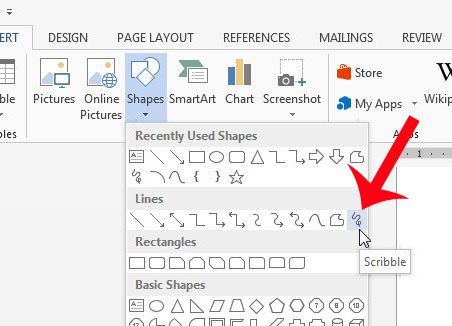
Step 4: Use your mouse to draw on the canvas.
The drawing shape will be completed once you let go of the mouse, which will bring up a new Drawing Tools option. This menu will have options for ways to change the color of the drawing, or to change the fill color.
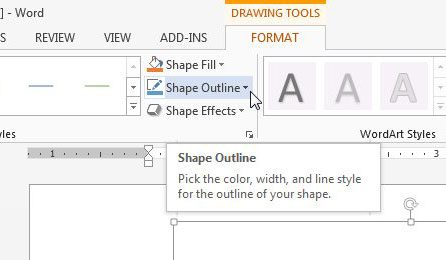
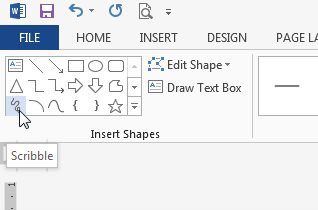
If you need to draw more, then you can re-click the Scribble shape at the left side of the navigational ribbon, as in the image below.
How to Edit the Shape of an Existing Drawing in Word
This section will show you a way to change the shape of your drawing. This method is a little cumbersome, but can be effective if you only need to make minor adjustments to your drawing.
Step 1: Select your drawing, then click the Format tab under Drawing Tools.
Step 2: Click the Edit Shape button in the Insert Shapes section of the ribbon, then click the Edit Points option.
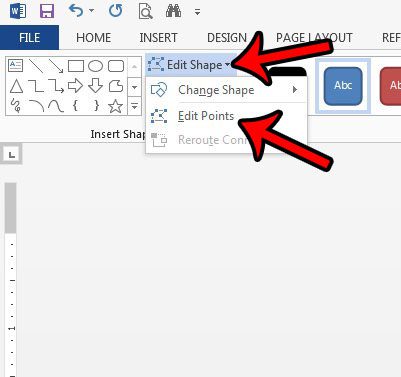
Step 3: Click on one of the points on your drawing, then drag the point to adjust the shape.
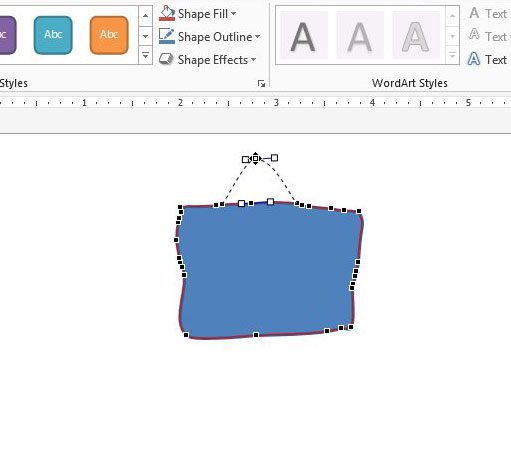
Making drawings in Word is a helpful option in the application when you need to include a simple drawing in your document and either don’t want to use a dedicated image-editing application or don’t have one at your disposal.
I use the Word drawing tool mainly when I need to make something basic, or when the quality of the drawing isn’t terribly important for the document. I’m also a terrible artist (as indicated by my drawings in the guide above) so I haven’t spent a lot of time getting good with Word’s drawing tools.
Note that drawing in Microsoft Word can be somewhat difficult, even frustrating at times. If you find that the drawing capabilities of Word are limited, then you might have better luck drawing in Microsoft Paint and inserting the saved Paint drawing into your document. This article will show you how to insert a picture in Word 2013.
More Information on How to Draw in Word
While our article above focuses specifically on how to draw on Word using the “scribble” tool, there are other ways that you can draw in your document as well.
When you go to the “Shapes” tool from the Insert tab there are a lot of different shapes that you can use. For example, if you wanted to draw a line, a square, or a circle, you could select that shape instead. This can be a preferable option if you are struggling to draw a freehand shape, as it can be very difficult to do with a mouse.
You may want to consider getting a USB drawing tablet if you are going to be doing a lot of drawings in Microsoft Word. It can be much easier to use that type of tool, as it allows you to draw in the same manner that you would when drawing on paper.
Where is the Draw Tool in Word?
Finding the Draw tool can be a little tricky, simply because there isn’t a tool that is directly called “Draw” by default. You need to use one of the shape tools, specifically the “scribble” tool that is found on the Shapes menu.
Alternatively, however, you could go to File > Options > Customize Ribbon, then check the box to the left of Draw. This is going to add a new tab to the ribbon where you can find some drawing tools and options.
How Do I Use the Pen Tool in Word?
As we mentioned in the section above, you will need to enable the Drawing tab in the ribbon by opening the Word Optiones menu, then checking the box to the left of Draw.
Once you have the Draw tab in your ribbon you will find an assortment of different drawing tools, including some pen options. While you can use these with a mouse, many people find them easier to use with a touchscreen tablet or laptop, or a drawing tablet accessory.
How Do I Use Handwriting in Word?
You can use handwriting in Microsoft Word with either the scribble tool, then Pen tool on the Draw tab, or with a connected tablet.
Alternatively you could use on of the script fonts found in Word by default, or by downloading a script font from a resource like Google Fonts.
How Do You Get Word Art on Microsoft Word?
The Word Art option is located on the Insert tab, at the right side, in the Text section of the ribbon.
This is going to add a text box with the WordArt style that you selected. You can then customize the appearance of the Word Art by selecting the text in the text box, then choosing a formatting option from the Format Shape tab in the ribbon.
See also
- How to insert a check mark in Microsoft Word
- How to do small caps in Microsoft Word
- How to center text in Microsoft Word
- How to merge cells in Microsoft Word tables
- How to insert a square root symbol in Microsoft Word
Matthew Burleigh has been writing tech tutorials since 2008. His writing has appeared on dozens of different websites and been read over 50 million times.
After receiving his Bachelor’s and Master’s degrees in Computer Science he spent several years working in IT management for small businesses. However, he now works full time writing content online and creating websites.
His main writing topics include iPhones, Microsoft Office, Google Apps, Android, and Photoshop, but he has also written about many other tech topics as well.
Read his full bio here.


