
Excel for Microsoft 365 Word for Microsoft 365 Outlook for Microsoft 365 PowerPoint for Microsoft 365 Project Online Desktop Client Excel 2021 Word 2021 Outlook 2021 PowerPoint 2021 Project Professional 2021 Project Standard 2021 Excel 2019 Word 2019 Outlook 2019 PowerPoint 2019 Project Professional 2019 Project Standard 2019 Excel 2016 Word 2016 Outlook 2016 PowerPoint 2016 Project Professional 2016 Project Standard 2016 Excel 2013 Word 2013 Outlook 2013 PowerPoint 2013 Project Professional 2013 Project Standard 2013 Excel 2010 Word 2010 Outlook 2010 PowerPoint 2010 More…Less
This article discusses drawing curves, circles, and ovals. For information about drawing lines, see Draw or delete a line or connector. For information about freeform shapes and editing points in shapes, see Draw or edit a freeform shape.
Draw a curve
-
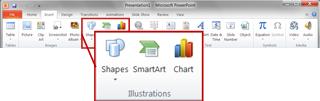
On the Insert tab, click Shapes.
-
Under Lines, click Curve.
-
Click where you want the curve to start, drag to draw, and then click wherever you want to add a curve.
-
To end a shape, do one of the following:
-
To leave the shape open, double-click at any time.
-
To close the shape, click near its starting point.
-
Draw an oval or circle
-
On the Insert tab, click Shapes.
-
Under Basic Shapes, click Oval.
-
Click where you want the oval to start, and drag to draw the shape.
-
To draw a circle, press Shift while you drag.
Notes:
-
You can change the look of your circle or curve by adding a shape fill or effect or changing the border.
-
If you want to create a more advanced diagram like overlapping circles, an organizational chart, or a flowchart, you can create a SmartArt graphic instead of drawing each shape manually.
-
Circles and ovals are filled automatically. If you don’t want the shape to obscure anything underneath it, such as text or cells, select the shape, and on the Format tab, click Shape Fill, and then click No Fill.
-
Draw a curve
-
On the Insert tab, in the Illustrations group, click Shapes.

-
Under Lines, click Curve
. -
Click where you want the curve to start, drag to draw, and then click wherever you want to add a curve.
-
To end a shape, do one of the following:
-
To leave the shape open, double-click at any time.
-
To close the shape, click near its starting point.
Note: By default, a closed shape is filled. To make sure that the shape doesn’t obscure the cells underneath, select the shape, and then under Drawing Tools, on the Format tab, in the Shape Styles group, click Shape Fill, and then click No Fill
-
 .
.Top of Page
Draw an oval or circle
-
On the Insert tab, in the Illustrations group, click Shapes.
-
Under Basic Shapes, click Oval
. -
Click where you want the circle to start. To make the shape a circle, press and hold SHIFT while you drag to draw.
Notes:
-
You can change the look of your circle or curve by adding a shape fill or shape effect or changing the shape border.
-
If you want to create a more advanced diagram like overlapping circles, an organizational chart, or a flowchart, you can create a SmartArt graphic instead of drawing each shape manually.
-
By default, a circle or oval is filled. To make sure that the shape doesn’t obscure the cells underneath, select the shape, and then under Drawing Tools, on the Format tab, in the Shape Styles group, click Shape Fill, and then click No Fill.
-
 .
.Top of Page
Need more help?
![]()
Download Article
![]()
Download Article
While you can’t outright draw free-form in Word, you can use the shapes menu to make shapes like circles. This wikiHow will teach you how to draw a circle in the computer desktop and mobile versions of Word.
-
1
Open a blank project in Word. When you tap to open Word, the program will launch and ask if you want to open a previous document or start a new one. You’ll want to open a new document to practice creating circles before you use them in any other documents.
- This app icon looks like two white pieces of paper on a blue background that you can find on your home screens, in the app drawer, or by searching.
-
2
Tap ••• (iOS) or
(Android) at the top of your keyboard. If you don’t see this menu, you’ll need to tap anywhere in the document to pull this menu up.
- The menu options will change and your keyboard should disappear.
- If you’re opening up a previous document, enable editing mode by tapping the pencil icon.
Advertisement
-
3
Tap the arrows next to Home. You’ll see this on the left side of your screen.
-
4
Tap Insert. The menu options in the right panel of the window will change.
-
5
Tap Shapes. Tapping this will bring you to a menu of shapes you can insert into the document.
-
6
Tap a circle you want to add. You can scroll through to find the «Basic Shapes» header; you’ll find a circle in that section if there isn’t one under «Recent Shapes.»
-
7
Edit the circle in your document. When you tap a circle shape from the menu at the bottom of the screen, it is copied into your document. You can pull, pinch, and drag the dots around the shape to edit its appearance.
- When you’re satisfied with the circle, tap the document around the circle and that editing menu will close. If you need to edit that shape again, you can tap on it.


Advertisement
-
1
Open Word. You’ll find this program in your Start Menu or Applications folder.
- You can either start a new document or resume a previously created document.
-
2
Click the Insert tab. You’ll see this in the editing ribbon above the document with «Home.»
-
3
Click Shapes. A menu of shapes you can add to the document will drop-down.
-
4
Click a circle you want to add. You’ll find circle shapes in «Basic Shapes.»
-
5
Click and drag while pressing ⇧ Shift on your keyboard to draw the circle on your document. After you select a circle theme and click and drag your mouse over the document to draw your circle, you can edit it.
- If you don’t hold down the Shift key, your shape may not result in a circle.
- You can change the overall look of your circle by changing the settings in Format > Shape Fill.[1]


Advertisement
Ask a Question
200 characters left
Include your email address to get a message when this question is answered.
Submit
Advertisement
Thanks for submitting a tip for review!
References
About This Article
Article SummaryX
1. Open a blank project in Word.
2. Tap the three-dots menu icon (iOS) or the up-pointing arrow icon (Android) .
3. Tap the arrows next to Home.
4. Tap Insert.
5. Tap Shapes.
6. Tap the circle icon.
7. Edit the circle in your document.
Did this summary help you?
Thanks to all authors for creating a page that has been read 14,265 times.
Is this article up to date?
Contents
- 1 How do I circle something in a Word document?
- 2 How do I circle something in a PDF?
- 3 How do you make circles around letters?
- 4 Which tool is used to draw a circle?
- 5 How can I draw in Word?
- 6 How do I draw on a PDF in Windows?
- 7 Can I draw on a PDF?
- 8 What is the i in a circle symbol?
- 9 How do I turn a text into a shape?
- 10 How do you make a circle with a pencil code?
- 11 What is circle shape?
- 12 How do I draw a pen in Word?
- 13 Is there a draw tool in Word?
- 14 How do you draw freehand in Word?
How do I circle something in a Word document?
Draw an oval or circle
- On the Insert tab, click Shapes.
- Under Basic Shapes, click Oval.
- Click where you want the oval to start, and drag to draw the shape.
- To draw a circle, press Shift while you drag. Notes: You can change the look of your circle or curve by adding a shape fill or effect or changing the border.
How do I circle something in a PDF?
Choose Insert Menu > Drawing > Select Rectangle , Circle or Basic Shape.
How do you make circles around letters?
You can use one of the alt keys and type the decimal numbers using number pad. For example, alt + 9411 will produce circled capital N like Ⓝ. If you do not have a keyboard with number pad then try the alt + x method. Type the hexadecimal codes and then press alt + x to convert it into a circled letter.
Which tool is used to draw a circle?
compass
compass is traditional tool for drawing circles
A compass is the traditional tool for drawing precise circles, and its sharp point acts as a pivot. A pencil is attached to the other end.
How can I draw in Word?
How to draw in Word
- Click the ‘Shapes’ button and select ‘Scribble’ Open up your Microsoft Word document.
- Hold down your mouse to draw. Click and hold down your mouse to draw.
- Release the mouse. As soon as you release your mouse, the drawing will be finished.
- Edit your drawing. Double-click your drawing.
How do I draw on a PDF in Windows?
Add a line, arrow, or shape
- Choose Tools > Comment.
- Draw in the PDF:
- To edit or resize the markup, select it and drag one of the handles to make your adjustments.
- To add a pop-up note to the markup, select the Hand tool, and double-click the markup.
- (Optional) Click the close button in the pop-up note.
Can I draw on a PDF?
With Adobe Acrobat online services, you can draw directly on a PDF to visually mark your edits. Freehand drawing on a PDF is the perfect way to clearly show what content you want moved or removed altogether.
What is the i in a circle symbol?
The grey ‘circle with an i’ symbol indicates your connection is not secure.The lowercase i with a circle around it is formally known as the Information Symbol. It tells you when your connection to a website is not secure. When you connect to a website your browser uses the HTTP protocol or the HTTPS protocol.
How do I turn a text into a shape?
To convert text into a shape, right-click on the text layer, and choose “Convert To Shape”. Then select the Direct Selection tool (the white arrow tool) by pressing Shift A and click-and-drag the points in the path to give the characters a new shape.
How do you make a circle with a pencil code?
curves using a turning radius
Curves can be drawn by giving a second argument to rt and lt . The optional second argument for rt and lt is a turning radius. The turn is made while tracing out part of a circle of that radius. If you provide a radius of 0, the turtle will just pivot in place as with a normal turn.
What is circle shape?
A circle is a shape consisting of all points in a plane that are at a given distance from a given point, the centre; equivalently it is the curve traced out by a point that moves in a plane so that its distance from a given point is constant.
How do I draw a pen in Word?
On the Draw tab of the Ribbon, tap a pen to select it. In Word, you must be in Print layout to draw with ink. If the Draw tab is grayed out so that you can’t select a pen, go the View tab and select Print Layout. ; then you can select a pen to draw with.
Is there a draw tool in Word?
You can draw freely in Microsoft Word using the “Draw” feature whether you have Word for Mac or Windows. You can also insert customizable shapes into your document, or draw using the “Scribble” feature. The process of drawing in Word varies based on which version of Word and device you’re using.
How do you draw freehand in Word?
Draw a freeform shape
Click anywhere in the document, and then drag to draw. To draw a straight segment with the Freeform tool, click one location, move your pointer to a different location, and then click again; to draw a curved segment, keep your mouse button pressed as you drag to draw.
Circle is one of the basic shapes that you may need. However, drawing a circle in Word and PowerPoint is not straightforward. But with the simple trick, you can quickly draw a perfect circle of any size in Word or PowerPoint.
Steps to draw a Circle in Word and Power Point
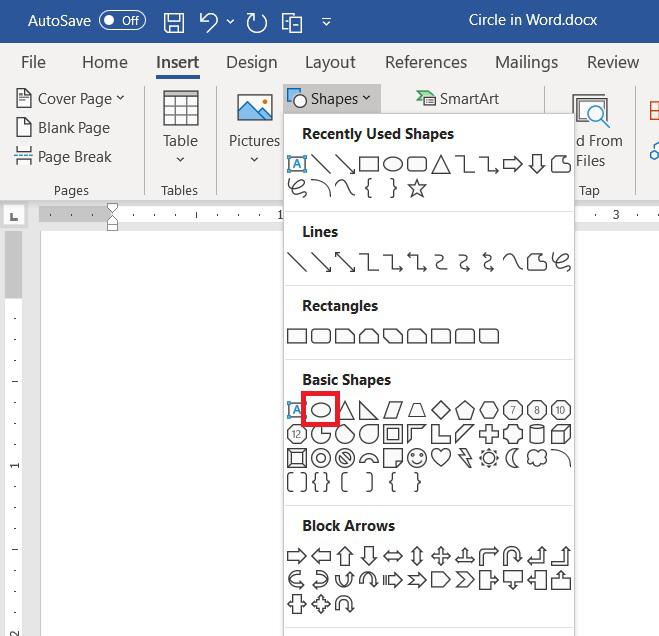
- In the Insert Tab, click on Shapes
- From the drop-down list, click on Oval under Basic Shapes
- Left click at the location where you want to start Circle
- Drag the mouse holding shift key to draw the perfect circle of desire size
- Release shift key and mouse when done
Resizing Circle Afterwords
You can also resize the circle after drawing it.
- Click anywhere on the circle to resize
- Drag the corner handle around the circle while holding shift key to resize it to desired size
- Once done release mouse button
Summary
To draw circle in Ms Word and PowerPoint, navigate to Insert > Shape and click Oval from Basic Shapes. Left click anywhere to start circle and drag with left mouse button holding shift key to get perfect circle.
Simple shapes can have a lot of uses in a Word document, so it’s entirely possible that you might need to use one.
Whether you want to use the circle on its own, or as part of another document option, knowing how to draw a circle in Word can be beneficial for a number of reasons.
- Open your document.
- Click where you want the circle.
- Select the Insert tab.
- Click the Shapes button, then select the Oval shape.
- Click in the document then drag your mouse to draw the circle.
Our article continues below with additional information on how to draw a circle in Word 2010, including pictures of these steps.
If you would like to know how to insert a circle or another shape in a Google Slide presentation, then click here to find out how.
While Microsoft Word is primarily thought of as a document editor for text, it has a variety of different drawing tools that allow you to insert custom shapes into the document.
You can even use shape fill options and format shape settings to further customize an object that you draw. Our steps below will walk you through how to draw a circle in Microsoft Word 2010 using these tools and settings.
There are a lot of different types of files and objects that you can insert into Microsoft Word 2010 documents, and some of them are simpler and more useful than you might expect.
We have previously described how to take a screenshot in Microsoft Word 2010, but not everything that you add to a Word document needs to be an image or an external type of media.
For example, you can also create objects and shapes entirely from scratch. Therefore, if you need to create a circle and insert it into your document, you can use the Shapes option on the Insert menu to do so.
Fortunately, the Shapes tool in Microsoft Word is quite versatile, and you can use it and the other various drawing tools to create some useful shapes and designs.
Our article below will show you how to draw a circle (or draw an oval) in Microsoft Word if your document would be improved with the addition of that shape.
Our 1 inch margins in CM Word guide can show you how to change the unit of measurement when you are using Microsoft Word.
Inserting a Circle into Word 2010 (Guide with Pictures)
While the tool that you are going to be using is technically for inserting ovals, you can manually adjust the size of the oval so that it is perfectly proportioned and, therefore, a circle. Continue reading below to learn about the steps that you need to take to draw your circle in a Word document.
Are you currently in the market for a new laptop that will easily run Word, along with all of the other programs you use on a regular basis? Check out best selling laptops on Amazon and find a fast and affordable option.
Step 1: Launch Microsoft Word 2010, or double-click the Word file in which you want to draw a circle.
Step 2: Browse to the location in which you want to insert the circle.
Step 3: Click the Insert tab at the top of the window.
Step 4: Click the Shapes drop-down menu in the Illustrations section of the ribbon at the top of the window, then click the Oval icon in the Basic Shapes section of the menu.

Step 5: Click your mouse at the desired location in your document, then drag your mouse until the oval is at the desired shape.
Now that you know how to draw a circle in Word you might have all of the steps that you need. But if you need a perfect circle, then you will need to take a couple more steps.
**The following steps are only necessary if you need a perfect circle**
How to Draw a Perfect Circle in Word 2010
This section continues from the steps in the previous section.
Step 6: If it is not currently selected, click the Drawing Tools – Format tab at the top of the window.
Note that the circle will need to be selected for this menu to be visible.

Step 7: Click inside the Shape Height field in the Size section of the ribbon at the top of the window, then enter your desired circle height.

Step 8: Click inside the Shape Width field under the Shape Height field, then enter the same value that you entered in Step 7. Your shape should now be a perfect circle.
If you want to change the appearance of the circle, you can modify the settings for the shape using the assorted menus in the Drawing Tools-Format tab of the ribbon.
Additional Information on How to Use the Circle Shape Tool in Microsoft Word
If you want to use any of the additional drawing tools, such as the “Shape Fill” option, which allows you to color in your circle, then you will need to select the circle first.
The Insert tab in Word is also where you will need to go if you want to add an image to your document, or other custom objects like a table or a text box.
If you are adding a circle to your document because you want to use it in conjunction with another object, such as a text box that will display text on top of the circle, then you will probably need to adjust the “layers” of those objects. You can find these on the Layout tab in the Arrange section.
Another way that you can add a perfect circle to your document is by holding the Shift key after you have chosen to draw an oval. To accomplish this you would click the Insert tab, click Shapes, choose the Oval from the drop down menu, then hold down the Shift key as you draw a circle in your document.
Additional Sources
- How to insert a check mark in Microsoft Word
- How to do small caps in Microsoft Word
- How to center text in Microsoft Word
- How to merge cells in Microsoft Word tables
- How to insert a square root symbol in Microsoft Word

Matthew Burleigh has been writing tech tutorials since 2008. His writing has appeared on dozens of different websites and been read over 50 million times.
After receiving his Bachelor’s and Master’s degrees in Computer Science he spent several years working in IT management for small businesses. However, he now works full time writing content online and creating websites.
His main writing topics include iPhones, Microsoft Office, Google Apps, Android, and Photoshop, but he has also written about many other tech topics as well.
Read his full bio here.
Presenting some information in a text document with schemes and drawings helps to be understood. This article will show you how to draw on a Word document and what tools to use. Keep on reading to know more.

About drawing tools in Word documents
When you run out of words, you can express yourself through drawings. They are used to present a new idea or dilute a text-only document. Complex phenomena are also easier to explain through illustrations.
One way to illustrate a text is to add a ready-made picture or photo. Draw a picture in a third-party application, then add it to your document via the Insert tab.
Another way to draw on Word documents is to use drawing tools in a document editor. Drawing on Word documents is necessary when the text interacts directly with pictures. For example, you need to specify what part of the text the illustration belongs to, point to a consequence using arrows, and embed a diagram in the text.
The users can draw in Word documents with:
- Standard shapes and lines in a document editor. All office suites offer features for adding shapes and lines that allow users to draw schemes and create complex illustrations and any drawing in Word files.
- Plugins with additional functionality. Plugins, called apps or add-ins, are small applications that help you do a few things that the office suite can’t do. They are usually available in the app stores of office suite developers. Users can download the selected apps they need and install them. So they can supplement their document editors with electronic signatures, spell checkers, translators, photo editors, citation and bibliography generators, etc.
Now, let’s see how to draw on Word document and apply formatting in ONLYOFFICE document editor.
How to draw lines and arrows in Word document
The most used are lines and arrows. You can make a simple pointer, diagrams, or a whole drawing. For example, you can add an image to a passage of text and then point to it.
To draw line in Word, go to the Insert tab → Shape → Choose Lines or Figured Arrows and one of the options.
Click and hold down the mouse button, then drag to draw a line.
You can select a line by clicking on it, and once selected, you can move it in any direction. Change the size by moving the white dots.
On the right-side toolbar, you can adjust the line and change its color, type, and position in relation to the text.
To prevent the line from crossing the text, you can use curved lines.
Go to Shape → Choose Lines, then, one of the curved connectors.
Draw the line in the same way as in the previous step. Then, by moving the yellow point, change the curve of the line.
How to draw text box in Word document
There are two ways to draw a figure with text inside.
1. Choose a text box on the upper toolbar, draw the box, and print the text inside. Then, you can change a shape on the right-side toolbar.
2. Select any shape, draw it, then double-click it and type the text. Then, you can format the text in the text box as usual text in a document.
If you have already selected the size and position of the line and added a text but then, decided to change it to another, select a different shape on the right-side toolbar. The formatting will be saved.
How to draw circle and oval
To draw in Word with circles and ovals, go to the Insert tab → Shapes → Basic shapes → Ellipse.
Click and hold the mouse and stretch a shape to form an oval or a circle. Then, define the size.
On the right-side toolbar, in the field Fill, you can also choose the figure color, make it gradient or select a pattern or picture from the device. For the last option, choose Picture and Texture, click Select Picture and insert a picture from a file or a URL.
How to get any shape using a toolbar
In addition to the standard shapes offered in the editor, you can draw a picture yourself.
Go to the Insert tab → Shape → Lines → Scribble
Draw freehand drawing. The blue color of the lines is set by default. You can change the color and thickness of the lines on the right-side toolbar.
There is also an option to create any shapes with straight lines.
To draw them, go to the Insert tab → Shape → Lines → Freeform
Click at the beginning of the drawing to start. Then click on the next point which will be connected to a previous one with a straight line. There is no limit to the number of lines. To complete the drawing, double-click on the last point. After that, format the shape.
If your drawing has the same starting point as the end one, so that you got a polygonal figure, it is possible to select the color of the whole figure or make it gradient.
Drawing whatever with draw.io plugin
ONLYOFFICE has added Draw.io to its collection of plugins. It is a free open-source solution to create diagrams. The plugin allows you to draw any picture and insert it into a Word document. Read more information about Draw.io and find the installation instruction in our blog.
Go to the Plugins tab —> Draw.io. In the opened tab, you will see all the tools for work. The markup on the sheet will make it easier to draw.
Let’s insert a scheme using a ready-made layout.
On the left-side toolbar, choose Advanced, Vertical Tree Layout.
Enter the text in the boxes.
On the right-side toolbar, format the shapes, or apply a ready style from the Style tab.
After your drawing is ready, click Insert to add the drawing to the document.
The plugin also offers more sophisticated drawings and interface elements of different software. To add them, select More Shapes in the left-side toolbar.
Conclusion
Drawings are often used in text documents. To add them, no separate professional programs are needed. You can draw in a Word document, using simple shapes. For more complex ones, plugins are available with which you can extend the editor’s functions.
While you can’t outright draw free-form in Word, you can use the shapes menu to make shapes like circles. This wikiHow will teach you how to draw a circle in the computer desktop and mobile versions of Word.
Using the Mobile App
-
Open a blank project in Word. When you tap to open Word, the program will launch and ask if you want to open a previous document or start a new one. You’ll want to open a new document to practice creating circles before you use them in any other documents.
- This app icon looks like two white pieces of paper on a blue background that you can find on your home screens, in the app drawer, or by searching.
-
Tap ••• (iOS) or (Android) at the top of your keyboard. If you don’t see this menu, you’ll need to tap anywhere in the document to pull this menu up.
- The menu options will change and your keyboard should disappear.
- If you’re opening up a previous document, enable editing mode by tapping the pencil icon.
-
Tap the arrows next to Home. You’ll see this on the left side of your screen.
-
Tap Insert. The menu options in the right panel of the window will change.
-
Tap Shapes. Tapping this will bring you to a menu of shapes you can insert into the document.
-
Tap a circle you want to add. You can scroll through to find the «Basic Shapes» header; you’ll find a circle in that section if there isn’t one under «Recent Shapes.»
-
Edit the circle in your document. When you tap a circle shape from the menu at the bottom of the screen, it is copied into your document. You can pull, pinch, and drag the dots around the shape to edit its appearance.
- When you’re satisfied with the circle, tap the document around the circle and that editing menu will close. If you need to edit that shape again, you can tap on it.


Using Word for Windows or Mac
-
Open Word. You’ll find this program in your Start Menu or Applications folder.
- You can either start a new document or resume a previously created document.
-
Click the Insert tab. You’ll see this in the editing ribbon above the document with «Home.»
-
Click Shapes. A menu of shapes you can add to the document will drop-down.
-
Click a circle you want to add. You’ll find circle shapes in «Basic Shapes.»
-
Click and drag while pressing ⇧ Shift on your keyboard to draw the circle on your document. After you select a circle theme and click and drag your mouse over the document to draw your circle, you can edit it.
- If you don’t hold down the Shift key, your shape may not result in a circle.
- You can change the overall look of your circle by changing the settings in Format > Shape Fill.


Microsoft 365, Microsoft Office, Microsoft Office for Mac, Microsoft Word, Office 2013, Office 2016, Office 2019, Office 2021 / Office LTSC, Office 365 /
30 April 2022
In Microsoft Word, circling around text can place emphasis or enhance the text appearance. There are a few methods you can choose in Word documents and you’re not limited to circles.
We’ll show how to add a simple circle like this, plus a lot more.
Add shape to document
Go to Insert | Illustrations | Shapes
For our example we’ve chosen the Oval shape under Basic Shapes.

Now, hold down your cursor and drag the circle over the text.

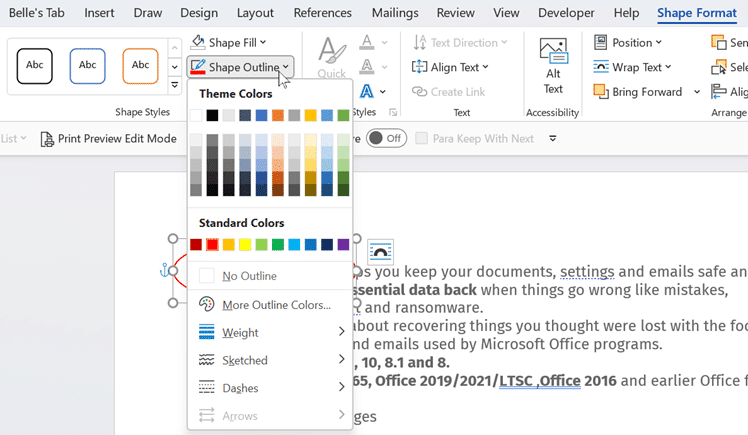
Now, make sure the shape has been selected. We change the formatting under Shape Format | Shape Styles to make it into a transparent circle.
- Shape Fill – choose No Fill, so that it doesn’t cover your text.
- Shape Outline – choose a color of your choice that will really stick out on the page.
- Weight – choose the thickness of the line.
- Sketched – add more of a sketched look to your line.
- Dashes – choose between different dashed lines.

Sketchy or hand-drawn effect
For a rough, hand-drawn line effect go to Shape Outline | Sketchy .

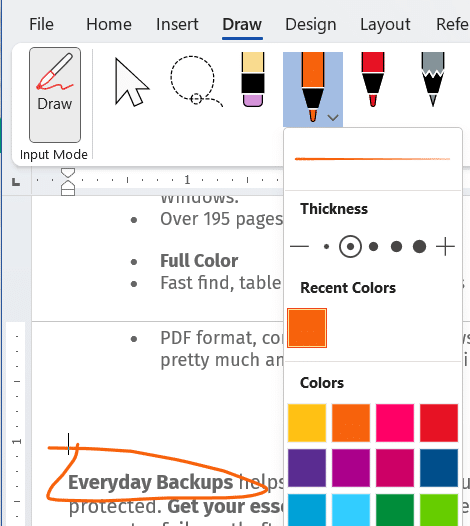
Really hand drawn shape
Yet another option is to really draw a line or shape around the words using the Draw tab. You don’t need a digital pen, just a mouse is enough. Go to the Draw tab, choose a pen, pencil etc and a color.
Add text within a shape
Another way around it is adding text within a shape. This means the text will move with the shape.
Go to Insert | Illustrations | Shapes.
Select your preferred shape.
Right click on the shape and select ‘Add Text’.
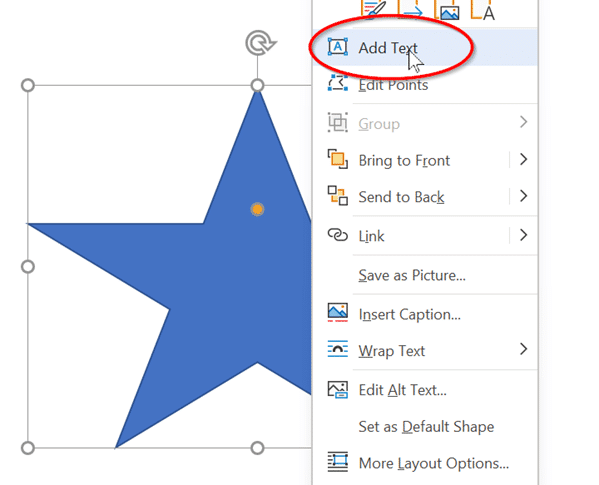
Type your text within the shape. If you need more room for text, drag the yellow dot up to ‘fatten’ the star shape

Double-click inside the shape to bring up options to change the Font style from the mini-toolbar. Of course all the formatting options are also on the Home tab.

Starting Word Page numbers from a specific page number
Make lines and arrows straight – a Word bug fix
Solved! How to connect shapes in Word