
Sometimes you may need to insert numbers or letters with circles in Word document, but you can’t type them directly or copy them from Internet every time. So how to insert circled numbers and letters in Word exactly?
To answer this question, I’ll share the detailed steps in the post. You can have a try following this guide.
Insert Circled Numbers from Symbol
1. One of the most commonly used way to insert circled numbers or letters is using Symbol.
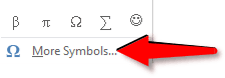
2. Go to Insert tab, click Symbol and choose More Symbols… in the drop-down list.

3. Choose Windings, Windings 2 or Wingdings 3 as the font in Symbols tab, then scroll down to find the circled numbers. Click Insert to add the specified number to your document.

4. Note: you can only insert numbers from 1-10 with circles in this way. So if you want to insert larger numbers or letters with circles, please try the second method.
Insert Circled Number or Letter Using Enclose Characters
There’s a feature called Enclose Characters in Word, you can make use of it to insert circled numbers as well as letters.
1. Switch to Home tab, click the icon of Enclose Characters in Font section.

2. Enter the number or text you want to add circle in the textbox, then make the choice of Style and Enclosure. Click OK to implement it.

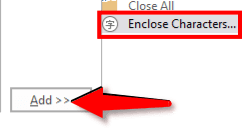
3. You can also select the existing letter in advance and click Enclose Characters to circle it. But don’t forget the maximum number of characters you can circle is 2.
4. As for circling 2 characters, like 2 letters or numbers larger than 9, you’ll find the result isn’t very well even if you choose Enlarge symbol in Style.

5. To make it looks better, you can press [Alt+F9] to switch to field mode. The circled number I just entered will be displayed as below:

6. The circle and the number are both in the parentheses, you can select the number to shrink its size.

7. It’s not enough cause the number will still be on the lower part of the circle. To raise its position, you can select the number and click the small arrow at the lower right corner of Font section in Home tab.

8. Switch to Advanced in the popping out Font window, choose Raised in the drop-down list of Position and click OK.

9. Then you can press [Alt+F9] to check the result. If it can still not satisfy you, just keep switching the mode to make adjustments till it finally looks good.

Insert a Circle Shape and Add Text to It
This method is not that frequently used, but it still works under certain circumstance. For example, if you want to circle more than 2 characters, the normal means may not help at all while this one does.
1. Switch to Insert tab, click Shapes and choose the oval shape in the list.

2. Hold your [Shift] key while dragging mouse to draw the shape. It will help you to draw a perfect circle instead of oval.

3. You can drag the vertices of it to move or resize it, but don’t forget holding [Shift] while resizing it, otherwise it will become oval again.
4. And if the color isn’t right, just double click the circle to enable Drawing Tools, you can change the setting in Shape Fill and Shape Outline.

5. Then right click the circle and choose Add Text in the menu.

6. A textbox will be created inside the circle, you can type any text in it and adjust its font and size.

But you can do very little to adjust the text added in this way – you can’t even move it freely.
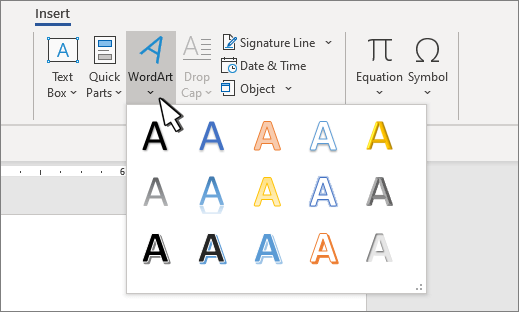
Instead, you can try changing the text into WordArt in advance.
7. Click WordArt in Insert tab to choose a style and type the text in the textbox.

8. Then you can freely resize and move the new created WordArt to adapt the circle.

9. Circled numbers and letters created in this way allow you to adjust them freely, but you must make corresponding changes to both the circle and the WordArt inside it, since they won’t match with each other automatically.

Copyright Statement: Regarding all of the posts by this website, any copy or use shall get the written permission or authorization from Myofficetricks.
You may want to place a circle around a certain letter or number in your MS Word document. This may be to emphasize an important point in the document. It may also be to simply decorate the text.
- Use the Oval Tool
- Use the Enclose Characters Tool
- Insert a Circle Shape
- Insert Enclosed Alphanumeric Symbols
We will show you step-by-step instructions for all the tools above.
Let us begin.
Method #1: Use the Oval Tool
Note: Word does not enable the Oval Tool by default. The best place to enable and place the Oval Tool is in the Quick Access Toolbar.
Step #1: Open the Word Document
Open the Word document where you want to place circles.

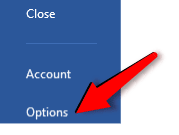
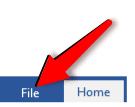
Step #2: Open the Word Options menu.
Click on the File tab in the top menu toolbar.

This opens the Files menu.
Click Options at the bottom of the Files menu.
Word Options menu will open.
Click on Quick Access Toolbar.
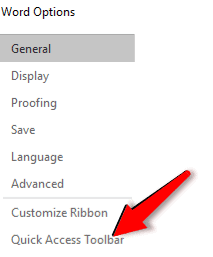
A dialog box for Customize the Quick Access Toolbar will open on the right-hand side.
Step #3: Customize the Quick Action Toolbar
Click on the down arrow below Choose commands from:
From the drop-down menu, select All Commands to change the command list below.

Search in the command list below All Commads and click on Oval.

Click on the Add button on the right-hand side of the command list.
Word will add the Oval tool in the Quick Action Toolbar list on the right.

Click on OK at the bottom of the dialog box to exit.
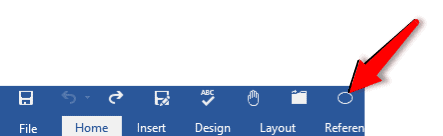
The Oval tool appears in the Quick Action Toolbar above the main toolbar.
Step #4: Use the Oval Tool
Position the cursor where you want the circle to appear.
Click on the Oval Tool in the Quick Action Toolbar.
The cursor will change to a cross.
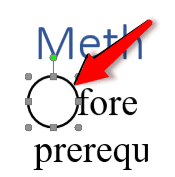
Click on one corner and drag the cross cursor to the opposite corner to form a non-transparent circle.
Right-Click on the circle to open a menu.
Click on Format AutoShape/Picture.
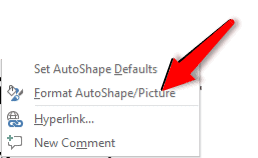
This opens the Format AutoShape dialog box.
Click on the tab Colors and Lines.
Under Fill, drag the Transparency bar to the extreme right to 100%.

Click on OK at the bottom of the dialog box to exit.
Word makes the circle transparent.
Open the Format AutoShape/Picture dialog box again. Use it to change the weight, color, and style of the circle.
Method #2: Use the Enclose Characters Tool
Note: Word does not enable the Enclose Characters Tool by default. The best place to enable and place the Enclose Characters Tool is in the Quick Access Toolbar.
Step #1: Open the Word Document
Open the Word document where you want to place circles.

Step #2: Open the Word Options menu.
Click on the File tab in the top menu bar.
This opens the Files menu.
Click Options at the bottom of the Files menu.

Word Options menu will open.
Click on Quick Access Toolbar.

A dialog box to Customize the Quick Access Toolbar will open on the right-hand side.
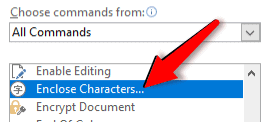
Step #3: Customize the Quick Action Toolbar
Click on the down arrow below Choose commands from:
From the drop-down menu, select All Commands to change the command list below.

Search in the command list and click on Enclose Characters.
Click on the Add button on the right-hand side of the command list.
Word will add the Enclose Characters tool in the Quick Action Toolbar list on the right.
Click on OK at the bottom of the dialog box to exit.
The Enclose Characters tool appears in the Quick Action Toolbar above the main toolbar.
Step #4: Use the Enclose Characters tool
Select the letter or number around which you want the circle to appear.
Click on the Enclose Characters tool in the Quick Action Toolbar.
The Enclose Characters dialog box will open.
Under Style, click on the Enlarge symbol icon in the dialog box.
Under Enclosure, select the shape of the enclosure you want.
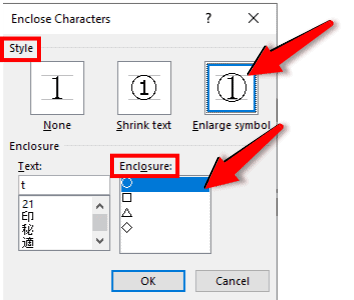
Click on OK to exit.
Word places the selected shape to enclose the letter/number.

Method #3: Insert a Circle Shape
Step #1: Open the Word Document
Open the Word document where you want to place circles.

Step #2: Insert a Circle Shape
Click on the Insert tab on the top menu toolbar to change the ribbon.

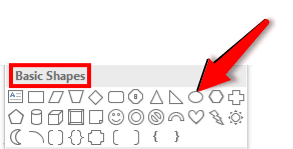
In the section Illustrations, click on the Shapes icon.

This opens a drop-down dialog box for various shapes.
Click on the Oval icon in Basic Shapes.
The cursor will change to a cross.
Position the cross cursor at the top left-hand corner. Drag it to the bottom right-hand corner to form a non-transparent circle.
Under Shape Styles, click on Shape Fill.

This opens the Shape Styles dialog.
Click on No Fill.

The circle changes to a transparent one.
You can select the circle and use the handles to move it. You can also change its shape and size.
Method #4: Insert Enclosed Alphanumeric Symbols
Step #1: Open the Word Document
Open the Word document where you want to place circles.
Place the cursor where you want the circle to appear.
Step #2: Insert Enclosed Alphanumeric Symbols.
Click on the Insert tab in the top menu toolbar to change the ribbon.

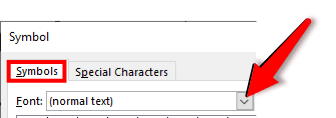
In the section Symbols, click on the Symbol icon.

In the drop-down menu, click on the More Symbols icon.
This will open the Symbol dialog.
Under the Symbols tab, click on the downward arrow on the right of Font.
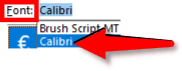
Under Font, select the Calibri font.
Under Subset, select Mathematical Operators.
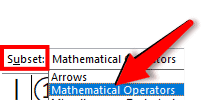
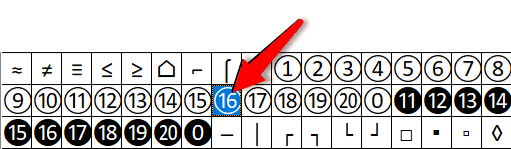
A number of encircled symbols will appear.
Select the symbol you want.
Click on Insert and then on Close at the bottom of the dialog to exit.
Word places the selected symbol in the document.

Note: Word offers only numbers as enclosed alphanumeric symbols.
Conclusion
Follow our simple instructions to place a circle around a number or letter in your document. We have shown you four methods. Select the one that suits you best.
How do I circle a letter in Word?
Draw an oval or circle
- On the Insert tab, in the Illustrations group, click Shapes.
- Under Basic Shapes, click Oval .
- Click where you want the circle to start. To make the shape a circle, press and hold SHIFT while you drag to draw. Notes:
How do you sign a document on word?
In Microsoft Word or Excel, open the document that you want to sign. In the word document or worksheet, place you cursor (pointer) where you want the signature line to appear. Click Insert. On the Insert tab, in the Text section, click Signature Line > Microsoft Office Signature Line.
Where is the symbol for 183 in Word?
The character is the bullet symbol, which you can reproduce by changing the font to Symbol and by finding it in the symbol list or pressing ALT + 0183 (maybe 183 without the zero for others).
How do I find enclose characters in Word?
There’s a feature called Enclose Characters in Word, you can make use of it to insert circled numbers as well as letters.
- Switch to Home tab, click the icon of Enclose Characters in Font section.
- Enter the number or text you want to add circle in the textbox, then make the choice of Style and Enclosure.
How can I draw a line in Word?
On the Insert tab, in the Illustrations group, click Shapes. Under Lines, right-click the line or connector that you want to add, and then click Lock Drawing Mode. Click where you want to start the line or connector, and then drag the cursor to where you want the line or connector to end.
How do I find symbols in Word?
Go to Insert > Symbol. Pick a symbol, or choose More Symbols. Scroll up or down to find the symbol you want to insert. Different font sets often have different symbols in them and the most commonly used symbols are in the Segoe UI Symbol font set.
Where is the arrow symbol in Word?
Insert Arrow Symbol Go to Insert tab, click Symbol button on the right of the ribbon and choose More Symbols… in the menu. 2. Change the Font into Wingdings in the popping out Symbol window, scroll down till the end and you’ll find many different arrow symbols here.
How do I type an arrow symbol?
To type an arrow symbol by using its Alt Code in Word, in Excel etc;
- Make sure you switch on the NumLock,
- press and hold down the Alt key,
- type the Alt Code value of the arrow you want, for example for an arrow down symbol, type 2 5 on the numeric pad ,
- release the Alt key and you got a ↓ downwards arrow.
How do you type a upside down carrot?
An upside-down circumflex is called a caron, or a háček. It has an HTML entity in the TADS Latin-2 extension to HTML: &caron and looks like this: ˇ which unfortunately doesn’t display in the same size/proportion as the ^ caret. Or you can use the unicode U+30C .
How do I make a curved arrow in Word?
How to Create a Curved Arrow. On the “Insert” tab of the Ribbon, click the “Shapes” button. In the “Lines” section, click one of the curved arrow shapes. You’ll find one with a single arrowhead, one with two heads, and a simple curved line with no arrowheads.
How do you type in 4 lines in Word?
Type the four lines of text, and then at the “Insert” tab click “Shape” drop down arrow, and select the very first option “Line.” Then, while holding the “Shift” key down draw a line under the first line of text. Select the line and hold down the “Ctrl” key.
How do I make vertical lines in Word?
To add a vertical line using the shape tool, go to Insert | Shapes and select the Line tool. Place the cursor where you want the line to start, and drag to where you want the other end of the line to be. Holding the Shift key while you drag will ensure that the line is straight.

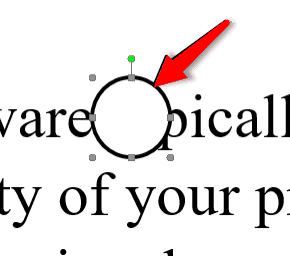
There are many ways to make text stand out in your document. You can format the font in bold or italic or highlight the text using color. For another option, we’ll show you how to circle text in Microsoft Word.
You may want to place a circle around text to emphasize it. But you might also want to use that circled text to enhance the appearance. Whatever your reason, circling text in Word takes only a couple of steps.
Add a Shape to the Document
Open your Word document and go to the Insert tab. Click “Shapes” to view the available options.

The closest shape to a circle is the oval, which works well for circling text. Choose that option in the Basic Shapes section.
Your cursor changes to a plus sign. Click and then drag to draw the oval on your document. You can make it as large or small as you like to accommodate the text you want to circle. But remember, you can resize the shape later as well.
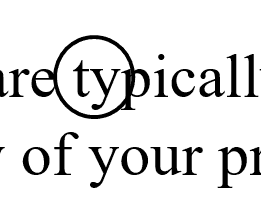
Now that you have your shape, you may need to adjust it so that you can see the text you circle. You can also make optional changes to the line size or color.
Format the Circle Around the Text
You can use the Shape Format tab to customize your shape.
RELATED: How to Add and Format Text in a Shape in Microsoft Word
If your shape has a fill color that you need to remove, select the shape and pick “No Fill” in the Shape Fill drop-down box on the Shape Format tab.
This allows you to place the circle over the text and see only the outline of the shape.
To adjust the line of the circle, select the Shape Outline drop-down arrow. You can then change the line color, weight, and style.
As you make your changes, you’ll see your circle update immediately. So, you can get just the right look.
Move and Resize the Circle
You can move the shape so it’s on top of the text you want to circle by simply dragging it.
If you need to make the circle larger or smaller, drag a corner or edge in or out.
You can make these adjustments to your shape until you see the ideal circle.
If your preferred method of making text pop in your document is by circling it, you can do this in just minutes. And by using the Shapes feature in Microsoft Word, you’ll have a nicely drawn circle.
READ NEXT
- › How to Use the Ink Features in Microsoft Office
- › Expand Your Tech Career Skills With Courses From Udemy
- › BLUETTI Slashed Hundreds off Its Best Power Stations for Easter Sale
- › This New Google TV Streaming Device Costs Just $20
- › Google Chrome Is Getting Faster
- › The New NVIDIA GeForce RTX 4070 Is Like an RTX 3080 for $599
- › How to Adjust and Change Discord Fonts
How-To Geek is where you turn when you want experts to explain technology. Since we launched in 2006, our articles have been read billions of times. Want to know more?
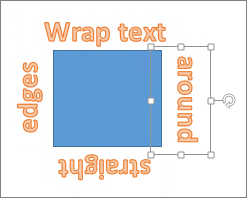
You can use WordArt with a Transform text effect to curve or bend text around a shape. If you want the text to circle the shape, you can also do this, but it’s a little bit more work. You can also insert WordArt multiple times to wrap text around shapes with straight edges.

-
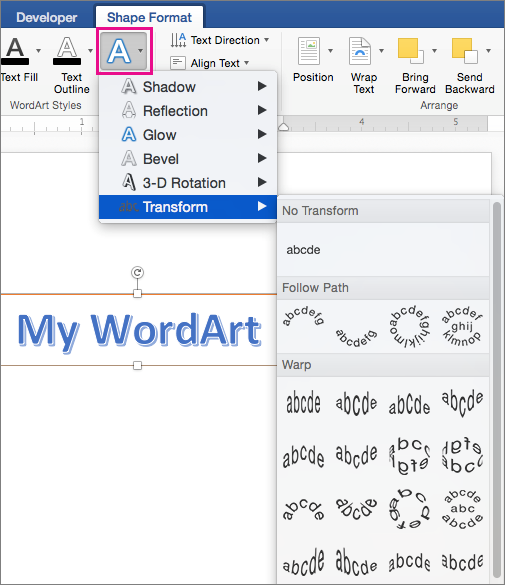
Go to Insert > WordArt, and pick the WordArt style you want.

Note: The WordArt icon is located in the Text group, and it may appear different depending on the version you’re using and the size of your screen. The icon may also look like this
or . -
Replace the WordArt placeholder text with your own text.
-
Select your WordArt text.
-
Go to Shape Format or Drawing Tools Format, select Text Effects >Transform and pick the look you want.
 or
or  .
.
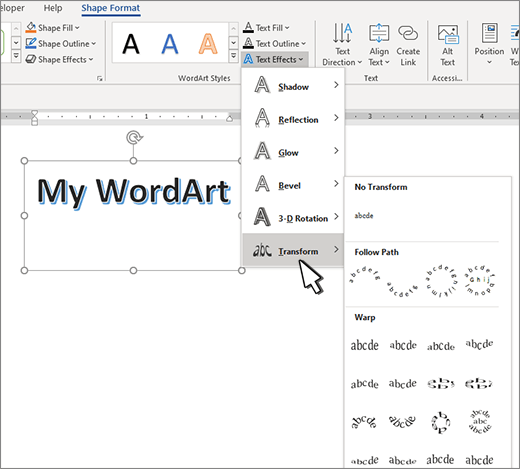
Note: Depending on your screen size, you might only see the icons for WordArt Styles.

Advanced techniques
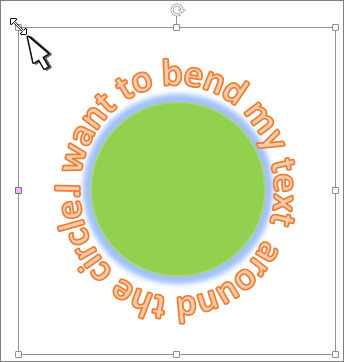
Wrap around a circle To create text that completely circles your shape, choose Circle under Follow Path, and then drag any of the sizing handles until your WordArt is the size and shape you want.
Wrap around straight edges To wrap text around a shape that has straight edges, such as a rectangle, insert WordArt objects for each edge. In this example, WordArt is inserted four times, one for each side of the shape.
Group moves and copy To move or copy multiple WordArt objects as a single shape, see Group or ungroup shapes, pictures, or other objects .
Precise angle control You can control the angle of your WordArt text in relation to your shape with precision by using the Rotate tool.
If you need very precise control or are creating a complex combination of shapes and text, you’ll want to use a third-party drawing or graphics program to create the text around your shape and then copy and paste it into your Office document.
See Also
Add shapes
Insert WordArt
Create curved or circular WordArt
-
Go to Insert > WordArt.
-
Pick the WordArt style you want.
-
Type your text.
-
Select the WordArt.
-
Go to Shape Format > Text Effects > Transform and pick the effect you want.


Advanced techniques
Wrap around a circle To create text that completely circles your shape, choose Circle under Follow Path, and then drag any of the sizing handles until your WordArt is the size and shape you want.
Wrap around straight edges To wrap text around a shape that has straight edges, such as a rectangle, insert WordArt objects for each edge. In this example, WordArt is inserted four times, one for each side of the shape.
Group moves and copy To move or copy multiple WordArt objects as a single shape, see Group or ungroup shapes, pictures, or other objects .
Precise angle control You can control the angle of your WordArt text in relation to your shape with precision by using the Rotate tool.
If you need very precise control or are creating a complex combination of shapes and text, you’ll want to use a third-party drawing or graphics program to create the text around your shape and then copy and paste it into your Office document.
In Word for the web you can see WordArt that’s already in your document, but to add more WordArt you need to open or edit the doc in the desktop version of Word.
You can use the Font features on the Home tab to change the font color and size, and apply bolding, italics, or underlines to your text.
![]()
Written by Allen Wyatt (last updated February 5, 2021)
This tip applies to Word 2007, 2010, 2013, and 2016
When Des writes paper notes, she often puts squares around certain letters or numbers and circles around others. This is her own «code» that allows her to key in on information she needs to pay attention to. Des can relatively easily put squares around letters or numbers in a Word document (using borders), but she hasn’t found a way to add circles.
There are actually a few ways you can go about this. One way, of course, is to use the graphics capabilities built into Word to create a shape (a circle) that can be placed around any letters or numbers you desire. A quick way to do this is to customize the Quick Access Toolbar so it includes the Oval tool. (How you customize the QAT has been covered in other WordTips. The Oval tool is found by listing All Commands during the configuration process.)
Once the Oval tool is in place, click on it and you can then use the mouse pointer to draw the circle. Just hold down the Shift key as you click and drag, and you are guaranteed of a perfect circle. Of course, the circle is filled in with a color, but all you need to do is use the Fill tool (on the Format tab, visible immediately after drawing the circle) to choose No Fill. You can even right-click the circle and choose Set As Default. This assures that the next use of the Oval tool results in a no-fill shape. (You’ll still need to hold down Shift, however, to ensure you create a circle.)
The benefit to this approach is that you can make the circle any size you want and any color you want. The drawback is that it adds graphic shapes to your document—they can sometimes be difficult to position and they increase the size of your document file.
Another approach is to «enclose» your characters. This is achieved through a different command you can add to the Quick Access Toolbar. When configuring, again display All Commands and look for one named Enclose Character. When you’ve added it to the QAT, use it by selecting some text (either one or two characters, no more) and then clicking the tool. You then see the Enclose Character dialog box displayed. (See Figure 1.)
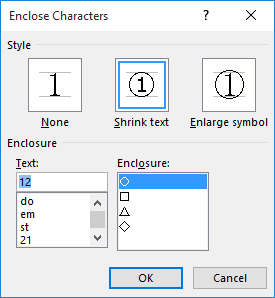
Figure 1. The Enclose Character dialog box.
Here you can select how you want the text affected (shrunk or enlarged) and what type of shape you want to use to enclose the text (circle, square, triangle, etc.). When you click on OK, the text is adjusted through the use of an EQ field. You’ll need to play with this approach a bit to determine if it works just the way you want.
A third way you can tackle this problem is to use a font that already has characters enclosed within circles. This is actually built into Word 2007, Word 2010, and Word 2013. Follow these steps:
- Position the insertion point where you want the circled text.
- Display the Insert tab of the ribbon.
- In the Symbols group, click the Symbol tool and then choose More Symbols. Word displays the Symbol dialog box.
- Using the Font drop-down list, choose Arial Unicode MS.
- Make sure that the From drop-down list is set to Unicode (Hex).
- Using the Subset drop-down list, choose Enclosed Alphanumerics. (You will need to scroll through the drop-down options a ways to find this.) (See Figure 2.)
- Select the symbol you want to use. (If you scroll down a bit you’ll also find circled uppercase letters and circled lowercase letters.)
- Click Insert.
- Close the Symbol dialog box.
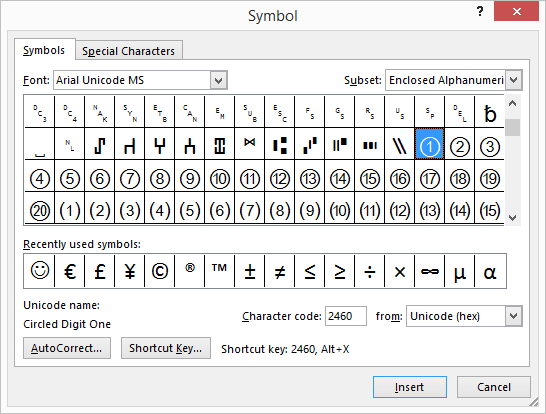
Figure 2. The Symbol dialog box.
The drawback to this approach is that it works only for the numbers 1 through 20 and for single letters (uppercase or lowercase). These steps also won’t work in Word 2016 because—for some inexplicable reason—Microsoft removed the Arial Unicode MS font, and it seems that none of the installed fonts has the Enclosed Alphanumerics subset included. You could, of course, search the Web for a downloadable font that would include circled characters.
WordTips is your source for cost-effective Microsoft Word training.
(Microsoft Word is the most popular word processing software in the world.)
This tip (13436) applies to Microsoft Word 2007, 2010, 2013, and 2016.
Author Bio
With more than 50 non-fiction books and numerous magazine articles to his credit, Allen Wyatt is an internationally recognized author. He is president of Sharon Parq Associates, a computer and publishing services company. Learn more about Allen…
MORE FROM ALLEN
Changing Sort Order
When sorting information, Word follows some pretty strict rules. If you want to modify how those rules are applied, you …
Discover More
Adding Items to a Context Menu
Context menus can be very helpful for presenting common operations you can perform, based on the context in which the …
Discover More
Using the EOMONTH Function
If you need to determine the date of the last day in a month, it’s hard to beat the flexibility of the EOMONTH function. …
Discover More
Have you ever wanted to add circled letters to your Microsoft Word documents?
While it can be quite easy to type text using circled letters on a mobile device, it’s not quite so smooth on a PC. Here are the steps.

- On the far right of the Insert tab of the ribbon, click Symbol > More Symbols.
- Select Font: Arial Unicode MS
- Select Subset: Enclosed Alphanumerics (shortcut: just press “e” on your keyboard to jump to “Enclosed Alphanumerics”)
- Make sure that Unicode (Hex) is selected in the “from:” dropdown at the bottom of the dialog.
- Scroll down in the character selection window a bit – you’ll see both upper and lower case encircled letters.
- Now just click twice on each letter that you wish to insert.
- Click the mouse cursor on your document if you wish to insert a space or punctuation, and then click back on the “Symbols” pop-up box to insert more symbols.
Normal:
The quick fox jumped over the lazy brown dog.
Lowercase circles:
ⓣⓗⓔ ⓠⓤⓘⓒⓚ ⓕⓞⓧ ⓙⓤⓜⓟⓔⓓ ⓞⓥⓔⓡ ⓣⓗⓔ ⓛⓐⓩⓨ ⓑⓡⓞⓦⓝ ⓓⓞⓖ.
Uppercase circles:
ⓉⒽⒺ ⓆⓊⒾⒸⓀ ⒻⓄⓍ ⒿⓊⓂⓅⒺⒹ ⓄⓋⒺⓇ ⓉⒽⒺ ⓁⒶⓏⓎ ⒷⓇⓄⓌⓃ ⒹⓄⒼ.
(I have no idea why the Ⓜ is blue. Weird!)
Lowercase parentheses:
⒯⒣⒠ ⒬⒰⒤⒞⒦ ⒡⒪⒳ ⒥⒰⒨⒫⒠⒟ ⒪⒱⒠⒭ ⒯⒣⒠ ⒧⒜⒵⒴ ⒝⒭⒪⒲⒩ ⒟⒪⒢.
I hope that helps!
~ Hermione Rocks ~

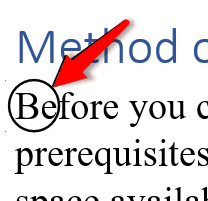
1. Open the Word document and select the text that needs to be circled. Here, we take “and” as an example.
2. Click the Change Case drop-down button → the Enclose Characters option. Then, the Enclose Characters dialog will pop up.
3. We can set the Style of the circled text. According to our actual needs, we can choose Shrink text or Enlarge symbol.
4. Click the OK button. Then, we can circle the text in Word.
(Note: We can add circles to up to 3 letters at a time. )

To be office word advanced, you could learn how to use WPS Office Writer online in WPS Academy.