
Word for Microsoft 365 Word 2021 Word 2019 Word 2016 Word 2013 Word 2010 Word 2007 More…Less
You can use the numbered list feature in Word to add numbers to cells in a table.
Note: If a table cell contains multiple lines of text, Word numbers each line in the cell.
-
Select the table cells that you want to number.
To number the beginning of each row, select only the first column in the table by clicking the column’s top border.

-
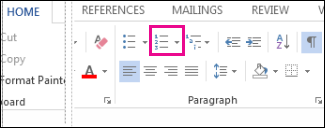
On the Home tab, in the Paragraph group, click Numbering.
Note: To select a different number format, right-click a number in the list, point to Numbering, click Define New Number Format, and then select the options that you want.

See also
Automatically number rows in Excel
Need more help?
Want more options?
Explore subscription benefits, browse training courses, learn how to secure your device, and more.
Communities help you ask and answer questions, give feedback, and hear from experts with rich knowledge.
Tables are visual displays of data arranged in rows and columns. Table cells contain numbers, text, or a combination of numbers and text. Some cells can include images, symbols, links, and other objects. See how to create and modify tables in Word.
Each table should be referenced in the document content. Typically, tables have a number and a title, which are referenced. Microsoft Word offers functionality to create automatically updated numbers for figures, tables, and equations. The numbers and titles, created using the Captions functionality, are used to cross-reference tables in a document and create a List of Tables.
The word Table and a number identify a table then follows the caption. A caption is a short block of text that explain table contents without referring to the document content:

See more about creating numbers and captions for figures: images, pictures, charts, etc., creating captions for equations, and creating captions for photographs.
Attention! We highly recommend checking the formatting requirements, accepted by your college, university, company, or established on the project, etc.
Insert a caption for tables
To add automatically updated numbers and a title (caption) for a table, select it by:
- Selecting all rows or columns of the table one by one, or
- Moving the mouse over the table until you see the table selection icons in the upper-left corner of the table and clicking it:

Note: You can also click on the table selection icon in the bottom-right corner for the same effect. See how to select table elements for more details.

After selecting a table, do one of the following:
- On the References tab, in the Captions group, click the Insert Caption button:

- Right-click on the selection and select the Insert Caption… in the popup menu:


In the Caption dialog box:

Select the label and its position
- Under Options:
- From the Label dropdown list, select the item type you need:

- Table,
- Equation – see how to create captions for equations,
- Figure (selected by default) — see how to create captions for figures,
- Another label (in this example, My Caption) was created using the New Label… button (see how to create a new label below).
Note: Remember that each type of object you labeled will be numbered sequentially within its group.
- From the Position dropdown list, select one of the options:
- Above selected item (selected by default for the Table label), or
- Below selected item (selected by default for the Figure label).
Note: The captions for tables are usually located above the tables.
- From the Label dropdown list, select the item type you need:


Exclude label from caption
- Select the Exclude label from caption check box if you don’t need to add the label to the caption:
Some requirements recommend using the lowercase word table instead of the automatically added Table in Word cross-references.
The option Exclude label from caption hides the label from being displayed in cross-references or a List of Tables.
For example:
- When you insert a cross-reference with the selected option Entire captions or Only label and number (see more details how to use cross-references in Word), Word adds the capitalized label and number, as you see in the Caption field of the Caption dialog box. E.g., “are listed in Table 3” or “are listed in Table 3 Number of articles by statuses and products”.
- All captions, created with selected option Exclude label from caption, Word adds in cross-references as their numbers without the labels. Type the word table (as required) and insert a reference to a caption (e.g., “are listed in table 3”).

Add a new label
- Click the New Label… button to create a new label:
In the New Label dialog box, type a new label name:


Note: See also how to delete a custom label.
Modify caption numbering
- Click the Numbering… button if you want to change any of the numbering options:
In the Caption Numbering dialog box:

- In the Format dropdown list, select the numbering format you need (some requirements recommend using Latin capital letters instead of numbers for tables):
- Select the Include chapter number check box to include the chapter number in the caption number. After selecting this option, two more options will be unlocked:
- From the Chapter starts with style dropdown list, select the heading level you need to include in the caption:
- In the Use separator dropdown list, select the punctuation you need to insert between the chapter number and the table number:
- At the bottom of the dialog box, see how your choices will look in the Examples section. E.g., Table 2.3” means the third table in chapter 2.
- Click the OK button.
- From the Chapter starts with style dropdown list, select the heading level you need to include in the caption:


Add a title
- To add the text of your caption, click after the table number and enter the text. E.g.:

Notes:
- There are several standard requirements for table titles:
- Chicago style recommends using the table title in line with the label and number. E.g.:

- In opposite, APA (American Psychological Association) and MLA (Modern Language Association) styles recommend using the table title with one double-spaced line below the table number (see how to adjust line spacing). E.g.:

To create such a title, don’t type any text in the Caption field, leave it, then do the following:
- Create a caption without a title.
- Position cursor after a caption number and add a new line (by pressing Shift+Enter) in which type of title you need.
Note: You can press Enter and create a new paragraph instead of a new line. See how to create a List of Tables (Table of Figures) for more details.
- Format the caption to adjust line spacing (see how to change caption line spacing).
- In addition, MLA style recommends using a hanging indent to the second line of long titles. E.g.:

- Chicago style recommends using the table title in line with the label and number. E.g.:
- Word offers very helpful functionality to create a text that can be displayed in a List of Tables instead of a caption text. See how to create a Table of Contents Entry.
- For most requirements, the number and the title should be without an ending period. If you need a period after a number, type it in the Caption field.
- If a table spans more than one page, the first page of that table should have a complete caption; the subsequent pages should have an abbreviated caption consisting of a label, a number, and the word Continued. E.g., “Table 3. Continued”.


Using an AutoCaption
See Adding captions with AutoCaption.
Group a table and its caption
According to all requirements, a table (or its part) with its caption should appear on the same page. Word adds captions for tables as a regular paragraph with selected Keep with next option. See how to keep lines and paragraphs together for more details.
See also how to keep a table row on one page and keep a table on one page of a Word document.
Edit or modify a caption
Microsoft Word adds numbers in captions as fields.
![]()
You can show all fields in a document with a gray background, see how to turn on or turn off highlighting of fields in a Word document.
- Labels:
If needed, you can change the label. Word for Microsoft 365 will update the reference if available. In this case, Word will not create a new label and a separate numbering. Be careful!
- Numbers:
DO NOT edit caption numbers! If you change a number:
- In some cases, Word will update it, and you will lose your changes,
- Otherwise, the caption number may stop updating automatically.
- Text:
To add or modify a caption text, click on it and change what you need, like in a regular paragraph.
Do not forget to format a caption according to the requirements you use!
Delete a caption and an unnecessary label
If you need to remove some caption, select the caption paragraph (full line or several lines) and press Delete. Do not forget to update fields in the document!
To remove the unnecessary label, do the following:
1. Open the Caption dialog box.
2. In the Label dropdown list, select the label you want to remove.
3. Click the Delete Label to remove a custom label:

Note: You can’t delete predefined labels: Equation, Figure, and Table.
Update caption numbering
Word automatically updates references and numbering if you insert a new text. However, copying, deleting, or moving context often leads to confusion in the document. After such operations, you have to update all dependencies manually.
To update fields in the document, select the entire document by clicking Ctrl+A, and do one of the following:
- Press F9,
- Right-click on any of the fields and select Update Field in the popup menu:


Word will update all fields. You can be sure that the numbering and references are correct.
We strongly recommend checking a document at least visually after changes!
To add up a column or row of numbers in a table, use the Formula command.
- Click the table cell where you want your result to appear.
- On the Layout tab (under Table Tools), click Formula.
- In the Formula box, check the text between the parentheses to make sure Word includes the cells you want to sum, and click OK.
Contents
- 1 Can you AutoSum in a Word table?
- 2 How do you do automatic numbering in Word?
- 3 How do you sum text values?
- 4 How do I sum a column in numbers?
- 5 How do I add row numbers in Word?
- 6 How do I count cells with certain text?
- 7 How do I sum only cells with values?
- 8 How do you use the count function?
- 9 How do I add cells in Mac Numbers?
- 10 How do you show formulas in Numbers?
- 11 How do I add paragraph numbers in Word?
- 12 How do you use the parchment fill effect?
- 13 How do you count cells with numbers?
- 14 How do I count cells with text in sheets?
- 15 How do I count the number of characters in a cell?
- 16 How do I sum cells and ignore text?
- 17 How do you sum If blank?
- 18 How do I use Sumif not?
- 19 Which function counts the number of characters in the text?
- 20 What is the function of word count?
Can you AutoSum in a Word table?
You can use a Word table and let Word do the calculating.Simply click in a cell to the right or below a contiguous row or column and click the AutoSum button on the Tables And Borders toolbar. (To display this toolbar, choose Toolbars from the View menu,and check Tables And Borders.)
How do you do automatic numbering in Word?
Turn on or off automatic bullets or numbering
- Go to File > Options > Proofing.
- Select AutoCorrect Options, and then select the AutoFormat As You Type tab.
- Select or clear Automatic bulleted lists or Automatic numbered lists.
- Select OK.
How do you sum text values?
Press Ctrl + Shift + Enter to get the SUM of the required text values as this is an array formula.
How do I sum a column in numbers?
On your Android tablet or Android phone
- In a worksheet, tap the first empty cell after a range of cells that has numbers, or tap and drag to select the range of cells you want to calculate.
- Tap AutoSum.
- Tap Sum.
- Tap the check mark. You’re done!
How do I add row numbers in Word?
Add line numbers to a section or to multiple sections
- Click in a section or select multiple sections.
- On the Layout tab, in the Page Setup group, click Line Numbers.
- Click Line Numbering Options, and then click the Layout tab.
- In the Apply to list, click Selected sections.
- Click Line Numbers.
How do I count cells with certain text?
Count if cell contains text or part of text with the COUNTIF function
- =COUNTIF(B5:B10,”*”&D5&”*”)
- Syntax.
- =COUNTIF (range, criteria)
- Arguments.
- Notes:
- =COUNTIF(B5:B10,”*”)
- Tip. If you want to have a free trial (60-day) of this utility, please click to download it, and then go to apply the operation according above steps.
How do I sum only cells with values?
If you want, you can apply the criteria to one range and sum the corresponding values in a different range. For example, the formula =SUMIF(B2:B5, “John”, C2:C5) sums only the values in the range C2:C5, where the corresponding cells in the range B2:B5 equal “John.”
How do you use the count function?
Use the COUNT function to get the number of entries in a number field that is in a range or array of numbers. For example, you can enter the following formula to count the numbers in the range A1:A20: =COUNT(A1:A20). In this example, if five of the cells in the range contain numbers, the result is 5.
How do I add cells in Mac Numbers?
Click a cell to use in your formula, or type a value (for example, a number such as 0 or 5.20). Type an arithmetic operator (for example, +, -, *, or /), then select another cell to use in your formula, or type a value. By default, Numbers inserts a + between cell references. in the formula editor when you’re done.
How do you show formulas in Numbers?
To use Functions, just select the cell that you want to use for the calculation, and then click the Function tool, which will display a menu containing common functions like sums, averages, minimums, and maximums, but in addition you can choose “Show function browser” to see a list of all the functions that Numbers has
How do I add paragraph numbers in Word?
Click the “Home” tab, highlight the paragraphs you’d like to number and click the Numbered icon to add a number before each paragraph. The Numbered icon looks like three lines numbered 1 to 3. After you add the numbers, you may discover a slight problem; by default, the line spacing between your paragraphs disappears.
How do you use the parchment fill effect?
Here are the quick steps:
- Choose Page Layout tab on the Ribbon. Go to Page Color -> Fill Effects.
- In the Fill Effects box, click on the Texture tab.
- Click through the texture swatches on display (the names appear just below) and then select the swatch for Parchment.
- Click OK.
How do you count cells with numbers?
Count Cells with Numbers — COUNT
- Enter the sample data on your worksheet.
- In cell A7, enter an COUNT formula, to count the numbers in column A: =COUNT(A1:A5)
- Press the Enter key, to complete the formula.
- The result will be 3, the number of cells that contain numbers. Cell A1 isn’t counted, because it contains text.
How do I count cells with text in sheets?
COUNTA Method
- Select a blank cell and type the =COUNTA function including the range of cells that you want to count. For example, we used =COUNTA(A2:A11).
- Just hit enter, and the COUNTA function will automatically count the cells that are not blank.
- You now have the total number of cells that have values in it!
How do I count the number of characters in a cell?
To use the function, enter =LEN(cell) in the formula bar and press Enter. In these examples, cell is the cell you want to count, such as B1. To count the characters in more than one cell, enter the formula, and then copy and paste the formula to other cells.
How do I sum cells and ignore text?
There is a formula can help you quickly sum up the column ignore #N/A. Select a blank cell, C3 for instance, and type this formula =SUMIF(A1:A14,”<>#N/A”), press Enter key to get the result.
How do you sum If blank?
Select a blank cell to display the result. Copy and paste the formula =SUM(IF(ISBLANK(B2:B7),A2:A7,0)) (B2:B7 is the data range which contains the blank cells, and A2:A7 is the data you want to sum) into the Formula Bar, then press Ctrl + Shift + Enter keys at the same time to get the result.
How do I use Sumif not?
When you use an operator in the criteria for a function like SUMIF, you need to enclose it in double quotes (“”). In this case, the criteria is input as “<>West” which you can read as “not equal to West”, or simply “not West”.
Which function counts the number of characters in the text?
The LEN function
1. The LEN function in Excel counts the number of characters in a cell.
What is the function of word count?
Word counts the number of words in a document while you type. Word also counts pages, paragraphs, lines, and characters. When you need to know how many words, pages, characters, paragraphs, or lines are in a document, check the status bar.
You are here
If you’re using Word to present a table of data that includes numbers, you can use Word’s built in formulas to add up those numbers rather than manually calculate them each time they change. This can also eliminate the possibility of error — particularly important if you’re producing a sales proposal or an important report.
Note that you can’t just add up numbers on different lines — you can only add up numbers that are presented in either a column or a row inside a table.
First, create your table and decide which column or row will hold the numbers you wish to add up. Enter the numbers, making sure that there is a number in each cell in the column.
Then, in the last row in the table, click in the cell in the number column and choose Insert > Quick Parts > Field, then click Formula
A new dialog box should appear containing a Formula field with one of the following formulas:
=SUM(ABOVE)
=SUM(LEFT)
Note — if you get an error rather than one of these formula, it most likely means that Word couldn’t find any numbers in the cells above or to the left of the current cell.
You can now choose a format for the number. The list of available number format is somewhat limited, but you can manually enter any format that is supported by Excel. For example, the following format is not listed but will work to format the number with a $ sign, thousand separators and two decimal places:
$#,###.##
Once you’ve chosen a format, you can click OK.
This will insert the SUM formula into the cell. Word will then calculate the sum of all the cells above the cell where the formula is located provided they all contain numbers.
If you find that Word does not calculate the sum of all the numbers in the column, it is possible that one of the cells does not contain a valid number. This gives rise to two possibilities:
- Word will ignore any cells containing non-numbers (i.e. text) in the column above and add up the rest of the cells. In some cases, you may have typed a number which Word sees as text instead. Try retyping these numbers to see if that fixes the problem.
- Word encounters an empty cell. Once it hits an empty cell, Word stops calculating. Any cells above the empty cell will be ignored. If this happens, you may need to rearrange the order of the rows in the table, or consider putting a text value into the empty cells.
.
Want to learn more? Try these lessons:
.
.
Our Comment Policy.
We welcome your comments and questions about this lesson. We don’t welcome spam. Our readers get a lot of value out of the comments and answers on our lessons and spam hurts that experience. Our spam filter is pretty good at stopping bots from posting spam, and our admins are quick to delete spam that does get through. We know that bots don’t read messages like this, but there are people out there who manually post spam. I repeat — we delete all spam, and if we see repeated posts from a given IP address, we’ll block the IP address. So don’t waste your time, or ours. One other point to note — if you post a link in your comment, it will automatically be deleted.
Add a comment to this lesson
.
Comments on this lesson
This is helpful, but one must
This is helpful, but one must remember that if you change the numbers in the table, you need to recalculate the total. It doesn’t update automatically, as it does in Excel.
.
Recalculating totals when the numbers change
Thanks for pointing this out. You’re right that the numbers won’t update automatically. You can update a total by right-clicking the total and choosing the Update Field option. If you have multiple total fields (or other types of Word fields, such as a table of contents or cross references to other parts of your document) you can trick Word into recalculating all of them by pressing CTRL+P (or simply choosing the Print option). You don’t actually have to print the document, but this will force Word to recalculate the fields in your document.
.
What about the formatting of the input numbers
It appears the numbers captured in the table need to be «unformatted» (e.g. 1000000 instead of $1,000,000) for them to be added up. Is there a way around this?
.
Adding up formatted numbers in a Word table
Hmmm. In my experience, adding up numbers with formatting such as you’ve shown is no problem at all. Perhaps there is something else happening in your table? Happy to take a look at an example document if you would like to get in touch directly via the Contact page.
.
Adding Up Numbers in Word
I have tried these instructions at least twice. The numbers aren’t adding up correctly. I have Word 2013. Does this make a difference in the «how to» instructions?
.
Added up different lines not just the whole column
you certainly can just add up different lines e.g. =SUM(B2:B3) just like in Excel. You just have to image the rows and columns numbered like an Excel spreadsheet. And if you put a number in brackets e.g. (£750.00) it will subtract the amount.
.
Sum word table cells with numbers in bracket
Word 2016 will sum correctly all numbers in text whether there are thousand separators and brackets.
But Word 2007 could not sum text like «-» or number in brackets
.
Sum Numbers in MS Word
So we have an invoice with a subtotal, then add tax for final total, etc. But how do we image to discover what the Subtotal & Tax fields are to add for the final total?
.
auto sum in word
i did above steps and i am able to do auto sum but my problem is, i need to use that word file with Autosum function as a template and send it to all employee. i saved the word and re open it and when i enter data it do not automatically auto sum it. how can i fix this?
.
.
.
.
.

on
March 27, 2008, 5:00 PM PDT
How to number rows in a Word table
Number Word table rows and columns
I love discovering an easy trick, especially one I’ve never seen used before. Did you know that you can quickly add row and column numbers to a Word table? Simply use the Numbering tool on the Formatting toolbar (in version 2003 and earlier):
- To number rows, select the left most column in the table and click Numbering on the Formatting toolbar. To select a column, hover the mouse over the column until Word displays the selection arrow (see below) and click. In Word 2007, select the column and then click Numbering in the Paragraph group on the Home tab.
- To number columns, select the top row in the table and click Numbering on the Formatting toolbar. To select a row, hover the mouse in the left margin just next to the row you want to click. When Word displays the selection tool (see below) click to select the row. In Word 2007, select the row and then click Numbering in the Paragraph group on the Home tab.
Select a column
Select a row
In truth, you can number any row or column, but most likely, you’ll want to display numbers to the left or across the top of the table. I realize that you won’t want to number most tables and columns, but I still like knowing I can do it.
Number rows
Number columns
-
Software

Let Word sum a column or row of numbers in a table for you. That saves a lot of calculations.
Mathematics in Word
Table made with noted costs incurred? Or the number of hours you have spent volunteering? Word adds the numbers using a special formula. This means that you do not do the calculations yourself. Especially useful when the table contains a long string of numbers. Making a calculation error is quickly done.
Addition Formulas
Add up the numbers in a Word table like this:
- Create a table or open the Word document that contains the table.
- In the table, click an empty cell where you want to display the result of the addition. For example, the cell at the bottom of the first column.
- No empty cell? Then add a row or column first. To do this, right-click in a cell where a row or column should be next to, below or above.
- click on Insert.
- click on Insert columns on the left, Insert columns on the right, Insert rows above or Insert rows below.
- At the top of the Table Tools group, click the tab Layout.
- Right click Formula.
- Usually the correct formula has already been entered. Enter a different formula if necessary:
- SUM(ABOVE): Sum the numbers in the column above the selected cell.
- SUM(LEFT): Add the numbers in the row to the left of the selected cell.
- SUM(RIGHT): Add the numbers in the row to the right of the selected cell.
- SUM(BELOW): Sum the numbers in the column below the selected cell.
- Click on the drop-down menu under ‘Number format’. click on 0 to display the result in numbers.
- click on OK.
The numbers are added up. Change a number or add an extra line at a later time? Unfortunately, the result of the addition does not change automatically. Then re-enter the formula to add the numbers.
For large tables in Word, it would be more convenient if we can auto number their rows or columns. Follow this article to learn how.
Many of us may know how to use the AutoNumber feature in Excel worksheets. In fact, this feature can also be applied to Word tables. For complex documents that may contain large tables, you may want Word to number the rows automatically to save time. Besides, if you have inserted auto-number to the rows or columns of a table, then you will never need to adjust numbers when you insert or remove rows or columns from your table anymore, because Word will update them automatically. In this article, we will mainly introduce how to do so.
Method 1: Create a Normal Auto-numbered List
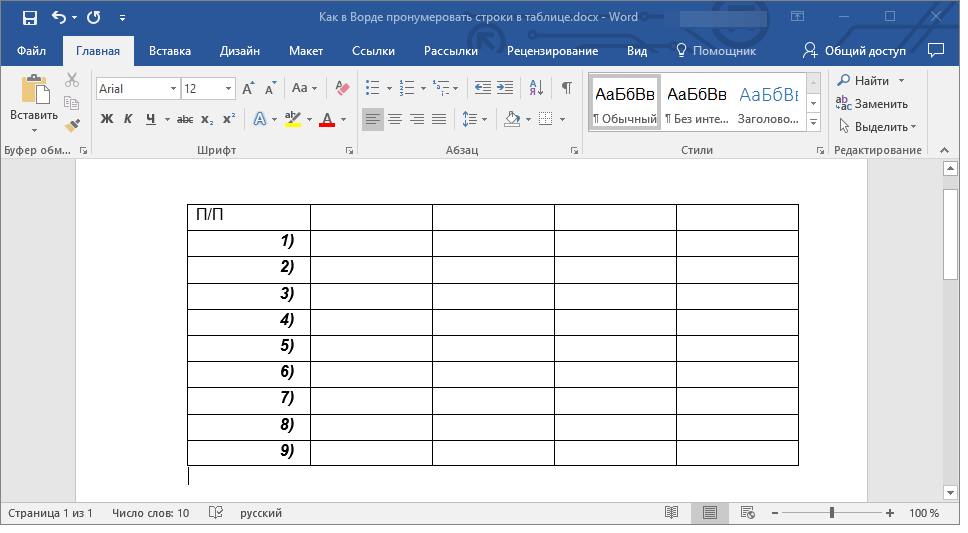
For better understanding, I will show you how to insert an auto-numbered list in the first left column of the table like this: 
- Select the column of your table where you want to insert a numbered list.
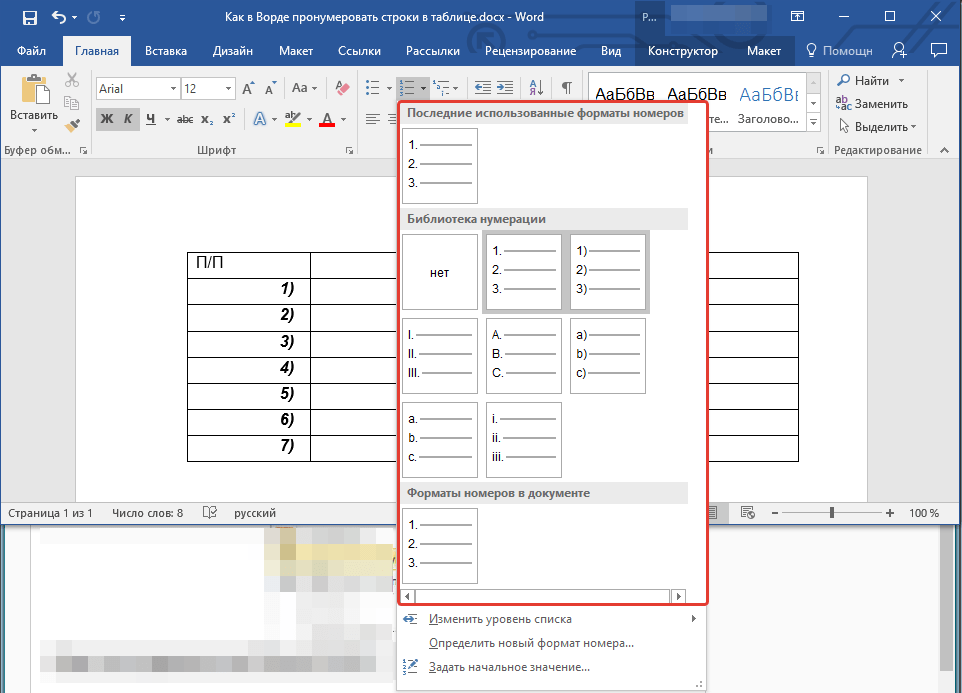
- Go to “Home” tab, and then click “Numbering” drop down list.
- Select a numbered list from “Numbering Library”.


Method 2: Apply Customized Number Format
In Word, you can also change the style and format of the numbered lists. For example, sometimes you may need to restart the sequence, or specify a new start number like this:
To do so, you can follow these steps:
- Select the column of your table where you want to insert a numbered list with other formatting.
- Switch to “Home” tab, and click “Numbering” drop down list. And then select “Define New Number Format”

- In the subsequent dialog box, enter your customized number format under “Number Format” box.
- Select the style of numbers from “Number Style” drop-down list. And then click “OK” to save it.

- In this way, we will be able to define new number format of our own. And if we delete or add an item into the table, the numbered list will update accordingly.


Take Assistance of a Specialized Repair Tool
All in all, we can quickly add row or column numbers to a large Word table automatically. And also, Word provides many other features to bring common users convenience. However, Word sometimes can be affected by malware intrusion or virus attacks. Thus, it is essential to keep a stellar repair tool nearby to recover word. This tool is capable of examining Word files and restoring them to their prior condition in a jiffy.
Author Introduction
Kelly Zhao is a data recovery expert in DataNumen, Inc., which is the world leader in data recovery technologies, including excel recovery and pdf repair software products. For more information visit www.datanumen.com

Если вам необходимо пронумеровать строки в созданной и, возможно, уже заполненной таблице в программе MS Word, первое, что приходит в голову — сделать это вручную. Конечно, всегда можно добавить в начало таблицы (слева) еще один столбец и использовать именно его для нумерации, вводя туда цифры в порядке возрастания. Вот только целесообразным такой метод является далеко не всегда.
Урок: Как сделать таблицу в Ворде
Добавление нумерации строк в таблицу вручную может быть более менее подходящим решением лишь в том случае, когда вы уверены, что таблица больше не будет изменяться. В противном случае, при добавлении строки с данными или без них, нумерация в любом случае собьется и ее придется изменять. Единственно верное решение в данном случае — сделать автоматическую нумерацию строк в таблице Word, о чем мы и расскажем ниже.
Урок: Как добавить строки в таблицу Ворд
1. Выделите тот столбец в таблице, который будет использоваться для нумерации.
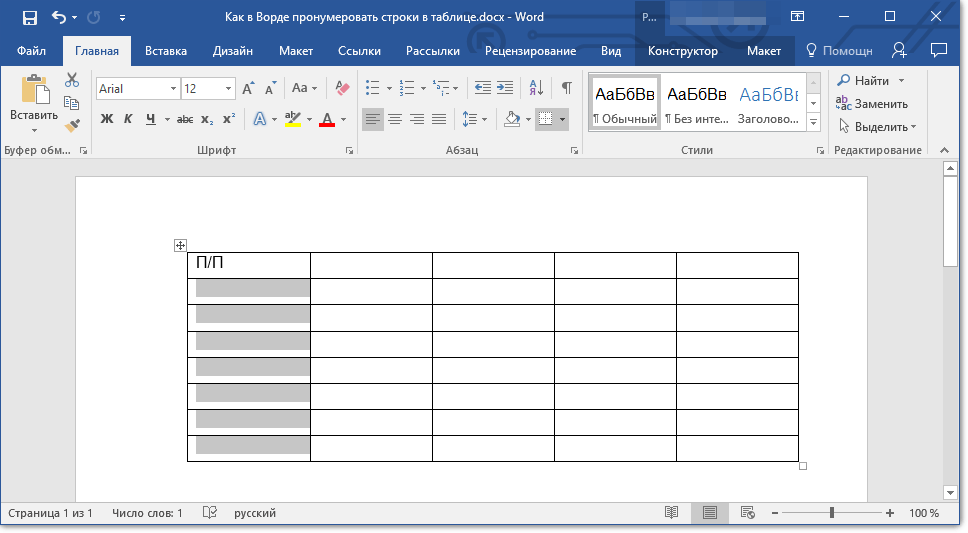
Примечание: Если в вашей таблице есть шапка (строка с названием/описанием содержимого столбцов), первую ячейку первой строки выделять не нужно.
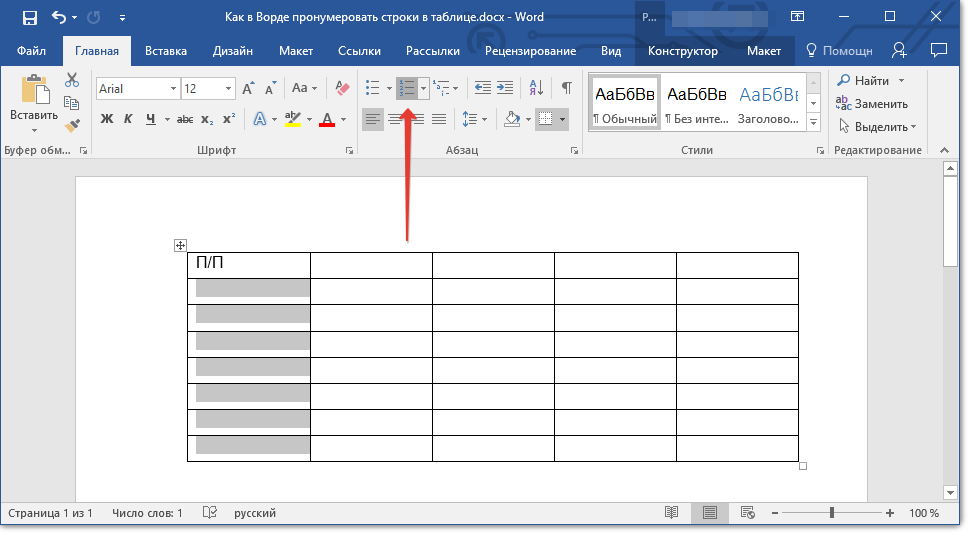
2. Во вкладке “Главная” в группе “Абзац” нажмите кнопку “Нумерация”, предназначенную для создания нумерованных списков в тексте.
Урок: Как отформатировать текст в Word
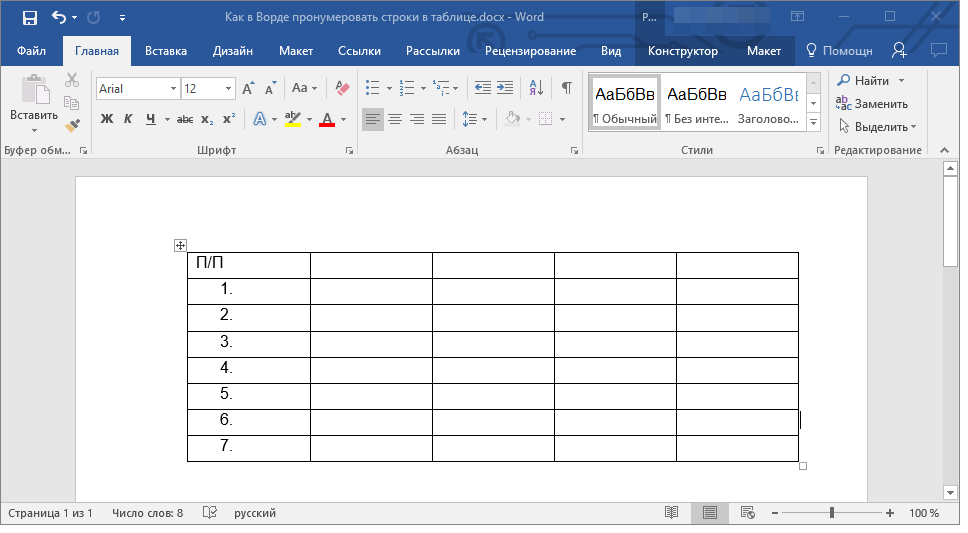
3. Все ячейки в выделенном вами столбце будут пронумерованы.
Урок: Как в Ворд упорядочить список в алфавитном порядке
Если это необходимо, вы всегда можете изменить шрифт нумерации, ее тип написания. Делается это точно так же, как и с обычным текстом, а наши уроки вам в этом помогут.


Уроки по работе с Word:
Как изменить шрифт
Как выровнять текст
Помимо изменения шрифта, типа написания размера и прочих параметров, вы также можете изменить расположение номерных цифр в ячейке, уменьшив отступ или увеличив его. Для этого выполните следующие действия:
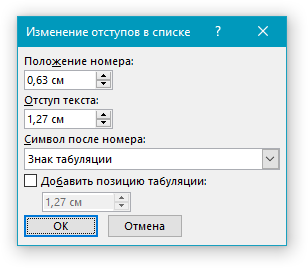
1. Кликните правой кнопкой мышки в ячейке с цифрой и выберите пункт “Изменить отступы в списке”:
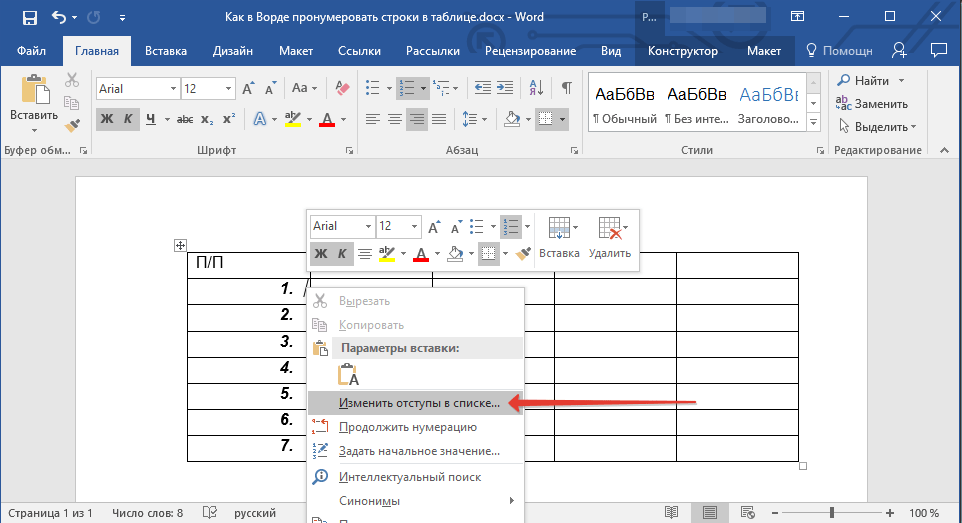
2. В открывшемся окошке задайте необходимые параметры для отступов и положения нумерации.
Урок: Как объединить ячейки в таблице Ворд
Для изменения стиля нумерации воспользуйтесь меню кнопки “Нумерация”.
Теперь, если вы будете добавлять в таблице новые строки, вносить в нее новые данные, нумерация будет изменяться автоматически, тем самым избавив вас от лишних хлопот.
Урок: Как пронумеровать страницы в Word
Вот, собственно, и все, теперь вы знаете еще больше о работе с таблицами в Ворде, в том числе и о том, как сделать автоматическую нумерацию строк.
Еще статьи по данной теме:
Помогла ли Вам статья?
![]()
Written by Allen Wyatt (last updated March 15, 2021)
This tip applies to Word 2007, 2010, 2013, and 2016
Denis frequently uses tables in his documents. In those tables, he has a need to add a series of sequential numbers to the cells in the first column. Denis wonders if there is a way to pick a starting number in a cell and then have Word add the sequential numbers for all the cells under that starting number.
There are a couple of ways you could go about this. One way is to use Word’s built-in numbering, in this manner:
- Insert your table as you normally would.
- Select the cells in the table that you want to have numbered.
- Display the Home tab of the ribbon.
- Click the Numbering tab, in the Paragraph group. Word adds numbering, automatically, to the selected cells.
If you want to modify the starting number for the cells, right-click the number in the first cell and then choose Set Numbering Value from the resulting Context menu. Word displays the Set Numbering Value dialog box. (See Figure 1.)
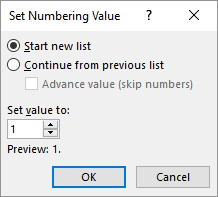
Figure 1. The Set Numbering Value dialog box.
Enter the value you want to start with, and when you click OK, Word updates the numbers in the cells. You’ll also note that if you insert any rows in the middle of your numbered sequence, Word automatically adds a number to that inserted row.
Noting this behavior, you might appreciate a simple variation on the above process that works well when you are inserting a brand new table:
- Insert a single-row table.
- Add the automatic number to the desired column and change its starting value, if desired. (In other words, follow the steps above for the single cell in the row.)
- When entering data in the table and you get to the last column, press Tab and Word inserts a new row that is automatically numbered.
Another powerful way to add your numbering is to use the SEQ field. Follow these general steps:
- Insert the insertion point at the place in the table where you want the first number.
- Press Ctrl+F9 to insert an empty set of field braces.
- Inside the field braces, type SEQ followed by a space, then a name you want used for this particular sequence, then another space, then r, then the number you want the sequence to start with. Here’s an example of how the field code would appear if you wanted to start counting with the number 4:
- With the insertion point still within field code, press Shift+F9. Your number should appear.
- Repeat steps 2 through 4 for each of the other cells where you want a number, but make sure you leave off the r switch in these others.
{ SEQ table1 r4 }
Finally, if you prefer to use a macro to insert numbers in a sequence of cells, you could use one similar to this:
Sub AddNumbersToTable()
    Dim RowNum As Long
    Dim ColNum As Long
    Dim iStartNum As Integer
    Dim J As Integer

    If Selection.Information(wdWithInTable) Then
        RowNum = Selection.Cells(1).RowIndex
        ColNum = Selection.Cells(1).ColumnIndex

        iStartNum = Val(Selection.Cells(1).Range.Text)
        If iStartNum <> 0 Then
            iStartNum = iStartNum + 1

            For J = RowNum + 1 To ActiveDocument.Tables(1).Rows.Count
                ActiveDocument.Tables(1).Cell(J, ColNum).Range.Text = iStartNum
                iStartNum = iStartNum + 1
            Next
        Else
            MsgBox "Cell doesn't contain a non-zero starting number."
            Exit Sub
        End If
    Else
        MsgBox "Not in table"
    End If
End Sub
To use the macro, just put a starting sequence value into a cell of the table and leave the insertion point in that cell. When you then run the macro, all the cells under that starting cell are filled with sequential values. (Anything previously in those cells is deleted.)
If you would like to know how to use the macros described on this page (or on any other page on the WordTips sites), I’ve prepared a special page that includes helpful information. Click here to open that special page in a new browser tab.
WordTips is your source for cost-effective Microsoft Word training.
(Microsoft Word is the most popular word processing software in the world.)
This tip (89) applies to Microsoft Word 2007, 2010, 2013, and 2016.
Author Bio
With more than 50 non-fiction books and numerous magazine articles to his credit, Allen Wyatt is an internationally recognized author. He is president of Sharon Parq Associates, a computer and publishing services company. Learn more about Allen…
MORE FROM ALLEN
Checking Up On Numbers
When do you use digits in your prose and when do you spell out the numbers? Why not let Word help you make the decision? …
Discover More
Inserting the Total Number of Pages in Your Document
Word keeps track of many statistics for each of your documents. One statistic is the total number of pages in the printed …
Discover More
Precision and Number Display
Do you need to work with very precise numbers in your worksheets? If you do, then it is imperative you understand …
Discover More