
Word for Microsoft 365 Word 2021 Word 2019 Word 2016 Word 2013 Word 2010 Word 2007 More…Less
In this article
-
Add a cell
-
Add a row above or below
-
Add a column to the left or right
-
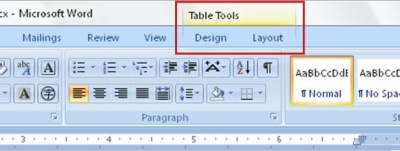
About the Table Tools contextual tabs
Add a cell
-
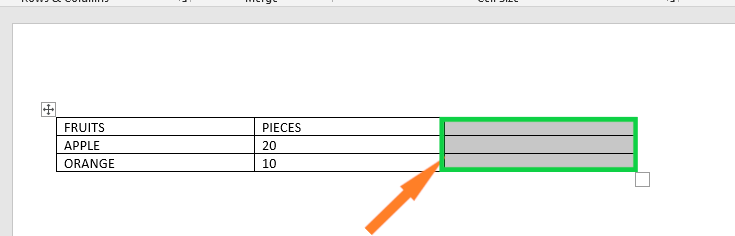
Click in a cell that is to the right of or above where you want to insert a cell.
-
Under Table Tools, click the Layout tab.
-
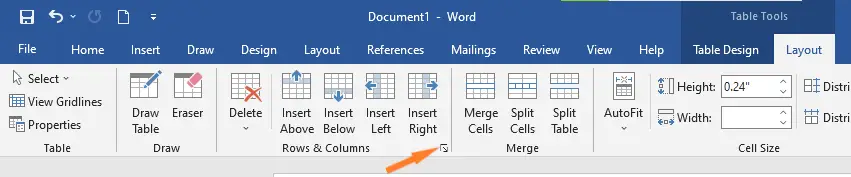
Click the arrow at the bottom, right-hand corner of the Rows & Columns section.
-
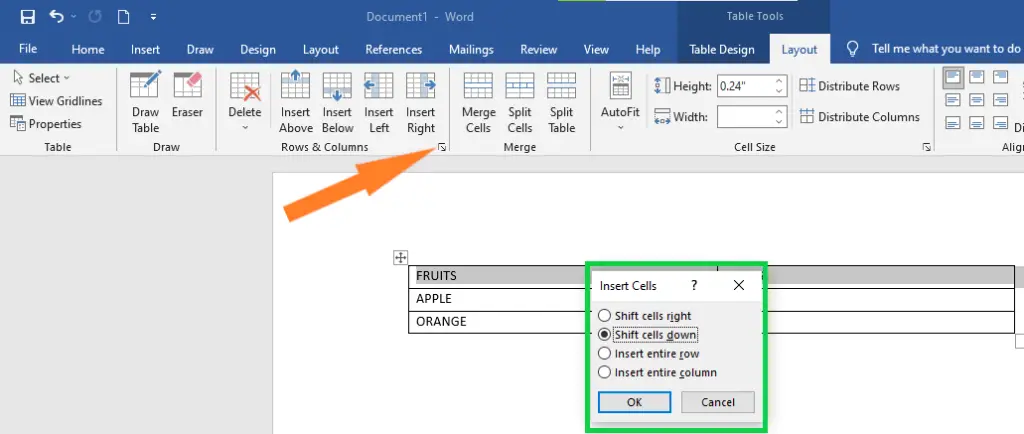
Click one of the following options.
Click
To
Shift cells right
Insert a cell and move all other cells in that row to the right.
Note: Word does not insert a new column. This may result in a row that has more cells than the other rows.
Shift cells down
Insert a cell and move the existing cells down one row. A new row is added at the bottom of the table.
Insert entire row
Insert a row above the cell that you clicked in.
Insert entire column
Insert a column to the left of the cell that you clicked in.
Top of Page
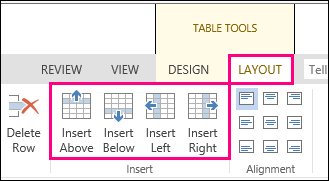
Add a row above or below
-
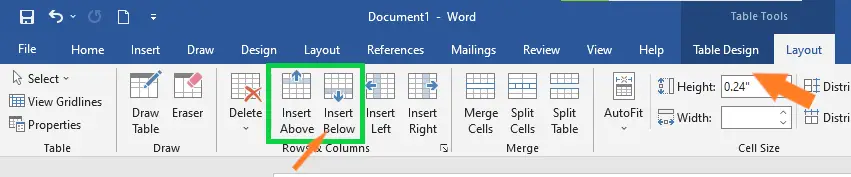
Click in a cell above or below where you want to add a row.
-
Under Table Tools, on the Layout tab, do one of the following:
-
To add a row above the cell, click Insert Above in the Rows and Columns group.
-
To add a row below the cell, click Insert Below in the Rows and Columns group.
-
Tip: To insert more than one row (or column) at the same time, select as many rows or columns as you want to add before you click the insert control. For example, to insert two rows above a row, first select two rows in your table and then click Insert Above.
Top of Page
Add a column to the left or right
-
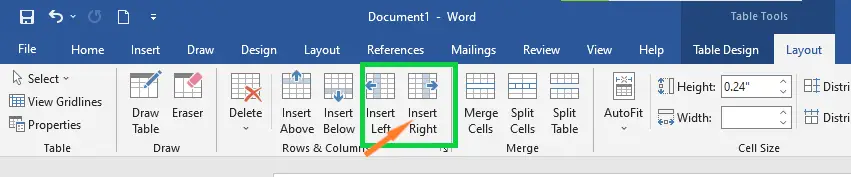
Click in a cell to the left or right of where you want to add a column.
-
Under Table Tools, on the Layout tab, do one of the following:
-
To add a column to the left of the cell, click Insert Left in the Rows and Columns group.
-
To add a column to the right of the cell, click Insert Right in the Rows and Columns group.
-
Top of Page
About the Table Tools contextual tabs
You will need to know where the Design and LayoutTable Tools contextual tabs are when working on the design and structural layout of a table. The Design and Layout tabs are only visible after you have clicked inside of a table, and appear at the top of the screen on the ribbon.
Top of Page
See Also
Delete a row, column, or cell from a table
Add columns and rows to a table
Keyboard shortcuts for Microsoft Word on Windows
Need more help?
To make room for more information in a table, you can add rows and columns without leaving Word for the web.
-
First, if you’re in Reading View, click Edit Document > Edit in Word for the web.

-
Click anywhere in the table that you want to change. You’ll see Table Tools appear above the ribbon.
-
Under Table Tools, click Layout. This opens options for inserting rows and columns, plus other table options.
-
Put your cursor wherever in the table you want to add a column or row.
-
To insert a row, click Insert Above or Insert Below.
-
To insert a column, click Insert Left or Insert Right.
-


Tip: If you also want to change the look of your table, check out the options on the Table Tools > Design tab.
Need more help?
Want more options?
Explore subscription benefits, browse training courses, learn how to secure your device, and more.
Communities help you ask and answer questions, give feedback, and hear from experts with rich knowledge.

For customization, you can add rows and columns to a Microsoft Word document. To do so, follow these instructions to add tablets.
Microsoft Word probably isn’t the first thing you think of when you need to work with a spreadsheet. For that, you’d turn to Microsoft Excel. And yet, you can still add columns and rows to a table in a Word document. Here’s how to do it.
The first step in adding rows and columns in a Word document is to create a table. To get started:
- Start Microsoft Word.
- Bring up the document you want to use.
- Put your pointer in the location where you want to add a table.
- Choose Insert > Table on the Word ribbon.
- Use the chart in the pull-down menu to add rows and columns.

Once the table is created, you can add data.
Adding Rows
After you’ve created a table in a Word document, you may have to add a new row. You can do this by putting your cursor into the last cell in the table, then click Tab on your keyboard. To add more rows, repeat.

Deleting Rows
You can also delete rows and columns in your table by pressing the Delete key. To do so, select a row or column in the table, then use the Delete key. You can also choose the Delete button in the options box, then select Delete Row. You can also select Delete Cell, Delete Column, and Delete Table using the same button.

Deleting Columns
It’s also possible to delete columns similarly. First, select the entire column you wish to delete, then hit the Delete key on your keyboard.

Other Options
With your cursor in the table, you can perform additional steps using the Word ribbon menu. First, be sure to select the second Layout option on the menu. From there, choose Rows & Columns and select from the following options.
With Insert Above, a row above the current cell gets created, just as Insert Below adds a new row immediately after the active cell. Insert Right makes a new column to the right of the cell, while Insert Left does the opposite.
More With Microsoft Word
Not surprisingly, there’s a lot more you can do with Word, even with tables, including changing the formatting. You can also use an Outline View when you’re working with large documents and insert animated GIFs, among other tasks.
You can find Microsoft Word inside the Microsoft 365 suite. For home use, the Microsoft 365 suite (formerly O365) is currently available in three varieties, including a Family, Personal, and Home & Student plan. Price-wise, the first is $100 per year (or $10/month) and includes Word, Excel, PowerPoint, OneNote, and Outlook for Mac. Membership covers up to six users. The Personal version is for one individual and is $70/year or $6.99 per month. Finally, the student plan is a one-time purchase of $150 and includes Word, Excel, and PowerPoint.
Business users can select from Basic, Standard, and Premium plans, starting at $5 per user/month.
![]()
In this chapter, we’ll talk about How to add rows and columns in MS Word. As we talked about in the last chapter, a table is made up of columns on the left and rows on the right, with a cell at each intersection. This chapter will show you how to add and remove rows and columns from a table.
Table of contents
- What is row and column in MS Word?
- How To Add Rows and Columns in MS Word
- Add Table Rows Using Tab
- Add a column to the table
- Use the Ribbon Menu to Add Rows or Columns
- Use Delete Key to Remove Rows and Columns
- Summary
What is row and column in MS Word?
A Word table can have up to 63 columns in a Word document. This is the maximum number of columns that can be in a Word document. In addition, you can have as many rows as you want. Word Document, specifically, allows you to put 32, 767 rows in one table.
The following are the simple steps to add rows to a table in a word document. Once you create a table in a Word document, you will be able to add additional rows to your table based on your requirements.
- Step 1: Place cursor in the table where you want to add a row.
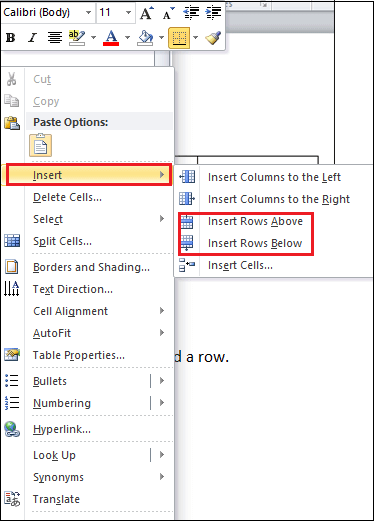
- Step 2: Right-click on the selected area, the following dialog box will appear on the screen. Click on the drop-down menu associated with the Insert button.
Click on the Insert Rows Above option to add a row above the selected row.
Click on the Insert Rows Below option to add a row below the selected row.
- The screenshot below shows that a new row is added to the table.

Add Table Rows Using Tab
Adding rows to your table is easiest if you put your cursor in the cell in the bottom-right corner of your table and then press Tab on your keyboard.
This will add a new row. When you want to add a row, you can choose the cell at the bottom right and press Tab again. If you choose another cell and press Tab, the cursor will move to the next cell. A new row is only automatically added to the last cell.
Add a column to the table
Adding more columns to a Word document is not hard for you to do. To add a column to the table, follow the steps below.
Step 1: Place the cursor where you want to add a column to the table.
Step 2: Right-click on the table, a list of options will show up. Click the drop-down arrow next to the Insert icon.
- Click on the Insert Columns to the Left to add the column left side of the table.
- Click on the Insert Column to the Right to add the column right side of the table.

- Step 3: The screenshot below shows that column is added to the table.

Use the Ribbon Menu to Add Rows or Columns
If you have a table in a Word document, you can use the ribbon menu to see more ways to add rows and columns.
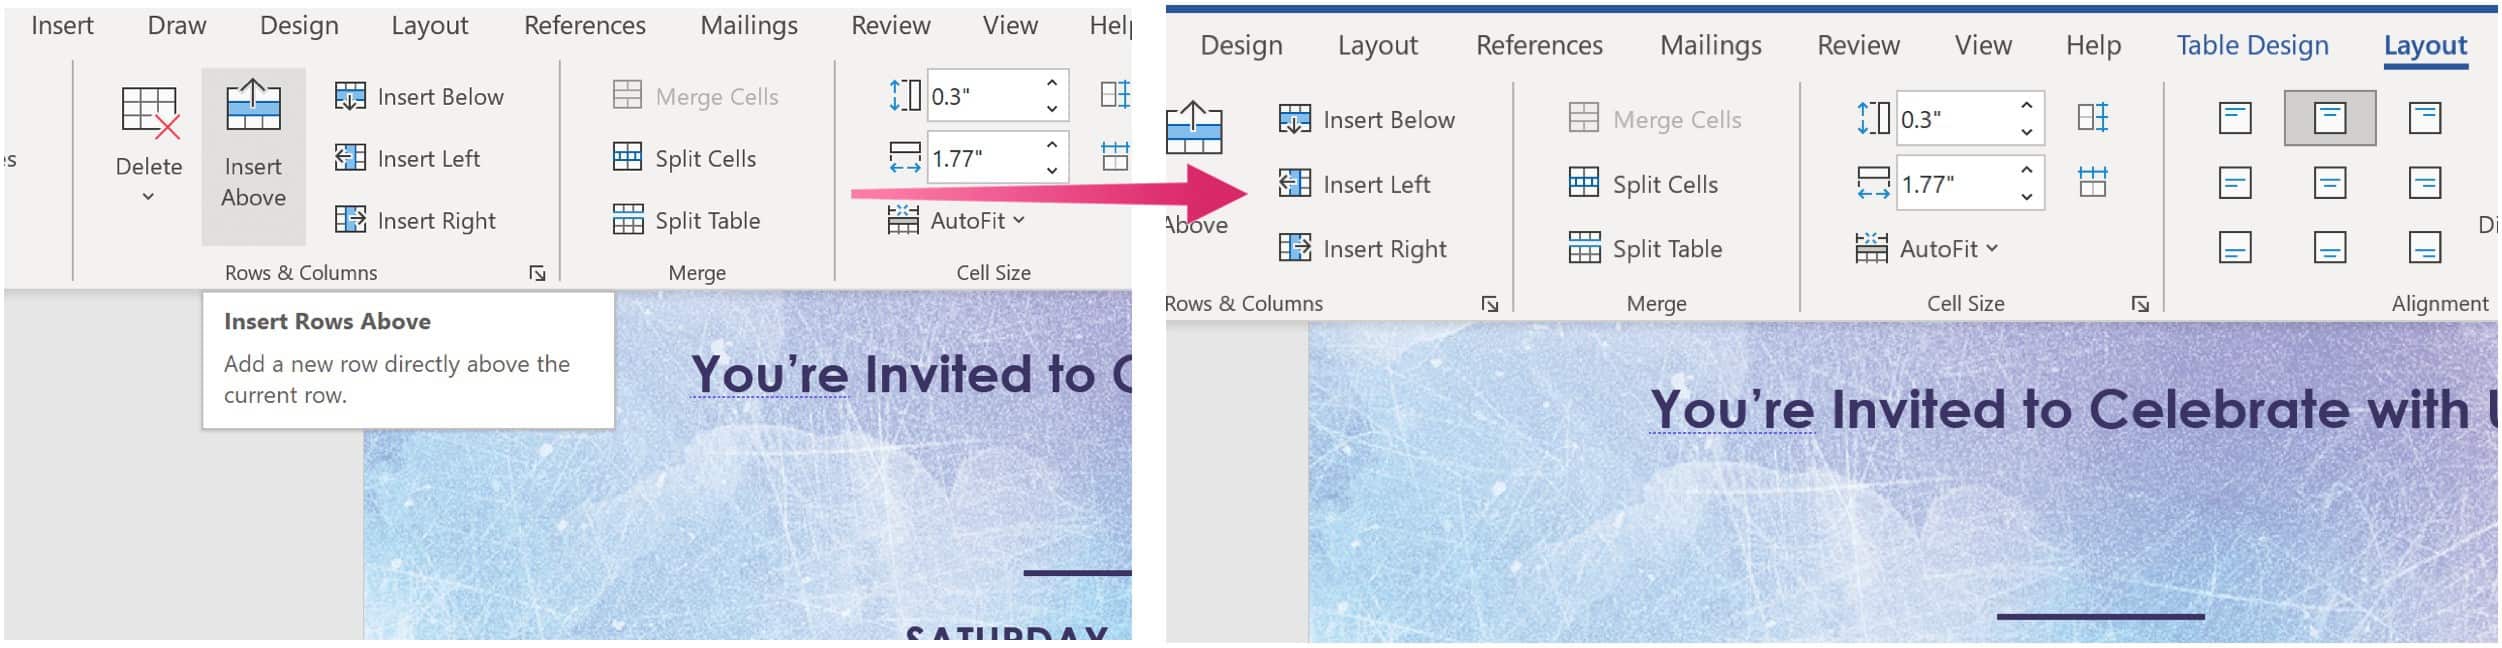
Use the Layout tab in the top ribbon menu to get to these options. The only thing that’s not clear is why there are two tabs called Layout in the menu bar. You need to click the “Layout” tab, which is next to “Table Design” on the right.

When you choose this, you’ll see a list of table-related options here. Since our goal is to add rows and columns, we’ll pay attention to the “Rows & Columns” command group.

If you want to add a row above the cell you’ve chosen in your Microsoft Word table, click “Insert Above.” To add a row below the cell you’ve chosen, click “Insert Below.” Here, we will add a row to the bottom of the cell.
You can also quickly add columns with the buttons here. If you click “Insert Right,” a column will be added to the right of the cell. In the same way, “Insert Left” will add a column to the left of the cell that is currently selected. In our example, we are going to add a column to the right.
You can also click the arrow icon that’s to the right of the “Rows & Columns” command group to reveal a few more options.
Here, you can add rows or columns by clicking “Insert entire row” or “Insert entire column.”
Use Delete Key to Remove Rows and Columns
The following steps are using Delete key to remove rows and columns in word document.
Summary
In the end, we’ve learned how to add rows and columns to a table in MS Word and what those terms mean. We also know that there are different ways to add rows and columns to a table, which we can use in our document to make it look more professional and presentable.
Meanwhile, if you want to learn more about working on tables, see the previous tutorial on how to create tables in Microsoft Word. In our format text and pages tutorial, you’ll also learn how to change page orientation and cover page etc. You can browse those guides if you are having a hard time formatting your documents.
We hope this tutorial helps you as you format your documents in MS Word.
PREVIOUS

NEXT

Many documents present some data in the form of figures or tables. Creating tables is often more efficient than describing the data in the paragraph text, especially when the data is numerical or large. The tabular data presentation makes it easier to read and understand.
A table is a collection of information or data, usually represented by horizontal rows and vertical columns. Each column and each row can have a header. Some tables have only column headings or only row headings. The box at the junction of each column and row is a cell that contains data such as text, numeric information, or images. Some cells can be merged or split (see more about formatting tables). E.g.:

Microsoft Word has many features that make working with tables simple and convenient.
Create a table
There are several ways how to insert or create a table:
- Create a blank table of up to 10 columns and 8 rows,
- Create a blank table with more than 10 columns or more than 8 rows,
- Create a blank table manually (Draw a table),
- Create a table using predefined templates (Quick Tables),
- Create a table from the existing data (Convert Text to Table),
- Insert a Microsoft Excel spreadsheet.
To create a blank table in a Word document, do the following:
1. Place your cursor where you want to insert the table.
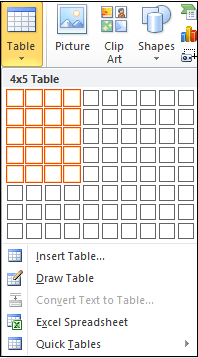
2. On the Insert tab, in the Tables group, click the Table button:

3. Do one of the following:
Create a blank table of up to 10 columns and 8 rows
- To create a table of up to 10 columns and 8 rows, move the cursor right (to select columns) and down (to select rows) the grid to select as many cells as you need. E.g., the table of 5 columns and 3 rows (selected cells will turn orange):

Click on a cell in the grid with the expected number of rows and columns (or press Enter) to insert an empty table to fit the width of the text (paragraph).
The table has the specified number of single-line text rows in the current paragraph and equal-width columns. E.g., the table of 3 rows and 5 columns:


Create a blank table with more than 10 columns or more than 8 rows
- To create a table with more than 10 columns or more than 8 rows, do one of the following:
- Create a table with exactly 10 columns or 8 rows, then add as many columns or rows as you need (see below how to customize table).
- Click the Insert Table… option:
In the Insert Table dialog box:

- In the Table size group, specify the number of columns and rows,
- In the AutoFit behavior group, specify the width of the table and its columns:
- Select the Fixed column width option to customize width in the appropriate field: select Auto (used by default) or specify width. E.g., 0.75″:

- Select the AutoFit contents option to adjust cell sizes to the document content. E.g.:

- Select the AutoFit to window option to adjust the table’s width to the document content width. E.g.:

- Select the Remember dimension for new tables check box if you want to create tables with the same options later. Word will remember your customization.


Create a blank table manually
- To manually create an empty table, click the Draw Table option:
After clicking that option, the cursor changes to the pencil
 that allows drawing cells directly in the Word document to create a table:
Click anywhere in a document but the table itself by the pencil to stop drawing a table.
Notes:
- To draw additional lines, select a table, then on the Table Layout tab, in the Draw group, click the Draw Table button:

- If you draw a line in the wrong position, click the Eraser button in the Draw group of the Table Layout tab:
- We recommend displaying the rulers or gridlines to help you place the lines correctly.
- To draw additional lines, select a table, then on the Table Layout tab, in the Draw group, click the Draw Table button:


Create a table using predefined templates
To create a table using predefined Word templates of tables and calendars, do the following:
1. Place your cursor where you want to insert the table.
2. On the Insert tab, in the Tables group, click the Table dropdown list, then select Quick Tables list:

3. From the Quick Tables gallery, select the template you prefer.
For example:

Create a table from the existing data
To create a table from the existing data in a document data (either as regular text or as a tabbed list), do the following:
1. Select the document data you want to shape into a new table.
2. On the Insert tab, in the Tables group, click the Table dropdown list, then select Convert Text to Table…:

3. In the Convert Text to Table dialog box:

- In the Table size group, specify the number of columns,
- In the AutoFit behavior group, specify whether the width of the columns should be fixed (see details above),
- In the Separate text at group, select the character that separates text into columns in the selected text: paragraph marks, commas, tabs, or some other character.
E.g.:

Insert a Microsoft Excel spreadsheet
Note: It is possible to insert a Microsoft Excel spreadsheet in a document. To do so, on the Insert tab, in the Tables group, click the Table dropdown list, then select Excel Spreadsheet:

Word opens the Excel spreadsheet where you can enter the data. You can use Excel features such as functions and formulas to create or manipulate the data. Note that it is not a Word table.
Add rows and columns
To add a row and a column to a table, do the following:
1. Position the cursor:
- to a cell in a row above or below which you need to insert a row,
- to a cell in a column left or right which you need to insert a column.
2. Do one of the following:
- Click the Insert dropdown list in the Mini toolbar:

- On the Table Layout tab, in the Rows & Columns group:

- Click the Insert Above button to insert a row above the row with the cursor,
- Click the Insert Below button to insert a row below the row with the cursor,
- Click the Insert Left button to insert a column left to the column with the cursor,
- Click the Insert Right button to insert a column right to the column with the cursor.
- Right-click and select the Insert list:


Notes:
- To insert rows or columns, move the mouse over the table or left of the table until you see the Insertion indicator, then click the icon:
 and
and
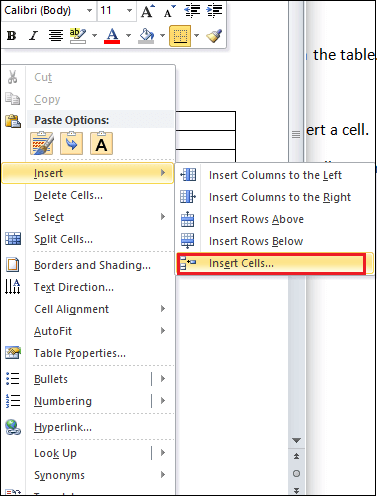
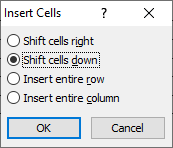
- You can choose the option Insert -> Insert Cells… from the popup menu; Word opens the Insert Cells dialog box:

After selecting the option and clicking the OK button, Word adds an entire row or column, not a cell. Word just moves cells according to the selection.
 and
and 

Delete a table element
To delete a table element, do the following:
1. Select the cell, multiple cells, the entire column or multiple columns, the entire row, or multiple rows.
2. Do one of the following:
- Click the Delete dropdown list in the Mini toolbar:

- On the Table Layout tab, in the Rows & Columns group, click the Delete dropdown list, then select one of the options:


3. Select one of the proposed options:
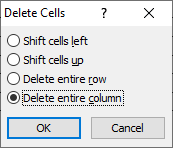
- Delete Cells… opens the Delete Cells dialog box, in which select the option you need:
- Delete Columns
- Delete Rows
- Delete Table

Note: You can select the element you want to delete, right-click on the selection and select the appropriate item in the popup menu. For example, if the entire table is selected or the column is selected:
 and
and

Convert a table into text
To convert a table into text in Word, follow the next steps:
1. Click anywhere in the table.
2. On the Layout tab, in the Format group, click the Convert to Text button:

3. In the Convert Table to Text dialog box, select the charter to separate cells data in the text:

4. Click OK.
In this article, we would like to introduce you with 4 ways to quickly add multiple rows or columns to an existing Word table.
Every so often, we would find additional rows or columns are needed for an existing table. Certainly, there are a number of methods to realize it. And we here provide you 4 quick ways to do that.
Method 1: Add Multiple Rows with “Tab” Key
- Firstly, put your cursor outside the end of the last row of a table.
- Then press “Tab” key to get as many rows as you need.
Method 2: Add Multiple Rows or Columns with Contextual Menu
- At first, select a number of rows or columns.
- Next right click and choose “Insert”.
- Then choose the right command as you need. The number of rows or columns is as the same as that of the rows or columns you selected at the very first.


Besides, there are also the shortcuts for inserting columns. Press “Alt”, “J”, “L”, and “L” can insert columns to the left of the selection. And press “Alt”, “J”, “L”, and “R” can insert columns to the right of the selection.
Method 3: Add Multiple Rows with “Insert Table” Option
- To begin with, click “Layout” and check the column width in “Cell Size” group. And put cursor right at the head of the line below the last row of table.

- Secondly, click “Insert” tab.
- Then click “Table” icon.
- Next, choose “Insert Table” option on the drop-down menu.

- In “Insert Table” dialog box, enter the number of columns and rows. Remember the number of columns as the same as the existing table.
- Then input the column width you get in step 1.
- Click “OK”.


You will find 2 tables automatically merge into one.
Method 4: Add Multiple Rows or Columns with Macro
- First off, select a row then press “Alt+ F11” to trigger the VBA editor.
- Click “Normal” then “Insert”.
- Next choose “Module”.

- Double click on the new module to open the editing area.
- Then paste the following codes:

Sub AddRowsAbove()
  Dim nNumber As Long

  If Selection.Information(wdWithInTable) = True Then
    nNumber = InputBox("Input the number of rows you want to add:", "Add Rows to the selection")
    Selection.InsertRowsAbove NumRows:=nNumber
  End If
End Sub
- Hit “Run”.

- In the input box, enter the number of rows you want and click “OK”.


Now there will be 2 blank rows above the first row in the table. And if you want to add rows below a selected one, simply change the “InsertRowsAbove” to “InsertRowsbelow”.
Additionally, here is the macro to add columns:
Sub AddColumnsToLeft()
  Dim nNumber As Long

  If Selection.Information(wdWithInTable) = True Then
    Selection.InsertColumns
  End If
End Sub
You should first select a number of columns then run the macro with the steps above. You can then get new columns. The above macro adds columns to the left of the selection. To add columns to the right selection, you need to replace “InsertColumns” with “InseertColumnsRight”.
Take Care of Word Files
There can be errors or mistakes occurring in Word, result in the collapse of the software. More often than not, it’s not only our time that is wasted but also amounts of priceless data. When it gets that far, you will definitely need a tool to recover docx.
Author Introduction:
Vera Chen is a data recovery expert in DataNumen, Inc., which is the world leader in data recovery technologies, including Excel recovery and pdf repair software products. For more information visit www.datanumen.com
Is the list of items are more than you that you expected? Need more rows, columns or cells for entering extra items. Then you need to insert the cells into a word table. Do you know how to insert row, column, cell into excel? We can easily Insert row in the word ( Microsoft 365 word and older version MS word) table.
This tutorial tells you how to add row or column or cell to a table in word. You will also learn, how to add multiple rows to a table in a word document.
- Must Read: How to make a table in word? 4 simple methods
- How to delete a table in word
Table of Contents
1. How to Insert a row or column into table in Microsoft 365 Word document?
Video Tutorial:
For our reader’s convenience, we have provided this tutorial in a video form. If you are interested to watch video tutorial then click on it to play. Otherwise, skip this video tutorial and continue reading.

Inserting a row or column in a Word table is a very easy process whether it may be in MS Word or Microsoft 365 Word document. Firstly, we will discuss how to insert row or column in Microsoft 365 Word document and then in older version MS Word document. Follow the below steps for how to insert row or column in table of Microsoft 365 Word Document.
Total Time: 4 minutes
Step 1: Open word document

The first thing you need to do is, open the word document in Microsoft 365 word in which you have a table. Move the cursor up to table for which you want to add extra rows and columns.
Step 2: Click on Table Layout

Once you reached the table, place the cursor in it. When you place the cursor in the table then two new options namely Table Design and Table Layout will appear on the screen. Click on the Table layout option.
Step 3: Click on any one of insertion options

When you click on the Table Layout option then you can see different options for selecting, removing and inserting rows and columns into the table.
Go to the insertion section. In the insertion section, you have mainly four types of insertion options in which two for rows and two for column insertion.

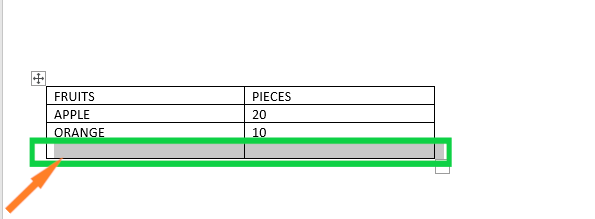
If you want to add an extra row to the table at the bottom of all rows then place the cursor in the last row. Now click on the below option which is in the insertion options. Then a new row is added at the bottom of the table as shown in the below figure.

Step 4: Click on right or left option to insert column

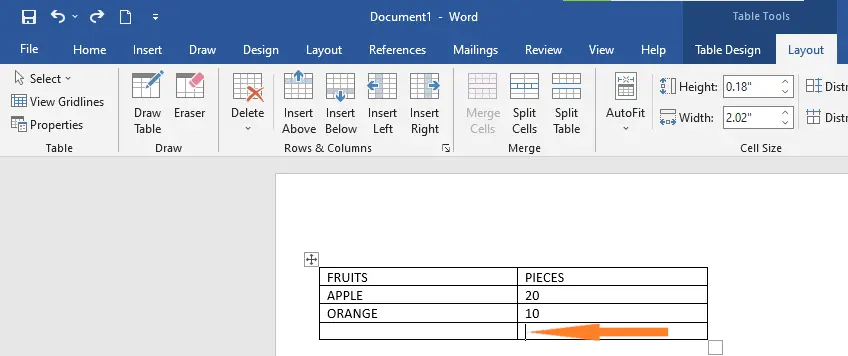
Now to insert extra columns, you have two options those are left and right. You can use anyone based on the cursor position.
If you want to add a new column prior to the column in which the cursor is placed then click on the left option.
If you want to add a new column followed by the column in which the cursor is placed then click on the right option.
Finally, we can say that the Above and Below options are used for inserting new Rows into existing table. Left and Right options are used for inserting new columns into an existing table.

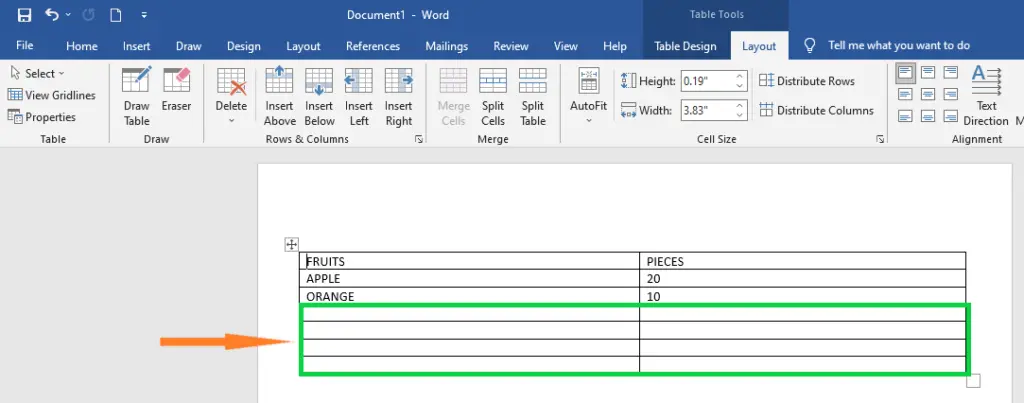
I have used all options above, below, left and right for better clarification. Then the existing table is turned into a form which is shown in the below image.

Estimated Cost: 9.99 USD
Supply:
- Microsoft 365
Tools:
- Microsoft 365
Materials: software
2. How to Insert Row / Column in Older version MS Word document?
Note: It is not recommended to use the older versions. We recommend buying Microsoft 365 for the best features.
You can do this in two methods. You can use any one of the following methods to add a row or column to the table.
Video Tutorial:
This article is also available in video format. If you are interested to watch, play the below video or else continue reading.
Method 1:
- Place cursor on table where you want to insert row or column.

- Give a Right-click.
- Go to “Insert”. You will see the available options. Select any one to insert row or column.
Method 2:
Place cursor on table where you want to insert row or column.

- Click “Layout”. It is the last option in the top menu shows that in the above screenshot.
- You will see four available options. If you want to insert rows, click “insert above” or “insert below”. If you want to insert a column, click “insert left” or “insert right”.
3. How to insert multiple rows or columns at a time?
From the above two methods, you can insert only one row or column. You can also insert more than one row or column.
Select the number of cells equal to the number of rows or columns which you want to insert. For example, If you want to insert three rows, select three cells. If you want to insert three columns, select three columns. You can use the “shift + arrow” keys to select multiple cells.
Use any one of the above two methods to insert rows or columns. This time you can insert multiple rows or columns, equal to the number of cells you had selected.
Conclusion:
We think now you got complete details about How to insert rows and columns in Microsoft 365 word and older version word. Once again we recommend to buy Microsoft 365 because it gives you many features.
- You may like : How to password protect word document
- How to insert and format pictures in word document
Thanks for reading my article about Insert row in word table. If you like it, do me favor by sharing it with your friends. Follow WhatVwant on Facebook and Twitter for more tips. Subscribe whatvwant channel on YouTube for regular updates.
To add a cell, row, and column to a table, first, you need to create a table in a Word document.
Create a Table
Tables are a combination of rows, columns, and cells. In a Word document, tables are used to organize and present information in a better way.
Note: Cells are the combination of rows and columns.
Follow the below instruction to add a table in a Word document —
1. Open the new or an existing Word document.
2. Place the cursor in the document where you want to insert a table.
3. Go to the Insert tab on the Ribbon and click on the Table option in the Tables group.

4. An Insert table dialog box will appear on the screen. Select the numbers of rows and columns according to your requirement.
Note: In our case, we select four rows and five columns.
5. Press the Enter key from the keyboard or click to create the table.
The screenshot below shows that a table with the rows and columns is inserted in the Word document.
Add a row above or below the table
Once you create a table in a Word document, you can able to add additional rows in your table based on your requirement.
Follow the below simple steps to add a row in the table —
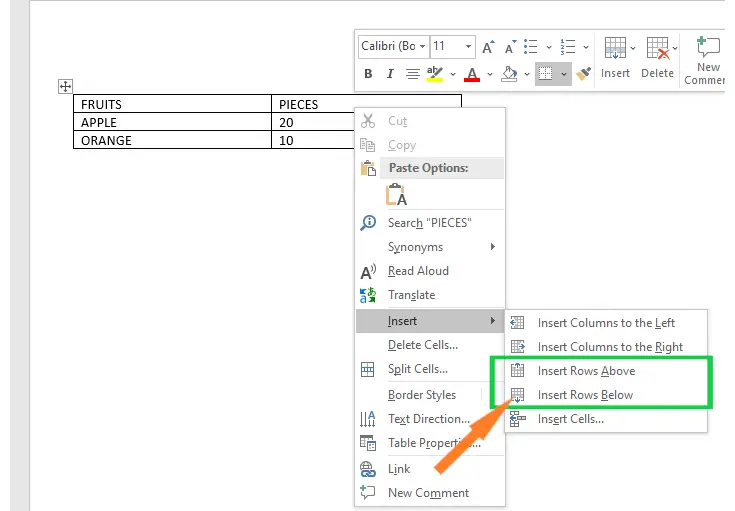
Step 1: Place cursor in the table where you want to add a row.
Step 2: Right-click on the selected area, the following dialog box will appear on the screen. Click on the drop-down menu associated with the Insert button.
- Click on the Insert Rows Above option to add a row above the selected row.
- Click on the Insert Rows Below option to add a row below the selected row.
The screenshot below shows that a new row is added to the table.
Delete a Row from the table
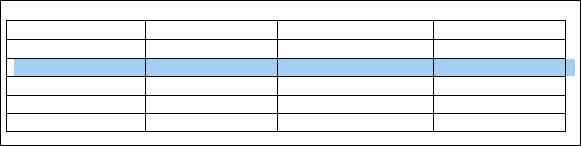
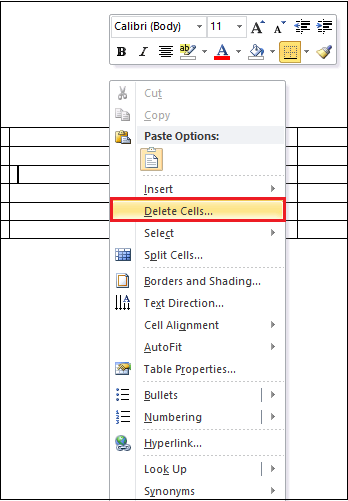
1. Place the cursor in the row that you want to delete from the table.
2. Right-click on the selected row, a list of options will appear on the screen. Click on the on Delete Cells.
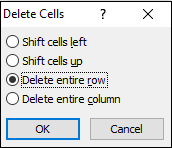
3. A small Delete cells dialog box will appear on the screen. Click on the Delete entire row radio button and then click on the OK.
Now, you can see that your selected row is deleted from the table.
Add a column to the table
Adding additional columns in Word document is not a difficult task for you. Follow the below-mentioned steps to add a column to the table.
Step 1: Place cursor in the table where you want to add a column.
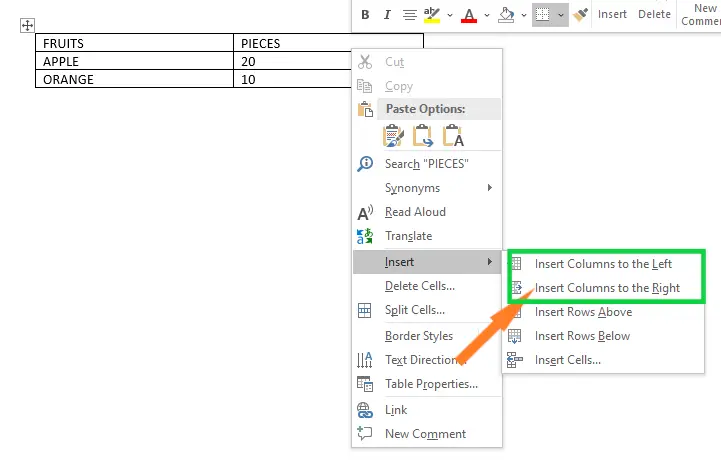
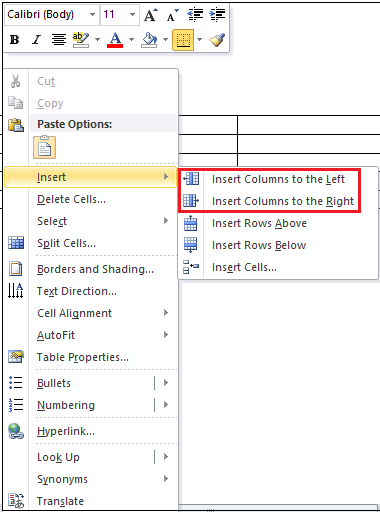
Step 2: Right-click on the table, a list of options will appears on the screen click on the drop-down icon associated with the Insert.
- Click on the Insert Columns to the Left to add the column left side of the table.
- Click on the Insert Column to the Right to add the column right side of the table.
The screenshot below shows that column is added to the table.
Note: In our case, we want to insert the table right side of the selected column, so we use Insert Column to the Right option.
Delete a Column from the table.
In the Microsoft Word document, follow the below instructions to delete unnecessary columns from the table.
1. Place cursor in the column that you want to delete.
2. Right-click on the table, a list of options appear, click on the Delete cells.
3. A delete cells dialog box appears, click on the Delete entire column radio button.
Now, you can see that the selected column is deleted from the table.
Add a Cell
Cell is a combination of rows and columns.
There are the following steps that you can use to add a cell to the table —
Step 1: Place cursor in the table where you want to insert a cell.
Step 2: Right-click on the table, a list of options will appears on the screen click on the drop-down icon associated with the Insert.
Step 3: Click on the Insert cells option.
Step 4: An Insert Cells dialog box will appear on the screen. Cslick on the Shift cells down radio button, and click on the OK button.
The screenshot below shows that a new cell is added to the table.

Insert and Edit a Table with Multiple Columns and Rows in Word
by Avantix Learning Team | Updated August 23, 2022
Applies to: Microsoft® Word® 2013, 2016, 2019, 2021 and 365 (Windows)
You can create a table in a Word document in 4 easy ways using the Ribbon. A table is a grid made up of columns and rows that intersect to form cells. You can insert text, numbers and images in a table. Once you have inserted a table, you can easily add and resize columns and rows and change table formatting.
It’s best to avoid using Draw Table to create a table since the table may not be created in a consistent way.
Note: Buttons and Ribbon tabs may display in a different way (with or without text) depending on your version of Word, the size of your screen and your Control Panel settings. For newer versions of Word, Ribbon tabs may appear with different names. For example, the Table Design tab may appear as Table Tools Design.
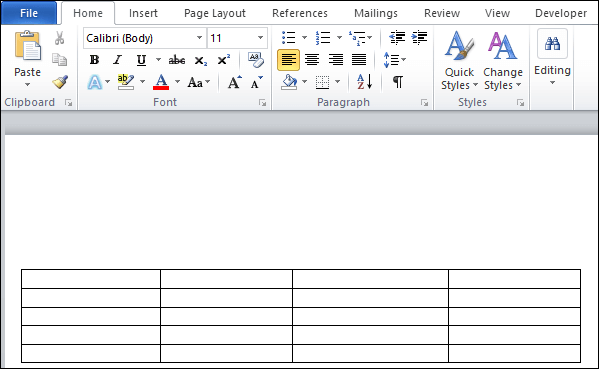
In the following example, a table with 4 columns and 5 rows has been inserted in a Word document:
Recommended article: 10 Microsoft Word Shortcuts for Moving Around in Tables
Do you want to learn more about Microsoft Word? Check out our virtual classroom or in-person classroom Word courses >
Create a table using the Table Grid
To insert a table using Insert Table and select columns and rows in the Table Grid:
- Click in the Word document where you want to insert a table.
- Click the Insert tab in the Ribbon.
- Click Table in the Tables group. A drop-down menu appears with a Table Grid.
- Hover over the grid until the number of columns and rows you want is selected.
- Click in the highlighted area of the grid to insert a table.
To insert a table, select cells in the Table Grid as follows:

Create a table using the Insert Table dialog box
To insert a table using the Insert Table dialog box:
- Click in the Word document where you want to insert a table.
- Click the Insert tab in the Ribbon.
- Click Table in the Tables group. A drop-down menu appears.
- Select Insert Table. A dialog box appears.
- Enter the number of columns and rows you want to create.
- Select the desired options below AutoFit behavior (typically Fixed column width: Auto).
- Click OK.
The Insert Table dialog box appears with options to select the number of columns and rows:

Create a table using Quick Tables
To insert a table using Quick Tables:
- Click in the Word document where you want to insert a table.
- Click the Insert tab in the Ribbon.
- Click Table in the Tables group. A drop-down menu appears.
- Select Quick Tables. A gallery appears.
- Click the table you want to insert.
Quick Tables appear in the Table drop-down menu:

Create a table by converting text to a table
If you have used tabs or other delimiters in paragraphs, you can convert the data into a table (if the delimiters are entered consistently). Wherever you have pressed Enter or Return to create a new paragraph, Word will create a new table row. You can use various delimiters to separate data but the most common are tabs, spaces or commas.
To convert delimited data to a table:
- Select the text that you want to convert.
- Click the Insert tab in the Ribbon.
- Click Table in the Tables group. A drop-down menu appears.
- Select Convert Text to Table. A dialog box appears.
- Enter the number of columns if necessary and ensure a delimiter is selected in the Separate text at area.
- Under AutoFit behavior, choose how you want your table to appear. Word chooses a width for the table columns by default. If you want a different column width, choose AutoFit to contents or AutoFit to window.
- Click OK.
In the Convert Text to Table dialog box, enter the number of columns as well as the delimiter:

Show table gridlines
Gridlines show the cell boundaries of a table on screen if table borders are not applied. Gridlines appear only on the screen and are not printed.
Gridlines are not visible when you view a document in a Web browser or in Print Preview.
To show table gridlines in a Word document:
- Click in a table.
- Click the Table Layout or Table Tools Layout tab in the Ribbon.
- In the Table group, check View Gridlines.
View Gridlines appears on the Table Tools Layout or Table Layout tab in the Ribbon:

Move around in a table
You can use the following keys to move from one cell to another in a table:
- Tab to move to the next cell to the right.
- Shift-Tab to move to the cell to left.
- Ctrl-Tab to tab within a cell.
Add a row or a column
To add a row in a table:
- Click in a cell that is located above or below where you want to add a row.
- Click the Table Layout or Table Tools Layout tab in the Ribbon.
- To add a row above the cell you clicked in, click Insert Above in the Rows and Columns group. To add a row below the cell you clicked in, in the Rows and Columns group, click Insert Below.
The commands to insert rows or columns appear on the Table Tools Layout or Table Layout tab in the Ribbon:

You can also right-click in a row and choose Insert from the drop-down menu and insert options from the sub-menu.
If you click in the last cell in a table and press Tab, Word will automatically add a row.
To add a column in a table:
- Click in a cell that is located to the right or left of where you want to add a column.
- Click the Table Layout or Table Tools Layout tab in the Ribbon.
- To add a column to the left of the cell you clicked in, click Insert Left in the Rows and Columns group. To add a column to the right of the cell you clicked in, in the Rows and Columns group, click Insert Right.
You can also right-click in a row and choose Insert from the drop-down menu and insert options from the sub-menu.
Delete a column or row
To delete a row or column:
- Select the row or column (drag over the cells or click to the left of a row or above a column when the arrow appears).
- Click the Table Layout or Table Tools Layout tab in the Ribbon.
- In the Rows & Columns group, click Delete. A drop-down menu applears.
- Click Delete Rows or Delete Columns as appropriate.
You can also right-click in a row or column and choose Delete from the drop-down menu and delete options from the sub-menu.
Change column width
To change column width:
- Select the column or columns you want to change.
- Click the Table Layout or Table Tools Layout tab in the Ribbon.
- Click Properties in the Table group. You can also right-click and choose Properties from the drop-down menu. A dialog box appears.
- Click the Column tab.
- Check Preferred Width.
- Type the new measurement for the column width. For example, typer 1.0″ or click the up and down arrows.
- Click OK.
The Table Properties dialog box appears as follows with the Column tab selected:

You can also drag the right line of a column to resize it.
Change row height
To change row height:
- Select the row or rows you want to change.
- Click the Table Layout or Table Tools Layout tab in the Ribbon.
- Click Properties in the Table group. You can also right-click and choose Properties from the drop-down menu. A dialog box appears.
- Click the Row tab.
- Check Specify Height.
- Type the new measurement for the row height. For example, type 1.0″ or click the up and down arrows.
- Specify row height as At Least or Exactly.
- Click OK.
The Table Properties dialog box appears as follows with the Row tab selected:

You can also drag the bottom line of a row to resize it.
Distribute rows and columns evenly
To distribute rows and columns evenly:
- Select the entire table by clicking the four-arrows that appear on the top left of the table.
- Click the Table Layout or Table Tools Layout tab in the Ribbon.
- Click Distribute Rows and / or Distribute Columns in the Cell Size group.
Apply a table style
To apply a table style:
- Click in the table.
- Click the Table Design or Table Tools Design tab in the Ribbon.
- Click a table style or click the More arrow to display the Table Styles gallery and click a style.
Table Styles gallery appears on the Table Tools Design or Table Design tab in the Ribbon:

To learn more about working with table styles, check out the article How to Format Microsoft Word Tables Using Table Styles (Ultimate Guide).
Subscribe to get more articles like this one
Did you find this article helpful? If you would like to receive new articles, JOIN our email list.
More resources
4 Ways to Delete a Table in Word
How to Make Columns in Word (Newspaper-style)
How to Insert Formulas and Functions in Word Tables
How to Keep a Microsoft Word Table Together on One Page
How to Delete a Page in Word (Remove Blank or Extra Pages)
Related courses
Microsoft Word: Intermediate / Advanced
Microsoft Excel: Intermediate / Advanced
Microsoft PowerPoint: Intermediate / Advanced
Microsoft Word: Long Documents Master Class
Microsoft Word: Styles, Templates and Tables of Contents
Microsoft Word: Designing Dynamic Word Documents Using Fields
VIEW MORE COURSES >
Our instructor-led courses are delivered in virtual classroom format or at our downtown Toronto location at 18 King Street East, Suite 1400, Toronto, Ontario, Canada (some in-person classroom courses may also be delivered at an alternate downtown Toronto location). Contact us at info@avantixlearning.ca if you’d like to arrange custom instructor-led virtual classroom or onsite training on a date that’s convenient for you.
Copyright 2023 Avantix® Learning
Microsoft, the Microsoft logo, Microsoft Office and related Microsoft applications and logos are registered trademarks of Microsoft Corporation in Canada, US and other countries. All other trademarks are the property of the registered owners.
Avantix Learning |18 King Street East, Suite 1400, Toronto, Ontario, Canada M5C 1C4 | Contact us at info@avantixlearning.ca
Home > Microsoft Word > How to Add Columns in Microsoft Word? All You Need to Know
(Note: This guide on how to add columns in Word is suitable for all MS Word versions including Office 365)
Columns are used in newspapers, magazines, academic journals, and newsletters. They improve the document’s organization and its readability. Word allows you to adjust columns by including page breaks to utilize all of the available space on the page. You can format the document in a newspaper-style column by adding columns.
You’ll Learn:
- Add Columns in Word
- Adding Column Breaks
- Remove Columns
- Customize Columns
- Navigating Between Columns
- Through the Menu
- Through Keyboard Shortcut
- Show Text Boundaries
- Inserting Multiple Columns in a Document
- Insert a Line Between Two Columns
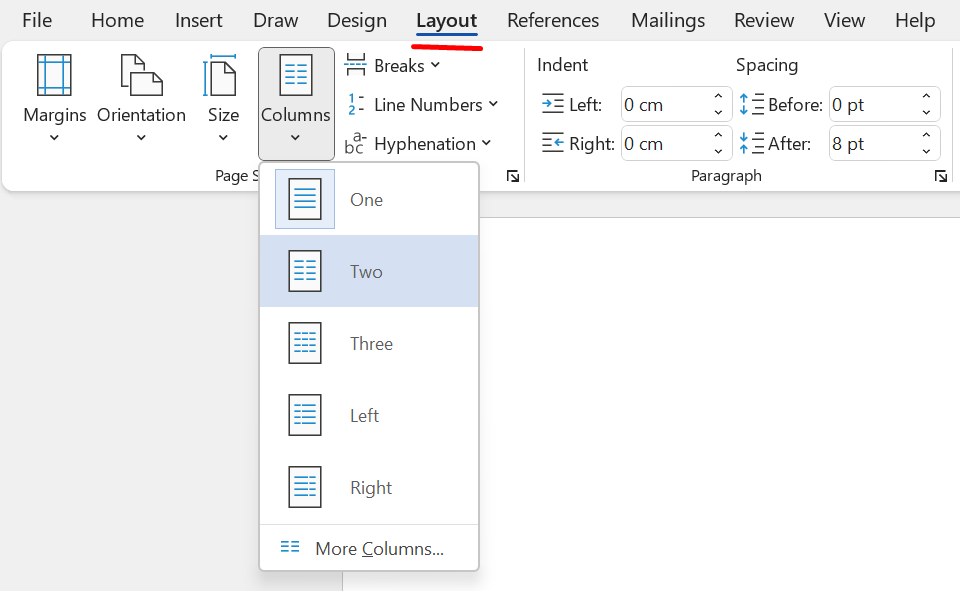
Select the Layout tab, then choose from the options available. You can make your text appear in two, three, left-aligned, or right-aligned.
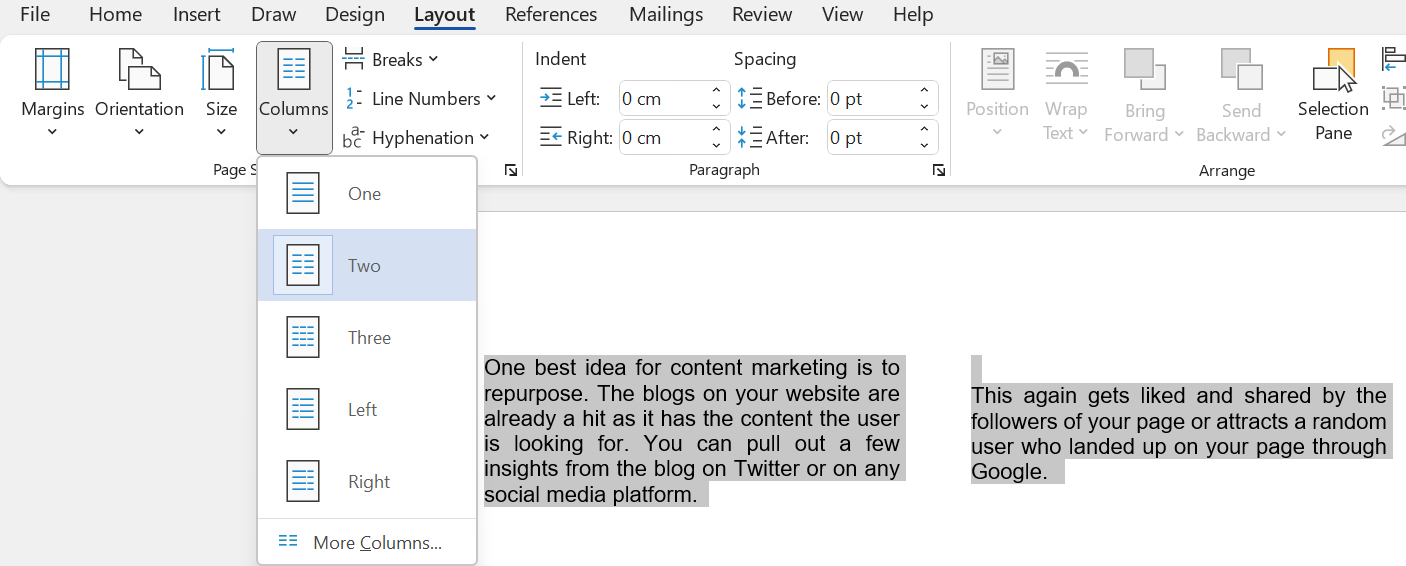
Add Columns in Word
Select the text where you wish to apply the column formatting. Choose any of the formats from the drop-down menu and click it. The two-column format splits your column into two or more columns.
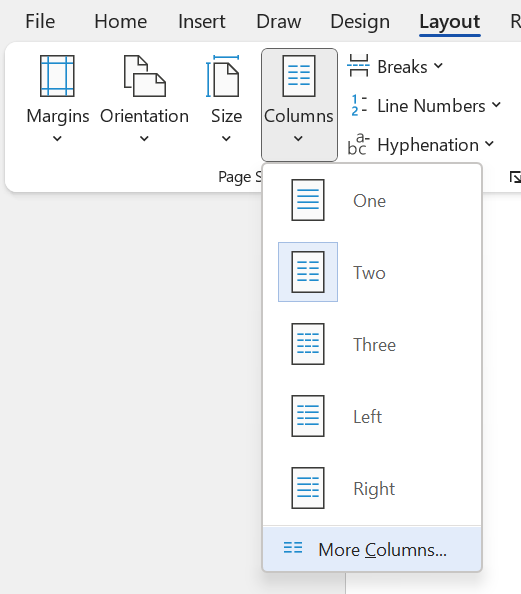
If you wish to have customized columns, select More Columns. Here, you can choose your width and spacing or use one of the preset methods.
There are four basic types of columns that can be applied to the text.
- Book – the text continues from one column to the next on reaching the bottom of a page.
- Newspaper – the text continues elsewhere in the article if it is not completed on a page.
- Table – the vertical field of cells within a table or a database.
- Tabbed – these columns are used in a menu to display an item on the left and its details on the right. The tabbed column can have more than just two columns. When it has more details, it appears as the third or fourth column spaced by tabbing to a specific measurement.
Adding Column Breaks
A column break inserts a hard break in the inserted location and forces the rest of the text to appear in the next column. It controls the flow of text from one column to the next.
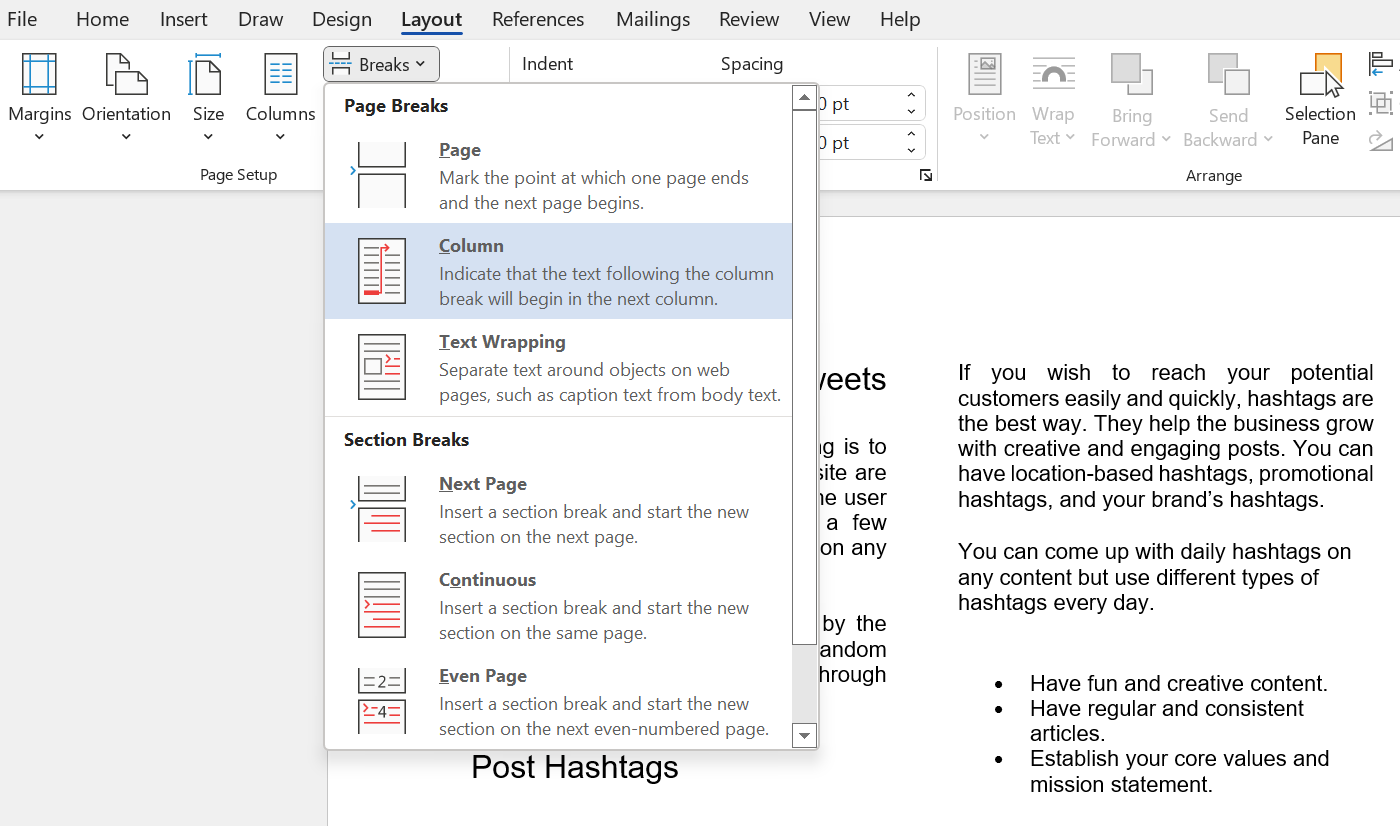
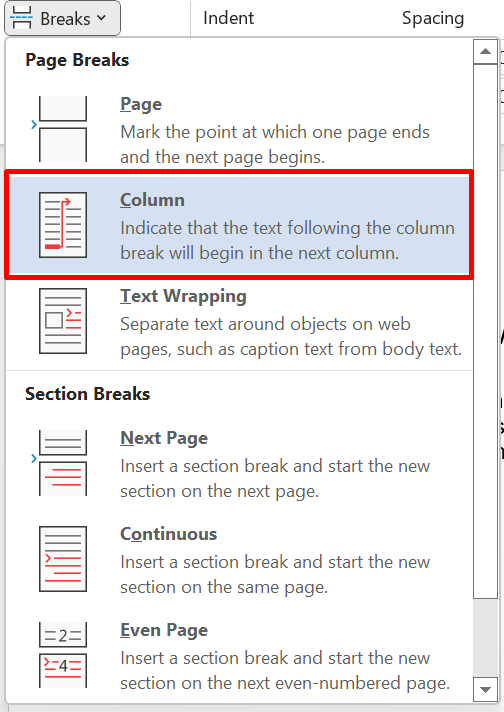
Position your cursor at the place where you wish the column break to appear. Then click on Layout -> Breaks -> Column. In the example above, the cursor was placed before the subheading “Post Hashtags” and then the column page break was clicked.
After applying that option, you find that the subheading is pushed to the next column and the text follows it as shown below.

Related Reads:
- How to Find and Replace in Word? 7 Simple Methods
- How to Superscript in Word? 4 Easy Methods
- How to Double Space in Word? 4 Easy Ways
Remove Columns
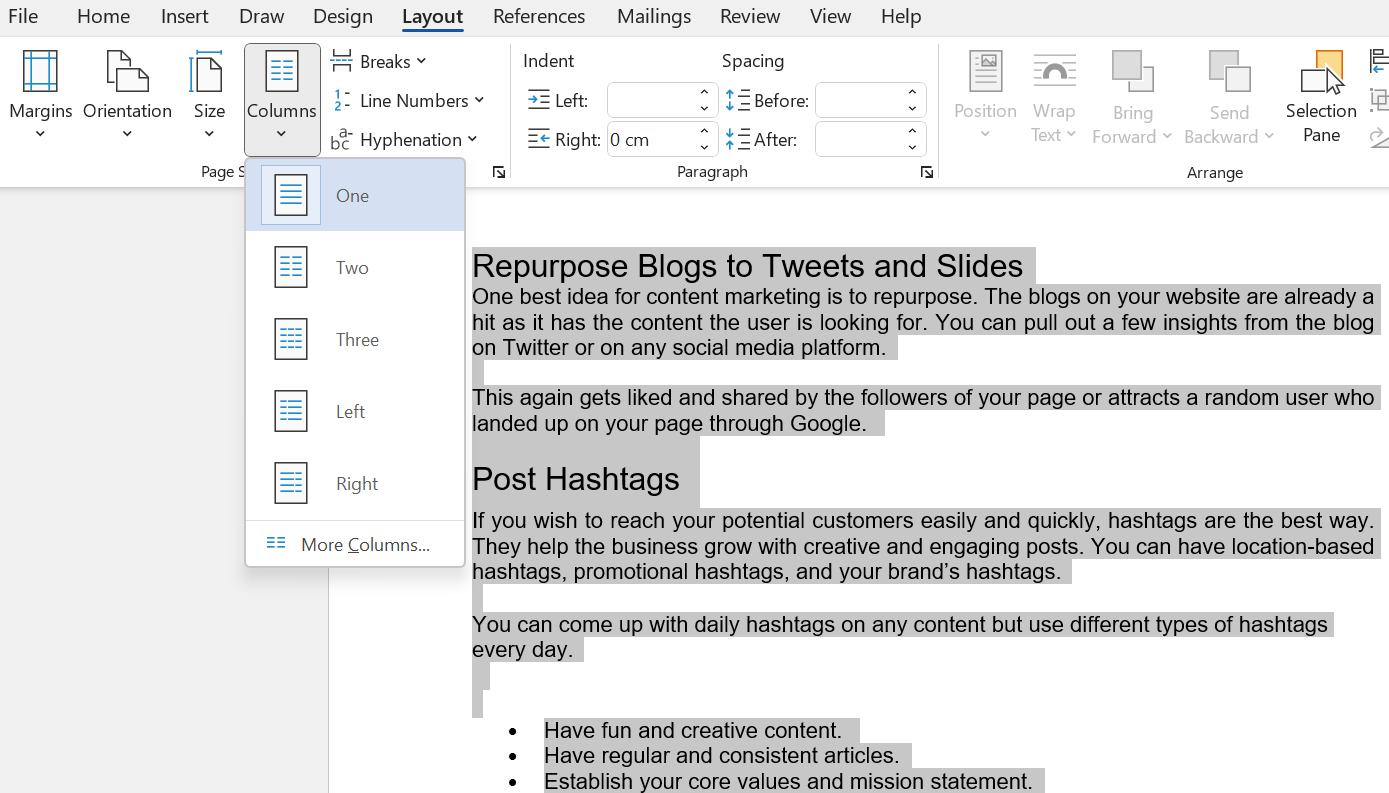
To remove the columns in the text, select the entire text and click on One column and it removes the formatting that was applied to it.
Customize Column
To customize the columns, click on More Columns. By default, the Presets has automatically formatted columns with equal spacings between the columns. You can check the box Line between if you wish to have a line between two columns.
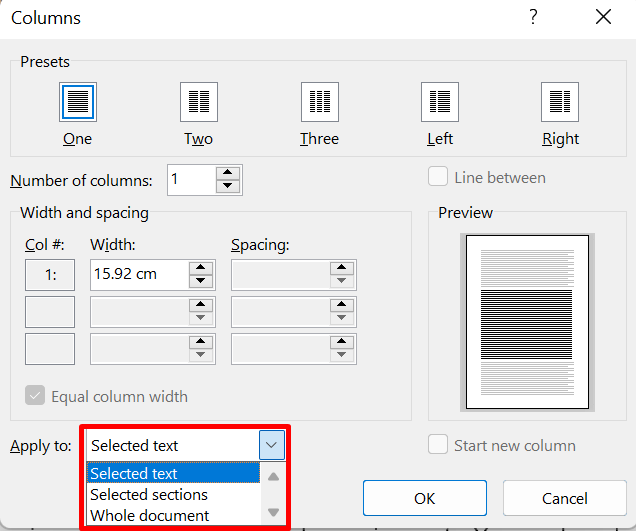
If you don’t wish to have equal spacings between two columns, uncheck the box Equal column width at the bottom of the dialog box.
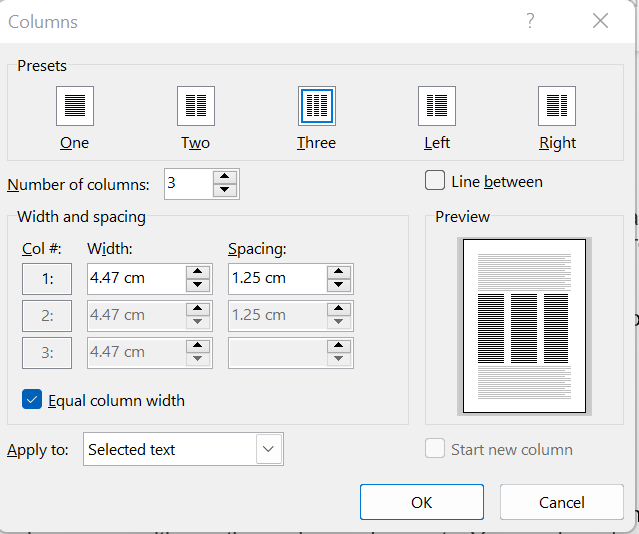
Under the Width and spacing option, you can preset the column width and the spacing between them for the columns that you have in the document. This formatting can be applied to either the selected text, selected section, or the whole document.
Navigating Between Columns
It is tricky to navigate from one column to another. Sometimes, you have to type in the first column and end it to start typing in the second column. To do that, insert column breaks before the text from where you want the text to appear in the second column. If you are using a table, it is easy to navigate between the cells just by making use of the Tab key.
Through Menu
Page breaks can be applied by clicking on the layout tab first, then clicking breaks and choosing columns.
Through Keyboard Shortcut
Place the cursor near the text that you want to display in the new column. Press Ctrl + Shift + Enter simultaneously and you can find the further text shifting to the second column.
Show Text Boundaries
Text boundaries are dotted lines that appear in the document to mark the limits of text elements. When you use text boundaries, dotted lines appear around the margins of your text, around the headers, footers, footnotes, etc.
Select File -> Options -> Advanced -> Show document content -> Show text boundaries to apply text boundaries.
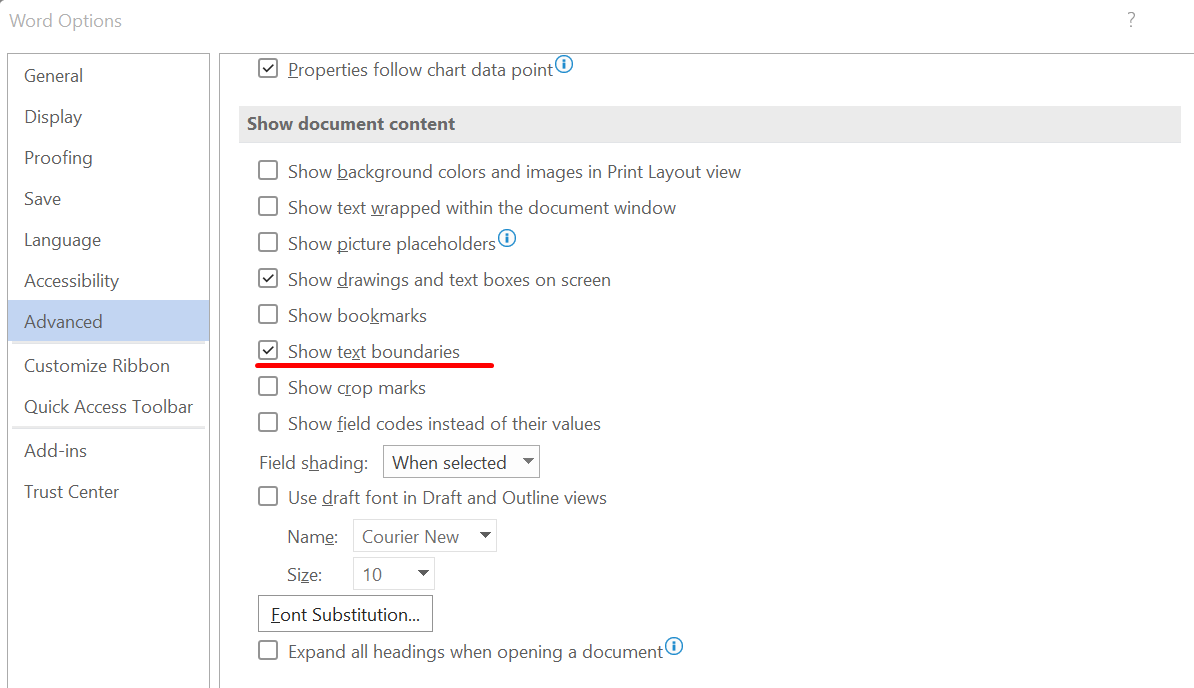
After you apply these options, the text appears like this. This feature is useful if you work often with Print Layout View.

Suggested Reads:
- How to Make a Checklist in Word? 3 Simple Steps
- How to Track Changes in Word? A Step-by-Step Guide
- How to Delete a Page in Word?
Inserting Multiple Columns in a Document
While typing in a new document, you can include two or more columns and later decide that you want to stick onto a single paragraph itself. Place the cursor at the place where there’s no further text and click on Layout -> Columns -> More Columns. At the bottom of the dialog box, you will notice a drop-down menu Apply to. Choose This point forward to make the text that follows the two-column paragraph appear in a single paragraph.

Insert a Line Between Two Columns
When you add columns in word, you can insert a line between the columns to show the division between the columns. A line can be drawn between two or three columns by clicking on the options Layout -> Columns -> More Columns -> Line between.
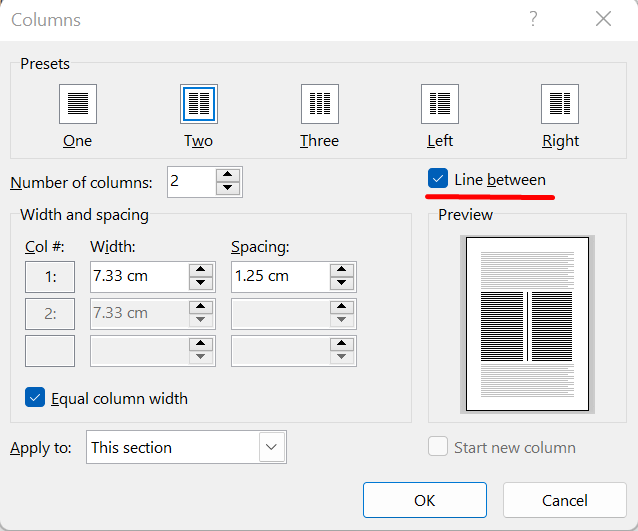
You can see a line between the two columns after you select the check box. You must remember that this checkbox gets enabled only if you have a text to appear as two or three columns. You can see that the option is not enabled if it is a single paragraph.

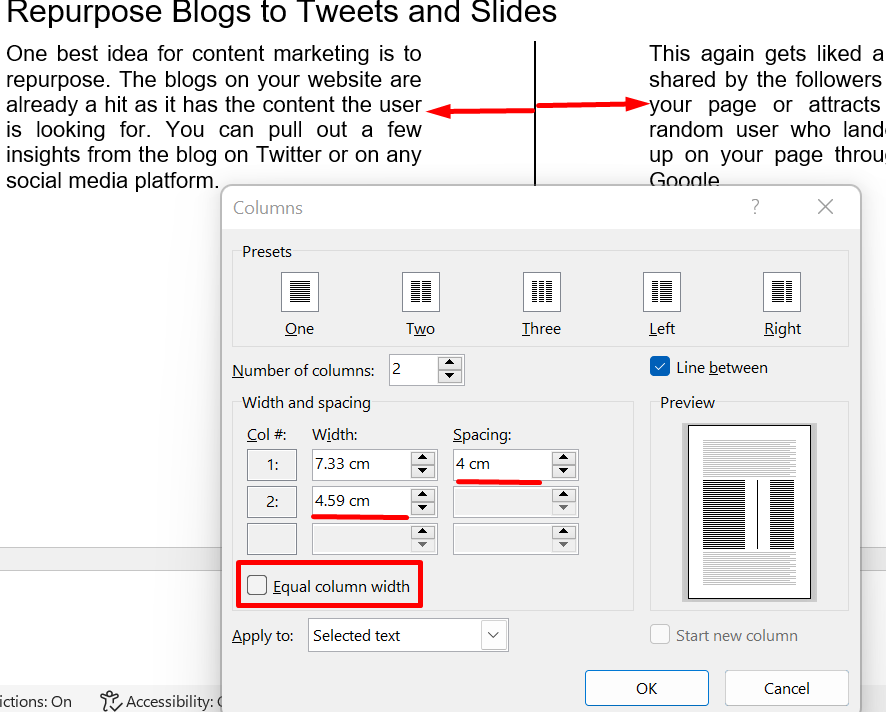
You have the text split into two columns and a line dividing them. Now, you wish to change the column width and the spacing between them. You can do that by unchecking the checkbox Equal column width at the bottom of the dialog box. After you click OK, you can see the column width of column 1 has increased.
More Reads:
- How to Add Page Numbers in Word? 3 Easy Examples
- How to Create Professional Documents in Microsoft Word – Recorded Webinar
- How to Convert PDF to Word
Closing Thoughts
Adding columns in Word improves the document’s readability and appearance. You can fit a little more text when you lay it out in the columns rather than laying it out in a single line. The shorter lines are easier to read as the reader’s eyes need not travel to the end of the page to read it.
In this article, we saw how to add column breaks, customize a column, and modify its width and spacings. You can explore every option in the Columns menu and try using it in your document.
For more high-quality guides on MS Word or Excel, please visit our free resources section.
SimonSezIT has been effectively teaching Excel for 15 years. We have a very comprehensive set of courses with in-depth training modules covering all major business software.
You can access all these 130+ courses for a low monthly fee. Please visit our courses section for more information about our offers.
Simon Calder

Chris “Simon” Calder was working as a Project Manager in IT for one of Los Angeles’ most prestigious cultural institutions, LACMA.He taught himself to use Microsoft Project from a giant textbook and hated every moment of it. Online learning was in its infancy then, but he spotted an opportunity and made an online MS Project course — the rest, as they say, is history!