
Have Microsoft Office Word Read Back To You
Dictate In Microsoft Word
I’ve got to admit I’m pretty excited about some of the new commands that come up in Microsoft Word. Remember with office 365 it’s a subscription. Microsoft now add new features all the time and you don’t even know it. Before, they use to tell you – we are going to update your system and you don’t really have a choice. Update, Shutdown and Restart.
I’d like to explore with you some features that most of us wouldn’t even know were there.
Everyone is time poor and time to explore and play with Microsoft Office new features isn’t something we tend to schedule time for, but if we did you might find some time saving techniques. This includes me. I have been delivering Microsoft Office now for over 25 years and even I don’t always get a lot of play time.
If you are like me and don’t have some to look over your content. Someone to pick up you used the word you when you meant to write your or you are. Using the dictate feature could help. It’s also great if you think faster than you can type.
How Does Dictate Work?
You will need to have an Internet connection.
Next in the Home tab at the very end you will see a Microphone icon. Click the Dictate icon and start talking. Even if you have an accent give it time, ensure you practice so that it can get use to your voice.
There are some key words to remember.
To end a sentence, you can all so say the command. “Full Stop”.
| Phrase | Output |
| Period | . |
| Comma | , |
| Question mark | ? |
| Exclamation mark | ! |
| New line | New line (Enter) |
| Colon | : |
| Semicolon | ; |
| Open quotes | “ |
| Close quotes | “ |
| Smiley Face | 🙂 |
Command For Make Bullet Style
You would think the command to make something with Bullet points would be “Make Bullet Point”.
However, this does not work. If you google you will get the response of –
How Do I Dictate Bullet Points?
Say “Make That Bullet Style” or “Make That Numbered”. Dictate your points, saying “New Line” as needed to start a new point. Once your list is complete, end it by saying “Make That Not Bullet Style” or “Make That Not Numbered”.
However, these commands do not work.
If you do find the command that works for making bullets. I would love to hear from you in the comments area below.
Let Word Read Your Text Back To You.
Our sense of hearing can be especially useful. Close your eyes so you don’t get distracted by your sense of sight and focus on the words that are being read out to you.
Go to the Review Tab and on the left, you will find a command for Read Aloud.
The sound of someone’s voice can either be irritating, soothing or pleasant to listen to. This is why Microsoft have given us the choice of speaker. Press the speaker icon with the clog wheel.
There is a choice of only two voice types, male and female their names are James and Catherine, in time there me more choices.
Speed of speech is also something you will need to adjust under the same setting. Position your cursor where you would like the Read Aloud to start from or you might prefer to select a specific paragraph to listen to by pressing the Play button.
I found the Read Aloud feature in Microsoft Word useful to listen out for where to position or not position a comma. With this tool I’m able to pick up on punctuation like you, your, you’re.
Are You Easily Distracted?
If we could take away temporarily all the Ribbon commands and highlight the text more. Would that help you concentrate on the wording in your document. Microsoft seem to think this will help and they have named this feature “Focus”, are they trying to tell me something.
Go to the View Tab and select Focus have a look.
What do you think, was it helpful? Use the comments below to let me know.
Reading is a big problem going through primary school. Breaking down the words into syllables. Listening to the words, sounding them out. In Microsoft Word using the Immersive Reader will help with this.
Focus and Immersive reader
From the immersive reader you are able to break down how you want to see the text by narrowing or widening the column width. I particularly like the feature where it highlights one line or two at a time. When you are ready to break down larger words you can use the syllables feature. You can find all this under the View Tab and Select Immersive Reader.
Conclusions
Reading is a big problem for many people. Some slip through the cracks of the school system and once they hit there working life, struggle take place. Technology is our saviour here. Know we don’t have to get bogged down with grammar and spelling because Microsoft Word will highlight these for us in red for spelling and green for grammar. However we still need to read. I am one of those people who don’t like to read but tough luck reading is inevitable. Microsoft Office Word feature focus is great making you read the text and not get distracted with other imagery. The immersive feature is fantastic, breaking text into syllables I think is brilliant. The one line focus at a time is also pretty cool.
If you are more of a listener than a reader you might like to try my Podcast Channel – Analir Pisani
(Spotify, ItunesRadio, Stitcher, OneCloud, iheartRadio….)
Microsoft Office Small Group Training Sessions
AZ Solutions delivers customized training courses in Sydney – Australia. We come to you. All you need is a board room, PC’s for each student and a TV/ Projector with a HDMI connection cable. Virtual Training sessional also available.
In our training sessions you are welcomed to bring examples of your work to class. We prefer it.
Call Now M 0414 417 059 visit www.azsolutions.com.au
Share This Story, Choose Your Platform!

Related Posts
Page load link
Go to Top
Can Microsoft Word read to me? Yes, it can. There are three ways to accomplish this task: The Speak and Read Aloud features in Word, or the Narrator feature in Windows.
The Speak feature was incorporated into Microsoft Office (Word, Outlook, PowerPoint, etc.) back in version 2003. It was called Text to Speech (TTS) then, and it functioned much the same as it does now. Fortunately, it’s a very simple procedure to set up and use, so you can get started immediately.
1. Click the Customize arrow on the Quick Access Toolbar.
2. From the dropdown menu, select More Commands.
3. Go to Word Options >Customize the Quick Access Toolbar and locate the Choose Commands From box. Scroll down to the Speak command.
4. Select the Speak command, click the Add button in the middle of the screen, then click OK.
5. Word adds the Speak command to the Quick Access Toolbar at the end, and you’re ready to go.
Add Speak button to Quick Access Toolbar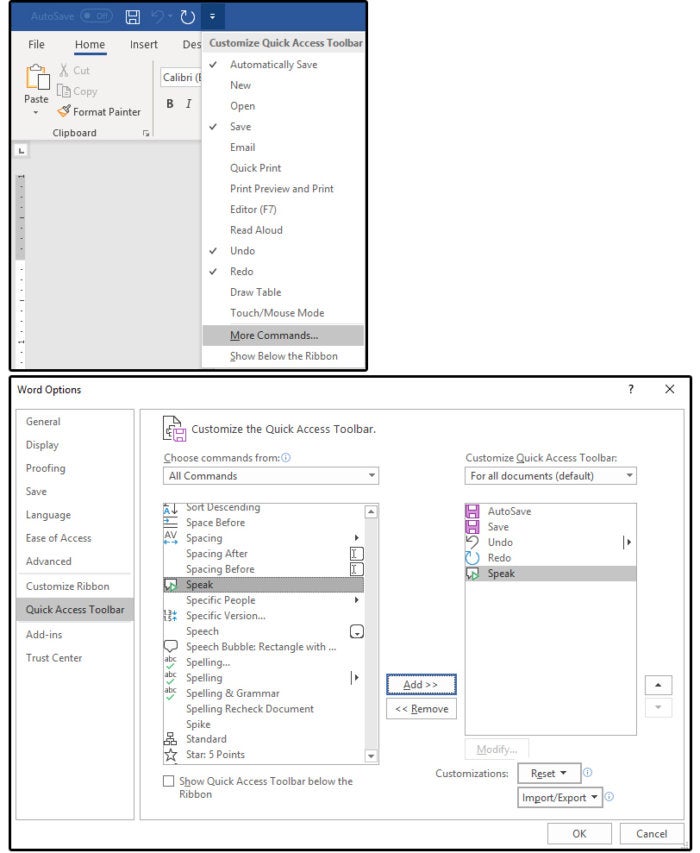 JD Sartain / IDG Worldwide
Click the Speak button to listen to your text
1. Ensure that your system’s speakers or sound devices are turned on.
2. Highlight a paragraph of text, then click the Speak command button.
3. Word reads any text that’s highlighted, even the entire document. Press Ctrl+ A to select the entire document.
4. Click the Speak command button once to begin the reading session, then click it again to stop. There is no pause-and-continue option at this time, but many users have requested this feature, so we hope to see it in future versions.
Select the Read Aloud command
1. Another way to have your text read aloud in Word is to select the Review tab > Read Aloud button.
The greatest benefit of Read Aloud as opposed to the Speak command is…
(a) You don’t have to highlight the text. Just position your cursor where you want the reading aloud to begin and click the Read Aloud button.
And (b), when you click the Read Aloud button a second time, it stops. Click the button again to continue from that point on. So, essentially, you have a Pause feature with Read Aloud that is not available with Speak.
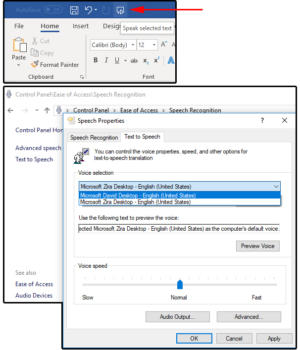
Change the Speak preferences in the Windows Control Panel
The Speak preferences are defined in Widows, not in Word specifically.
1. Click Start > Windows System > Control Panel
2. Select Ease of Access > Speech Recognition > Text to Speech, and the Speech Properties dialog window opens on the Text to Speech tab.
 JD Sartain / IDG Worldwide
3. Under Voice Selection, choose MS David Desktop for a male voice or MS Zira Desktop for a female voice.
4. Click the Preview button to listen to each voice, then make your selection.
5. Use the slider under Voice Speed to adjust the pace (slow, normal, or fast) of the reader.
6. Click the Audio Output button to define the Sound preferences.
7. Click the Advanced button to select or change the output device.
Using Windows 10 Narrator in Word and beyond
Windows 10 Narrator is an accessibility feature designed for vision-impaired users, however, anyone can use it. It reads everything onscreen: documents, websites, comments, page instructions, commands, and more. It’s also not restricted to Word, as the Speak feature is.
Using Narrator is really easy, though learning all the commands may take some time. See Microsoft’s “Complete guide to Windows Narrator” for full information. (If you search elsewhere online for WIndows 10 Narrator help, check the date of the article and the Windows version before you start memorizing commands.)
There are two keyboard layouts available: Standard and Legacy. The default is Standard. Follow these instructions to change the keyboard (which changes how the commands function). For more information, go to Microsoft’s support page about Narrator keyboard layouts.
1. Right-click the Windows Start button and select Settings.
2. Select Ease of Access.
3. Click Narrator in the left panel.
4. Browse to Choose Keyboard Setting.
5. From the Select Keyboard Layout field box, choose Standard or Legacy.
6. Next, select your Narrator Modifier key (that is the key used to activate the Narrator commands). Options include Caps Lock, Insert, or Caps Lock and Insert. I chose the Caps Lock key, because its location on the keyboard is more efficient.
7. Once you have chosen the Narrator Modifier key, the instructions here and on the web will refer to that key as the Narrator key (or, in some cases, the SR key).
8. Exit the Settings menu.
Windows Narrator keyboard settings.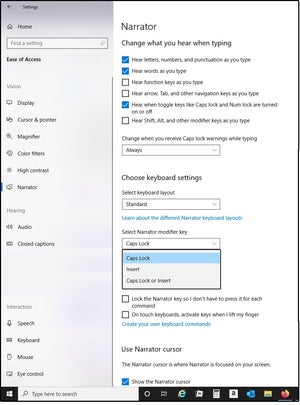 JD Sartain / IDG
The basics for using Narrator are this:
1. Press Windows logo key + Ctrl +Enter (simultaneously) to access or exit Narrator.
2. If you have not memorized all the “reader” keystrokes yet, the easiest method to read text is to place your cursor on the target word/sentence/paragraph and press Narrator key + Down Arrow. Press Narrator key (by itself) to stop, then Narrator key + Down Arrow to continue. There are other keys that perform this same function, but these are the easiest.
3. Most important: For a list of all the Narrator commands, press Narrator + F1.
4. For reading the current paragraph, press Narrator + Ctrl + K.
5. For the next paragraph, press Narrator + Ctrl + L.
6. For the current page, press Narrator + Ctrl + I.
7. For the next page, press Narrator + Ctrl + O.
The list goes on and on. In addition to the complete guide above, check out the support pages for Windows 10 Narrator keyboard commands and touch gestures, and Windows 10 narrator reading text.
Use the Speak and Read Aloud commands
Updated on February 10, 2022
What to Know
- Select the Read Aloud icon in the ribbon under the Review menu to hear the entire document narrated.
- Add the Speak command to the Quick Look Toolbar and select the Speak icon to narrate the text you’ve highlighted in your document.
- Read Aloud sounds better but is only available in versions of Office after 2019. The Speak feature is available in Office 2003 and later.
There are several options available to have Word read the text aloud to you so you’ll know what’s on the page even if you can’t fully see the text or you want to hear how it flows. Here’s how to make Word read to you.
How to Make Word Read to You
From within Microsoft Word, there are two main features to make Word read to you. The first is Read Aloud, which will read the entire page. The second is Speak, which will read aloud only the text you’ve selected.
How to Use Read Aloud in Word
You can only use the Read Aloud feature in Word if you have Office 2019, Office 2021, or Microsoft 365. Otherwise, you’ll need to upgrade Office to enjoy this feature.
-
Select the Review menu and select Read Aloud from the ribbon.
You’ll want to first open the document you’d like Microsoft Word to read aloud to you. Without a document open, the Read Aloud controls won’t do anything.
-
This option will open the Read Aloud controls at the upper right corner of your open document. There are five buttons to control the Read Aloud feature. To hear the text read aloud to you, press the Play icon in these controls (the right arrow icon).
-
You’ll hear a voice reading the text aloud. You’ll also notice that the play icon has now changed to a Pause icon (two vertical lines). Press the Pause button if you want to pause the audio voice wherever it’s currently reading. When you’re ready to start listening again, press the Play button.
-
You will also notice two other buttons to the right and left of the Play/Pause button. These are two left arrows (Previous) and two right arrows (Next). These buttons will let you navigate forward or backward one paragraph, which is helpful if you aren’t interested in hearing the current paragraph anymore and want the narration to skip back or ahead.
-
When you finish listening to the document being read aloud, you can stop the Read Aloud feature by selecting the Stop icon (an X icon).
Remember, you don’t need to use your mouse to control Microsoft Word Read Aloud. You can use the following keyboard shortcuts instead.
- CTRL + Alt + Space: Launch the Read Aloud feature
- CTRL + Space: Play or pause voice narration
- CTRL + Left Arrow: Move voice narration to the previous paragraph
- CTRL + Right Arrow: Skip narration to the next paragraph
- Alt + Left Arrow: Slow down voice narration speed
- Alt + Right Arrow: Speed up voice narration speed
Enable and Use Speak in Word
Microsoft incorporated the Speak feature into Microsoft Office 2003. That means even if you don’t have a newer version of Microsoft Word with Read Aloud available, you can still use the Speak feature. The only difference is you’ll need to highlight the text you want to hear narrated first.
-
Before you can use the Speak feature, you’ll need to enable it in the Quick Access Toolbar. To do this, select File, Options, and Quick Access Toolbar from the left menu. Select All Commands from the Choose commands from drop-down menu.
-
Scroll down to and select Speak, and select the Add button in the middle to add the Speak feature to the Quick Access Toolbar. Select OK to finish.
Make sure the Show Quick Access Toolbar checkbox is selected, or you won’t be able to see the toolbar even if Speak is enabled.
-
To use the Speak feature, highlight the text you want to hear narrated. You can select the entire document if you wish. Once you’ve highlighted the text, select the Speak icon from the Quick Access Toolbar.
-
You will hear the text narrated in a digitized voice. At any time, if you want to stop the narration, you can select the Speak icon again, and the narration will stop.
FAQ
-
How do I make a Word document read-only?
To make a document read-only, go to Review > Restrict Editing. Under Editing restrictions, check Allow only this type of editing in the document and choose No changes (Read only). You’ll have the option to set a password if you don’t want anyone else to alter the file.
-
How do I record read aloud in Word?
Word doesn’t have a built-in recorder, so you must run a separate audio recording program while Word reads your text. You can use built-in tools to record sound on Windows or record audio on Mac.
-
How do I use voice dictation in Word?
To dictate or transcribe in Word, select the down-arrow next to Dictate > Transcribe > Start recording > Save and transcribe now. To transcribe existing audio, select Upload audio and choose the file.
Thanks for letting us know!
Get the Latest Tech News Delivered Every Day
Subscribe
Microsoft Word has a new trick up its sleeve that should help anyone who struggles with the written word. Read Aloud is a significant improvement on Microsoft’s previous text-to-speech offerings.

Microsoft Word has a new trick up its sleeve, and it should help anyone who struggles with the written word. The new feature is called Read Aloud, and it’s a significant improvement on the previous text-to-speech offerings in Word. Let’s hope this helps eradicate typos once and for all.
Most of us can look at a word and immediately tell whether it’s spelt wrong. Or look at a sentence and tell whether it’s structured correctly. However, some people struggle with these things. Which is the main reason why Microsoft has upped its text-to-speech game with Read Aloud.
Microsoft Word Can Now Read Your Documents Aloud
Read Aloud is a new feature which has arrived as part of the latest Office 365 updates. Read Aloud does exactly what you’d expect it to do, with Word reading your document back to you. However, Word can now highlight each word as it’s read aloud right from within your workflow.
In its blog post detailing all of the new Office 365 updates Microsoft states that Read Aloud «makes it easier to recognize and correct errors as you write, improving reading and editing accuracy for everyone, especially users with learning disabilities such as dyslexia.»

Read Aloud, which is listed under the Review tab, is currently only available to Office Insiders. However, Microsoft promises it will become widely available to the general population «later this year». Which, in Microsoft parlance, means anytime between now and December 31st.
These updates come hot on the heels of the unveiling of Microsoft 365, a new enterprise offering designed to destress IT departments. Microsoft 365 combines Office 365, Windows 10, and Enterprise Mobility + Security in one package. Making it easier for businesses to move to Microsoft.
Let’s Make Typos a Thing of the Past
Not everyone will need to make use of the new Read Aloud feature in Word. However, for those who struggle with spelling for whatever reason, this is sure to be useful. And if Read Aloud makes typos a thing of the past then people like myself will be able to sleep more suondly soundly.
Do you use Office 365? Do you think it represents good value for money? Can you see yourself using the new Read Aloud function in Word? Have you ever used text-to-speech functions before? Did you find them useful? If so, how? The comments are open below…
Image Credit: sloppyperfectionist via Flickr
-
1
read back
English-Russian dictionary of verb phrases > read back
-
2
read-back
считывание только что записанной информации; эхосчитывание
English-Russian base dictionary > read-back
-
3
read back
Большой англо-русский и русско-английский словарь > read back
-
4
read back
[ʹri:dʹbæk]
повторять записанный текст
when you send a telegram by phone, the operator will normally read it back to you — когда вы посылаете телеграмму по телефону, телеграфистка обычно перечитывает вам её текст
НБАРС > read back
-
5
read back
phr v повторять записанный текст
when you send a telegram by phone, the operator will normally read it back to you — когда вы посылаете телеграмму по телефону, телеграфистка обычно перечитывает вам её текст
English-Russian base dictionary > read back
-
6
read-back
Большой англо-русский и русско-английский словарь > read-back
-
7
read back
Универсальный англо-русский словарь > read back
-
8
read-back
Универсальный англо-русский словарь > read-back
-
9
read back
повторять записанный текст
Англо-русский большой универсальный переводческий словарь > read back
-
10
read-back
считывание только что записанной информации; эхосчитывание
English-Russian dictionary of computer science and programming > read-back
-
11
read back
• 1) считывать в обратном направлении; 2) считанный в обратном направлении
Англо-русский словарь по авиации > read back
-
12
read back
English-Russian military dictionary > read back
-
13
read back
English-Russian dictionary of terms that are used in computer games > read back
-
14
read back Take down the names as
Англо-русский словарь Мюллера > read back Take down the names as
-
15
read-back check
Большой англо-русский и русско-английский словарь > read-back check
-
16
read-back signal
Большой англо-русский и русско-английский словарь > read-back signal
-
17
read-back waveform
Большой англо-русский и русско-английский словарь > read-back waveform
-
18
read-back check
Универсальный англо-русский словарь > read-back check
-
19
read-back signal
Универсальный англо-русский словарь > read-back signal
-
20
read-back waveform
Универсальный англо-русский словарь > read-back waveform
Страницы
- Следующая →
- 1
- 2
- 3
- 4
- 5
- 6
- 7
См. также в других словарях:
-
read back — ˌread ˈback [transitive] [present tense I/you/we/they read back he/she/it reads back present participle reading back past tense … Useful english dictionary
-
read back — index repeat (state again) Burton s Legal Thesaurus. William C. Burton. 2006 … Law dictionary
-
read back — phrasal verb [transitive] Word forms read back : present tense I/you/we/they read back he/she/it reads back present participle reading back past tense read back past participle read back to look at and speak words that you wrote earlier, usually… … English dictionary
-
read back — A phrase used in air traffic control terminology meaning, “Repeat all, or the specified part, of this message back to me exactly as received.” … Aviation dictionary
-
read — read1 W1S1 [ri:d] v past tense and past participle read [red] ▬▬▬▬▬▬▬ 1¦(words/books)¦ 2¦(find information)¦ 3¦(read and speak)¦ 4¦(music/maps etc)¦ 5¦(computer)¦ 6¦(understand something in a particular way)¦ 7¦(have words on)¦ 8¦(style of… … Dictionary of contemporary English
-
Read-eval-print loop — A read eval print loop (REPL), also known as an interactive toplevel, is a simple, interactive computer programming environment. The term is most usually used to refer to a Lisp interactive environment, but can be applied to command line shells… … Wikipedia
-
read — I UK [riːd] / US [rɪd] verb Word forms read : present tense I/you/we/they read he/she/it reads present participle reading past tense read UK [red] / US past participle read *** 1) [intransitive/transitive] to look at and understand words in a… … English dictionary
-
read-after-write verification — A method of checking that data is written to a hard disk correctly. Data is written to the disk and then read back and compared with the original data still held in memory. If the data read from the disk matches, the data in memory is released … Dictionary of networking
-
Back to Basics (Christina Aguilera album) — Back to Basics Studio album by Christina Aguilera Released August … Wikipedia
-
read — ► VERB (past and past part. read) 1) look at and understand the meaning of (written or printed matter) by interpreting its characters or symbols. 2) speak (written or printed words) aloud. 3) (of a passage, text, or sign) contain or consist of… … English terms dictionary
-
read something back — read a message or piece of writing aloud so that its accuracy can be checked * * * ˌread sthˈback derived to read a message, etc. to others in order to check that it is correct Main entry: ↑readderived … Useful english dictionary
![]()
- Текст
- Веб-страница
![]()
Can I read that back to you
0/5000
Результаты (русский) 1: [копия]
Скопировано!
Можно прочитать обратно к вам
переводится, пожалуйста, подождите..
Результаты (русский) 2:[копия]
Скопировано!
Могу ли я читал, что обратно к вам
переводится, пожалуйста, подождите..
Результаты (русский) 3:[копия]
Скопировано!
я могу снова прочитаю
переводится, пожалуйста, подождите..
Другие языки
- English
- Français
- Deutsch
- 中文(简体)
- 中文(繁体)
- 日本語
- 한국어
- Español
- Português
- Русский
- Italiano
- Nederlands
- Ελληνικά
- العربية
- Polski
- Català
- ภาษาไทย
- Svenska
- Dansk
- Suomi
- Indonesia
- Tiếng Việt
- Melayu
- Norsk
- Čeština
- فارسی
Поддержка инструмент перевода: Клингонский (pIqaD), Определить язык, азербайджанский, албанский, амхарский, английский, арабский, армянский, африкаанс, баскский, белорусский, бенгальский, бирманский, болгарский, боснийский, валлийский, венгерский, вьетнамский, гавайский, галисийский, греческий, грузинский, гуджарати, датский, зулу, иврит, игбо, идиш, индонезийский, ирландский, исландский, испанский, итальянский, йоруба, казахский, каннада, каталанский, киргизский, китайский, китайский традиционный, корейский, корсиканский, креольский (Гаити), курманджи, кхмерский, кхоса, лаосский, латинский, латышский, литовский, люксембургский, македонский, малагасийский, малайский, малаялам, мальтийский, маори, маратхи, монгольский, немецкий, непальский, нидерландский, норвежский, ория, панджаби, персидский, польский, португальский, пушту, руанда, румынский, русский, самоанский, себуанский, сербский, сесото, сингальский, синдхи, словацкий, словенский, сомалийский, суахили, суданский, таджикский, тайский, тамильский, татарский, телугу, турецкий, туркменский, узбекский, уйгурский, украинский, урду, филиппинский, финский, французский, фризский, хауса, хинди, хмонг, хорватский, чева, чешский, шведский, шона, шотландский (гэльский), эсперанто, эстонский, яванский, японский, Язык перевода.
- Teacher: Tolkien’s The Lord of the Rings
- Most people say that Saturdays or Sunday
- Medical plantsThe collection and use of
- Dear friend, Thank you for your support
- ему нужно отдохнуть в деревне без суеты
- Hello friend, sorry about the delay. How
- Medical plantsThe collection and use of
- ему нужно отдохнуть в деревне без суеты
- Mr. Manson: Good afternoon, gentlemen. M
- There isn’t much entertainer for young p
- do you like to swim
- to discover new things, to see different
- Logical topology, or signal topology, is
- discover new things, to see different wa
- Monday June 1st My father had a letter t
- Добрый день! Мы до сих пор не получили с
- Monday June 1st My father had a letter t
- if the preceding
- Сколько килограмм в этой коробке ?
- Он мой лучший друг
- read and choose the correct word
- Are you hungry? Would you like a biscuit
- Office workers admit being rude MOST off
- Играл
повторять записанный текст, считывать в обратном направлении
глагол ↓
- повторять записанный текст
when you send a telegram by phone, the operator will normally read it back to you — когда вы посылаете телеграмму по телефону, телеграфистка обычно перечитывает вам её текст 
Мои примеры
Словосочетания
read back key — клавиша возврата введенною текста
read back — считанный в обратном направлении; считывать в обратном направлении
In the Office 2019 and Microsoft 365 versions, you can have a document read aloud to you in Word. This is a great function, for example, if you have been writing for a long time and want to check your document again. The “Read Aloud” function is also helpful if you want to use Word in an access friendly way. You will find it in the “Review” submenu, but you can also display it in the Quick Access Toolbar at the top of a document. Alternatively, start it directly with the Word shortcut [Alt] + [Ctrl] + [Space].
Contents
- Quick guide: Read Word out loud
- Read Word aloud: Settings
- Read Word document out loud: Instant method
$1 Domain Names
Register great TLDs for less than $1 for the first year.
Why wait? Grab your favorite domain name today!
![]() Matching email
Matching email
![]() SSL certificate
SSL certificate
![]() 24/7/365 support
24/7/365 support
Quick guide: Read Word out loud
- In the Word menu “Review” you will find the function “Read Aloud” — as symbol “A)))” – to the left.
- Place the cursor at the point where you want to start reading aloud.
- Click the “Read Aloud” icon. Alternatively, press [Alt] + [Ctrl] + [Space].
- control buttons for reading aloud appear at the top right of the document window: Back, Pause, Forward, Settings (to change the speed and speaking voice).
- End the read aloud by pressing X or press [Alt] + [Ctrl] + [Space] again.

Tip
In addition to Word, the option to have texts read aloud is also offered by the Office programs Outlook, PowerPoint, and OneNote.
Read Word aloud: Settings
When you hear a Word document read aloud, you have the option to pause, skip back, and skip forward, just as you would when listening to an audio file. First select whether you want to hear the entire text or only parts of it:
- Cursor at the beginning of the document: the document is read aloud from the beginning.
- Cursor at a specific point in the text: The document will be read aloud from here on.
- Text selected: The selected text will be read aloud.
Click “Pause” or “Play” in the middle of the “Read Aloud” menu to pause or restart the voice output. You can also use the “Next” and “Back” buttons to switch back and forth. The reading flow then resumes at the next or previous paragraph. Alternatively, you can control this with the following key combinations (shortcuts):
- [Ctrl] + [Space]: play or pause.
- [Ctrl] + [Left arrow]: jump to the previous paragraph
- [Ctrl] + [Right arrow]: jump to the next paragraph
You can also control reading speed and speaking voice when you have a text read aloud in Word. Select the speaker and gear icon on the right to open the settings. Now you can use a slider to change the reading speed. You can also do this with the following shortcuts:
- [Alt] + [Left arrow]: slower reading speed
- [Alt] + [Arrow right]: faster reading speed
In the submenu “Voice selection” you can choose between different male and female voices.

Word often automatically detects which language a document is written in and displays this in the bar at the bottom left. Otherwise, you can assign a language to the document. The “Read Aloud” function is based on this language setting.
If another language — for example, Spanish — is set, follow these steps to change the language.
- Select the text you want to have read aloud.
- Select the “Review” tab.
- Click the “Language” option and select your language from the menu.
- Start the “Read Aloud” command again.

Read Word document out loud: Instant method
Step 1: Open Microsoft Word or open the desired text document in Word right away.
Step 2: In the top blue toolbar for the Quick Access Toolbar, click “Customize Quick Access Toolbar” and check “Read Aloud”. If this command does not appear the first time, select “More Commands…”.

Step 3: Select “All Commands” from the “Select Commands” menu bar.
Step 4: Scroll down the long list to get to the “Read Aloud” command. Now click on this command.

Step 5: In the list on the right, you can specify where you want to position the Read Aloud function in the toolbar for quick access. Then click on “Save”.
Step 6: Now that you’ve added the Read Aloud command to the quick access toolbar, you can have Word read aloud a selected passage of text or the entire text. Click on the “Read Aloud” function in the toolbar for quick access — icon “A” — or alternatively press the key combination [Alt] + [Ctrl] + [Space]. Microsoft Word will now read out loud the selected text.

Professional Email Address & Personal Domain Name
Get an email address as professional and unique as you are including a free matching domain!
![]() Address book
Address book
![]() Calendar
Calendar
![]() Virus protection
Virus protection

How to create a table of contents in Word
Microsoft Word makes it easy to create smart text documents with its diverse template styles. This includes pre-formatted table of contents templates. With our illustrated, step-by-step guide, we’ll show you how to find the templates and how to customize the design.
How to create a table of contents in Word

How to delete a blank page in Word
Word sometimes has weird quirks: suddenly a blank page appears in the middle of the document for no reason and cannot be removed. You can quickly reach your (stress) limits in this kind of situation, at least when trying conventional means. But you can delete a page in Word easily, if you know how. The problem usually lies in invisible control characters.
How to delete a blank page in Word

Word is not responding: What to do when Microsoft Word has stopped working
Word is not responding: For many users, Microsoft Word is the most important program on their computer, making it all the more frustrating when Word freezes. There are many reasons why Word might suddenly stop responding. Add-in problems are a frequent cause. Other times, Word itself is not the source of the problem: Printer settings or antivirus software can also interfere with Word.
Word is not responding: What to do when Microsoft Word has stopped working

on
June 24, 2020, 11:20 AM PDT
Two ways to return to where you last were in a Microsoft Word document
If you browse a lot, you might want to make use of these two easy methods for returning to where you started in Microsoft Word.
We may be compensated by vendors who appear on this page through methods such as affiliate links or sponsored partnerships. This may influence how and where their products appear on our site, but vendors cannot pay to influence the content of our reviews. For more info, visit our Terms of Use page.

That title’s a bit ambiguous because where you last were could mean different things to different users. What users really want is to look around in a document without losing their place. If you’re reading a book, you can bookmark the spot. You can do the same in a Word document, but that’s a bit dramatic if all you’re looking for is a quick way to return to where you last were. In this article, I’ll show you two easy ways to do that, even though where you last were doesn’t mean the same thing in both tips.
I’m using Microsoft 365, but you can use earlier versions. There’s no demonstration file because you won’t need one. I used the RAND() function to create a few paragraphs of text and then copied them several times to create a five-page document. The space bar tip works in the browser, the Shift+F5 tip doesn’t. Enlarging the cursor carries over into the browser but increasing the size of the insertion point doesn’t.
SEE: Office 365: A guide for tech and business leaders (free PDF) (TechRepublic)
Finding where you last were in Word
The phrase where you last were could mean two different things. Either you want to go back to the spot where the insertion pointer is, or you want to return to the last edit. Sometimes, the spot is the same and sometimes it isn’t. Fortunately, there are two quick ways to satisfy both possibilities.
Getting back to the insertion pointer in Word
It’s common for a user to be reviewing a part of the document that’s nowhere near the insertion point. The user might be referencing related information or checking to make sure information was included in a later section. There are many reasons for viewing content that is paragraphs, pages, or even full sections away from the insertion point. All that’s required to get home is a tap of your shoes–I mean, the space bar. It really is that simple.
Now, let’s suppose you’re working in a long document (which is difficult to represent in a single figure, so lend me your imagination a bit). You can see in Figure A that the insertion point is on the first page, but let’s say you’re reviewing content on page 4. (You’d probably scroll down rather than displaying multiple pages as I have. I’m displaying multiples to represent what we’re doing.)
Figure A

Now, let’s suppose you’re reading page 4 or 14 or 421, and you want to return to the insertion point, and you don’t remember exactly where it is. Remember, the insertion point is where you can edit the document and not necessarily where you’re currently viewing. All you have to do is press the space bar and Word immediately returns you to the insertion point. You’ll want to delete the space of course, but that’s the quickest and easiest method for getting back to where you last were. This is one of those simple tips that works more often than not without doing a single special thing. However, this quick and easy solution won’t always work. For instance, if you use Page Down to browse the document, it won’t work because Page Down moves the insertion point!
Get back to the last edit(s)
In some cases, where you last were will refer to the last edit you made. That may or may not be where the insertion point is. To find the last edit, simply press Shift+F5. You can press this combo to find the last three places in the document where you edited content. Keep in mind that a single keystroke is an edit, so sometimes this combo won’t work as you expected.
Try it now by making simple edits in a longish document—remove a word, add a space, apply bold—and then press Shift+F5 to return to each of those edits. If you have more than one document open, the combo might even take you to another document!
SEE: Recap: Microsoft Build 2020 (free PDF) (TechRepublic)
How to enlarge the cursor and insertion point
Neither of these tips is perfect but don’t give up. They’re both worth the effort of familiarity. However, there’s one more tip to offer. The cursor is small. Even when working on the same page, it can be difficult to find. One way to attack this is to make the cursor larger and thereby more visible. (Notice that I’m talking about the cursor and not the insertion point—we’ll get to that next.)
This solution is a Windows solution and it isn’t perfect (nothing in this article has been) but it can help. Here’s what you can do:
- In Cortana, type Control Panel and choose Mouse from the list to the right (Figure B).
- In the resulting dialog, click the Pointers tab.
- From the Customize list, choose Text Selector, and then click Browse.
- Thumb down to the I beam choice and select a bold, larger item (Figure C).
- Click Open, Apply, and OK. The new insertion point is much larger than the out-of-the box icon.
Figure B
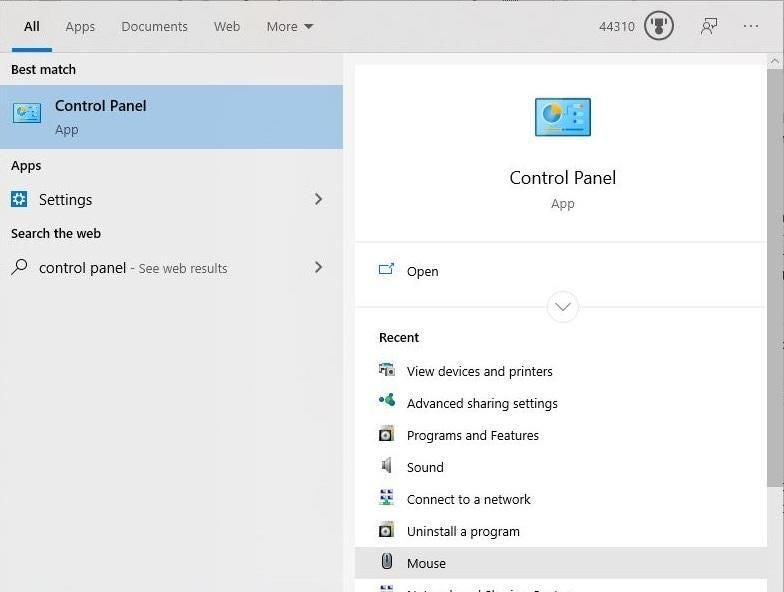
Figure C

That’s helpful to a point, but what about the insertion point? You can also enlarge it. To increase the size (or thickness) of the blinking cursor (the insertion point), do the following:
- In Cortana, type Ease of Access mouse settings and choose the system settings item from the resulting list.
- Click Mouse and Pointer on the left.
- Scroll down to change cursor thickness and use the thumb to increase the size. Figure D shows the insertion point at its full thickness. The thickest setting can be confusing as it resembles insertion mode a bit. Reset the thickness until you find the one that’s right for you.
Figure D

Keep in mind that changing the insertion point and the cursor are Windows settings, so they impact more than Word. You will see the modifications in other applications that use them.
It’s not a silver bullet
Nothing I’ve shown you in this article will work perfectly, as you expect, every single time. As you become more familiar with each, you’ll intuitively know what will work best in any given situation. Whether you change the visual impact of the cursor and the insertion point is up to you.
Also See
-
What’s in Windows 10 19H2 for enterprises?
(TechRepublic) -
Windows 10: A cheat sheet
(TechRepublic) -
What to do if you’re still running Windows 7 (free PDF)
(TechRepublic) -
Power checklist: Securing Windows Server 2016
(TechRepublic Premium) -
Microsoft delivers first Windows 10 Fast Ring build from its new development branch
(ZDNet) -
6 simple security changes all Windows 10 users need to make
(CNET) -
Get more must-read Microsoft tips and news
(TechRepublic on Flipboard)
-
Enterprise Software
-
Microsoft
-
Software
Become a professional master in Microsoft Word by learning these useful tips and tricks to help you management your emails better and work more productivity.
Table of Content
- CTRL Key Shortcuts
- Save as PDF
- Scroll Zoom
- Add a Horizontal Line
- Shrink One Page
- Have Word Read To You
- Add Random Text
- rand()
- rand(paragraphs,sentences)
- lorem() (for Latin Text)
- Convert Text to Table
- Insert Hyperlinks
- Insert Date/Time
- Insert a File Path/Location
- Insert a Screenshot/Screen Clipping
- File Share Email
- AutoCorrect
- Triple Click to Highlight a Paragraph
- Show Formatting Marks
![]()
1. CTRL Key Shortcuts
In Microsoft Word, the CTRL key can be used to navigate through your document more efficiently.
- Hold CTRL and press Right Arrow to go right one word at a time.
- Hold CTRL and press the Left Arrow to go left one word at a time.
- Hold CTRL and Backspace to delete a whole word at a time.
- CTRL + SHIFT + Right Arrow will highlight one word at a time
- CTRL + END to move cursor to the end of the line.
- CTRL + HOME to move cursor to the beginning of the line.
- CTRL + Page Up to move up one page.
- CTRL + Page Down to move down one page.
- CTRL + UP Arrow to move cursor up one paragraph at a time.
- CTRL + Down Arrow to move cursor down one paragraph at a time.
2. Save as PDF
If you need to share your document in a fashion that can not be edited by others and will preserve the pagination and formatting as you’ve designed it, save it as a PDF. This file format (Portable Document Format) was developed by Adobe in the early 1990s as a way for people to share documents and have it appear exactly the same no matter what computing platform is use to view it from. There are other benefits of PDF as is the defacto standard for business documents.
Follow these step to save your Microsoft Word document as a PDF:
- Open the Word document you want to create a PDF of.
- From the menu bar, click File > Save As, as highlighted in the illustration below.
- From the drop-down list, find and select PDF (*.pdf) and then click Save.


3. Scroll Zoom
You can quickly zoom in and out of your Microsoft Word document with this easy keyboard and mouse combination.
- Press and hold down the CTRL key on your keyboard.
- Then scroll your mouse wheel forward and backward to zoom in and out, respectively.

4. Add a Horizontal Line
Easily add a horizontal line across your page, extending from the left margin to the right margin, by typing three hyphens (---) and then pressing Enter
In Word, a horizontal line is a type of border. To delete it, perform the following:
- Place the cursor immediately above the horizontal line.
- On the Home tab, click the arrow next to the Borders and Shading button.
- Click No Border.
5. Shrink One Page
As you finalize your Word document, you may find yourself with the last page looking a bit odd by it having just only a few lines of text. You can use the Shrink One Page feature of Microsoft Word to easily have it attempt to adjust your document to include those few lines of text without having to print that last extra page. It does this by reducing the size and spacing of your text with adversely affecting the overall presentation of your document.
Before using this feature, we’ll need to make the Shrink One Page icon accessible to us on our Quick Access Toolbar by performing this one-time setup:
- Click on the down arrow on the Quick Access Toolbar.

- Select More Commands from the list of options that appears.
- In the Word Options dialog box, from the Choose Command From drop-down list, select All Commands.
- From the list of commands, scroll down to find and highlight Shrink One Page.
- Click the Add button to add the Shrink One Page option to your Quick Access Toolbar.
- Click OK to close the dialog box.


The Shrink One Page option is now accessible through your quick access toolbar. To use this feature, simply follow these steps:
- Highlight all the text in your Microsoft Word document (you can press CTRL + A)
- Then click on the Shrink One Page icon, as illustrated below.

6. Have Word Read To You
Microsoft Word has a built-in text-to-speech feature that is able to read your document to you. You’ll be able to hear it speak your text out loud. Having Microsoft Word read aloud is a great feature for the visually-impaired. For others, this feature can be a time saving by having Word read to you while you are working on other things.
Before using it, we’ll need to make the Speak icon accessible to us on our Quick Access Toolbar by performing this one-time setup:
- Click on the down arrow on the Quick Access Toolbar.
- Select More Commands from the list of options that appears.
- In the Word Options dialog box, from the Choose Command From drop-down list, select All Commands.
- From the list of commands, scroll down to find and highlight Speak.
- Click the Add button to add the Speak option to your Quick Access Toolbar.
- Click OK to close the dialog box.

The Speak option is now accessible through your quick access toolbar. To have Word speak your text, simply follow these steps:
- Highlight the text you want Microsoft Word to read to you.
- Click on the Speak icon, as illustrated below.

You can stop speak at anytime by clicking on the Speak icon again.
7. Add Random Text
At times, you may find a need to quickly add filler text into your Microsoft Word document preview your document flow or a set of document design format. Word allows you to use one easy-to-use command to quickly populate your document with English or Latin text.
rand()
The =rand() will quickly add a few paragraphs into your document. To use, follow these steps:
- In your document, position the Microsoft Word cursor (not your mouse cursor) where you want random text to be inserted. The cursor needs to be at the beginning of a line. It does need to be a blank line, the cursor just needs to be at the beginning. This command will not work if you attempt to use it within a sentence.
- Type
=rand()and press Enter. Random text is now added to your document as illustrated below.

rand(paragraphs, sentences)
The rand command allows you to customize the random text generated by specifying the number of paragraphs and the number of sentences per paragraph to created.
For example to generate 2 paragraphs with 6 sentences each, follow these steps:
- In your document, position the Microsoft Word cursor (not your mouse cursor) where you want random text to be inserted. The cursor needs to be at the beginning of a line. It does need to be a blank line, the cursor just needs to be at the beginning. This command will not work if you attempt to use it within a sentence.
- Type
=rand(2,6)and press Enter. Random text is now added to your document as illustrated below.

lorem()
Instead of English text, you can use the lorem command in insert random Latin text. You use this command in the same manner as rand as illustrated above. In its simplest form type in =lorem() and press Enter.
To specify the number of paragraphs and sentences to generate, use command syntax is lorem(paragraphs, sentences).As an example, to insert 3 paragraphs with 4 sentences each, type =lorem(3,4) and press Enter. The result is illustrated below.

8. Convert Tabbed Text to Table
If you create rows and columns of text using tab, you can easily convert them into a table using the built-in Convert Text to Table feature in Microsoft Word. This feature will also work if you have a delimited list (e.g, comma delimited text). To use, follow these simple steps:
- In Microsoft Word, highlight your text.
- From the menu bar, click Insert tab > Table > Convert Text to Table, as illustrated below.
- In the dialog box that appear, define the criteria for the text you want to convert to a table then click OK.
- Your tabbed text (or delimited text) is now converted into a table, as illustrated below.


9. Insert Hyperlinks
You can add links to websites (or even to a different section of your document) into your document easily. This enables your reader to click on the hyperlink to go to the external resources. This is a great tool to use if you want to share or reference additional information from websites.
To insert a hyperlink, follow these steps:
- Highlight the text you make to make a hyperlink
- Press CTRL + K
- In the Insert Hyperlink dialog box that appears, select one of four available choices
- Link to Existing File of Web Page
- Link to Place in This Document
- Link to Create New Document
- Link to E-mail Address
- Enter the URL or select the target destination for your link
- For links to a web page, enter the website address (URL), as illustrated below.
- For links to a place within your document, select the position from the list of available places
- For a link to create a document, specify the folder path for your new file
- For e-mail address, enter the email address in textbox provided
- For links to a web page, enter the website address (URL), as illustrated below.
- Your highlighted text will now turns to a blue clickable hyperlink. To test the link, hold CTRL then click on the link.

10. Insert Date/Time
You can quickly insert the current date and/or time into your document with the Date & Time button. This feature enables to define whether to insert the current date only or with the time. You are also able to define the format of how the date and time should appear. This is a great time saver if you constantly need to add date or time into your document, such as for your work logs, laboratory workbooks, and similar.
Before using it, we’ll need to make the Date & Time icon accessible to us on our Quick Access Toolbar by performing this one-time setup:
- Click on the down arrow on the Quick Access Toolbar.
- Select More Commands from the list of options that appears.
- In the Word Options dialog box, from the Choose Command From drop-down list, select All Commands.
- From the list of commands, scroll down to find and highlight Date & Time.
- Click the Add button to add the Speak option to your Quick Access Toolbar.
- Click OK to close the dialog box.

The Date & Time option is now accessible through your quick access toolbar. To have Word insert the current date and time into your document, simply follow these steps:
- Position your cursor in your document where you want to insert the file path.
- Click on the Date & Time icon, as illustrated below.
- From the Date & Time dialog box, select the format on how you want your data/time to appear then click OK.


The current data and/or time is now inserted into your document.
11. Insert a File Path/Location
As you and your colleagues share Word documents with each other, you may find yourself needing to know where a particular document is saved. This is particularly the case if you have a printed copy of the document or the document was emailed to you as an attachment. By using the Insert File Path command in Microsoft Word, you can easily include the full file path of your document so others can locate it when needed (e.g., network file share).
Before using it, we’ll need to make the Insert File Path icon accessible to us on our Quick Access Toolbar by performing this one-time setup:
- Click on the down arrow on the Quick Access Toolbar.
- Select More Commands from the list of options that appears.
- In the Word Options dialog box, from the Choose Command From drop-down list, select All Commands.
- From the list of commands, scroll down to find and highlight Insert File Path.
- Click the Add button to add the Speak option to your Quick Access Toolbar.
- Click OK to close the dialog box.

The Insert File Path option is now accessible through your quick access toolbar. To have Word insert the file path of your document, simply follow these steps:
- Position your cursor in your document where you want to insert the file path. A good spot may be on your cover page or in the document footer.
- Click on the Insert File Path icon, as illustrated below.

Your document’s file path is now inserted into your document.
12. Insert a Screenshot/Screen Clipping
Microsoft Word includes a built-in feature to enable you to easily insert a screenshot (or screen clipping) into your document without the need of using the Print Screen key on your keyboard and then using Microsoft Paint to crop your image. This feature provides you with a list of selectable thumbnail preview of the windows you have open (windows that are minimized will not be included in this list).
To insert a screenshot into your Word document, follow these steps:
- In your Microsoft Word document, position the cursor where you want the screenshot to be inserted.
- From the menu bar, click on Insert > Screenshot.
- From the list of thumbnail images, click to select the screenshot you want to insert, as illustrated below.
- Your screenshot is now inserted and you can resize and re-position as needed.

Screen Clipping
If you need the ability to manually select a specific area of your screen to capture and insert into your document, use the Screen Clipping feature. You’ll be able to select a rectangular area of your screen to capture and insert.
You access this feature as follows:
- In your Microsoft Word document, position the cursor where you want the screenshot to be inserted.
- From the menu bar, click on Insert > Screenshot > Screen Clipping.
- Using the drawing pointer that appears, draw a rectangular area of your screen to capture.
- Your screenshot is now inserted and you can resize and re-position as needed.
13. File Share Email
If you are like most, you will often need to share your Microsoft Word documents with your team or colleagues for peer review, edits, and feedback. With the Share feature in Microsoft Word, you can quickly and easily attach open Microsoft Outlook and attached your document with a few clicks of the mouse.
Follow these steps to use this feature:
- While in Microsoft Word, click File > Share > Email.
- Click Send as Attachment.

An Outlook new message window will automatically open with your document attached.
14. AutoCorrect
The AutoCorrect feature can be used to automatically insert frequently used text or sentences with a simple short keystroke combination. Long disclaimer statements, reference terms, and any other long series of text can easily be inserted by typing in just a few letters.
- In Microsoft Word, click on File > Option.
- In the Word Options dialog box, select Proofing from the left side bar.
- Then click the AutoCorrect Options button.
- In the AutoCorrect dialog box, type in a short key stroke combination you want to use and type in the sentence(s) you want Word to automatically replace it with. In the example below, we use the key strokes
!safeto have Word insert the sentenceSafety is our #1 priority and everyone's responsibility! - Click Add and the OK button.


Now, as you edit your document, when you type !safe and press Space Bar, Word will automatically replace it with Safety is our #1 priority and everyone's responsibility!
This is a quick and easy shortcut to type in repetitive text into your documents.
15. Triple Click to Highlight a Paragraph
This tip quickly highlights the entire paragraph. Simply triple click on your left mouse button anywhere within a paragraph to highlight.
16. Show Formatting Marks
There are many formatting options in Microsoft Word that you can use to make your document look perfect. These include spaces, tabs, and page breaks. Why many of these are visible as you edit your document, there are some that are not. This can be a cause of frustration if you are trying to format text but are not getting the desired effect as invisible formatting are working against you.
You can have all the formatting options used in your document become visible by using the show/hide formatting mark option in Microsoft Word. Do one of the following to show and hide the formatting marks.
- Click on the paragraph symbol ¶ on the toolbar to show/hide, as illustrated below.
- Or press CTRL + SHIFT + * to show/hide.

Once displayed, formatting marks are shown, as illustrated in the example below.
