
While Word® is traditionally thought of a word processor, you can make a flowchart in Word one of two ways:
- Create a basic flowchart using SmartArt included in Word
- Use a third-party tool and insert your flowchart into your reports and documents in Word

Add A Flowchart in Word using SmartArt
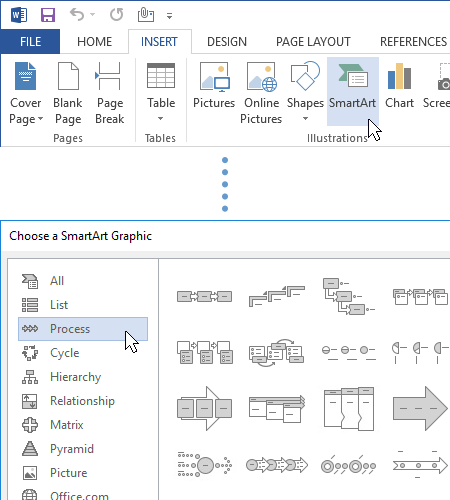
To make a flowchart in Word, start by selecting the Insert tab. Click SmartArt and choose «Process». This will insert a basic three-step process into your document.
There are a few different styles to choose from. Pick one that best fits your presentation or reporting needs. You can always change your mind and change the style of your entire flowchart after the fact.
Add New Shapes
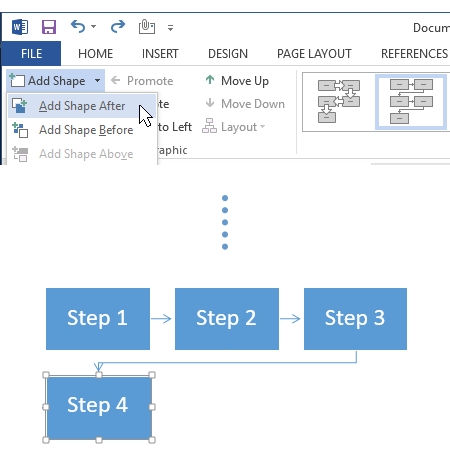
Add shapes by clicking the Add Shape button.
By default, Add Shape will just add a shape after the shape currently selected.
To add shapes in other directions, use the options in the drop down menu under Add Shape. You can add shapes, before, below, and above the currently selected shape.
Add and Edit Text
Add text to any shape, by first selecting it and then typing. You can also add text, by right-clicking and choosing to Edit Text.
You can change text weight, size, and effects in the Format tab or in the Font pop-up menu accessed from the right-click menu options. Double-clicking on any shape with text, will also bring up a shortened version of text editing options.
Change the Flow
Change the direction of arrows by clicking Right to Left.
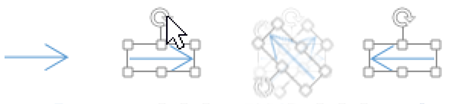
To change the direction of an individual arrow, select it and use the circular control above the arrow to rotate it in a different direction.
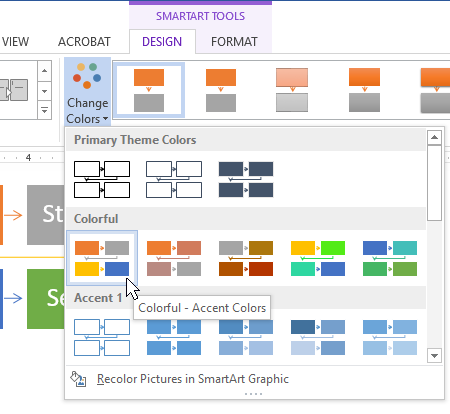
Change the Colors
Change the colors of your entire flowchart by selecting a different theme from the Change Color menu.
To change the color of an individual shape, click on the Format tab and choose a color from Shape Fill. You can also right-click on the shape and choose Format Shape from the pop-up menu.
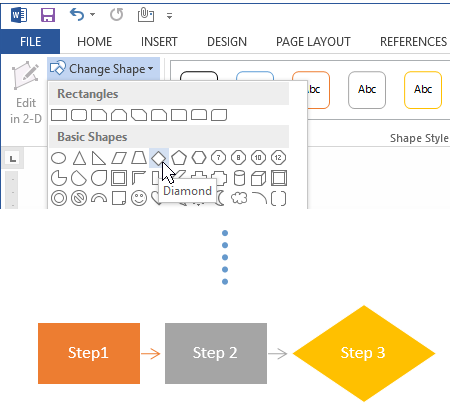
Adding a Decision Symbol and Other Shapes
By default, a SmartArt flowchart is very basic. You get a series of rectangular boxes or actions in a row.
If you need to introduce different types of shapes to denote decisions, inputs, or some other common process steps, you’ll have to do a little more work.
Add the default rectangle shape and select it. From the right-click menu choose Change Shape or click the Format tab and select Change Shape to choose a new shape type like a diamond or parallelogram.
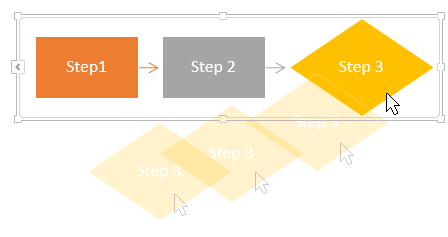
Move Shapes
To a move a shape in your flowchart, grab its outline and move it to a new location. Notice that an arrow pointing to and from your shape will move with it.
It’s fairly difficult to create a split path after a decision using this method.
Moving Beyond Simple Flowcharts to Complex Flowcharts
SmartArt is great for adding a very simple flowchart to Word with only a few steps. If you need to visualize a more complex process with multiple decision points and steps, consider using the a dedicated flowchart tool.
SmartDraw can help you build a complex flowchart without any of the manual hassles. SmartDraw’s shapes are smart. If you add a decision symbol, you’ll automatically get two arrows pointing to two different steps denoting the split in the flow.
Make a Flowchart in SmartDraw for Word
Start by opening a flowchart template and adding shapes using the SmartPanel to the left of your drawing area.
Move, delete, add shapes and your flowchart will expand automatically.
Use the arrow keys to control the direction of how your flowchart grows. Add split paths and different flowchart symbols using the attached flowchart symbol library.

Insert Your Flowchart into Word
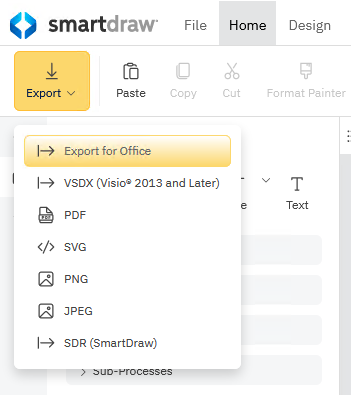
Once your flowchart is ready, you can easily export it to Word®. Choose «Export» under the «Home» tab and click on «Export to Office.»
A flowchart or flow chart usually shows steps of the task, process, or workflow.
Microsoft Word provides many predefined SmartArt templates that you can use to make a flowchart,
including visually appealing basic flowchart templates with pictures. However, if you have a
process with a tangled flow or you need a custom layout, you can build a complex flowchart
in Word using rectangular, diamond, round, and other box types.

Managers, system analysts, programmers, and engineers adopted flowcharts as a mean of
communication for describing:
- Document workflows
- Data flows
- System operation flows
- Algorithms
No wonder that building blocks and rules of flow charts were standardized by the American
National Standards Institute (ANSI) and International Organization for Standards (ISO)
more than 50 years ago. The current standard defines the drawing direction from top to
bottom and left to right and specific symbols for different types of entities, actions,
etc. E.g.:
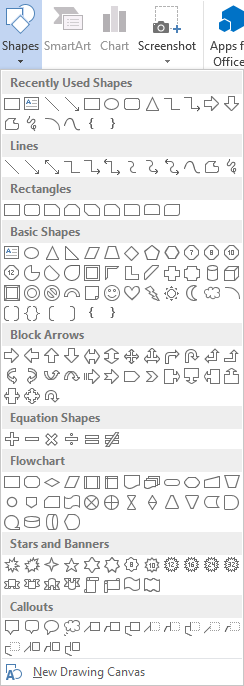
You can find all these shapes and other useful visual elements in the Shapes
dropdown list on the Insert tab of Microsoft Word.
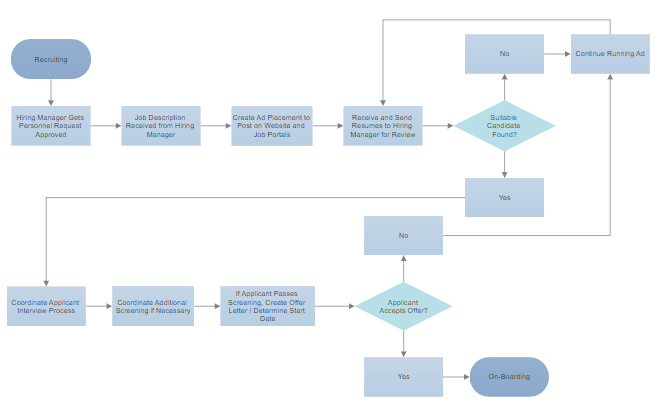
The flowchart above is «cross-functional» and defines the responsibility zones of
different business units.
To create a diagram like the one above, follow the next steps (we recommend to check the
tip how to easily organize shapes in
Word,
which demonstrates easy tricks to simplify the drawing routine):
Add the drawing canvas
The drawing canvas is an essential element for the flow chart that you need to add before
adding the flow shapes because of flowchart connectors. You can add flowcharts connectors
only between the shapes within the drawing canvas:
1. On the Insert tab, in the Illustrations group, click
Shapes:

2. On the Shapes list, in the bottom, choose New Drawing
Canvas:

Word adds the new drawing canvas to your flow chart:

Draw the flowchart blocks
3. On the Shapes list, in the Flowchart group,
select the block you want to add:

4. To add text to the selected shape, just double-click in it and enter
the text.
Connect the flowchart blocks by connectors
5. To connect shapes, do the following:
- On the Insert tab, in the Illustrations group, click in the Shapes list and
then select one of the connectors in the Lines group:
- Select the beginning point on the border of the first shape (source) and the ending
point on the edge of the second shape (target):

For more customizations of shapes and connectors, see
how to change format of
diagram shapes in Word
and
how to change flowchart shapes
or
how to change connector
type for flowchart.
Top-to-down flowcharts are perfect for the Portrait page orientation in Microsoft word. For
the Landscape page orientation or the PowerPoint presentation, the preferred layout is
left-to-right. Sometimes left-to-right flow diagrams with delimited borders of organization unit
activities are called Swimlane diagrams or Swimlane flowcharts.
See also this tip in French:
Comment créer un organigramme des opérations dans Word.
How to make a Flowchart in Word
- Open a blank document in Word.
- Add shapes. To begin adding shapes to your flowchart in Word, you have two options.
- Add text. Add text to a SmartArt graphic by clicking the filler text and begin typing.
- Add lines.
- Format shapes and lines.
Contents
- 1 Does Microsoft Word have a flow chart template?
- 2 Can you create a workflow in Word?
- 3 How do you create a workflow chart?
- 4 How do I insert a flow chart template in Word?
- 5 How do I create a flowchart in Microsoft Office?
- 6 Is it easier to create a flowchart in Word or Excel?
- 7 What program is best to make flow charts?
- 8 How do I create a flowchart in Office 365?
- 9 How do I make a diagram in Word?
- 10 Is Microsoft Visio free?
- 11 Is Word or PowerPoint better for flowcharts?
- 12 How do I create a flowchart in Word 2016?
- 13 How do you make a simple flow chart?
Does Microsoft Word have a flow chart template?
A flowchart or flow chart usually shows steps of the task, process, or workflow. Microsoft Word provides many predefined SmartArt templates that you can use to make a flowchart, including visually appealing basic flowchart templates with pictures.
Add A Flowchart in Word using SmartArt
To make a flowchart in Word, start by selecting the Insert tab. Click SmartArt and choose “Process”. This will insert a basic three-step process into your document.You can always change your mind and change the style of your entire flowchart after the fact.
How do you create a workflow chart?
How to create a workflow diagram
- Select your process. First, you’ll need to work out what process you’re intending to track and, most importantly, why.
- Define the start and endpoint.
- Gather together your information.
- Eliminate inefficiencies.
- Design the workflow.
- Analyze your results.
How do I insert a flow chart template in Word?
Navigate to Insert > Illustrations > SmartArt. A pop-up window will open. In the SmartArt window, select “Process” to see the various flowchart options. Select the diagram you want and click “OK” to place it into the document.
How do I create a flowchart in Microsoft Office?
Create a flowchart
- Click the File tab.
- Click New, click Flowchart, and then under Available Templates, click Basic Flowchart.
- Click Create.
- For each step in the process that you are documenting, drag a flowchart shape onto your drawing.
- Connect the flowchart shapes in either of the following ways.
Is it easier to create a flowchart in Word or Excel?
This is an minor difference of convenience, but Excel makes formatting flowchart shapes easier than Word.When clicking it, the dialog box in Excel centralizes the flowchart shape formatting options in one place, whereas Word has half as many the formatting options in its dialog box.
What program is best to make flow charts?
The 7 Best Flowchart Software of 2021
- Best Overall: Lucidchart.
- Runner-Up, Best Overall: SmartDraw.
- Best for Beginners: Gliffy.
- Best for Intuitive Use: Cacoo.
- Best Features: EdrawMax.
- Best Price: Draw.io.
- Best for Power Windows Users: Visio.
How do I create a flowchart in Office 365?
Select a flowchart shape and drag it onto the drawing page. Point to the shape, and point to the arrow that indicates the direction of the next shape you want to add. Select the shape you want to add.
Try it!
- Select File > New.
- Select Basic Flowchart.
- Select Create.
How do I make a diagram in Word?
To create a diagram in a document
- Position the cursor in the document where you want to insert the diagram.
- Do either of the following to open the Choose a SmartArt Graphic dialog box:
- In the left pane, select a type of diagram.
- Click OK to insert the selected diagram at the cursor.
Is Microsoft Visio free?
Is Microsoft Visio Free? No, Microsoft Visio is not a free tool. It comes with monthly or annual subscription plans as well as one-time software purchase for standard and professional versions licensed for 1 PC.
Is Word or PowerPoint better for flowcharts?
Word is great for simple flowcharts with few shapes as long as they all fit within the page constraints of Word. PowerPoint has similar slide constraints like Word’s page constraints, but for larger flowcharts, you can use PowerPoint’s hyperlinking options that let you spread the same flowchart over multiple slides.
How do I create a flowchart in Word 2016?
Select Insert tab and then select Shapes, next select New Drawing Canvas from the bottom of the Shapes box. All the required symbols can be found on the Insert tab > Shapes. Specific flowchart symbols are organised under the Flowchart group but you could use any of the other shapes to construct your flowchart.
How do you make a simple flow chart?
How to plan and draw a basic flowchart
- Define your purpose and scope.
- Identify the tasks in chronological order.
- Organize them by type and corresponding shape, such as process, decision, data, inputs or outputs.
- Draw your chart, either sketching by hand or using a program such as Lucidchart.
Last Update: Jan 03, 2023
This is a question our experts keep getting from time to time. Now, we have got the complete detailed explanation and answer for everyone, who is interested!
Asked by: Geoffrey Pacocha
Score: 4.2/5
(39 votes)
From the Insert tab within the Ribbon, select a flowchart shape from the dropdown gallery. You can then click and drag it to the size you want on the page to place it. Continue to add shapes and lines to complete your flowchart.
Does Microsoft Word have a flow chart template?
A flowchart or flow chart usually shows steps of the task, process, or workflow. Microsoft Word provides many predefined SmartArt templates that you can use to make a flowchart, including visually appealing basic flowchart templates with pictures.
What is the best Microsoft Office program to make a flowchart?
Of the standard Microsoft Office applications — Excel Word, PowerPoint — Excel is the most powerful and user friendly for creating flowcharts (disclosure: we make a flowchart automation add-in for Excel), but in some cases creating flowcharts in Word is handy.
How do I create a flowchart in Word or Excel?
The key is to look in the SmartArt Process category.
- Open the Excel worksheet where you want to add a flowchart.
- Go to the Insert tab.
- In the Illustrations group, select SmartArt to open the Choose a SmartArt Graphic dialog box.
- Choose Process in the left pane.
- Select the flowchart template you want to use.
- Select OK.
Can I create a flowchart in Excel?
You can also build your flowchart in excel using the shapes tool. To access Excel’s shape library, go to the insert tab and click “Shapes.” A gallery will appear with a variety of basic shapes including lines, arrows, and geometric shapes. Scroll down to find the flowchart section.
32 related questions found
How do you create a process flow?
The 6 steps to making a business process flow diagram
- Determine the main components of the process. …
- Order the activities. …
- Choose the correct symbols for each activity. …
- Make the connection between the activities. …
- Indicate the beginning and end of the process. …
- Review your business process diagram.
Which is better for flowcharts Word or PowerPoint?
Word is great for simple flowcharts with few shapes as long as they all fit within the page constraints of Word. PowerPoint has similar slide constraints like Word’s page constraints, but for larger flowcharts, you can use PowerPoint’s hyperlinking options that let you spread the same flowchart over multiple slides.
How do you make a simple flowchart?
Create a flowchart
- Click the File tab. …
- Click New, click Flowchart, and then under Available Templates, click Basic Flowchart.
- Click Create.
- For each step in the process that you are documenting, drag a flowchart shape onto your drawing. …
- Connect the flowchart shapes in either of the following ways.
Is Microsoft Visio free?
? Is Microsoft Visio Free? No, Microsoft Visio is not a free tool. It comes with monthly or annual subscription plans as well as one-time software purchase for standard and professional versions licensed for 1 PC.
How do I make a diagram in Word 2010?
To create a simple chart from scratch in Word, click Insert > Chart, and pick the chart you want.
- Click Insert > Chart.
- Click the chart type and then double-click the chart you want. …
- In the spreadsheet that appears, replace the default data with your own information. …
- When you’ve finished, close the spreadsheet.
How do I install Microsoft Visio for free?
In a web broswer, navigate to https://www.office.com.
- If prompted to sign in: Click Sign In. …
- Click Install Office apps drop-down button.
- Click Other install options.
- Select View Apps & Devices.
- Under My installs next to the Visio label click Install Visio.
- The installer will begin to download.
Is Visio free with Office 365?
It’ll be available, at no additional cost, for all commercial license subscribers. This lightweight version of the web app will offer core Visio functionalities and allow business users to create, edit, and share professional diagrams.
Can I install Visio for free?
Microsoft Visio is a premium software program, with several different subscription-based plans. However, if you follow the steps above, you can download a free trial version through the Microsoft Evaluation Center.
What is flowchart example?
A flowchart is a type of diagram that represents a workflow or process. A flowchart can also be defined as a diagrammatic representation of an algorithm, a step-by-step approach to solving a task. The flowchart shows the steps as boxes of various kinds, and their order by connecting the boxes with arrows.
What is the best free flowchart software?
The 7 Best Free Flowchart Software for Windows
- Dia. Dia is a free and full-featured flowchart creator. …
- yEd Graph Editor. yEd Graph Editor is an excellent, up-to-date tool for flowcharts, diagrams, trees, network graphs, and more. …
- ThinkComposer. …
- Pencil Project. …
- LibreOffice Draw. …
- Diagram Designer. …
- PlantUML.
What is a yes no flowchart called?
The yes no flowchart shows acknowledgments between different types of categories for an issue. It is helpful if you want to present the results of a survey. The Yes No flowchart is also known as two-fold or butterfly charts. … It is also called a tornado chart.
Is Word or Excel better for flow charts?
Excel is an easier to learn program and does have the peculiar manner as Word. From the perspective of flowchart mapping, Excel outperforms Word on several levels.
How do you present a process?
Sometimes you may have to discuss a process or sequence that has many steps. It is a good idea to show a process using a sequence diagram such as a shapes and arrow diagram. The challenge when you have many steps is fitting them all on the slide. Here is an example based on a slide in a recent customized workshop.
What are different types of process flow?
4 Most Common Flowchart Types
- The Process Flowchart. Illustrate How a Process Works or Plan a Project with a Process Flowchart. …
- The Workflow Chart or Workflow Diagram. Understand How Data and Documents Flow Within Your Organization. …
- The Swimlane Flowchart. …
- The Data Flowchart.
How do you create a process?
How to Create Processes to Increase Your Productivity
- Choose your platform. First you need to choose the platform you’re going to use to document your processes. …
- Pick the first process to document. …
- Record how it’s currently achieved. …
- Fill in any gaps. …
- Improve what you can. …
- Test your changes. …
- Rinse and repeat.
Why is Visio not in 365?
Unfortunately the visio subscription is not included in the subscription of Office, for it must be purchased separately. Visio Work visually. Diagramming made simple. The good news is that Office 2016 is approaching its «sell-by» date in that Office 2019 has been announced for this fall.
How much does a Visio license cost?
Microsoft offers two Visio subscriptions to its users: Annual Subscription – $9.80 per user per month. Monthly Subscription – $11.70 per user per month.
This article shows the process of creating a flowchart in Microsoft Word.
Of the standard Microsoft Office applications — Excel Word, PowerPoint — Excel is the most powerful and user friendly
for creating flowcharts (disclosure: we make a flowchart automation add-in for Excel),
but in some cases creating flowcharts in Word is handy.
This isn’t a step-by-step tutorial, but it does try to give a useful overview
of the Drawing tools in Word, as well as offer some tips and highlight a few quirks.
Excel Flowchart Wizard
FlowBreeze is a flowchart add-in for Microsoft Excel that makes creating flowcharts simple and pain free. Free 30-Day Trial.
Download
Note on Ribbon (Toolbar) Controls
You may want to maximize Word to full screen when using this tutorial. The ribbon takes a lot of screen space, and some of the controls referenced in this article may be hidden if the window is not maximized.
The next two section reference the image on the right. The screenshot is from Word 2013, but the following steps have remained consistent from Word 2007 through Word 2019.
Insert canvas and shapes
Insert a Canvas
Word flowcharts are best contained within a Drawing Canvas. You
can insert shapes directly into a Word document, but using a canvas
has several advantages:
- They act as a container for the shapes, making it easier to position (or re-position) a flowchart in a document.
- Certain features, like arrows that connect to shapes, only work in a canvas.
- You can add formatting to the canvas itself, giving the flowchart an attractive backdrop.
To insert a canvas, click the Insert tab on the Word ribbon and
click the Shapes dropdown button. Below the gallery of shape types,
select the bottom menu item labeled New Drawing Canvas, as shown to the right.
Side note: If you are using a laptop with a glossy monitor, the canvas border can
be difficult to see when viewed at a slight angle.
Adding a Flowchart Shape
Adding shapes is pretty straightforward:
- Click the Insert tab on the ribbon.
- Click the Shapes dropdown.
- Click on the shape type you want to add.
- Click in the canvas area, holding the left button down while dragging the mouse to add the shape.
You can also double-click on any shape in the gallery,
and Word will add it to the top left of the canvas. Typically you
will need to move and resize the shape if you use this method.
Displaying a Grid
Grids let you layout shapes to uniform widths and heights, as well as making it easier to align shapes if you need to edit a flowchart and move things around. Not only is the grid a visual indicator, but it also has a snap function that assists with alignment and sizing.
A quick way to enable a grid is to click the View tab and click the Gridlines checkbox. With enabled gridlines, the grid will appear only within the canvas (which we’ll get to next) when it is selected, but when any other part of the Word document outside the canvas is selected, the grid will be displayed over the entire document.
For more precise control of the gridlines, you can customize settings in the Grid and Guides screen, shown in the images below. Generally the default settings are sufficient, but checking the «Snap objects to grid when gridlines are not displayed» box is useful if you want the snap behavior without having gridlines cover the entire document. As shown below-right, a «Display alignment guides» option was added to this dialog. When checked the gridlines are not shown, so personally I do not find this option useful.
To access the Drawing Grid screen, follow these steps:
- Click on the drawing canvas.
- Click on the Drawing Tools Format tab that appears.
- Click the Align dropdown menu and select Grid Settings.

Grid and Guides Dialog — Word 2007
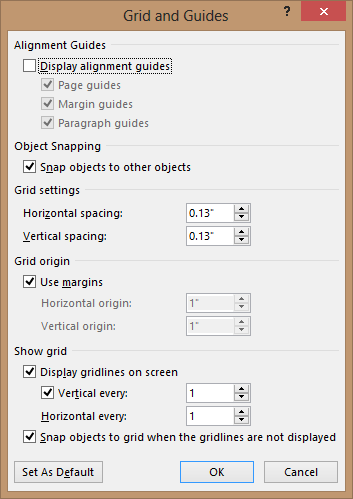
Grid and Guides Dialog — Word 2013
Adding Text to a Flowchart Shape
In Word 2007, if you click on a shape and start typing, you will
soon find out that text is added somewhere in the main document
body instead of within the shape. In order to add text, you need to
right-click on the shape and select «Add Text» from the
context menu. Once a shape contains text, you can click the text
and edit it normally.
In Word 2010 — 2019, by contrast, you can simply click on the shape and
start typing.

Adding Connector Arrows
Connectors are different from plain arrows in that they stay
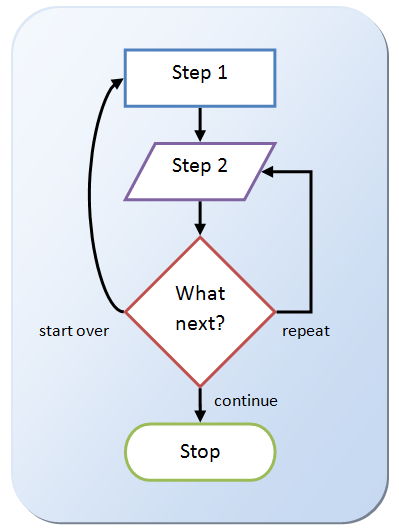
connected to shapes if they are moved. Assuming you want to route a
connector line between two shapes, we will call these Shape 1 and
Shape 2 below.
- Click the Insert tab.
- Click the Shapes dropdown
- Click the desired line type from the gallery.
- Move your mouse near Shape 1 and little dots denoting connection points will appear on its border.
- Click on one of the dots and, while holding the left mouse button down, move the mouse over to Shape 2.
-
As you move the mouse over Shape 2, Word will highlight connection points and display a dashed line showing the
routing. - Select one of the connection points and release the left mouse button.
Quirk: In Word 2007 and previous versions, the elbow connector
would render as a straight line between two aligned shapes of the
same size. In Word 2010, the same elbow connectors render slightly
jagged and unaesthetic.
Tip: Right-click on a connector to change the connector type via
the context menu. The three types are straight, elbow, and curved,
as shown in the sample flowchart.
Adding Labels
To add branch labels next to connector lines, use the textbox symbol ![]() on the Insert > Shapes gallery. After inserting the textbox (label), type in the text. Click the Home tab in Word and format the text as needed. The easiest way to adjust the size is to click and drag the adjustment handles on the texbox edges. With the textbox still selected, click the Format tab, and then select the Shape outline drop down and toggle on the No Outline option for a cleaner look.
on the Insert > Shapes gallery. After inserting the textbox (label), type in the text. Click the Home tab in Word and format the text as needed. The easiest way to adjust the size is to click and drag the adjustment handles on the texbox edges. With the textbox still selected, click the Format tab, and then select the Shape outline drop down and toggle on the No Outline option for a cleaner look.
Adding labels is a multi-step process, so when adding more labels it’s usually easiest to copy and paste the first label and edit the text accordingly.
Selecting Multiple Shapes
There are several ways to select multiple objects. One method is
to click on one shape, hold the Shift key down, and click on the
remaining shapes. Another method is to click and drag your mouse
around all the shapes you want to select. This is faster, but
sometimes less useful if, for example, you want to select
the flowchart shapes without selecting the connector arrows.
Two non-recommended methods that you may be familiar with are
Select All and Select Objects. These tools are commonly used in
Excel and other Office programs, but they are not as useful in
Word. In Excel, for example, Select All will select only the shapes
on a worksheet, but in Word, it will select the entire document.
The Select Objects tool is a special cursor that allows you to
click on the shapes instead of the text, and does not add any value
above selecting them with the regular mouse cursor. Plus,
you need to toggle it off in order to resume normal Word
operations.

Align shapes menu
Aligning Shapes
With the grid enabled, the easiest way to keep shapes aligned is
to draw them with uniform widths at the time they are added to the
diagram. If you need to edit the alignment after the fact, you can
use several approaches. The first approach is to click on each
shape and drag it to its new location. (If you need to resize the
shape to get it aligned properly, see the next section.)
The next approach is to select all the shapes you want to align,
which will cause Word to display the Format tab. On the Format tab,
click the Align dropdown menu, shown below. Making sure the Align
Selected Objects item is checked, you can then use the alignment
tool to align the shapes automatically.
Moving Shapes
The most obvious way to move shapes is to click and drag them to
a new position. With the grid enabled, you can also move one or
more selected shapes using the keyboard arrow keys and they will
snap to the nearest gridline. You can nudge a shape by holding the
Ctrl key down while pressing the keyboard arrow keys.
Resizing and Rotating Shapes
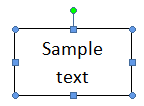
If you click on a shape, resize
handles appear on the shape’s border, allowing you to click
and drag a side or corner, as shown in the image.
The green dot at top is the rotation adjustment handle.
Alternately, you can right-click on the shape and select
«Format AutoShape» from the context menu. Clicking the
Size tab on the Format AutoShape window will allow you to set the
height, width and rotation angle to specific values.
Formatting Tips
Formatting shapes and connectors can be tedious if you try to do
them one at a time. It is best to wait until you are finished with
the flowchart and do the formatting in bulk. You can do this by
selecting multiple shapes and formatting them together. You should
format shapes and connectors separately because the styling tools
are different for each.
If you have a format that you would like to reuse, you can right-click
on a formatted shape and select «Set Autoshape Defaults».
Any shape added subsequently will have the same fill color and border style.
When you select a shape or connector in Work 2007, a Format tab
will appear on the ribbon, but you need to click to activate it. In
Word 2010, the Format tab is automatically activated.
Quirk: Word 2007 has two format tabs – Drawing Tools
Format and Text Box Tools Format. They are mostly the same. Word
displays the Text Box Tools Format tab when the selected shape
contains text and the Drawing Tools Format tab for all other
shapes. In fact, if you add a flowchart shape to a drawing,
selecting it will make the Drawing Tools Format tab appear, but
once you add text to the shape, the Text Box Tools Format tab will
appear. Fortunately, Word 2010 has only one Format tab.
Formatting Shapes
The formatting tools are located on the Format tab in Word 2007 and 2010. Starting in Word 2013, the formatting dialog has been replaced with side panels, and the Shape Fill and Shape Outline menus are disabled on the Format ribbon tab. Instead, you can access them by right-clicking on a shape.
There are too many formatting tools to cover them all in detail, but the primary ones are covered below.
Shape Styles: The style gallery allows you to apply formatting to one or more selected shapes. There is a significant difference
between Word 2007 and 2010. Word 2007 has a larger selection of styles, but they are not consistent with the Excel 2007 shape
styles. Starting with Word 2010, the styles are uniform across all Office appslication — Word, Excel, and PowerPoint.
Shape Fill: Allows you to set custom fill colors and gradients for the shapes.
Shape Outlines: Allows you to set the line color and weight (thickness) of a shape’s borders.
Change Shape: Allows you to change the type of the selected shape, e.g. from a process (rectangle) shape to a decision (diamond).
Tip: To access more formatting features (including vertical text
alignment), right-click on a shape and select Format AutoShape.
Formatting Connectors
Word 2007: There is a gallery of styles available, but unfortunately, these are the styles used for flowchart shapes
and do not work well for lines. To format connectors, you should use the color and weight settings available in the Shape Outline dropdown menu.
Word 2010 — 2019: Formatting connectors in Word 2010 — 2016 is straightforward. Just as with flowchart shapes, when you click a
connector, the Format tab will be active, and a list of built-in styles is available for quick selection. Unlike Word 2007, the styles in Word 2010 — 2019 are actually attractive.
Formatting and Aligning Text
The bad news about flowcharting in Word is that it can be difficult to customize the text formatting. Some changes can be done in bulk and some must be done one shape at a time.
- Font: The font family, size and attributes such as bold and italic can be set from the Home tab of Word. You can select multiple shapes and make the changes in bulk.
- Color: The font color is set on the Home tab, and it must be done one shape at a time.
- Horizontal text alignment: The horizontal alignment can be set on the Home tab, and it must be done one shape at a time.
- Vertical text alignment: Vertical text alignment can only be set in the Format AutoShape window, which is accessed via the context menu by right-clicking on a shape.
Note:In Word 2007, the default text alignment is top, left. In Word
2010, it is centered both horizontally and vertically.
Canvas Size and Alignment
When you are done with the flowchart your canvas may be much larger than the
diagram. If you want to shrink the canvas to the minimum footprint, right-click
on the canvas and select Fit from the context menu.
On the other hand, you may want the diagram centered on the page horizontally,
vertically, or both. If so, follow these steps:
- (Optional) Resize the canvas to the page width and/or height by clicking and dragging the edges or corners.
- Next, select all the shapes in the flowchart, including the connectors.
- On the Format tab, click the Group dropdown and select Group from the menu.
- Click the Align dropdown and verify that the Align to Margin item is checked.
- In the Align dropdown again, click Align Center and/or Align Middle.
- Click the Group dropdown and select Ungroup from the menu.
If you don’t Group the shapes before doing the alignment,
the shapes will stack on top of each in the center of the canvas.
Finally, you can spruce up the flowchart a bit by adding formatting
to the canvas. The Canvas shape itself can be changed — just like a
flowchart shape — using the tools on the Format tab. In the sample
flowchart above, the Change Shape tool was used to set the shape type to
Alternate Process, which makes it a rounded rectangle. A custom fill color
with a gradient scheme was applied. Finally, the Drop Shadow tool was used
to add depth.
Summary of Quirks
- If you do not use a canvas, connectors will not «connect».
-
You can copy a flowchart from Word (2007 — 2019) and Paste
Special into Excel as an editable Microsoft Office Drawing Object,
but you cannot copy a flowchart from Excel and Paste Special into
Word as an editable drawing. Earlier versions of Word (2003 and
prior) used to allow this. -
If you Group all the shapes within a canvas, the Fit feature
is disabled. If you ungroup the shapes, then right-click on the
canvas again, the Fit feature is re-enabled. -
Using Page Layout > Themes to change the document
formatting will change the flowchart styling as well, even if you
carefully customized the formatting of all your shapes. -
Using View > Gridlines will display a grid not only in the
canvas, but also over the entire document and any other open
document as well. When the canvas is selected, the grid will only
be displayed within the canvas. The quirk is that if you apply a
background style to the canvas, the grid will not display in the
canvas — perhaps the one place you did want it to show. - Word 2007 introduced vertical text alignment (it was not available in Word 2003 and previous versions), but centered text is skewed toward the top of the shape and the difference between it and top aligned text is barely noticably. You can set this in the Format AutoShape screen.
- The Format AutoShape dialog has a «Resize AutoShape to fit text» option. If you use it, remember that Word has an Undo function. You might need it.
About the Author

Microsoft Word provides built-in tools for creating and arranging different types of flowcharts. You can create your own flowchart by using different shapes and SmartArt. Here’s how to do it.
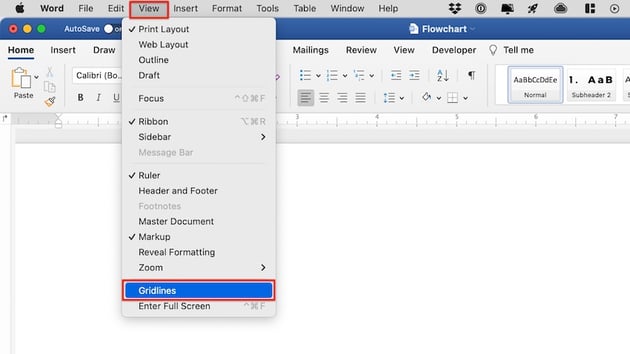
When working with shapes in any Office application, it’s always useful to use gridlines to make sure everything is sized and placed correctly. To make the gridlines appears, head over to the “View” tab and tick the “Gridlines” checkbox.

Your gridlines will now appear on your Word document.
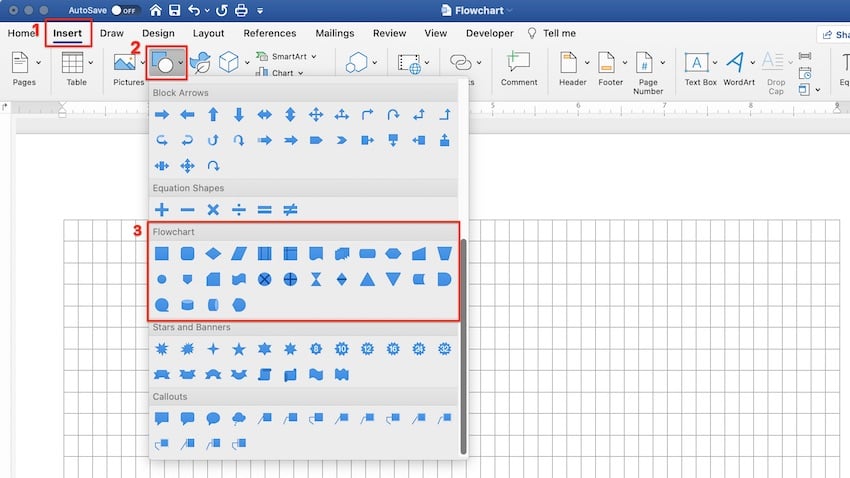
Next, switch to the “Insert” tab and then click the “Shapes” button (we’ll go through SmartArt later).
A drop-down menu displays a large library of shapes you can choose from. We’ll be focusing on two things here—the connectors in the “Lines” group near the top and the shapes in the “Flowchart” group near the bottom.
Before we continue, it’s important to understand the intended purpose of the shapes. You may want to consider reading this comprehensive list that details the meaning of flowchart shapes, but here’s a quick overview of the basics.
- Rectangle: Used for process steps.
- Diamond: Used to show decision points.
- Oval: Used as the terminator shape, indicating the start and end points of a process.
Hovering over any of the shapes in the drop-down menu displays a text bubble showing the shape’s purpose.
Let’s go ahead and insert our first shape. Back at the shapes menu, select the shape you’d like to use in the flow chart. Since this is our first shape being used in the flowchart, we’ll use the oval shape.
Once you select the shape, you’ll notice your cursor turns into a crosshair. To draw the shape, click and drag.
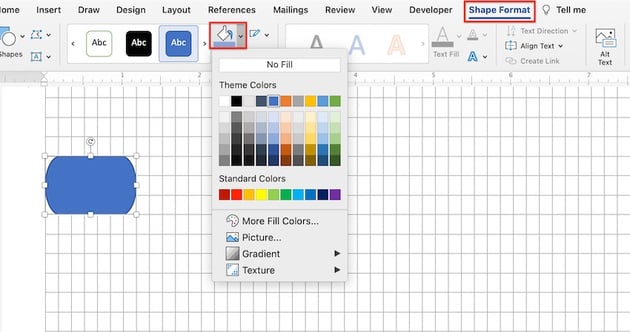
After drawing the shape, you’ll notice a new “Format” tab appears with commands that let you format your shape, change the outline and fill color, and more.
To insert text inside the shape, select the shape and then start typing.
Let’s insert another shape and then connect the two shapes. We’ll add a rectangle to indicate another part of the process. Repeat the above steps to insert the shape.
To connect the two shapes, head back to the shape menu and select the connector you want to use. We’ll use a simple line arrow for this example.
Once you select the arrow, click the center handle on the first shape and then, while still holding down your mouse button, drag to the center handle on the next shape.
As with shapes, you can also format the arrow with different line widths, colors, and so on.
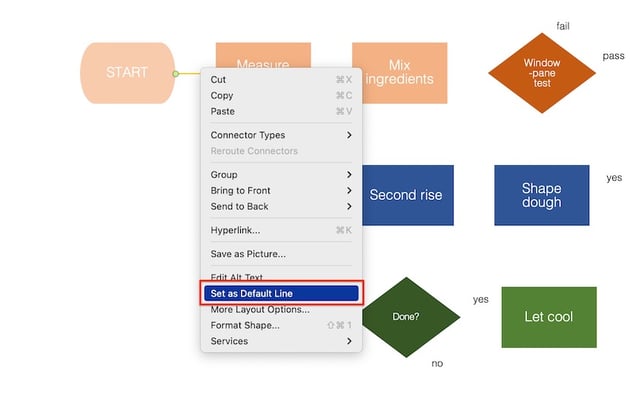
If you plan to use the same line format throughout the entire flowchart, right-click the inserted line after you’ve formatted it and select “Set as Default Line.” You can do this with shapes, too.
Creating a Flowchart with SmartArt
In addition to using shapes to create your flowchart, you also have some pretty handy options with SmartArt. Head over to the “Insert” tab and then click the “SmartArt” button.
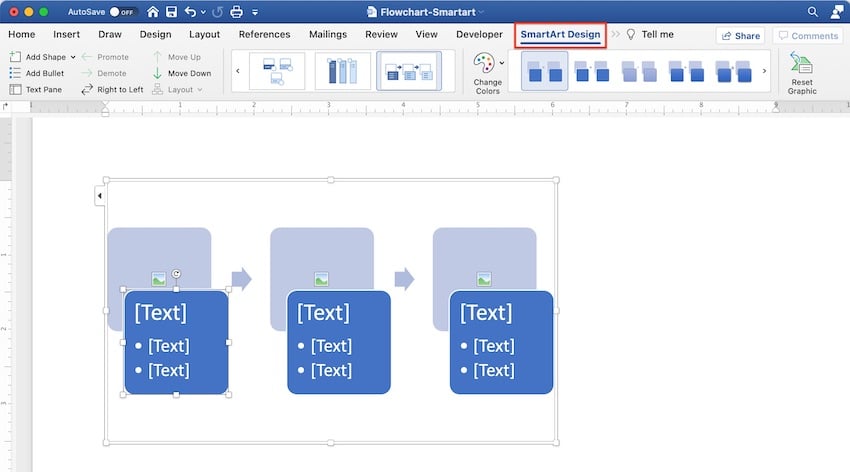
In the Choose a SmartArt Graphic window, select the “Process” category on the left, chose a type of process (we’re using the “Picture Accent Process” option here), and then click “OK.”
This SmartArt graphic is designed explicitly to detail a process. It groups shapes for adding photos (1) and text (2).
Enter the relevant information. If you don’t need a particular object, you can get rid of it by selecting it and pressing the delete key. On the other hand, if you can copy the objects if you need to add additional information.
READ NEXT
- › How to Make a Chart in Microsoft Word
- › How to Make a Calendar in Microsoft Word
- › How to Group and Ungroup Shapes and Objects in Microsoft Word
- › How to Insert a Picture or Other Object in Microsoft Office
- › How to Quickly Search the Menus in Microsoft Office
- › Google Chrome Is Getting Faster
- › Expand Your Tech Career Skills With Courses From Udemy
- › This New Google TV Streaming Device Costs Just $20
A diagram is worth a thousand words, especially if you’re trying to explain a process. And if you know how to make a flowchart in Word, you don’t need a different diagram-creation tool. You can make the flowchart right inside Microsoft Word, no programming or design skills required.


A flowchart is a graphical representation of a series of steps or actions. It’s most effective for depicting a process, data flow, workflow, or decision steps. In a flowchart, each shape holds a meaning. The most basic ones are:
- Oval (or pill shape). Start or end of the process.
- Rectangle. Action or sub-process.
- Diamond. Decision point.
- Parallelogram. Either an input needed for the process, or an output that goes into the next step.
Other shapes are used in flowcharts for very specific applications like data flow diagrams. But the above basic flowchart symbols should be enough for the most common charts. Whether you need just the basics or specialized shapes, you can find them in Word.
In this tutorial, I walk you step-by-step through how to make a flowchart in Microsoft Word using basic shapes. Word offers two ways to create a flowchart. Use the method that lets you make the flowchart you envision.
Note: For this tutorial, I used Microsoft Word for Mac version 16. If you’re using a different version of the application, the interface and steps may be different.
Method One: Create a Flowchart in Word With Shapes
The first way to create a flowchart in Word is by inserting shapes in your document. Here’s what to do:
1. Display Gridlines
Before getting started, make sure to switch on gridlines. This will make it much easier for you to create a nice-looking flowchart. Aside from showing you guide lines, when gridlines are on, shapes and lines snap to regular spaces, making it easy to align elements.
To switch on the gridlines, go to View > Gridlines.


2. Create the Flowchart Shapes
Now you’re ready to start inserting shapes. Go to Insert > Shapes. The shapes menu appears. Scroll down to the Flowchart shapes. If you hover over any shape, a tip-tool appears, letting you know what the shape means. Click on the shape you wish to use.


The cursor turns into a crosshair. Click and drag the crosshair to create the shape to the size you want.


3. Format the Flowchart Shapes
Use the options on the Shape Format ribbon to format the shape’s fill color, border, and other attributes.


4. Add text inside the flowchart shapes.
To add text inside a flowchart shape, first select the shape. Then, start typing. The text will appear inside the selected shape.


5. Format the Text
If you wish to format the text inside a shape, select the shape. Under the Home tab, use the formatting options to select the font, font size, and other attributes.


Repeat the previous steps to create all the shapes you need for your flowchart. Use the gridlines to arrange them on your document.


6. Add the Flowchart Connectors
Next, you’re going to want to connect the shapes with lines or arrows.
To insert an arrow, go to Insert > Lines. The lines menu opens. Click on the line you wish to use.


Under the Shape Format tab, use the options to format the connector.
![]()
![]()
![]()
When the line is formatted as you like, set it as a default line. That way Word will use the same formatting settings for the next lines you create, and you won’t have to keep formatting each one.
To set a line as the default line, right-click on it, then select Set as Default Line.


Repeat until you’ve inserted, formatted, and arranged all the connectors you need.
4. Insert More Text
You may find that you need text outside of the shapes in your flowchart.
To add text, go to Insert > Text Box. Click and drag the cursor where you wish to place the text box. Type the text inside the box.


Next, format the text. With the text box selected, click on the Home tab. Use the formatting options on the ribbon to format the text.


When your flowchart is complete, switch off the Gridlines, and enjoy your creation!


Method Two: Create a Flowchart in Word With SmartArt
Another way to create flowcharts in MS Word is by using SmartArt. It’s a pre-designed visual template in Word that lets you quickly make charts and diagrams. You can format SmartArt—up to a certain extent—and personalize them with your own information.
To create a Microsoft SmartArt flowchart, follow these steps:
1. Insert a New SmartArt
Go to Insert > SmartArt > Process. The Process menu pops up.


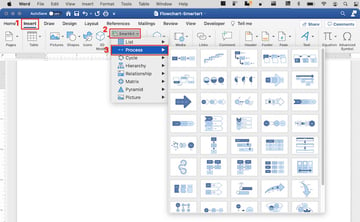
Choose the SmartArt that’s most suitable for the flowchart you wish to create and click on it.
2. Format the SmartArt Flowchart
Under the SmartArt Design tab, use the tools on the ribbon to format the various elements of the SmartArt.


Explore the special effects menu to see ways you can spice up your chart.

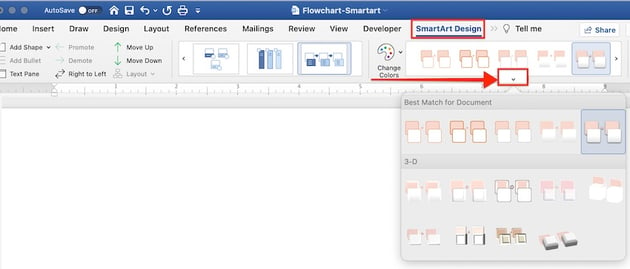

At any point, you can also change the style of your Microsoft SmartArt flowchart. First, select the SmartArt. Under the SmartArt Design tab, open the styles menu. Click on a different style you wish to apply.


3. Add Steps
You’ll probably need to add steps to your process SmartArt. To do this, make sure you’re on the SmartArt Design tab. Click on the Add Shape dropdown menu and choose from one of two options:
- Add Shape After. Adds a step at the end of the current SmartArt.
- Add Shape Before. Adds a step at the beginning.


Tip: You can add steps at any point in your workflow. But I suggest you add all the steps you think you’ll need before you add your text.
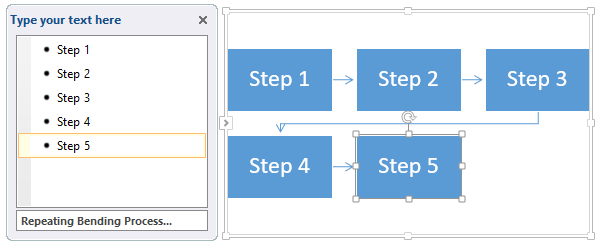
4. Add Your Text
To add your text, click on a text box—it’ll have a placeholder that says “Text”—and type your own text. Under the SmartArt Design tab, you can also click on the Text Pane button to add and edit text through the Text Pane.


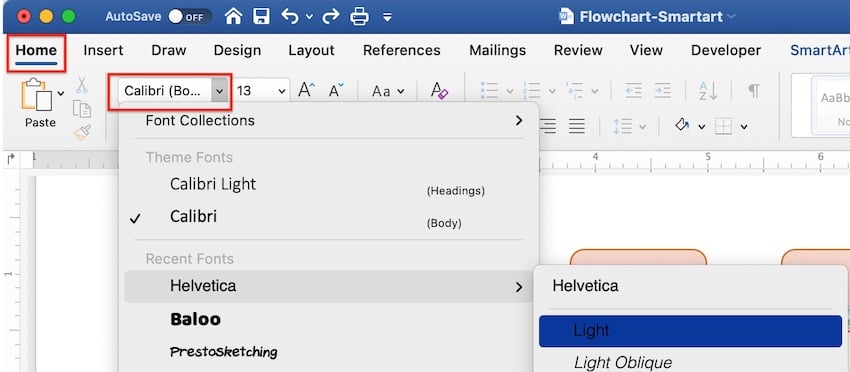
You can also format the text inside the SmartArt. First, select the text box, then click on the Home tab. Use the formatting options to change the font, font size, and etc.


5. Add Images
If the SmartArt flowchart style you created includes pictures, now’s the time to add your custom images.
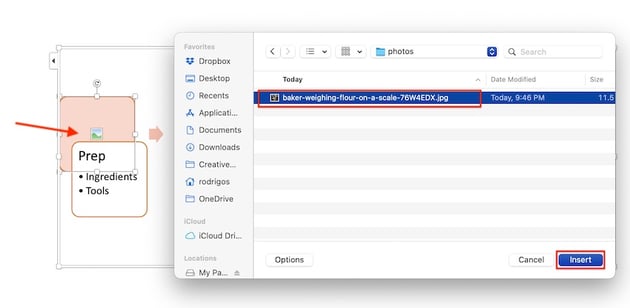
Click on the image icon. This launches your document finder. Click on the image file you want to add, then click Insert.


Tip: Make sure your image has the correct proportions for the image placeholder in the SmartArt. If the placeholder is square, edit your image to be a square before inserting it. Otherwise, it may get cropped awkwardly.
Repeat the steps above to complete your Microsoft SmartArt flowchart.


Shapes vs. SmartArt: What’s the Best Way to Create a Flowchart in Word?
Now that know how to create a flowchart in Word using two methods, you may be wondering, which is the better way: shapes or SmartArt?
Each has its advantages and disadvantages.
Use shapes to create a flowchart if:
-
You want complete control over how your flowchart looks. It’s simply easier to control the different elements of a flowchart that’s built from scratch using shapes and lines or arrows as connectors.
-
You want to use symbolic flowchart shapes. Word shapes include both the basic shapes and special flowchart shapes.
-
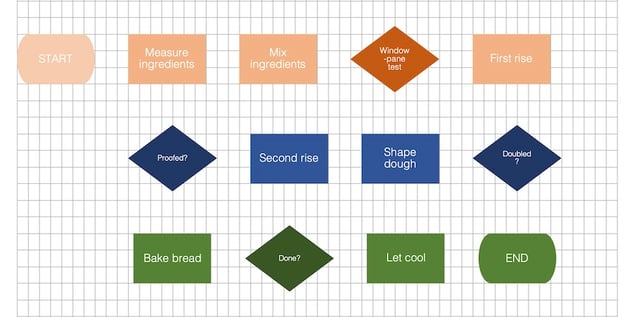
You’ve got a complicated flowchart. If you’re trying to create a flowchart with split steps (like the bread making flowchart I made with charts), then you’re better off using shapes.
Consider using SmartArt to make a flowchart if:
-
You want a creatively designed chart quickly. SmartArt process diagrams are pre-made by designers to look great with minimal fuss.
-
You don’t need traditional flowchart shapes. Most Microsoft SmartArt flowcharts use only basic shapes and other elements that are chosen more for aesthetic purposes.
-
Your flowchart has only a few and simple steps. SmartArt charts lend themselves best to straightforward processes.
5 Flowchart Making Tips
Microsoft Word gives you two convenient ways to make MS Word flowchart diagrams. To get the best results, keep these tips in mind:
1. Plan It Out
Have a clear vision for what you want your flowchart you look like. Sketch it out with pen and paper and know exactly what text and images you’re going to use.
2. Make the Design Elements Consistent
Use a consistent style among the shapes and connectors in your flowchart. For example, use the same one or two fonts for the text.
3. Fit the Entire Chart on One Page
For the greatest legibility, make sure your chart fits all on one page. You may have to change the document’s orientation from portrait to landscape to accommodate a long or wide flowchart.
4. Don’t Count on People Knowing What Flowchart Shapes Mean
As mentioned above, shapes have specific meanings when used in flowcharts. But your readers may not know what those are. Make sure your flowchart makes sense even if this is the case. It’s also a good idea to include a legend or symbol key to let your readers know what the various shapes stand for.
5. Follow the Conventional Reading Direction
In the English language, readers read from left to right and top to bottom. If your flowchart is more than one level long, continue the second level on the left side of the page. (Of course, if your document is in a language that’s read from right to left, bottom to top, then you’d follow that direction for your flowchart as well.)
Streamline Your Workflow With Microsoft Word Templates
Another way to streamline your workflow is with a Word template.
Templates may include a Microsoft Word flowchart or other diagrams. Even if that’s not the case, starting with a Microsoft Word flowchart template is still an easy way to create a professionally-designed document.


With a template for Word, all the major design decisions have already been made for you by a professional. All you’ve got to do is to customize it with your branding colors, images, and text.


One excellent source of Word templates is Envato Elements. In this creative marketplace you’ll find templates for various kinds of documents such as this resume/CV template, which includes infographics.


An Elements subscription gives you access to much more than high-quality Word templates. For one low, fixed price per month, you get unlimited downloads of the creative components you need to make your document look its best, such as fonts, photos, graphics, and icons.
And if you create other types of materials, like videos and websites, then you’ll also benefit from unlimited downloads of stock videos, music, sound effects, and presentation templates.
Create Your Own Flowcharts in Microsoft Word
Now you know how to make an easy flowchart in Microsoft Word. For complete control, build your flowchart with shapes and lines. For a fast and artistic look, use SmartArt. Either way, a well-constructed flowchart will make your document more effective at showing a process, workflow, or data flow.
You can also use Word templates to streamline your workflow. For the best quality and value, get Word templates and other creative resources from Envato Elements. Your subscription brings to your fingertips millions of creative assets to help you communicate effectively.

In this article you’ll learn what the basic symbols in flowcharts mean, and how to draw out these flowcharts in Microsoft Word.
In nearly every industry, people use flowcharts as part of troubleshooting, decision-making, and logical analysis.
If you learn how to make a flowchart in Microsoft Word, you’ll always have a tool at your disposal to do these kinds of thought experiments.
In this article, you’ll learn what the basic symbols in flowcharts mean, and how to draw out these flowcharts in Microsoft Word. If you already understand basic flowcharting, you can skip down to the section on how to make a flowchart in Word.
Basic Flowchart Symbols
Before you can draw out flowcharts in Word, it’s important to understand what those symbols mean.
The following simple guide will help with using the right symbols at the right time.
Start or Terminator

The oval block is known as the “terminator”. No, not the kind of terminator that saves the planet. This terminator is the kind you use to terminate a logical flowchart branch. It’s used to start the flowchart as well.
Step Blocks

The step block is one of the most common shapes used when you’re writing flowcharts. It represents a step where some process or work is done. For example, if you’re writing code that includes a module that’ll calculate something based on user input, you’d use a process block to represent “Calculate User Results”.
Decision Blocks

Frequently, in a flowchart logic flow, the process needs to make a logical decision. This is usually based on inputs, represented by the line or lines flowing into the top of the decision block. The decision then generates outputs based on the outcome of the logic, represented by lines flowing out of the bottom of the sides of the decision block.
Input/Output Data Blocks

There are a variety of blocks used to represent data that flows into and out of your flowchart processes. The most common ones are those displayed above. These include:
- Input/Output: Trapezoid blocks like the one on the left. This could be output from a process calculation block or an input from some other process in the flowchart.
- Manual Input: User input trapezoid for something like input from an entry form.
- General Data Storage: The shape displayed on the right is a general data storage block representing data you might write to some file or database.
There are also specific shapes for things like databases, documents, or internal storage. You can also find those in the Microsoft Word collection of flowchart shapes.
Miscellaneous Shapes

There are a few other common shapes you need to know before heading into Word to create your first flowchart. These include:
- Off-Page Connector: Allows you to continue your flowchart onto another page by pointing to the label for the start of the second-page flowchart here.
- Predefined Process: Reference a process block you’ve defined elsewhere that you want to reuse in this spot.
- Merge: Combine the output of two other flowchart lines into a single process using the Merge triangle.
You typically connect flowchart shapes with a line that terminates with an arrow. You can use any kind of line type, so long as you’re consistent with it throughout the entire flowchart.
Now that you know the basic, most common flowchart symbols, you’re ready to make your own flowchart in Microsoft Word. The purpose of the example flowchart we’ll discuss here is to write a program to take manual input from a user form. The program will be used in a liquor store to allow customers to automatically confirm their legal ability to purchase alcohol.
The user will type their name and social security number into the form on the screen. Your program will look up their information from a database to obtain their age. If they’re over 21, the program will process their purchase for alcohol and output a receipt. If they’re under 21, it will display an error screen saying that they’re too young to purchase alcohol.
Let’s get started.
Start Flowchart with Manual Entry
Open Microsoft Word and select the Insert menu. Select the Shapes dropdown to view all available flowchart shapes.
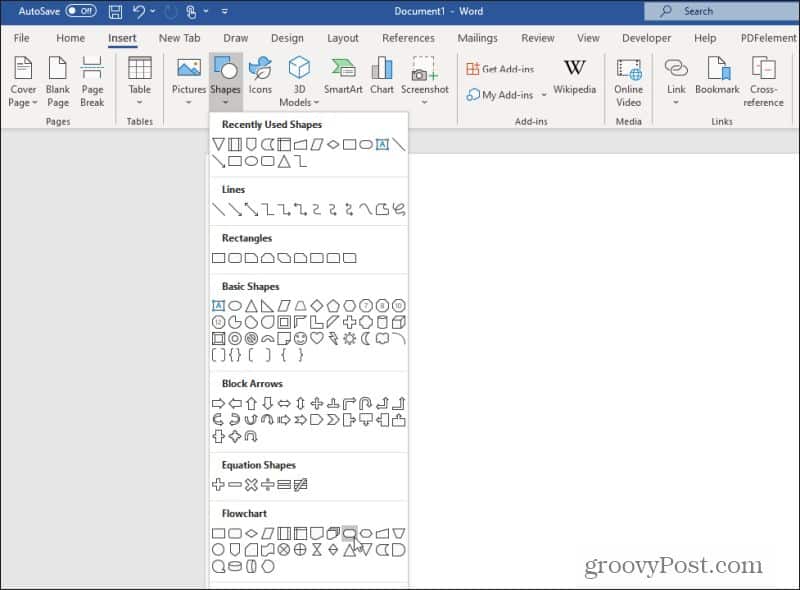
Look for and select the Terminator shape. Remember, the Terminator shape is also the one used to start a flowchart.
Draw the shape at the top of the Word page, and set the fill and outline coloring however you like. Right-click the shape and choose Add Text to enter text inside the shape.
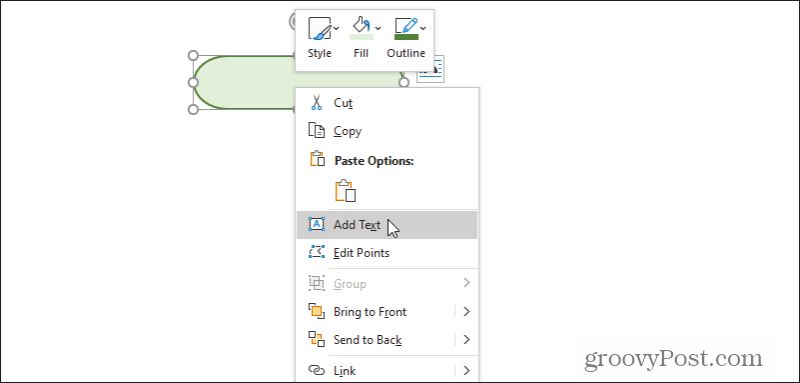
Type something like “Program Launched” or even just “Start” for the text in this block.
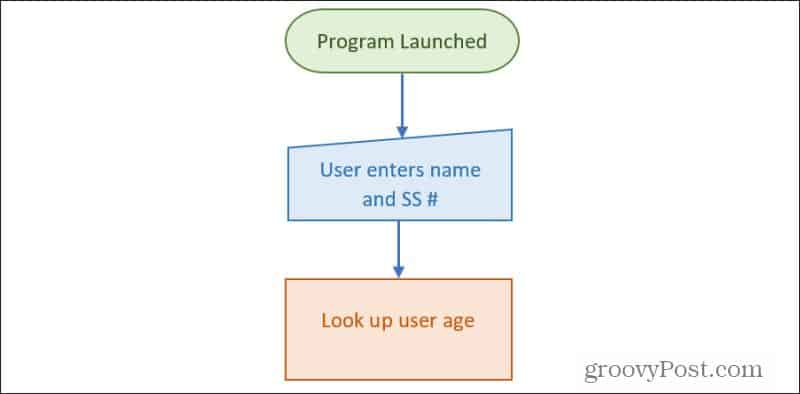
Next, you’re going to want a block for user input. Select the Insert menu, select Shapes, and choose the manual input shape. Draw this into the Word document just under the start block. Right-click, select Edit Text and type the appropriate text to describe the manual data entry.

Draw a line with an arrow (using the same Insert menu), and format the line to whatever thickness you prefer.
Next, you’ll need to have the process deal with the newly entered data.
Processing Data In Flowcharts
In the next step of your flowchart, you’ll want to manage entered data. This will require a process block.
Use the Insert menu and choose the Process block. Place it underneath the data entry and add an arrow line.
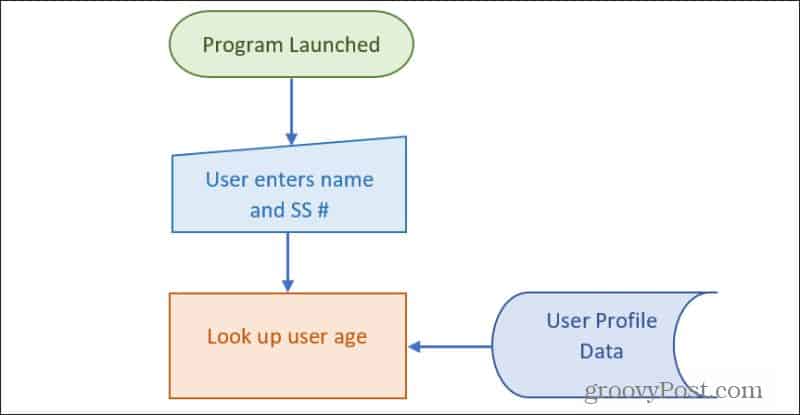
For this process to work properly, the process block needs to obtain the user’s age (based on name and SS# input) from a database. You could use either the special “database” block or the more generic General Data Storage block described above.
Add this block to the side of the process block and draw an arrow from it to the process block.
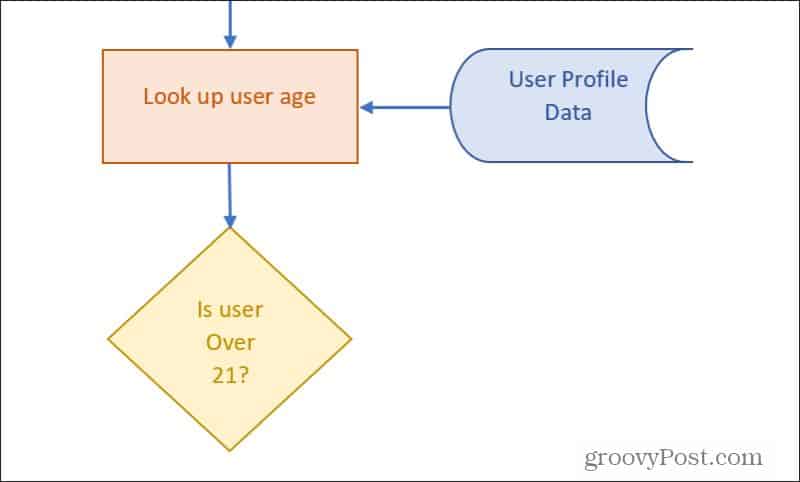
Now that the process has the right inputs, you’ll need to draw a process output line out of the bottom of the process. Typically a process needs to make a decision, such as in this case. So the next step of your flowchart will be the decision block.
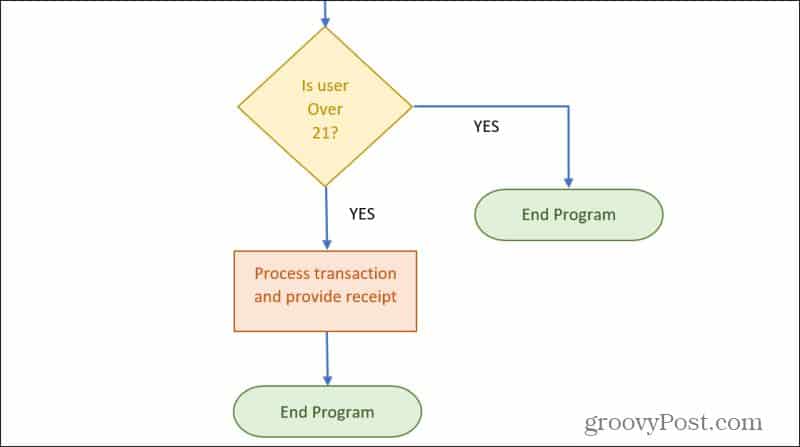
Decision Blocks In a Word Flowchart
Draw the diamond decision block (from the Insert menu) right under the process block. Add text that describes the decision that the process needs to make.
As always, draw an arrow from the bottom of the process block down to the decision block.
As mentioned previously, decision blocks receive input. You’ll have an output for every possible result. In this case, there will be output for YES and one for NO.
Technically, this decision will be made inside the program. Decision blocks often represent process decisions, so typically almost always follow process blocks.
Draw a line with an arrow as an output from the bottom of the triangle. Label this line YES. Draw an angled line from the side of the decision block and label it NO. You can create the labels by adding a text box without a borderline.

Next, you’ll need to provide the logical flow on each output of the decision block.
Finishing Your Flowchart in Microsoft Word
Now you can just continue the process of building the rest of your flowchart using whatever flowchart blocks make the most sense.
You can use either the Off-Page Connector block to continue any process flow onto another page. Or use the Terminator block to finish any logic lines in the flowchart.
Making Flowcharts in Word Is Easy
As you can see, making a flowchart in Word doesn’t have to be complicated. Word also provides all of the important logical blocks you need to create mostly any flowchart.
You can use flowcharts to brainstorm ideas, work through important decisions, or like in this example chart out the logic of your programming projects.
If you don’t want to use Word, there are plenty of other tools available to draw diagrams and flowcharts as well.
And if you’re running an old version of Word check out our article on how to make a flow chart in Word 2007.
![]()