Excel for Microsoft 365 Word for Microsoft 365 Access for Microsoft 365 Project Online Desktop Client Publisher for Microsoft 365 Word for the web OneNote for the web PowerPoint for the web Excel 2021 Word 2021 Access 2021 Project Professional 2021 Project Standard 2021 Publisher 2021 OneNote 2021 Excel 2019 Word 2019 Access 2019 Project Professional 2019 Project Standard 2019 Publisher 2019 Excel 2016 Word 2016 Access 2016 OneNote 2016 Project Professional 2016 Project Standard 2016 Publisher 2016 Office 2016 for Mac Excel 2013 Word 2013 Access 2013 OneNote 2013 Project Professional 2013 Project Standard 2013 Publisher 2013 Project Online Excel 2010 Word 2010 Access 2010 OneNote 2010 Project 2010 Project Standard 2010 Publisher 2010 Office 2010 Excel Starter 2010 More…Less
You can use the Office programs to save or convert your files to PDFs so that you can share them or print them using commercial printers. And you won’t need any other software or add-ins.
Use PDF format when you want a file that:
-
Looks the same on most computers.
-
Has a smaller file size.
-
Complies with an industry format.
Examples include resumes, legal documents, newsletters, files that are intended to be read (not edited) and printed, and files that are intended for professional printing.
Important: Many programs, including Microsoft Word, have the ability to open and edit PDF files. Simply sharing something as a PDF is not sufficient to guarantee the recipient can’t edit the file.
To see step-by-step instructions, select an Office program from the drop-down list.
-
Open the table or report you want to publish as a PDF.
-
On the External Data tab, in the Export group, select PDF or XPS.
-
In the File Name field, type or select a name for the document.
-
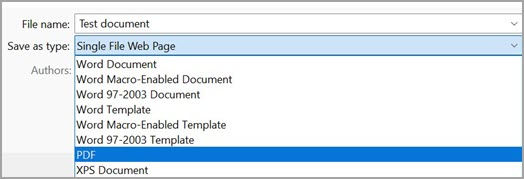
In the Save as type list, select PDF (*.pdf) .
-
If the document requires high print quality, select Standard (publishing online and printing) .
-
If file size is more important than print quality, select Minimum size (publishing online).
-
-
Select Options to set the page to be printed, to choose whether markup should be printed, and to select output options. Select OK .
-
Select Publish.
Note: You can’t save Power View sheets as PDF files.
-
Select the File tab.
-
Select Save As .
To see the Save As dialog box in Excel 2013 or Excel 2016, you have to choose a location and folder. -
In the File Name box, enter a name for the file, if you haven’t already.
-
In the Save as type list, select PDF (*.pdf) .
-
If you want the file to open in the selected format after saving, select the Open file after publishing check box .
-
If the document requires high print quality, select Standard (publishing online and printing) .
-
If file size is more important than print quality, select Minimum size (publishing online) .
-
-
Select Options to set the page to be printed, to choose whether markup should be printed, and to select output options. For more information on the Options dialog box in Excel, see More about PDF options . Select OK when finished.
-
Select Save .
-
Select the File tab.
-
Select Export .
-
Under Export Current , select what part of the notebook you want to save as PDF.
-
Under Select Format , select PDF (*.pdf) , and then select Export .
-
In the Save As dialog box, in the File Name field, enter a name for the notebook.
-
Select Save .
-
Select the File tab.
-
Select Save As .
To see the Save As dialog box in PowerPoint 2013 or PowerPoint 2016 , you have to choose a location and folder. -
In the File Name box, enter a name for the file, if you haven’t already.
-
In the Save as type list, select PDF (*.pdf) .
-
If you want the file to open in the selected format after saving, select the Open file after publishing check box.
-
If the document requires high print quality, select Standard (publishing online and printing) .
-
If the file size is more important than print quality, select Minimum size (publishing online) .
-
-
Select Options to set the page to be printed, to choose whether markup should be printed, and to select output options. Select OK when finished.
-
Select Save .
-
On the File tab, choose Save As .
To see the Save As dialog box in Project 2013 or Project 2016, you have to choose a location and folder. -
In the File Name box, enter a name for the file, if you haven’t already.
-
In the Save as type list, select PDF Files (*.pdf) or XPS Files (*.xps) , and then choose Save .
-
In the Document Export Options dialog box, select a Publish Range , whether to Include Non-printing Information , and ISO 19500-1 compliance (PDF only).
Formatting tips
Project doesn’t support every PDF or XPS formatting feature, but you can still use some print options to change the look of the final doc.
Choose File > Print , and then change any of these options:
-
Dates
-
Orientation
-
Paper Size
-
Page Setup
In the Page Setup dialog box, you can change options on these tabs:
-
Margins
-
Legend
-
View
-
Select the File tab.
-
Select Save As .
To see the Save As dialog box in Publisher 2013 or Publisher 2016, you have to choose a location and folder. -
In the File Name box, enter a name for the file, if you haven’t already.
-
In the Save as type list, select PDF (*.pdf) .
-
If you want to change how the document is optimized, select Change . (Select Options in Publisher 2013 or Publisher 2016.)
-
Make any changes you want to the picture resolution and non-printing information.
-
Select Print Options to make changes to the printing options for the document.
-
Select OK when finished.
-
-
If you want the file to open in the selected format after saving, select the Open file after publishing check box.
-
Select Save .
-
Select the File tab.
-
Select Save As .
To see the Save As dialog box in Visio 2013 or Visio 2016, you have to choose a location and folder. -
In the File Name box, enter a name for the file, if you haven’t already.
-
In the Save as type list, select PDF (*.pdf) .
-
If you want the file to open in the selected format after saving, select the Automatically view file after saving check box.
-
If the document requires high print quality, select Standard (publishing online and printing) .
-
If file size is more important than print quality, select Minimum size (publishing online) .
-
-
Select Options to set the page to be printed, to choose whether markup should be printed, and to select output options. Select OK .
-
Select Save .
-
If the file was previously saved, select File > Save a Copy.
If the file is unsaved, select File > Save As. -
Select Browse to choose the location on your computer where you want to save the file.
-
In the drop-down list, select PDF.
-
Select Save.
Select More Options > Options to customize your PDF.
-
To make a PDF file from only some of the pages in your document, choose an option under Page range.
-
To include tracked changes in the PDF, under Publish what, select Document showing markup. Otherwise, make sure Document is selected.
-
To create a set of bookmarks in the PDF file, select Create bookmarks using. Then, choose Headings or, if you added bookmarks to your document, Word Bookmarks.
-
If you want to include document properties in the PDF, make sure Document properties is selected.
-
To make the document easier for screen-reading software to read, select Document structure tags for accessibility.
-
ISO 19005-1 compliant (PDF/A) This option outputs the PDF document as version 1.7 PDF, which is an archiving standard. PDF/A helps to insure that a document will look the same when it’s opened later on a different computer.
-
Bitmap text when fonts may not be embedded If fonts can’t be embedded into the document, the PDF uses bitmap images of the text so that the PDF looks the same as the original document. If this option isn’t selected and the file uses a font that can’t be embedded, then the PDF reader might substitute another font.
-
Encrypt the document with a password To restrict access so only people with the password can open the PDF, select this option. When you select OK, Word opens the Encrypt PDF Document box, where you can type and re-enter a password.
Open and copy content from a PDF with Word
You can copy any content you want from a PDF by opening it in Word.
Go to File > Open and browse to the PDF file. Word opens the PDF content in a new file. You can copy any content you want from it, including images and diagrams.
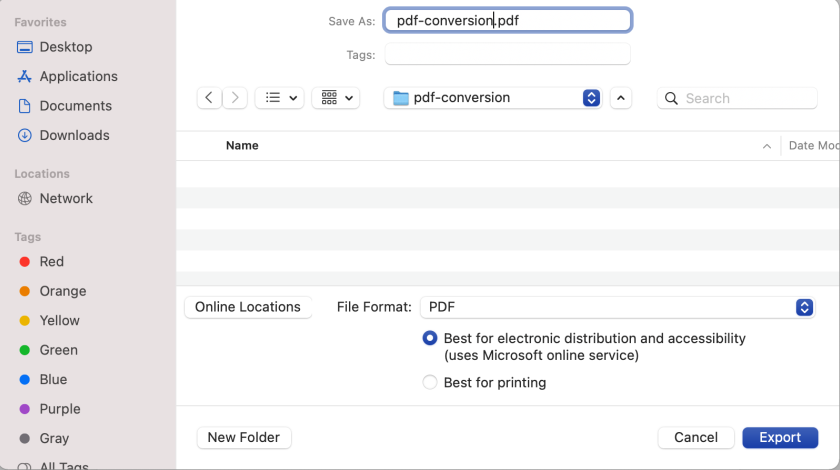
To save your file as a PDF in Office for Mac, follow these easy steps:
-
Select File.
-
Choose Save As.
-
Select File Format at the bottom of the window.
-
Choose PDF from the list of available file formats.
-
Give your file a name, if it doesn’t already have one, then select Export.
Note: When using Best for printing, the hyperlinks may not convert correctly. This is a known issue in Word for Mac.
Important:
-
When using Online Service , only font that Microsoft has the legal rights to can be used. If the documentation contains custom font, it will be substituted and may cause problems. This can be avoided by embedding the fonts into the document.
-
Learn more about embedding fonts by visiting:
-
Benefits of embedding custom fonts
-
Some of your fonts can’t be saved with the presentation
You can use Word, PowerPoint, and OneNote for the Web to convert your doc into a PDF.
-
Select File > Print > Print (in PowerPoint you will select one of three formats).
-
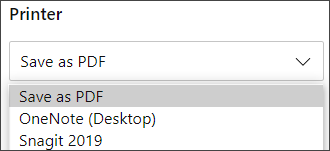
In the dropdown menu under Printer , select Save as PDF and then select Save.
-
Then in the Explorer menu that opens you can name the PDF and choose where to save it and then select Save.
This will generate a basic PDF that preserves the layout and format of your original document.
If you need more control over the options for your PDF, such as adding bookmarks, use the desktop app to convert your doc to a PDF. Select Open in Desktop App in the toolbar of PowerPoint and OneNote to start using the desktop app, and in Word select the Editing dropdown first and then select Open in Desktop App .
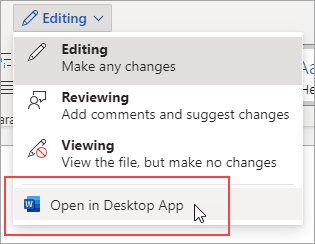
If you don’t own the desktop app, you can try or buy Microsoft 365.
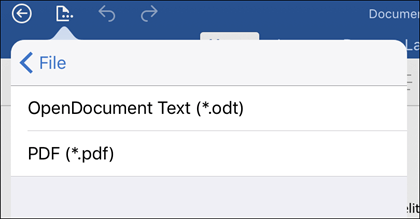
To export your Word document or Excel workbook to PDF format on iOS tap the File button at the top left, choose Export and then PDF.
Portable Document Format (PDF) preserves document formatting and enables file sharing. When the PDF format file is viewed online or printed, it retains the format that you intended. The PDF format is also useful for documents that will be reproduced using commercial printing methods. PDF is accepted as a valid format by many agencies and organizations, and viewers are available on a wider variety of platforms than XPS.
XML Paper Specification (XPS) is an electronic file format that preserves document formatting and enables file sharing. The XPS format ensures that when the file is viewed online or printed, it retains exactly the format that you intended, and that data in the file cannot be easily changed.
Important: Most modern web browsers can open and display a PDF file. If you have an older operating system, however, you may need a PDF reader installed on your device such as the Acrobat Reader, available from Adobe Systems.
See also
-
Edit or make changes to a PDF file
-
Create accessible PDFs
Need more help?
Want more options?
Explore subscription benefits, browse training courses, learn how to secure your device, and more.
Communities help you ask and answer questions, give feedback, and hear from experts with rich knowledge.
Find solutions to common problems or get help from a support agent.
Download Article
An easy-to-use guide to turn your Word documents into viewable PDFs
Download Article
Do you want to convert your Word document into an easy-to-send PDF file? PDFs are compatible with all platforms, so turning your Word document into a PDF ensures that more people can open the file. It’s incredibly easy to convert a Word document to PDF—we’ll show you how to do it on any PC or Mac!
-
1
Open the Microsoft Word document. Double-click the Word document to open it in Microsoft Word.
- If you haven’t yet created the document, open Word, then click Blank document and create the document as needed before proceeding.
-
2
Click File. It’s in the top-left corner of the Word window. Doing so opens a pop-out window.
Advertisement
-
3
Click Export. This option is in the left-hand column of options. You should see several new options appear in the middle of the window.
-
4
Click Create PDF/XPS Document. It’s in the upper-left corner of the window.
-
5
Click Create PDF/XPS. This option is in the middle of the window. Doing so prompts a pop-up window.
-
6
Select a save location. On the left side of the window, click the folder in which you want to store the PDF version of your Word file.
- Since the PDF is a different file type than the Word document, you can store the PDF in the same file location as the Word file.
- You can also enter a new file name in the «File name» text box if you like.
-
7
Click Publish. It’s in the bottom-right corner of the window. This will create a PDF copy of your Word document in your specified location.
Advertisement
-
1
Open the Microsoft Word document. Double-click the Word document to open it in Microsoft Word.
- If you haven’t yet created the document, open Word, then click Blank Document and create the document as needed before proceeding.
-
2
Click File. It’s in the upper-left corner of your Mac’s screen. A drop-down menu will appear.
-
3
Click Save As…. This option is in the drop-down menu. Doing so opens a new window.
-
4
Enter a file name. Type whatever you want to name the PDF into the «Name» text box at the top of the window.
-
5
Select a save location. On the left side of the window, click the folder in which you want to save your PDF.
-
6
Click the «File Format» text box. It’s at the bottom of the window. A drop-down menu will appear.
-
7
Click PDF. This option is in the «Export» section of the drop-down menu.
- You may have to scroll down in the drop-down menu to see this option.
-
8
Click Export. It’s a blue button in the bottom-right corner of the window. Doing so saves your PDF in the specified file location.
Advertisement
-
1
-
2
Click Choose file. It’s in the middle of the SmallPDF page. Doing so will open either a File Explorer (Windows) or a Finder (Mac) window.
-
3
Select your Word document. Go to your Word document’s location, then click the Word document to select it.
-
4
Click Open. It’s in the bottom-right corner of the window. Doing so will upload the Word document to SmallPDF.
- On a Mac, you may click Choose here instead.
-
5
Click Download File. This option is in the lower-left side of the SmallPDF page. Your PDF will download onto your computer, though you may have to select a storage location and/or confirm the download depending on your browser’s settings.
- It may take a few seconds for this option to appear if your Word document is large or your Internet connection is slow.
Advertisement
-
1
Open Google Drive. Go to https://drive.google.com/ in your computer’s web browser. This will open your Google Drive page if you’re logged in.
- If you aren’t logged in, click Go to Google Drive, then enter your email address and password when prompted.
-
2
Click + New. It’s in the top-left side of the Google Drive window. A drop-down menu will appear.
-
3
Click File upload. It’s in the drop-down menu. Doing this will open either a File Explorer (Windows) or a Finder (Mac) window.
-
4
Select your Word document. Go to your Word document’s location, then click the Word document to select it.
-
5
Click Open. It’s in the bottom-right corner of the window. Your Word document will upload to Google Drive.
- On a Mac, you may click Choose here instead.
-
6
Open the Word document. Once the Word file finishes uploading to Google Drive, double-click it in Google Drive to open it in your browser.
-
7
Click File. It’s in the upper-left side of the window. Doing so prompts a drop-down menu.
- On a Mac, make sure you’re clicking File in your browser window and not in the menu bar at the top of the screen.
-
8
Select Download as. This option is in the middle of the drop-down menu. Selecting it prompts a pop-out menu.
-
9
Click PDF document. It’s in the pop-out menu. A PDF version of the Word document will immediately download onto your computer.
- Depending on your browser’s settings, you may have to confirm the download and/or select a save location before the file will actually download.
Advertisement
Add New Question
-
Question
Why doesn’t Microsoft Word give me the option to «Save as PDF» in the file menu?
A special type of software (technically called add-in) has the ability to convert Microsoft Word documents to PDF. However, Word 2007 does not include this add-in by default. To convert to PDF with Microsoft Word 2007, you have to download the add-in from Microsoft’s website.
-
Question
I need to convert a PDF file to a Microsoft Word document. Is there a way to do this?
Open up your PDF document and select «Save as —> Word Document.» You’ll need to clean it up afterwards (remove paragraph signs, reformat, etc.).
-
Question
How do I fix the glitches and formatting errors that show up in the new PDF file?
The latest versions (after MS Office 2007) allow you to save the document as a pdf, thus avoiding formatting errors. Go to Files->Save As and select «.pdf format» from Save As Type. Click to save.
See more answers
Ask a Question
200 characters left
Include your email address to get a message when this question is answered.
Submit
Advertisement
-
To open your PDF in your computer’s default PDF reader, simply double-click it; if you have more than one PDF reader, you may be prompted to select one after double-clicking the PDF.
-
You can also use the «Save as» menu to convert your Word document to a PDF on a Windows computer.
Advertisement
-
When converting sensitive documents (e.g., credit card statements), avoid using SmallPDF. While their site is secure, it’s best to keep such documents offline as much as possible.
Advertisement
About This Article
Article SummaryX
1. Go to https://smallpdf.com/word-to-pdf in your web browser.
2. Click Choose file.
3. Double-click the Word file you want to convert.
4. Click Download File when the PDF is available.
Did this summary help you?
Thanks to all authors for creating a page that has been read 4,795,095 times.
Is this article up to date?
-
Facebook
-
Columbia University
-
Unileve
-
Hilton
-
Fleet Plus
-
The And Partnership
-
Verizon
-
Taxfix
The Best Online Word to PDF Converter
Smallpdf is the most popular online PDF software. We help millions of happy users to convert Word files to the handy PDF format every day. Try it out!
Seamless Word to PDF Conversion
With this helpful tool, you can efficiently and accurately transform any Word document to PDF online. Same layout, same formatting.
Share Converted Files with Others
Once you convert a Word file to PDF—use our share feature to quickly create a shareable download link or email the PDF via a simple click.
Enhance Your PDFs
Before saving, take advantage of our other tools to modify your PDF further. You can add text and annotations, compress it for emailing, or even merge it with other PDFs for easy file handling.
- Drag and drop any Microsoft Word document onto this page.
- Wait as this tool converts the uploaded Word file to PDF format.
- On the result page, preview and continue editing—if needed.
- Hit the “Download” button to save your PDF.
Our Doc to PDF Converter in a Nutshell
-
Quick and Efficient Processing
Word to PDF conversion is a piece of cake. To begin, upload a Word file, sit back, and we should have your PDF ready in no time. We accept both DOC and DOCX files.
-
Secure Online PDF Software
Have no worries! We permanently remove converted files from our servers after 1 hour. Create a free Smallpdf account if you want to store converted files online instead.
-
Any Device, Any Operating System
Being an online browser-based software, you can conveniently access our Doc to PDF converter anytime, anywhere—from your PC, phone, or tablet.
-
Other Supported File Types
The fun doesn’t stop there. With this all-in-one PDF converter, you can transform other file formats to PDF, such as JPG, PNG, Excel, and PPT.
-
Advanced Word to PDF Conversion
If you convert plenty of files daily, check out Smallpdf Pro, where you can process as many Word files to PDF as you’d like, all in one go, up to 15 GB per file.
-
Work on the Cloud
We want to enable a seamless digital work environment. Once you convert a DOC file to PDF—freely preview, edit, and store it—all on the cloud.
 Word to PDF Converter
Quick and easy way to convert your Word to PDF file
Or drop Word files here
Private Processing
All processing is done on your device locally. No files are uploaded nor stored in the server.
Quick and Easy
No registration is needed to use our server. Convert and download your files within seconds.
Platform Friendly
Our service works on all devices — compatible with Mac, Windows, Linux, iOS, and Android
Step 1.
Select your file in our free online Word to PDF converter.
Step 2.
Click the Convert button to start the Word to PDF conversion.
Step 3.
Download the converted PDF file to your device.
Frequently Asked Questions

To convert a Microsoft Word Document to a PDF, open the document in Microsoft Word, then go to File > Save As and select PDF from the available formats. You can also use Google Drive or LibreOffice to convert a Word Document to a PDF.
PDFs are handy for distributing documents so that they’re seen the same way by all parties. Typically, you’ll create documents using another app and then convert them to PDF. Here’s how to convert a Microsoft Word document to PDF.
If you have the desktop version of Microsoft Word installed on your Windows PC or Mac, the easiest way to convert your document to PDF is right in Word itself.
Open the document you want to convert and then click the “File” tab.
On the backstage screen, select “Save As” from the list on the left.
Next, from the Save As screen, select where you would like the PDF to be saved (OneDrive, This PC, a particular folder, or wherever).
Click the dropdown arrow on the right side of the “Save As Type” box and select “PDF (*.pdf)” from the dropdown menu.
If you want to, you can change the filename at this time. When you’re ready, click the “Save” button.
After saving the PDF, you’ll be returned to your Word document, and the new PDF will open automatically in your default PDF viewer.
If You Don’t Have Microsoft Word
If you don’t have Word, but need to convert a document someone sent you to PDF, you do have a few options:
- Google Drive: You can upload a Word document to Google Drive, save it as a Google Document, and then convert it to PDF. This works well enough if you have a simple, mostly text Word document without much formatting (and if you already have a Google account).
- A Conversion Website: There are a lot of sites out there that offer to convert Word documents to PDF for free. We recommend freepdfconvert.com. It’s a safe site, it works fast, and it does a pretty good job on Word documents with even a modest amount of formatting. And it really is free if you just need to convert the occasional Word document to PDF. A paid subscription gets you additional features like unlimited conversions (multiple documents at once), and the ability to convert more types of files.
- LibreOffice: LibreOffice is a free, open-source office app that offers a lot of the same features as Microsoft Office. You can even open Microsoft Word documents, and convert them to PDF.
RELATED: How to Print to PDF on Any Computer, Smartphone, or Tablet
READ NEXT
- › How to Create a PDF from a Google Docs Document
- › How to Troubleshoot Printing Issues in Microsoft Word
- › How to Create a PDF File in Windows
- › How to Save a Microsoft Word Document as a Web Page
- › How to Convert PNG to PDF on Windows 11 or 10
- › How to Send Word, Excel, or PowerPoint Files as a PDF
- › How to Translate a PDF
- › Google+ Will Come to a Final End on July 5, 2023
How-To Geek is where you turn when you want experts to explain technology. Since we launched in 2006, our articles have been read billions of times. Want to know more?


