
Quick navigation to the main content of this page:
| Workable Solutions | Step-by-step Troubleshooting |
|---|---|
| Locate File Location to Fix «I saved a word document and can’t find it» | You can find the Word document by searching or using Windows File Explorer to locate your files. Input file name in the search box…Full steps |
| How to Recover Lost/Deleted Word Documents | If you can’t find the Word document or it’s lost or deleted by accident, don’t worry, use EaseUS data recovery to get back lost Word documents in simple clicks…Full steps |
| How to Recover Unsaved Word Documents | If you don’t know to restore unsaved Word documents. Here are the 2 effective ways you can try: use Temp files or apply AutoRecover…Full steps |
«I just saved and closed a word document but I can’t find it anywhere and I really need it! I closed A word document and didn’t pay attention to where I saved it and I cannot find it anywhere and I really need it and I don’t want to type 4 pages again.»
Why you can not find your word document?
- Do not remember where the word file was saved.
- Word document gets lost or deleted.
- The file gets unsaved or corrupted.
To find your data for these three reasons, we have collected a bunch of ways in the body part. Whatever the reason you can not search the file, you can get the answer in this article. Join us to handle «I saved a word document and can’t find it».
Locate File Location to Fix I Saved a Word Document and Can’t Find It
The easiest way about finding files, as we all know, is to locate your word file location. Seems too simple? But, indeed, a lot of users do not remember where they saved their files when they stored them. And you might have kept data to a path that you do not use very often, or you might have stored documents to a path that’s too long to remember. Fortunately, there are ways to locate your file location.
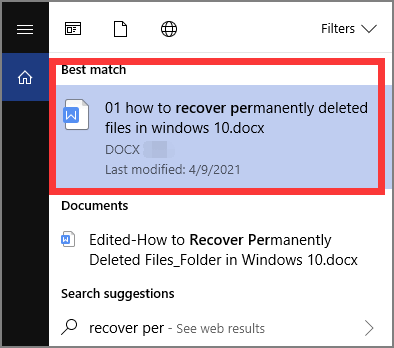
If you know the filename you just saved, you can find your data by search box.
Step 1. Input file name in the search box. (If you don’t know the full name of the file, you can input keyword first, then narrow down your search based on the results.)
Step 2. Check the best match result.
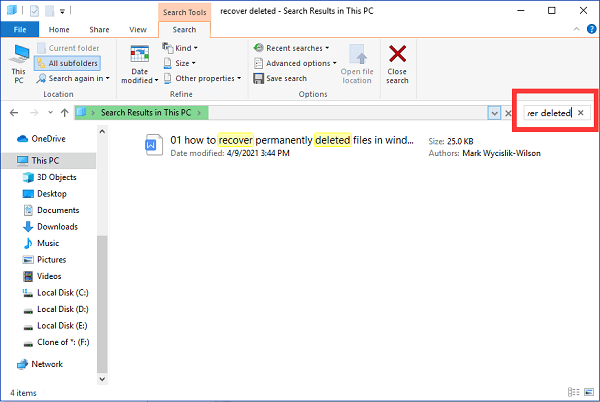
Also, you can use Windows File Explorer to search your files.
Step 1. Run Windows File Explorer.
Step 2. Type file name or keywords on the search box.
Step 3. Wait for the search result to complete.
If you can not locate your word files on this PC, it means your files are lost by accident or unsaved by yourself. Go to part 2 and part 3 to learn how to recover lost or deleted files and retrieve unsaved word documents.
How to Recover A Lost/Deleted Word Document
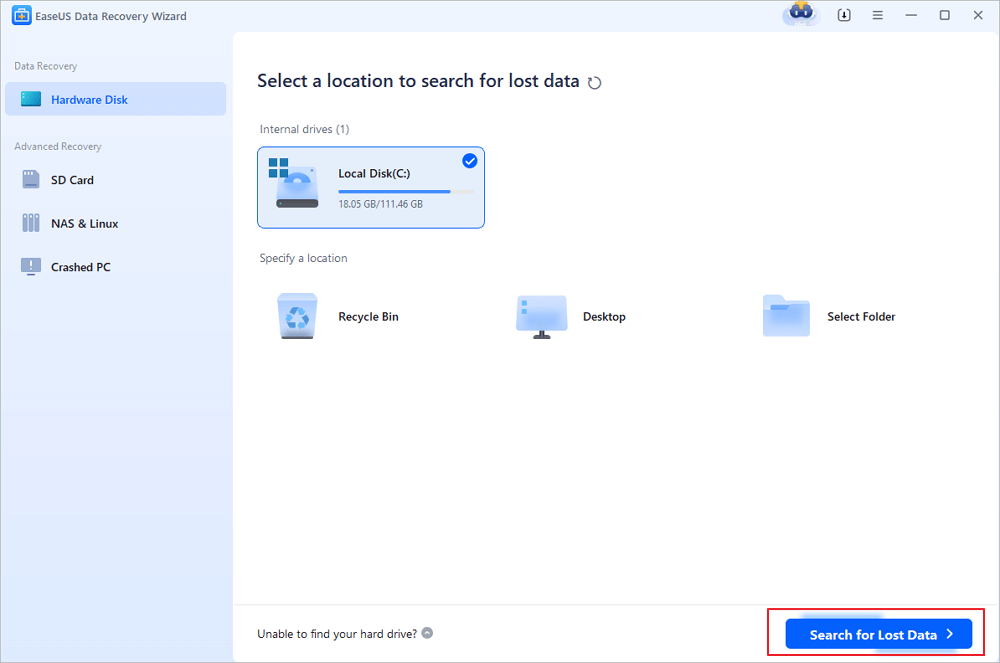
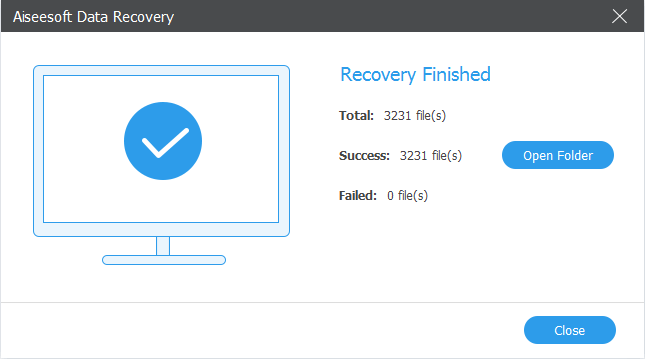
If you can not find your word files from recycle bin, the bad news is you have lost your saved word document due to accidental deletion, computer crashing, hard drive formatting. Make sure you don’t overwrite the files and all lost files are recoverable. So it’s time to restore to a robust EaseUS Data Recovery Wizard — EaseUS Data Recovery Wizard to get data back.
With this reliable file recovery tool, you can recover deleted files from your laptop/PC, HDD, SSD, SD card, USB drive, flash drive, and memory card.
Check Video Tutorial to Recover Deleted Files:
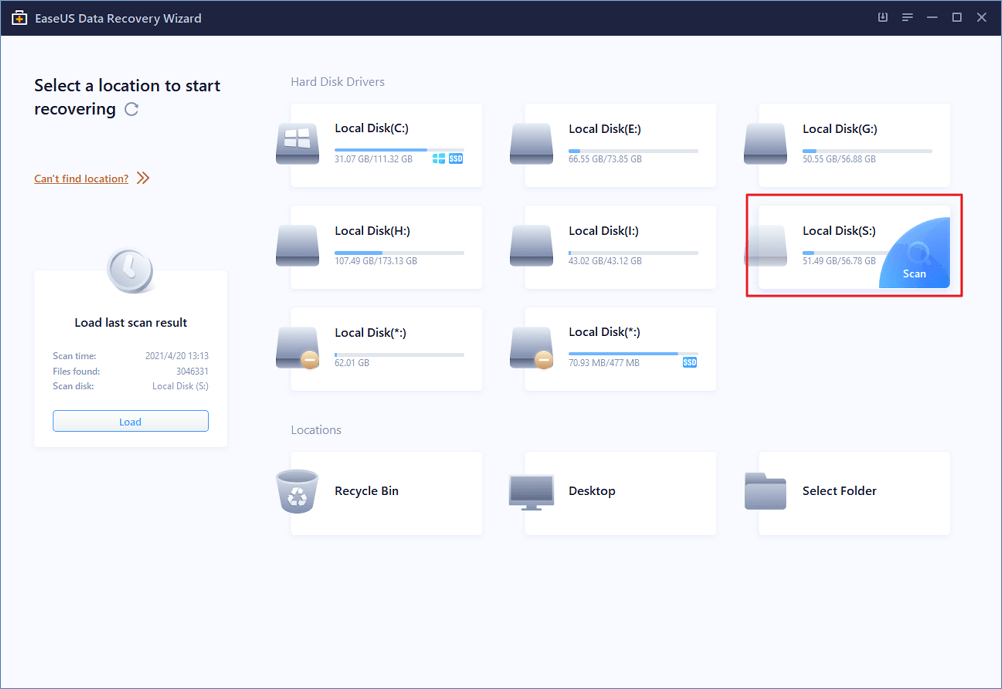
Step 1. Choose the Word file location
Choose the drive or a specific folder and click the «Scan» button.
Step 2. Locate your Word files
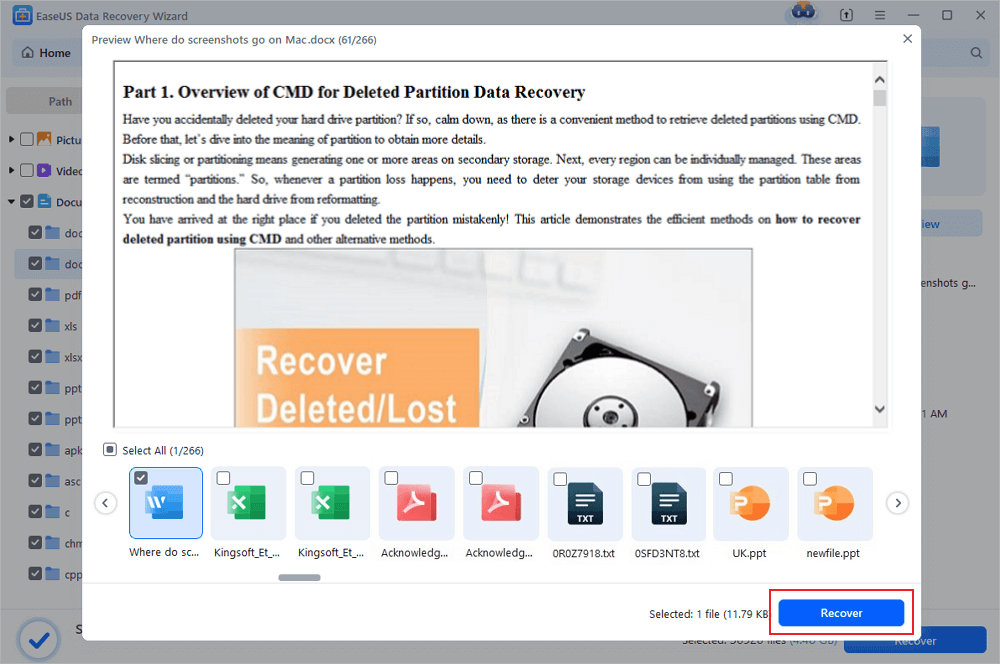
The software will start immediately scanning all lost data on the selected drive. After the scan, click the «Documents» option in the left panel. Choose «Word» from the category bar. Then, click «Preview».
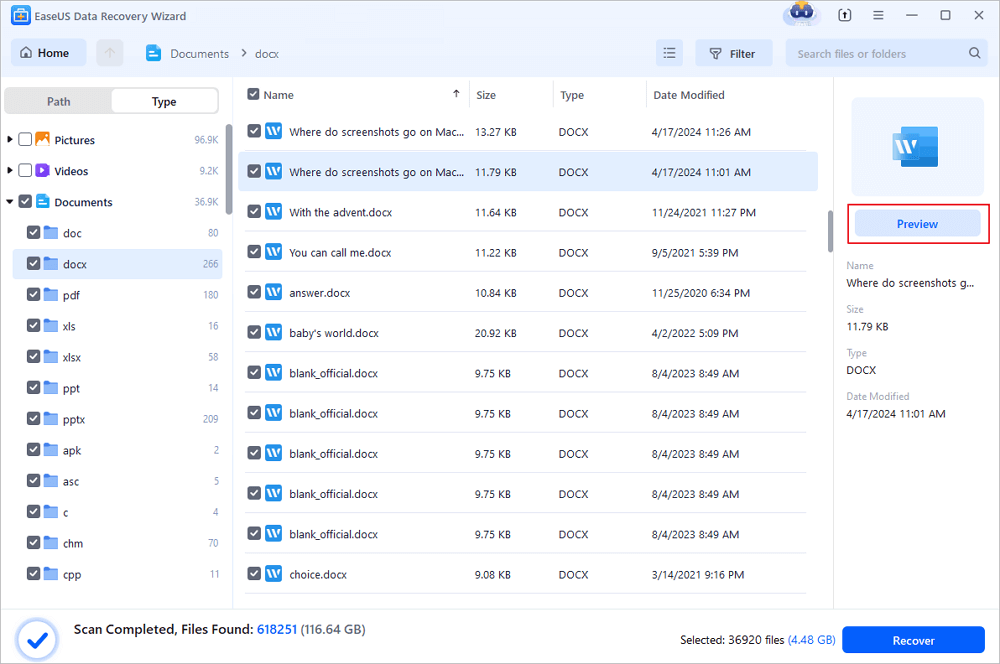
Step 3. Recover Word files
After previewing the lost Word files, select the desired Word files and click «Recover». Then, select a folder to store the Word files.
We have written more files about how to recover deleted files, go to the full guide:
![]()
2 Built-in Functions to Recover Unsaved Word Documents
Stop hopping from page to page to learn how can I recover a word document not saved! Microsoft word has some built-in functions to restore your unsaved document. In this part, we will recommend the two easiest ways.
1 — Using Temp Files to Recover Unsaved Word Documents.
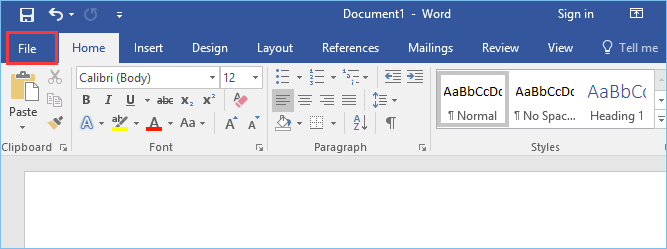
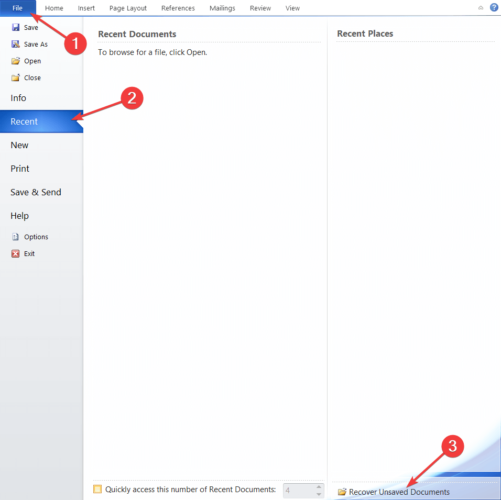
Step 1. Open Microsoft Word, click the File tab on the upper left corner.
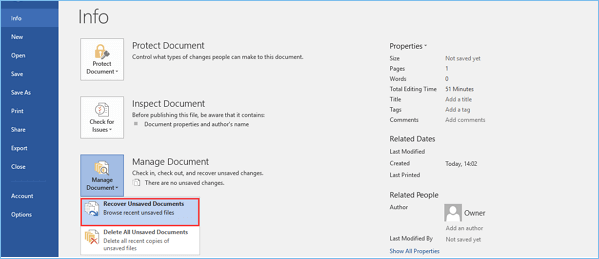
Step 2. Click Info > Manage Document > Recover Unsaved Document.
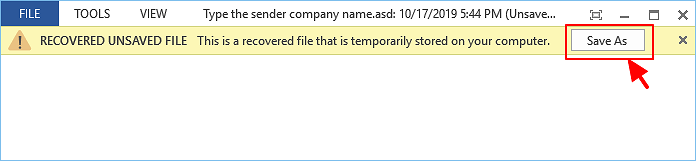
Step 3. Check your files from dialog box > Open recovered unsaved file and click Save As button.
2 — Apply AutoRecover (If Available)
If you have set AutoRecover before, you can use this function to bring your data back.
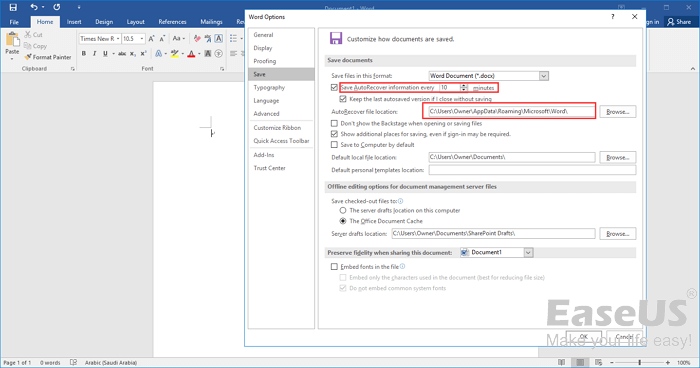
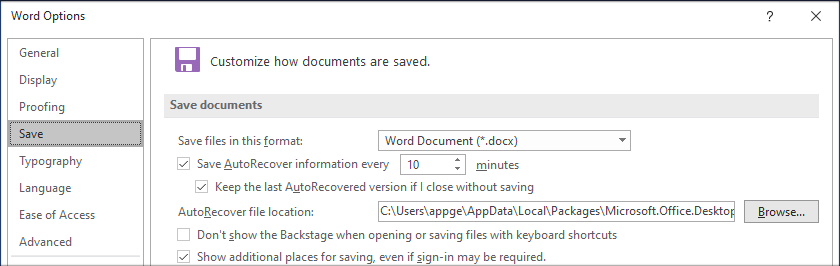
Step 1. Open Microsoft Word > Click File tab > Choose Options > Click Save > Copy the AutoRecover file location.
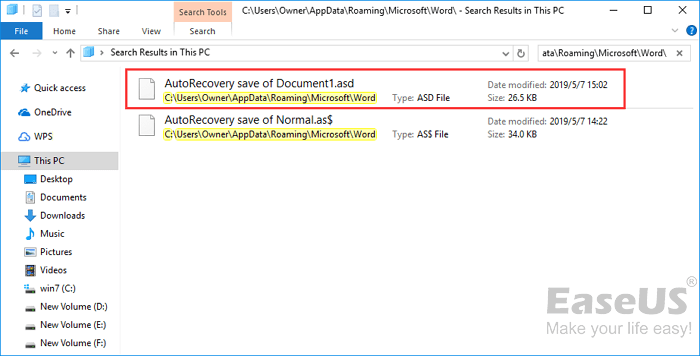
Step 2. Navigate to File Explorer > Paste AutoRecover file path > Copy the .asd file.
Step 3. Open Microsoft Word > Click File tab > Choose Open > Select Recover Unsaved Documents > Paste the copied .asd file in the File name search box.

Read also:
Make sure you backup your files in order to prevent data loss.
by Milan Stanojevic
Milan has been enthusiastic about technology ever since his childhood days, and this led him to take interest in all PC-related technologies. He’s a PC enthusiast and he… read more
Updated on August 18, 2022
Reviewed by
Vlad Turiceanu

Passionate about technology, Windows, and everything that has a power button, he spent most of his time developing new skills and learning more about the tech world. Coming… read more
- Sometimes users forget to save their Word documents, or their application unexpectedly closes.
- Fortunately, Word has an autosave feature that periodically saves your documents to prevent data loss.
- But where are autosaved Word files stored? Here’s the answer you’ve been looking for.
- There are multiple ways to access the Word autosave location and we will show you all of them.
XINSTALL BY CLICKING THE DOWNLOAD FILE
This software will keep your drivers up and running, thus keeping you safe from common computer errors and hardware failure. Check all your drivers now in 3 easy steps:
- Download DriverFix (verified download file).
- Click Start Scan to find all problematic drivers.
- Click Update Drivers to get new versions and avoid system malfunctionings.
- DriverFix has been downloaded by 0 readers this month.
Microsoft Word is one of the most popular text processors in the world, and millions of users use it on daily basis. Creating documents in Word is fairly simple.
Sometimes, you can forget to save your documents, so you might find search for the Word autosave location.
In order to prevent file loss, many users are using the autosave feature that will save your documents in specified intervals.
In case your Word document cannot be saved, check out our solutions for the issue.
How to access autosave files in Word?
If you’re using the feature, today we’re going to show you how to access Word autosave location on Windows 10.
1. Access Word autosave location through the MS Word settings
AutoRecover feature in Word is extremely useful because it will save your files in specified intervals and prevent data loss.
This feature is useful if you accidentally forget to save your file, or if a system crash occurs.
Alternatively, you can use a tool listed in our fresh article about the best software to prevent data loss.
To turn on the autosave feature, you need to do the following:
- Open Word and click on File > Options.
- Now go to Save section and make sure that Save AutoRecover information option is checked. Here you can set the desired time interval for auto save.
- Look for AutoRecover file location field. It will show you the location of the autosave directory. By default the location should be C:UsersYour_usernameAppDataRoamingMicrosoftWord. If you want, you can easily change the location by clicking the Browse button and choosing a different directory on your PC.
After you locate Word autosave location on your PC, you need to open Word, navigate to that directory, locate the file it automatically saves and open it in Word.
Keep in mind that this directory might be hidden on your PC, especially if it’s located in the AppData folder.
To quickly access this folder, you can simply paste its location into File Explorer’s address bar.
If you want to access the folder manually, just follow the path, but be sure to go to the View tab. Then, check the Hidden items option so you can reveal the hidden AppData folder.

After doing that, you’ll be able to access Word autosave location without any problems.
2. Check the AppData folder to find the Word autosave location
By default, Word’s autosave location is the AppData folder. There are several locations where Microsoft Word can save your files. Usually, the autosave location is one of these two: C:UsersYour_usernameAppDataLocalMicrosoftWord C:UsersYour_usernameAppDataLocalTemp
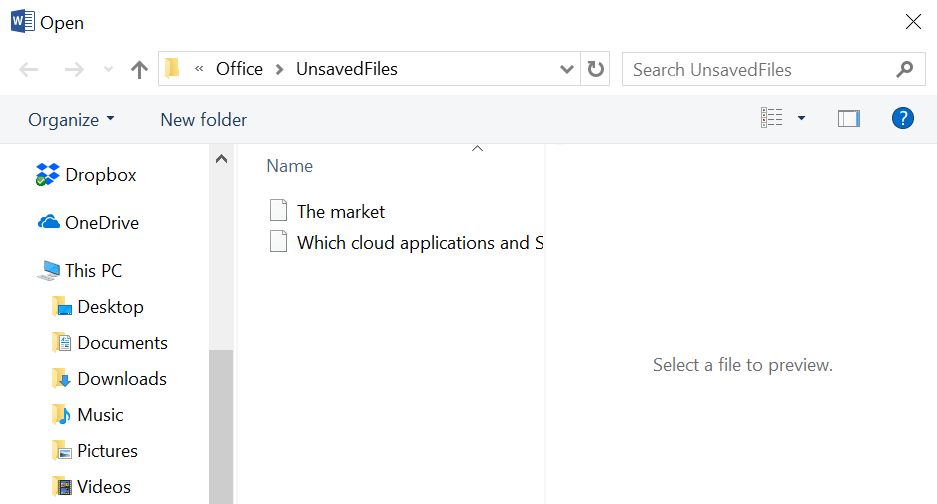
Newer versions of Word use a different location, and you can find all your unsaved files in here: C:UsersYour_usernameAppDataLocalMicrosoftOfficeUnsavedFiles
There are different types of Word files in these folders, and usually, these files will have a tilde or a squiggly line before the file name. Most of these files will have a .tmp extension and a 4-digit number.
For example, a Word document will look like this ~wrdxxxx.tmp. The temp document file will look like ~wrfxxxx.tmp, while the auto recovery file will look like ~wraxxxx.tmp.
Some PC issues are hard to tackle, especially when it comes to corrupted repositories or missing Windows files. If you are having troubles fixing an error, your system may be partially broken.
We recommend installing Restoro, a tool that will scan your machine and identify what the fault is.
Click here to download and start repairing.
Lastly, complete auto-recovery files will not have a .tmp extension and they’ll use the .wbk extension instead. After you find one of those files, simply open it in Word and save them.
3. Access Word autosave location using Recover Unsaved Documents
If you accidentally close Word or if it crashes for some reason, you can open the autosave location by using the Recover Unsaved Documents option.
It is built-in on Microsoft Word and helps you restore any files which you was not able to save before closing the app.
1. Open Microsoft Word on your PC.
2. Go to File in the top left corner of the UI.
3. Choose Recent from the list of options.
4. Click on Recover Unsaved Documents.
5. You can also navigate to File>Info>Manage Versions>Recover Unsaved Documents in order to access the autosave location.
6. After finding the automatically saved file, open it and choose the Save as option to save it.
4. Access Word autosave location through the document directory
Sometimes autosave location is set to the same directory where you save your file. However, autosave files are usually hidden and in order to see them, you need to follow these steps:
- Open Word.
- Click File > Open > Browse.
- Navigate to the directory in which you saved the file.
- Change File type from All Word documents to All Files.
- Now you should see a backup file. The file will have Backup of in its name, so it will be easily recognizable.
- Open the file and save it.
As you can see, Word sometimes saves unsaved files to the same directory in which your currently open file is stored in order to make it easily accessible.
If you didn’t save changes to your Word document, be sure to try this method.
- 6 Best Password Recovery Tools for Microsoft Word
- 6 Best Backup Software for Windows 11 [2022 Guide]
- How to open hidden files on Windows 10
5. Search for .wbk or .asd files to find the Word autosave location
Although Word automatically saves your files, sometimes it can be hard to find the autosave location. If you can’t find the location on your own, you might want to search for a specific file extension.
Word autosave files usually use .wbk or .asd file extension, and in most cases, the Word autosave directory will have these files in it. To search your system for these files, do the following:
- Open File Explorer. You can do that quickly by pressing the Windows Key + E shortcut.
- When File Explorer opens, go to the search bar in the top right corner and enter .wbk or .asd, and press Enter.

- Windows 10 will now search your system for all .wbk or .asd files. If any files are found, simply right-click the file and choose Open file location from the menu.
- This will open Word autosave location and you’ll be able to see all automatically saved files.

If you can’t find any .wbk or .asd files, be sure to search your system for .tmp files. Keep in mind that .tmp files aren’t strictly related to Word, so some of them might be a part of different applications.
For more information on what temporary Word files look like, be sure to check Solution 2.
Losing your data can be a major problem. Because of that, Microsoft Word usually saves your documents to its autosave location.
Even if you forget to save your document, you can restore it by accessing the Word autosave location and opening the unsaved documents in Word.
![]()
Newsletter
How to Recover Unsaved Word Document — Applies to deleted word document
Accidentally exiting Microsoft Word, experiencing an application crash, or having your computer run into an unexpected error may cause a Word document you’re working on to disappear unsaved. You’ll need to take steps to recover unsaved Word document.
This often leads to a loss of data, time, and effort. Fortunately, there are a few ways to attempt to recover an unsaved Word document.
Don’t give up just yet! You might be able to bring your work back onto your computer in one piece.
This article goes into the details of all the possible ways how you can recover unsaved Word document that you forgot to save, or lost because of an unpredictable error. Let’s get started right away.
Let’s get started.
Recovering Unsaved Word Document
Summary to recover unsaved Word document:
- In MS Word, click the File Tab in the upper left.
- Click Manage Document and select Recover Unsaved Documents from the drop-down list.
- Check for your missing file in the dialog box.
- Open the recovered Word document and click the Save As button in the top banner.
Please note that the various sections and instructions in this article apply to Word 2019, Word 2016, Word 2013, Word 2010, Word for Mac, and Word for Office 365.
If you’re working with other versions of Word, such as Word Online or Word 2007, there’s no known way to recover a document that wasn’t saved.
How to recover unsaved Word document: Pre-Recovery
Temporary files may allow you to recover an unsaved Word document. Multiple recovery methods exist, but no one method is guaranteed to work in every situation. You can enable auto-saving in Microsoft Word’s settings to prevent losing your work.
Here are 7 ways to recover unsaved work documents:
1. Search for Word documents to recover unsaved Word documents
Try searching for the Word document in Windows to recover the unsaved document:
- Select Start, type the document name (in Windows 8.1, type the name in the Search box), and then press Enter.
- If the Documents list (or Files list in Windows 8.1) contains the document, double-click the document to open it in Word.
If the search results don’t contain the file, go to the next method.
2. Searching for Word backup files to recover deleted Word document
All Word backup file names have a «.wbk» extension. If you have the «backup copy» option selected in Word, there might be a backup copy of the file on your PC.
If you want to check whether this option is on, select File > Options > Advanced, then scroll down to the Save section, and select Always create backup copy.
If you’re using Microsoft 365 subscription, you can check these two folder locations for the backup file:
- C:UsersAppDataRoamingMicrosoftWord
- C:UsersAppDataLocalMicrosoftOfficeUnsavedFiles
Note: In these paths, replace <UserName> with your username.
To find your Word document’s backup copy, select Start > enter .wbk in the Search box > then press Enter. If there are any files with the name «Backup of» followed by the name of the missing file, that’s your file. Just double-click the file name to open it.
If you still don’t find a backup file for the document, go to the next method.
3. Use the Recover Unsaved Documents function in Word
Microsoft has added an option that may potentially save your unsaved documents from permanent deletion. This can be accessed in Word itself by following the steps outlined below.
- Open Microsoft Word and navigate to the File menu using the header interface on top of your window.

- Click on the Manage Document button to extend its options, then choose Recover Unsaved Documents from the drop-down menu. This will open up a separate window where you can see a list of unsaved documents Word is aware of.

- Select the unsaved file you want to recover from the displayed list, then click the Open button.

- Your file will open in Word, where you can proceed to save it using either the File menu or the Ctrl + S keyboard shortcut.


4. Recover unsaved Word document from your temporary files manually
Windows keeps hundreds of temporary files on your computer for various optimization reasons. If you don’t want to use the recovery option directly from Word, you can manually find a copy of your unsaved Word document here, which you can move and save manually in order to restore it.
- Open your File Explorer and navigate to the following folder:C:UsersUserAppDataLocalMicrosoftOfficeUnsavedFilesMake sure to replace User with your local Windows username, or else the path will be incorrect. You can also paste this string into the Run application (opened by pressing the Windows + R keys at the same time.)
- Similarly to the first method, you’ll see all of the files Word has automatically saved for you. Select all the files you want to recover.
- Right-click on one of the selected files and click the Copy option from the context menu. You can also use the Ctrl + C keyboard shortcut.
- Navigate to the location where you want to keep your restored files. Right-click anywhere inside the folder, then press the Paste option. You may also use the Ctrl + V keyboard shortcut.
- Wait for your files to finish copying. Voila! You’ve successfully restored your unsaved documents to a safe place. You can simply open them and work with them again without having to fear that they’ll be deleted.
5. Restore deleted Word documents from the Recycle Bin
If you accidentally deleted a document, it’s possible to restore it from the Recycle Bin on your desktop if it hasn’t been emptied yet. The steps below guide you through checking whether your document is in the Bin, and how you can restore the document if it is.
- Navigate to your desktop and check if your Recycle Bin has any contents by double-clicking on it. A new window will open up, displaying everything currently in your bin.
- If you see contents, locate your accidentally deleted Word document and select it.
Pro-tip, the Recycle Bin has a search feature that allows you to locate files way easier.
- Select your Word document and keep holding the mouse button. Drag and drop the file onto your Desktop (or any other folder that isn’t the Recycle Bin.)
- You’ve successfully restored your unsaved documents to a safe place. You can simply open them from the new location and work with them again without having to fear that they’ll be deleted.
6. Prevent future losses with AutoSave and AutoRecover
Two extremely useful features work together in Word to ensure you never run into problems with unsaved or lost documents. This section describes how you can turn these features on to ensure you never come across an issue like this in the future, even if you experience similar unexpected errors.
AutoSave
AutoSave works when Office 365 subscribers choose to save their documents to OneDrive or SharePoint. It automatically saves your document as you work on it, without you ever having to worry about manually saving all the time. This feature drastically decreases the chances of data loss and is highly recommended for people who work with Word on a daily basis.
As mentioned above, this is a feature exclusive to Office 365 subscribers. If you wish to work with AutoSave enabled, look into how you can become a subscriber by visiting Microsoft’s official website.
AutoRecover deleted Word document
For non-subscribers, there’s a feature that may save you from future loss of data if used correctly. Here’s how you can turn it on when working on a Windows operating system:
- Go to the File tab, then select the Options menu from the pane on the left side. A new window will appear, listing the many settings of Word.
- Switch to the Save tab in the left pane.
- Select the Save AutoRecover Information Every X Minutes checkbox, then manually enter the number of minutes you want in between each saves. Many people recommend inputting somewhere between 5 and 10 minutes.
- Make sure that the Keep the Last AutoRecovered Version if I Close Without Saving option is selected. This is what will make it possible to recover files in the future even if Word or your computer encounters a sudden error.
- Click the OK button to finalize the change. You now have AutoRecover turned on for the future!
7. Recover an unsaved Word document on Mac
On macOS versions of Word, the process of restoring files including unsaved Word documents is slightly different.
Unlike some Windows versions, the AutoRecover feature is turned on by default for Mac users. This makes the process slightly different, but more efficient as you don’t have to worry about losing unsaved files at all unless the feature was manually turned off previously.
To recover deleted Word document in Mac:
- Open the Finder window on your Mac, then:
- Type in “AutoRecovery” in the search bar and hit the enter key. Doing this will search your device for the default Word AutoRecovery folder.

- Alternatively, click the Go option from the header and select Go to folder (shift + ⌘ + G) Paste in the following path and hit enter: Library/Containers/com.microsoft.Word/Data/Library/Preferences/AutoRecovery.
- You’ll see all of the files Word has automatically saved for you. Select all the files you want to recover.
- Right-click on one of the selected files and click the Copy option from the context menu. You can also use the ⌘ + C keyboard shortcut.
- Navigate to the location where you want to keep your restored files. Right-click anywhere inside the folder, then press the Paste option. You may also use the ⌘ + V keyboard shortcut.
- Wait for your files to finish copying. Voila! You’ve successfully restored your unsaved documents to a safe place. You can simply open them and work with them again without having to fear that they’ll be deleted.

Final Thoughts
That’s it. We’ve highlighted 7 ways to recover unsaved Word documents. We hope that this article was useful in teaching you how to recover an unsaved Word document on various platforms.
If you ever run into issues with your Word documents getting lost, feel free to return to our article in the future.
You can also check our cheat sheet for MS Word here. Check out our help center for many other tips and tricks about Microsoft Word documents.
Further Reading
> How to Unfreeze Word on Mac Without Losing Work
> 9 Ways to Fix Windows 10 Won’t Shut Down
> Fixed: Print Spooler Keeps Stopping on Windows 10
Get your lost/unsaved doc back with autosaved word documents right away.
Last Updated on December 8, 2020 by Ian McEwan
All Methods Here Apply to Microsoft Office Word 2003/2007/2010/2013
For quite some time now, Microsoft Word has provided users with an autosave feature which saves documents being worked on without an express prompt from the user. This has proved very efficient in situations where the computer goes off or crashes when the user has not yet saved their work. However, the question arises as to how one can find these autosaved word documents when they log back into the computer. Moreover, how to open .asd file when you find it.
Normally, you can easily restore your lost word document after a restart. Because a Document Recovery window pane will open up in the Word, and you can choose the latest file from the recoverable document list to resume.
If the Document Recovery doesn’t show up or you’re a Mac user, try the methods below.

Part 1: Effective Ways to Find Autosaved Word Documents On Win/ Mac
- Method 1: Find Autosaved Word Documents From App Data Folder
- Method 2: Recover Autosaved Word Documents With Data Recovery Tool
- Other methods which are worth a shot
Part 2: Why are my AutoSaved Word file in .asd format rather than .doc? How to open .asd file?
Part 3: Setup AutoRecover.
Part 1: Effective Ways to Find Autosaved Word Documents On Win/ Mac
Method 1: Find Autosaved Word Documents From App Data Folder on Windows And Mac
For Windows Users:
The default AutoRecover location for the documents that MS Word has autosaved is the App Data folder located in the system partition of the hard disk.
In most computers, this is the partition labeled ‘C’. The path to access this folder is as follows C:Users*user name* AppDataRoamingMicrosoftWord where the *user name* is the name of the user that was logged in at the time when the document was auto-saved.
Or, you can open an Explorer window and paste %AppData%MicrosoftWord into the address bar and press Enter.

It is important to note that the App Data folder is normally hidden. Therefore, the user would have to first of all show hidden folders in the control panel to be able to view it.
Learn how to open .asd file here.
For Mac users:
Like Word for Windows, Microsoft Word for Mac has document recovery feature, which is AutoRecovery, to prevent users from losing unsaved progress in a document, if either MS Word or the Mac are shut down(crash) unexpectedly.
Find the autosaved file on mac to recover unsaved/lost word document, all you need to do is to locate the AutoRecovery folder:
- Quit Word for Mac and Open Finder, then click “Go” > “Go to Folder”.

- Copy and paste “~/Library/Containers/com.microsoft.Word/Data/Library/Preferences/AutoRecovery” and click “Go” to open the AutoRecovery folder

- There, all the files, which start with the words “AutoRecovery save of”, are what you looking for.
Simply select the most related one and change the filename extension to “.doc”.
Method 2: Recover Autosaved Word Documents With Data Recovery Tool On Windows And Mac
In some situations, it might prove difficult to find the important documents even after following the methods above.
So, to speed the process of finding autosaved doc or recover deleted word document, using an ideal Data Recovery tool will be a must.
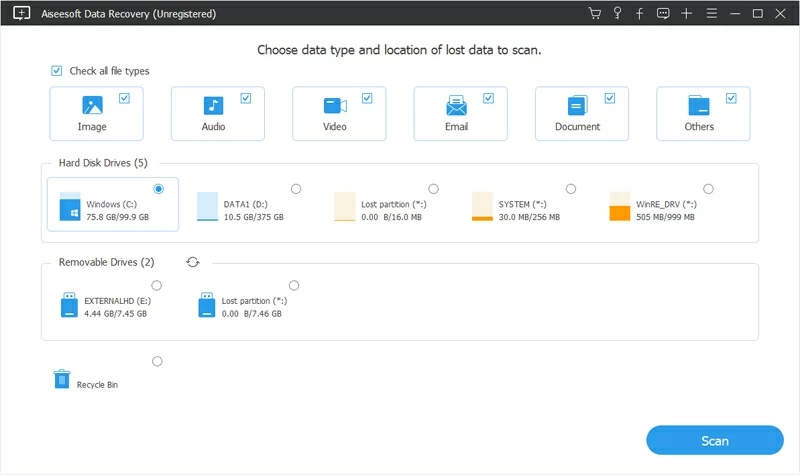
One thing Data Recover can do is quickly locate your autosaved word file with its quick scan mode.
No need to find the folder on your own or any other aforementioned steps. It should offer a little extra peace of mind.
- Just download the free trial and have it run on your Win/Mac, then press Scan.
Win Download
Mac Download
Win Download
Mac Download - With any luck, it will show you the autosaved/lost file in a minute. If it doesn’t, use the “Deep Scan” or “All-Around Recovery” function.
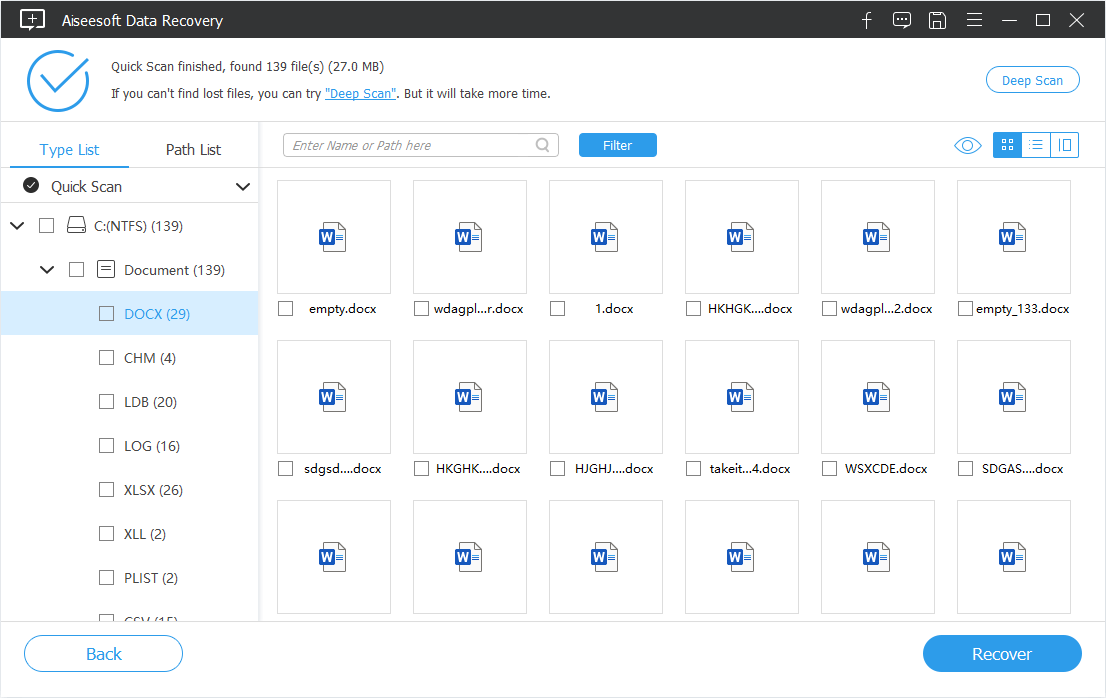
- Chance are all your files, such as Videos, Images, Audios or Email, etc., which were permanently deleted or lost recently, can be recovered with the data recovery tool. But you can speed up the deep-scanning by selecting the file type first or using the Filter button.
- After deep scan, you can preview the word document and click “Recover” to save it.
Since the usages of all data recovery software are pretty much the same, here are top 4 Data Recovery software (Win and Mac) in 2020 for you to choose from.
- #1 Aiseesoft Data RecoveryAiseesoft Data Recovery
- #2 Stellar Data RecoveryStellar Data Recovery
- #3 Wondershare RecoveritWondershare Recoverit
- #4 EaseUs Data Recovery WizardEaseUs Data Recovery Wizard
*Why Are My AutoSaved Word File in .asd Format Rather Than .doc? Click here to learn how to open .asd file.
Other Methods Which Are Worth a Shot
Checking the Initial Save Directory For Word Backup Files
There are times when the autosave file is saved in the directory where the original document was saved, in case changes were being made to it.
To open this document, you would first have to launch MS Word, then go to File, then click Open. (If you are word 2013 user, you need to click Computer and Browse after that.) Then go to the directory where the original document was saved.
Ensure that you have changed the file type ‘All Word Documents‘ to ‘All Files‘ from the dropdown menu. You will be able to identify the file as it will have ‘Back up of‘ in its name.
Use “Recover Unsaved Documents” Feature
In situations where one’s computer unexpectedly shuts down or crashes, there is always a chance that they can recover their unsaved documents.
For Word 2010 user: The first step would be to reopen MS Word then go to File, then select Recent, then Recover Unsaved Documents.
For Word 2013 user: Go to File >Open > Recent Documents and click Recover Unsaved Documents at the end of all Recent Document.
There you can find autosaved word documents and can, therefore, select the file you need to open. It is highly advisable to save the document immediately after recovering it to avoid the inconvenience of having to look for it again.
Manual Searching
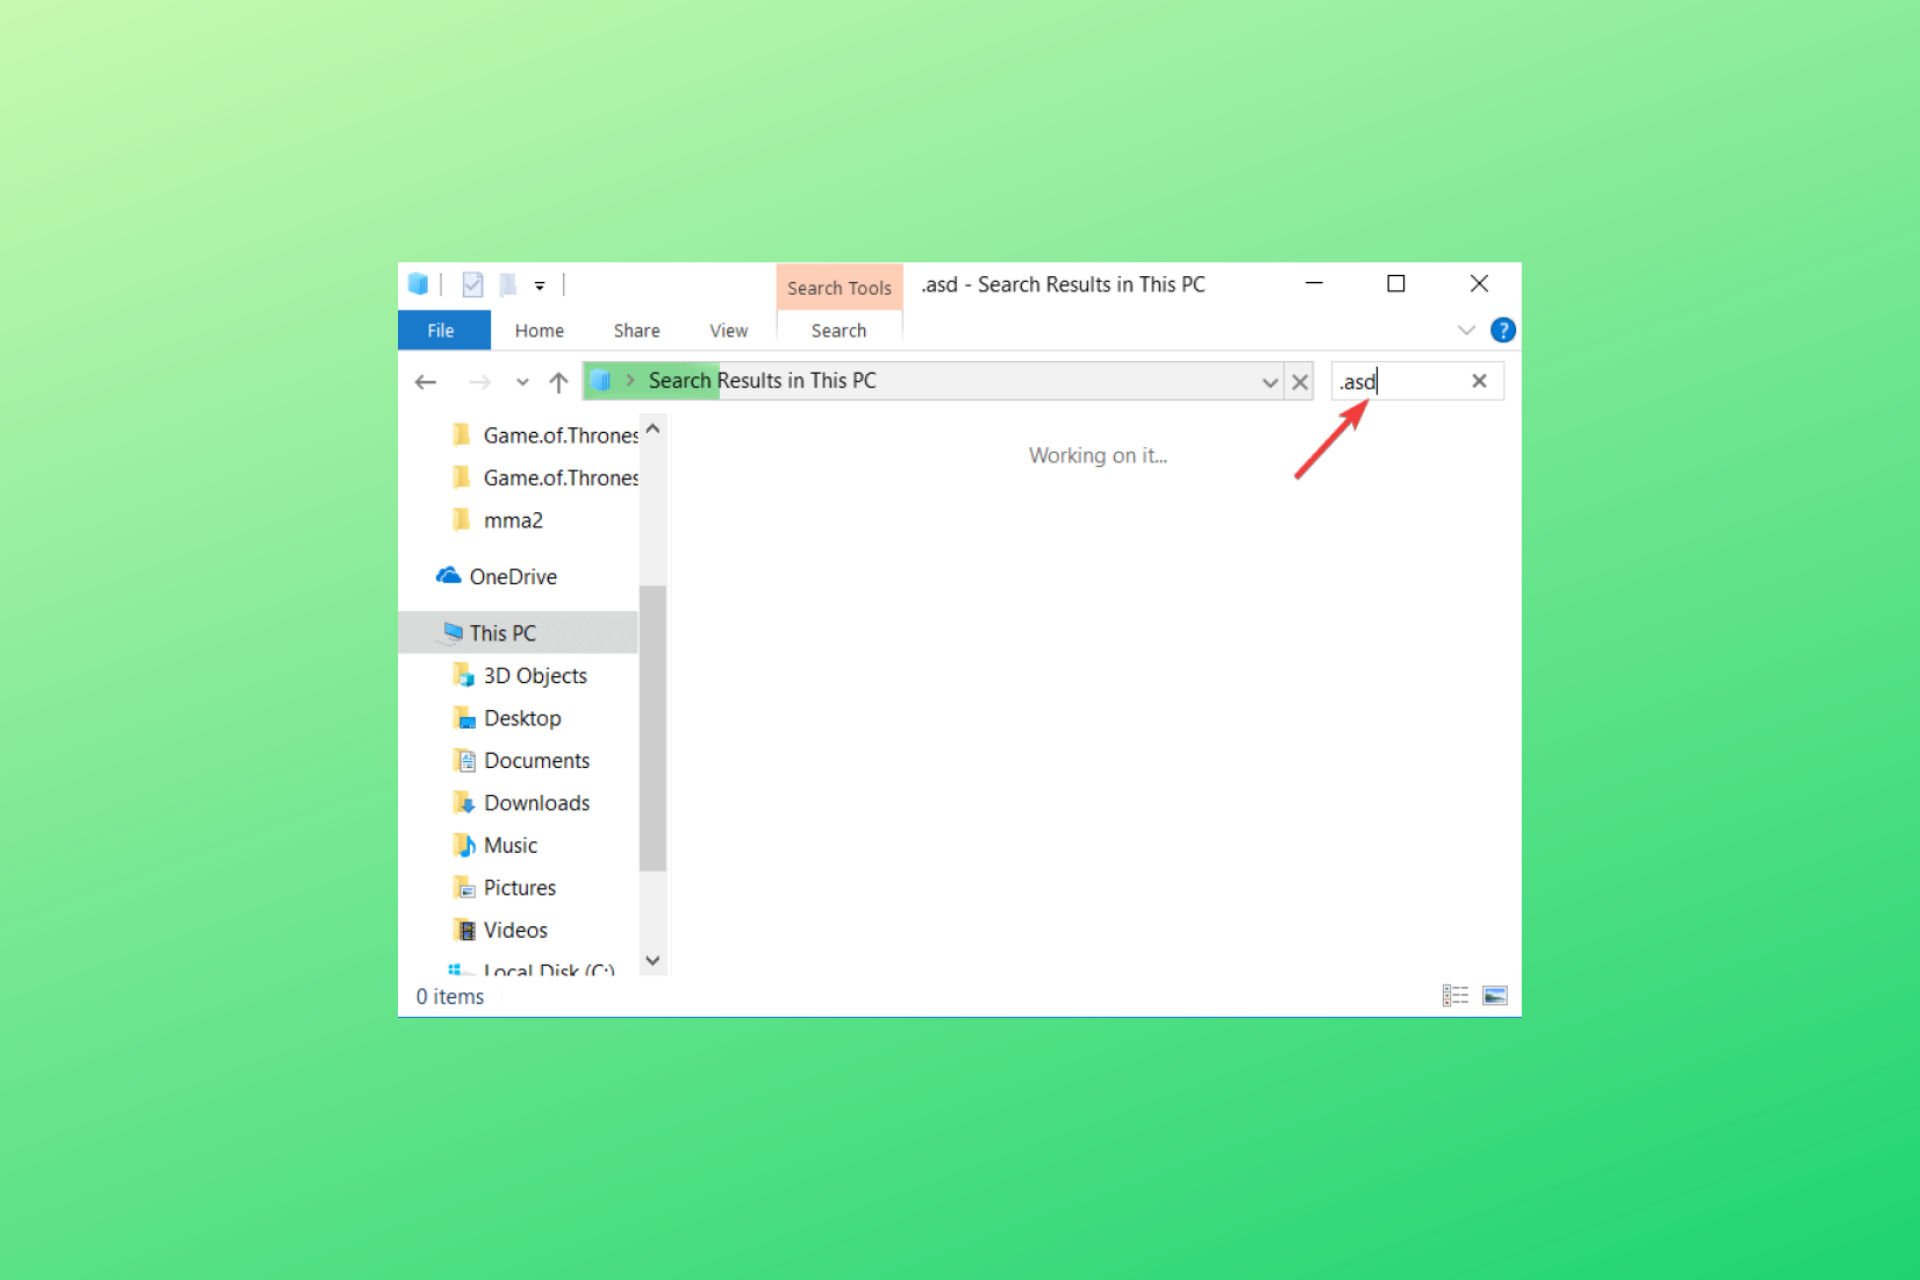
The next possible step would be to manually search the computer for files with the .asd or .wbk extensions.
These files are backup copies of MS Word documents. This search can be done by first opening the Windows Explorer by pressing the Windows button and letter E at the same time, then typing .asd or .wbk in the search box at the top right corner of the window.
You can then right click the file found and click on the ‘show file location’ option. The folder containing the autosaved files will open up. Another kind of files to search for is those with the .tmp file extension. However, not all .tmp files are necessarily related to word documents.
Those related to MS Word look like the following: ~wrdxxxx.tmp, ~wrfxxxx.tmp or~waxxxx.tmp where the xxxx part represents a series of four numbers assigned to the files.
The above methods have proven to be very effective when one wants to try to find autosaved word documents and should, therefore, be tried out in the event of loss of unsaved work.
Part 2: Why Are My AutoSaved Word File in .asd Format Rather Than .doc? How to open a .asd file?
Now that you have found your AutoSaved word document.
But the head-scratching part of Microsoft Word AutoRecover feature is that the autosaved word format is in .asd rather than .doc.
And you can’t even open it if the autosaved file is not in the Recovery folder.
However, if someone told you “Files with the file extension .asd can only be launched by certain applications.” don’t trust them.
You just need to follow the step below:
- Go to the Recovery folder as below.
C:Users*your user name*AppDataRoamingMicrosoftWord
- Drag your .asd file into this folder and create a new word document.
- Open the new doc, go to File > Info > Manage Document
- Click Recover Unsaved Documents.
- Select your .asd file and click open. Done!
Part 3: Setup AutoRecover
The Best Rule Of Thumb is To Save Often and you can leave it to the AutoRecover.
To configure AutoRecover:
- Open your Microsoft Word file and click File > Options >Save.
- Then select the box before Save AutoRecover information every _ Minutes and box before Keep the last autosaved version if I close without saving.
- Set the autosave duration to 1 min.
Related Articles:
Accidentally Saved Over a Word Document on Mac. Can I Recover it?

Blake Sullivan Updated on Jun 23, 2022 4:25 PM
How to recover an unsaved Word 2007 file in Windows 7? My computer shuts down suddenly and the data with the Word document is missing when I relaunch the tool. Is it complete deleted or just saved somewhere I can’t find?
Microsoft Word (MS Word) documents can be information-enriched Word files fulfilled with formatted texts, images, charts, page data or more saved in .doc, .docx, .dotx or other Word file formats. With all that crucial data, it can be an ordeal when one of the Word files got deleted, unsaved or lost from your Windows 7 computer. Whatever the reason why the MS Word file is gone, Windows and Word program have their own ways to make Windows 7 Word file recovery a breeze. There’s also an excellent 3rd-party data recovery utility to lean on if nothing works.
How to Recover a Word Document in Windows 7
This post applies to all versions of Microsoft Word. (Word 2007, 2010, 2013, 2016, 2019, etc.)
Way 1: Recover Unsaved Documents
MS Word features an AutoRecover function to keep backup copies of Word docs in case they’re lost or deleted. Beyond recovering an unsaved Word document in Windows 7 PC for free, you’re also allowed to retrieve the disappeared text that’s accidentally overwritten in the Word file. Open a new Word document, then follow the appropriate instructions below:
- Go to File > Info > Manage Documents (or Manage Versions) > Restore Unsaved Documents.
- Choose the unsaved Word document you need to recover and open it up in Word.
If you need to restore unsaved Word documents in Word 2010 from Windows 7:
- Click on the File tab and choose Recent.
- If you don’t find the needed document, hit Recover Unsaved Documents.
You can also directly recover a lost Microsoft Word document in Windows 7 from the temporary Unsaved folder through here: C:UsersusernameAppDataLocalMicrosoftOfficeUnsavedFiles
Way 2: Recycle Bin
When a saved Word .doc file was removed, the Recycle Bin will kindly enable you to retrieve deleted Word documents on a Windows 7 laptop & desktop before the files are permanently erased from the Recycle Bin.
- Click on Recycle Bin icon to open it up.
- Find the deleted Word file(s) and right-click the item(s).
- Click on Restore to undelete Word documents from Windows 7’s hard drive.
Way 3: Search for the Original Document
If you’ve saved a Word document you worked on but can’t find it, step through the instructions below to locate the Windows 7 missing Word document.
- On the taskbar, choose the Start or Search icon.
- Enter the name of the deleted Word document. Then, press Enter.
If the resulting list contains the Word document you’re looking for, open the document in Word and get it back by saving it locally on the machine. For assistance with finding lost Word files after upgrading from Windows 7 to Windows 10, you can refer to this link.
Way 4: Data Recovery
Potentially, you’ll completely lose a Word document on Windows 7 computer if:
- The machine crashes, restart or shuts down abruptly.
- Word doesn’t close correctly.
- You turn off the computer or Word software without saving the Word files.
Relax: Data Recovery can save you from the permanent loss of Word documents effortlessly. It’s useful whether you need to restore a deleted .docx file on Windows 7 when the Recycle Bin is emptied or recover Word files erased with Shift+Delete keys. After scanning the deleted or disappear Word docs from anywhere you’ve appointed, it’s able to retrieve only the specific Word files you need back to the disk without affecting the content included.
Once you’ve downloaded the tool, it’ll install promptly. Then, you can proceed with the following steps to get deleted Word documents recovered on Windows 7
Step 1: Open the software
To start with, run the program on your Windows 7 by double-clicking the icon.
Step 2: Select document and source drive for recovery
When a window appears, highlight Document and the storage media where the Windows 7 permanently deleted Word document files can recovered from. Continue by clicking on Scan button.
Step 3: Select the needed Word file(s)
Next up, this tool will provide a list of Word document files and folders orderly. You can filter the results based on the file size, extension, modified timeframe, etc. or running a search to quickly pinpoint the one(s) you’re seeking for.
Then, tick the checkbox(es) of the deleted Word file(s) that you’ve found.
Optional: Click on the Deep Scan button if you find nothing in the first quick scanning.
Step 4: Get back the mistakenly deleted Word documents on Windows 7
Once done, hit Recover button. When prompted, select a location that’s NOT located on the same physical media you’re recovering from to save the recovered Windows 7 Word files and you’re all set.
Related article: How to recover a deleted Word document on Mac.
Way 5: Word AutoRecover Files
If an autosave version of Windows 7 disappeared MS Word documents had been saved before the software was exited abnormally, you can always restore it back from the Document Recovery pane that opens when you restart the tool. See what to do here.
In the event that you closed the window that offers options to save or delete unsaved documents, or you reboot Windows 7 with leaving the reopened Word file a mess, you can manually access the previous saves of the lost Word document.
- On the File tab, click on Options from the bottom.
- In the pop-up window, choose Save.
- Locate the AutoRecover file location under the Save documents headings.
- Copy the path in the AutoRecover file location field.
- Paste the path in the File Explorer and press Enter.
- Look for the Word file whose name ends in .asd.
- Right-click the item, and select Open with. Then, choose Word and press OK.
Finding hidden Word documents in Windows 7 computer? Learn what to do here.
Way 6: Search for Word Backup File
If you’ve activated the option «Always create Backup copy» in Word setting, there may be a backup that can be used for recovering an unsaved or mistakenly deleted word document from a computer running Windows 7 OS. To locate the Word backup files:
- Go to the folder in which you last stored the missing Word files.
- Search for the files with the .wbk file name extension.
- Right-click the backup file you need and choose Open.
Have no luck? Search the whole disk for any .wbk files. If you find any files that have the name «Backup of» followed by the name of the missing file, use the following procedures to open it in Word.
- On the File menu, select Open. (In some Word versions, hit Open > Browse.)
- In the Files of type list (All Word Documents), choose All Files.
- Right-click the backup file you found, and hit Open.
Have recently recovered deleted Word files but can’t read it via MS Word as it looks like the file structure has been damaged? Go to this Microsoft support page and follow the prompts to fix it up.
Way 7: Restore from Backups
It may also worth exploring the Windows copies or other backup strategies you’ve set up for the accidentally lost or deleted Microsoft Word documents in a Windows 7 machine.
Windows Backup & Restore
With copies made via Windows Backup & Restore mechanism, it should be intuitive to retrieve the replaced Microsoft Word documents or bring back the mistakenly lost over 188 pages of Word documents in Windows 7. This link explains how to do: Restoring files from a backup
Restore previous versions
Go through this article to employ the restore points if you need to recover content of a word document in Windows 7 where half the content was deleted in error and then saved over.
Using OneDrive
You can also search a Microsoft Word document which you lost by ignorance in OneDrive simply if you’ve ever utilized this online backup service.