
Word for Microsoft 365 Word for the web Word 2021 Word 2019 Word 2016 Word 2013 More…Less
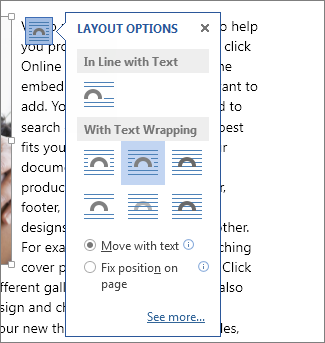
Moving or repositioning a picture on page in Word is as simple as dragging it with your mouse. But sometimes it doesn’t work. The key to getting the results you want is to select Layout Options.

-
Select a picture.
-
Select the Layout Options icon.
-
Choose the layout options you want:

-
To bring your picture in front of the text and set it so it stays at a certain spot on the page, select In Front of Text (under With Text Wrapping), and then select Fix position on page.
-
To wrap text around the picture but have the picture move up or down as text is added or deleted, select Square (under With Text Wrapping), and then select Move with text.
-
For or more information and examples of text wrapping, see Wrap text around pictures in Word
The picture is probably behind another object, like a block of text:
To select the picture, use the Selection pane:
-
Select Home > Select > Selection Pane.
-
In the Selection pane, select the picture.
To move a picture a tiny amount, select the picture, then hold down the Ctrl key and press an arrow key.
To move several objects at the same time, group them together:
-
Select the first object.
-
Hold down the Ctrl key and select the other objects.
-
Right-click one of the objects, point to Group, and then select Group.
Tip: If you are unable to group or multi-select pictures, it’s possible that the layout of your picture is inline with text. If so, please refer to Open Layout Options to change the picture layout to any option under With Text Wrapping.
For absolute control over the alignment and positioning of a picture, use the Layout box to set alignment relative to margins or columns, absolute position in inches, or relative position by percentage. This comes in handy when you want to place a picture a certain distance from something else, like a page margin.
-
Select the picture.
-
Select the Layout Options icon.
-
Select See more, and then make alignment and position adjustments on the Position tab.
If you can’t select any of the position options on the Position tab, select the Text Wrapping tab, and then select any option except the In line with text option.
If you have more than one picture that you want to overlap on a page, you can enable this in the Layout box.
-
Select a picture.
-
Select the Layout Options icon.
-
Select See more.
-
On the Position tab, in the Options group at the bottom, select the Allow overlap check box.
-
Repeat for each picture for which you want to enable overlapping.
In addition to aligning and positioning pictures on a page, you can also align pictures to each other, or to other objects on the page. Although picture-to-picture alignment is not available from the Layout Options icon or the Layout dialog box, it’s a common task that you might do while working with picture positioning and alignment.
-
Hold down the Ctrl key and select each object that you want to align.
-
Go to Picture Format or Picture Tools Format > Align, and then choose an option, such as Center, Top, or Bottom.
An object anchor  indicates where a picture or object is located in relation to the text in your document. Anchors do not appear for inline pictures; inline objects are tied to the place within the text where they were inserted and are treated like any text character—»in line with text.»
All other wrapping options (Square, Tight, Through, Top and Bottom, Behind Text, In Front of Text) are anchored to a particular place in the document; the anchor indicates the paragraph with which the object is associated. Select a picture, and then select the Layout Options icon to find out how your picture is inserted.
Notes: If you select a picture and it’s not inline with text, but you don’t see an object anchor, you can ensure that anchors are shown in two ways:
-
Show formatting marks On the Home tab, in the Paragraph group, select Show/Hide ¶.
-
Always show anchors Select File > Options > Display, and then select Object anchors.
Because anchors are simply a visual indication of a picture’s relative position on a page, they cannot be removed. However, by trying different text wrapping options, you should find all the flexibility you need in positioning a picture, regardless of its anchor.
For or more information and examples of text wrapping, see Wrap text around pictures in Word.
If you want to ensure that an image stays put even if the text around it is deleted, you can lock its anchor:
-
Select the picture.
-
Select the Layout Options icon.
-
Select See more, and then select Lock anchor.
Note: Because anchors are not used for pictures placed In Line with Text, anchor locking and all other positioning options are unavailable for inline images.
See also
Wrap text around pictures in Word
Rotate a text box, shape, WordArt, or picture in Word
Group or ungroup shapes, pictures, or other objects
If you inserted a picture into your document while using Word for the web, you can cut and paste it to move it within a document, and you can apply paragraph formatting, like vertical spacing and centering, to it. However, you cannot move a picture that was inserted while using the desktop version of Word if the picture has text wrapping or a fixed position on the page.
If you find that you cannot make changes to a picture, and you have the desktop version of Word, select Open in Word to open your document in Word and make changes to its layout.
When you are done, press Ctrl+S to save your document to its original location. You can then open the document again in Word for the web, and continue editing. Word for the web will retain the layout settings that you applied in the desktop version of Word.
Need more help?

By default, you can’t freely move pictures (by drag-and-drop) to any position in a Microsoft Word document without also placing them somewhere in the text. But with a small change, you can drag images anywhere. Here’s how.
Make a Picture Freely Move in a Word Document
Using the method below, you can move a picture anywhere you want in your Word document—outside of the normal flow of text. You can even place the picture on top of an existing block of text if you want.
We’ll use a blank document to do this. Start by opening Microsoft Word on your Windows or Mac computer. On Word’s first screen, select “Blank Document” to create a new document.

In Word’s editing window that opens, click the “Insert” tab at the top.
In the “Insert” tab under the “Illustrations” section, click Pictures > This Device. This lets you add a picture from your computer.
Use the “File Explorer” window that opens to navigate to the folder containing your picture. Double-click the picture to add it to your Word document.
Back on Word’s editing screen, right-click the image that you just added and select Wrap Text > In Front of Text from the menu.
Your picture is now freely movable. Drag and drop it anywhere you want in your document.
Make All Future Pictures Freely Move in a Word Document
If you’d like to make all of your future pictures freely move in your Word documents, you can modify an option in Word’s settings menu. To do so, first, open Microsoft Word on your Windows or Mac computer.
On Word’s main screen in the lower-left corner, click “Options.”
Note: If you’re on Word’s document editing screen instead, click “File” at the top to see the “Options” option.
In the “Word Options” window, select “Advanced” in the sidebar on the left.
Scroll down the right pane to the “Cut, Copy, and Paste” section. In this section, find the “Insert/Paste Pictures As” option and click the drop-down menu next to it.
Select “In Front of Text” in the drop-down menu.
Click “OK” at the bottom of the “Word Options” window to close the window.
And that’s it. From now on, Word will allow you to freely move pictures on top of text in your documents.
If you ever need to remove many images from your Word document, it’s easy to remove all of them at once. This handy tip can save you a lot of time in the future. Good luck!
RELATED: How to Quickly Remove All Images from a Word Document
READ NEXT
- › How to Move Images in Google Docs
- › 8 Microsoft Word Tips for Professional Looking Documents
- › How to Move a Table in Microsoft Word
- › How to Prevent Accidentally Dragging and Dropping Text in Microsoft Word
- › How to Overlay Images in Microsoft Word
- › How to Perfectly Align Objects and Images in Microsoft Word
- › The New NVIDIA GeForce RTX 4070 Is Like an RTX 3080 for $599
- › BLUETTI Slashed Hundreds off Its Best Power Stations for Easter Sale
How-To Geek is where you turn when you want experts to explain technology. Since we launched in 2006, our articles have been read billions of times. Want to know more?
Learn how to freely move your pictures without restrictions
by Milan Stanojevic
Milan has been enthusiastic about technology ever since his childhood days, and this led him to take interest in all PC-related technologies. He’s a PC enthusiast and he… read more
Updated on February 13, 2023
Reviewed by
Vlad Turiceanu

Passionate about technology, Windows, and everything that has a power button, he spent most of his time developing new skills and learning more about the tech world. Coming… read more
- Word is one of the most popular applications in the Microsoft Office suite.
- Word can do all sorts of things, and in this article, we’ll show you how to move an image in Word.
- We will also show you how to wrap text around a picture.

Microsoft Word is the most popular word processor in the world, and it is heavily used by both home and office users.
Word has a wide array of features, and in today’s article, we’re going to show you how to move a picture in Word and how to wrap text around it.
How can I move pictures in Word?
1. Wrap text around it
- Open Word, create a new document, and add a picture to it.
- Now select the picture that you added.
- Go to the Layout tab and choose Wrap Text.

- Select any option from the menu except In Line with Text.

- The text will now wrap around the image.
- To move the image, simply click the image and drag it to the desired position.


You can also experiment with different layout options in order to find suitable text wrapping for your needs.
2. Move an image to an exact position
- Go to Layout > Wrap Text > More Layout Options. Alternatively, you can select the image, and go to Layout Options > See more.

- Now you’ll be able to set the exact position relative to column, page, characters, and other elements.


For more precision, you can also use the advanced layout options. To do that, follow the steps above.
This option is useful if you’re planning to print a document, and you need to ensure that your images are positioned perfectly for printing.
- How to Make a Checklist in Microsoft Word
- Fix: Microsoft Office not opening [Word, Excel, PowerPoint]
- Word Autosave Location: Where Is It And How to Access It
3. Freely move a picture using arrow keys
1. Open Microsoft Word.
2. Upload the image you want to add to it, then select it.
3. Go to Layout options.
4. Select any option from the With Text Wrapping section.
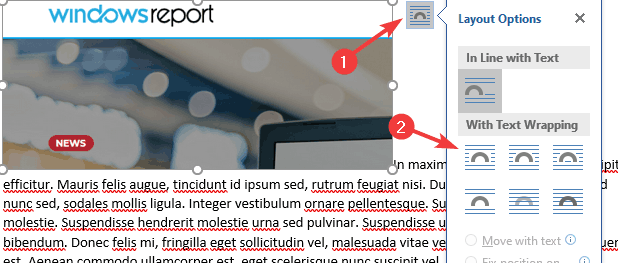
5. The text will now wrap around your image and you can move it freely.
An easy method to move a picture in Word is to change the Layout Option right from the image itself. You can also move your image pixel by pixel by using the arrow keys.
Wrapping text around an image in Word and moving the image is pretty simple, and you just need to use the Wrap Text feature in Word. Thus, you will be able to freely move a picture in Word.
After doing that, you should be able to move the image freely simply by dragging it to the desired position.
If you found this guide useful, let us know in the comments below.
Still having issues? Fix them with this tool:
SPONSORED
If the advices above haven’t solved your issue, your PC may experience deeper Windows problems. We recommend downloading this PC Repair tool (rated Great on TrustPilot.com) to easily address them. After installation, simply click the Start Scan button and then press on Repair All.
![]()
Newsletter

Зачастую, изображения в Microsoft Word должны не просто быть на странице документа, а присутствовать в строго обозначенном месте. Следовательно, картинку необходимо переместить, и для этого, в большинстве случаев, достаточно просто потянуть ее левой кнопкой мышки в необходимом направлении.
Урок: Изменение изображений в Ворд
В большинстве не значит, что всегда… Если в документе есть текст, около которого и расположен рисунок, такое «грубое» перемещение может нарушить форматирование. Для того, чтобы правильно переместить изображение в Word, следует подобрать правильные параметры разметки.
Урок: Как в Ворде форматировать текст
Если вы не знаете, как добавить картинку в документ Microsoft Word, воспользуйтесь нашей инструкцией.
Урок: Как в Ворде вставить изображение
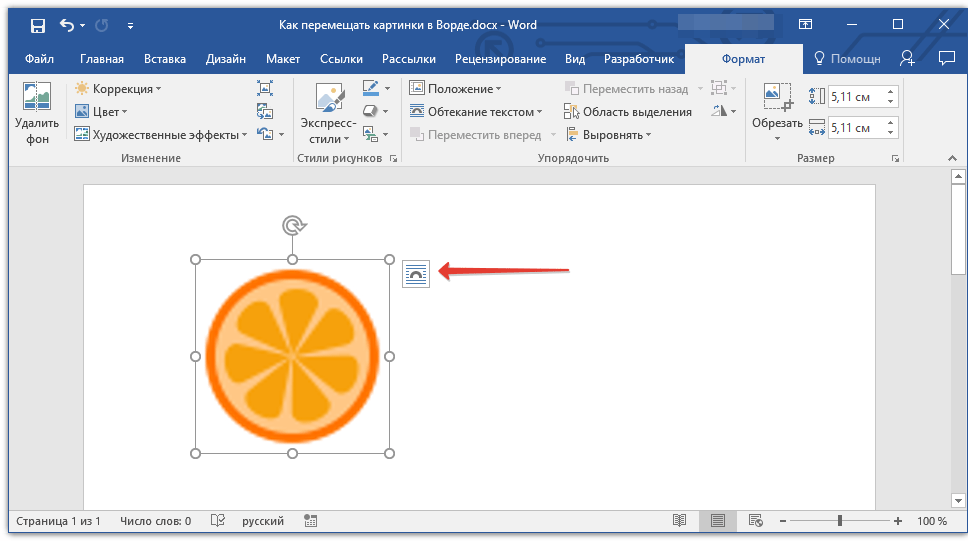
Изображение, добавленное в документ, находится в специальной рамке, обозначающей его границы. В левом верхнем углу находится якорь — место привязки объекта, в правом верхнем — кнопка, с помощью которой и можно изменить параметры разметки.
Урок: Как в Word поставить якорь
Нажав на этот значок, вы можете выбрать подходящий параметр разметки.
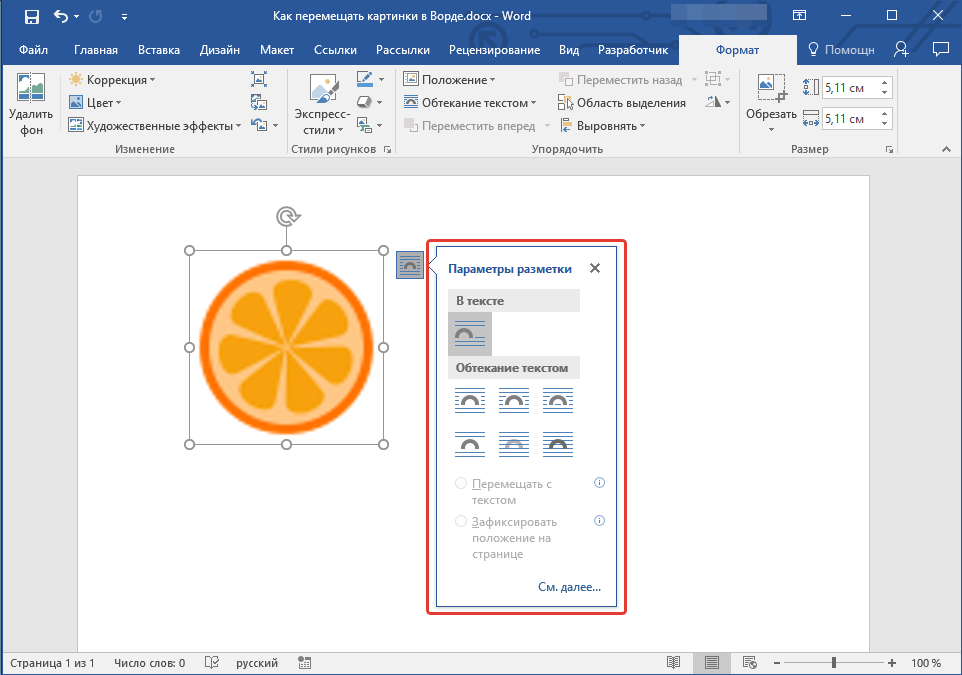
Это же можно сделать и во вкладке «Формат», которая открывается после вставки рисунка в документ. Просто выберите там параметр «Обтекание текстом».

Примечание: «Обтекание текстом» — это и есть основной параметр, с помощью которого можно грамотно вписать картинку в документ с текстом. Если ваша задача — не просто переместить изображение на пустой странице, а красиво и правильно расположить его в документе, где есть текст, обязательно прочтите нашу статью.

Урок: Как сделать обтекание картинки текстом в Ворде
Кроме того, если стандартные параметры разметки вас не устраивают, в меню кнопки «Обтекание текстом» можно выбрать пункт «Дополнительные параметры разметки» и выполнить там необходимые настройки.
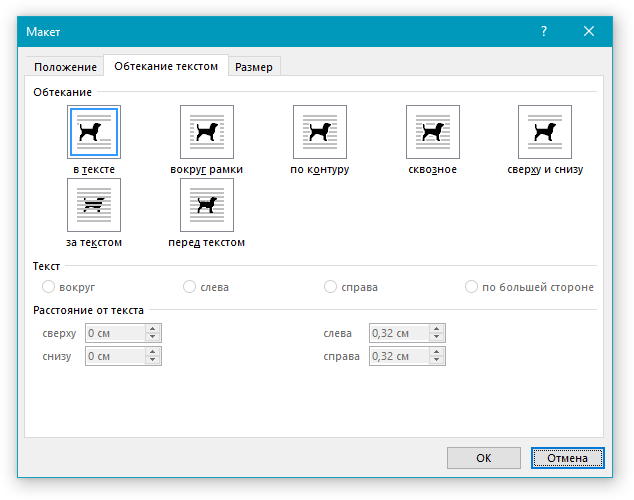
Параметры «Перемещать с текстом» и «Зафиксировать положение на странице» говорят сами за себя. При выборе первого картинка будет перемещаться вместе с текстовым содержимым документа, которое, конечно же, может изменяться и дополняться. Во втором — изображение будет находиться в конкретном месте документа, чтобы не происходило с текстом и любыми другими объектами, содержащимися в документе.
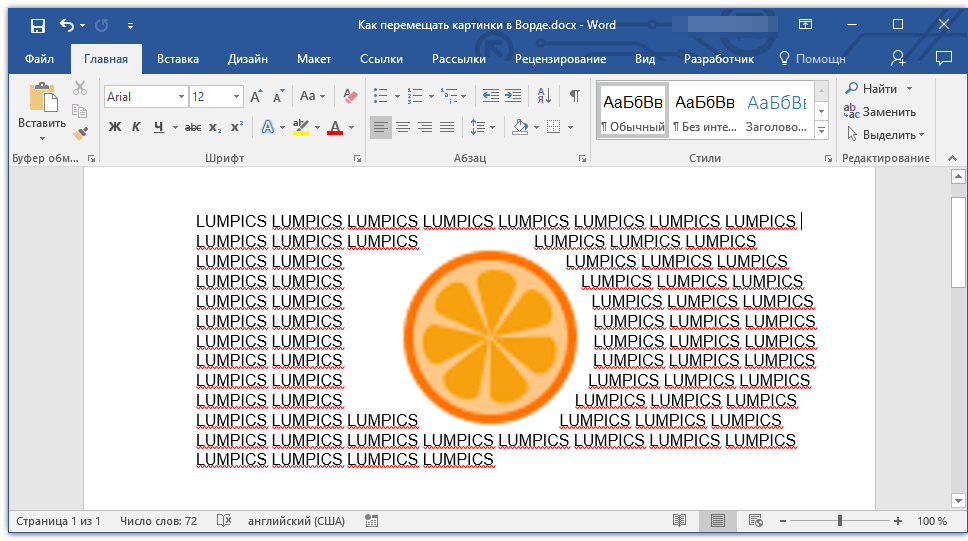
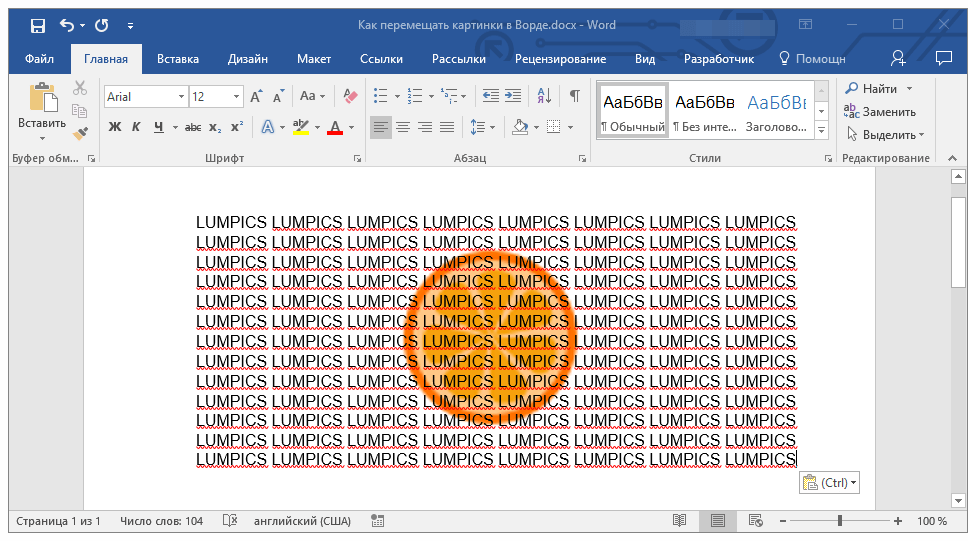
Выбрав параметры «За текстом» или «Перед текстом», вы сможете свободно перемещать картинку по документу, не оказывая влияния на текст и его положение. В первом случае текст будет находиться поверх изображения, во втором — за ним. Если это необходимо, вы всегда можете изменить прозрачность рисунка.
Урок: Как изменить прозрачность картинки в Word
Если вам нужно переместить изображение в строго вертикальном или горизонтальном направлении, зажмите клавишу «SHIFT» и потяните его мышкой в нужном направлении.
Для перемещения картинки небольшими шагами кликните по ней мышкой, зажмите клавишу «CTRL» и перемещайте объект с помощью стрелок на клавиатуре.
При необходимости повернуть изображение, воспользуйтесь нашей инструкцией.
Урок: Как в Ворде повернуть рисунок
Вот и все, теперь вы знаете, как перемещать картинки в Microsoft Word. Продолжайте осваивать возможности этой программы, а мы сделаем все возможное для того, чтобы облегчить для вас этот процесс.
Double-click the picture to add it to your Word document. Back on Word’s editing screen, right-click the image that you just added and select Wrap Text > In Front of Text from the menu. Your picture is now freely movable. Drag and drop it anywhere you want in your document.
Contents
- 1 Why can’t I freely move pictures in Word?
- 2 How do you move an object freely in Word?
- 3 How do I move a picture in Word 2013?
- 4 How do you move a picture on word without snapping it?
- 5 How do you move pictures on Microsoft Word 2007?
- 6 How do I drag an image?
- 7 How do I place pictures side by side in Word?
- 8 Where is layout options in Word?
- 9 How do you move floating pictures?
- 10 How do I insert a picture in Word 2007 without moving text?
- 11 How do I move pictures in Windows 10?
- 12 How do I insert an image into drag and drop?
- 13 How do you drag photos on a laptop?
- 14 How do I layout a picture in Word?
- 15 How can I put two pictures side by side?
- 16 How do I do side by side in Word?
- 17 How do you stop pictures moving in Word 2016?
Why can’t I freely move pictures in Word?
Please tell me the ways to move image’s in every situation…. 2. Choose a wrapping option OTHER THAN In-line with Text. If you choose In-Line with Text you won’t be able to freely position the picture object.
How do you move an object freely in Word?
First, confirm that the object is not set to In Line with Text: With the object selected click the Arrange button on the Shape Format contextual tab. From the Wrap Text choices select the method you prefer. You then should be able to freely drag the object to any location.
How do I move a picture in Word 2013?
In your Word 2013 document, select the picture you would like to move. Choose Picture Tools Format→Position button to open a menu of positions. Choose the position that shows the picture in the upper-right corner of the document. Drag the picture downward so that its top aligns with the top of the first body paragraph.
How do you move a picture on word without snapping it?
Turn off the snap-to options
- Click a chart, picture, or object in the document.
- On the right end of the ribbon, select Format > Align > Grid Settings.
- To turn off the Snap objects to grid when the gridlines are not displayed or Snap objects to other objects settings, clear the respective box.
How do you move pictures on Microsoft Word 2007?
How to Move a Picture in Word 2007
- Launch Microsoft Word 2007 and open a document that contains a picture.
- Click the picture that you would like to move to select it.
- Hold down your left mouse button and drag the picture to a new location in the document.
How do I drag an image?
Instructions
- Step 1: Begin the drag operation. Use the ImageList_BeginDrag function to begin a drag operation.
- Step 2: Move the image. The ImageList_DragMove function moves the image to a new location.
- Step 3: End the drag operation.
How do I place pictures side by side in Word?
Click and drag the first image to where you want it on the page. Release the mouse button. Click and drag the second image next to the first, where you want it to align. As the sides come close to each other, Word will automatically snap the second image into place next to the first.
Where is layout options in Word?
The layout options and compatibility options in Word 2007 and later versions are found near the bottom of the Word Options dialog box > Advanced category. This illustration shows the options found in Word 2013, 2016, 2019, 2021, and Word for Microsoft 365.
How do you move floating pictures?
Firstly, right click on the picture and move cursor over “Wrap Text” option on the contextual menu. Next choose any style other than “In line with text”. Then you will be able to drag the picture to wherever you like.
How do I insert a picture in Word 2007 without moving text?
You can add a picture in the top left corner of a document and have the text flow around it.
- Select a picture.
- Go to Picture Format or Format > Position, and under Format with Text Wrapping, select Top Left. Tip: You can drag the image around the document and align it any way you like.
How do I move pictures in Windows 10?
To move a file or folder from one window to another, drag it there while holding down the right mouse button. Select the Traveler file. Moving the mouse drags the file along with it, and Windows explains that you’re moving the file. (Be sure to hold down the right mouse button the entire time.)
How do I insert an image into drag and drop?
To add an image to your item:
- From the left panel in the Drag and Drop editor, click Images.
- Double-click on an image style to add it to the first page of your item.
- When the image type is added to your item, the image selector window will display.
How do you drag photos on a laptop?
Press “Ctrl-A” to select all of the files in a folder or on the desktop; press “Ctrl” and then click each object with the left button on the touchpad to select specific files. Hold down the left button and drag the files to the target destination, such as another folder in Windows Explorer.
How do I layout a picture in Word?
Open Layout Options
- Select a picture.
- Select the Layout Options icon.
- Choose the layout options you want: To bring your picture in front of the text and set it so it stays at a certain spot on the page, select In Front of Text (under With Text Wrapping), and then select Fix position on page.
How can I put two pictures side by side?
How to arrange two photos or screenshots side by side
- Step 1: Open Quick Picture Tools in your browser.
- Step 2: Click the Add button in the first of the four boxes, the one in the top left.
- Step 3: Repeat the process, this time clicking the Add button in the top right box.
How do I do side by side in Word?
View and compare documents side by side
- Open both of the files that you want to compare.
- On the View tab, in the Window group, click View Side by Side. Notes: To scroll both documents at the same time, click Synchronous Scrolling. in the Window group on the View tab.
How do you stop pictures moving in Word 2016?
Click on the Picture Position tab. Under both the Horizontal and Vertical selections, select Absolute Position, and pick “Page” from the drop-down menu at the right. Also, click on the checkbox that says “Lock anchor.” Now, your pictures won’t move around the page.