
Insert or delete rows and columns
Insert and delete rows and columns to organize your worksheet better.

Note: Microsoft Excel has the following column and row limits: 16,384 columns wide by 1,048,576 rows tall.
Insert or delete a column
-
Select any cell within the column, then go to Home > Insert > Insert Sheet Columns or Delete Sheet Columns.
-
Alternatively, right-click the top of the column, and then select Insert or Delete.
Insert or delete a row
-
Select any cell within the row, then go to Home > Insert > Insert Sheet Rows or Delete Sheet Rows.
-
Alternatively, right-click the row number, and then select Insert or Delete.
Formatting options
When you select a row or column that has formatting applied, that formatting will be transferred to a new row or column that you insert. If you don’t want the formatting to be applied, you can select the Insert Options button after you insert, and choose from one of the options as follows:
If the Insert Options button isn’t visible, then go to File > Options > Advanced > in the Cut, copy and paste group, check the Show Insert Options buttons option.
Insert rows
To insert a single row: Right-click the whole row above which you want to insert the new row, and then select Insert Rows.
To insert multiple rows: Select the same number of rows above which you want to add new ones. Right-click the selection, and then select Insert Rows.
Insert columns
To insert a single column: Right-click the whole column to the right of where you want to add the new column, and then select Insert Columns.
To insert multiple columns: Select the same number of columns to the right of where you want to add new ones. Right-click the selection, and then select Insert Columns.
Delete cells, rows, or columns
If you don’t need any of the existing cells, rows or columns, here’s how to delete them:
-
Select the cells, rows, or columns that you want to delete.
-
Right-click, and then select the appropriate delete option, for example, Delete Cells & Shift Up, Delete Cells & Shift Left, Delete Rows, or Delete Columns.
When you delete rows or columns, other rows or columns automatically shift up or to the left.
Tip: If you change your mind right after you deleted a cell, row, or column, just press Ctrl+Z to restore it.
Insert cells
To insert a single cell:
-
Right-click the cell above which you want to insert a new cell.
-
Select Insert, and then select Cells & Shift Down.
To insert multiple cells:
-
Select the same number of cells above which you want to add the new ones.
-
Right-click the selection, and then select Insert > Cells & Shift Down.
Need more help?
You can always ask an expert in the Excel Tech Community or get support in the Answers community.
See Also
Basic tasks in Excel
Overview of formulas in Excel
Need more help?
Want more options?
Explore subscription benefits, browse training courses, learn how to secure your device, and more.
Communities help you ask and answer questions, give feedback, and hear from experts with rich knowledge.
Creating new tables, reports and pricelists of different types, we cannot predict the number of necessary rows and columns. Using Excel program implies to a great extent creating and setting up spreadsheets, which requires inserting and deleting different elements.
First, let’s consider the methods of inserting sheet rows and columns when creating spreadsheets.
Note that in this tutorial we indicate hot keys for adding or deleting rows and columns. They should be used after highlighting the whole row or column. To highlight the row where the cursor is placed, press the combination of hot keys: SHIFT+SPACEBAR. Hot keys for highlighting a column are CTRL+SPACEBAR.
How to insert a column between other columns?
Assuming you have a pricelist lacking line item numbering:
To insert a column between other columns for filling in pricelist items numbering you can use one of the two ways:
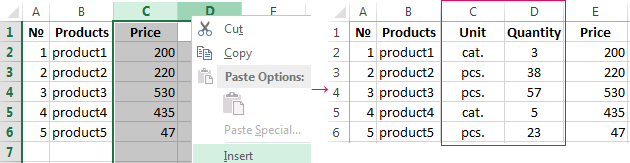
- Move the cursor to activate A1 cell. Then go to tab «HOME», tool section «Cells» and click «Insert», in the popup menu select «Insert Sheet Columns» option.
- Right-click the heading of column A. Select «Insert» option on the shortcut menu.
- Select the column, and press the hotkey combination CTRL+SHIFT+PLUS.
Now you can type the numbers of pricelist line items.
Simultaneous insertion of several columns
The pricelist still lacks two columns: quantity and units (items, kilograms, liters, packs). To add simultaneously, highlight the two-cell range (C1:D1). Then use the same tool on the «Insert»-«Insert Sheet Columns» main tab.

Alternatively, highlight two headings of columns C and D, right-click and select «Insert» option.
Note. Columns are always added to the left side. There appear as many new columns as many old ones have been highlighted. The order of inserted also depends on the order of highlighting. For example, next but one etc.
How to insert a row between rows in Excel?
Now let’s add a heading and a new goods line item «All for the garden» to the pricelist. To this end, let’s insert two new rows simultaneously.
Highlight the nonadjacent range of two cells A1,A4 (note that character “,” is used instead of character “:” – it means that two nonadjacent ranges should be highlighted; to make sure, type A1; A4 in the name field and press Enter). You know from the previous tutorials how to highlight nonadjacent ranges.
Now once again use the tool «HOME»-«Insert»-«Insert Sheet Columns». The picture shows how to insert a blank row between other rows in Excel.
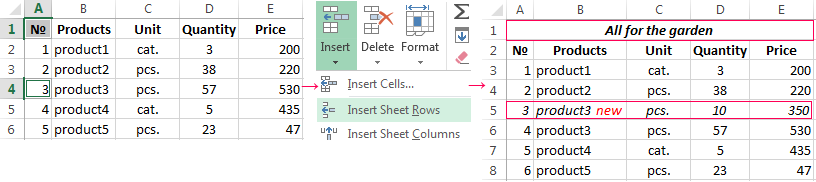
It is easy to guess the second way. You need to highlight headings of rows 1 and 3, right-click on one of the highlighted rows and select «Insert» option.
To add a row or a column in Excel use hot keys CTRL+SHIFT+PLUS having highlighted the appropriate row or column.
Note. New rows are always added above the highlighted rows.
Deleting rows and columns
When working with Excel you need to delete rows and columns as often as to insert them. Therefore, you have to practice.
By way of illustration, let’s delete from our pricelist the numbering of goods line items and the unit column simultaneously.
Highlight the nonadjacent range of cells A1; D1 and select «HOME»-«Delete»-«Delete Sheet Rows». The shortcut menu can also be used for deleting if you highlight headings A1 and D1 instead of cells.
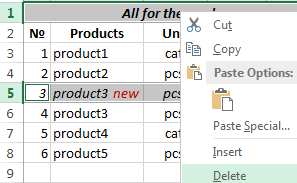
Row deleting is performed in the similar way. You only need to select a tool in the appropriate menu. Applying a shortcut menu is the same. You only have to highlight the rows correspondingly by row numbers.
To delete a row or a column in Excel, use hot keys CTRL+MINUS having preliminary highlighted them.
Note. Inserting new columns and rows is in fact substitution, as the number of rows (1 048 576) and columns (16 384) doesn’t change. The new just replace the old ones. You should consider this fact when filling in the sheet with data by more than 50% — 80%.
Do you need to insert a column into your data? This post is going to show you all the ways you can use to add columns in Microsoft Excel.
A column is a vertical group of cells in your spreadsheet. Columns help you to organize your data and a column will usually contain the same type of data across all the cells in the column.
Inserting columns for new data is a very common task in Excel. Columns can be used to add extra information to your spreadsheet with data entry or calculations.
Inserting columns is easy to do in Excel and there are many ways to get it done. Follow along to find out all the ways to insert a column into your Excel data.
Insert a Column with a Right Click
The easiest and most convenient way to insert a column is using the right-click menu.
All you need to do is select a column and the right-click menu will allow you to insert a column to the left of the selected column.

Follow these steps to insert a column.
- Select a column to the right of the location where you would like your new column. Left click on the column heading or select any cell in the column and press Ctrl + Space to select the entire column.
- Right-click anywhere in the selected column.
- Choose the Insert option from the menu.
This will insert a new column to the left of the selected column!
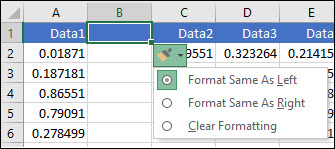
You will notice an Insert Options button appears next to the newly inserted column. You can choose from three very useful options.
- Format Same As Left will apply the same formatting as the column to the left of the new column.
- Format Same As Right will apply the same formatting as the column to the right of the new column.
- Clear Formatting will not apply any formatting to the new column.
This is a great feature if you’re inserting the same type of column, such as a currency column, as you can quickly apply the same format to the new column.
💡 Tip: Arrange similar types of columns together and use the Insert Options to quickly apply the same format to new columns.
You can also insert columns by selecting a single cell. When you right-click on any single cell you will still be able to select the Insert command in the menu.
This will open the Insert menu and you can choose the Entire column option and then press the OK button to insert your new column.
Insert a Column from the Home Tab
Inserting a new column can also be performed from the Excel ribbon. You might try to look for this option in the Insert tab, but you won’t be able to find it there.
The Insert column command is actually found in the Home tab.
Follow these steps to add a column to your data from the Home tab.
- Select the column to the right of the location where you want to add your column.
- Go to the Home tab.
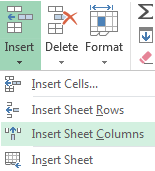
- Click on the Insert command found in the Cells section.
- Choose the Insert Sheet Columns option from the menu.
Insert a Column with a Keyboard Shortcut
If you prefer to avoid using the mouse for performing any actions in Excel, you’re in luck because there is a keyboard shortcut for inserting columns.
Press Ctrl + + on your keyboard and it will insert a column to the left of your select cell or column.
If only the active cell is selected when you use this keyboard combination, it will open the Insert menu and you will need to use the arrow keys to select the Entire column option and press Enter to execute.
You can avoid the Insert menu by pressing Ctrl + Space to select the entire column first, and then employ the Ctrl + + shortcut to insert your column.
Insert a Column with a Click and Drag
My personal favorite and the most fun way to insert a column into your data is to click and drag an empty column to a new location in your data.
Select any empty column and hover the mouse cursor over the green border and it will turn into a black cross with arrows. Hold the Shift key and then left click and drag.
When you drag the empty column over, you will see a green vertical line. This indicated where the column will be placed when you release the left click.
Move the column over to the location where you would like your new column and release the left mouse button. This will add the empty column to its new location!
Click and Drag to Duplicate a Column
This click and drag method can also be used to quickly duplicate a column with a slight modification.
Hold Ctrl + Shift and when you hover the mouse cursor over the border it will change to a small black plus sign.
Left click and drag the column to a new location and when you release a copy of the column will be inserted.
Insert a Column with the Fill Handle
When you select an entire column, you will see the fill handle at the top right of the selection. You can actually use this to insert a column.
When you hover the mouse cursor over the fill handle, you will see a small black plus icon. When you press and hold the Shift key while on the fill handle, the icon will change to two bars with arrows. This indicates you can insert a column.
Hold the Shift key then left click and drag the fill handle to the left. When you release, a new column will be inserted!
💡 Tip: Drag the fill handle across multiple columns to insert more than one column.
You can drag the fill handle to the right to insert a column to the right or drag it left to insert a column to the left. Both directions will work!
This multi-directional ability makes it more versatile than any of the previous methods.
Insert Multiple Adjacent Columns
The process of adding multiple adjacent columns is very simple. The previous methods will all allow you to add multiple columns.
Select multiple adjacent columns by clicking on the first column heading then holding the Shift key and clicking on the last column.
Right-click and select the Insert option and the selected number of columns will be inserted to the left.
Insert Multiple Non-Adjacent Columns
You can also select non-adjacent columns to insert.
Hold the Ctrl key while you select each column then right-click and choose the Insert option.
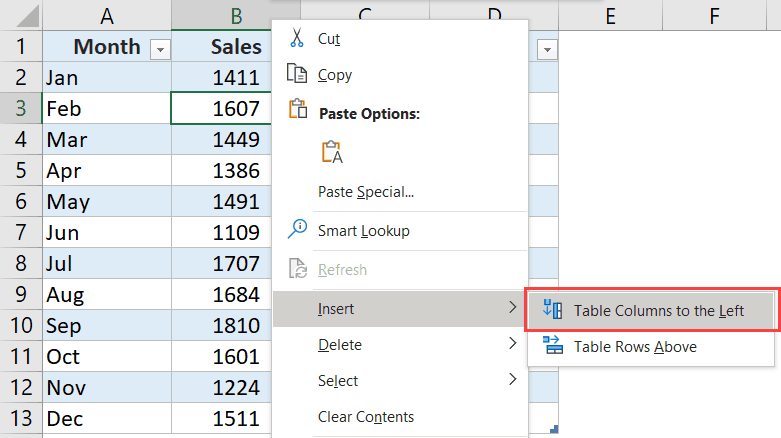
Insert a Column in an Excel Table
Suppose you have your data inside an Excel Table. It is still possible to insert a column in your table.
- Select any cell in the table.
- Right-click on the cell.
- Choose the Insert option.
- Select the Table Columns to the Left options from the submenu.
This will insert a new column to the left of your selected cell.
📝 Note: This will create a new column with a generic column heading name like Column1. You can type over this to rename the column.
Insert a Column at the End of an Excel Table
Since inserting a column inside a table adds the column to the left, you might think you can’t add your column to the right end of the table.
This can be easily done, but not through the right-click menu.
One of the great features of tables is their ability to absorb new rows or columns of data. This means all you need to do is start typing in the empty column to the right of the table and when you press Enter a new column will be created in the table.
Insert a Column with the HSTACK Function
Did you know you can insert a column with a function? Yes, it’s true.
Dynamic array formulas allow you to manipulate ranges and return multiple values.
The HSTACK function can be used to horizontally stack multiple ranges. So you can use it to effectively insert a column.
= HSTACK ( B2:B12, E2:E12, C2:C12)The above formula can be used to insert a column E between columns B and C. The example shows the Salary column is inserted between the ID and Name column.
The formula is entered in cell G2 but the results spill into the range G2:I12.
Insert Every Second Column with VBA
Perhaps you need to insert a new column between every existing column in your dataset.
This could be a tedious task with the previous manual methods if you have a larger dataset and if you need to repeat it across many datasets.
This is where you can use some VBA to automate the task for you.
Go to the Developer tab and select the Visual Basic command or press Alt + F11 to open the VBA editor.
Sub InsertColumns()

Dim Start As Integer
Dim Total As Integer
Dim i As Integer

Start = Selection.Columns(1).Column
Total = Selection.Columns.Count

For i = Start To Start + Total
    Cells(1, Start).Offset(0, Start + Total - i + 1).EntireColumn.Insert
Next i

End Sub
Go to the Insert tab and select the Module option to create a new module. You can then copy and paste the above code into the module.
This code allows you to select a range in the workbook and when you run the VBA code it will insert every second column into the selected range.
This code will start at the last column in the selected range and insert a column to the right then move one column to the left and repeat until it gets to the first column.
Insert Every Second Column with Office Scripts
There is another way you can automate the column insertion.
You can use Office Scripts with Excel online. This is a JavaScript based language available for the web version of Excel when you have a Microsoft 365 business plan.
function main(workbook: ExcelScript.Workbook) {
	let selectedSheet = workbook.getActiveWorksheet();
	let rng = workbook.getSelectedRange();
	let start = rng.getColumnIndex();
	let cols = rng.getColumnCount();

	for (let i = start; i < start + cols; i++) {
		selectedSheet.getCell(1, start).getOffsetRange(0, start + cols - i).getEntireColumn().insert(ExcelScript.InsertShiftDirection.right);
	};
}
You will see an Automate tab and you can create a New Script to add the above code.
This will do the same thing as the VBA code and insert every other column in the selected range.
Select a range and press the Run button to insert your columns!
Insert a Column with Power Query
Suppose you are importing data to Excel from an external source such as a CSV file.
In this scenario, you should be using power query to connect to and import data.
With a power query solution, you will be able to easily insert columns during the import query.
In the power query editor, any action you perform in the Add Column tab will insert a column to your data!
For example, you can select the Name column and Extract the last name based on the Text After Delimiter option with the space character.
= Table.AddColumn(#"Changed Type", "Text After Delimiter", each Text.AfterDelimiter([Name], " "), type text)You will see an M code formula is automatically generated for the query using the Table.AddColumn function.
When you Close & Load the query into the Excel workbook, the new column is automatically added to your data.
Insert a Column with Power Pivot
Suppose you will be analyzing and summarizing your data.
You might want to create a new dimension or metric column to help you gain more insight to your dataset.
This can be done in the Power Pivot data model before loading the source data into your pivot table.
Go to the Power Pivot tab and select the Add to Data Model command to load your selected data and open the Power Pivot editor.
Power Pivot makes it very easy to add a column as the data preview in the editor will always show you an empty column labeled Add Column. As the name suggests, this is where you can add a column.
= LEFT ( HR[Name], FIND( " ", HR[Name] ) -1 )Double click on the heading to rename the column and you can add a formula like the above to populate the column. This example shows a formula that will extract the First name from the Name column.
📝 Note: Power Pivot formulas apply to the entire column!
When you create a pivot table with the data model, this new column will be available to use as a field to slice and dice your data!
Conclusions
Inserting a column is a common task in Excel and there are many ways it can be done.
Usually, you will want simple methods to add columns like the right-click menu, Home tab, or keyboard shortcuts.
There are other interesting but hidden ways like the click and drag or using the fill handle. Once you discover these methods you may prefer them.
All of these simple methods will also allow you to insert multiple columns as well!
You can also use more advanced techniques to automate the process of inserting columns with the HSTACK function, VBA, or Office Scripts.
If you’re importing data or analyzing it and need to add a column in the process then you will want to use the Power Query or Power Pivot method.
How do you insert new columns into Excel? Do you use any of these methods? Let me know in the comments below!
About the Author
John is a Microsoft MVP and qualified actuary with over 15 years of experience. He has worked in a variety of industries, including insurance, ad tech, and most recently Power Platform consulting. He is a keen problem solver and has a passion for using technology to make businesses more efficient.
Adding or removing columns in Excel in a common task when you’re working with data in Excel.
And just like every other thing in Excel, there are multiple ways to insert columns as well. You can insert one or more single columns (to the right/left of a selected one), multiple columns (adjacent or non-adjacent), or a column after every other column in a dataset.
Each of these situations would need a different method to insert a column.
Note: All the methods shown in this tutorial will also work in case you want to insert new rows
Insert New Columns in Excel
In this tutorial, I will cover the following methods/scenarios to insert new columns in Excel:
- Insert one new column (using keyboard shortcut or options in the ribbon)
- Add multiple new columns
- Add non-adjacent columns at one go
- Insert new columns after every other column
- Insert a New Column in an Excel Table
Insert a New Column (Keyboard Shortcut)
Suppose you have a dataset as shown below and you want to add a new column to the left of column B.
Below is the keyboard shortcut to insert a column in Excel:
Control Shift + (hold the Control and Shift keys and press the plus key)
Command + I if you’re using Mac
Below are the steps to use this keyboard shortcut to add a column to the left of the selected column:
- Select a cell in the column to the left of which you want to add a new column
- Use the keyboard shortcut Control Shift +
- In the Insert dialog box that opens, click the Entire Column option (or hit the C key)

- Click OK (or hit the Enter key).

The above steps would instantly add a new column to the left of the selected column.
Another way to add a new column is to first select an entire column and then use the above steps. When you select an entire column, using the Control Shift + shortcut will not show the insert dialog box.
It will just add the new column right away.
Below is the keyboard shortcut to select the entire column (once you select a cell in the column):
Control + Spacebar (hold the Control key and press the space bar key)
Once you have the column selected, you can use Control Shift + to add a new column.
If you’re not a fan of keyboard shortcuts, you can also use the right-click method to insert a new column. Simply right-click on any cell in a column, right-click and then click on Insert. This will open the Insert dialog box where you can select ‘Entire Column’.

This would insert a column to the left of the column where you selected the cell.
Add Multiple New Columns (Adjacent)
In case you need to insert multiple adjacent columns, you can either insert one column and time and just repeat the same process (you can use the F4 key to repeat the last action), or you can insert all these columns at one go.
Suppose you have a dataset as shown below and you want to add two columns to the left of column B.
Below are the steps to do this:
- Select two columns (starting with the one on the left of which you want to insert the columns)
- Right-click anywhere in the selection
- Click on Insert

The above steps would instantly insert two columns to the left of Column B.
In case you want to insert any other number of columns (say 3 or 4 or 5 columns), you select that many to begin with.
Add Multiple New Columns (Non-Adjacent)
The above example is quick and fast when you want to add new adjacent columns (i.e., a block of 3 adjacent columns as shown above).
But what if you want to insert columns but these are non-adjacent.
For example, suppose you have a dataset as shown below, and you want to insert one column before Column B and one before Column D.

While you can choose to do this one by one, there is a better way.
Below are the steps to add multiple non-adjacent columns in Excel:
- Select the columns where you want to insert a new column.
- Right-click anywhere in the selection
- Click on Insert.

The above steps would instantly insert a column to the left of the selected columns.

Insert New Columns After Every Other Column (Using VBA)
Sometimes, you may want to add a new column after every other column in your existing dataset.
While you can do this manually, if you’re working with a large dataset, this can take some time.
The faster way of doing this would be to use a simple VBA code to simply insert a column after every column in your dataset.
Sub InsertColumn()
'Code created by Sumit Bansal from trumpexcel.com

Dim ColCount As Integer
Dim i As Integer

StartCol = Selection.Columns.Count + Selection.Columns(1).Column
EndCol = Selection.Columns(1).Column

For i = StartCol To EndCol Step -1
    Cells(1, i).EntireColumn.Insert
Next i

End Sub
The above code will go through each column in the selection and insert a column to the right of the selected columns.
You can add this code to a regular module and then run this macro from there.
Or, if you have to use this functionality regularly, you can also consider adding it to Personal Macro Workbook and then adding it to the Quick Access Toolbar. This way, you will always have access to this code and can run it with a single click.
Note: The above code also works when you have the data formatted as an Excel table.
Add a Column in an Excel Table
When you convert a dataset into an Excel Table, you lose some of the flexibility that you have with regular data when it comes to inserting columns.
For example, you can not select non-contiguous columns and insert columns next to it at one go. You will have to do this one by one.
Suppose you have an Excel Table as shown below.
To insert a column to the left of column B, select any cell in the column, right-click, go to the Insert option and click on ‘Table Columns to the left’.
This will insert a column to the left of the selected cell.
In case you select a cell in Column B and one in Column D, you will notice that the ‘Table Columns to the left’ option is grayed out. In this case, you will have to insert columns one by one only.
What’s surprising is that this works when you select non-contiguous rows, but not with columns.
So these are some of the methods you can use to insert new columns in Excel. All the methods covered in this tutorial will also work if you want to insert new rows (the VBA code would need some modification though).
Hope you found this tutorial useful!
You may also like the following Excel tutorials:
- How to Sum a Column in Excel
- How to Unhide COLUMNS in Excel
- How to Move Rows and Columns in Excel
- How to Compare Two Columns in Excel (for matches & differences)
- How to Freeze Multiple Columns in Excel?
How to Add a Column in Excel: Full Guide with Shortcuts
Adding columns in our worksheets might just be one of the most basic tasks that we do in Excel.
Adding one column is not a problem. But what if you need to add multiple columns? 😱
That will not be a problem too! Learn different and faster ways to either insert a single column or insert multiple columns at once. This will surely help you insert important data faster, and work smarter in Excel😀
Let’s go!
You can download this free practice workbook we’ve prepared for you to work on.
Add columns with right-click
The easiest way to add a column in Excel is by using the right-click option. You can insert a column within two clicks of your mouse.
You can do this in two ways too! You can right-click the column letter or right-click a cell in a column. We’ll teach you how to do both👇
Right-click the Column letter
You can right-click the column letter to add a column in Excel.
The column letter is a gray-colored row containing the letters (A, B, C, … ) used to identify each column in the worksheets.

Open your practice workbook. Let’s say we want to insert a new column in the sheet intended for the titles of the names in the list.
Let’s insert a column after the Full Name column below.
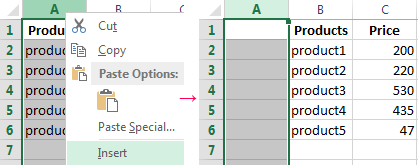
- Right-click column letter B.
- Click Insert.

Viola! You’ve inserted a new column👍

We can add a title to this new column. Let’s type “Title” and fill in the needed data.

(The emails we use in these examples are generated from a fake email generator and do not belong to anyone.)
Pro Tip!
You can also highlight the whole column by selecting a cell and then press “Ctrl” + “Space” on your keyboard. Then follow the steps above to insert a column immediately.
Right-click the cell
You can also right-click the cell in a column to insert a new column.
Say, we want to add a column between columns C and D.
- Right-click on cell C4.
- Then click Insert.

An insert dialog box will pop up. Giving you options on what to insert.
- Click the Entire column option.
- Finally, click OK.

That’s it! You got a whole column you can use to insert needed data in your worksheet😊

Add columns from the ribbon menu
Another way to add columns is by using the Standard Menu option. You can insert columns by clicking the Insert button in the Home Tab of the Excel ribbon.
For example, let’s insert a new column between columns E and F in our workbook. To do that, make sure to click Column F or any of its cells👇
- Select any cell in Column F.

- Go to the Home Tab, and head over to the Cells Group.

In the Cells Group, you will find the Insert, Delete, and Format Cells options.
- Click the dropdown arrow in the Insert button.
- Select the Insert Sheet Columns option.

The column you select is the new location where your column will be inserted. This will move the other columns and their values to the right.

Add columns with shortcuts
You can do all the steps you have done above easier and faster with keyboard shortcuts. All you have to do is to press certain key combinations on your keyboard to perform tasks and functions in Excel. Here’s how.
First, select the column letter. In our workbook, select column letter E.
Then hold down the keys “Ctrl” + “Shift” + “+“.

You get an instant column😀

Insert Column Hot Key
You can also use the Insert Column Hot Key. A hot key is a key combination to perform an action quickly.
The hotkey combination for adding a column is holding down “Alt” + “I” + “C“.
To use it, simply select a cell from a column you like to insert a column before it.

“Alt” + “I” is the hotkey for “Insert”.
“Alt” + “I” + “C” is the hotkey for “Insert columns”.

Insert a column using the right-click or standard menu option. Insert a column like a PRO when you use the keyboard shortcuts, especially the Insert column hot keys😎
This works not only in inserting one column but also inserting multiple columns in Excel!
How to add multiple columns at once
You can forget having to insert a column one by one. Why do that when you can insert multiple columns at once? There are plenty of ways to choose from when you want to insert multiple columns.
We can use the right-click option to insert multiple columns.
Let’s add three new columns to our worksheet. A column for First Name, Middle Initial, and Last Name.
- Highlight Column letters C, D, E.

- Right-click and select Insert.

Three new columns are added in seconds⚡

You can choose to do this using the Standard Menu option as well. Any of the ways will yield the same results.
The number of columns you highlight will be the number of columns that will be inserted into the worksheet.
Insert Column Hot Key
Let’s try to insert multiple new columns using keyboard shortcuts. Specifically, the Insert Column Hotkey.
- Select cells C3 to E5.
- Press Alt + I + C on your keyboard.

Columns are inserted instantly🙌

You can add single or multiple columns using the Keyboard shortcut. Whichever works for you. But this one is our favorite😊
That’s it – Now what?
Nice work! Adding columns might be basic and repetitive when working in Excel but you can always level up by adding multiple columns using shortcuts😀
You can now add a column or columns as needed in your worksheets to insert important data that shouldn’t be missing in your report or records.
While adding rows is easy, Excel has a lot in store for you to make your work easier. Learn about Excel’s built-in functions like the IF and SUMIF function. Don’t miss out on Excel’s most popular function too: the VLOOKUP function🚀
You won’t be missing these when you join my free 30-minute video course.
Other resources
Do you want to know how to insert rows instead? We got you! Click here to learn how to insert rows in Excel.
You can actually transpose data between rows and columns in excel. Read our How to Transpose Data in Excel: Turn Rows into Columns (2022) guide to help you transpose data between rows and columns!
Happy reading (and learning)👋
Kasper Langmann2022-12-14T00:54:10+00:00
Page load link