
Your handwritten signature gives your document a personal touch. You can scan your signature and store it as a picture to insert in the document.
You can also insert a signature line to indicate where a signature should be written.
Create and insert a handwritten signature
You need a scanner to do this.
-
Write your signature on a piece of paper.
-
Scan the page and save it on your computer in a common file format: .bmp, .jpg, or .png.
For information on how to use your scanner, use the manufacturer’s manual or Web site.
-
Open the image file in Word.
-
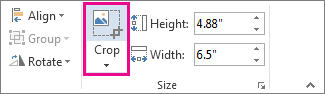
Select the image and on the Picture Format tab, click Crop and use the handles to crop the image.

-
Right-click the image, and choose Save as Picture to save as a separate file.
-
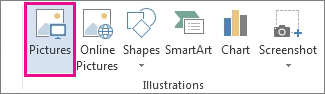
To add the signature to a document, click Insert > Picture s.
Include typewritten text with your reusable signature
If you want information like your job title, phone number, or email address to be part of your signature, save it along with the picture as AutoText.
-
Type the text you want under the inserted picture.
-
Select the picture and the typed text.
-
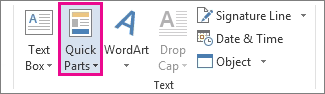
Click Insert > Quick Parts.
-
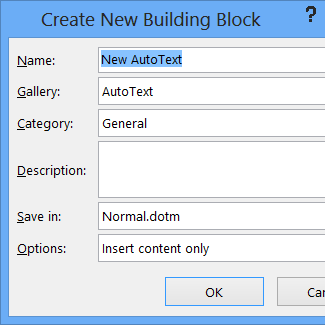
Click Save Selection to Quick Part Gallery. The Create New Building Block box opens.
-
In the Name box, type a name for your signature block.
-
In the Gallery box, select AutoText.
-
Click OK.
-
When you want to use this signature, place the insertion point where you want to insert the signature block.
-
Click Insert > Quick Parts > AutoText, and then click the name of your signature block.
Insert a signature line
Use the Signature Line command to insert a signature line with an X by it to show where to sign a document.
-
Click where you want the line.
-
Click Insert > Signature Line.
-
Click Microsoft Office Signature Line.
-
In the Signature Setup box, you can type a name in the Suggested signerbox. You can also add a title in the Suggested signer’s title box.
-
Click OK. The signature line appears in your document.


Your handwritten signature gives your document a personal touch. You can scan your signature, store it as a picture, and then insert your signature in Word documents.
Scan and insert a picture of your handwritten signature
You need a scanner to do this.
-
Write your signature on a piece of paper.
-
Scan the page and save it on your computer in a common file format: .BMP, .GIF, .JPG, or .PNG.
Tip: For information on how to use your scanner, use the manufacturer’s manual or Web site.
-
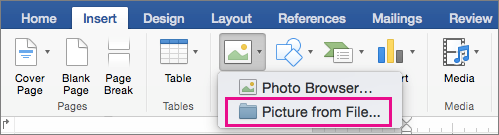
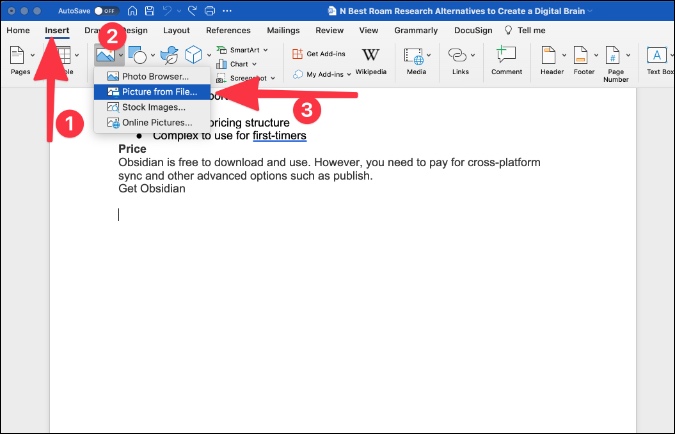
On the Insert tab, click Pictures > Picture from File.
-
Browse to the picture you want to insert, select it, and then click Insert.
-
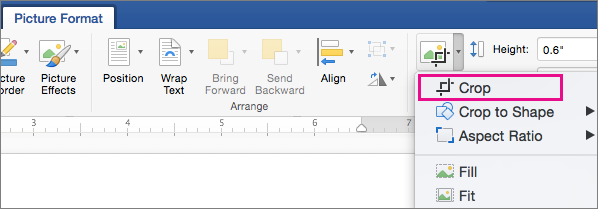
Click the picture to show the Picture Format tab.
-
On the Picture Format tab, click Crop, and then crop the signature.
-
Right-click the picture, and then click Save as Picture to save it as a separate file you can use in other documents.
Include text with your reusable signature
If you want information, such as your job title, phone number, or email address to be part of your signature, save it along with the picture as AutoText.
-
Type the text you want under the inserted picture.
-
Select the picture and the typed text.
-
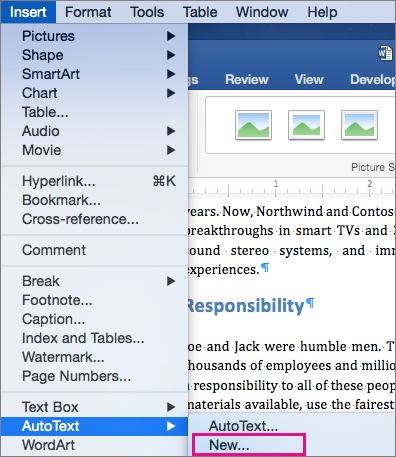
On the Insert menu, click AutoText > New.
-
The Create New AutoText box opens.
Next to Name, type a name for your signature block and click OK.
-
When you want to use this signature, place the insertion point where you want to insert the signature block.
-
On the Insert menu, click AutoText > AutoText, and then click the name of your signature block.

Did you recently receive an NDA (non-disclosure agreement) or the rent agreement in a Word document to sign? You can print it out, sign the document using a pen and then scan it using a printer to send it back. It’s a time-consuming and unproductive way to get things done though. We have a better solution. You can open the document in Microsoft Word on PC or Mac and add a signature digitally. Here’s how to do it.
Add Signature in Microsoft Word
There are three ways to add a signature in Microsoft Word. Let’s discuss all of them.
1. Use the Drawing Tool
Microsoft Word comes with a built-in drawing tool to doodle on a Word document. Using the drawing tool, one can draw a digital signature and add it anywhere in the Word document. Follow the steps below to do so:
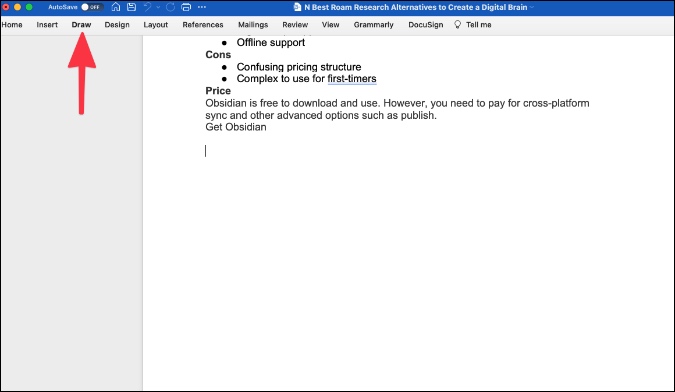
1. Open the document that you want to sign in Microsoft Word.
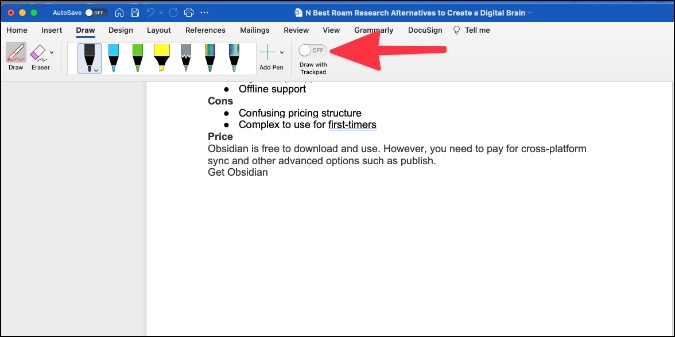
2. Select Draw from the above menu bar.
3. Select the Pen tool that you want to use to sign a document.
4. You can also click on the little down arrow beside the pen and change the thickness of the pointer, color, and even add glittering effects (irrelevant here).

5. For better results, use a thinner pointer and choose Black, Green, or Red color.
Here, we are going to sign a document using the trackpad. Doing the same thing with a mouse won’t get you desired results. Enable the Draw with Trackpad toggle.
6. It will open a little dialog box. Use one finger to add a signature. Use two fingers to change the position. And finally, press any key to exit the preview.

Using the drawing tool won’t deliver a professional outcome that you might look for. For that, you will have to use a built-in add-on to sign a document in Microsoft Word.
2. Use Third-Party Add-ons
Using third-party add-ons like Adobe Sign, DocuSign, and Panda Sign, you can easily sign a document in Word. DocuSign is one of the most popular services out there to sign documents. Let’s learn how to use it in Microsoft Word.
1. Open the document that you want to sign in Microsoft Word.
2. Select Insert > Get Add-ins.
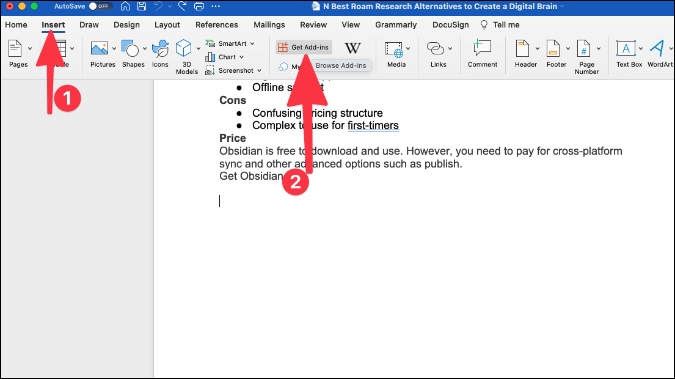
3. It will open the Add-in store inside Microsoft Word. Search for DocuSign and install the add-in in Microsoft Word.

4. Select the Add-in and create a DocuSign account.
5. Whenever you want to sign a document, select DocuSign from the menu bar.
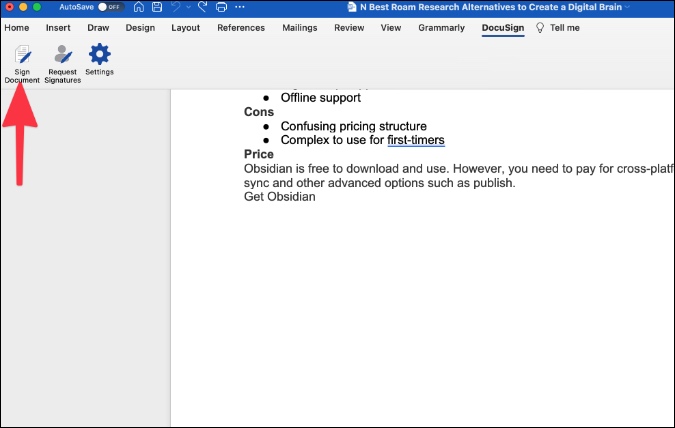
6. Click on Sign Document and DocuSign will upload the document to the cloud and open the default interface to sign a document.
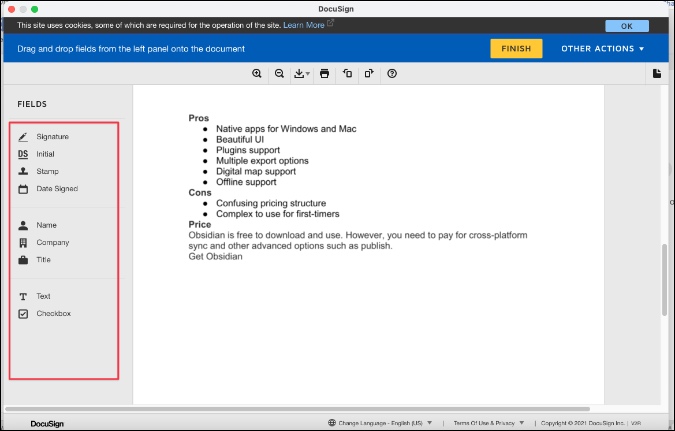
Here, you can sign documents, add initials, stamp, text, check box, and even company details to a document.
Using a third-party add-on allows you to use the same signature across all services. We are saying all services here as DocuSign is available as a mini-app across various apps like Google Docs, Microsoft Word, Zoom, and even Microsoft Teams.
The idea is to sign a document without leaving the current interface.
3. Add Image Signature
If you have saved your signature in a white background as a PNG or JPG file on the PC, it’s time to insert it to the Word document.
1. Open the Word document that you want to sign.
2. Select Insert > Picture > Picture from File.
3. Select the image from the device and insert it in the Word file.
4. Resize the image and place it at a relevant place in the file.
This is just a temporary workaround though. Let’s say the document has some other color background then the image signature with a white background looks unprofessional and out of place. You would need to remove that ugly background for a better outcome.
Wrapping Up: Sign Word Documents on the Go
The methods above will save a lot of time figuring out how to add a signature to Word documents quickly and effortlessly. Our favorite method is the second one using third-party add-ins. You can also opt for the drawing tool if you accurately figure it out using the trackpad to add a signature.
Parth Shah
Parth previously worked at EOTO.tech covering tech news. He is currently freelancing at TechWiser, Android Police, and GuidingTech writing about apps comparisons, tutorials, software tips and tricks, and diving deep into iOS, Android, macOS, and Windows platforms.
Need to add your electronic signature to a contract, offer letter or non disclosure agreement from a Word document? It’s easy to create an electronic signature on a Microsoft Word document without ever leaving the application.
How to sign a Word document
Read on to discover how to add an electronic signature to a Word document in just a few steps with this easy guide.
1. First, install the DocuSign add-in. Go to the Insert tab in the Menu bar and navigate to “Get Add-ins. This will open up the Office Store (or Store on Mac). Type “DocuSign” in the search bar. Click “Add” DocuSign for Word and confirm the installation. This is free.
2. Find DocuSign in your Menu tab. Once the add-in has loaded successfully, you will see a new menu option called “DocuSign.” Click on that and choose “Sign Document.”

3. Log into your DocuSign account or click “Create Account” for a free DocuSign account. Signing up for a free trial will allow you to create a free electronic signature in Word. You can also send forms and contracts to others for signature for 30 days — no credit card required.
4. Add Signature to your document. You can now drag and drop the Signature field to add your electronic signature to the Word document. Simply click “Signature” on the left side of the page, then click the spot in your document where you want to insert your signature. You’re also able to add your Initials, Date Signed, Name and other information if you choose.

5. Click the yellow “Adopt and Sign” button at the bottom of the window. Your signature will appear in the desired place on the document. Then click the “Finish” button at the top of the page.
Your signed document is ready to send and download.
If you need to send the document to another party, enter the recipient’s name and email address in the “Full Name” and “Email Address” fields in the pop-up menu, then click “Send and Close”.
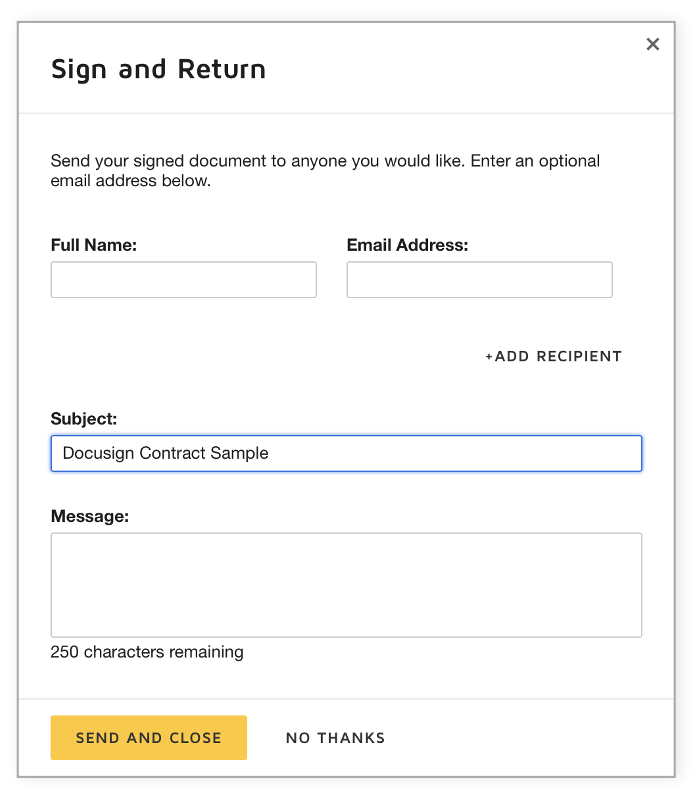
And you’re done. You can then log in to your DocuSign account to see all the documents you’ve signed and sent.
Creating your own electronic signature
When adding an electronic signature to any document, you can choose to simply adopt a DocuSign pre-made signature using your name. If you love your unique autograph, you can also choose to upload or draw your own electronic signature:
1. Log in to your DocuSign account. Click the Profile Image, then click “Signatures.”
2. To change your signature, click “Edit” and select “Draw”.

3. To draw a signature in word, click and hold within the “Draw your signature” box, then draw the desired signature with your cursor or on your touch screen.
4. Click and hold within the “Draw your initials” box to draw the desired initials. Click “Create” to save your signature.
Try eSignature Now for Free
Ready to get started with DocuSign eSignature? Try now for free.
-
Try now
Related:
- How to Electronically Sign Documents in Google Docs
- What is a Wet Signature vs. an Electronic Signature?
- Are Electronic Signatures Legal?
Learn more about DocuSign eSignature and other ways to digitally transform how you do business with the DocuSign Agreement Cloud.
Signing a document makes it easy to prove your identity and authenticity of the document. Here is how to sign a Word document (add signature).
For document creation, there is no other better software as popular or feature-rich as MS Word. Whether you are writing a book, contract letters, official documents, or general notes, MS Word has everything for you and can do it all.
After creating a document, you can further personalize it with a digital signature. In fact, you can even add an image or picture signature in Word. As an added benefit, a signature will prove your identity and the document’s authenticity, just like in real life. It also discourages others from editing the manuscript. Any changes made to the document after signing will invalidate the signature.
As you can guess, Word document signing is very useful in several cases where you don’t want others changing the document content in any way.
Let me show you how to sign a Word document in simple steps.
There are two significant steps to sign a Word document. First, we need to create or insert a signature line in the document. Second, you or the target user can add a signature on the signature line in the document. Though it sounds complicated, it is pretty easy to do. Here is how.
First, open the Word document you want to sign. Ensure the document is fully ready and requires no more editing or changes. Once you sign the document, you cannot edit it without invalidating the signature.
In the document, place the cursor where you want to insert the signature. In my case, I want to add it to the bottom left of the page.
Next, go to the “Insert” tab.

Click on the “Signature Line” dropdown menu and select the “Microsoft Office Signature Line” option.

The above action will open the Signature Setup window. Here, fill in the following fields.
- Suggested signer: Who should sign the document.
- Suggested signer’s title: What is the title of the person signing the document.
- Signer’s email address: Signer’s email address.
- Instructions for the signer: Any special instructions you need to tell the person signing the document.
Select the “Show sign date in signature line” checkbox. If you want to allow the signer to add their own comments to the signature, select the “Allow the signer to add comments in the Sign dialog” checkbox.
After filling the fields, click the “Ok” button to save changes in the Signature Setup window.

As soon as you click the Ok button, the signature line is added to the document. You can sign the document yourself or send it to the user who needs to sign it.

Double-click on the signature line or right-click on it and select the “Sign” option to sign the document.
In the Sign window, type your signature in the big box. If you have your signature in image format, click on the “Select image” button, select the image, and add it.

If you want to add additional information, like full name, address, etc., to your signature, then click on the “Details” button and add those details.

Finally, click on the “Sign” button.

As soon as you click the button, the document will be signed with the signature and details you provided.


The signed document is considered final from this point forward, and no edits or changes are allowed. You will even see a yellow warning bar telling you the same.

Edit signed Word document
Of course, one can still edit the document, but it will invalidate the signature and removes it. If you click on the “Edit Anyway” button, you will see the “Editing will remove signatures in this document. Do you want to continue?” message. Clicking “Yes” will remove the signature and allows you to edit the document.

That is all. It is that simple to add or insert a signature in the Word document.
I hope that helps.
If you like this article, check out how to convert PDF to editable Word document.
![]()
To insert a signature line into a Word document, click Insert > Signature, and fill out the «Signature Setup» box. You can also insert a digital signature, or use Insert > Pictures to insert signature from an image.
Adding your signature to a Microsoft Word document is the ultimate way to personalize it as your own, especially for documents like letters or contracts. If you want to add a signature to a Word document, here’s how.
There are several ways to add your signature to a Word document. You can add a signature line for a post-print signature, add a digital signature, or insert your own handwritten signature as a picture.
RELATED: How to Electronically Sign PDF Documents Without Printing and Scanning Them
How to Add a Signature Line in Word
A signature line provides you, or somebody else, with a location to sign a printed document. If you’re planning on printing your Word document, adding a signature line is probably the easiest way for you to add a signature.
To add a signature line to your Word document, click Insert > Signature Line. This icon is usually included in the “Text” section of your Word ribbon menu bar.

In the “Signature Setup” box that appears, fill out your signature details. You can include the name, title, and email address of the signer. This can be you or somebody else.
You can also provide instructions for the signer. Once you’re ready, click “OK” to insert your signature line.
Once you’ve confirmed your signature options, a signature line is inserted with a cross and a line to signify where to sign.
You can now place this into an appropriate position within your Word document. The document can then be signed at this position after printing or, if you’ve saved your Word document into the DOCX file format, you can insert a digital signature into your document at this point.
RELATED: What Is a .DOCX File, and How Is It Different from a .DOC File in Microsoft Word?
To add a digital signature to your Word document, you’ll need to have followed the above instructions and inserted a signature line first.
You’ll also need to install a security certificate for your signature. If you don’t have one, Word will ask you if you’d like to acquire one from a “Microsoft Partner” like GlobalSign.
As an alternative, you can create your own digital certificate using the “Selfcert” tool, included in your Microsoft Office installation folder.
Find “Selfcert.exe” in your Office installation folder and double-click it to open it.
In the Selfcert tool, type a name for your security certificate in the “Your Certificate Name” box and then click “OK” to create it.
Once you have a digital certificate installed, return to your Word document and double-click on your signature line.
In the “Sign” box that appears, type your name or click “Select Image” to insert a picture of your handwritten signature.
Click “Sign” to insert your digital signature into the Word document.
Once signed, Word will confirm that the signature has been added.
If you edit the document after signing it, the digital signature will become invalid, and you’ll need to sign it again.
How to Add a Picture Signature in Word
If you’d prefer to use your handwritten signature, you can take a picture or scan a copy of it and then upload it to your computer. You can then insert a picture of your signature into the Word document.
RELATED: How to Insert a Picture or Other Object in Microsoft Office
Click Insert > Pictures to insert the image into your document manually. Alternatively, double-click on your signature line and choose “Select Image” to insert it on your signature line.
In the “Insert Pictures” menu box, click “From a File” and select your signature image file. From there, click “Sign” to place the image onto your signature line.
Once inserted, the image file containing your signature will be inserted above your signature line.
READ NEXT
- › How to Insert a Handwritten Signature in Google Docs
- › How to Insert a Line in Microsoft Word
- › How to Insert and Customize a Signature Line in Microsoft Excel
- › 7 Awesome Microsoft Word Features You Should Be Using
- › Universal Audio Volt 2 Review: A Workhorse Audio Interface With Vintage Charm
- › Get to Your Windows 11 Desktop: 7 Fastest Methods
- › The Best DNS Servers for Secure Browsing
- › Google+ Will Come to a Final End on July 5, 2023