
![]()
Download Article
Step-by-step guide to making your own business cards in Word
![]()
Download Article
- Using a Template
- Creating from Scratch
- Video
- Expert Q&A
|
|
|
If you need to make business cards in a hurry and you don’t have fancy design software, Microsoft Word has the tools you need to make and print business cards. You can use templates to make the process easy but still maintain an individual feel, or you can create the cards completely from scratch. If you are creating cards from scratch, you can use the Table tool to help keep your cards at the proper size. This wikiHow guide will show you how to make business cards in Microsoft Word.
Things You Should Know
- Use a template by going to File > New and searching for «business cards.»
- Create your own card from scratch by going to File > New > Blank document.
- Use a table to organize copies of your business card on a single page.
-
1
Click the File tab and select New. You’ll be creating a new document from a business card template. If you just opened Microsoft Word, you can click New in the left menu.
Tip: Using a template will allow you to quickly make a lot of professional-looking cards at once.
-
2
Search for business card templates. Use the search field in the new document creation window to search for «business card». This will bring up a variety of free templates that you can use for business cards. There are templates for horizontal and vertical cards.
Advertisement
-

3
Click a template that you want to use. You’ll be able to change any element of the template you’d like, including colors, images, font, and layout. Pick the template that most closely matches the vision of your business card in your head.[1]
- Clicking a template will open a window with more information about the template.
-
4
Click the Create button to open the template in Word. This is under the description of the template. This will create a new file with the document template for you to use.
-
5
Fill out the information fields in the first card. If you’re using Office 2010 or newer (and the template was designed for 2010 or newer), you’ll see your text appear in all of the business cards on the page. You’ll only have to fill out information for one card this way. If the template is not designed to automatically fill out successive cards, you’ll need to enter the data for each one manually.
-
6
Change the format of any elements. You can select any of the text on the business card and change the format. You can switch fonts, change colors and size, and more, just like you would regular text.
- Since this is a business card, make sure that the font you choose is easy to read.
-
7
Replace the logo (if necessary). If the business card template has a placeholder logo, you can click it to replace it with your own. Make sure that you resize your logo so that it fits, and that it doesn’t look bad when the size has been changed.
-
8
Proofread the cards. Make absolutely sure that your business cards do not have any typos or other mistakes. Your business card is one of the first impressions people will have of you, so you don’t want to start off on the wrong foot.
- You can have a family member or friend review your cards before printing to make sure they’re free of errors.
-
9
Print the cards on stock, or send the file to a printer. If you’re going to be printing the cards at home, you’ll need high quality stock paper. Stick to white or off-white, and pick your finish. Most business cards don’t have a finish, but some people prefer a glossier card. Many print shops will be able to open your saved business card template and print them for you as well.
- When purchasing paper, make sure that your printer at home can handle it. Check your printer’s documentation or support site for details on the type of paper that it supports.
-
10
Use a precision cutting tool to finish the cards. Once the cards are printed, you’ll need to cut the sheet up. Each sheet will typically have ten cards on it. Don’t use scissors or other methods of cutting that rely on you keeping a straight line. Instead, use a paper guillotine or precision paper cutter. Many print shops have these tools available for customers, or can do the cutting for you.
- Note that the standard business card size varies by country. Here are a few other standards:
- The standard business card size is also 3.5 inches (8.9 cm) x 2 inches (5.1 cm) in Canada.
- In the United Kingdom, the standard size is 8.5 centimetres (3.3 in) x 5.5 centimetres (2.2 in).
- For Australia, the standard size is 9.1 centimetres (3.6 in) x 5.5 centimetres (2.2 in).
Tip: The standard US business card size is 3.5 inches (8.9 cm) x 2 inches (5.1 cm) (or 2 inches (5.1 cm) x 3.5 inches (8.9 cm) for vertical cards).
- Note that the standard business card size varies by country. Here are a few other standards:


Advertisement
-
1
Click New to create a new blank document. If you’d prefer to create your business card yourself, you can use the Table tool to make it easier.
- You can also use photo editing software like Photoshop to make a custom business card.
-
2
Click the Layout tab and click Margins. Select «Narrow» to make the margins a little smaller than the default setting. This will allow you to fit the business cards on the page.
-
3
Click the Insert tab and then click Table. A grid will appear beneath the Table button.
-
4
Create a 2 x 5 table. Use the grid to insert a table that is two cells wide and five cells high.
-
5
Right-click on the table’s selection crosshair and select «Table Properties». This will open the Table Properties window. The selection crosshair appear in the upper-left corner of the table when you hover over it.
-
6
Set the alignment of the table to Center. This will make it easier to make the cards even. This setting is in the Table tab of the «Table Properties» window.
-
7
Click the «Row» tab and check the «Specify height» box. Enter 2" and change the drop-down menu to «Exactly».
- Note that the standard business card size varies by country. The standard US business card size is 3.5 inches (8.9 cm) x 2 inches (5.1 cm). Here are a few other standards:
- The standard business card size is also 3.5 inches (8.9 cm) x 2 inches (5.1 cm) in Canada.
- In the United Kingdom, the standard size is 8.5 centimetres (3.3 in) x 5.5 centimetres (2.2 in).
- For Australia, the standard size is 9.1 centimetres (3.6 in) x 5.5 centimetres (2.2 in).
- Note that the standard business card size varies by country. The standard US business card size is 3.5 inches (8.9 cm) x 2 inches (5.1 cm). Here are a few other standards:
-
8
Click the «Column» tab and check the «Specify width» box. Enter 3.5" and change the drop-down menu to your preferred measurement such as «Inches».
-
9
Examine your table. You should now have a table on your page that is separated into ten identical business card-sized cells. If the table doesn’t fit, you may have to extend your bottom margin by a tenth of an inch.
-
10
Right-click the crosshair again and select AutoFit. Choose «Fixed column width». This will prevent the table from changing shape as you add information to the first cell.
- For double-sided business cards, copy and paste the table onto a second page in the Word document. The second page will be the back of the business card.
-
11
Add your information to the first cell. You can use all of your regular Word formatting tools while typing in the cell. You can insert text boxes and images, change fonts, add color, or perform any other formatting that you’d like.
- Adding pictures to your business card can give it a personal touch and build your brand. You can crop and rotate the images as needed.
- Check out our guide to formatting in Word for more tips!
- If you’re creating a double-sided card, add your additional information to the first cell in the second page table.
-
12
Proofread the card. Before copying the information into each of the other cells, take the time to review it now for any errors or typos. If you proofread later, you’ll have to change each cell instead of just changing the first before copying it.
- You can have a family member or friend review your cards before printing to make sure they’re free of errors.
-
13
Select the entire first cell when you’re satisfied. To do so:
- Move your cursor to the bottom-left corner of the cell until it turns into a diagonal arrow.
- Click and the cell’s contents will be selected.
- Press Ctrl+C (Windows) or ⌘ Cmd+C (Mac) to copy the contents of the cell to the clipboard.
-
14
Click in the next cell and paste the copied information. You can click «Paste» in the Home tab, or you can press Ctrl+V (Windows) or ⌘ Cmd+V (Mac). Your copied information will appear in the cell in the right locations. Repeat this for each of the cells on the page.
- Make sure that your business card organization is minimalistic. You can’t realistically fit everything about your company into a single card—instead, focus on the most important info like your company logo, name, email address, physical address, website, and role in the company.[2]
- Make sure that your business card organization is minimalistic. You can’t realistically fit everything about your company into a single card—instead, focus on the most important info like your company logo, name, email address, physical address, website, and role in the company.[2]
-
15
Right-click the crosshair again and select «Table Properties». Click the «Borders and Shading» button and select «None» for the border. This will ensure that parts of the cell borders don’t appear when the cards are cut.
- Make sure to save your Word document in case you want to edit it later!
-
16
Find good paper for the cards. You’ll want a nice card stock paper to print your new business cards on. Make sure that your printer supports the type of paper that you get. You can also send your completed file off to a printer to have the cards professionally printed.
- To print double-sided cards, make sure to select Print on both sides in the print menu. This will print the second page (the back of the business card) on the back side of the paper.
- Print one test sheet first to make sure everything looks good and that the back side is aligned properly with the front.
-
17
Use a precision cutting tool. Avoid using scissors or other cutting tools that require you to maintain a straight line. Use professional paper cutting tools to make sure your cuts are even and properly measured.


Advertisement
Add New Question
-
Question
How do I print different business cards on the same page?

Kyle Smith is a wikiHow Technology Writer, learning and sharing information about the latest technology. He has presented his research at multiple engineering conferences and is the writer and editor of hundreds of online electronics repair guides. Kyle received a BS in Industrial Engineering from Cal Poly, San Luis Obispo.
wikiHow Technology Writer
Expert Answer
If you’re using a template, you’ll need to choose a template that doesn’t automatically update the rest of the cards. If you’re creating a card from scratch using a table, you can make each cell a different card.
-
Question
How do I put an online photo on my business cards in Microsoft Word?
Kyle Smith is a wikiHow Technology Writer, learning and sharing information about the latest technology. He has presented his research at multiple engineering conferences and is the writer and editor of hundreds of online electronics repair guides. Kyle received a BS in Industrial Engineering from Cal Poly, San Luis Obispo.
wikiHow Technology Writer
Expert Answer
You’ll need to copy or download the online photo. Then, in Microsoft Word, go to Insert > Picture to add a photo to the business card.
-
Question
make one card on a sheet
Kyle Smith is a wikiHow Technology Writer, learning and sharing information about the latest technology. He has presented his research at multiple engineering conferences and is the writer and editor of hundreds of online electronics repair guides. Kyle received a BS in Industrial Engineering from Cal Poly, San Luis Obispo.
wikiHow Technology Writer
Expert Answer
You can make a single card by following the table method above and only filling in one cell. Make sure the table is formatted with the standard business card measurement.

See more answers
Ask a Question
200 characters left
Include your email address to get a message when this question is answered.
Submit
Advertisement
Sample Business Cards
Video
About This Article
Article SummaryX
1. Click the File menu and select New.
2. Search for business card templates.
3. Select a template.
4. Fill out the fields in the first card.
5. Edit format, fonts, and colors.
6. Replace the logo (optional).
7. Proofread the cards.
8. Print the cards to cardstock.
9. Cut the cards.
Did this summary help you?
Thanks to all authors for creating a page that has been read 827,656 times.
Is this article up to date?
Thinking of doing without business cards? Think again.
Even in today’s high tech world, business cards are a great
way to stay connected. You may be
tempted to do without business cards. After all, social media tools are how most people stay connected these
days, right? Business cards seem outmoded. Plus, you don’t want to go to the
expense of hiring a designer or going to a print shop to create a business card
for your small business.
But, it’s often quicker to exchange business cards than to
type contact information into your mobile phone. Having a business card handy
to pass out when needed makes good business sense.
Consider this. You are at a trade show and you just made a
great contact. You want to speak with them further, but suddenly they look at
their watch and mention that they have an appointment. “Can I have your card?”
the contact asks.
Fortunately, you decided to use business cards. You reach
into your pocket and hand them your business card. And they hand you theirs. They’re gone for now, but you’ll call them next week if you don’t hear from
them sooner. This is how business card etiquette works.
While you need business cards, you don’t necessarily need a designer or a print shop to create
professional business cards. Instead, you can do it yourself. In this tutorial, I’ll show you how to create your
own inexpensive business cards using Microsoft Word.
How to Make Business Cards in Word: Begin With Planning and Preparation
You can readily create an inexpensive, yet professional business card
using MS Word. It does, however, take some upfront planning first to make sure your design is on target with your brand goals. You should also have the assets you need to work with in-hand before getting started. Here’s what to prepare before jumping into Word:
1. Choose Your Fonts and Colors
How your business card looks is important. Your business
card should make a professional impression. Choose the right fonts and colors that match your card design to your brand identity.
Generally speaking, select colors and fonts that are
appropriate for your field. Fluorescent pink and orange might draw attention to
your business card, but for some industries those colors could seem
unprofessional. Likewise, a playful font is probably an inappropriate choice
for a conservative business.
Also, your business card is part of your marketing strategy.
It should match or complement your website, stationery, and other marketing
materials. Your target market should be able to recognize that your marketing
materials come from the same company.
You could also choose various sizes for your business cards,
but if you’re new to creating business cards it’s best to go with the standard
business card size of 3.5 inches by 2 inches. Learn more about various business card sizes you could use:
If you’re not a professional designer, it’s a good idea to
use a business card template to make sure that your business card has a
balanced, professional look. Word has some templates available online that you
can use, which we cover deeper in this tutorial.
Now that you’ve determined how your business card is going
to look, you are ready to gather your business information to put on your business card.
2. Decide What Information to Include
Business cards are small and there’s limited space to
include information. Yet, you want your contacts to be able to reach you.
You may be tempted to cram as much information onto your
business card as possible. Don’t do it. A cluttered card looks
sloppy and unprofessional. Instead, focus on including these essential bits of
information:
- Company name
- Company logo
- Name and title (if there is one)
- Contact information
- Website
- Social media links (only if you have a strong
social presence)
For a more thorough discussion of what to include on your
business card, read:
Make sure you have that information prepared and assets like your logo readily available. Now, you are ready to make your own business cards with MS
Word.
3. Create Your Business Card in Microsoft Word
There are basically two methods of using MS Word to create a
business card:
- By using a Word template
- By using a table in Word
I’ll go over both methods in detail in the next sections.
Note: This tutorial is based
on the version of Word found in Microsoft Office 365. The process for earlier
versions of Word might be slightly different.
How to Use a Word
Business Card Template
Use the following steps to make your own business card design using a template in
Word:
Step 1 — Search for a Business Card Template
Open a new document in Word. Now select the New option on the left of the screen to display common templates.
To choose one of the online templates, type the words “Business Card” into the Search bar and press the Enter key.
.jpg)
.jpg)
.jpg)
Step 2 — Browse Through Available Templates
Use
the scroll bar on the center right of the screen to browse through the various
business card templates available online.
.jpg)
.jpg)
.jpg)
Step 3 — Create Your Card From a Template
When you see a business card template you like, click on it
to enlarge your view of the template. Click the Create icon to download the template into your document.
.jpg)
.jpg)
.jpg)
For
this example, I’ve downloaded a template from Microsoft titled “Flower personal
business cards.” Even though the pink color and flower image don’t fit with the
business, I know that I can easily change them to match the professional brand
of my sample company.
If your copy of Word is registered, your name should already appear on the template.
.jpg)
.jpg)
.jpg)
Step 4 — Insert Your Logo
Next, let’s change the image to reflect our business logo.
Click the flower image in the template to select it. From the menu at the top of the screen select
the Insert option and then click on
the Pictures icon. Find the folder
where you store your corporate logo and select it.
.jpg)
.jpg)
.jpg)
Note: We used the Coloright logo template, from Elite Author Opaq, for this logo design. Discover more inspiring logo templates from Envato Market.
Click the logo you want to add to the business card to
replace the original image. Click Insert.
Since the template contains multiple cards, continue the process until all the
original images are replaced.
.jpg)
.jpg)
.jpg)
Note: Anytown
Consulting and Juan Perez are fictitious entities created for the purpose of
this tutorial. They are not intended to represent any real persons or
organizations.
Step 5 — Customize the Text
The next step is to change the color of the name text. To do
this highlight the entire name and select the font color icon from the toolbar
menu to display the font color palette.
.jpg)
.jpg)
.jpg)
For this example, I’m going to select a dark blue to go with
the blue in the logo. Click on a color in the color palette to replace the color
of the selected font.
.jpg)
.jpg)
.jpg)
Before we go any further, replace the template information
with your business information. To do this, highlight the template text to be
changed and type your information over it. You only need to do this on one card
and the information will be replaced on all the cards in the template.
Let’s pretend that our example company doesn’t have much of
a social media presence. For that reason, I delete the Twitter information from the template. If
you have an active professional social media presence, type your social media
information here instead.
Step 6 — Change Your Font
Our card looks pretty good now, but let’s make one final
change. The font used in our logo is a sans serif and the template font has
serifs. Let’s change the font on the business card to a san serif font for a
better match.
To
change the font type, highlight the text you want to change. Go to the font
selection option in the toolbar and click the arrow to display the available
fonts.
.jpg)
.jpg)
.jpg)
When
you find the font you want to use, click on it to replace the font in the
selected text.
.jpg)
.jpg)
.jpg)
You’re now ready to print your business cards, but first
let’s look at how you can use a table to create your own business cards.
How to Use a Word
Table to Create a Business Card
You can also use a table to create your own business cards
in Word. Here’s how:
Step 1 — Setup Your Document
Open a new document in Word. Once you are in a
blank document, click the Layout
menu option. Click the Margins
option in the toolbar. Use the Custom
Margins option on the menu to change the top and bottom margin to .25”.
.jpg)
.jpg)
.jpg)
Step 2 — Insert a Table
Click the Insert
option on the menu and click on the Table
icon. When you click on the Table icon, a grid appears to allow you
to define the number of rows and columns in your document. Highlight five rows
and two columns.
.jpg)
.jpg)
.jpg)
Click the Insert
Table option on the drop-down menu to add the table to your document.
Select the entire table by highlighting all the cells. Right-click on the table to bring up a new
drop-down menu.
.jpg)
.jpg)
.jpg)
Step 3 — Adjust Your Table Properties
Click the Table
Properties option on the submenu. The Table
Properties dialog box displays.
.jpg)
.jpg)
.jpg)
Click on the Center
icon. While the entire table is highlighted, also click on the Center Text icon in the drop-down menu
that appears when you right-click on the table. This centers any text or
graphics you add to the cell.
Next, click the Cell
tab at the top of the Table Properties dialog box. Now it is time to define the size of our
business cards. Place a check in the box next to the Preferred width option. Type 3.5” in the field next to Preferred width and click OK at the bottom of the dialog box.
Click the Row tab
at the top of the Table Properties
dialog box. Place a check in the box next to the Specify height option. Type 2” in the field next to Specify height and click OK at the bottom of the dialog box.
Your document should now look like this:
.jpg)
.jpg)
.jpg)
There are a total of ten business card size cells in your
table.
Step 4 — Insert Your Logo
You are ready to start adding information to your business
cards. Start with the cursor in the top cell. Click the Insert Option on the menu at the top of the screen, then click on the Pictures icon.
Find the folder where you stored your corporate
logo and select it.
Note: We used the Coloright logo template, from Elite Author Opaq, for this logo design. Find more great logo design templates from Envato Market.
Click
the logo you want to add to the business card and click Insert. Continue the process until all the business cards have a
logo image.
.jpg)
.jpg)
.jpg)
Step 5 — Customize Your Text
Now it’s time to add text to your business cards. First,
find and select the font you want to use. To change the font type, highlight
the text you want to change. Go to the font selection option in the toolbar and
click the arrow to display the available fonts.
You can also change the color of a font. Click on the color in the color palette to
replace the color of the selected font. To do this highlight the text you want
to change and select the font color icon from the toolbar menu to display the
font color palette.
Next, click beneath a logo image and type in your
information. Your finished business cards will look like this:
.jpg)
.jpg)
.jpg)
Your business cards are ready to print. You could also turn
the table borders off, but I prefer to use them as a guideline for cutting the
business cards apart.
How to Print Your Business Cards at Home
You’ve now learned how to create business cards using two
separate methods. But before you can use your business cards, you’ll need to
print them. You’ll need the following:
- High quality card stock
- A printer that can print card stock
- A paper cutter
You can find card stock in your local office supply store.
Some card stock is especially designed for business card use and comes with extra
software templates you can use to design your business card. The card stock may
even be perforated to make it easy to pull the cards apart after printing.
A laser printer provides the best quality print for your
business cards. Make sure that it has the capability to print card stock. If
your card design has color, you need a color laser printer.
To print your business cards, load your card
stock into the printer. Open your business card document. Click the File option from the menu at the top of
the screen. Click Print from the
menu on the left of the screen.


Check to make sure that your printer model displays under
the Printer option. If necessary,
change the printer settings. If desired, increase the number of copies to be
printed. (Remember that each card stock sheet prints ten business cards.)
When you are ready, click the Print icon on the upper left of the screen. Your business cards
print and are ready to be cut apart.
When cutting your business cards apart, be careful. It’s
important to cut straight lines. You may need to use a professional
cutting tool like a paper cutter.
How to Make Your Business Cards With InDesign or Photoshop
As your business gets larger, your business card needs
become more sophisticated.
When your small business is ready to move beyond the simple
business cards you can create with Word, consider using InDesign or Photoshop
to make your own business cards. With these professional design tools, you can
create a more unique or sophisticated business card design.
To learn more advanced techniques for creating business
cards, review the following tutorials:
If you do know how to use InDesign or Photoshop, or have
someone on your staff who can work with this software, consider using a professional business
card template from Envato Market. Or, browse through these curated collections of inspiring, professional templates:
Conclusion
Business cards are not outdated to use. Rather, they are still an
invaluable marketing tool. Business cards don’t have to be expensive either. In
this tutorial, you’ve learned how to make inexpensive, simple business cards in Microsoft Word.
A professional business card is a marketing tool that
represents your company. Make sure that your business card colors and fonts
coordinate with your other marketing materials. Don’t forget to include a way to contact you on your business cards.
When your small business is ready to move up to a more sophisticated business card design, InDesign or Photoshop can help you achieve more
impressive results. You’ll find plenty of professional business card templates
at Envato Market.
Don’t overlook the importance of business cards for your small business marketing.
Making business cards like these while you’re online is quick and easy.
Choose our business card template, and open it in Word for the web.
Tip: If you’re already in Word for the web, get to the business card template by going to File > New, and then below the template images click More on Office.com.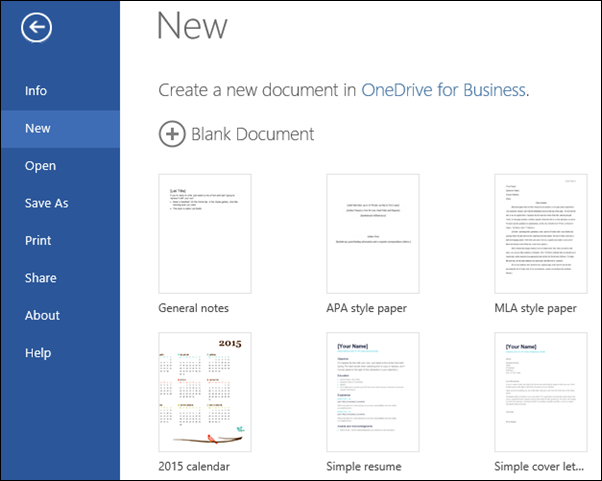
You’ll be on the Templates for Word page. In the list of categories, click Business.
When you’re working on the business cards, you’ll probably want to rename the file and swap out the placeholder pictures with pictures that work for you. Delete the pictures you don’t want, and then insert pictures from your computer or from the web.
To print the business cards, press Ctrl+P, and wait for the Print dialog. This template makes 10 cards.
Note: If you don’t see a Print dialog box, click the link for opening a PDF version of your business cards. From there, use the PDF program’s Print command.
Need more help?
Havent signed up yet?
Give us a try.
Create a free account to get started and start designing now.
Start designing
Free business card templates
Get started fast! Marq offers a selection of business card templates to jumpstart your design. Customize the template by hand or upload your branding to access a collection of Smart Templates automatically customized to fit your brand.
Design a business card
-
Quick and easy
Our intuitive, drag-and-drop editor makes creating on-brand content quick and easy.
More features
-
Grow your brand
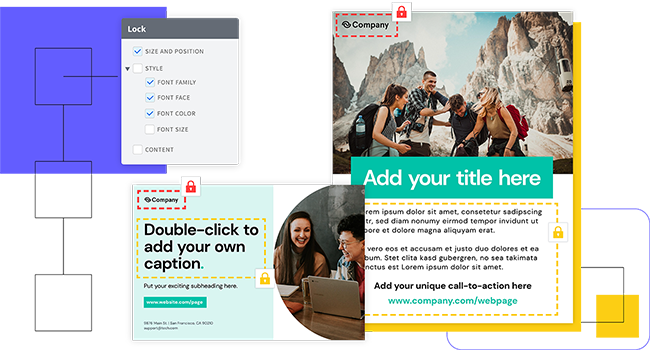
Advanced template locking empowers team members to customize co-owned templates — without going off-brand, in turn helping ensure content remains consistent.
More features
-
Empower your team
Share templates and brand assets with multiple team members and assign team roles to control who has access to what.
More features
How to create a business card in word
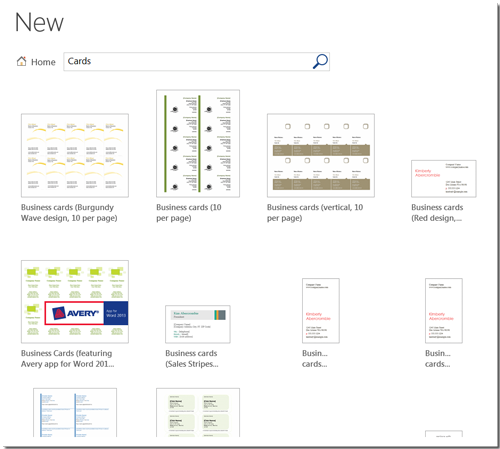
Step 1: Pick a template
First, open Microsoft Word. Choose File > New. From here, you can search for Microsoft Word templates. While making your selection, remember: when using Word 2013, make sure the template you select is compatible with the current version. If it has deprecated elements, it may harm your computer or not display correctly.
While you can add shapes directly to a page in Word, you may want to contain them within a Drawing Canvas instead. A canvas acts as a container for your flowchart, so instead of moving each element individually, you can position a chart with a single click. Canvases can also be styled to add polish to your flowchart. To insert a canvas, click the Insert tab and select Shapes. Scroll to the bottom of the panel and click the menu item labeled “New Drawing Canvas.”
Step 2: Add your information
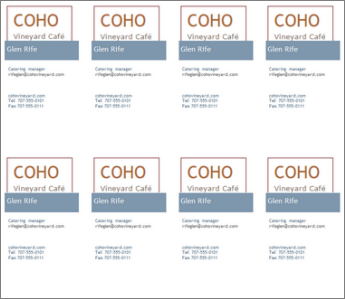
The template we’ve selected is fairly straightforward: it includes colorful blocks, the company name, and contact information, which are the basics you need for a business card.
Now we fill in the personal information. Don’t forget to proofread every detail on the card. It’s a good idea to have a friend or colleague take a look at your business card template to catch any typos you may have missed. Here’s what the card looks like with default fonts and colors.

Step 3: Customize Your Card
If you want your business card to be more personalized than the template, it doesn’t take much to adjust the fonts, colors, and shapes to reflect your style. We’ve changed the company name to a serif font, and the contact information to a sans serif one.
Try adding a shadow to the shapes. Right click on your shape, then select Format Shape. This will bring up a formatting panel on the right side of your canvas. You can also click on the Format tab to expand options for your shape. Here, we’ve done a drop shadow on all three shapes. This is what the card looks like now:
The default colors use warm shades—vermillion, green, and beige. You may decide that cool colors would better project your desired image. To use preset color themes, select the Design tab.
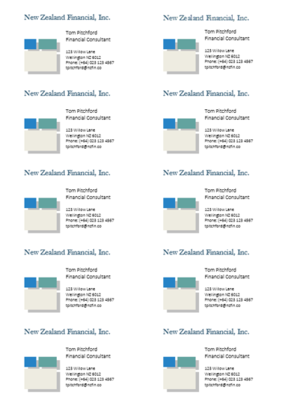
Step 4: Make a sheet of business cards
Depending on how up-to-date your template is, it might auto-populate to update every card to match. If you’re using an older template, simply copy and paste the information from one card into every other slot. Here’s what a sheet of business cards looks like in Microsoft Word when completed.
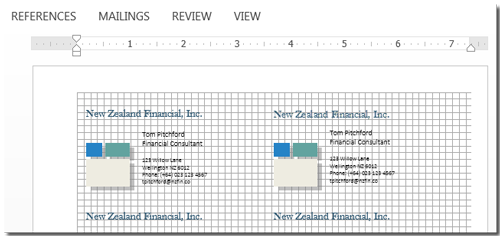
Step 5: Use a ruler or gird
When designing visual documents like business cards, it can sometimes be useful to create a more design-centric canvas, by enabling the ruler or the grid. Click on the View tab and check the Ruler and Gridlines boxes. Here’s what our business cards look like with this style of canvas. This can be helpful if you have specific layout needs for your business cards.
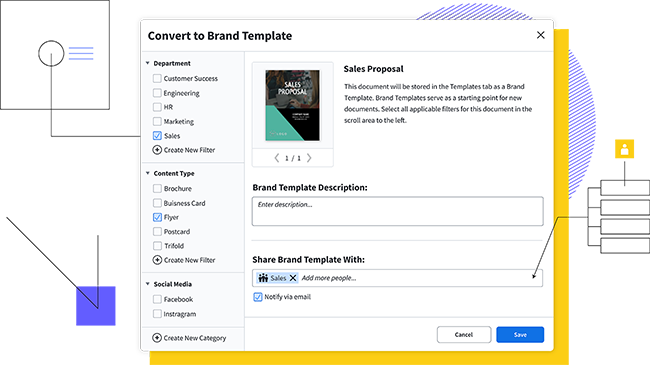
Step 6: Share your business cards
Now that you’ve designed your business cards, it’s time to print them. We suggest sharing your document with a professional printer to ensure the highest quality for the final product. From Word, you can download your file in a variety of formats, including .doc, .docx, or .pdf. Then, it’s a good idea to save your file to cloud storage, so it won’t get lost if your computer crashes!
You can experiment with home printing from Word. Standard business card size in the U.S. is 3.5 inches by 2 inches. Avery is a common business card paper manufacturer: their business card templates come with ten cards per sheet. To print, use Ctrl (Cmd) + P and use Word’s printing dialog.

A better design experience
Unlike Microsoft Word, Marq is a true layout and design program. No longer do you have to worry about difficulty aligning your shapes, decade-old templates, and losing your document if you forget to save. Make the switch to Marq: not only can you design business cards, but you can complete your stationery portfolio with letterhead, newsletters, and photo books. Sign up for a risk-free premium trial to unlock the full benefits of Marq!
Design a business card
Create all of your on-brand collateral in Marq
The #1 brand-templating platform trusted by over 6 million users worldwide
Find out why
Open Microsoft Word, head over to the “File” tab and then select “New” from the left-hand pane. In the search bar at the top of the window, search for “Business Cards.” A large selection of templates will appear. Scroll through the library of business card templates and choose the one you like best.
Contents
- 1 How do I make my own business card layout?
- 2 Is there a business card template on Word?
- 3 How do I make a card template in Word?
- 4 What app can I use to make my own business cards?
- 5 Does Google Docs have a business card template?
- 6 How do you make a blank business card template in Word?
- 7 Does Excel have a business card template?
- 8 How do you create a business card in Excel?
- 9 How do you make a 5×7 card on word?
- 10 What are the dimensions of a business card?
- 11 Are business cards still relevant 2021?
- 12 What software is used to design business cards?
- 13 What is a virtual business card?
- 14 How do I make a business card template in Google Docs?
- 15 Can I use Avery templates on Google Docs?
- 16 How do I create a business card in outlook?
- 17 How do I make a contact card in Excel?
- 18 How do I print business card size in Excel?
- 19 How do you make multiple cards in Word?
- 20 What are the margins for a business card?
How do I make my own business card layout?
How to design a business card in 8 steps —
- Choose your shape.
- Choose your size.
- Add your logo and other graphics.
- Add necessary text.
- Choose your typography.
- Consider special finishes.
- Pick a designer.
- Finalize your design.
Is there a business card template on Word?
You can use Word to create business cards from a template or from scratch.The business card shown here is a template on Office.com. With a template, you can include graphics on your business card–for example, your company logo. Just be sure to note what size card the template uses.
How do I make a card template in Word?
How to Create a Card Template in Microsoft Word
- Launch the Microsoft Word application and create a new document.
- Click inside the opened document and create or edit the content as you prefer.
- Add images to your card template.
- Click “Save As” when you are ready to save your page as a template.
What app can I use to make my own business cards?
Here are 10 apps that you can use to create your digital business card:
- SnapDat. SnapDat is a free digital business card app that easily integrates with iPhone Address book.
- CamCard. CamCard is among the best business card apps, and for a good reason.
- Knowee.
- Inigo.
- Haystack.
- eVaunt.
- OneCard.
- Clinck.
Does Google Docs have a business card template?
Since Google Docs doesn’t come with business card templates, you can use the numerous templates available for Microsoft Word. Just search for design template you like, download or save it and then upload it to Google drive. From there, you can click and open it with Google docs to start editing.
How do you make a blank business card template in Word?
Open Microsoft Word, head over to the “File” tab and then select “New” from the left-hand pane. In the search bar at the top of the window, search for “Business Cards.” A large selection of templates will appear. Scroll through the library of business card templates and choose the one you like best.
Does Excel have a business card template?
Excel’s page layout view makes it easy to format an entire page of business cards.
How do you create a business card in Excel?
How to Make Business Cards in Excel
- Open a new workbook in Excel and save as a template.
- Make a design area on the worksheet; a page-sized area works nicely.
- Make a card.
- Enter your business and personal information.
- Format the fonts.
- Add a business logo and graphics.
- If you want your image on the card, add your photo.
How do you make a 5×7 card on word?
Open a new blank Word document. Select Page Layout > Size > More Paper Sizes. 3. Select the Custom paper size from the Page Setup Screen or just enter the height and width of your custom card (in this case, 10.5 inches wide x 7 inches tall), then click OK.
What are the dimensions of a business card?
3.5″x 2″
Standard business cards are 3.5″x 2″ – but have you ever thought about why most cards are exactly that size and shape?
Are business cards still relevant 2021?
They’re Vital for Networking Events
Business cards still have their place in 2021 despite the increased presence of modern technology and digital tools. They retain their importance in the present day because they’re still perfect for networking events.
What software is used to design business cards?
The best business card design software is definitely Adobe Illustrator. This is because it will allow you to create vector files which are easily resizable and provide a crisp and clean print.
What is a virtual business card?
Virtual Business Cards are electronic formats of your paper business card that you see and share on your smartphone. Upgrade your networking with this Virtual Business Card App. It has analytics to track your clicks and visits.
How do I make a business card template in Google Docs?
How to Make a Business Card in Google Docs With Templates
- Download the template you want from Envato Elements.
- Log in to Google Drive and upload your template.
- Open your business card template in Google Docs.
- Use the selections in the toolbar to replace the placeholder text with your own information.
Can I use Avery templates on Google Docs?
The new Avery Label Merge add-on brings the ease of Avery templates to your Google Docs content.Simply pick an Avery label template or name badge template, choose your spreadsheet, and select the columns within your spreadsheet to merge.
How do I create a business card in outlook?
Create an Electronic Business Card
- Select People in the Navigation bar.
- In the top left corner of the Outlook window, click New Contact.
- In the contact form, double-click the business card to open the Edit Business Card box.
- Under Card Design, click the Layout list arrow and then click a layout from the list.
How do I make a contact card in Excel?
How to Create Contact Group From an Excel File
- Open Microsoft Excel.
- In the rows below those, enter the corresponding information for each contact.
- When you are done entering all the information for each contact, navigate to “File” > “Save As”.
- From the “Save as type:” drop-down menu, select “CSV (Comma delimited) (*.
How do I print business card size in Excel?
Click the Print button at the top of the screen.
- From your business card template, click File > Print.
- Choose the correct printer.
- Under Printing options, make sure that Multiple pages per sheet is selected.
- Select the paper size and orientation.
- Click the Print button at the top of the screen.
How do you make multiple cards in Word?
Under Pages, make sure to choose Multiple pages per sheet, and then click Print.
- Click File > New.
- Click Business Cards.
- Click to select a template, and then click Create.
- Click Insert > Page.
- In the Insert Page dialog box, enter the number of pages that you want to add.
What are the margins for a business card?
For a standard business card, the safety margins are about 1/8” from the cutting edge so make sure to keep any text or logos within a 3.34” by 1.84” area. This is where a standard sized business card template can help you with setting up a design layout for printing.