
Change page orientation to landscape or portrait

Change orientation of whole document
-
To change the orientation of the whole document, select Layout > Orientation.
-
Choose Portrait or Landscape.

Change part of a document to landscape
-
Select the content that you want on a landscape page.
-
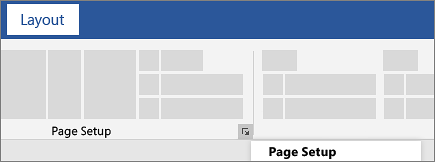
Go to Layout, and open the Page Setup dialog box.

-
Select Landscape, and in the Apply to box, choose Selected text.
Need more help?
Want more options?
Explore subscription benefits, browse training courses, learn how to secure your device, and more.
Communities help you ask and answer questions, give feedback, and hear from experts with rich knowledge.
Page orientation defines the direction for printing or displaying the document in Word, but one
does not have to be the same for the entire document. Usually, the whole article, paper, or
report is printed in the Portrait mode, but for a page with the big table, it is more
convenient to use the Landscape mode. On the Layout tab in the Page Setup
group, you can easily change the page orientation both for the entire document and for a
single page. Microsoft Word inserts sections breaks before and after the selected page, and
you can add more pages to this section later.
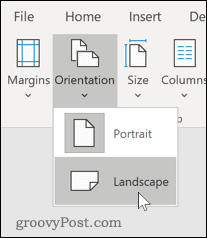
To change the page orientation for whole document Word, on the
Layout tab, in the Page Setup group, click Orientation:

From the Orientation dropdown list, choose the orientation you need:

To change the orientation of one page, or a few pages of
the document, do the following:
1. Select the text of the page or of the several
pages for which you want to change the page orientation.
2. On the Layout tab, in the Page Setup
group, click Margins:

Select Custom Margins… from the Margins dropdown list:

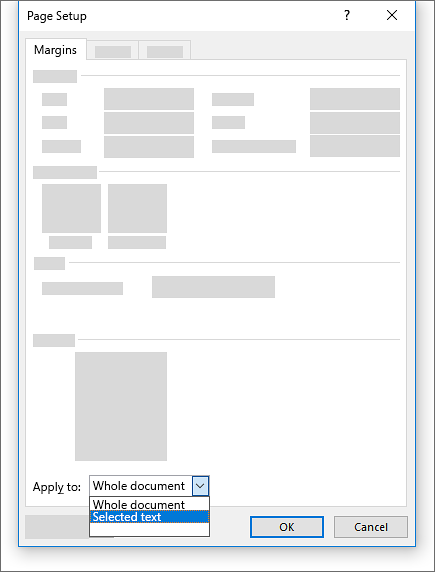
3. In the Page Setup dialog box, on the Margins
tab:
- In the Orientation group, choose Portrait or Landscape orientation,
- In the Apply to list, choose Selected text:

4. Click OK.
Notes:
- Microsoft Word automatically inserts section breaks before and after the text
that has the new page orientation. If you write a book or a long report and
your document is already divided into sections, you can click in the section
(or select multiple sections), and then change the orientation only for the
sections that you have chosen:

- The option Selected text in the Apply to list appears only if
there is selected text in the document.
See also this tip in French:
Comment changer l’orientation d’une page dans Word.
Please, disable AdBlock and reload the page to continue
Today, 30% of our visitors use Ad-Block to block ads.We understand your pain with ads, but without ads, we won’t be able to provide you with free content soon. If you need our content for work or study, please support our efforts and disable AdBlock for our site. As you will see, we have a lot of helpful information to share.

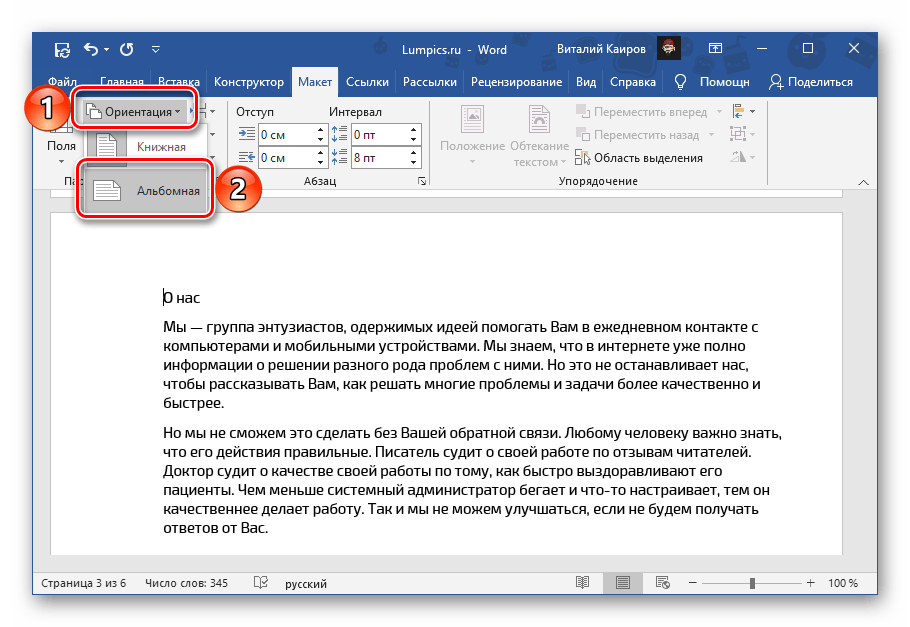
Способ 1: «Параметры страницы»
В текстовом редакторе Майкрософт Ворд присутствует возможность изменения ориентации страниц в документе с книжной на альбомную и наоборот. Проблема заключается в том, что по умолчанию данное действие применяется ко всем страницам, хотя иногда может потребоваться повернуть только одну или несколько из них. Проще всего сделать это следующим образом:
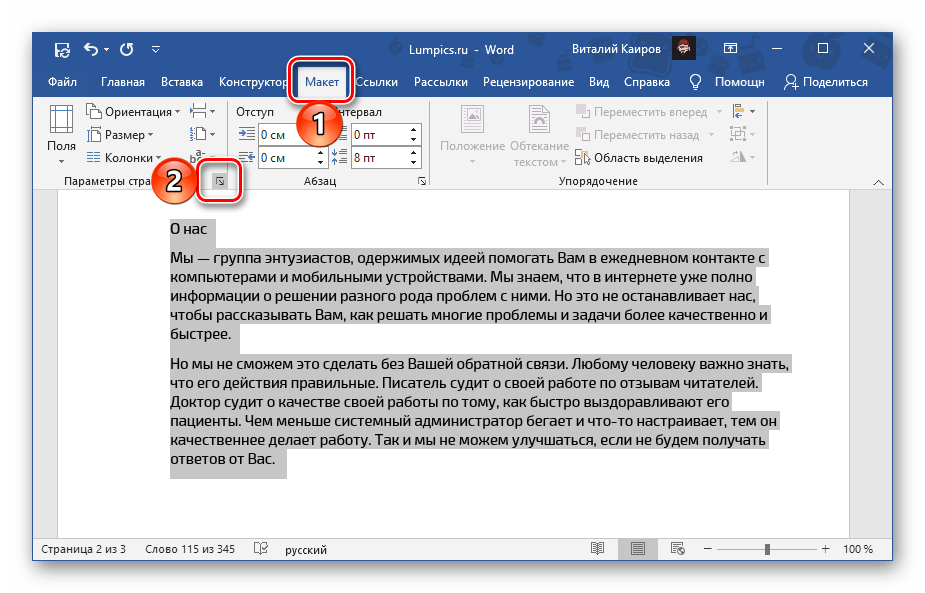
- Выделите все содержимое того листа или листов, ориентацию которого(ых) требуется изменить.

Читайте также: Как выделить одну или несколько страниц в документе Word
- Перейдите во вкладку «Макет» и вызовите диалоговое окно «Параметры страницы», кликнув по отмеченному на изображении ниже элементу.
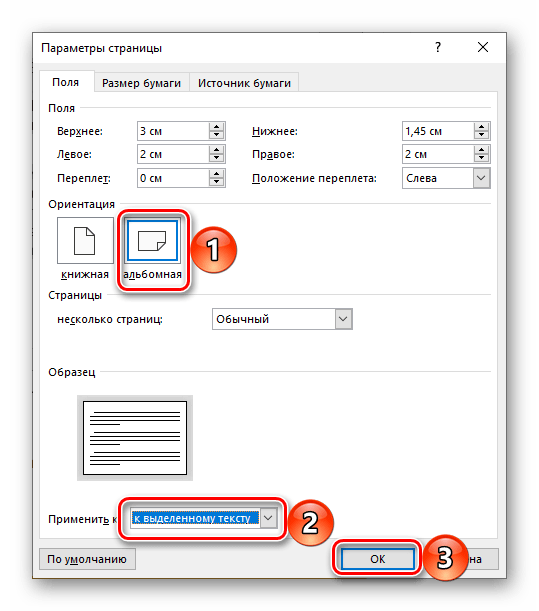
- Выберите вариант «Альбомная» (или, наоборот, «Книжная», если изначально была установлена противоположная ей), а в выпадающем списке «Применить к:» укажите «к выделенному тексту». Нажмите на кнопку «ОК» для того, чтобы изменения вступили в силу.

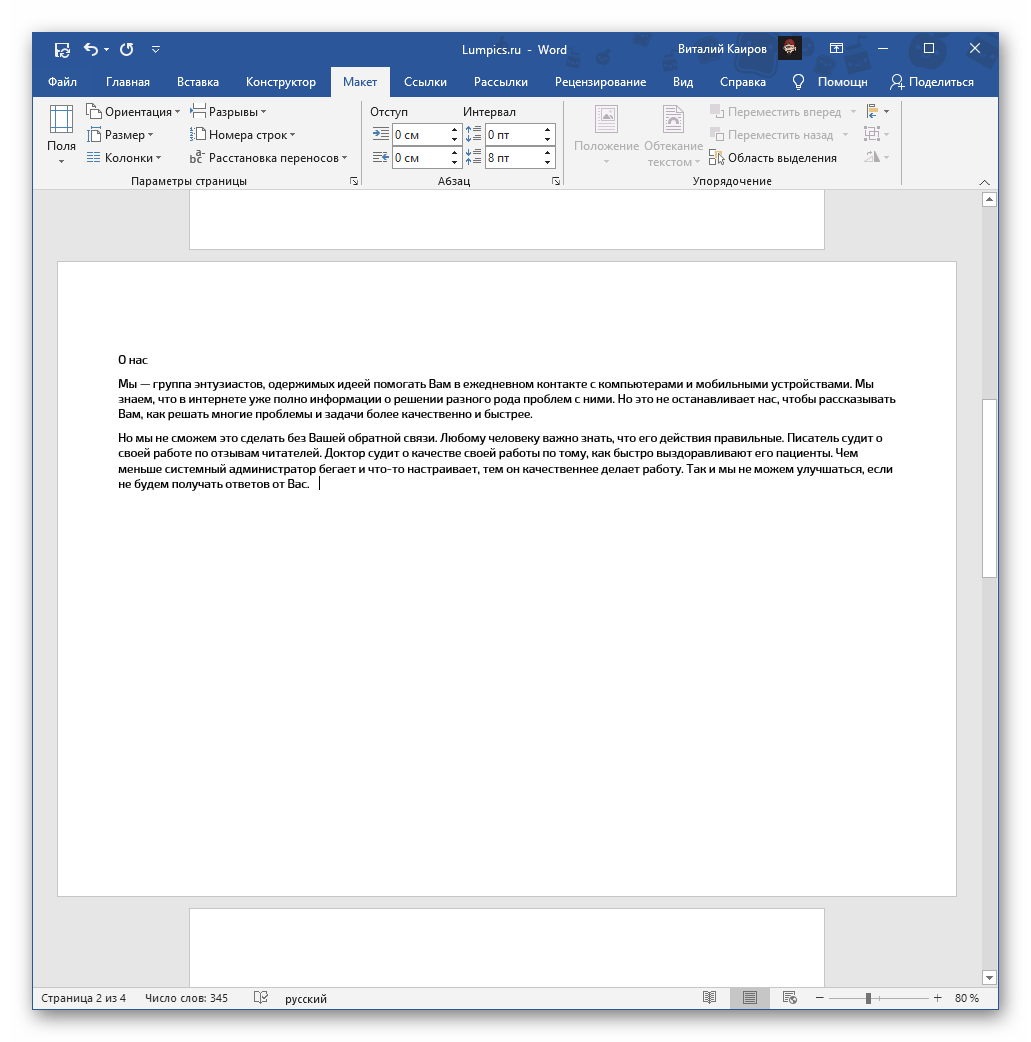
Важно! При выполнении вышеописанных действий иногда в документ может быть добавлен пустой лист. Если это произойдет, удалите его, воспользовавшись следующей инструкцией.
Читайте также: Как удалить пустую страницу Ворд
Пролистав текстовый документ, вы увидите, что ориентация выделенного листа (или листов) была изменена, а остальные сохранили свое прежнее расположение.
Читайте также: Как сделать альбомную страницу в Word
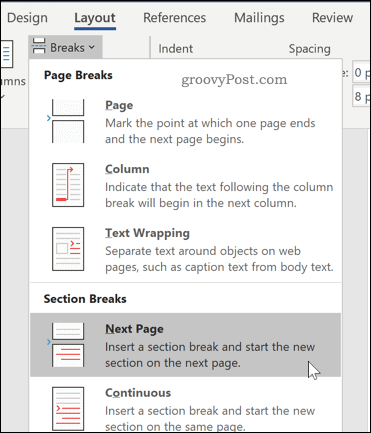
Способ 2: Добавление разрыва раздела
У озвученной в заголовке статьи задачи есть еще одно решение, несколько более радикальное, но находящее свое применение в случаях, когда требуется задать разное форматирование (включая не только оформление текста, но и нумерацию, колонтитулы и т. д.) для разных страниц в документе. Делается это путем создания разрыва раздела.
Читайте также:
Как добавить разрыв страницы в Ворд
Как форматировать текст в документе Ворд
Как сделать нумерацию страниц в Ворд
- Перейдите на тот лист текстового документа, ориентацию которого требуется изменить. Установите указатель курсора (каретку) в его конец.
- Откройте вкладку «Макет», разверните меню кнопки «Разрывы» и выберите пункт «Следующая страница», расположенный в блоке «Разрывы разделов».
- Если эта страница – не первая в документе, перейдите в ее начало и аналогичным образом добавьте еще один разрыв, чтобы отделить ее от предыдущей.

Удалить пустые страницы, которые появятся в документе, поможет инструкция, ссылка на которую дана в предыдущей части статьи.
- Во вкладке «Макет» нажмите на кнопку «Ориентация» и выберите «Альбомная» или «Книжная», то есть противоположное тому, что сейчас установлено для всего документа.
- Если потребуется, выполните аналогичное действие с другими страницами, которые необходимо повернуть.


Пролистайте документ и убедитесь, что все сделано правильно.
Читайте также: Как удалить разрыв страницы в Word
Еще статьи по данной теме:
Помогла ли Вам статья?

If you’re creating a Word document with multiple page layouts, you may wish to make a single page landscape. Here’s how.
Photo Credit — iStockPhoto
When you’re creating Word documents, you have two-page layout options available—landscape or portrait. Portrait mode is the default option, but you can switch to landscape mode instead if you want your text sideways.
If you want to use both types of layouts in Word, you’ll need to use a few workarounds using section breaks and Word’s own page formatting options to do so. Here’s how.
If you want to quickly make one page landscape in Word, here’s what you’ll need to do:
- Open your Word document and place the blinking cursor at the start of the page you wish to change to landscape mode.
- Click on the Layout menu in the ribbon bar.
- Select Breaks > Next Page in the Section Breaks section. This will insert a section break and push your text onto a new page.

- In the Layout menu, press Orientation > Landscape. This will switch the current page and all the following pages to landscape mode.

- You’ll now need to turn the remaining pages back to portrait mode. Scroll down to the next page, then place the blinking cursor at the start of the page.
- Press Layout > Breaks > Next Page to insert a new section break.
- Click on Orientation > Portrait to switch the pages to portrait mode.


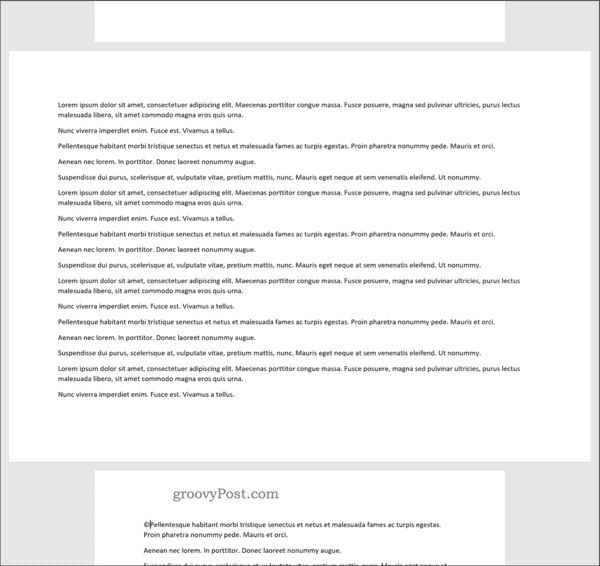
If you followed the steps correctly, you should now have one single landscape page, with all other pages remaining in portrait mode.
How to Make Specific Text Landscape in Word
If you don’t want all of the text on your page to appear on the landscape page, you can choose to make a landscape page that only contains specific text.
- To do this, start by highlighting the text that you want to appear on the landscape page.

- In the Layout menu, click on Margins, then select the Custom Margins… option at the bottom of the drop-down menu.

- In the Page Setup window, click on the Landscape option in the Margins tab, under the Orientation section.

- In the Apply to box, choose Selected Text.

- Click OK to confirm the settings you’ve selected.


You should now have a landscape page that contains the text you previously highlighted, creating a section break that uses a different page layout to the rest of your Word document.
You can use this method to turn an entire page landscape—to do this, select all of the text on the page before you start and repeat the steps above to complete the change.
Formatting Microsoft Word Documents
Now that you know how to make a single page landscape in Word, you can start creating documents with as many combinations of landscape and portrait pages as you want. This is where learning how to rearrange pages in Word might just come in handy.
If you’re looking for other ways to take your Word documents further, why not learn how to insert an Excel table into Word. For academic documents, you may wish to create a table of contents in Word to keep your document organized.
![]()
268
268 people found this article helpful
How to Insert a Landscape Page Into a Portrait Document in Word
Having trouble fitting that wide graph into your document?
Updated on February 13, 2022
What To Know
- Manual: Select Layout on the Ribbon. Go to Page Setup > Breaks > Next Page. Pick an area. Set the margins and choose your orientation.
- Auto: Go to Layout > Page Setup > Page Setup > Margins. Set the orientation and Apply to the Selected Text in the preview.
This article explains how to insert a page with a different orientation from the rest of your Word document. There are two ways to perform this action in Word, by inserting section breaks manually at the top and the bottom of the section that you want in the opposite orientation or by selecting text and allowing Word to insert the new sections for you. This article applies to Word 2019, Word 2016, Word 2013, Word 2010, and Word for Microsoft 365.
Manually Insert Section Breaks
Here’s how to tell Microsoft Word where to change the orientation.
-
In your document, place your cursor before the area where the pages should rotate. On the ribbon, select Layout.
-
In the Page Setup group, select Breaks > Next Page.
-
Move your cursor to the end of the area you want to rotate and repeat the steps above. Then, place your cursor in the area you want to rotate.
-
In the Page Setup group, select the Page Setup dialog box launcher (the small arrow in the lower-right corner of the group).
-
In the Page Setup dialog box, select the Margins tab.
-
In the Orientation section, select the orientation you want the section to have, Portrait or Landscape. Toward the bottom of the dialog box, in the Apply to dropdown menu, select This section. Select OK.
-
The selected section now reflects the orientation you chose.
Let Word Do It For You
You’ll save mouse clicks if you let Word insert the section breaks for you. However, when you use this method, the breaks may not end up exactly where you want them. So, make sure you’re careful when selecting the elements (paragraphs, images, tables, etc.) you want in the new layout orientation.
-
Select all the text, images, and pages that you want to switch to the new orientation.
-
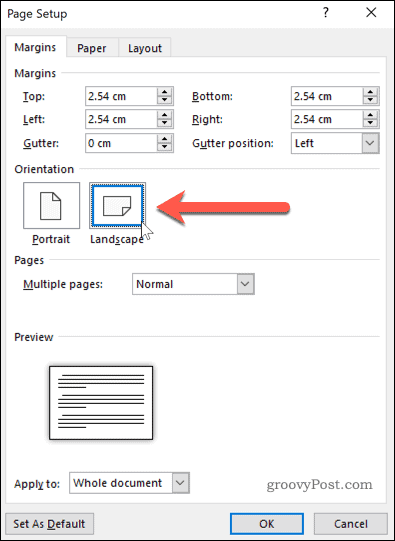
On the ribbon, select Layout. In the Page Setup group, select the Page Setup dialog box launcher (the small arrow in the lower-right corner of the group).
-
In the Page Setup dialog box, select the Margins tab.
-
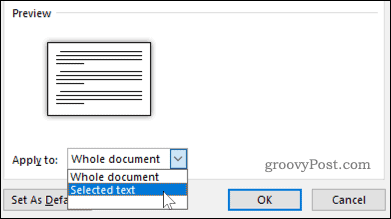
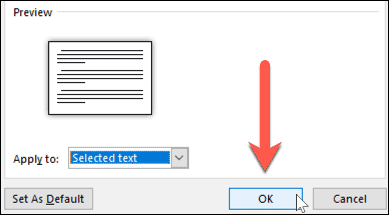
In the Orientation section, select the orientation you want the section to have, Portrait or Landscape. In the Preview section, in the Apply to dropdown menu, choose Selected text. Select OK.
-
The selected section now reflects the orientation you chose.
You may need to perform some formatting adjustments to make the text look the way you want in the new orientation.
FAQ
-
How do I change the orientation of an entire document in Word?
Select Layout > Orientation and select the orientation you’d like.
-
How do I use both portrait and landscape orientations in the same Word document?
Select the paragraph or page you want to change. Then, choose PAGE LAYOUT > Page Setup. Select Portrait or Landscape > Apply to > Selected text.
Thanks for letting us know!
Get the Latest Tech News Delivered Every Day
Subscribe