To import data from a PDF file to Excel, open Excel and go to the «Data» tab, then navigate to Get Data > From File > From PDF and select your PDF. Customize the import settings as necessary for your data, then click «OK.»
If you have a PDF document such as a bank statement or financial report, you may want to pull this information into Microsoft Excel. With a built-in feature, you can easily import and automatically convert a PDF to Excel.
This convenient feature can save you from hunting down a PDF file converter. Not only that, but it allows you to pick and choose the data from the file you want to import. The entire process takes only a minute.
Note: Since the time this feature was implemented, August 2020, it has only been available to Office 365 subscribers.
Connect a PDF File to Excel
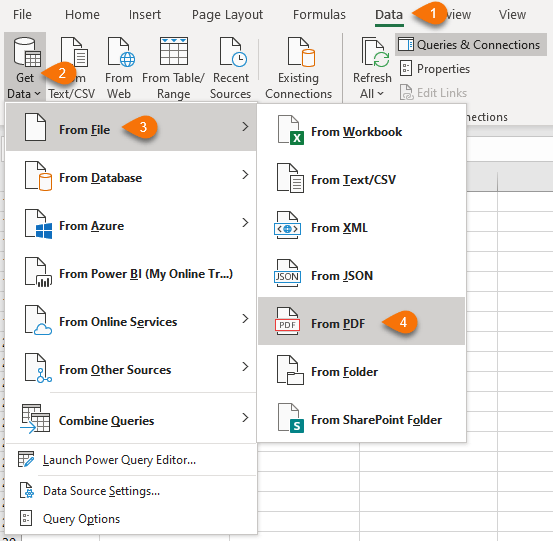
To get started, select the sheet you want to work with in Excel and go to the Data tab. Click the Get Data drop-down arrow on the left side of the ribbon. Move your cursor to From File and pick “From PDF.”
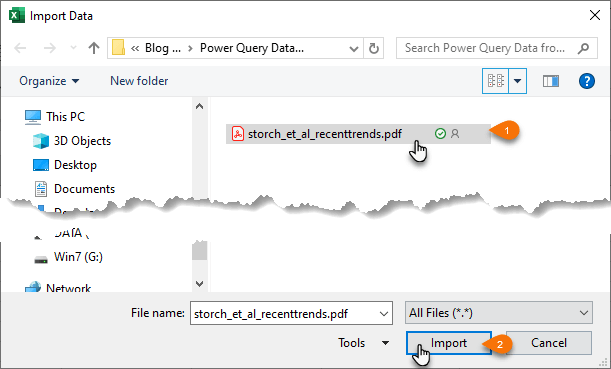
Locate your file in the browse window, select it, and click “Import.”
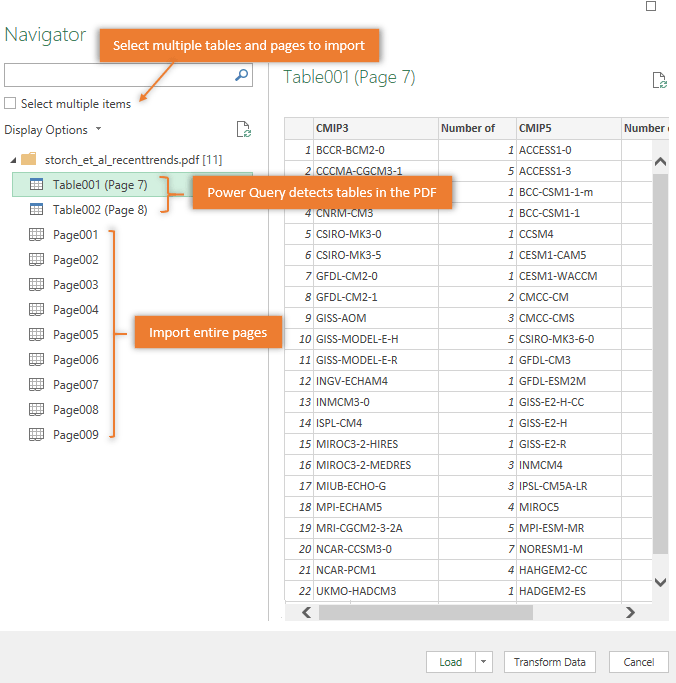
Next, you’ll see the Navigator pane. On the left are the tables and pages in your PDF file. You can search for one at the top or simply select an element and see a preview on the right side.
When you see the item you want to import, click “Load” at the bottom of the window.
Once your data is imported from the PDF, you should see it in your sheet along with the Queries & Connections sidebar. This handy spot lets you adjust the connected data if you wish, and we’ll explain these options below.
Adjust the Load Settings
If you prefer to load the data in a specific format such as a pivot table or to a new worksheet, select the Load drop-down arrow and pick “Load to” instead.
Then choose your options in the Import Data window and click “OK.”
RELATED: How to Use Pivot Tables to Analyze Excel Data
Transform the Data with Power Query
Another option for importing data from your PDF is to transform it using the Power Query Editor. In the Navigator window where you select the element to import, click “Transform Data” at the bottom instead of “Load.”
This will open the Power Query window where you can do things like choosing or adding more columns, transposing rows and columns, managing parameters, and formatting the data.
Adjust the Connected Data
If you want to adjust the data you imported, you can do so by opening the data from the Queries & Connections sidebar. You can then take actions such as editing it using the Power Query Editor, duplicating, merging, adding a reference, or deleting the connected data.
RELATED: How to Create Your Own Data Type in Microsoft Excel
As mentioned, you’ll see the Queries & Connections sidebar open when you import your PDF file. If you happen to close it, you can reopen it by going to the Data tab and clicking “Queries & Connections” in the ribbon.
Place your cursor over the connected data and you’ll see a window appear. At the bottom, you have actions for View in Worksheet, Edit, and Delete. If you click the three dots, you’ll see options like Duplicate, Reference, and Merge.
You can also manipulate the data within your sheet as you normally would. If you’re using a table, you can filter and sort. You can also select a different style, update the font, and apply additional formatting.
RELATED: How to Create and Use a Table in Microsoft Excel
For those times when the data you need to work with or analyze comes in the form of a PDF, remember that you can pull that PDF file right into Microsoft Excel.
If you’re looking to do the reverse, learn how easy it is to save an Excel sheet as a PDF file.
READ NEXT
- › How to Export a Cell Range or Excel Workbook as a PDF
- › How to Create a PDF from a Google Docs Document
- › How to Combine First and Last Names in Microsoft Excel
- › The New NVIDIA GeForce RTX 4070 Is Like an RTX 3080 for $599
- › Get to Your Windows 11 Desktop: 7 Fastest Methods
- › Mozilla Wants Your Feature Suggestions for Thunderbird
- › Expand Your Tech Career Skills With Courses From Udemy
- › Microsoft Is Testing Windows 11 Changes for the Steam Deck
Excel for Microsoft 365 Word for Microsoft 365 Outlook for Microsoft 365 PowerPoint for Microsoft 365 Publisher for Microsoft 365 Visio Plan 2 Word for the web Excel 2021 Word 2021 Outlook 2021 PowerPoint 2021 Publisher 2021 Visio Professional 2021 Visio Standard 2021 OneNote 2021 Excel 2019 Word 2019 Outlook 2019 PowerPoint 2019 Publisher 2019 Visio Professional 2019 Visio Standard 2019 Excel 2016 Word 2016 Outlook 2016 PowerPoint 2016 OneNote 2016 Publisher 2016 Visio Professional 2016 Visio Standard 2016 Excel 2013 Word 2013 Outlook 2013 PowerPoint 2013 OneNote 2013 Visio Professional 2013 Visio 2013 Excel 2010 Word 2010 Outlook 2010 PowerPoint 2010 OneNote 2010 Publisher 2010 Visio 2010 Visio Standard 2010 More…Less
See how to insert a file in PDF format into your Office file as an attachment. You can resize the object, but you can’t edit it after you insert it. You’ll need to have Adobe Acrobat or Abode Reader installed to see or read PDF files.
Note: If you’re looking to insert the contents of your PDF file into an Office file, as opposed to simply inserting the PDF as an attachment, then your best bet is to open that PDF with Word 2013 or 2016. Word will convert the PDF to editable text and you can then copy and paste that text into your Office document. For more information, go to Edit PDF content in Word.
-
Click Insert > Object in the Text group.
For Outlook, click inside of the body of an item, such as an email message or calendar event.
-
Click Create from File > Browse.
-
Browse to the .pdf file you want to insert, and then click Open.
-
Click OK.
More options
-
If you just want to reuse some of the text from a PDF—for example, a short passage—try copying and pasting it. Usually, you’ll get plain text without the formatting.
-
With the PDF reflow feature available in Word 2013 and 2016, you can open and edit PDF content, such as paragraphs, lists, and tables, as Word documents. Word pulls the content from the fixed-format PDF document and flows that content into a .docx file while preserving as much of the layout information as it can. See Edit PDF content in Word to learn more.
Word for the web doesn’t let you insert objects, such as PDFs, into a document. However, you can edit the PDF itself in Word for the web, which lets you update the PDF’s content, or copy and paste content from the PDF into a Word document.
Note: When you open a PDF in Word for the web, it is converted to a Word document and may not look exactly like the original document. For example, line and page breaks may happen in different spots. The conversion works best with PDFs that are mostly text.
If you own the Word desktop app, you can use it to add a PDF. Click Open in Word to start using the desktop app.
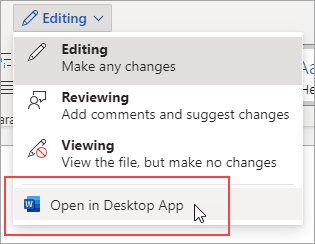
If you don’t own the Word desktop app, you can try or buy the latest version of Office now.
Need more help?
Want more options?
Explore subscription benefits, browse training courses, learn how to secure your device, and more.
Communities help you ask and answer questions, give feedback, and hear from experts with rich knowledge.
Office 365/Microsoft 365 users can now import data from a PDF to Excel using Power Query*.
It’s super handy for importing data tables inside PDF documents because Excel locates them for you ready to import. And if the data is a little messy you can use the Power Query transform tools to clean it before loading it into the Excel file.
*Only available to Office/Microsoft 365 subscribers, find out how to get the latest updates.
Tip: If you don’t have Office/Microsoft 365 then this same functionality is available in Power BI Desktop.
Watch the Video
Download Workbook
Enter your email address below to download the sample workbook.
By submitting your email address you agree that we can email you our Excel newsletter.
Step 1: Get Data from PDF — It’s as easy as going to the Data tab of the ribbon > Get Data > From File > From PDF:
Step 2: Locate the PDF File you want to import to Excel — Browse to the location the PDF is saved > click Import:
Step 3: Select Tables and Pages in PDF — The Power Query Navigator window opens with a list of pages and tables Excel has identified in the PDF. You can select a table or page to preview in the pane on the right, as shown below with the table on page 7 displayed:
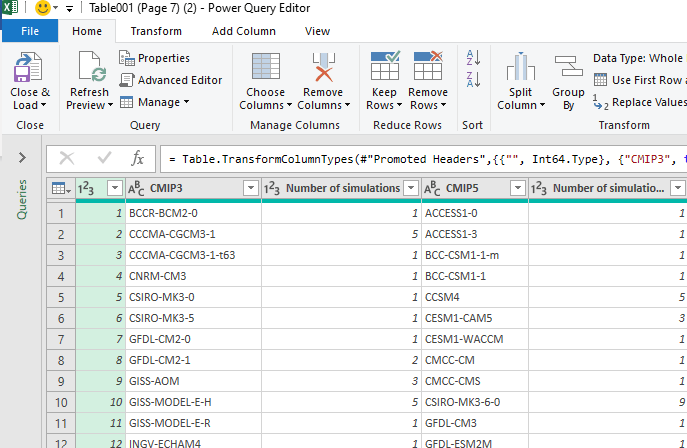
Step 4: Import Data from PDF or Clean — From here you can click the ‘Load’ button to import data directly to the Excel worksheet or to the Data Model. However, you’re most likely to want to do some more cleaning of the data first, in which case click the ‘Transform Data’ button to open the Power Query Editor:
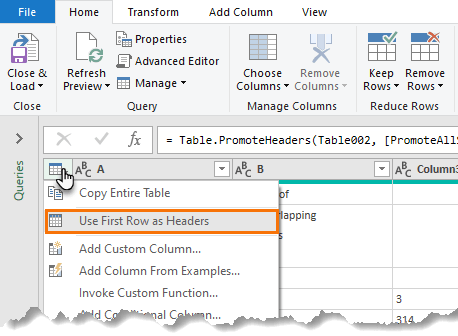
Notice Power Query has correctly identified the column labels and placed them in the header row. If it doesn’t do this automatically, click on the drop down in the top left of the table > Use First Row as Headers:
Not all tables will import as easily. For example, Table2 in this PDF has column headers split over multiple rows. Watch the video to see how to fix them so they’re in a single row and can form the column labels.
When you’re done with tidying up the data, give the query a name in the Properties pane, then go to the Home tab > Close & Load to finalise importing data from the PDF to Excel.
Import Multiple Tables/Pages from PDF
If you have tables that run over multiple pages, for example credit card or bank statements, Power Query will automatically combine then into a single table.
You can also import consecutive pages with the StartPage and EndPage optional parameters like so:
= Pdf.Tables(File.Contents("C:Sample.pdf"), [StartPage=3, EndPage=5])
More on the Pdf.Tables function here.
Import Multiple PDFs From Folder
If you have multiple PDFs containing data or tables with the same structure, you can use the Power Query Get Data From Folder connector to get them and import the data into a single table.
Inserting PDF into Excel is the best way to supplement an Excel spreadsheet with PDF resources, this saves our time and troubles to switch between different files, to retype a document. Copying and pasting a PDF into Excel might work, but it is not an efficient solution.
Therefore, we will show you 5 good methods to insert PDF into Excel spreadsheet on Mac and Windows PC, instructions in this article are very easy to follow.
- Insert PDF into Excel with Good Formatting
- How to Insert a One-page or Multiple-page PDF into Excel as Object
- Cannot Insert as Object? Insert PDF into Excel as Image
- How to Insert PDF into Excel as a Link or an Icon
- How to Insert PDF into Excel with Office 365?
 Cisdem PDF Converter OCR
Insert Native and Scanned PDF to Excel Now!
- Convert PDF to Excel, Word, PowerPoint for easy insertion
- Convert scanned PDF and image to Excel, Word, PowerPoint for insertion
- Convert PDF to images and other 15+ formats
- Batch convert PDFs
- Maintain high quality (resolution, formatting, layout, etc.)
- Create PDF from Word, PowerPoint, ePub, HTML and so on


Insert PDF into Excel with Good Formatting
The PDF you want to insert into Excel may have well-formatted tables, images or texts, if you want to maintain the formatting, fitting the cells from your PDF well into the Excel file, the most efficient way is to convert PDF to Excel first, then insert. In addition, such a conversion usually supports batch transformation and OCR scanned PDFs as well. To make this, we have to find ourselves a dedicated PDF to Excel converter on Mac and Windows.
Software like Cisdem PDF Converter OCR can convert and insert PDFs with high efficiency. It is an all-around tool to convert PDF to Excel, Word, PowerPoint, Keynote, text, EPUB, etc., perform OCR on PDFs and images, extract images from PDFs, create PDFs from other files and do other cool things.
Main Features of Cisdem PDF Converter OCR
- Extract table, image, or text from PDF for easy insertion to Excel
- Convert native and protected PDF to Excel, Word, PPT, Txt, total 16 formats
- OCR to Excel and other searchable/editable file
- Keep the original layout and quality
- Allow batch conversion and OCR
- Create PDF from Word, PowerPoint or other documents
- Merge, compress and protect PDF output
How to Insert PDF into Excel on Mac and Windows?
How to Insert a One-page or Multiple-page PDF into Excel as Object
Microsoft Office allows you to easily insert PDF into Excel, be it a single-page or multiple-page PDF, as an object. To read or edit the inserted PDF, you will need a PDF reader or PDF editor installed on the computer. However, you can only insert PDF as object on a PC. The object-embedding feature of Microsoft Office for Mac is limited.
Tip: If it’s a multiple-page PDF, people who read this Excel file may not know that they can access the rest of the pages by double-clicking. In a case like this, you can add a note to let them know.
Cannot Insert as Object? Insert PDF into Excel as Image
Mac users could have problems when they try to insert a PDF into Excel using the Insert Object feature. In this case, you can only insert PDF into Excel as image.
- Step 1. Open Microsoft Excel on your Mac. Open an Excel workbook.
- Step 2. Drag the PDF you want to insert into Excel. If it’s a single-page PDF, you will find the PDF inserted into a worksheet as an image. Or you can go to Insert>Pictures to import PDF as image to your Excel file.
If it’s a multi-page PDF, a dialog box will appear, asking you to select the specific page you need to insert. Select a page and click «Insert». To insert multiple PDF pages, just repeat the process.
How to Insert PDF into Excel as a Link or an Icon
If the inserted PDF appears as the preview of the first page, it will take a lot of space in a worksheet. The good news is you can insert PDF into Excel as an icon or a link. Below is how.
- Step 1. Open an Excel file using Microsoft Excel, click «Object».
- Step 2. Click the «Create from File» tab, you can find two options in the dialog box. One is Link to file, and the other is Display as icon.
If you select the checkbox Link to file, you will insert a hyperlink pointing to a location (where the PDF file is kept) on your local disk. In this case, the PDF file is not stored in the Excel workbook but on your computer’s internal disk. If you delete the PDF file on your computer later, or if the Excel workbook is opened on a different computer where the PDF file doesn’t exist, the link will be broken.
Tip: Make the Inserted PDF Fit into and Stick to an Excel Cell
When you insert PDF into Excel and display it as an icon, the icon will appear above the Excel cells. Its position won’t change as you add or remove cells above it. It won’t get hidden, sorted or filtered with the Excel cells. This can cause inconvenience sometimes. How do I insert a PDF file into an Excel cell and make it stick to the cell? The solution is easy.
- Step 1. Place the PDF file icon into a cell by resizing the cell.
- Step 2. Right-click on the icon. Select Format Object.
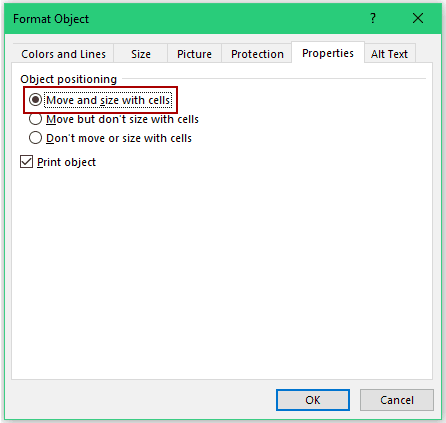
- Step 3. Go to the Properties tab and select the Move and size with cells option.
How to Insert PDF into Excel with Office 365?
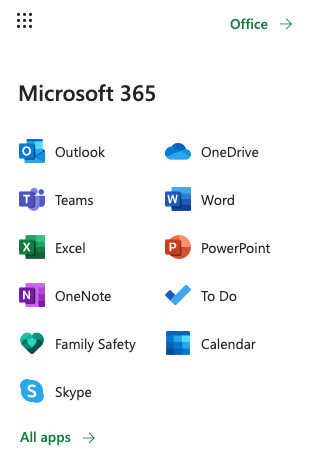
Excel doesn’t only offer desktop and mobile version, but also allows users to access its features online with a Microsoft 365 subscription. If you use Microsoft 365 to edit Microsoft documents online, you can insert PDF into Excel with 365 too. But before insertion, you have to convert PDF to image format first.
- Go to smallpdf or other PDF to Image converter, upload your PDFs and save as image first, it can be JPG or PNG.
- Login into your Microsoft 365 account.
- Go to Excel, drag and drop the Excel file that you want to insert a PDF.
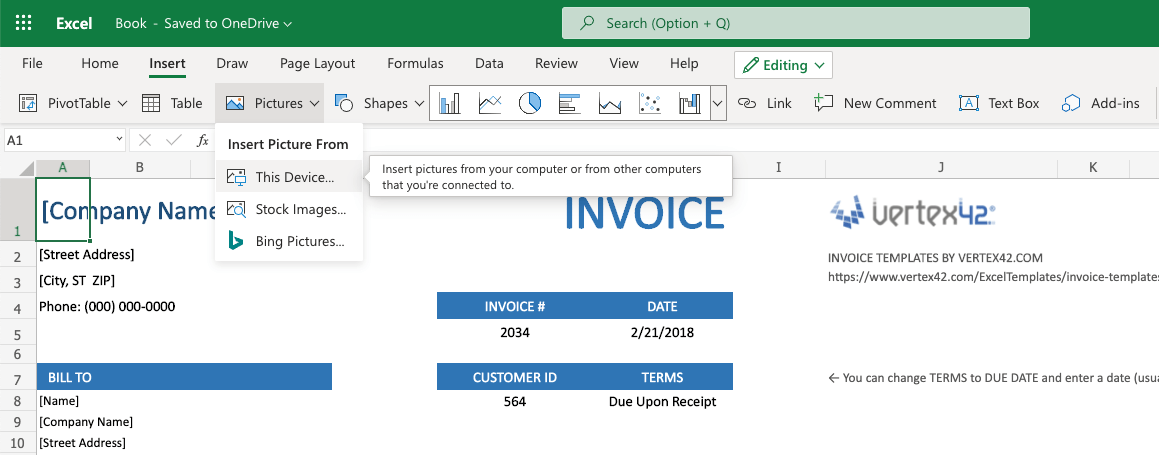
- Then go to Insert>Pictures>This Device, import the images converted from your PDF to Excel 365.
- Go to File and click Save as.
Conclusion
When you insert PDF into Excel, you can choose to insert as it as an object and display it as an icon/link, or as images, or only insert the selected images, tables and text from the PDF. It all depends on your needs. After the PDF file or its content is inserted, you can conveniently use it for reference or for presentation use.
Rosa Reyes

Rosa has worked in Mac software industry for more than eight years. She believes that the purpose of software is to make life better and work more productively. In addition to writing, Rosa is also an avid runner.

Download Article
Download Article
Do you have a PDF table that you want to add to your Excel sheet? If you try copying the data in PDF and then pasting it into your Excel sheet, you’ll probably get jumbled and non-sensical results. PDFs and Excel don’t use the same file format, so they aren’t easy to move information between. This wikiHow article will teach you how to copy a table from a PDF to Excel using the import feature in the spreadsheet software.
Steps
-
1
Open Excel. You can open a new project or continue a saved project in Excel.
- You’ll also need to know where in the PDF your table is so when you’re importing it, you’ll be able to find it easily.
-
2
Select a cell where you want to start the table. This will be the top left corner of the table you’re copying from the PDF.
Advertisement
-
3
Click Data. It’s in the menu above the editing ribbon next to File and Review.
- If you’re using a Mac, this is in the menu that’s running along the top of your screen.
-
4
Click Get Data. For Windows, it’s the furthest icon on the left of the menu.
- For Mac, you’ll see this in the drop-down when you click Data.
-
5
Click From File and From PDF. With each selection, the menu will continue expanding until you select From PDF, after which Excel will open your file manager (Finder for Mac and File Explorer for Windows).
-
6
Navigate to and double-click your PDF. You can also single-click your PDF to select it, then click Import.
-
7
Click the table you want to copy from the PDF to Excel. Knowing the location of the table you want to copy is important since they are labeled by location (which page they are on).
- If you click on a table on the left, the table’s preview will appear in the panel on the right side.
-
8
Click Load. It’s in the bottom right corner and will allow you to copy the table from the PDF to your Excel sheet.
- If you want to make changes to the data in the table, you can do it after you click Load.[1]
- If you want to make changes to the data in the table, you can do it after you click Load.[1]
Advertisement
Ask a Question
200 characters left
Include your email address to get a message when this question is answered.
Submit
Advertisement
Thanks for submitting a tip for review!
About This Article
Article SummaryX
1. Open Excel.
2. Select a cell where you want to start the table.
3. Click Data.
4. Click Get Data.
5. Click From File and From PDF.
6. Navigate to and double-click your PDF.
7. Click the table you want to copy from the PDF to Excel.
8. Click Load.
Did this summary help you?
Thanks to all authors for creating a page that has been read 116,712 times.
Is this article up to date?
We’ve helped you to insert PDF files into popular file formats, such as Word and PPT in the past, so here’s an article on how to insert PDF into Excel sheets. We’ll also tell you how to convert PDF to Excel, so you can then merge all of your files into one, without needing to insert a PDF into an Excel file. But first, let’s look at how you can do this in Excel.
How To Insert PDF Into Excel as a Picture
One of the quickest ways to insert PDF files into Excel sheets is via the software itself.
- Open the Excel file you want to insert a PDF into.
- Click on the «Insert» tab, «Pictures» and then «Picture from file.»
- Locate and double-click on the PDF you wish to insert into Excel.
Voila, inserting content from a PDF file into an Excel sheet couldn’t get any easier than this. Similarly, you can also choose other file formats, such as images, to place inside your Excel files.
News
Office 365 Excel Users Can Now Import Table Data from PDF Files

Microsoft announced this week that’s it’s now possible for Office 365 users to import table data from Adobe Portable Document Format (PDF) files into the Microsoft Excel spreadsheet program.
The ability to grab table data from PDF files seems like it should already have been there in Excel, but it’s just rolling out now. Users with paid Office 365 subscriptions whose organizations opted to receive so-called «Current Channel» feature updates are starting to get access to the Excel PDF table import feature.
Microsoft recently revamped its Office 365 feature-update channel names. The Current Channel signifies that Office 365 feature updates will arrive on a monthly basis. It’s these Current Channel users that will see the PDF table data import feature first, prior to a larger and more general rollout.
Technically, Microsoft built a «PDF data connector» for Excel, which lets end users import PDF table data using the Data tab in Excel. They select «From File» and then «From PDF» to import data.
After that’s done, end users will see a so-called «Navigator window.» It lets them select from a list of tables within the PDF document, identified by page number.
Users can select «one or multiple elements to import into Excel,» the announcement explained. It’s also possible to use the «Transform Data» function to clean the data first.
Microsoft’s Power Query Editor provides a graphical user interface for prepping and transforming such data. This tool also can be used for importing PDF table data that span multiple pages.
Enabling PDF table imports had been «one of the top requests» of Excel users, Microsoft’s announcement explained. Microsoft also has an optical character recognition import capability in Excel for grabbing data from photos, but it’s just available now for the mobile app versions. Another capability Microsoft has been working on is to make Excel recognize data by topics, such as displaying nutritional information for food items.
About the Author
Kurt Mackie is senior news producer for 1105 Media’s Converge360 group.
Featured
-
Microsoft To Tighten Azure Storage Default Permissions
Microsoft on Wednesday pledged to tighten how Azure Functions works with Azure Storage to address security concerns that were raised by Orca Security.
-
Microsoft Releases Windows Local Administrator Password Solution
Microsoft on Tuesday announced the roll out of a new «Windows Local Administrator Password Solution» (LAPS).
-
Microsoft Targets 97 Flaws in April Security Update
Tuesday saw the release of this month’s Microsoft security update — featuring fixes for 97 flaws, including one zero-day exploit.
-
Microsoft Details Attack Methods Using Azure AD Connect
Microsoft explained last week how purported nation-state attackers were able to «manipulate the Azure Active Directory (Azure AD) Connect agent,» and then destroy a victim’s Azure environment.
-
Microsoft and Fortra Clamp Down on Cobalt Strike Use for Ransomware Attacks
Microsoft and Fortra are using licensing agreements and copyright laws to thwart ransomware attacks, according to a Thursday Microsoft announcement.
comments powered by
Please type the letters/numbers you see above.


