Содержание
- Обновление актуальных версий Excel
- Обновляем Microsoft Excel 2007 на компьютере
- Способ 1: Обновление через интерфейс программы
- Способ 2: Ручная загрузка исправлений
- Вопросы и ответы
Программа Microsoft Excel предоставляет пользователям необходимые инструменты и функции для работы с электронными таблицами. Ее возможности постоянно расширяются, исправляются различные ошибки и корректируются присутствующие элементы. Для нормального взаимодействия с софтом его следует периодически обновлять. В разных версиях Экселя этот процесс немного отличается.
Обновление актуальных версий Excel
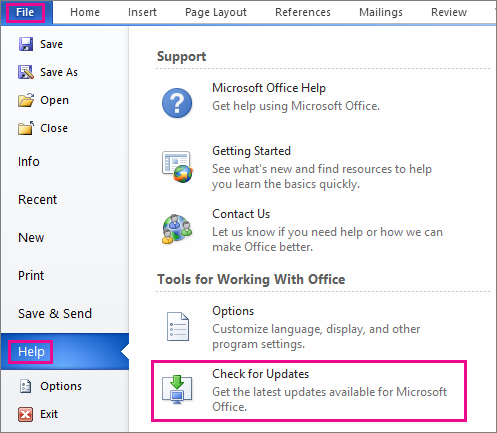
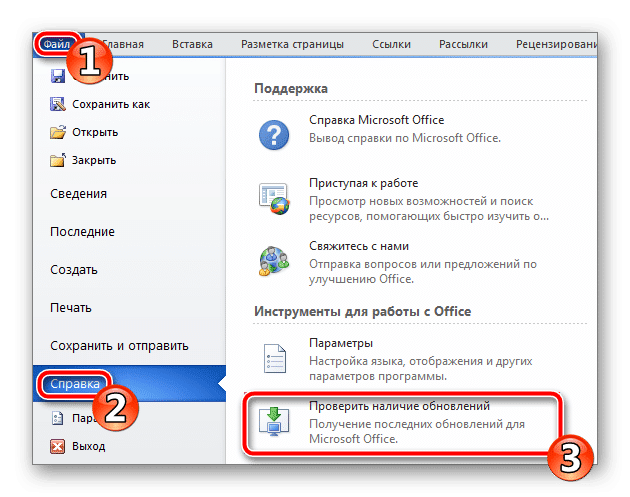
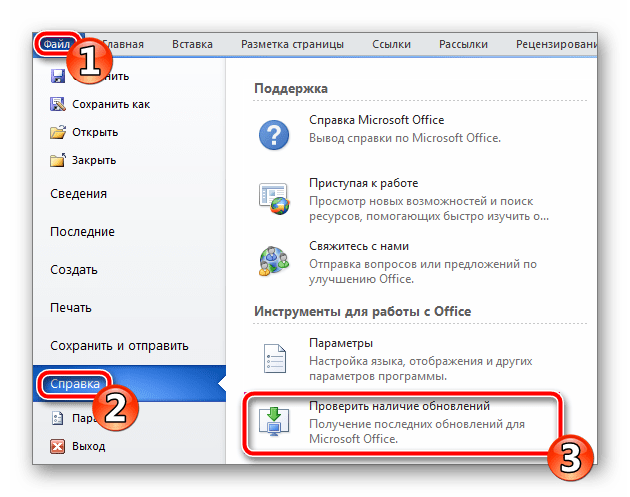
На данный момент поддерживается версия 2010 и все последующие, поэтому для них регулярно выпускаются исправления и нововведения. Хоть Excel 2007 и не поддерживается, для него также доступны обновления. Процесс их установки описан во второй части нашей статьи. Поиск и инсталляция во всех актуальных сборках, кроме 2010 осуществляется одинаково. Если же вы обладатель упомянутой версии, вам нужно перейти ко вкладке «Файл», открыть раздел «Справка» и нажать на «Проверить наличие обновлений». Далее просто следуйте инструкциям, отобразившимся на экране.
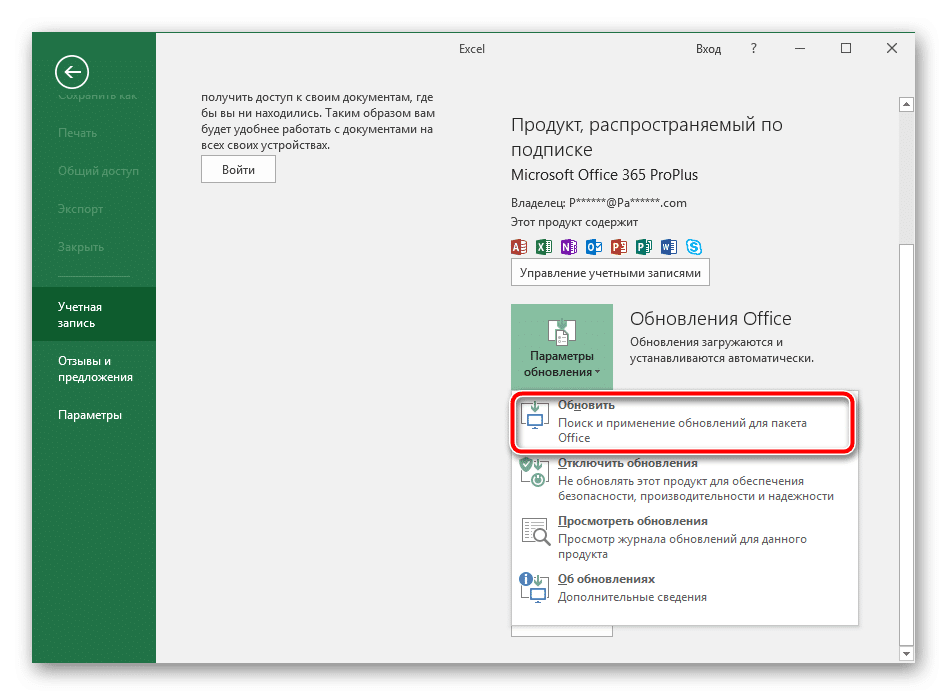
Пользователям последующих версий следует ознакомиться с инструкцией по ссылке ниже. Там подробно расписан процесс инсталляций нововведений и исправлений для свежих сборок Microsoft Office.
Подробнее: Обновление приложений Microsoft Office
Отдельное руководство есть и для обладателей Excel 2016. Для него в прошлом году было выпущено значимое обновление, корректирующее многие параметры. Инсталляция его не всегда производится автоматически, поэтому компания Microsoft предлагает сделать это вручную.
Скачать обновление Excel 2016 (KB3178719)
- Перейдите на страницу загрузок компонентов по ссылке выше.
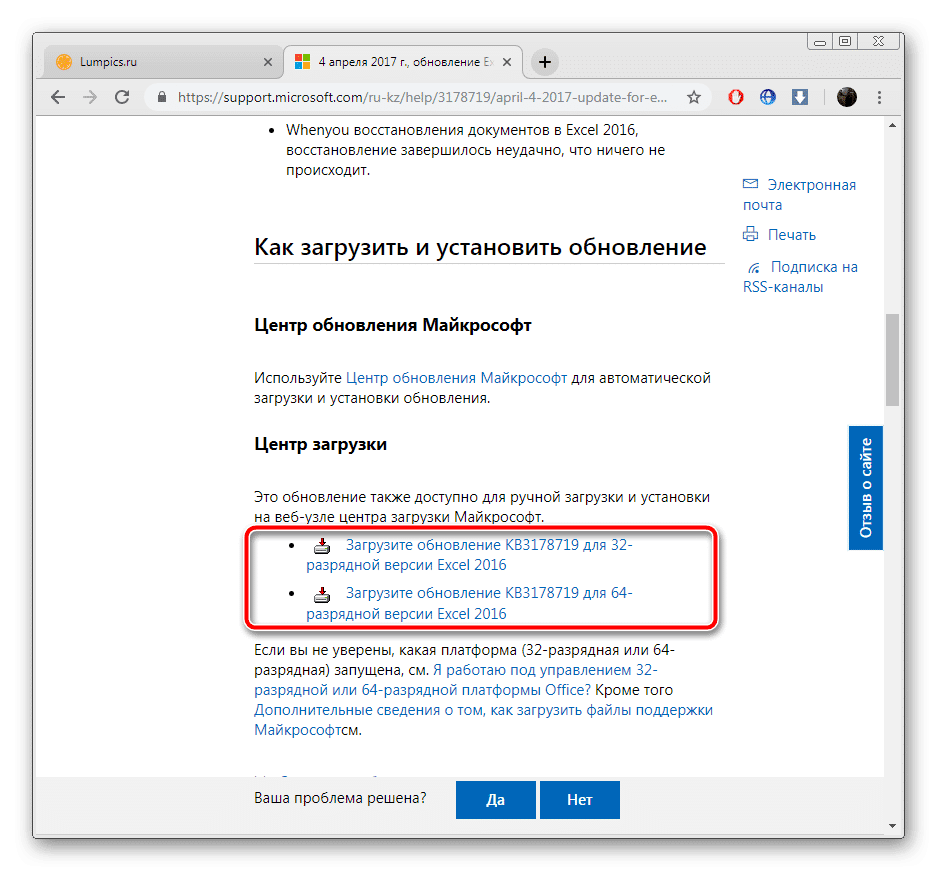
- Опуститесь вниз страницы в раздел «Центр загрузки». Нажмите на необходимую ссылку, где в названии присутствует разрядность вашей операционной системы.
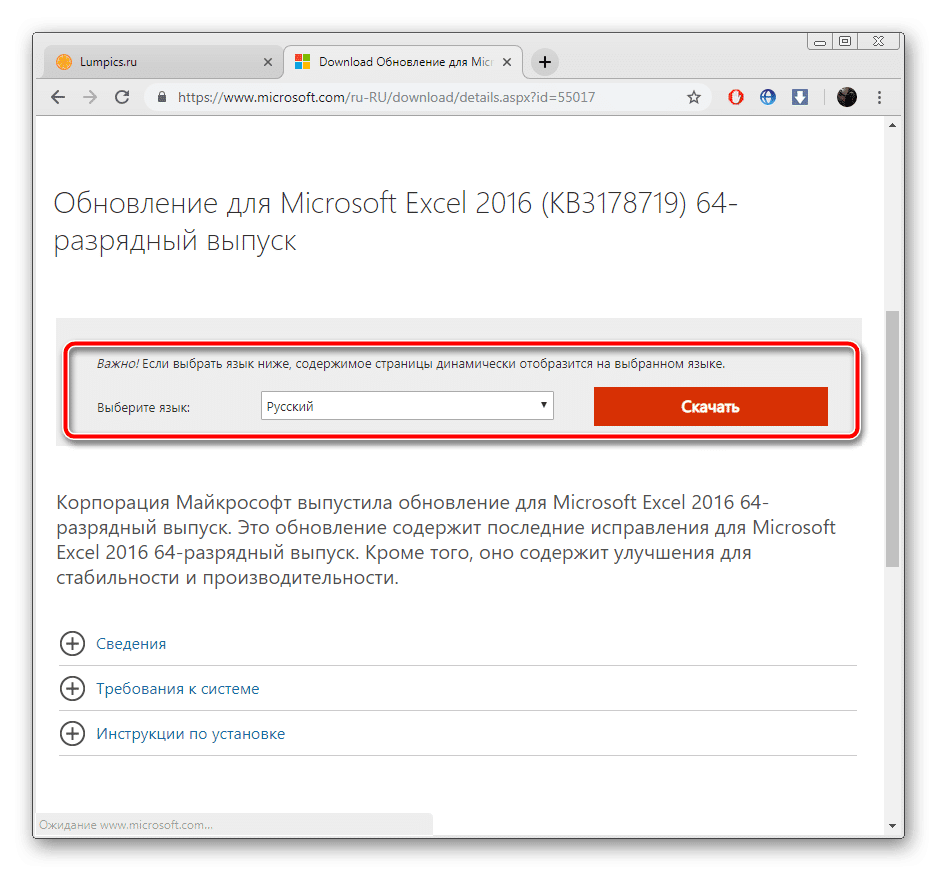
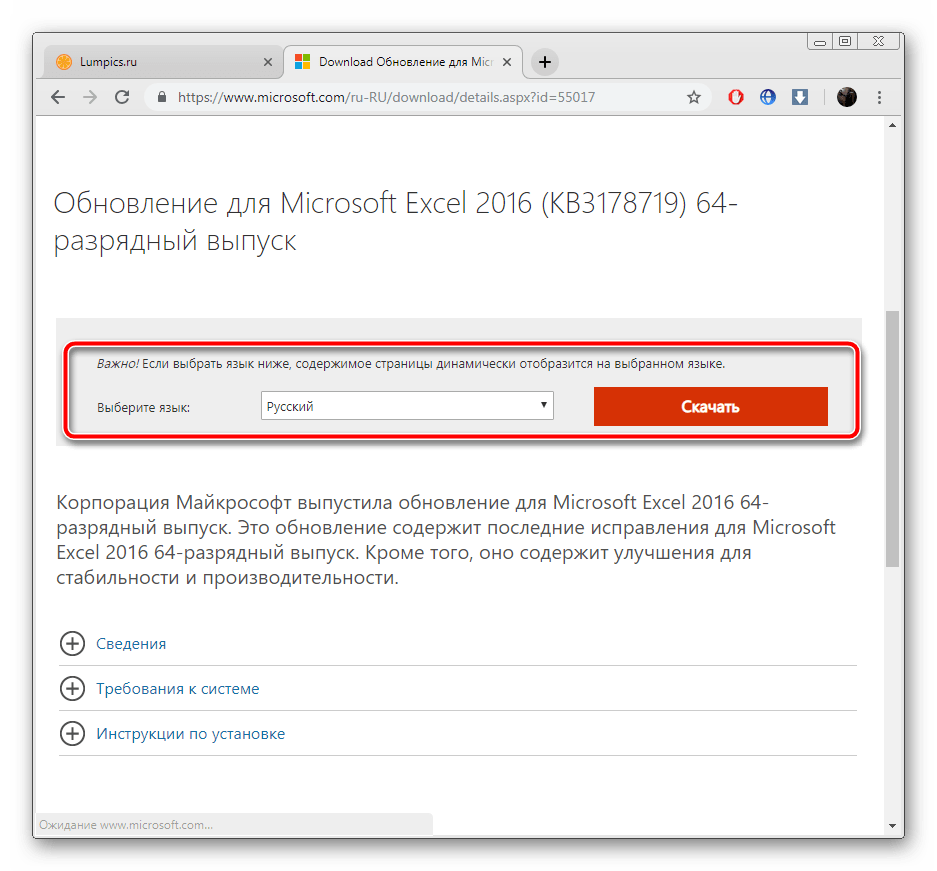
- Выберите подходящий язык и нажмите на «Скачать».
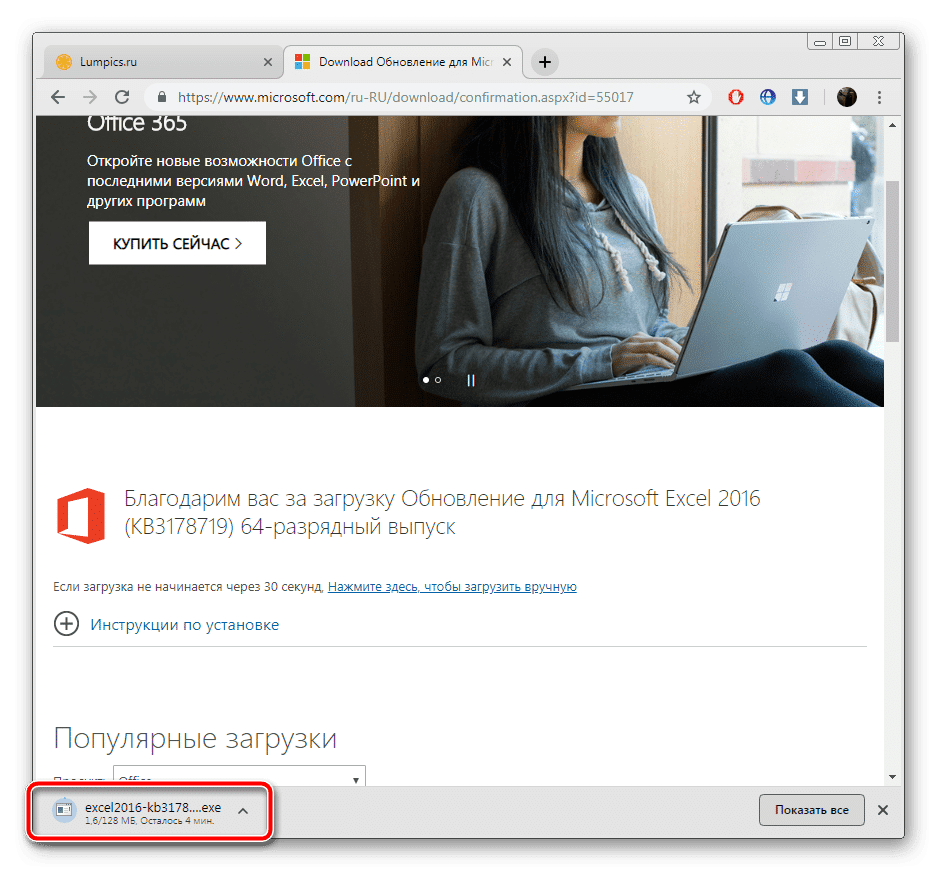
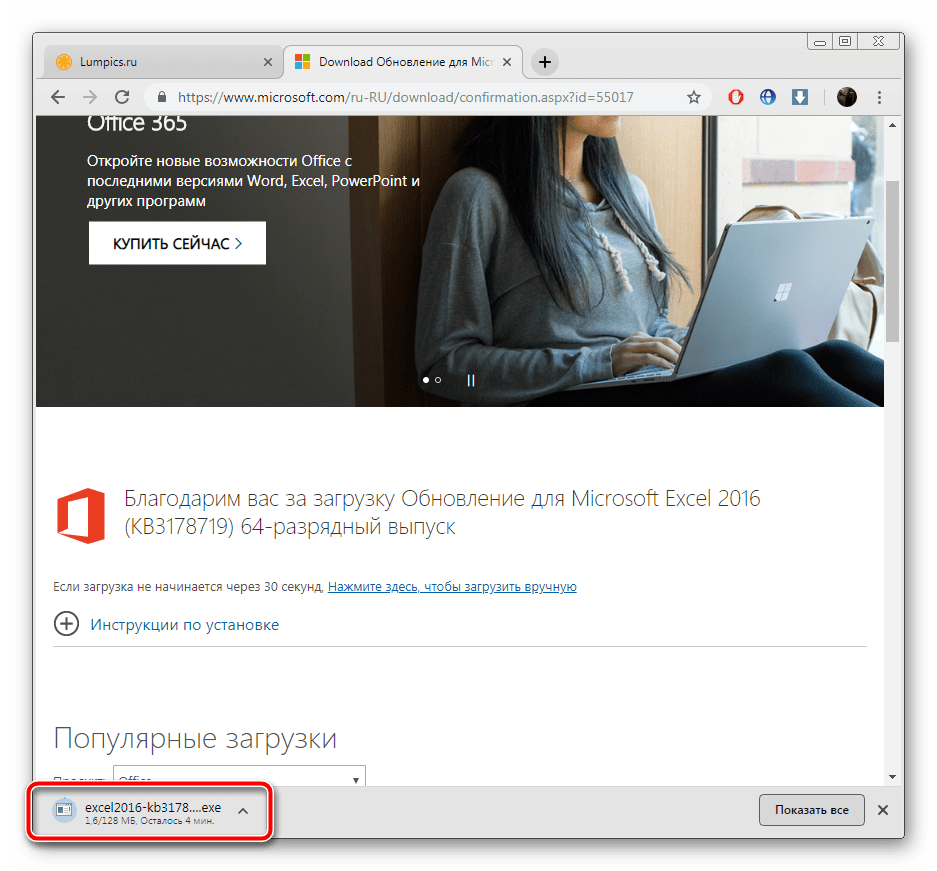
- Через загрузки браузера или место сохранения откройте загруженный инсталлятор.
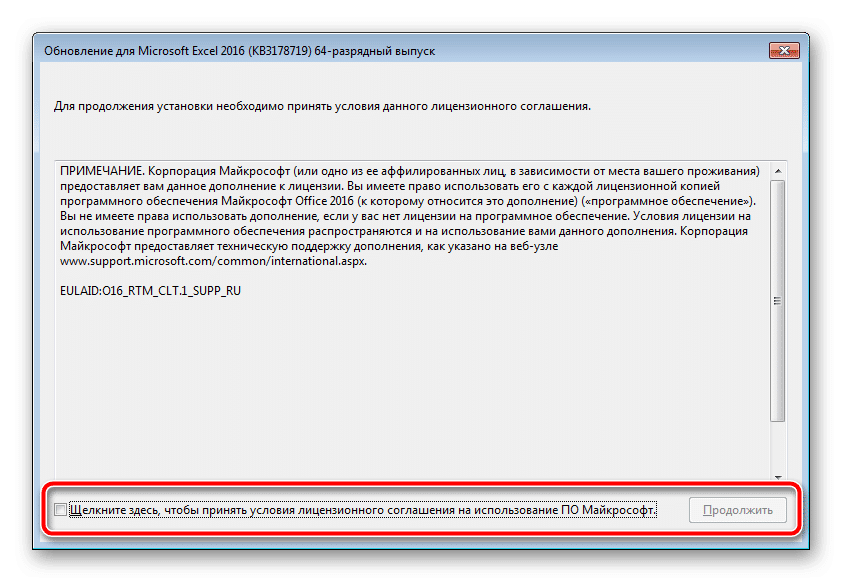
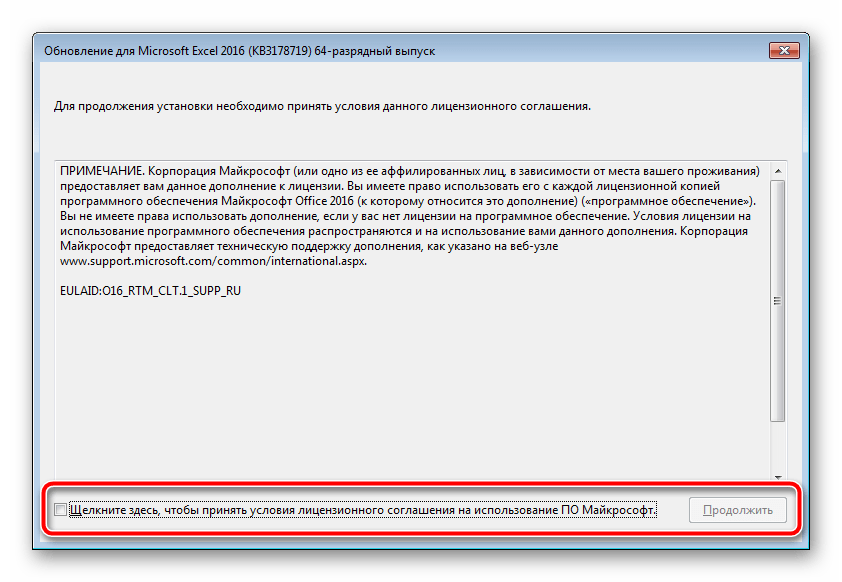
- Подтвердите лицензионное соглашение и ожидайте окончания установки обновлений.
Обновляем Microsoft Excel 2007 на компьютере
За все время существования рассматриваемого ПО вышло несколько его версий и для них было выпущено множество различных обновлений. Сейчас поддержка Excel 2007 и 2003 прекратилась, поскольку акцент был сделан на разработку и совершенствование более актуальных компонентов. Однако если для 2003 не найти никаких обновлений, то с 2007 дела обстоят немного по-другому.
Способ 1: Обновление через интерфейс программы
Данный метод все еще нормально функционирует в операционной системе Windows 7, но последующих версиях им пользоваться нельзя. Если же вы обладатель упомянутой выше ОС и хотите загрузить обновление к Excel 2007, сделать это можно так:
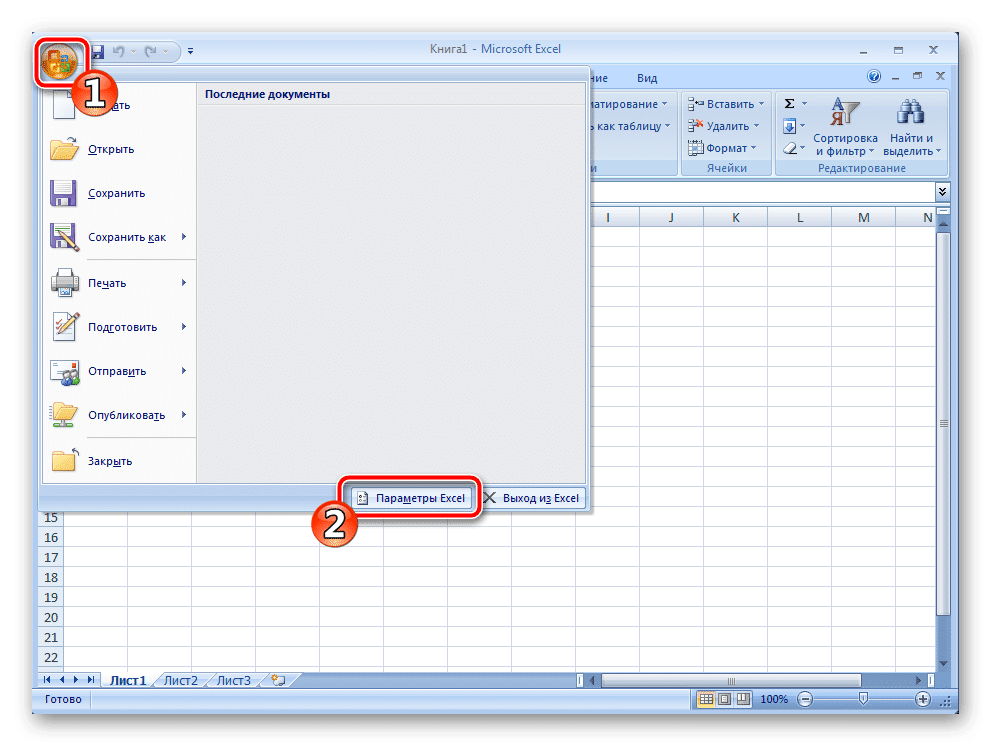
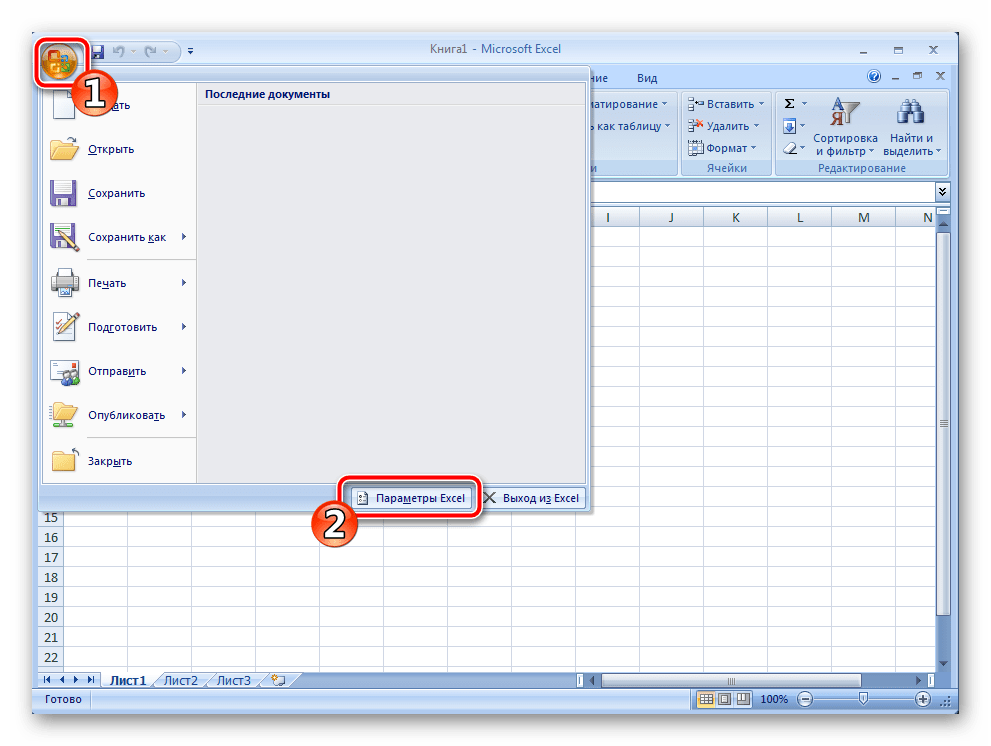
- Слева вверху окна находится кнопка «Меню». Нажмите ее и перейдите в «Параметры Excel».
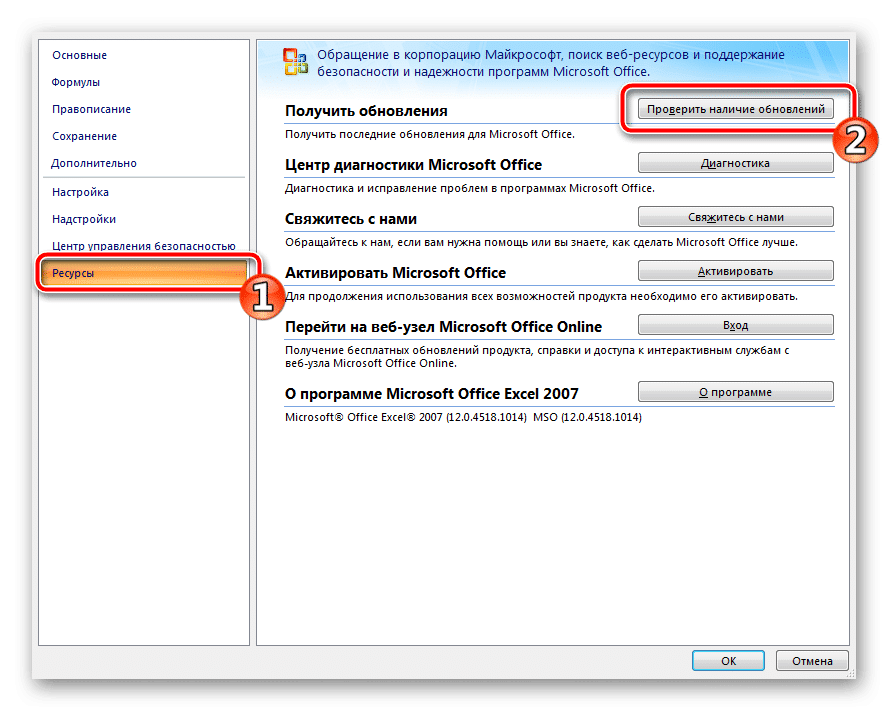
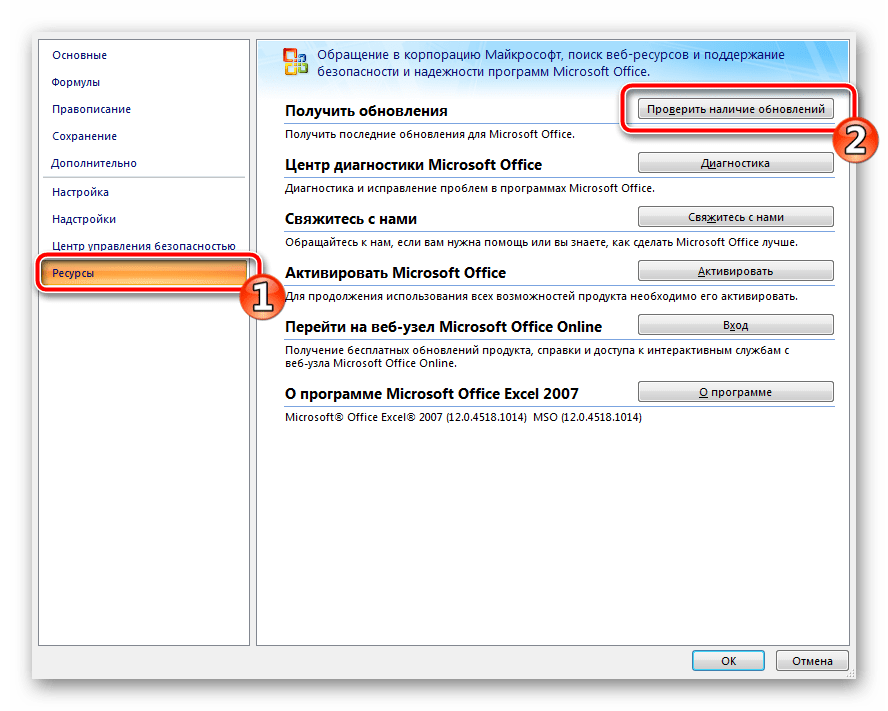
- В разделе «Ресурсы» выберите пункт «Проверить наличие обновлений».
- Дождитесь окончания сканирования и инсталляции, если это требуется.
Если перед вами отобразилось окно с просьбой воспользоваться «Центром обновления Windows», обратитесь к статьям по ссылкам ниже. В них предоставлены инструкции на тему запуска службы и ручной установки компонентов. Вместе со всеми остальными данными на ПК инсталлируются и файлы к Экселю.
Читайте также:
Запуск службы обновлений в Windows 7
Ручная установка обновлений в Windows 7
Способ 2: Ручная загрузка исправлений
Компания Microsoft на своем официальном сайте выкладывает файлы загрузок, чтобы при необходимости пользователь мог скачать их и установить вручную. За время поддержки работы Excel 2007 было выпущено одно крупное обновление, исправляющее некоторые ошибки и оптимизирующее программу. Поставить его на ПК можно следующим образом:
Скачать обновление для Microsoft Office Excel 2007 (KB2596596)
- Перейдите на страницу скачивания компонента по ссылке выше.
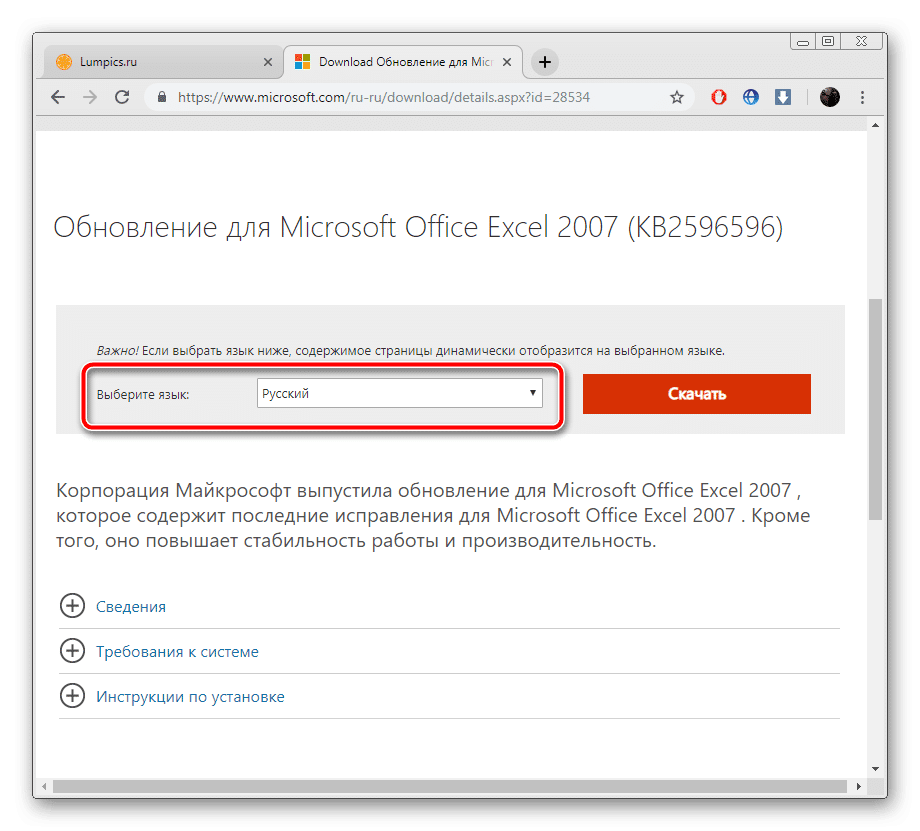
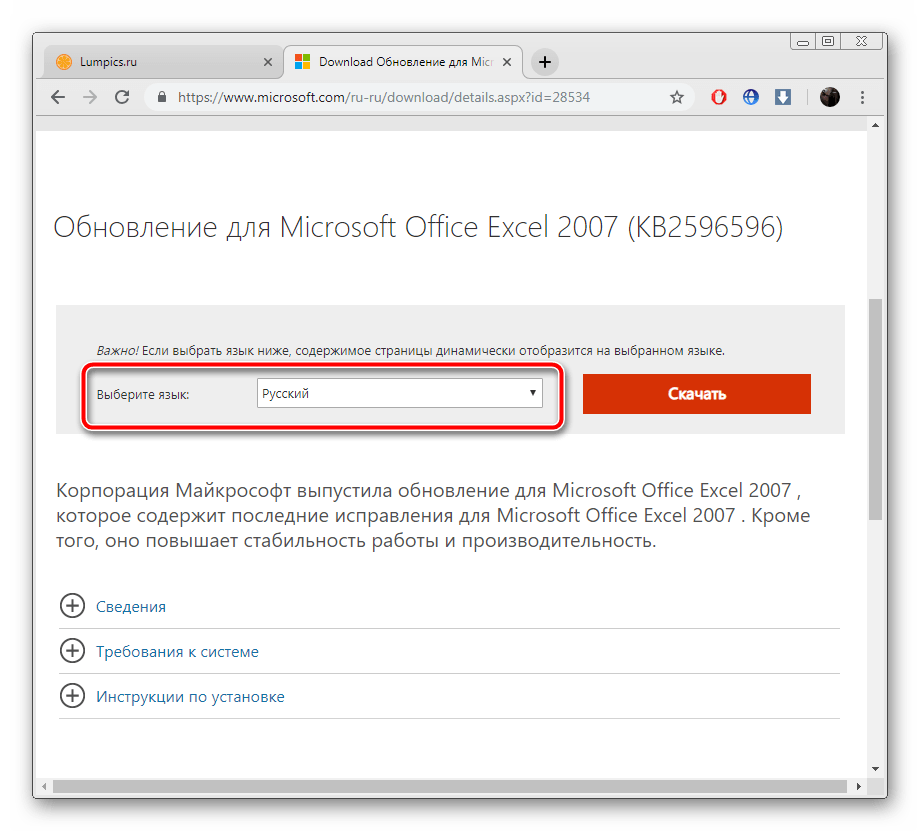
- Выберите подходящий язык.
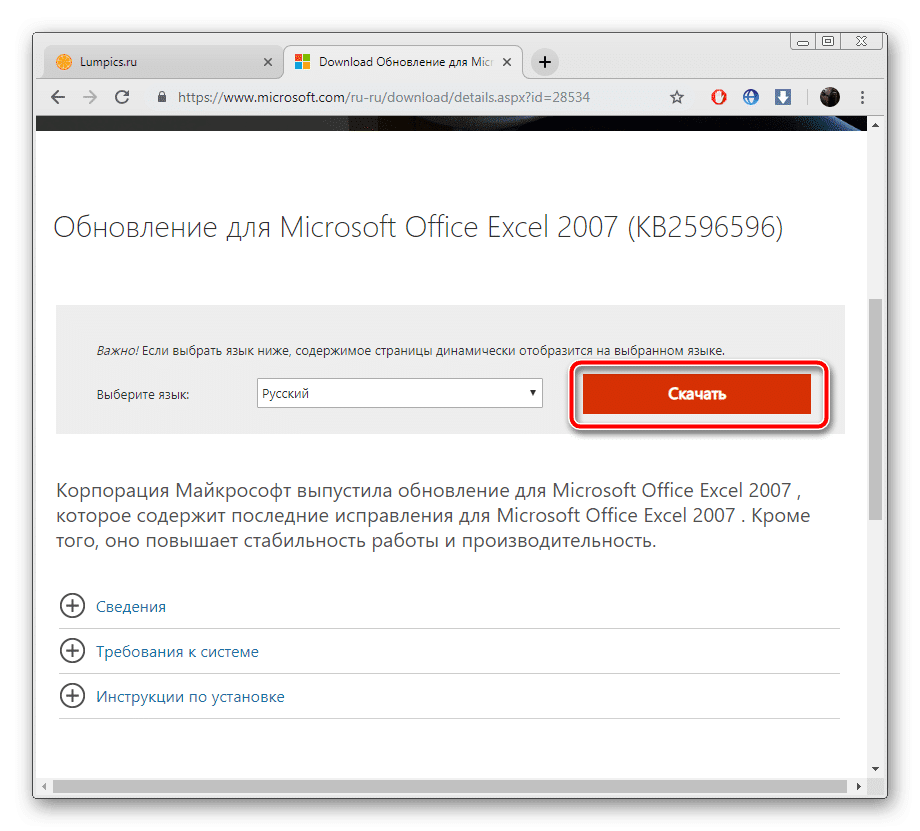
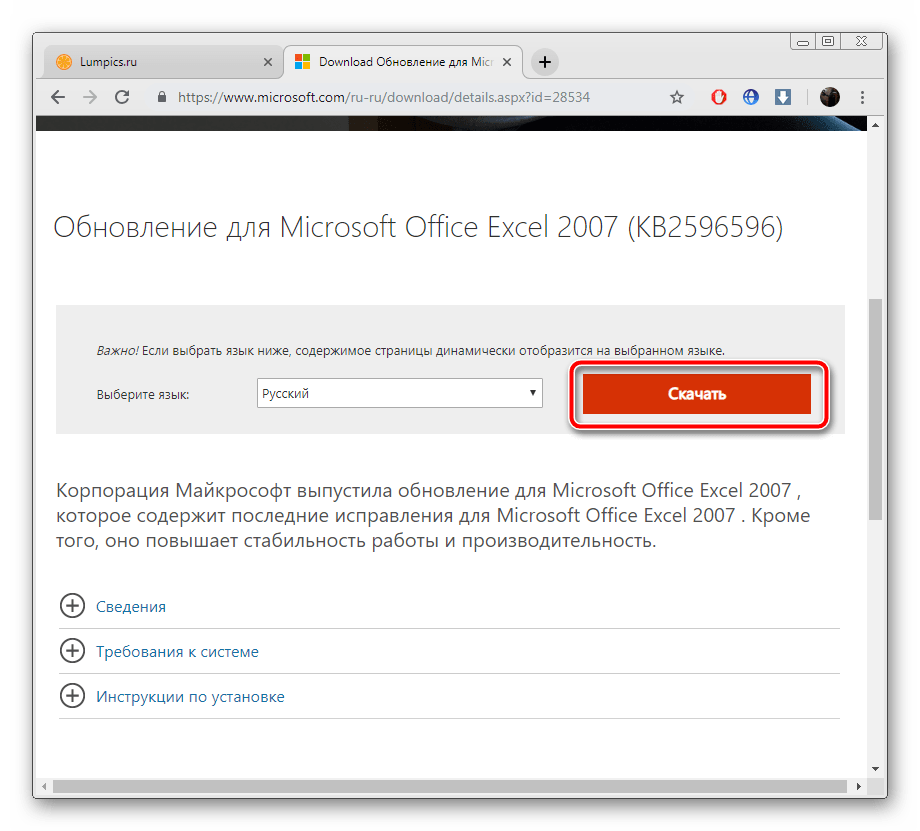
Кликните на соответствующую кнопку для начала загрузки.
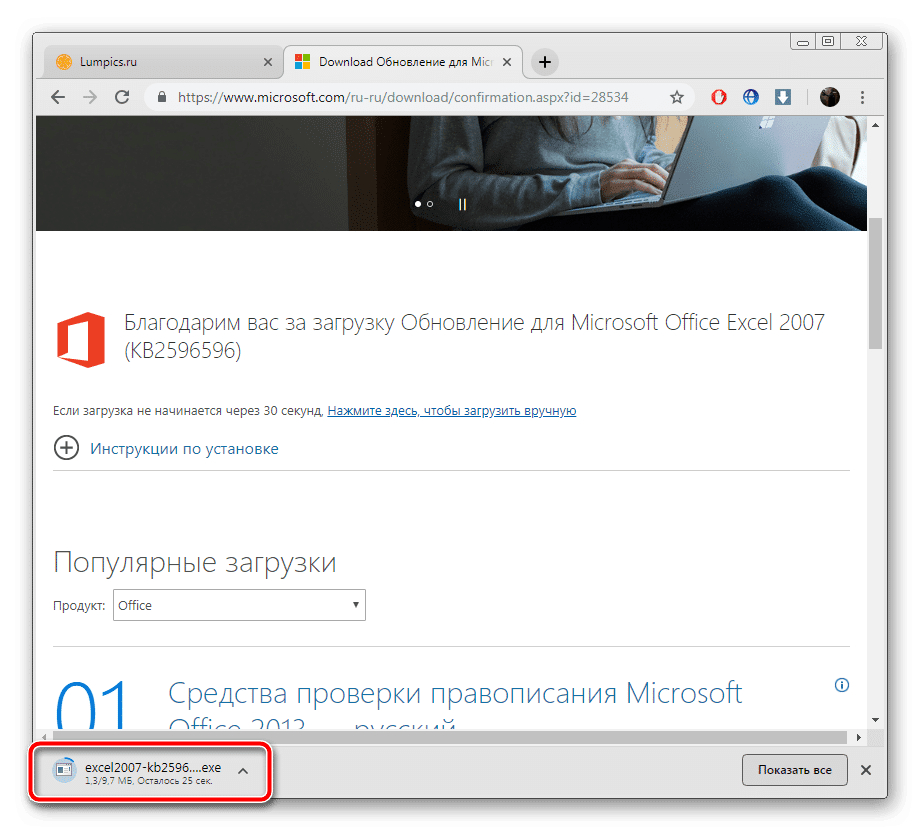
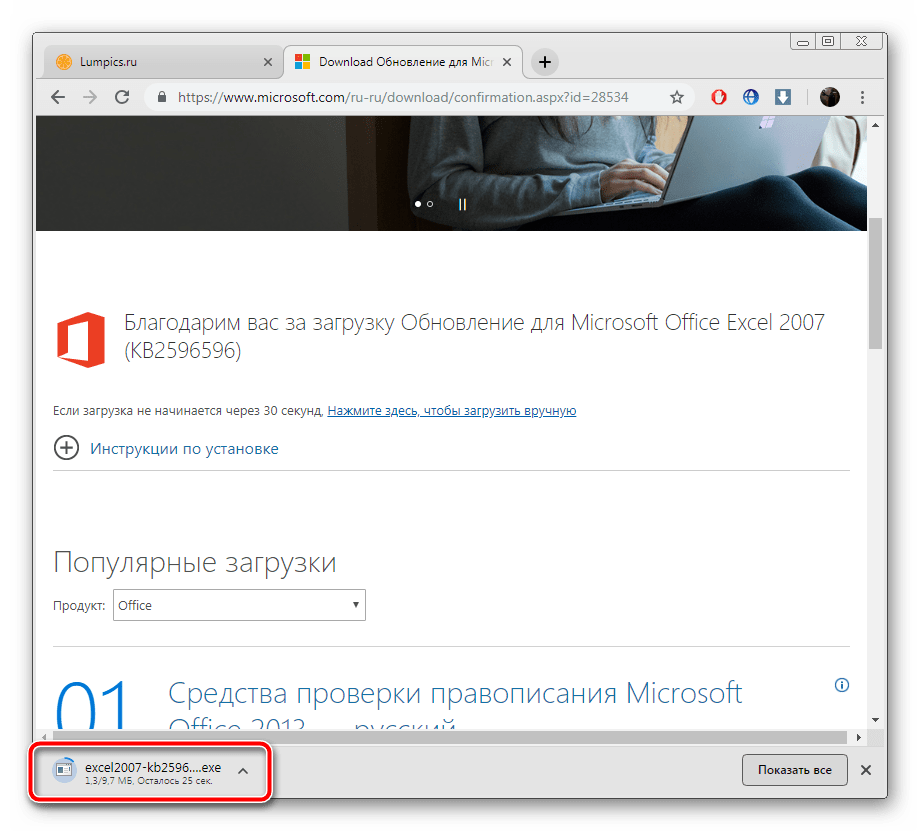
- Откройте автоматический инсталлятор.
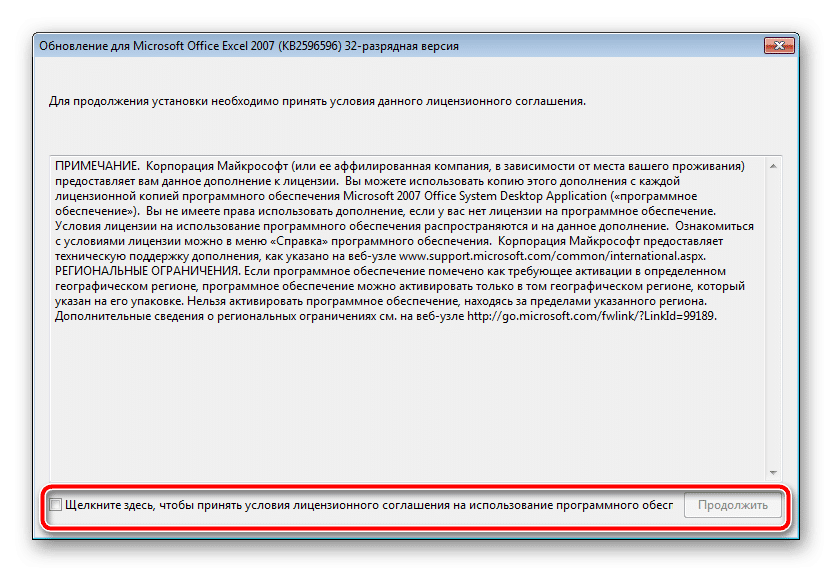
- Ознакомьтесь с лицензионным соглашением, подтвердите его и нажмите на «Продолжить».
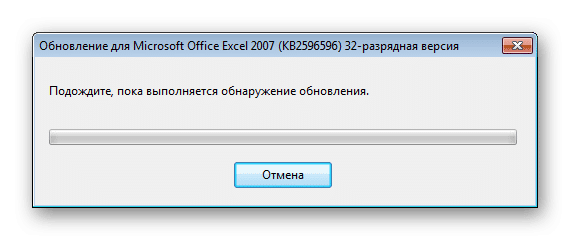
- Подождите, пока закончится обнаружение и установка.

Теперь вы можете запустить софт для работы с электронными таблицами.
Выше мы постарались максимально развернуто рассказать про обновления программы Microsoft Excel разных версий. Как видите, в этом нет ничего сложного, важно лишь выбрать подходящий метод и следовать приведенным инструкциям. Даже неопытный пользователь справится с поставленной задачей, поскольку для выполнения этого процесса не нужны дополнительные знания или навыки.
Еще статьи по данной теме:
Помогла ли Вам статья?
There are new updates of excel from time to time. These latest versions of excel come along with new features and other additional settings that may be beneficial to excel users. Excel does not promote auto-update. Thus it’s the responsibility of users to frequently check on the latest version and UpdateUpdate when necessary. To update excel, you need to be connected to the internet so that you can get the latest version of excel on the Microsoft site.
Updating the excel version is super quick and easy to do and only takes a few minutes to complete. However, the procedure of updating your excel largely depends on your previous version of excel. As a result of this, we shall discuss two methods that an excel user can use at any given time to update his excel.
Method 1 Excel 2010
This method involves the following steps:
1. Open Excel
Double click the Excel app icon, which resembles a green with a white «X» on it. This will open the excel launch page on which you can easily check if you’re excel is UpdateUpdate.
2. Click the excel Grid icon
Click on the Grid icon located on the top-left side of the screen. The grid icon is characterized by icons with rainbow colors. Then, choose Excel’s options button.
3. Select the «Resource» button
On excel’s options page, a left-down menu with various buttons is displayed. At the bottom of the menu, is where the Resource button is located. Click on this button, and various features are displayed on the right side of the menu.
4. Click the check for updates button
On the right side of «get updates,» click on the button named «Check for updates.» This link directs you to the Microsoft site, where you will get the latest Update. Your device needs to be connected to the internet. Download and install the latest version. You can therefore enjoy the latest features.
Method 2
If the version of your excel does not support the above procedure, go ahead and try this method. Steps involved in this method may include:
1. Open Excel
Double click the Excel app icon, which resembles a green with a white «X» on it. This will open the excel launch page on which you can easily check if you’re excel is UpdateUpdate.
2. Click the file tab
It is located in the top-left corner of the excel page. By clicking, a menu on the left side of the window is displayed. And then click on the «account» button.
3. Click the About option
It’s in the middle of the window. Clicking it prompts a pop-up menu. And then, click UpdateUpdate Now found on the pop-up box. Allow it to install the updates.
Install A New Version Manually
If the update button is missing then you need to install a new Excel version manually.
1. First Uninstall the existing office application(Search office on the search bar>> Right-Click then select uninstall)
2. Visit the Microsoft website and download and install the latest Excel Version
Download Article
Easily get the latest version of Excel
Download Article
- On Windows
- On a Mac
- Troubleshooting
- Expert Q&A
- Tips
- Warnings
|
|
|
|
|
This wikiHow guide teaches you how to check for updates in Microsoft Excel on a Windows or Mac computer. If updates are available, Excel will download and install them as needed. Keep in mind that Excel, like most Microsoft Office products, will usually update itself automatically. If your version of Excel doesn’t have an update button, you might have a volume license install or your company is managing Office updates.
Things You Should Know
- For Excel on Windows, navigate to File > Account > Update Options > Update Now.
- On macOS, go to Help > Check for Updates > check “Automatically Download and Install” > click “Check for Updates.”
- If you installed Excel via the Mac App Store, it’ll update automatically unless you’ve disabled automatic updates.
- If you don’t have an Update Options button, your Excel might be a volume license install or managed by your company.
-
1
Open Excel. Click or double-click the Excel app icon, which resembles a green box with a white «X» on it. This will open the Excel launch page.
- If you already had Excel open, make sure you save your work by pressing Ctrl+S. You can then skip the next step.
-
2
Click Blank document. It’s in the upper-left side of the launch page.
Advertisement
-
3
Click File. This option is in the top-left corner of the Excel window. Doing so brings up a menu on the left side of the window.
-
4
Click Account. You’ll find this in the left-hand column of options.
-
5
Click Update Options. It’s in the middle of the window. Clicking it prompts a pop-up menu.
-
6
Click Update Now. This option is in the pop-up menu.
- If you don’t see this option, first click Enable Updates in the pop-up menu. You should then be able to find the Update Now option in the pop-up menu.[1]
- If you don’t see this option, first click Enable Updates in the pop-up menu. You should then be able to find the Update Now option in the pop-up menu.[1]
-
7
Allow the updates to install. This may involve following some on-screen instructions or prompts (e.g., closing Excel). Once the updates finish installing, the update window will close and Excel will re-open.
- If no updates are available, you won’t see an update progress window appear.
- Shopping for PC accessories to up your spreadsheet productivity? Check out our coupon site for Staples discounts or our coupon site for Office Depot.
Advertisement
-
1
Open Excel. Click or double-click the Excel app icon, which resembles a green box with a white «X» on it.
- If you already had Excel open, make sure you save your work by pressing ⌘ Command+S before proceeding.
-
Note: If you downloaded Office/Excel from the Mac App Store and have automatic app updates enabled, they’ll update automatically. You can manually update by opening the Mac App Store, going to the Updates section, and clicking “Update” next to Excel.[2]
-
2
Click the Help menu item. It’s in the menu bar at the top of the screen. A drop-down menu will appear.
-
3
Click Check for Updates. This option is in the Help drop-down menu. Clicking it opens the update window.
-
4
Check the «Automatically Download and Install» box. It’s in the middle of the update window.[3]
-
5
Click Check for Updates. This blue button is in the bottom-right corner of the window.
-
6
Allow the updates to install. This may involve following some on-screen instructions or prompts (e.g., closing Excel). Once the updates finish installing, the update window will close and Excel will re-open.
- If no updates are available, you won’t see an update progress window appear.
Advertisement
-
1
If there isn’t an Update Options button, you might not have a version of Excel you can update manually. You might have a volume license install or your company is managing Office updates.
- You can try turning on automatic updates to update Office with Microsoft Update. Navigate to Settings > Update and security > Advanced options > Choose how updates are installed.[4]
- Then, click the checkbox for “Give me updates for other Microsoft products when I update Windows.”
- Check out our guide on updating Windows for more info.
- You can try turning on automatic updates to update Office with Microsoft Update. Navigate to Settings > Update and security > Advanced options > Choose how updates are installed.[4]
-
2
If your Mac App Store version of Excel isn’t updating automatically, turn on automatic updates. Follow these steps to get this feature up and running:
- Open the App Store. It’s the blue “A” icon.
- Go to “App Store” in the menu bar.
- Select “Preferences” from the drop-down menu.
- Select “Automatic Updates” in the preferences menu.
- For more ways to install updates, see our guide on checking for updates on a Mac.
Advertisement
Add New Question
-
Question
How can I get data analysis on excel?
Kyle Smith is a wikiHow Technology Writer, learning and sharing information about the latest technology. He has presented his research at multiple engineering conferences and is the writer and editor of hundreds of online electronics repair guides. Kyle received a BS in Industrial Engineering from Cal Poly, San Luis Obispo.
wikiHow Technology Writer
Expert Answer
Load and activate the Analysis ToolPak in Excel Add-ins. This will give you access to anova, descriptive stats, f-test, and more!
Ask a Question
200 characters left
Include your email address to get a message when this question is answered.
Submit
Advertisement
-
Updating Excel can prompt the rest of your Office 365 programs to update as well if you have automatic updates (the default setting) enabled for them.
Thanks for submitting a tip for review!
Advertisement
-
Excel will usually close during the update process, so it’s important to save your work before updating. If you don’t save your work, you’ll be asked if you want to recover the most recent saved version of your work the next time you open Excel.
Advertisement
About This Article
Thanks to all authors for creating a page that has been read 123,833 times.
Is this article up to date?
Excel for Microsoft 365 Word for Microsoft 365 Outlook for Microsoft 365 PowerPoint for Microsoft 365 Access for Microsoft 365 OneNote for Microsoft 365 Excel 2021 Word 2021 Outlook 2021 PowerPoint 2021 Access 2021 Office 2021 OneNote 2021 Excel 2019 Word 2019 Outlook 2019 PowerPoint 2019 Access 2019 Office 2019 Excel 2016 Word 2016 Outlook 2016 PowerPoint 2016 Access 2016 OneNote 2016 Project Professional 2016 Project Standard 2016 Office 2016 Excel 2013 Word 2013 Outlook 2013 PowerPoint 2013 Access 2013 OneNote 2013 Project Professional 2013 Project Standard 2013 Office 2013 Microsoft 365 for home Office for business Office 365 Small Business Office 365 operated by 21Vianet Word 2010 Outlook 2010 PowerPoint 2010 Project 2010 Project Standard 2010 Office 2010 Excel 2007 Word 2007 Outlook 2007 PowerPoint 2007 Project Standard 2007 Office 2007 InfoPath 2007 InfoPath 2010 InfoPath 2013 InfoPath Filler 2013 Office.com More…Less
On a Mac? See Check for Office for Mac updates automatically.
Click here for the Latest updates for versions of Office that use Windows Installer (MSI).
Choose your version of Office
If you’re not sure what version of Office you have, see What version of Office am I using?
Not sure which type of install you have?
Open an Office app to check your installation type
Note: If you can’t open an app to check your installation type, try the more common Click-to-Run or MSI uninstall steps first.
-
Create or open an existing file and select File > Account (or it might say Office Account).
-
Under Product information, find the About button and check for the following:
Click-to-Run
Click-to-Run installations have a Version and Build number, and include the phrase Click-to-Run.
Follow the Click-to-Run or MSI steps below.
MSI
An MSI installation doesn’t have a Version or Build number.
Follow the Click-to-Run or MSI steps below.
Microsoft Store
Microsoft Store installations have a Version and Build number, and include the phrase Microsoft Store.
If you have this installation type, select the Microsoft Store tab.
Newer versions of Office
-
Open any Office app, such as Word, and create a new document.
-
Go to File > Account (or Office Account if you opened Outlook).
-
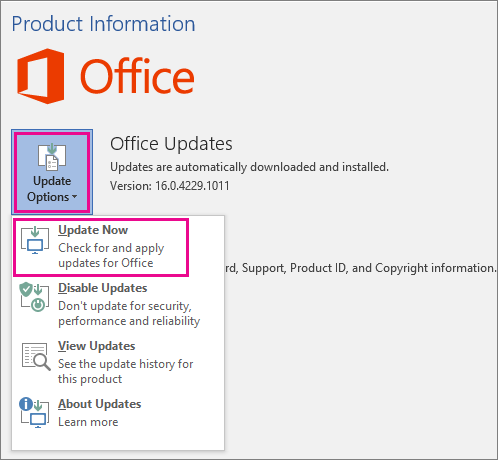
Under Product Information, choose Update Options > Update Now.
Note: You may need to click Enable Updates first if you don’t see the Update Now option right away.
-
Close the «You’re up to date!» window after Office is done checking for and installing updates.
You can also use the Update Options button to Disable Updates or to View Updates that were previously installed.
Office in the Microsoft Store
If you purchased Officefrom the Microsoft Store app on your Windows device, you can update Office from the same place!
-
Exit all Office apps.
-
Open the Microsoft Store app by typing «Microsoft Store» into the taskbar search and press Enter.
-
Click on the
icon and make sure you’re signed into the Microsoft account associated with your Office license.
-
Click on the
icon > choose Downloads and Updates.
-
Click Get Updates.
Note: If you get a «You’re good to go» message after clicking Get Updates, you don’t have any new updates to install.
Not working? Try this:
-
Make sure your PC is connected to the Internet.
-
If Update Options is missing and there’s only the About button, you either have a volume license install or your company is using Group Policy to manage Office updates. Try Microsoft Update or contact your company help desk.
-
To download an update manually, see Office Updates.
-
If you would like to update Office but can’t open any of your Office apps, try repairing your Office suite:
-
Go to Control Panel > Programs > Uninstall a program.
-
Find and select your version of Microsoft Office on your computer. In the bar above, click Change.
-
Select Quick Repair > Repair. If this does not work, retry the steps, but choose Online Repair instead. If you are still unable to open any apps, uninstall and reinstall Office.
-
Office 2013
-
1. Open any Office 2013 application, such as Word and create a new document.
-
2. Click File > Account (or Office Account if you opened Outlook 2013).
-
3. Under Product Information, choose Update Options.
Watch these steps in a video.
-
4. Click Enable Updates if the option is available.
-
5. Choose Update Now to manually check for and install Office updates.
-
6. Close the «You’re up to date!» window after Office is done checking for and installing updates.
Not working? Try this:
-
Make sure your PC is connected to the Internet.
-
If Update Options is missing under Product Information, and the About button is the only option available, you either have a volume license or your company is using Group Policy to manage Office updates. Try Microsoft Update to get the latest updates or contact your company help desk.
-
To download an update manually, see Office Updates.
-
If you would like to update Office but can’t open any of your Office apps, try repairing your Office suite.
Important:
Office 2010 is no longer supported. Upgrade to Microsoft 365 to work anywhere from any device and continue to receive support.
Upgrade now
-
Open any Office 2010 application, such as Word 2010 and create a document.
-
Go to File > Help > Check for Updates.
-
Choose Install Updates or Check for Updates. If neither option is available, follow the additional steps provided in the pop-up window that appeared after you chose Check for Updates.
Not working? Try this:
-
Make sure your PC is connected to the Internet.
-
If the Update option is missing or you’re unable to update, try Microsoft Update to install your Office updates through Windows.
-
To download an update manually, see Office Updates.
-
If you would like to update Office but can’t open any of your Office apps, try repairing your Office suite:
-
Go to Control Panel > Programs > Uninstall a program.
-
Find and select your version of Microsoft Office on your computer. In the bar above, click Change.
-
If you would like to update Office but can’t open any of your Office apps, try repairing your Office suite.
-
Thank you for using Office 2007. If you are looking for updates, Support has ended for Office 2007.
To use the newest features and get the most up-to-date security updates, we recommend you get the latest version of Office.
Upgrade to Microsoft 365
Thank you for using Office 2003. If you are looking for updates, Support has ended for Office 2003.
To use the newest features and get the most up-to-date security updates, we recommend you get the latest version of Office.
Upgrade to Microsoft 365
See Also
When do I get the newest features for Microsoft 365?
What’s new in Microsoft 365
Need more help?
Обновление Microsoft Excel на компьютере
Microsoft Excel предоставляет пользователям инструменты и функции, необходимые для работы с электронными таблицами. Его возможности постоянно расширяются, исправляются различные ошибки и исправляются присутствующие элементы. Для нормального взаимодействия с ПО его необходимо периодически обновлять. В разных версиях Excel этот процесс немного отличается.
Версия 2010 и все более поздние в настоящее время поддерживаются, поэтому для них регулярно выпускаются исправления и нововведения. Хотя Excel 2007 не поддерживается, обновления также доступны. Процесс установки описан во второй части нашей статьи. Поиск и установка во всех текущих сборках, кроме 2010, производятся одинаково. Если вы являетесь владельцем указанной версии, вам необходимо перейти на вкладку «Файл», открыть раздел «Справка» и нажать «Проверить наличие обновлений». Затем просто следуйте инструкциям на экране.
Пользователи более поздних версий должны прочитать инструкции по ссылке ниже. Подробно описан процесс установки нововведений и исправлений для новых сборок Microsoft Office.
существует также отдельное руководство для владельцев Excel 2016. В прошлом году для этого руководства было выпущено значительное обновление, в котором исправлены многие настройки. Его установка не всегда происходит автоматически, поэтому Microsoft предлагает сделать это вручную.
- Перейдите на страницу загрузки компонента по ссылке выше.
- Прокрутите страницу вниз до раздела Центр загрузок. Щелкните необходимую ссылку, в названии которой указана разрядность вашей операционной системы.
Выберите соответствующий язык и нажмите «Загрузить».
Подтвердите лицензионное соглашение и дождитесь установки обновлений.
Обновляем Microsoft Excel 2007 на компьютере
За все время существования рассматриваемого программного обеспечения были выпущены разные его версии и выпущено множество различных обновлений для них. Поддержка Excel 2007 и 2003 прекратилась, поскольку основное внимание уделялось разработке и совершенствованию самых последних компонентов. Однако, если вы не можете найти никаких обновлений для 2003 года, с 2007 года все немного по-другому.
Способ 1: Обновление через интерфейс программы
Этот метод по-прежнему отлично работает в операционной системе Windows 7, но более поздние версии использовать нельзя. Если вы являетесь владельцем указанной выше операционной системы и хотите загрузить обновление для Excel 2007, вы можете сделать это следующим образом:
- В левом верхнем углу окна находится кнопка «Меню». Щелкните и перейдите в Параметры Excel».
В разделе Ресурсы выберите Проверить обновления».
- При необходимости дождитесь завершения сканирования и установки.
Если вы видите окно с просьбой использовать Центр обновления Windows, обратитесь к статьям по ссылкам ниже. Они содержат инструкции о том, как запустить службу и вручную установить компоненты. Вместе со всеми другими данными на ПК устанавливаются файлы для Excel.
Способ 2: Ручная загрузка исправлений
Microsoft размещает загружаемые файлы на своем официальном веб-сайте, чтобы при необходимости пользователь мог загрузить и установить их вручную. В период поддержки Excel 2007 было выпущено крупное обновление, которое исправляет некоторые ошибки и оптимизирует программу. Вы можете установить его на свой компьютер следующим образом:
- Перейдите на страницу загрузки компонента по ссылке выше.
- Выберите подходящий язык.
Нажмите соответствующую кнопку, чтобы начать загрузку.
Откройте автоматический установщик.
Прочтите лицензионное соглашение, подтвердите его и нажмите «Продолжить».
Дождитесь завершения обнаружения и установки.
Теперь вы можете запустить программное обеспечение для работы с электронными таблицами.
Выше мы постарались максимально полно рассказать об обновлениях Microsoft Excel разных версий. Как видите, в этом нет ничего сложного, важно только выбрать подходящий метод и следовать предоставленным инструкциям. С поставленной задачей сможет справиться даже начинающий пользователь, так как для выполнения этого процесса не требуется никаких дополнительных знаний или навыков.
HOME
In the previous tutorial, I have explained about create a new excel file and write data in that new excel file using Java. In this tutorial, I will explain How to open and update existing excel files in Java.
I’m using Apache POI to write data to the excel file. To download and install Apache POI, refer here.
If you are using maven, then you need to add below dependency in pom.xml.
<!-- https://mvnrepository.com/artifact/org.apache.poi/poi -->
<dependency>
    <groupId>org.apache.poi</groupId>
    <artifactId>poi</artifactId>
    <version>5.0.0</version>
</dependency>


<!-- https://mvnrepository.com/artifact/org.apache.poi/poi-ooxml -->
<dependency>
    <groupId>org.apache.poi</groupId>
    <artifactId>poi-ooxml</artifactId>
    <version>5.0.0</version>
</dependency>
To know more about various interfaces and classes for managing Excel, please refer to this tutorial.
In the below example, I have an existing excel with the name of “EmployeeDetails.xlsx”
This is excel which I am going to update. I will add 2 rows below the last row in the excel.
Below is the complete example of updating the data in existing excel. One thing we need to note here is that we can update the excel file only when we close it first.
import java.io.File;
import java.io.FileInputStream;
import java.io.FileOutputStream;
import java.io.IOException;

import org.apache.poi.xssf.usermodel.XSSFCell;
import org.apache.poi.xssf.usermodel.XSSFRow;
import org.apache.poi.xssf.usermodel.XSSFSheet;
import org.apache.poi.xssf.usermodel.XSSFWorkbook;

public class ExcelFileUpdateExample {

	public static void main(String[] args) {

		try {

			FileInputStream fis = new FileInputStream(new File("EmployeeDetails.xlsx"));

			// Create object of XSSFWorkbook class
			XSSFWorkbook workbook = new XSSFWorkbook(fis);

			// Create object of XSSFWorkbook class
			XSSFSheet sheet = workbook.getSheet("Write_TestData");

			Object[][] bookData = { { "SeleniumTest", "0000A", 9999 }, { "JavaTest", "0000B", 9990 }, };

			// Get last row in Sheet
			int rowCount = sheet.getLastRowNum();

			for (Object[] Book : bookData) {

				// Create row for all the new data
				XSSFRow row = sheet.createRow(++rowCount);

				int columnCount = 0;

				// Create new cell for each row
				XSSFCell cell = row.createCell(columnCount);

				for (Object field : Book) {

					cell = row.createCell(columnCount++);
					if (field instanceof String) {
						cell.setCellValue((String) field);
					} else if (field instanceof Integer) {
						cell.setCellValue((Integer) field);
					}
				}

			}

			fis.close();

			// Write the workbook in file system
			FileOutputStream outputStream = new FileOutputStream("EmployeeDetails.xlsx");
			workbook.write(outputStream);
			System.out.println("Excel is updated successfully");

			// Close the workbook
			workbook.close();
			outputStream.close();

		} catch (IOException e) {
			e.printStackTrace();
		}
	}

}
Below is the updated excel.
Update a specific cell in the Excel file
In the below example, I will update the value in a specific cell. As you can see the above image, I will update 1004S to “Updated Value”. Below is the code snippet for the same.
XSSFCell cell = sheet.getRow(4).getCell(1);

cell.setCellType(CellType.STRING);
cell.setCellValue("Updated Value");
Below is the entire program.
package com.example.seleniumdemo;

import java.io.File;
import java.io.FileInputStream;
import java.io.FileOutputStream;
import java.io.IOException;

import org.apache.poi.ss.usermodel.CellType;
import org.apache.poi.xssf.usermodel.XSSFCell;
import org.apache.poi.xssf.usermodel.XSSFSheet;
import org.apache.poi.xssf.usermodel.XSSFWorkbook;

public class UpdateExcelDemo {

	public static void main(String[] args) {

		try {

			// Create an object of FileInputStream class to read excel file
			FileInputStream fis = new FileInputStream(new File("EmployeeDetails.xlsx"));

			// Create object of XSSFWorkbook class
			XSSFWorkbook workbook = new XSSFWorkbook(fis);

			// Read excel sheet by sheet name
			XSSFSheet sheet = workbook.getSheet("Write_TestData");

			// Print data present at row 0 column 2
			System.out.println(sheet.getRow(4).getCell(1).getStringCellValue());

			// Get the Cell at index 3 from the above row
			XSSFCell cell = sheet.getRow(4).getCell(1);

			cell.setCellType(CellType.STRING);
			cell.setCellValue("Updated Value");

			// Write the output to the file
			FileOutputStream fileOut = new FileOutputStream(new File("EmployeeDetails.xlsx"));
			workbook.write(fileOut);

			System.out.println("Id column in Excel is updated successfully");
			fileOut.close();

			// Closing the workbook
			workbook.close();

		} catch (IOException e) {
			e.printStackTrace();
		}

	}
}
That’s it! Well done.
Congratulations on making it through this tutorial and hope you found it useful! Happy Learning!! Cheers!!
Summary: Are you unable to open Excel file after upgrading to a new version? Read this blog to know the possible reasons behind such an issue. Also, find the solutions on ‘how to repair Excel files after upgrade?’. If you are worried about losing your crucial spreadsheet data, try using a specialized Excel file repair tool to repair the file and recover all its data.

Microsoft Excel is an advanced spreadsheet software program by Microsoft, included in the MS Office suite of applications. Apart from the basic spreadsheet features, Excel is used for recording, organizing, analyzing, formatting and manipulating numerical data. In addition to that, Excel features graphing tools, pivot tables and also VBA macro capabilities. Microsoft Excel is part of the Microsoft Office Suite and it is used both for personal and business objectives. XLS and XLSX are the two extensions for an Excel file and thanks to backward compatibility each file can be easily opened in any of the two versions.
But do you think even after possessing such an impressive suite of features MS Excel is a full-proof application? The answer to that is no! There are a lot of unforeseen situations that Excel users can face when working with the application. Take the following problem scenario for example.
Problem Scenario
We were recently contacted by a user who claimed that:
“I recently upgraded to Excel 2016 and I am unable to open existing Excel files from outside Excel 2016 using the shortcuts or double clicking on icons. When I was using Excel 2013, it was working fine on Windows 7 Professional.”
Problems like these are of course confusing. After all, why would an update from Microsoft mess up the working of the already installed Excel application? But it is a sad truth. There are times when an Excel file doesn’t open after a recent MS excel upgrade or Windows upgrade. What are the reasons behind such an issue and what can users do to repair Excel after upgrade?
Reasons Behind the ‘Unable to Open Excel File’ Issue
Here are some of the reasons why Excel files might not open after an upgrade:
- Microsoft Excel hasn’t been correctly installed or upgraded on your laptop/computer
- The Excel files might have been corrupted
- Microsoft Excel is not able to get access to the default printer setup on the laptop/computer
- Other third-party applications such as Tuneup utilities, Kaspersky Antivirus, Abby FineReader, etc. may cause the problem
- Sometimes add-ins can be the reason behind your problem
- Your MS Office might be running in a compatibility mode for a prior version than the current version of Windows you own
- Hardware Graphic Acceleration might be the issue
- There might be some issues in the Protected View
Regardless of whether you’re able to spot the exact trigger for the issue, you can try the below mentioned solutions to repair Excel files after upgrade.
Solutions to Repair Excel After Upgrade
You can try the below fixes to repair Excel files after upgrade:
Solution 1: Install Updates
As a first step, update your Microsoft Excel and Windows to the latest patch.
Solution 2: Restart & Repair Excel
You can fix the issue by simply restarting Excel 2016. If it doesn’t fix the issue, you need to repair Excel by following these steps:
- Open Windows Control Panel and go to the list of installed Programs
- Click the MS Office product you want to repair and click on Change
- Follow remaining instructions
Solution 3: Reinstall Microsoft Office
Solution 4: Change your default installed printer
If the issue is due to faulty printer setup, follow the below-mentioned steps:
- Close all open Office applications
- Change your default printer by going to: Start -> Devices and Printers. It may not be necessarily a physical one, it may be One Note or XPS or PDF or anything else.
Note: Remember to upgrade all the Printers Drivers to the latest version from the internet.
Solution 5: Check third-party problem causing programs
Sometimes third-party applications like antivirus utilities, etc. can cause issues within Office programs. Try closing all of them one by one and open the faulty Excel file each time to see the effect.
Solution 6: Disable Add-ins
To determine whether add-ins are the ones creating the issue, you need to open Excel in Safe Mode and see if it helps. To open excel in safe mode-
- Press and hold the Ctrl key on your keyboard and then click on the Excel icon.
- Otherwise, type “excel /safe” in the Run application and then press OK.

If the problem has been eliminated, restart Excel in normal mode and disable all add-ins one by one. You can try to determine which add-in is the main culprit by restarting Excel every time you disable one.
Solution 7: Disable the Hardware Graphic Acceleration
To disable Hardware Graphic Acceleration, follow these steps:
- Open Excel
- Go to File -> Options
- Go to Advanced tab -> Display
- Check the box for ‘Disable Hardware Graphic Acceleration’

- Click OK and then restart the Excel
Solution 8: Fix issues with Protected View
Follow the below mentioned steps:
- Open Excel
- Go to File ->Options
- Select Trust Centre ->Trust Centre Settings

- Click on Protected View
- Uncheck all options

Also change the below settings
- Under Trust Centre settings, go to ‘File Block Settings’
- Uncheck all options

Hopefully one of the above manual solutions should help you repair Excel after upgrade. If it doesn’t, you might be dealing with a heavily corrupted file. In such a case, to overcome the issue use automated Excel repair utility, Stellar Repair for Excel.
The best alternative to manual solutions
Stellar Repair for Excel software is a professional utility to fix corruptions within Excel files.
The competent and efficient software quickly scans even the most severely corrupted Excel files and repairs them to facilitate the recovery of tables, forms, reports, cell data, formatting etc. from them. It is a complete DIY product equipped with an interactive GUI and comes with a free preview feature which lets you view recoverable data before saving the repaired Excel file data.

Final Words
Hope you’ll be able to repair Excel files after an upgrade by using one of the above fixes. Remember to always backup your critical files to avoid data loss situations. If nothing works, you can place your trust in reliable products like Stellar Repair for Excel.
So, what are your views on this? Do let us know in the comments below.
About The Author
Priyanka
Priyanka is a technology expert working for key technology domains that revolve around Data Recovery and related software’s. She got expertise on related subjects like SQL Database, Access Database, QuickBooks, and Microsoft Excel. Loves to write on different technology and data recovery subjects on regular basis. Technology freak who always found exploring neo-tech subjects, when not writing, research is something that keeps her going in life.
Best Selling Products

Stellar Repair for Excel
Stellar Repair for Excel software provid
Read More

Stellar Toolkit for File Repair
Microsoft office file repair toolkit to
Read More

Stellar Repair for QuickBooks ® Software
The most advanced tool to repair severel
Read More

Stellar Repair for Access
Powerful tool, widely trusted by users &
Read More
Does your Excel spreadsheet suddenly starts showing “we can’t update some of the links error”? If you don’t know why you are encountering such an error then let me explain this to you first.
If your Excel workbook is having a link with the data of another workbook or file which was shifted to some other location. In such case when you try to open your Excel workbook it will throw the following “Excel we can’t update some of the links error”.
This message is given a clear indication that your workbook having external references from the source which is currently not found.
Well, this issue can be fixed easily by updating the link path of the source file. But if you are unable to fetch it or not having access to the document which was originally linked. Then in that case you can try updating the link by disabling the automatic update feature or by fixing/removing the Excel broken link.
To know how to perform all these tasks to fix “we can’t update some of the links “Excel error. You need to go through the complete post.
So, let’s dive in…!
But before getting into the fixes section. First, take a look over the practical scenario which user like you are already been facing regarding this error.
To extract data from corrupt Excel file, we recommend this tool:
This software will prevent Excel workbook data such as BI data, financial reports & other analytical information from corruption and data loss. With this software you can rebuild corrupt Excel files and restore every single visual representation & dataset to its original, intact state in 3 easy steps:
- Download Excel File Repair Tool rated Excellent by Softpedia, Softonic & CNET.
- Select the corrupt Excel file (XLS, XLSX) & click Repair to initiate the repair process.
- Preview the repaired files and click Save File to save the files at desired location.
Practical Scenario:
I have a destination workbook which contains links to various source documents. I have used this set up for months and have never had a problem. Each month I click edit links – change source – and then click on the new source file that I want to use for the current month. This month when I have done that I keep getting an error message ‘Cannot access XXXX.xlsx’. Help!!
I always try to link to the file on my local PC, but have noticed that the links always change to d.docs.live.net/[strange string of letters/numbers] – I assumed this was just something to do with working with OneDrive but don’t know if this is causing a problem?
Thanks in advance…!
SOURCE: https://techcommunity.microsoft.com/t5/Excel/Edit-links-change-source-file-error-message-Cannot-access-XXX/m-p/150290
How To Remove “We Can’t Update Some Of The Links In Your Workbook” Error?
Method 1: Unlock Protected Excel Worksheet
Mostly it is seen that users encounter “Excel edit links error source not found” issue also when they had protected Excel worksheet. Know complete steps to unlock password protected Excel worksheet. This process will help to Break The Link To An External Reference In Excel.
If you have the password of your protected Excel sheet, then the task of removing protection only takes a few seconds. You can try any of the following methods to unlock your protected sheet:
Way #1. Make a right-click on the Sheet tab. Now from the context menu choose the Unprotect Sheet option.
Way #2. Go to the Review tab on your Excel application menu bar. Now from the Changes group, hit the option Unprotect Sheet.
Way #3. From the Home tab under the Cells group, tap the Format option. after than from the drop-down menu choose the Unprotect Sheet
If your Excel worksheet is password-protected then the Excel application will ask you to put the correct password. So, in that case, just type the password and tap to the OK option.
But if your Excel worksheet was not locked with any password then tapping on the Unprotect Sheet option will unlock the protected sheet.
Method 2: Fix Excel Break Links
Keep a backup copy of your Excel workbook before starting up this procedure. As, the actions can’t be undone.
- Firstly, you need to open your Excel workbook which is showing the “Excel break links not working” or we can’t update some of the links in your workbook error.
- After then go to the Data tab, and hit the Edit Links option.
- You will see that the Edit Links command appears unavailable if the Excel workbook doesn’t have any links.
- Now in the Source file box, make a selection for the broken link that you want to fix.
- Now tap to the Change Source
- Search to the destination of a file having linked data.
- Choose the new source file after then hit the Change Source
- Tap to the Close
Method 3: Remove Excel Break Links
When any Excel user breaks a link in their Excel spreadsheet, all the formulas that are referring to the source file will attain their current value.
Suppose, if your Excel cell is having the formula =SUM([Budget.xls]Annual!C10:C25) and gives the answer 45. In that case, after breaking the link the formula would be converted to simple digits 45.
So, if you get stuck to the Excel edit links not working issue then break the link to an external reference in Excel. let’s know how to perform this:
- At first, Open your excel workbook showing the Excel edit links not working error.
- Now go to the Data tab, and hit the Edit Links
- If your workbook doesn’t have any links then the Edit Links command seems inactive.
- If the Edit Links command seems active then go to the Source file From this box choose the broken links which you want to delete.
- After the selection tap the Break Link
- At last, make a press on the Close
Method 4: Disable Excel Update Links Error Message
In the Excel workbook, we make external links with some other Excel workbooks. In such case, when you try to open your Excel workbook having the external links each time it will show the following warning message:
So, learn how can you get rid of this annoying Excel update link error message. Well, you can perform this task in two ways:
- By Disabling the update links message with Excel Options
- By Disabling the update links message with the Edit Links feature
Disable Update Links Message With Excel Options
You can easily fix Excel update links error message by disabling the update links message with Excel Options. So, please do the same as instructed below:
- Go to the File tab of your Excel workbook and then tap the Options button. This will open the Excel Options dialog box; from this tap the Advanced option present in the left pane.
- After that uncheck the option Ask to update automatic links present within the General Take a look at the figure:
- now tap to the OK option for closing the opened dialog box. Again, when you open this workbook, you will find that the links were automatic gets updated. And you won’t get any error messages this time.
Disable Update Links Message With Edit Links Feature
The first method to fix Excel update links error message is by disabling the update links message with the edit links feature. Let’s know how it is to be done:
- Tap to the Data after than on the Edit Links option, have a look over the screenshot:
- Within the Edit Links dialog box, tap the Startup Prompt option present at the bottom. Check out the following figure for a clear idea:
- In the opened Startup Prompt dialog box, select either Don’t display the alert and update links or Don’t display the alert and don’t update automatic links option as per your need.
- Tap to the OK option and close the opened dialog box. After making the complete procedure when you open the workbook next time, you won’t get any update link message in your Excel workbook anymore.
Wrap Up:
Linked object and hyperlink are two different things so don’t mix them up. All the solutions mentioned above can’t fix Excel broken hyperlinks. To catch more information on Excel hyperlinks, check out the following article:Easy Ways to Fix Hyperlinks in Excel Are Not Working
Priyanka is an entrepreneur & content marketing expert. She writes tech blogs and has expertise in MS Office, Excel, and other tech subjects. Her distinctive art of presenting tech information in the easy-to-understand language is very impressive. When not writing, she loves unplanned travels.






 icon and make sure you’re signed into the Microsoft account associated with your Office license.
 icon > choose Downloads and Updates.


