
![]()
Download Article
![]()
Download Article
If you’re not very familiar with Microsoft Excel, it might seem an intimidating program to use. Fortunately, it’s easy to get started. You can type in data, copy and paste it from other documents, and format it with just a few clicks. With a little practice, you’ll be able to quickly enter, edit and manage data in Microsoft Excel.
-

1
Launch Microsoft Excel. You can locate Excel by clicking the «Start» menu, selecting «All Programs,» selecting «Microsoft Office» and then choosing «Microsoft Excel.» Excel comes with the Microsoft Office suite of products generally packaged with Windows computers and notebooks.
- Mac users who have purchased Excel for Mac will find the program located in their Dock or among by opening «Finder» and then selecting «Applications.»
-
2
Open a spreadsheet. A blank «workbook» may automatically appear upon opening Excel. Otherwise, you’ll see a «Template Gallery» from which you can either select a new blank workbook or a specially formatted template.
- You may always open a new spreadsheet while working on another workbook in Excel. Simply click on «File» from the menu bar and select the «New Workbook» option.
Advertisement
-
3
Enter data into desired cells. You may type numbers, words, equations, formulas or functions in any cell after selecting and clicking on it. [1]
- When finished with a given cell, press ↵ Enter or Tab ↹ to automatically move to the next cell horizontally.
- You may also create a new line within a cell on which to add more text. Simply enter a «Line Break» by pressing Alt+↵ Enter.
-
4
Create headings for your columns. Enter text into Row 1 to create column headings for your data. For instance, enter «Name» into cell A1 and “Date” into cell B1 and allow these to serve as your column headers for tracking name and date information.
-
5
Create a sequenced data series. Excel is able to learn patterns underlying your data and then fill in data based on those pattern to save you time and energy. Begin by establishing a pattern in consecutive cells (e.g. typing «January» in one cell and «February» in the next). Then select the populated cells and click and drag the bottom right corner of your selected rectangle to expand the pattern into new cells. Excel will automatically recognize your established pattern and fill in subsequent cells with «March», «April» and so on.
- Excel can recognize many common patterns such as days of the week, evenly-spaced dates, consecutive numbers and many others.
-
6
Select a range of cells. To select a range of cells with via your mouse (in order to format or edit larger quantities of data), simply click the beginning or end of a data range and drag your cursor in your desired direction to highlight the appropriate text. There are also a number of helpful keyboard shortcuts enumerated below.[2]
- Pressing Ctrl and the spacebar extends a selection throughout the column where the original cell is located.
- Pressing ⇧ Shift and the spacebar extends a selection throughout the row where the original cell is located.
- Pressing Ctrl+⇧ Shift and the spacebar or Ctrl+A will select the entire worksheet.
-
7
Insert row(s). Begin by clicking a row number (this will select the entire row). Select the row that you’d like your new row to go above. Right-click (Control+click on Mac) and select «Insert» from the menu that appears.[3]
- This function is also available from the «Home» tab by selecting «Insert» from the «Cells» then «Insert Sheet Rows.»
- Inserting multiple rows requires you to select multiple rows above the location in which you wish to place new rows. Simply select the same number of rows that you want inserted below.
-
8
Insert columns(s). Begin by clicking a column letter (this will select the entire column). Select the column that you’d like your new column to go to the left of. Right-click (Control+click on Mac) and select «Insert» from the menu that appears.
- This function is also available from the «Home» tab by selecting «Insert» from the «Cells» then «Insert Sheet Rows.»
- Inserting multiple columns requires you to select multiple columns to the right of the location in which you wish to place new columns. Simply select the same number of columns that you want inserted to the left.


Advertisement
-
1
Copy one or more cells. After selecting the cell(s) you wish to copy, right-click and select «Copy» from the menu that appears. Alternately press Ctrl+C (or ⌘ Command+C for Mac users). This will add the selected data to your clipboard.
-
2
Cut one or more cells. After selecting the cell(s) you wish to cut, right-click and select «Cut» from the menu that appears. Alternately press Ctrl+X (or ⌘ Command+X for Mac users). This will add the selected data to your clipboard.
-
3
Paste one or more cells. After selecting the cell(s) in which you wish to paste your data, right-click and select «Paste» from the menu that appears. Alternately, press Ctrl (or ⌘ Command for Mac users). This will paste the contents of the copied or cut cell(s).
- If your cell contains a formula, «Paste» will paste the formula not calculated value of the formula. In order to «Paste» cell values, use «Paste Special»
-
4
Paste cell values instead of formulas. Begin by selecting «Edit» from the «Home» tab and clicking «Paste Special.» Select «Values» from the list of attributes to paste. [4]
- Depending on your version of Excel, other options in the «Paste Special» may include «Comments» (text comments which can be added to individual cells), «Formats» (all text formatting selections), or «All» to paste everything at once. [5]
- Depending on your version of Excel, other options in the «Paste Special» may include «Comments» (text comments which can be added to individual cells), «Formats» (all text formatting selections), or «All» to paste everything at once. [5]
-
5
Delete cell content. Simply select the cell(s) in which you wish to delete text and press Del or right-click and select «Delete» from the menu that appears.
-
6
Move cells, rows or columns. Highlight your chosen cells and activate the «move pointer» (appearing as four directional arrows for Windows users or as a hand icon for Mac users). Drag to your preferred location to replace any existing data there with the cells you’ve decided to move[6]
-
7
Use a formula. Excel uses «formulas» to make calculations within a cell and can reference other cells as part of that calculation. Click the cell in which you wish to enter the formula and then begin by typing «=». Now type a mathematical formula and click «Enter». Excel will display the results (not the formula itself).
- You can also learn more about How to Type Formulas in Microsoft Excel
-
8
Reference values from other cells. Formulas can reference other cells and their values. While typing a formula, simply click a single cell or a range of cells and Excel will automatically populate the cell’s name (e.g., B2, D5) into your formula. Now your formula references that specific cell and will draw a value from it continuously. If the value in the referenced cell changes, the results of your formula will as well.
- You can also reference values from other worksheets. Begin by selecting the cell in which you wish to reference a value, type an «=’ in the formula bar and then type your desired formula immediately after the «=.» After typing the formula, simply click on the tab for the worksheet you wish to reference and then select the desired data range that you want entered into the formula.
-
9
Track your changes. You can track changes by selecting «Tools» from the menu bar and then clicking «Track Changes.» Finally, select «Highlight Changes.»
- If this option is unavailable, you are in a Read-Only format. Under «Track Changes,» check the option next to «Track changes while editing. This also shares your workbook.» Once this option is selected, then you can make changes and view those changes by selecting this option again and checking the box next to «Highlight Changes.»
-
10
Add comments. This can be a useful way to discuss edits made on an Excel spreadsheet. Begin by selecting the cell(s) on which you wish to comment. Then select «Insert» from the menu bar and click «Insert Comment» from the menu that appears. A text box will appear in your desired location and allow you to leave a comment.
-
11
Save your changes. Select «File» from the menu bar and click «Save.» Then select the «Save In» drop-down list button and choose your preferred folder. If you attempt to exit Excel before saving your most recent changes, a dialogue box will appear and ask if you wish to save your changes. You may either click «Save» or «Don’t Save» depending on your preference.


Advertisement
-
1
View the «Format» ribbon. Be sure that the «Format» ribbon is visible so that you can easily and quickly access a variety of formatting options. Simply click the downward-pointing arrow at the right side of the «Format» ribbon to expand it. This will allow you to adjust font style and size while also making text italicized, bold or underlined. It also gives you shortcut access to several of the functions discussed in formatting steps outlined below. [7]
- A right-click on a cell or group of cells also brings up formatting options. After right-clicking the cell(s), select «Format Cells.» This will provide you a number of options with respect to Number (style), Alignment, Font, Border, Patterns and Protection.
-
2
Wrap your text. This will cause text to wrap around and remain visible within a cell rather than trailing off and becoming obscured by the next cell. Begin by highlighting the cells you wish to adjust. Then, under the «Home» tab, look at the «Alignment» group of buttons and select the «Wrap Text» option.
- You can also adjust your text to fit cells so that columns and rows automatically adjust their width or height (respectively) in order to accommodate the content within a cell. Under the «Home» tab, look at the «Cells» group of buttons and click «Format.» From the «Format» menu, select «Cell Size» and click either «AutoFit Column Width» or «AutoFit Row Height.»
-
3
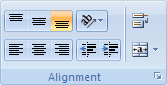
Align your text. This will cause your text to be justified on the left, right or center part of the cells. Begin by highlighting the cells you wish to adjust. Then, under the «Home» tab, select the appropriate alignment. You’ll see three buttons with lines oriented so as to demonstrate the side of the cell(s) in which text will begin.
-
4
Change the numeric style of data. You’ll find several basic numbering styles on the «Format» toolbar itself. Simply select the cell(s) you wish to format and then click the appropriate numeric style located on the toolbar. To access additional styles, right-click on the selected cell(s), click «Format Cells» and then select the «Number» tab. You’ll see a variety of options listed under «Category.»
-
5
Change your text color. Select the cell(s) for which you wish to adjust the text color. Then, from the «Format» toolbar, click the downward pointing arrow next to «Font Color.» This is the option that looks like a letter «A» with a colored line underneath it. Clicking the arrow with display a menu with a variety of color options.
-
6
Change your background color. Select the cell(s) for which you wish to adjust background color. Then, from the «Format» toolbar, click the downward pointing arrow next to «Fill Color.» This is the option that looks like a letter paint can with a colored line underneath it. Clicking the arrow with display a menu with a variety of color options.


Advertisement
Add New Question
-
Question
I want to edit information in an Excel spread sheet, but I can’t alter information in the cells.

Your Excel document may be in «Read Only» mode. After opening Excel, click the «Office Orb» at the upper, lefthand side of the screen and select «Open» to access your desired document. Then click that orb again and select «Save As.» Then select the «Tools» button next to «Save» and click «General Options.» Finally, uncheck the box located next to «Read-only,» click «OK» and select «Save» for the changes to take effect.
-
Question
How do i change background colors?
First, select the cell(s) for which you wish to change the background color. Then, from the «Format» toolbar, click the downward pointing arrow next to «Fill Color.» This is the option that looks like a letter paint can with a colored line underneath it. Clicking the arrow with display a menu with a variety of color options.
-
Question
How do I create a worksheet?
A blank «workbook» may automatically appear upon opening Excel. Otherwise, you’ll see a «Template Gallery» from which you can either select a new blank workbook or a specially formatted template. You may always open a new spreadsheet while working on another workbook in Excel. Simply click on «File» from the menu bar and select the «New Workbook» option.
See more answers
Ask a Question
200 characters left
Include your email address to get a message when this question is answered.
Submit
Advertisement
-
You can also create conditional formatting for specific cells (or categories of cells). Under the «Home» tab, choose «Conditional Formatting» from the «Styles» group of buttons. [8]
-
Pressing CTRL Shift and the appropriate directional arrow extends a selection to the last populated cell in the same column or row as the original cell.
-
Pressing CTRL Shift+⇱ Home extends a selection to the very beginning of the worksheet.
Show More Tips
Thanks for submitting a tip for review!
Advertisement
About This Article
Thanks to all authors for creating a page that has been read 121,962 times.
Is this article up to date?
Open, View, Edit Excel Online for Free.
Powered by
aspose.com
&
aspose.cloud
Create a new Excel file from the template gallery:
Expand
Personal transactions list
Monthly Vehicle Payment Calculator
Calorie Fat Percentage Log
Annual Employee Turnover Calculator
Bookmark this app
Press Ctrl + D to add this page to your favorites or Esc to cancel the action.
Send the download link to
Send us your feedback
Oops! An error has occurred.
Invalid file, please ensure that uploading correct file
Error has been reported successfully.
You have successfully reported the error, You will get the notification email when error is fixed.
Click this link to visit the forums.
Immediately delete the uploaded & processed files.
Are you sure to delete the files?
Enter Url
Microsoft Excel is a powerful spreadsheet application that comes with Windows. It offers advanced features such as formulas and highlighting to help you organize data, create charts and graphs, and analyze data. It also allows you to customize the look of your worksheet using formatting tools.
Here are eight simple steps on how to edit an Excel spreadsheet in Windows:
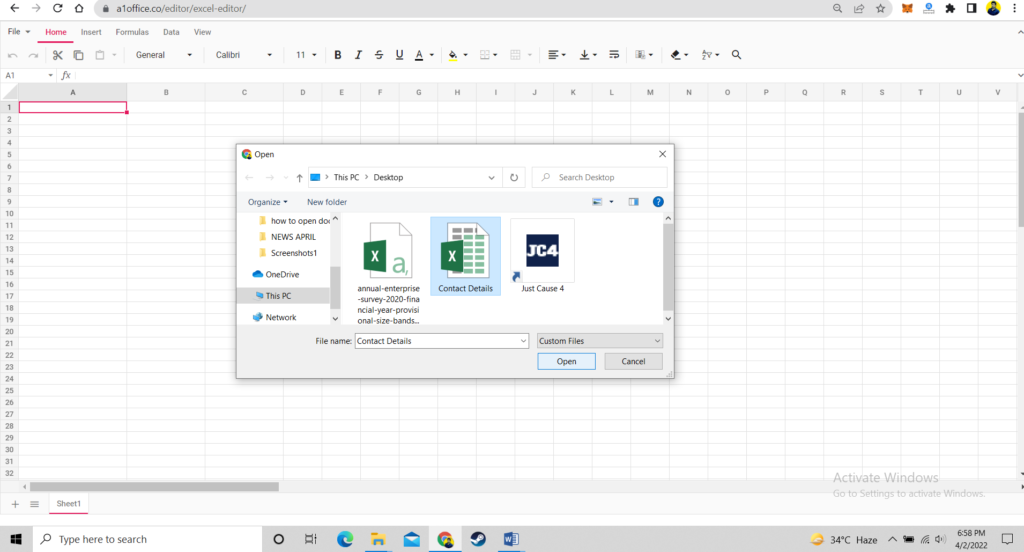
1. Open the File: To open an existing Excel file, click the “File” tab on the top left corner of the window. Then select “Open” and then select the file you want to open.
2. Select the Data: To select the data you want to edit, use your cursor to highlight it. You can also use the Control + A shortcut to select everything in the worksheet.
3. Edit the Data: To edit the data, double-click on any of the selected cells or press F2. This will open the cell editor where you can make changes to the cell’s contents.
4. Enhance Formatting: To give the worksheet a more professional look, use the formatting tools on the Ribbon. To change the text size, font, color and more, use the Home tab, and to add lines, borders, and background colors use the Page Layout tab.
5. Insert Columns and Rows: To insert columns or rows, click anywhere in the column or row until a drop-down arrow appears and select “Insert” from the menu.
6. Add a Formula: To calculate values in a worksheet, you can use formulas. For example, to sum a column of numbers, you can use the SUM formula.
7. Add Charts and Graphs: You can add charts and graphs to your worksheet to visually display the data. To do this, click on the “Insert” tab and select “Chart.”
8. Save the File: When you have finished making changes to your worksheet, click the “Save” icon on the top left corner to save the file. You can also use the shortcut Ctrl + S to save the file faster.
Related Content:
Microsoft has provided satisfactory features that ensure the safety and protection of your files from different viruses. One of them is “Protected View”, which makes sure that your file is safe and nobody else can make changes to it. Once in a lifetime, you probably would have encountered a Protected View Prompt after opening an Excel file.
This is a way that Excel tells you no virus can damage or delete the file. It usually happens when the source file is unknown. If you know the source file, you can simply press the Enable Editing button given on top of the file. Doing so will ensure editing the file whenever you need to.
Protected View at times can be the most annoying thing that appears on the screen when you want to make some changes to the file. To edit the file safely, you will have to disable the Protected View. You must be thinking about how to enable editing in Excel when the Protected View feature is active?
Why Cannot I Edit the Excel Spreadsheet?
Other than the Protected View feature, there are reasons that don’t let you edit the file. Let’s have a look at other reasons.
The Excel File is in Read Only Mode
As you open an Excel file, if you see a MARKED AS FINAL prompt right in front of the screen, it clearly tells you that this is the final document and is saved in read-only mode. No one can edit the file because it is un-editable.

The Excel Spreadsheet is Locked with Password
Another reason that leaves you unable to edit the Excel file is when the cell or Excel sheet is locked with a protection password. You will not be able to make changes to the file unless you disable the protection mode. Double-clicking the cell for editing purposes will pop a message “The cell or chart you are trying to change is on a protected sheet. To make a change, unprotect the sheet.”

How to Enable Editing in Excel
Here in this post, you will find some useful tricks to enable editing in Excel files.
Directly From Trust Center Settings
When the file is in read-only mode, you need to unprotect it, so that you can make further editing easily. You can do it directly through program settings. To disable the protected view, follow the steps given below:
Open Microsoft Excel and click on the File menu option.

Now, click on Options given on the left side menu.

Choose the Trust Center option given on the left side of the PowerPoint Options window.
Click on Trust Center Settings button.

Now, select Protected View given on the left side menu, from the Trust Center Settings window.
Uncheck these options: “Enable Protected View for files originating from the Internet”, “Enable Protected View for files located in potentially unsafe locations”, and “Enable Protected View for Outlook attachments”
Now, click OK in the Excel Options window.

This is how to enable editing in Excel using Trust Center Settings.
When the Excel File is Marked as Final
When you have downloaded a file from the internet, you may have to encounter with read-only mode issue. A yellow notification “Marked as Final” will appear on top of the Excel worksheet, when the file is in read-only mode.
To get yourself out of this situation, simply click the “Edit Anyway” button given right beside the MARKED AS FINAL notification on top of the sheet.

When the Excel File is Recommended as Read Only
If the file is in read-only mode when you open it, usually a message will appear asking you to open the file in read-only mode. If you select “Yes”, it will open as read-only and you cannot make editing into the file. On the other hand, if you want to disable the read-only mode, choose “No”.
If you need to do away with the read-only recommended feature, follow the steps:

Open the Excel file recommended as read-only and choose “No” from the pop-up window.
Open the Excel file recommended as read-only and choose “No”.
Move to the “File” option and click on “Save As” to open the file directory. At the bottom of the file explorer screen, hit the drop-down icon given besides “Tools” and choose “General Options”.
From the “General Options” menu, uncheck the “Read-only recommended” box. Press “OK” to enable editing in the Excel file.

When the Excel File is Protected with Modifying Password
You will see a pop-up message asking you to enter the password when your file is protected by modifying the password. You must be thinking about whether you can open the file or not when you don’t know the password.
Fortunately, you can easily enable the editing mode without knowing the correct password. If you don’t know the password, open the file in the read-only mode and press “CTRL+A” to select the whole worksheet. Now, press “CTRL+C” and “CTRL+V” to copy and paste the content to a new worksheet. Make as many changes as you want in the new worksheet. Changing the worksheet is as simple as that.

On the other hand, if you know the password, simply type it. Go to the “File” and click on “Save As”. Delete the password in the “Password to modify” field given in the “General Options” menu. Now, the file is without any protection. Whenever you will open this Excel file, it will not ask you to enter the password because it is not protected now.

To Sum Up
Now, you fully have an idea of how to enable editing in Excel. You can simply follow the methods given above to make any sort of changes in the Excel file whenever you need to. Each method is worthy enough to practice.
Use the methods provided in this article to edit your protected Excel file. Keep practicing new features and continue sharing useful information with others.
You can edit the contents of a cell directly in the cell. You can also edit the contents of a cell by typing in the formula bar.
When you edit the contents of a cell, Excel is operating in Edit mode. Some Excel features work differently or are unavailable in Edit mode.
When Excel is in Edit mode, the word Edit appears in the lower-left corner of the Excel program window, as shown in the following illustration.

How does Excel operate differently in Edit mode?
In Edit mode, many commands are unavailable. For example, when Excel is in Edit mode, you cannot apply conditional formatting or change the alignment of the contents of a cell.
Also, the arrow keys behave somewhat differently when Excel is in Edit mode. Instead of moving the cursor from cell to cell, in Edit mode, the arrow keys move the cursor around in the cell.
Enable or disable Edit mode
If you try to use Edit mode and nothing happens, it might be disabled. You can enable or disable Edit mode by changing an Excel option.
-
Click File > Options > Advanced.
-OR-
In Excel 2007 only: Click the Microsoft Office Button
, click Excel Options, and then click the Advanced category. -
Under Editing options, do one of the following:
-
To enable Edit mode, select the Allow editing directly in cells check box.
-
To disable Edit mode, clear the Allow editing directly in cells check box.
-
 , click Excel Options, and then click the Advanced category.
Enter Edit mode
To start working in Edit mode, do one of the following:
-
Double-click the cell that contains the data that you want to edit.
This starts Edit mode and positions the cursor in the cell in the location that you double-clicked. The cell contents are also displayed in the formula bar.
-
Click the cell that contains the data that you want to edit, and then click anywhere in the formula bar.
This starts Edit mode and positions the cursor in the formula bar at the location that you clicked.
-
Click the cell that contains the data that you want to edit, and then press F2.
This starts Edit mode and positions the cursor at the end of the cell contents.
Insert, delete, or replace cell contents
-
To insert characters, click in the cell where you want to insert them, and then type the new characters.
-
To delete characters, click in the cell where you want to delete them, and then press BACKSPACE, or select the characters and then press DELETE.
-
To replace specific characters, select them and then type the new characters.
-
To turn on Overtype mode so that existing characters are replaced by new characters while you type, press INSERT.
Note: Overtype mode can be turned on or off only when you are in Edit mode. When Overtype mode is turned on, the character to the right of the insertion point is highlighted in the formula bar, and it will be overwritten when you type.
-
To start a new line of text at a specific point in a cell, click in the where you want to break the line, and then press ALT+ENTER.
Cancel or undo edits
Before you press ENTER or TAB, and before or after you press F2, you can press ESC to cancel any edits that you made to the cell contents.
After you press ENTER or TAB, you can undo your edits by pressing CTRL+Z, or by clicking Undo  on the Quick Access Toolbar.
Adjust the way cell contents are displayed
After you edit cell contents, you may want to adjust the way they are displayed.
-
At times, a cell might display #####. This can occur when the cell contains a number or a date and the width of its column cannot display all the characters that its format requires. For example, suppose a cell with the Date format «mm/dd/yyyy» contains 12/31/2007. However, the column is only wide enough to display six characters. The cell will display #####. To see the entire contents of the cell with its current format, you must increase the width of the column.
Change the width of a column
-
Click the cell for which you want to change the column width.
-
On the Home tab, in the Cells group, click Format.
-
Under Cell Size, do one of the following:
-
To fit all text in the cell, click AutoFit Column Width.
-
To specify a larger column width, click Column Width, and then type the width that you want in the Column width box.
Note: As an alternative to increasing the width of a column, you can change the format of that column or even an individual cell. For example, you could change the date format so that a date is displayed as only the month and day («mm/dd» format), such as 12/31, or represent a number in a Scientific (exponential) format, such as 4E+08.
-
-
-
If there are multiple lines of text in a cell, some of the text might not be displayed the way that you want. You can display multiple lines of text inside a cell by wrapping the text.
Note: When Excel is in Edit mode, you cannot change the way text wraps.
Wrap text in a cell
-
Click the cell in which you want to wrap the text.
-
On the Home tab, in the Alignment group, click Wrap Text.
Note: If the text is a single long word, the characters won’t wrap; you can widen the column or decrease the font size to see all the text. If not all text is visible in the cell after you wrap the text, you may need to adjust the height of the row.
On the Home tab, in the Cells group, click Format, and then under Cell Size click AutoFit Row.
-

Exit Edit mode
To stop working in Edit mode, do one of the following:
-
Press ENTER.
Excel exits Edit mode and selects the cell directly below the current cell.
You can also specify that pressing ENTER select a different adjacent cell.
-
Click File > Options > Advanced.
-OR-
In Excel 2007 only: Click the Microsoft Office Button
, click Excel Options, and then click the Advanced category. -
Under Editing options, do one of the following:
-
To make the selection remain in the cell that you were editing, clear the After pressing Enter, move selection check box.
-
To control the direction of the selection, select the After pressing Enter, move selection check box, click the arrow next to Direction, and then select a direction from the list.
-
-
-
Press TAB.
This stops Edit mode and selects the cell to the right of the current cell. Pressing SHIFT+TAB selects the cell to the left.
-
Click a different cell.
Excel exits Edit mode and selects the cell that you clicked.
-
Press F2.
Excel exits Edit mode and leaves the cursor where it is.
A1Office: Online Excel Editor
If you need to edit xlsx files online, create, open and edit worksheet, using A1Office Excel Editor Online — XLS Editor is the fastest and best alternative.
If you’ve ever used MS Excel, editing on our free MS Excel Online Editor should be a piece of cake.
Open, Create and Edit Excel File Online Using Our Online Excel Sheet Editor Tool
If you need to edit excel file online in different formats using common browsers like Chrome, Firefox or Safari, without purchasing or installing any excel editor, then A1Office Online Excel Sheet Editor – XLS Editor is exactly what you need! Go to A1Office Homepage and select XLS Editor to create csv file online and access the free online excel editor.
With our online csv editor, which can be used on various browsers, just like our A1Office Docx Editor, for free without any registration or installation, you can now create, open and edit worksheets online. Our Online Excel Sheet Editor supports XLSX, XLSM, and XLS file formats.
The xls viewer can be accessed from any Windows PC, Mac, smartphone or tablet with internet access.
Also Use this tool: – Edit Pdf

How to Edit Excel Sheet Online?
Find out how to edit excel sheet in following steps:
- Go to A1Office Homepage.
- Select XLS Editor.
- To begin viewing and editing the excel file, select Open from File Tab.
- Upload the desired xls/xlsx file from your computer on Online Excel Sheet Editor.
- File will be automatically rendered for you to view/edit/download instantly.
- View & edit document.
- Save the edited Excel file as .xlsx, .xls, .csv or pdf formats.
How to Edit Excel File Online with A1Office Online Excel Sheet Editor?
Do you need to create csv file online, view or edit xls/xlsx files online? Need to do some quick edits to an excel file? Just go to our XLS Editor to access online excel sheet editor and create csv online, edit the xlsx file online and edit the excel file online.
Getting Started with Online Microsoft Excel Editor
In order to use MS Excel, users must have enough free storage space on their devices to install Microsoft Office Suite.
As a result, if you do not want to pay for a costly Microsoft Office Suite, you can use the alternatives to Microsoft Excel to edit excel files online. Although there are several Online Microsoft Excel Editor desktop applications similar to Excel, we are mandated to register and install them on our device. Instead, we can try some online alternatives to Excel without the need for any installation like our A1office excel editor.
Try Our Excel Editor For Free
USPs of A1Office XLS Editor:
Our Main USPs:
- Our Excel Editor is free to use tool
- Edit excel file online without registration
- Our online CSV editor does not need any installation or plugins
- You can also access our online XLS File Viewer on mobile phones.
- A free online excel editor tool — A1Office XLS Editor is supported by all modern browsers like Chrome, Opera, and Firefox.
Features of A1Office
Online Excel Sheet Editor — XLS Editor
Features and characteristics of A1Office Online Excel Sheet Editor – XLS Editor:
- Create, open and edit worksheets online
- Allows users to create a new file or work on the existing file
- Create CSV file online without any plugin or software installation
- Styles management including Font sizes & colors
- Insert columns/rows/tables/images.
- Delete row/column
- Advanced find & replace/regular expressions/special characters
- Spreadsheet functions
- Calculate formulas
- Render Charts & Shapes, Edit Comments
- Compatible with all platforms (Windows, Mac, Android & iOS)
- Password-protected and User-friendly interface

Frequently Asked Questions
How to edit a csv file?
For general editing of CSV file contents, a plain text editor just like A1Office Online Excel Sheet Editor – XLS Editor is a good choice. It can also be used to create csv file online for extensive transformations that include adding columns, deleting columns, deleting or modifying rows based on key values.
What is a .CSV file?
CSV is an abbreviation for comma-separated values. It is a file that consists of large databases. It is used to transfer files from one program to the other, and is not meant to store files in the long run. You can open these files with a bunch of programmes, but Excel is the one everyone uses.
What tools and features can Online Microsoft Excel Editor users access?
In short: just like any excel editor, XLS Editor comes with a three tools: File, Insert, and Home. First tool contains buttons to create excel file, open excel file and saving the edited excel file. The second button is for inserting links, images and charts. The Home button includes elements like Undo, Cut, Copy, Font Styles & Sizes, Text Color, Fill Color, Borders, Horizontal & Vertical Alignment, Wrap Text, Conditional Formatting, Find & Replace, Sort & Filter, etc. Other tools include Formulas, Data (to protect spreadsheets) and view headers, hide gridlines, freeze panes/rows/columns.
Does Excel Editor require an internet connection when a document is loaded and opened?
Yes, our Online Microsoft Excel Editor is a client-server tool where WYSIWYG editor (What-You-See-Is-What-You-Get) is only a facade for a server-based software. If your internet connection goes down while you’re creating an excel file online, you won’t be able to save or download it.
Is it safe to use the excel sheet online editor A1Office XLS Editor?
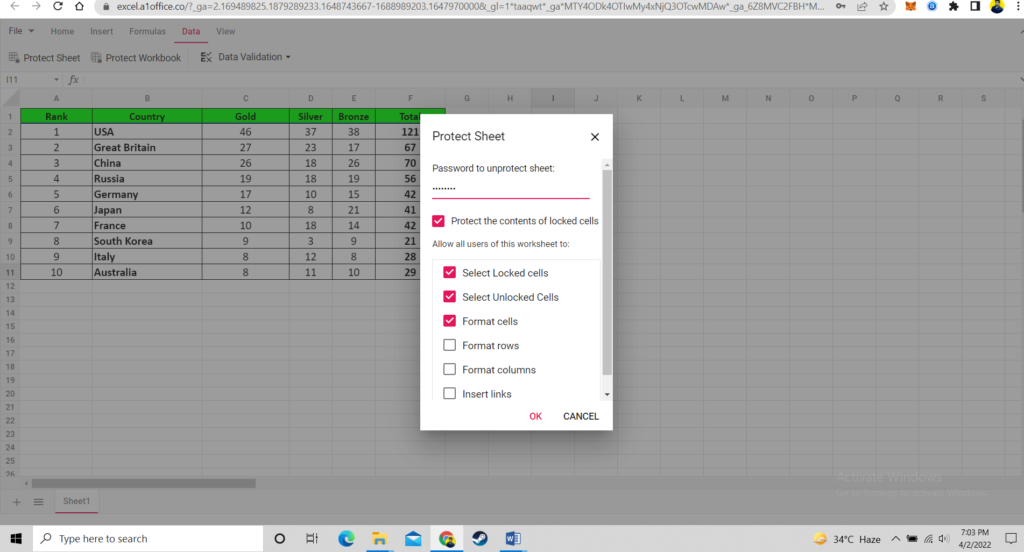
Yes. Our xlsx editor is a reliable and safe tool. It’s usage scenario implies that you select and open an excel file, edit it and then save and download the edited version, and that’s all. All the edited files will be automatically deleted from our servers after 24 hours after uploading and downloading the excel file. Moreover, our free online excel editor is password protected. You can a set a password for the entire spreadsheet, workbook, or separate sheet. Hide formulas to keep them private. Lock cells, shapes, and text. Enable editing only in specified ranges.
Can I Edit excel file on Mac OS, Android or Linux using A1Office XLS Editor?
Yes, you can use our MS Excel Online Editor on any OS that supports web browsing. Our xlsx editor online tool works smoothly on all operating system and does not require any software installation.
What browsers does A1Office XLS Editor support?
You can use any modern browser to edit excel file online, for example, Google Chrome, Firefox, Opera, Safari.
Does A1Office XLS Editor have any mobile application?
Just like any other WYSIWYG-based excel sheet online editor, our A1Office XLS Editor is a web-based online excel sheet editor and does not have any mobile application. However, it is compatible to open and run with browsers like Chrome and Safari on Android phones and iPhones respectively. You can however, install XLSX viewer: XLS File Viewer & Reader from Google Play Store on Android phones as a default XLS reader and directly open the XLS/CSV/XLSX/XLSM file from the file manager, email container or web in this spreadsheet reader without opening the application. The XLS viewer: XLS file viewer app is the most efficient office productivity tool to read excel files.
What is a number of times users can create, open and edit worksheet using A1Office XLS Editor?
There are no limits. Users can view, create, edit and download the resultant excel file any number of times.
Is there any contact support for A1Office XLS Editor?
Contact Us
MS-Excel / Getting Started
The two ways to edit a spreadsheet are:
- Edit the data itself, such as the labels, numbers, and formulas that make up a spreadsheet.
- Edit the physical layout of the spreadsheet, such as adding or deleting rows and columns, or widening or shrinking the
width or heights of rows and columns.
Editing Data in a Cell
To edit data in a single cell, follow these steps:
- Double-click the cell that contains the data you want to edit. Excel displays a cursor in your selected cell.
- Edit your data by using the Backspace or Delete key, or by typing new data.
- If you click a cell, Excel displays the contents of that cell in the Formula bar. You can click and edit data directly in
the Formula bar, which can be more convenient for editing large amounts of data.
Changing the size of rows and columns with the mouse
Using the mouse can be a quick way to modify the sizes of rows and columns. To change the height of a row or the width of
a column, follow these steps:
- Move the mouse pointer over the bottom line of a row heading, such as the 2 or 18 heading. (Or move the mouse pointer
over the right line of the column heading, such as A or D.) The mouse pointer turns into a two-way pointing arrow. - Hold down the left mouse button and drag (move) the mouse. Excel resizes your row or column.
- Release the left mouse button when you are happy with the size of your row or column.
Typing the size of rows and columns
If you need to resize a row or column to a precise value, it is easier to type a specific value into the Row Height or
Column Width dialog box instead. To type a value into a Row Height or Column Width dialog box, follow these steps:
- Click the Home tab and then click the row or column heading that you want to resize. Excel highlights your entire row or column.
- Click the Format icon that appears in the Cells group. A pull-down menu appears and then click Height (if you selected a
row) or Width (if you selected a column). The Row Height or Column Width dialog box appears.Enter a height for the row.
- Type a value and then click OK. Excel resizes your row or column.
Excel measures column width in characters. (A cell defined as 1 character width can display a single letter or number.)
Excel measures row height by points where 1 point equals 1/72 inch.
Adding and deleting rows and columns
After you type in labels, numbers, and formulas, you may suddenly realize that you need to add or delete extra rows or
columns. To add a row or column, follow these steps:
- Click the Home tab and then click the row or column heading where you want to add another row or column.
- Click the Insert icon in the Cells group. Inserting a row adds a new row above the selected row. Inserting a column adds
a new column to the left of the selected column.
To delete a row or column, follow these steps:
- Click the Home tab and then click the row or column heading that you want to delete.
- Click the Delete icon in the Cells group.
- Deleting a row or column deletes any data stored in that row or column.
Adding Sheets
For greater flexibility, Excel lets you create individual spreadsheets that you can save in a single workbook (file).
When you load Excel, it automatically provides you with three sheets, but you can add more if you need them. To add a new
sheet, choose one of the following:
- Click the Insert Worksheet icon.
- Click the Home tab, click the downward-pointing arrow next to the Insert icon in the Cells group, and then choose Insert Sheet.
Excel displays the names of individual sheets as tabs.
Renaming sheet
By default, Excel gives each sheet a generic name such as Sheet1. To give your sheets a more descriptive name,
follow these steps:
- Choose one of the following:
Double-click the sheet tab that you want to rename. Excel highlights the entire sheet name.
Click the sheet tab you want to rename, click the Home tab, click the Format icon in the Cells group, and choose Rename Sheet.
Right-click the sheet tab you want to rename; when a pop-up menu appears, choose Rename. - Type a new name for your sheet and press Enter when you are done. Your new name appears on the sheet tab.
Rearranging Sheets
You can rearrange the order that your sheets appear in your workbook. To rearrange a sheet, follow these steps:
- Move the mouse pointer over the sheet tab that you want to move and hold down the left mouse button and drag (move) the
mouse. The downward-pointing black arrow points where Excel will place your sheet. - Release the left mouse button to place your sheet in a new order.
Deleting a Sheet
Using multiple sheets may be handy, but you may want to delete a sheet if you do not need it. If you delete a sheet, you also
delete all the data stored on that sheet. To delete a sheet, follow these steps:
- Choose one of the following:
Right-click the tab of the sheet you want to delete. When a pop-up menu appears, click Delete.
Click the Home tab, click the downward-pointing arrow that appears to the right of the Delete icon in the Cells group,
and choose Delete Sheet.If your sheet is empty, Excel deletes the sheet right away. If your sheet contains data, a dialog box appears to warn you
that you will lose any data stored on that sheet. - Click Delete. Excel deletes your sheet along with any data on it.

Microsoft Excel is used by many people to open and edit Excel files. However, the full version of Excel costs money. If you want a free alternative, these free apps can open, modify, and create Excel spreadsheets.
The majority of these apps support files with the XLS or XLSX extension, among others.
Excel Online
Microsoft offers a web-based version of the Office suite, which includes Excel. Excel Online has Excel’s basic functionality but doesn’t include the advanced features of the paid version, such as macro support.
Excel Online is accessible in most browsers. You can use it to edit existing XLS and XLSX files and create new workbooks.
Office Online’s integration with Microsoft OneDrive means you can store your spreadsheets in the cloud and collaborate with others in real-time.
Microsoft Excel App and 365 App
The standalone Excel app is available for Android and iOS, and the features vary depending on the device. There’s also a unified Microsoft 365 iOS app that includes Excel, Word, and PowerPoint.
You can create and edit spreadsheets on an Android device with a 10.1 inch or smaller screen at no charge. If you use the app on a larger phone or tablet, you’ll need a subscription to Microsoft 365 to do more than view an Excel file.
With the Excel standalone iOS app or as part of the Microsoft 365 iOS app, you can create, edit, save, and view Excel documents for free on an iPad, iPhone, or iPod touch. Advanced features, however, will require a Microsoft 365 subscription.
Some advanced features are only accessible with a subscription, no matter which device you have.
Microsoft 365 Home Trial
Microsoft’s free offerings, such as the browser-based Office suite and the Excel app, limit the available features. If you require access to Excel’s advanced functionality but don’t want to pay for Excel, the trial version of Microsoft 365 may be a short-term solution.
Once activated, you can run the complete version of Microsoft Office Home Edition (including Excel) on a combination of five PCs and Macs. The Excel app can be installed on up to five Android or iOS phones and tablets.
You must have a valid credit card number to start the 30-day trial. After the trial, you’re charged for a 12-month subscription if you don’t manually cancel the subscription before the expiration date.
Office Online Chrome Extension
The add-on for Google Chrome opens a powerful version of Excel in a browser window. It works on all major desktop operating systems.
The Office Online extension only works with an active Microsoft 365 subscription. It functions as expected during the Microsoft 365 free trial period.
LibreOffice
LibreOffice is an open-source software suite that you can download for free. It features Calc, an Excel alternative that supports XLS and XLSX files, and the OpenDocument format.
Calc offers many of the spreadsheet features and templates that are commonly used in Excel. It contains multi-user functionality that allows for seamless collaboration. It also includes several power-user components, including DataPivot and a comparative Scenario Manager.
Kingsoft WPS Office
The personal, free-to-download version of the Kingsoft WPS Office suite contains Spreadsheets, which is compatible with XLS and XLSX files. Spreadsheets features data analysis and graphing tools along with basic spreadsheet functionality.
Spreadsheets can be installed as a standalone app on Android, iOS, and Windows operating systems.
A business version is available for a fee. It offers advanced features, cloud storage, and multi-device support.
Apache OpenOffice
Apache OpenOffice has amassed hundreds of millions of downloads since its initial release. It’s available in over three dozen languages. OpenOffice includes a spreadsheet application that’s also named Calc. It supports basic and advanced features, including extensions, macros, and Excel file formats.
Calc and the rest of OpenOffice may be shutting down due to an inactive developer community. If this happens, essential updates, including patches for security vulnerabilities, won’t be made available. At that point, we recommend that you quit using this software.
Gnumeric
Gnumeric is a standalone spreadsheet application that is also available for free. This open-source program is frequently updated. It supports all Excel file formats and is scalable to work with large spreadsheets.
Google Sheets
Google’s answer to Excel Online is Sheets. Sheets is a full-featured browser-based spreadsheet. It integrates with your Google account and your server-based Google Drive. This easy-to-use application offers high-end functionality, templates, add-ons, and real-time collaboration.
Sheets is fully compatible with Excel file formats and is entirely free to use. In addition to the web-based version for desktops and laptops, Sheets apps are available for Android and iOS devices.
Thanks for letting us know!
Get the Latest Tech News Delivered Every Day
Subscribe
If you need to edit documents in different formats using only the usual browser like Chrome, Firefox or Safari, without installing any editing software like Microsoft Office or OpenOffice, then Excel Editor App is exactly what you need!
With our Excel Editor App, which is absolutely free and doesn’t require registration, you can easily drag and drop the required file on upload form, edit its content right here in the browser, and then download the edited version in order to save it locally. Even more, you’re not forced to download the resultant file in the same format as you’ve uploaded it, — you’re able to choose any appropriate one! For example, you can upload a document in RTF format, edit it, and save as DOCX.
WYSIWYG-editor with its toolbar adapts to the specific format of an uploaded document, enabling those features and possibilities, which are actual for only this format and disabling those, which are not related. In particular, for Spreadsheet documents like XLSX, ODS, and CSV, there will be navigation between worksheets (tabs). For all document content the table editing mode will be enabled, but it is not possible to create new tables (because all content is the one single table) as well as the lists.
This online editor, because of its web-based nature, is absolutely portable and multi-platform — you only need a usual web-browser without any plugins, and no matter on which platform you’re using it: desktop PC or smartphone, Windows, Linux, or macOS, Android or iOS.