
Insert or delete rows and columns
Insert and delete rows and columns to organize your worksheet better.

Note: Microsoft Excel has the following column and row limits: 16,384 columns wide by 1,048,576 rows tall.
Insert or delete a column
-
Select any cell within the column, then go to Home > Insert > Insert Sheet Columns or Delete Sheet Columns.
-
Alternatively, right-click the top of the column, and then select Insert or Delete.
Insert or delete a row
-
Select any cell within the row, then go to Home > Insert > Insert Sheet Rows or Delete Sheet Rows.
-
Alternatively, right-click the row number, and then select Insert or Delete.
Formatting options
When you select a row or column that has formatting applied, that formatting will be transferred to a new row or column that you insert. If you don’t want the formatting to be applied, you can select the Insert Options button after you insert, and choose from one of the options as follows:
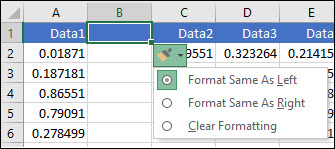
If the Insert Options button isn’t visible, then go to File > Options > Advanced > in the Cut, copy and paste group, check the Show Insert Options buttons option.
Insert rows
To insert a single row: Right-click the whole row above which you want to insert the new row, and then select Insert Rows.
To insert multiple rows: Select the same number of rows above which you want to add new ones. Right-click the selection, and then select Insert Rows.
Insert columns
To insert a single column: Right-click the whole column to the right of where you want to add the new column, and then select Insert Columns.
To insert multiple columns: Select the same number of columns to the right of where you want to add new ones. Right-click the selection, and then select Insert Columns.
Delete cells, rows, or columns
If you don’t need any of the existing cells, rows or columns, here’s how to delete them:
-
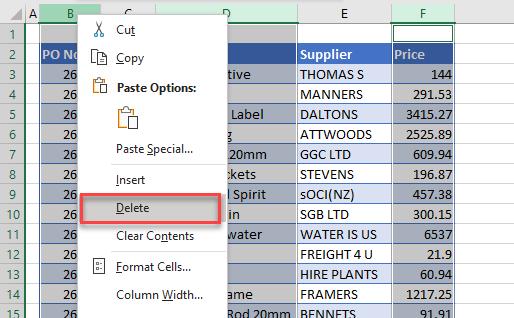
Select the cells, rows, or columns that you want to delete.
-
Right-click, and then select the appropriate delete option, for example, Delete Cells & Shift Up, Delete Cells & Shift Left, Delete Rows, or Delete Columns.
When you delete rows or columns, other rows or columns automatically shift up or to the left.
Tip: If you change your mind right after you deleted a cell, row, or column, just press Ctrl+Z to restore it.
Insert cells
To insert a single cell:
-
Right-click the cell above which you want to insert a new cell.
-
Select Insert, and then select Cells & Shift Down.
To insert multiple cells:
-
Select the same number of cells above which you want to add the new ones.
-
Right-click the selection, and then select Insert > Cells & Shift Down.
Need more help?
You can always ask an expert in the Excel Tech Community or get support in the Answers community.
See Also
Basic tasks in Excel
Overview of formulas in Excel
Need more help?
How to delete a single column in a worksheet using Excel, VBA and Shortcut methods
METHOD 1. Delete a column by selecting an entire column
EXCEL
Select an entire column > Right-click anywhere on the selected column > Click Delete
| 1. Select an entire column where you want to delete a column. Note: in this example we are deleting column (B). To select an entire column, either click on the column heading or select the first cell of the column, press and hold the Ctrl and Shift keys and press the Down key. |
 |
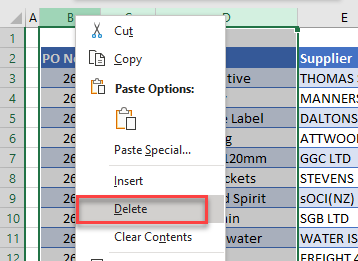
| 2. Right-click anywhere on the selected column and click Delete. |  |
METHOD 2. Delete a column using the ribbon option
EXCEL
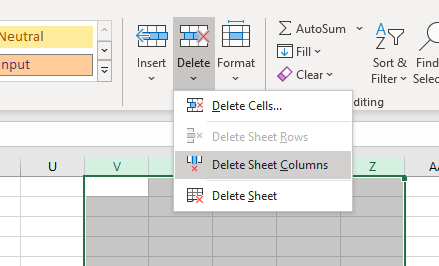
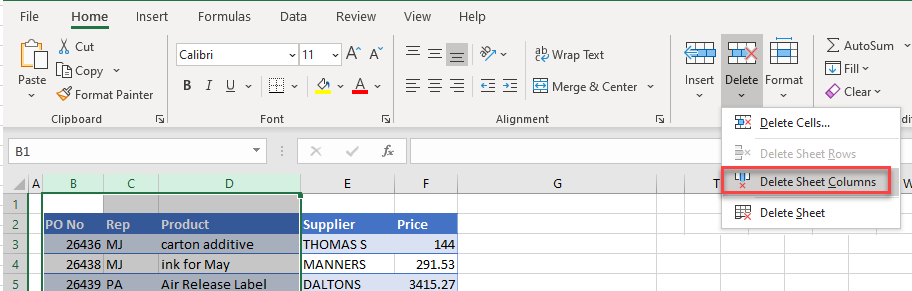
Select a cell in the column where you want to delete a column > Home tab > Cells group > Delete > Delete Sheet Columns
| 1. Select any cell in the same column where you want to delete a column. Note: in this example we are deleting column (B), given we have selected a cell in the second column. |
 |
| 2. Select the Home tab. |  |
| 3. Click Delete in the Cells group. 4. Click Delete Sheet Columns. |
 |
METHOD 3. Delete a column using the cell option
EXCEL
Right-click on a cell in the row where you want to delete a column > Delete > Entire column > OK
| 1. Right-click on any cell in the column where you want to delete a column. 2. Click Delete Note: in this example we are deleting column (B), given we have right-clicked on a cell in the second column. |
 |
| 3. Select the Entire column option and click OK group. |  |
METHOD 1. Delete a column using VBA by selecting a single cell
VBA
Sub Delete_a_Column()
‘delete column B
Worksheets(«Sheet1»).Range(«B2»).EntireColumn.Delete
End Sub
OBJECTS
Worksheets: The Worksheets object represents all of the worksheets in a workbook, excluding chart sheets.
ADJUSTABLE PARAMETERS
Column Selection: Select the column that you want to delete by changing the column reference («B2»). You can also change the row reference to any row as this will have no impact on which column will be deleted.
Worksheet Selection: Select the worksheet where you want to delete a column by changing the Sheet1 worksheet name.
METHOD 2. Delete a column using VBA by selecting a range of cells
VBA
Sub Delete_a_Column()
‘delete column B
Worksheets(«Sheet1»).Range(«B2:B5»).EntireColumn.Delete
End Sub
OBJECTS
Worksheets: The Worksheets object represents all of the worksheets in a workbook, excluding chart sheets.
ADJUSTABLE PARAMETERS
Column Selection: Select the column that you want to delete by changing the column reference («B2:B5»). You can also change the row reference to any row as this will have no impact on which column will be deleted.
Worksheet Selection: Select the worksheet where you want to delete a column by changing the Sheet1 worksheet name.
METHOD 3. Delete a column using VBA by selecting an entire column
VBA
Sub Delete_a_Column()
‘delete column B
Worksheets(«Sheet1»).Range(«B:B»).EntireColumn.Delete
End Sub
OBJECTS
Worksheets: The Worksheets object represents all of the worksheets in a workbook, excluding chart sheets.
ADJUSTABLE PARAMETERS
Column Selection: Select the column that you want to delete by changing the column reference («B:B»).
Worksheet Selection: Select the worksheet where you want to delete a column by changing the Sheet1 worksheet name.
Delete a column using a Shortcut
SHORTCUT
WINDOWS SHORTCUT
NOTES
To delete a column using this shortcut method you will need to select an entire column. If you select a single cell or a range of cells and action this shortcut a Delete dialog box will appear and you will need to select Entire column and click OK.
Explanation about how to delete a column
EXPLANATION
EXPLANATION
This tutorial explains and provides step by step instructions on how to delete a single column in a worksheet using Excel, VBA and Shortcut methods.
Excel Methods: Using Excel you can delete a column by selecting an entire column or a single cell and using a ribbon or cell option.
VBA Methods: Using VBA you can delete a column by referencing to a single cell, a range of cells or an entire column. If you want to delete a single column by referencing to a range of cells you need to ensure that the range of cells only references to a single column. As per the example in this tutorial the VBA code references to only column B across multiple rows («B2:B5»).
Shortcut Methods: Using a Shortcut you can delete a column by selecting an entire column that you want to delete and then actioning the shortcut.
ADDITIONAL NOTES
Note 1: Deleting a column will move the existing columns, that are after the deleted column, leftwards. In this this tutorial every column after column B will be moved leftwards.
| Related Topic | Description | Related Topic and Description |
|---|---|---|
| Insert a column | How to insert a single column in a worksheet using Excel, VBA and Shortcut methods | |
| Insert multiple columns | How to insert multiple columns in a worksheet using Excel, VBA and Shortcut methods | |
| Delete multiple columns | How to delete multiple columns in a worksheet using Excel, VBA and Shortcut methods | |
| Insert a row | How to insert a single row in a worksheet using Excel, VBA and Shortcut methods | |
| Insert multiple rows | How to insert multiple rows in a worksheet using Excel, VBA and Shortcut methods |
See all How-To Articles
This tutorial demonstrates how to delete multiple rows or columns in Excel and Google Sheets.
By selecting multiple rows or columns in Excel, you can quickly delete any number of rows or columns using the right mouse button or the Excel Ribbon. This can also be done with VBA.
Delete Adjacent Rows
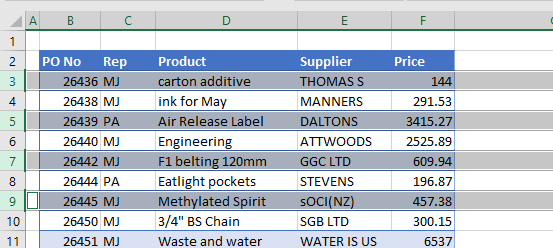
To delete multiple rows in your worksheet, select the rows you wish to delete by clicking on the row header and dragging down to the header of the last row you wish to delete.
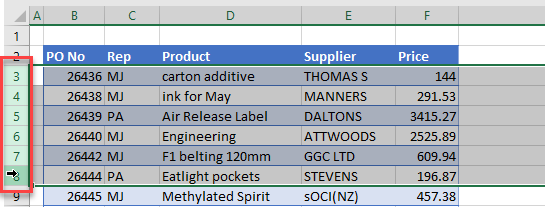
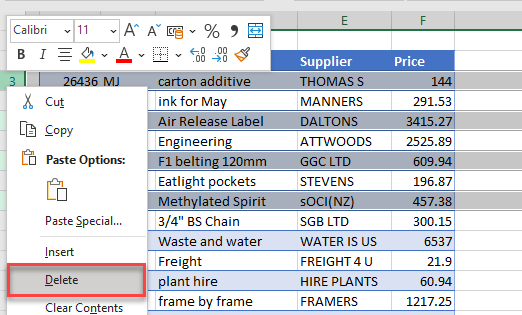
Right-click on the row header and select Delete.
OR
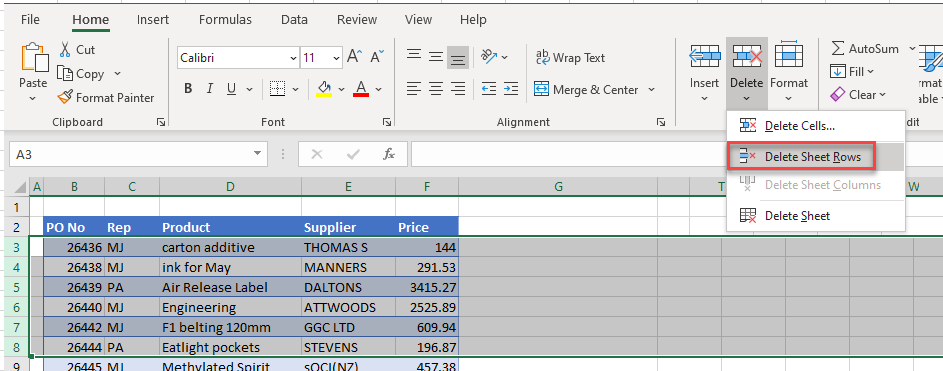
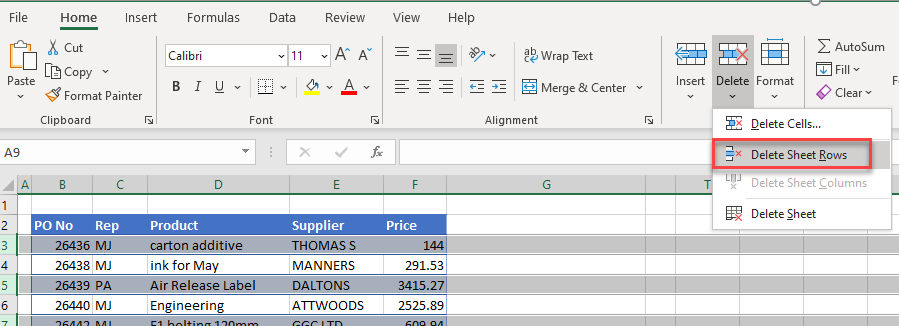
In the Ribbon, select Home > Cells > Delete > Delete Sheet Rows.
Delete Non-Adjacent Rows
To delete multiple non-adjacent rows, select the first row you wish to delete by clicking on the row header, and then, holding down the CTRL key, click on each additional row you wish to delete.
Right-click on the row header and select Delete.
OR
In the Ribbon, select Home > Cells > Delete > Delete Sheet Rows.
Delete Adjacent Columns
To delete multiple adjacent columns, select the columns you wish to delete by clicking on the column header and dragging across to the header of the last column you wish to delete.
Right-click on the column header and select Delete.
OR
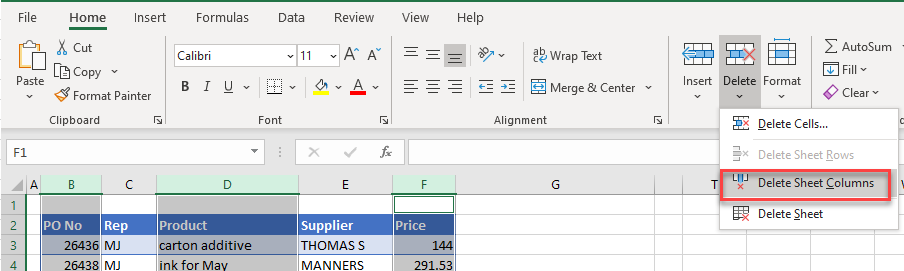
In the Ribbon, select Home > Cells > Delete > Delete Sheet Columns.
Delete Non-Adjacent Columns
To delete multiple non-adjacent columns, select the columns you wish to delete by clicking on the first column header and then, holding down the CTRL key, click on each additional column header of the columns you wish to delete.
Right-click on the column header and select Delete.
OR
In the Ribbon, select Home > Cells > Delete > Delete Sheet Columns.
Delete Multiple Rows and Columns in Google Sheets
Deleting multiple rows and columns in Google Sheets works much the same as it does in Excel.
You can select adjacent rows or columns by clicking on the row or column header and dragging down or across to the row or column header of the last row or column you wish to delete.
You can select non-adjacent rows or columns by clicking on the first row or column header, and then, holding down the CTRL key, click on any further row or column headers required.
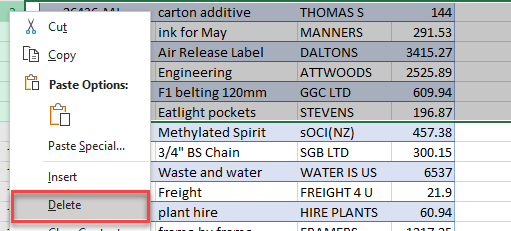
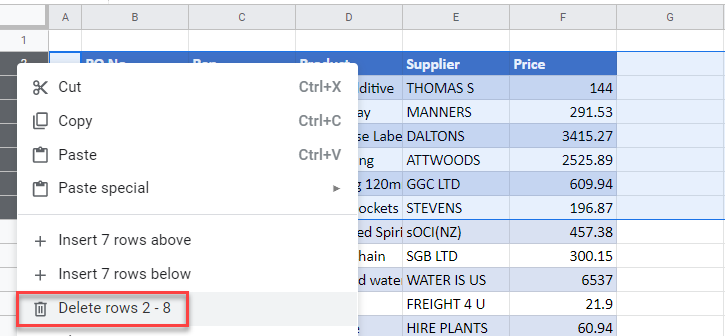
As with Excel, click on the row/column header with the right mouse button and select the Delete option from the quick menu (e.g., Delete rows 2 – 8).
OR
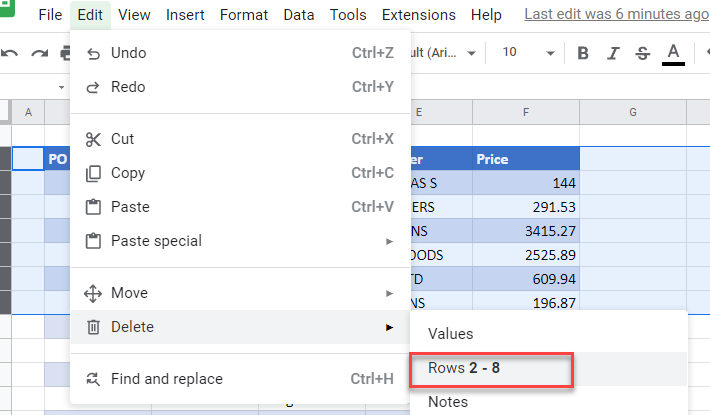
In the Menu, select Edit > Delete, and then select the options (e.g., Rows 2 – 8) as shown below.
Creating new tables, reports and pricelists of different types, we cannot predict the number of necessary rows and columns. Using Excel program implies to a great extent creating and setting up spreadsheets, which requires inserting and deleting different elements.
First, let’s consider the methods of inserting sheet rows and columns when creating spreadsheets.
Note that in this tutorial we indicate hot keys for adding or deleting rows and columns. They should be used after highlighting the whole row or column. To highlight the row where the cursor is placed, press the combination of hot keys: SHIFT+SPACEBAR. Hot keys for highlighting a column are CTRL+SPACEBAR.
How to insert a column between other columns?
Assuming you have a pricelist lacking line item numbering:
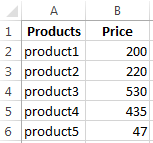
To insert a column between other columns for filling in pricelist items numbering you can use one of the two ways:
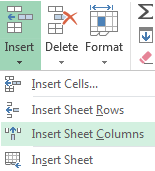
- Move the cursor to activate A1 cell. Then go to tab «HOME», tool section «Cells» and click «Insert», in the popup menu select «Insert Sheet Columns» option.
- Right-click the heading of column A. Select «Insert» option on the shortcut menu.
- Select the column, and press the hotkey combination CTRL+SHIFT+PLUS.
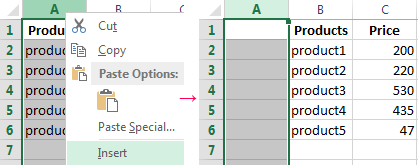
Now you can type the numbers of pricelist line items.
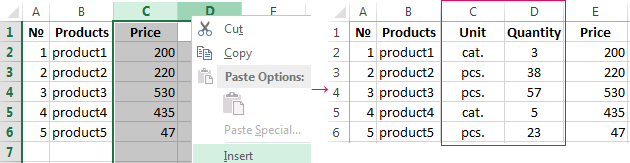
Simultaneous insertion of several columns
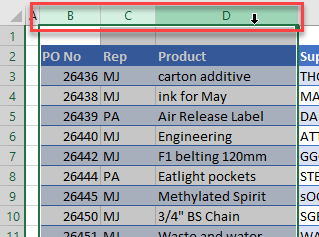
The pricelist still lacks two columns: quantity and units (items, kilograms, liters, packs). To add simultaneously, highlight the two-cell range (C1:D1). Then use the same tool on the «Insert»-«Insert Sheet Columns» main tab.

Alternatively, highlight two headings of columns C and D, right-click and select «Insert» option.
Note. Columns are always added to the left side. There appear as many new columns as many old ones have been highlighted. The order of inserted also depends on the order of highlighting. For example, next but one etc.
How to insert a row between rows in Excel?
Now let’s add a heading and a new goods line item «All for the garden» to the pricelist. To this end, let’s insert two new rows simultaneously.
Highlight the nonadjacent range of two cells A1,A4 (note that character “,” is used instead of character “:” – it means that two nonadjacent ranges should be highlighted; to make sure, type A1; A4 in the name field and press Enter). You know from the previous tutorials how to highlight nonadjacent ranges.
Now once again use the tool «HOME»-«Insert»-«Insert Sheet Columns». The picture shows how to insert a blank row between other rows in Excel.
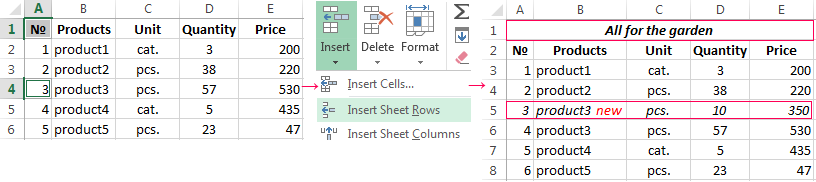
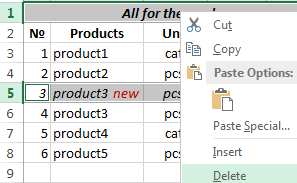
It is easy to guess the second way. You need to highlight headings of rows 1 and 3, right-click on one of the highlighted rows and select «Insert» option.
To add a row or a column in Excel use hot keys CTRL+SHIFT+PLUS having highlighted the appropriate row or column.
Note. New rows are always added above the highlighted rows.
Deleting rows and columns
When working with Excel you need to delete rows and columns as often as to insert them. Therefore, you have to practice.
By way of illustration, let’s delete from our pricelist the numbering of goods line items and the unit column simultaneously.
Highlight the nonadjacent range of cells A1; D1 and select «HOME»-«Delete»-«Delete Sheet Rows». The shortcut menu can also be used for deleting if you highlight headings A1 and D1 instead of cells.
Row deleting is performed in the similar way. You only need to select a tool in the appropriate menu. Applying a shortcut menu is the same. You only have to highlight the rows correspondingly by row numbers.
To delete a row or a column in Excel, use hot keys CTRL+MINUS having preliminary highlighted them.
Note. Inserting new columns and rows is in fact substitution, as the number of rows (1 048 576) and columns (16 384) doesn’t change. The new just replace the old ones. You should consider this fact when filling in the sheet with data by more than 50% — 80%.
Transcript
In this lesson, we’ll look at how to insert and delete columns in Excel. You may want to insert columns to make room for new information. You may want to delete columns to remove information you no longer need or want.
No matter how many columns you add or delete, the number of columns in the worksheet never changes. When you insert columns, columns are pushed off the worksheet at the far right edge. When you delete columns, new columns are added to the far right edge.
Let’s take a look.
To insert a column in Excel, first select the column to the right of where you want the new column to be. Excel will always insert columns to the left of your selection.
Then, click the Insert button on the ribbon.
You can also right-mouse click and choose Insert from the menu, which is usually faster.
If you’d like to insert multiple columns, just select more than one column before you insert. Excel will insert as many columns as you have selected.
To delete a column in Excel, first select the column you’d like to delete.
You can then delete the column using the ribbon or by right-clicking. To use the ribbon, click the Delete button.
To use your mouse, right-click and choose Delete from the menu.
You can delete multiple columns in the same way.

Author![]()
Dave Bruns
Hi — I’m Dave Bruns, and I run Exceljet with my wife, Lisa. Our goal is to help you work faster in Excel. We create short videos, and clear examples of formulas, functions, pivot tables, conditional formatting, and charts.
Great site — amazingly clear but with a lot of depth in terms of the explanations.
Get Training
Quick, clean, and to the point training
Learn Excel with high quality video training. Our videos are quick, clean, and to the point, so you can learn Excel in less time, and easily review key topics when needed. Each video comes with its own practice worksheet.
View Paid Training & Bundles
Bottom line: Learn some of my favorite keyboard shortcuts when working with rows and columns in Excel.
Skill level: Easy

Whether you are creating a simple list of names or building a complex financial model, you probably make a lot of changes to the rows and columns in the spreadsheet. Tasks like adding/deleting rows, adjusting column widths, and creating outline groups are very common when working with the grid.
This post contains some of my favorite shortcuts that will save you time every day.
I’ve also listed the equivalent shortcuts for the Mac version of Excel where available.
#1 – Select Entire Row or Column
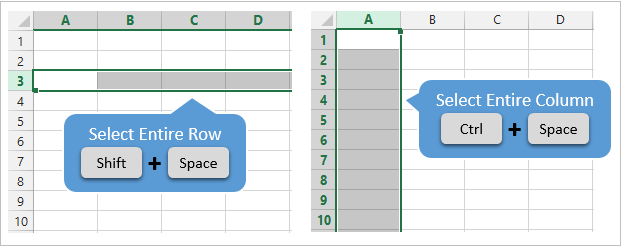
Shift+Space is the keyboard shortcut to select an entire row.
Ctrl+Space is the keyboard shortcut to select an entire column.
Mac Shortcuts: Same as above
The keyboard shortcuts by themselves don’t do much. However, they are the starting point for performing a lot of other actions where you first need to select the entire row or column. This includes tasks like deleting rows, grouping columns, etc.
These shortcuts also work for selecting the entire row or column inside an Excel Table.
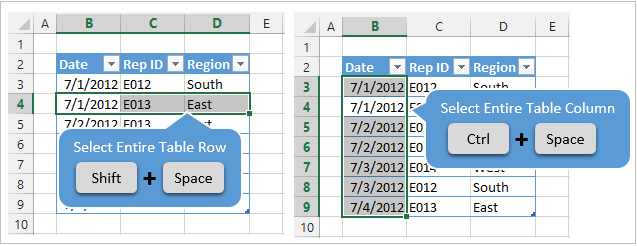
When you press the Shift+Space shortcut the first time it will select the entire row within the Table. Press Shift+Space a second time and it will select the entire row in the worksheet.
The same works for columns. Ctrl+Space will select the column of data in the Table. Pressing the keyboard shortcut a second time will include the column header of the Table in the selection. Pressing Ctrl+Space a third time will select the entire column in the worksheet.
You can select multiple rows or columns by holding Shift and pressing the Arrow Keys multiple times.
![]()
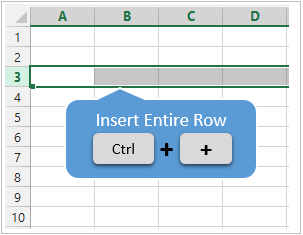
#2 – Insert or Delete Rows or Columns
There are a few ways to quickly delete rows and columns in Excel.
If you have the rows or columns selected, then the following keyboard shortcuts will quickly add or delete all selected rows or columns.
Ctrl++ (plus character) is the keyboard shortcut to insert rows or columns. If you are using a laptop keyboard you can press Ctrl+Shift+= (equal sign).
Mac Shortcut: Cmd++ or Cmd+Shift+
Ctrl+- (minus character) is the keyboard shortcut to delete rows or columns.
Mac Shortcut: Cmd+-

So for the above shortcuts to work you will first need to select the entire row or column, which can be done with the Shift+Space or Ctrl+Space shortcuts explained in #1.
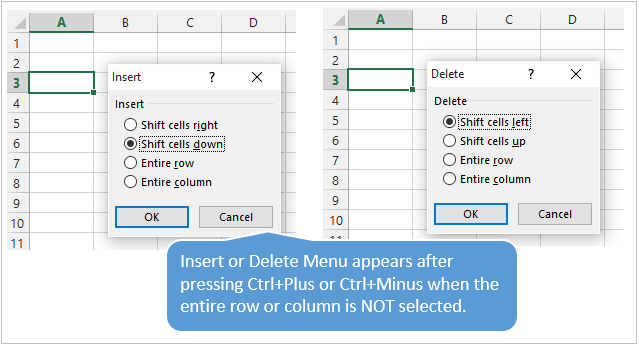
If you do not have the entire row or column selected then you will be presented with the Insert or Delete Menus after pressing Ctrl++ or Ctrl+-.
You can then press the up or down arrow keys to make your selection from the menu and hit Enter. For me it is easier to first select the entire row or column, then press Ctrl++ or Ctrl+-.
So, the entire keyboard shortcut to delete a column would be Ctrl+Space, Ctrl+-. You could also use the keyboard shortcut Alt+H+D+C to delete columns and Alt+H+D+R to delete rows. There are lots of ways to do a simple task… 🙂
#3 – AutoFit Column Width
There are also a lot of different ways to AutoFit column widths. AutoFit means that the width of the column will be adjusted to fit the contents of the cell.
You can use the mouse and double-click when you hover the cursor between columns when you see the resize column cursor.
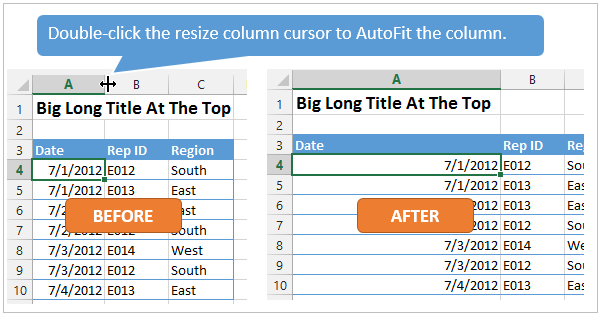
The problem with this is that you might just want to resize the column for the date in cell A4, instead of the big long title in cell A1. To accomplish this you can use the AutoFit Column Width button. It is located on the Home tab of the Ribbon in the Format menu.
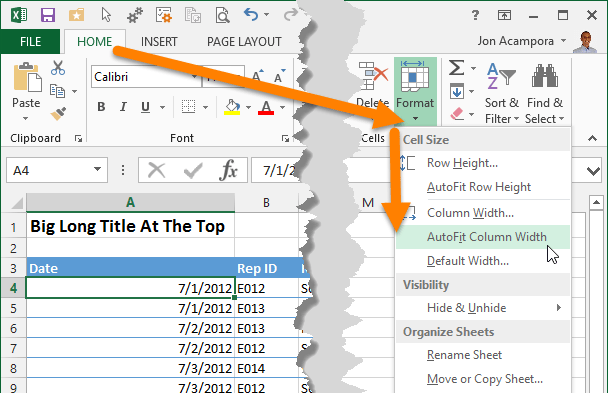
The AutoFit Column Width button bases the width of the column on the cells you have selected. In the image above I have cell A4 selected. So the column width will be adjusted to fit the contents of A4, as shown in the results below.
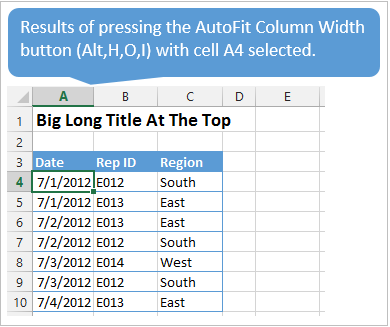
Alt,H,O,I is the keyboard shortcut for the AutoFit Column Width button. This is one I use a lot to get my reports looking shiny. 🙂
Alt,H,O,A is the keyboard shortcut to AutoFit Row Height. It doesn’t work exactly the same as column width, and will only adjust the row height to the tallest cell in the entire row.
Mac Shortcuts: None that I know of. The Mac version does not use the Alt key sequence which I believe is a limitation of the Mac OS.
#3.5 – Manually Adjust Row or Column Width
The column width or row height windows can be opened with keyboard shortcuts as well.
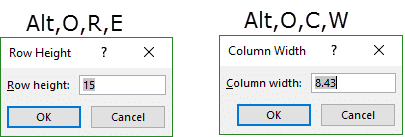
Alt,O,R,E is the keyboard shortcut to open the Row Height window.
Alt,O,C,W is the keyboard shortcut to open the Column Width window.
The row height or column width will be applied to the rows or columns of all the cells that are currently selected.
These are old shortcuts from Excel 2003, but they still work in the modern versions of Excel.
Mac Shortcuts: None that I know of. The Mac version does not use the Alt key sequence which I believe is a limitation of the Mac OS.
#4 – Hide or Unhide Rows or Columns
There are several dedicated keyboard shortcuts to hide and unhide rows and columns.
- Ctrl+9 to Hide Rows
- Ctrl+0 (zero) to Hide Columns
- Ctrl+Shift+( to Unhide Rows
- Ctrl+Shift+) to Unhide Columns – If this doesn’t work for you try Alt,O,C,U (old Excel 2003 shortcut that still works). You can also modify a Windows setting to prevent the conflict with this shortcut. See the comment from Pablo Baez on Oct 5, 2015 below for further instructions. Thanks Pablo! 🙂
Mac Shortcuts: Same as above
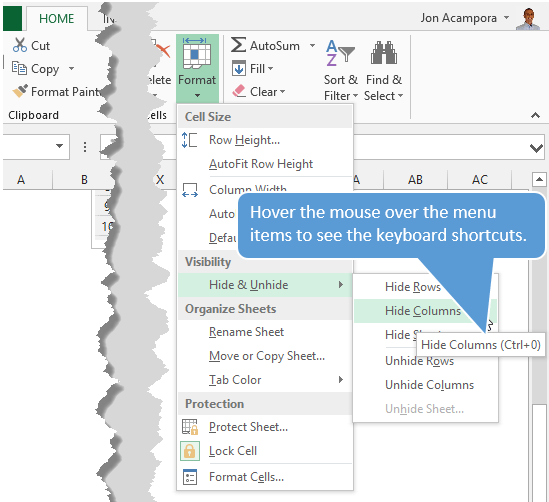
The buttons are also located on the Format menu on the Home tab of the Ribbon. You can hover over any of the items in the menu and the keyboard shortcut will display in the screentip (see screenshot below).
The trick with getting these shortcuts to work is to have the proper cells selected first.
To hide rows or columns you just need to select cells in the rows or columns you want to hide, then press the Ctrl+9 or Ctrl+Shift+( shortcut.
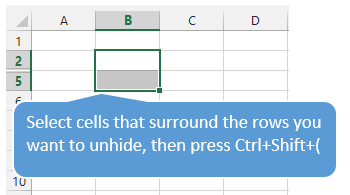
To unhide rows or columns you first need to select the cells that surround the rows or columns you want to unhide. In the screenshot below I want to unhide rows 3 & 4. I first select cell B2:B5, cells that surround or cover the hidden rows, then press Ctrl+Shift+( to unhide the rows.
The same technique works to unhide columns.
#5 – Group or Ungroup Rows or Columns
Row and Column groupings are a great way to quickly hide and unhide columns and rows.
Shift+Alt+Right Arrow is the shortcut to group rows or columns.
Mac Shortcut: Cmd+Shift+K
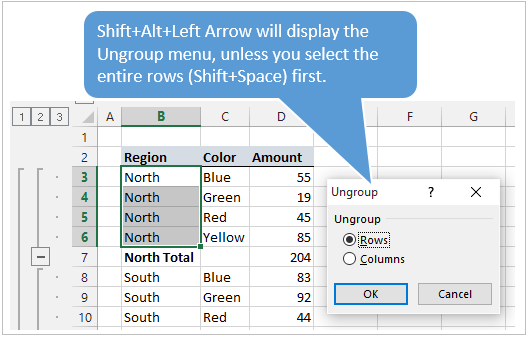
Shift+Alt+Left Arrow is the shortcut to ungroup.
Mac Shortcut: Cmd+Shift+J
Again, the trick here is to select the entire rows or columns you want to group/ungroup first. Otherwise you will be presented with the Group or Ungroup menu.
Alt,A,U,C is the keyboard shortcut to remove all the row and columns groups on the sheet. This is the same as pressing the Clear Outline button on the Ungroup menu of the Data tab on the Ribbon.
*Bonus funny: At some point when using the group/ungroup shortcuts, you will accidentally press Ctrl+Alt+Right Arrow. This is a Windows shortcut that orientates the entire screen to the right. I call it “neck ache view”. To get it back to normal press Ctrl+Alt+Up Arrow.
If your co-worker or boss accidentally leaves their computer unlocked and you want to play a joke on them, press Ctrl+Alt+Down Arrow. This will turn their screen upside down. Don’t forget to record a video of their WTF reaction… 🙂
What Are Your Favorites?
There are a ton of keyboard shortcuts for working with rows and columns. The above are some of my favorites that I use everyday. What are some of your favorites? Please leave a comment below. Thanks! 🙂

This Excel tutorial explains how to delete a column in Excel 2016 (with screenshots and step-by-step instructions).
Question:In Microsoft Excel 2016, how do I delete a column in a spreadsheet?
Answer: Select a cell in the column that you wish to delete. In this example, we’ve selected cell B3 because we want to delete colulmn B.

Right-click and select «Delete» from the popup menu.
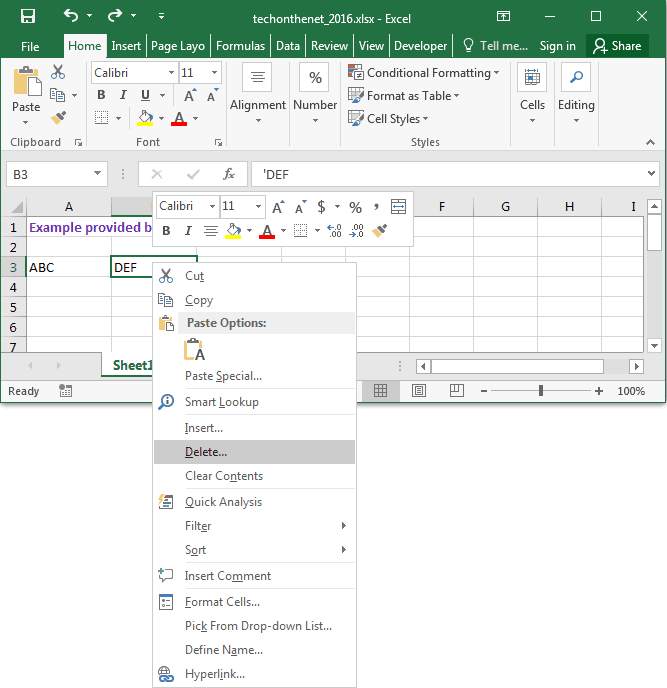
When the Delete window appears, select the «Entire column» option and click on the OK button.
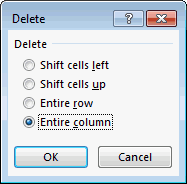
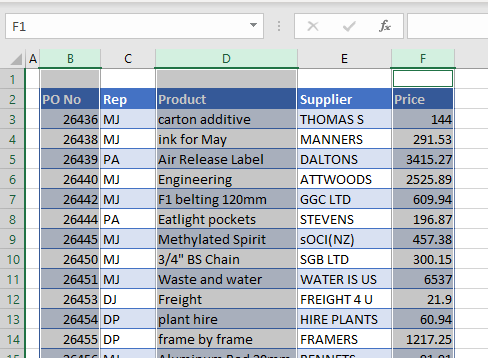
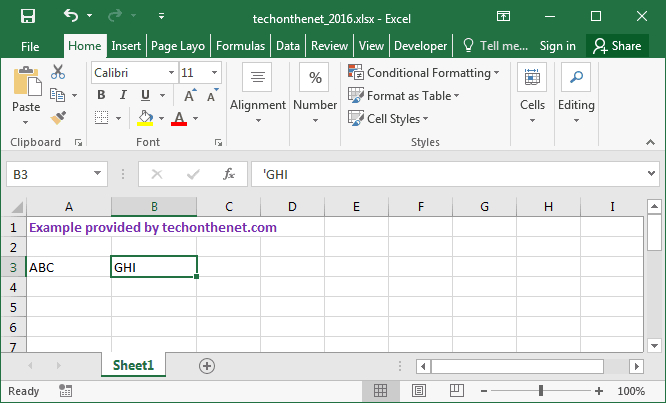
The column should now be deleted in the spreadsheet. In this example, column B was deleted and the data in the columns to the right were shifted over to the left.
What to Know
- Add/delete row: Shift + Spacebar > Ctrl + Shift and the plus or minus key, or Insert or Delete from the context menu.
- Add/delete column: Press Ctrl + Spacebar > Ctrl + Shift and the plus or minus key, or Insert or Delete from the context menu.
These instructions cover how to add and delete rows and columns using a keyboard shortcut and the right-click context menu in Excel 2019, 2016, 2013, 2010, Excel Online, and Excel for Mac.
Add Rows to an Excel Worksheet
When columns and rows containing data are deleted, the data is deleted as well. These losses also affect formulas and charts that reference the data in the deleted columns and rows.
If you accidentally delete columns or rows containing data, use the undo feature on the ribbon to get your data back.
Add Rows Using Shortcut Keys
The keyboard key combination used to add rows to a worksheet is:
Ctrl + Shift + " + " (plus sign)
If you have a keyboard with a Number Pad to the right of the regular keyboard, use the + sign there without the Shift key. The key combination is: Ctrl + «+» (plus sign)
Before adding a row, tell Excel where you want the new one to be inserted by selecting its neighbor. This can also be done using a keyboard shortcut:
Shift + Spacebar
Excel inserts the new row above the row selected.
To Add a Single Row Using a Keyboard Shortcut
- Select a cell in the row where you want the new row added.
- Press and hold the Shift key on the keyboard
- Press the Spacebar without releasing the Shift key.
- The entire row is highlighted.
- Press and hold the Ctrl and Shift keys on the keyboard.
- Press the » + » key without releasing the Ctrl and Shift keys.
- A new row is added above the selected row.
To Add Multiple Adjacent Rows Using a Keyboard Shortcut
Tell Excel how many new adjacent rows you want to add to the worksheet by selecting the same number of existing rows. If you want to insert two new rows, select two existing rows where you want the new ones to be located. If you want three new rows, select three existing rows.
To Add Three New Rows to a Worksheet
- Select a cell in the row where you want the new rows added.
- Press and hold the Shift key.
- Press the Spacebar without releasing the Shift key.
- The entire row is highlighted.
- Continue to hold the Shift key.
- Press the Up arrow key twice to select two additional rows.
- Press and hold the Ctrl and Shift keys.
- Press the « + » key without releasing the Ctrl and Shift keys.
- Three new rows are added above the selected rows.
Add Rows Using the Context Menu
The option in the context menu (also referred to as the right-click menu) that adds rows to a worksheet is Insert.
As with the keyboard method above, before adding a row, tell Excel where you want the new one to be inserted by selecting its neighbor.
The easiest way to add rows using the context menu is to select the entire row by selecting the row header.
To Add a Single Row to a Worksheet
- Select the row header of a row where you want the new row added. The entire row is highlighted.
- Right-click on the selected row to open the context menu.
- Choose Insert from the menu.
- A new row is added above the selected row.
To Add Multiple Adjacent Rows
Tell Excel how many new rows you want to add to the worksheet by selecting the same number of existing rows.
To Add Three New Rows to a Worksheet
- In the row header, drag with the mouse pointer to highlight three rows where you want the new rows added.
- Right-click on the selected rows.
- Choose Insert from the menu.
- Three new rows are added above the selected rows.
How To Insert Multiple Rows in Excel
Delete Rows in an Excel Worksheet
The keyboard key combination to delete rows from a worksheet is:
Ctrl + " - " (minus sign)
The easiest way to delete a row is to select the entire row to be deleted. This can also be done using a keyboard shortcut:
Shift + Spacebar
To Delete a Single Row using a Keyboard Shortcut
- Select a cell in the row to be deleted.
- Press and hold the Shift key.
- Press the Spacebar without releasing the Shift key.
- The entire row is highlighted.
- Release the Shift key.
- Press and hold the Ctrl key.
- Press the » — » key without releasing the Ctrl key.
- The selected row is deleted.
To Delete Adjacent Rows using a Keyboard Shortcut
Selecting adjacent rows in a worksheet allows you to delete them all at once. Selecting adjacent rows can be done using the arrow keys on the keyboard after the first row is selected.
To Delete Three Rows from a Worksheet
- Select a cell in a row at the bottom end of the group of rows to be deleted.
- Press and hold the Shift key.
- Press the Spacebar without releasing the Shift key.
- The entire row is highlighted.
- Continue to hold the Shift key.
- Press the Up arrow key twice to select two additional rows.
- Release the Shift key.
- Press and hold the Ctrl key.
- Press the » — » key without releasing the Ctrl key.
- The three selected rows are deleted.
Delete Rows Using the Context Menu
The option in the context menu (or right-click menu) that is used to delete rows from a worksheet is Delete.
The easiest way to delete rows using the context menu is to highlight the entire row by selecting the row header.
To Delete a Single Row to a Worksheet
- Select the row header of the row to be deleted.
- Right-click on the selected row to open the context menu.
- Choose Delete from the menu.
- The selected row is deleted.
To Delete Multiple Adjacent Rows
Again, multiple adjacent rows can be deleted at the same time if they are all selected
To Delete Three Rows from a Worksheet
In the row header, drag with the mouse pointer to highlight three adjacent rows.
- Right-click on the selected rows.
- Choose Delete from the menu.
- The three selected rows are deleted.
To Delete Separate Rows
Separate, or non-adjacent, rows can be deleted at the same time by first selecting them with the Ctrl key and mouse.
To Select Separate Rows
- Select the row header of the first row to be deleted.
- Press and hold the Ctrl key.
- Select additional rows in the row header to highlight them.
- Right-click on the selected rows.
- Choose Delete from the menu.
- The selected rows are deleted.
How to Remove Blank Rows in Excel
Add Columns to an Excel Worksheet
The keyboard key combination to add columns to a worksheet is the same as for adding rows:
Ctrl + Shift + " + " (plus sign)
If you have a keyboard with a Number Pad to the right of the regular keyboard, use the + sign there without the Shift key. The key combination becomes Ctrl++.
Before adding a column, tell Excel where you want the new one to be inserted by selecting its neighbor. This can also be done using a keyboard shortcut:
Ctrl + Spacebar
Excel inserts the new column to the left of the column selected.
To Add a Single Column using a Keyboard Shortcut
- Select a cell in the column where you want the new column added.
- Press and hold the Ctrl key.
- Press the Spacebar without releasing the Ctrl key.
- The entire column is highlighted.
- Press and hold the Ctrl and Shift keys.
- Press and release the » + » without releasing the Ctrl and Shift keys.
- A new column is added to the left of the selected column.
To Add Multiple Adjacent Columns using a Keyboard Shortcut
Tell Excel how many new adjacent columns you want to add to the worksheet by selecting the same number of existing columns.
If you want to insert two new columns, select two existing columns where you want the new ones to be located. If you want three new columns, select three existing columns.
To Add Three New Columns to a Worksheet
- Select a cell in the column where you want the new columns added.
- Press and hold the Ctrl key.
- Press the Spacebar without releasing the Ctrl key.
- The entire column is highlighted.
- Release the Ctrl key.
- Press and hold the Shift key.
- Press the Right arrow key twice to select two additional columns.
- Press and hold the Ctrl and Shift keys on the keyboard.
- Press the » + » without releasing the Ctrl and Shift keys.
- Three new columns are added to the left the selected columns.
Add Columns Using the Context Menu
The option in the context menu that is used to add columns to a worksheet is Insert.
Before adding a column, tell Excel where you want the new one to be inserted by selecting its neighbor.
The easiest way to add columns using the context menu is to highlight the entire column by selecting the column header.
To Add a Single Column to a Worksheet
- Select the column header of a column where you want the new column added. The entire column is highlighted.
- Right-click on the selected column to open the context menu.
- Choose Insert from the menu.
- A new column is added to the left of the selected column.
To Add Multiple Adjacent Columns
Again as with rows, tell Excel how many new columns you want to add to the worksheet by selecting the same number of existing columns.
To Add Three New Columns to a Worksheet
- In the column header, drag with the mouse pointer to highlight three columns where you want the new columns added.
- Right-click on the selected columns.
- Choose Insert from the menu.
- Three new columns are added to the left of the selected columns.
Delete Columns from an Excel Worksheet
The keyboard key combination used to delete columns from a worksheet is:
Ctrl + " - " (minus sign)
It’s important to note that deleting a column is just that — while there is the option of hiding columns, which is the not-so-permanent way of getting rid of your columns.
The easiest way to delete a column is to select the entire column to be deleted. This can also be done using a keyboard shortcut:
Ctrl + Spacebar
To Delete a Single Column using a Keyboard Shortcut
- Select a cell in the column to be deleted.
- Press and hold the Ctrl key.
- Press the Spacebar without releasing the Shift key.
- The entire column is highlighted.
- Continue to hold the Ctrl key.
- Press and release the » — » key without releasing the Ctrl key.
- The selected column is deleted.
To Delete Adjacent Columns using a Keyboard Shortcut
Selecting adjacent columns in a worksheet allows you to delete them all at once. Selecting adjacent columns can be done using the arrow keys on the keyboard after the first column is selected.
To Delete Three Columns from a Worksheet
- Select a cell in a column at the bottom end of the group of columns to be deleted.
- Press and hold the Shift key.
- Press the Spacebar without releasing the Shift key.
- The entire column is highlighted.
- Continue to hold the Shift key.
- Press the Up arrow keyboard twice to select two additional columns.
- Release the Shift key.
- Press and hold the Ctrl key.
- Press and release the » — » key without releasing the Ctrl key.
- The three selected columns are deleted.
Delete Columns Using the Context Menu
The option in the context menu that is used to delete columns from a worksheet is Delete.
The easiest way to delete columns using the context menu is to highlight the entire column by selecting the column header.
To Delete a Single Column to a Worksheet
- Select the column header of the column to be deleted.
- Right-click on the selected column to open the context menu.
- Choose Delete from the menu.
- The selected column is deleted.
To Delete Multiple Adjacent Columns
Multiple adjacent columns can be deleted at the same time if they are all selected.
To Delete Three Columns from a Worksheet
- In the column header, drag with the mouse pointer to highlight three adjacent columns.
- Right-click on the selected columns.
- Choose Delete from the menu.
- The three selected columns are deleted.
To Delete Separate Columns
Separate, or non-adjacent, columns can be deleted at the same time by first selecting them with the Ctrl key and mouse.
To Select Separate Columns
- Select the column header of the first column to be deleted.
- Press and hold the Ctrl key.
- Select additional rows in the column header to highlight them.
- Right-click on the selected columns.
- Choose Delete from the menu.
- The selected columns are deleted.
Thanks for letting us know!
Get the Latest Tech News Delivered Every Day
Subscribe