
Содержание
- Процесс создания
- Создание таблицы
- Присвоение атрибутов базы данных
- Сортировка и фильтр
- Поиск
- Закрепление областей
- Выпадающий список
- Вопросы и ответы

В пакете Microsoft Office есть специальная программа для создания базы данных и работы с ними – Access. Тем не менее, многие пользователи предпочитают использовать для этих целей более знакомое им приложение – Excel. Нужно отметить, что у этой программы имеется весь инструментарий для создания полноценной базы данных (БД). Давайте выясним, как это сделать.
Процесс создания
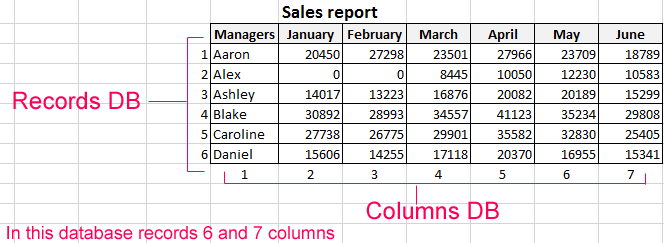
База данных в Экселе представляет собой структурированный набор информации, распределенный по столбцам и строкам листа.
Согласно специальной терминологии, строки БД именуются «записями». В каждой записи находится информация об отдельном объекте.
Столбцы называются «полями». В каждом поле располагается отдельный параметр всех записей.
То есть, каркасом любой базы данных в Excel является обычная таблица.
Создание таблицы
Итак, прежде всего нам нужно создать таблицу.
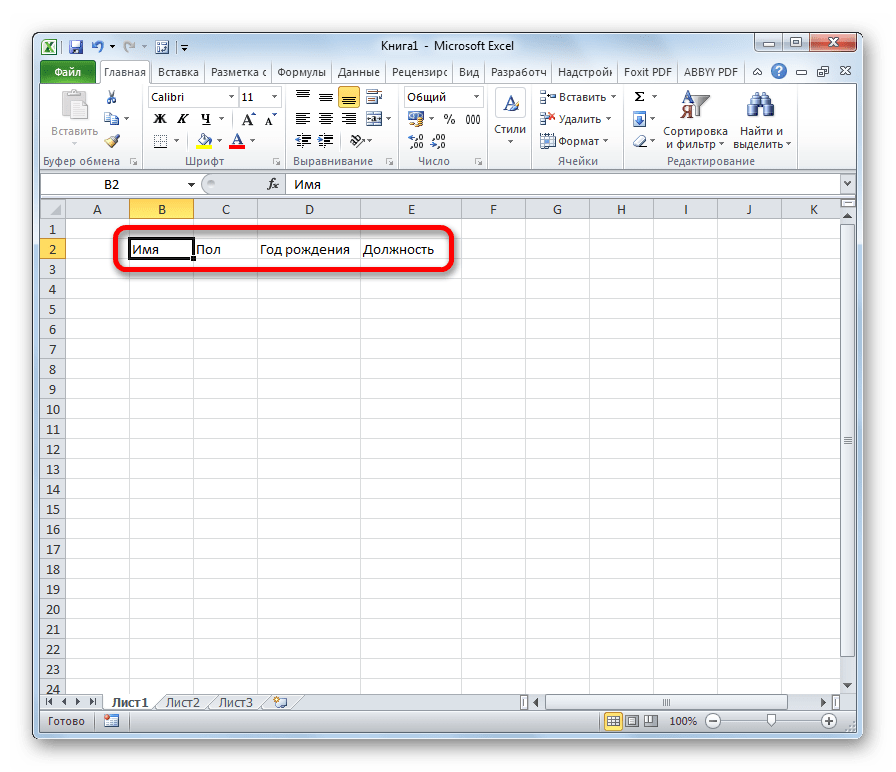
- Вписываем заголовки полей (столбцов) БД.
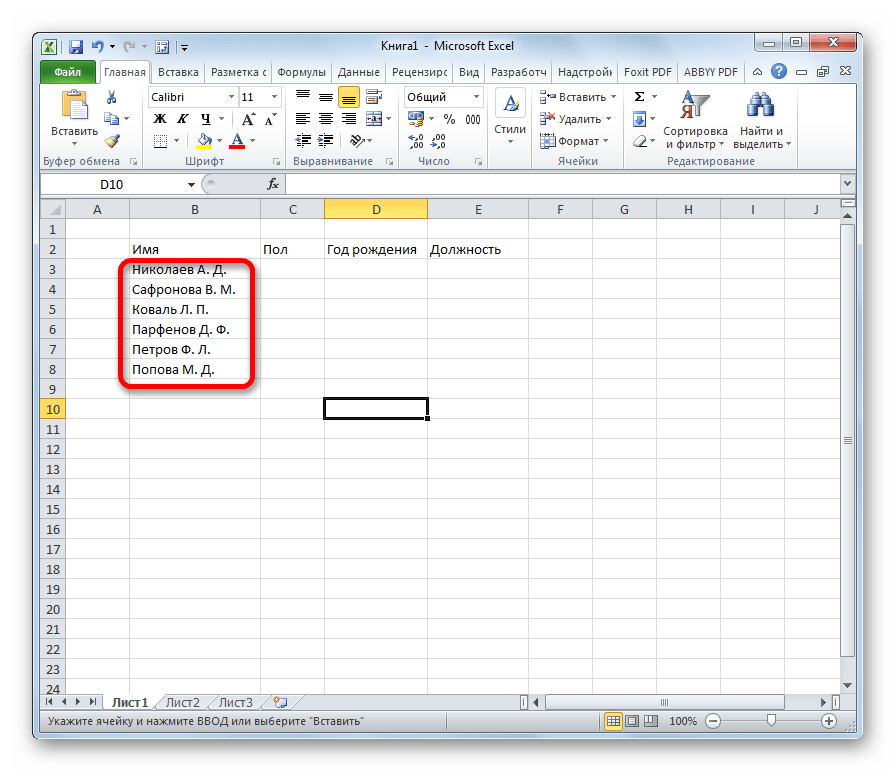
- Заполняем наименование записей (строк) БД.
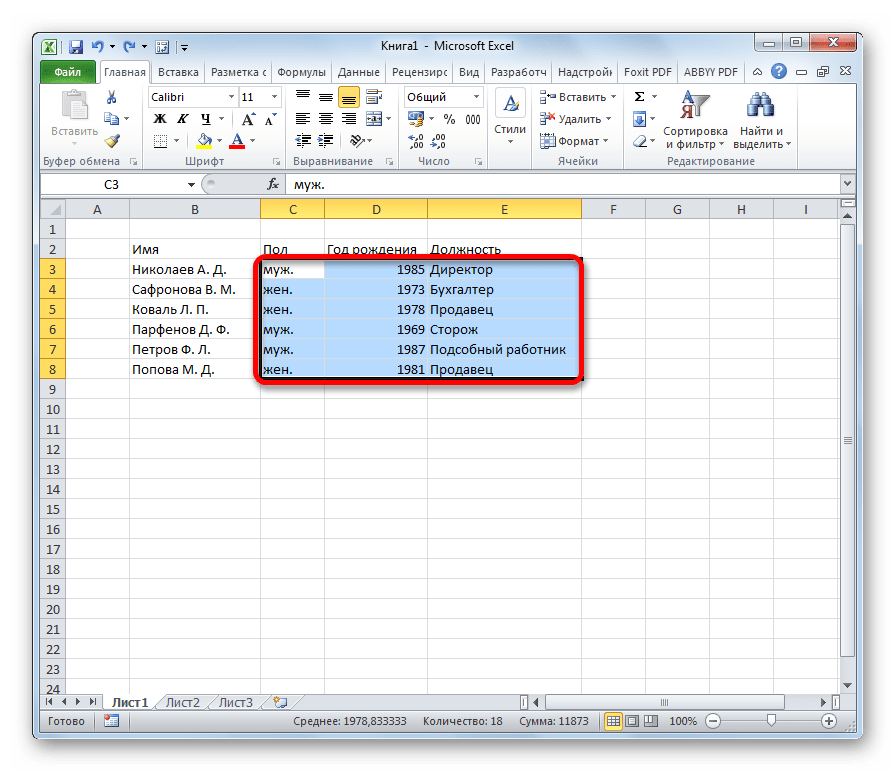
- Переходим к заполнению базы данными.
- После того, как БД заполнена, форматируем информацию в ней на свое усмотрение (шрифт, границы, заливка, выделение, расположение текста относительно ячейки и т.д.).
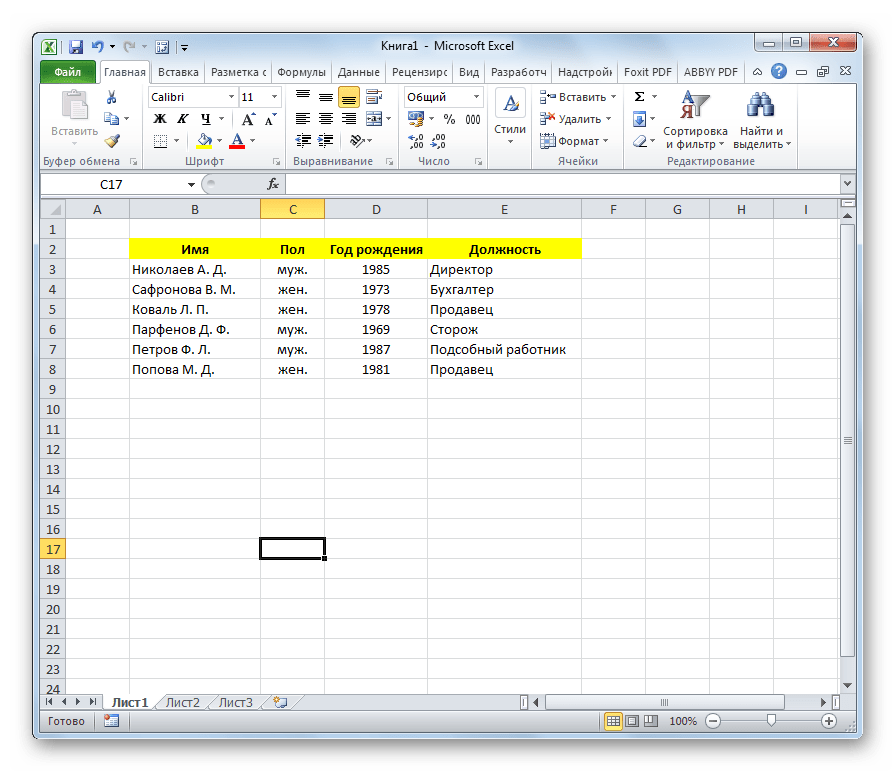
На этом создание каркаса БД закончено.
Урок: Как сделать таблицу в Excel
Присвоение атрибутов базы данных
Для того, чтобы Excel воспринимал таблицу не просто как диапазон ячеек, а именно как БД, ей нужно присвоить соответствующие атрибуты.
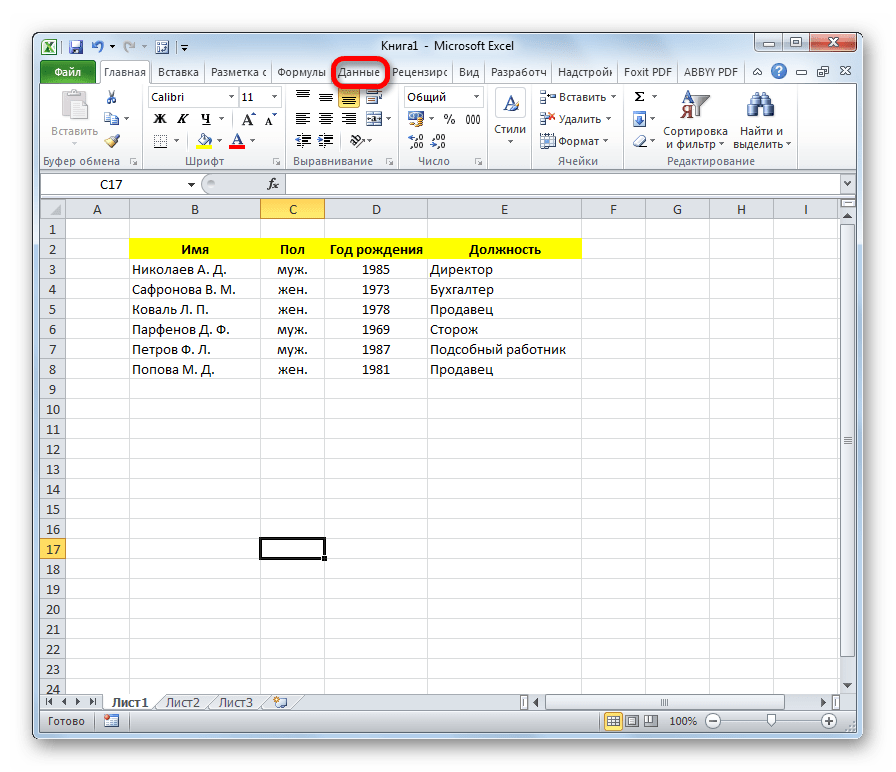
- Переходим во вкладку «Данные».
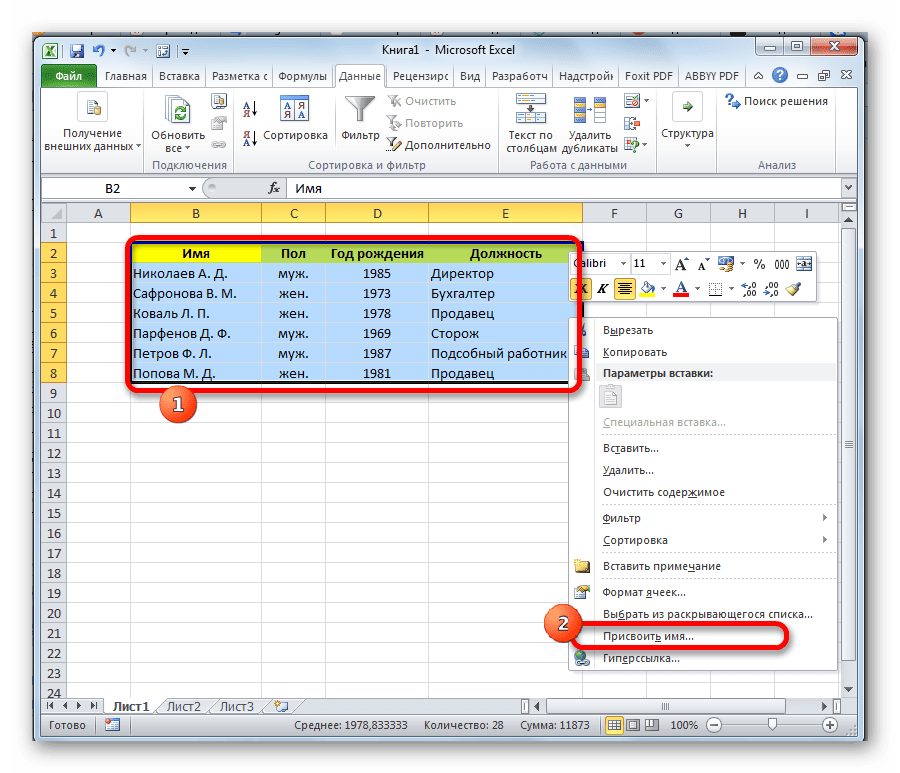
- Выделяем весь диапазон таблицы. Кликаем правой кнопкой мыши. В контекстном меню жмем на кнопку «Присвоить имя…».
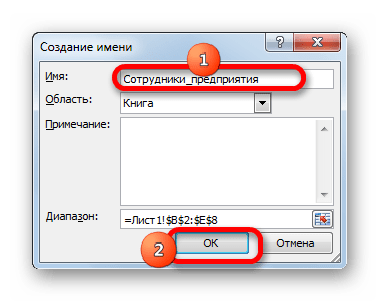
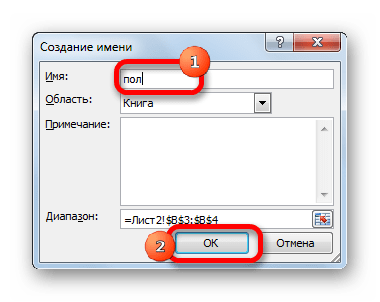
- В графе «Имя» указываем то наименование, которым мы хотим назвать базу данных. Обязательным условием является то, что наименование должно начинаться с буквы, и в нём не должно быть пробелов. В графе «Диапазон» можно изменить адрес области таблицы, но если вы её выделили правильно, то ничего тут менять не нужно. При желании в отдельном поле можно указать примечание, но этот параметр не является обязательным. После того, как все изменения внесены, жмем на кнопку «OK».
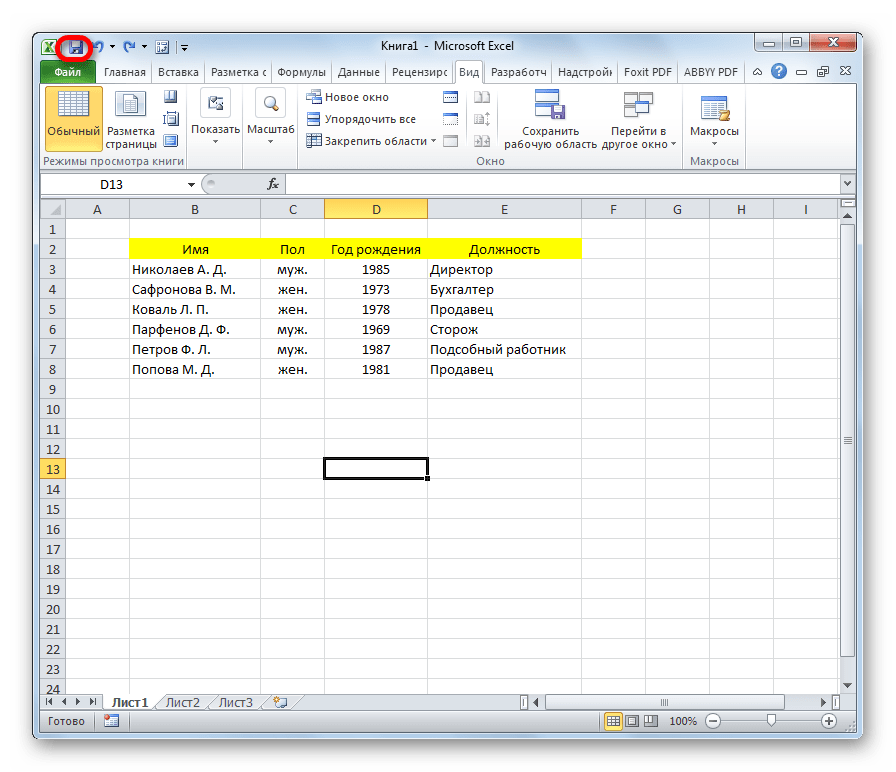
- Кликаем по кнопке «Сохранить» в верхней части окна или набираем на клавиатуре сочетание клавиш Ctrl+S, для того, чтобы сберечь БД на жестком диске или съемном носителе, подключенном к ПК.

Можно сказать, что после этого мы уже имеем готовую базу данных. С ней можно работать и в таком состоянии, как она представлена сейчас, но многие возможности при этом будут урезаны. Ниже мы разберем, как сделать БД более функциональной.
Сортировка и фильтр
Работа с базами данных, прежде всего, предусматривает возможность упорядочивания, отбора и сортировки записей. Подключим эти функции к нашей БД.
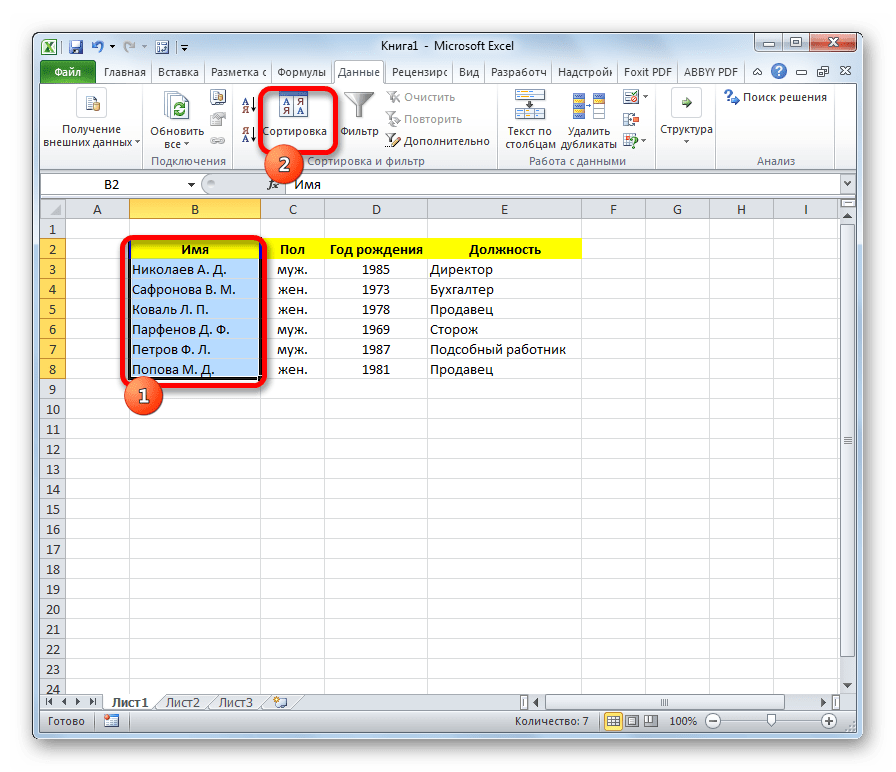
- Выделяем информацию того поля, по которому собираемся провести упорядочивание. Кликаем по кнопке «Сортировка» расположенной на ленте во вкладке «Данные» в блоке инструментов «Сортировка и фильтр».

Сортировку можно проводить практически по любому параметру:
- имя по алфавиту;
- дата;
- число и т.д.
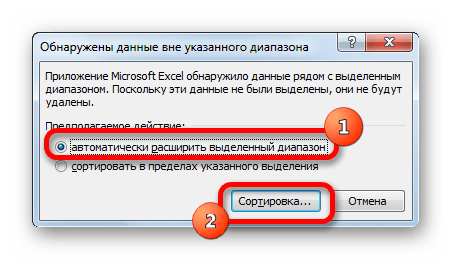
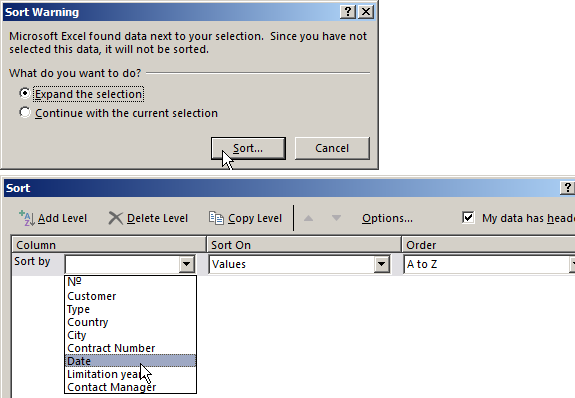
- В следующем появившемся окне будет вопрос, использовать ли для сортировки только выделенную область или автоматически расширять её. Выбираем автоматическое расширение и жмем на кнопку «Сортировка…».
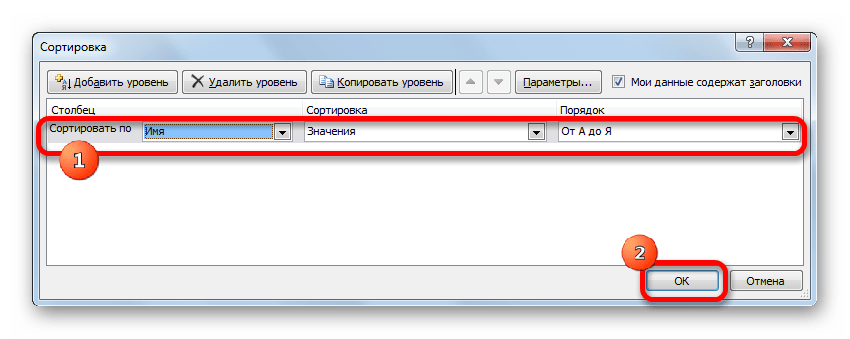
- Открывается окно настройки сортировки. В поле «Сортировать по» указываем имя поля, по которому она будет проводиться.
- В поле «Сортировка» указывается, как именно она будет выполняться. Для БД лучше всего выбрать параметр «Значения».
- В поле «Порядок» указываем, в каком порядке будет проводиться сортировка. Для разных типов информации в этом окне высвечиваются разные значения. Например, для текстовых данных – это будет значение «От А до Я» или «От Я до А», а для числовых – «По возрастанию» или «По убыванию».
- Важно проследить, чтобы около значения «Мои данные содержат заголовки» стояла галочка. Если её нет, то нужно поставить.
После ввода всех нужных параметров жмем на кнопку «OK».

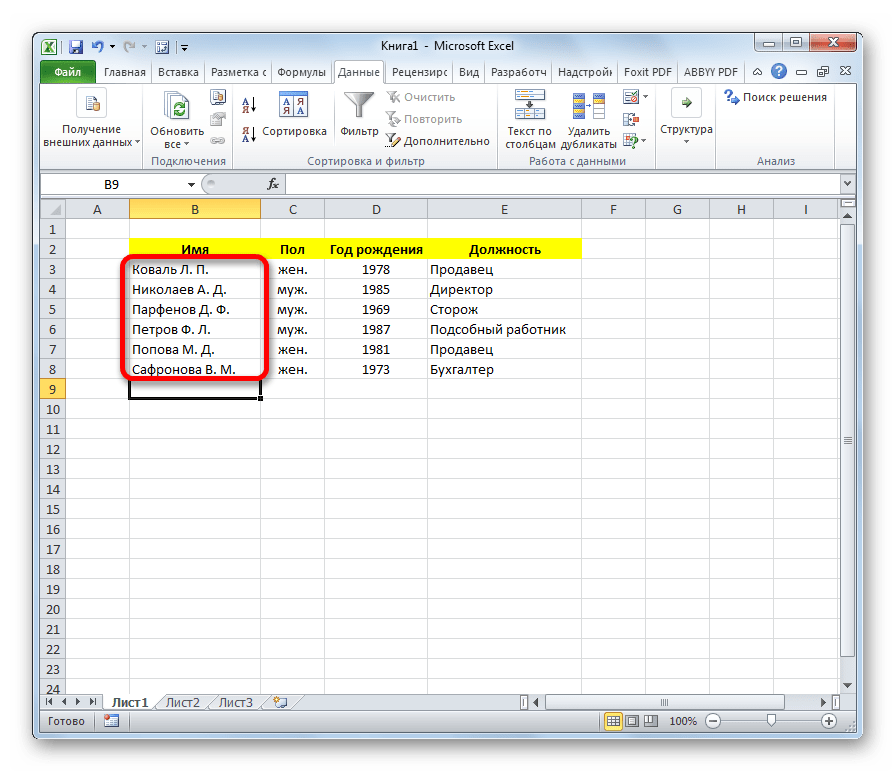
После этого информация в БД будет отсортирована, согласно указанным настройкам. В этом случае мы выполнили сортировку по именам сотрудников предприятия.
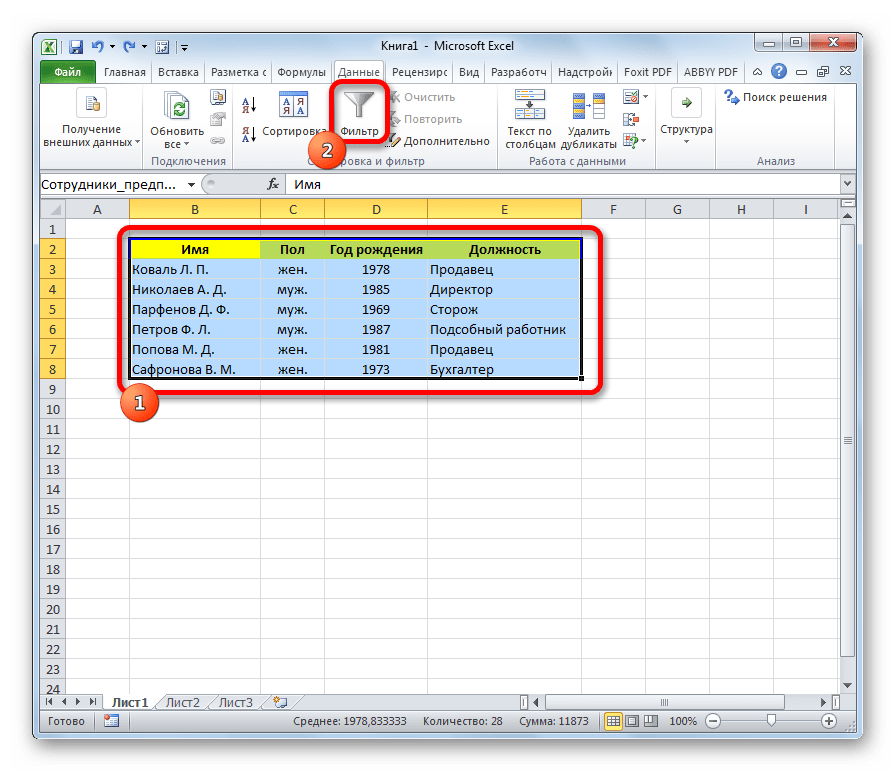
- Одним из наиболее удобных инструментов при работе в базе данных Excel является автофильтр. Выделяем весь диапазон БД и в блоке настроек «Сортировка и фильтр» кликаем по кнопке «Фильтр».
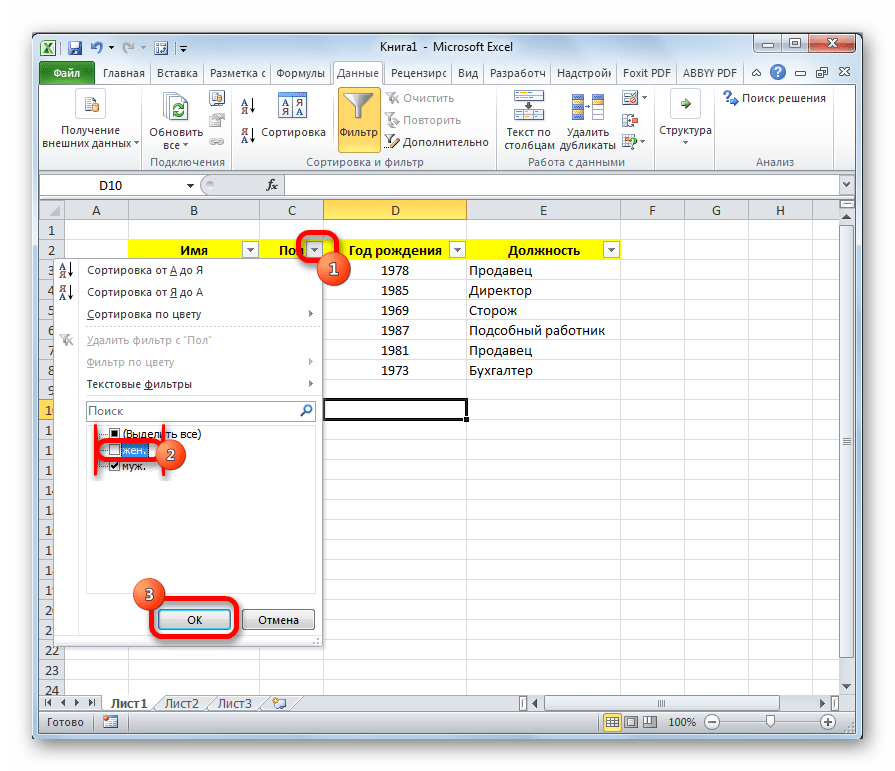
- Как видим, после этого в ячейках с наименованием полей появились пиктограммы в виде перевернутых треугольников. Кликаем по пиктограмме того столбца, значение которого собираемся отфильтровать. В открывшемся окошке снимаем галочки с тех значений, записи с которыми хотим скрыть. После того как выбор сделан, жмем на кнопку «OK».

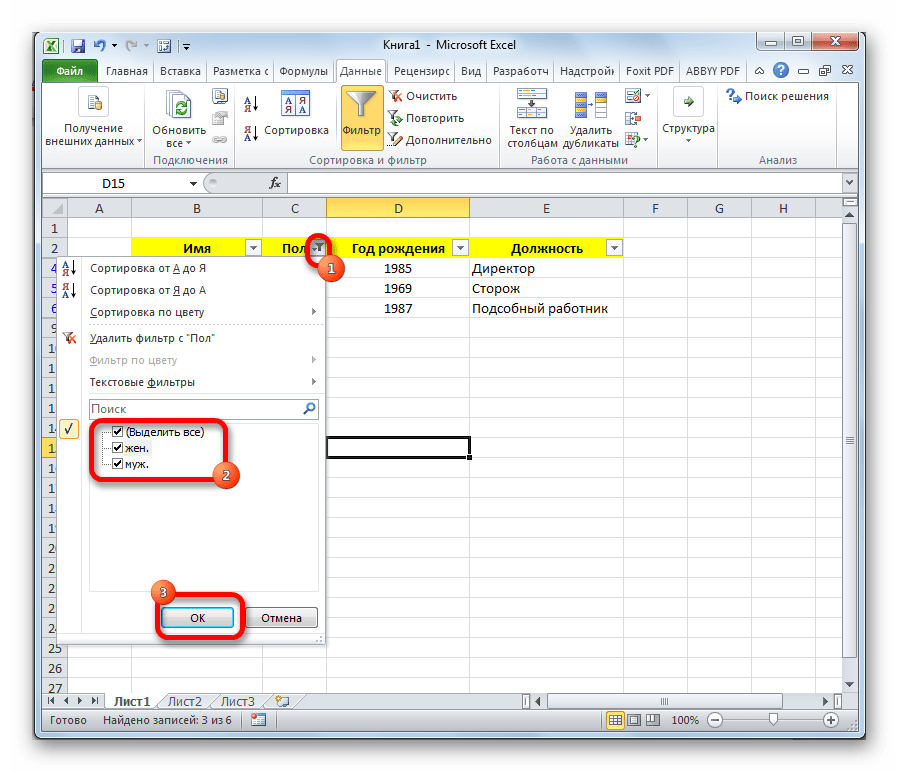
Как видим, после этого, строки, где содержатся значения, с которых мы сняли галочки, были скрыты из таблицы.
- Для того, чтобы вернуть все данные на экран, кликаем на пиктограмму того столбца, по которому проводилась фильтрация, и в открывшемся окне напротив всех пунктов устанавливаем галочки. Затем жмем на кнопку «OK».
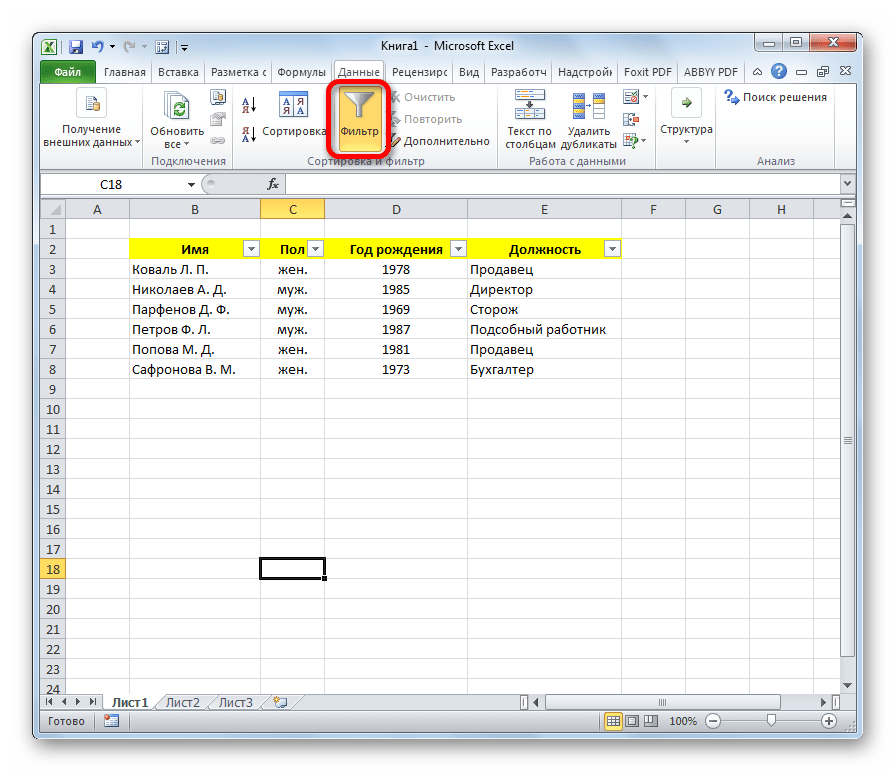
- Для того, чтобы полностью убрать фильтрацию, жмем на кнопку «Фильтр» на ленте.
Урок: Сортировка и фильтрация данных в Excel
Поиск
При наличии большой БД поиск по ней удобно производить с помощь специального инструмента.
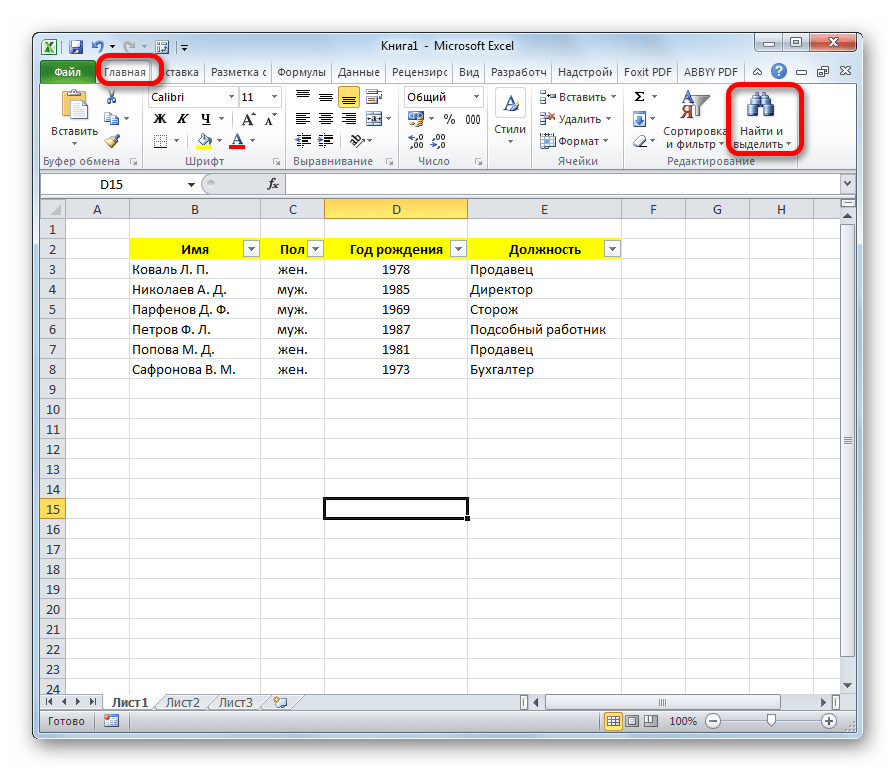
- Для этого переходим во вкладку «Главная» и на ленте в блоке инструментов «Редактирование» жмем на кнопку «Найти и выделить».
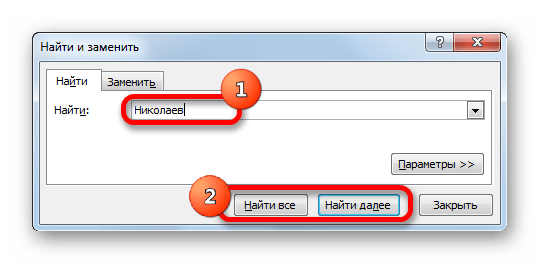
- Открывается окно, в котором нужно указать искомое значение. После этого жмем на кнопку «Найти далее» или «Найти все».
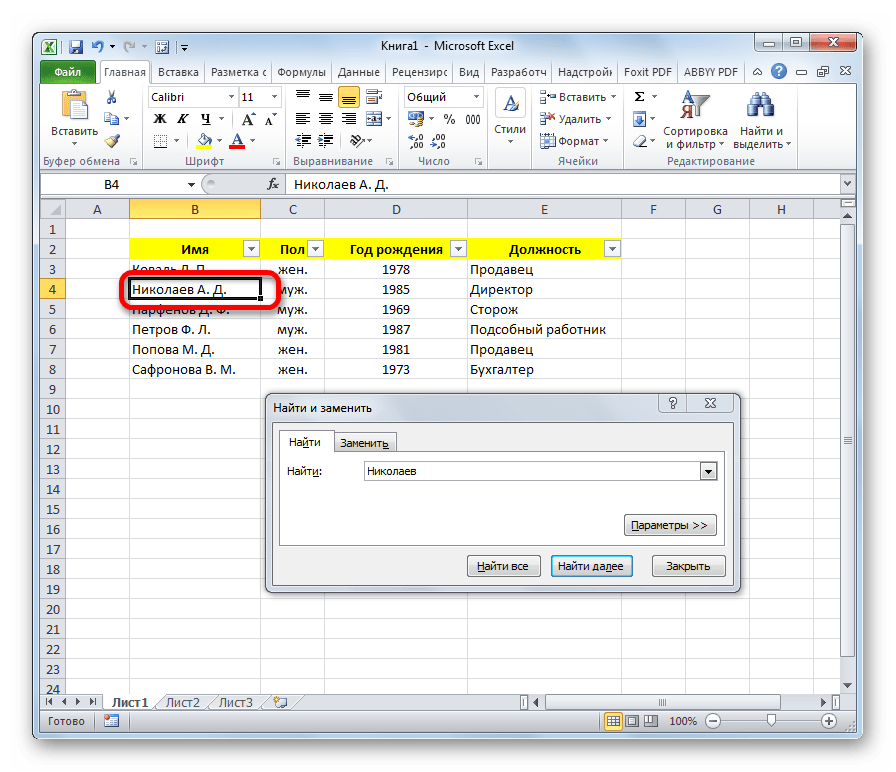
- В первом случае первая ячейка, в которой имеется указанное значение, становится активной.
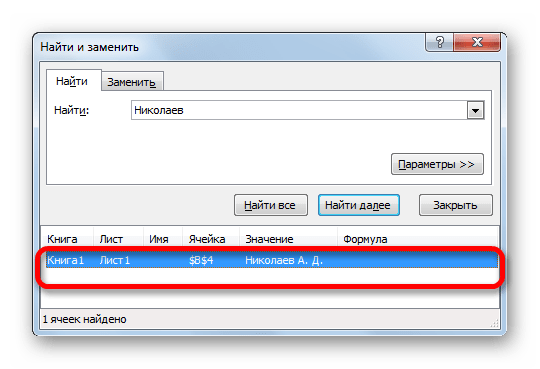
Во втором случае открывается весь перечень ячеек, содержащих это значение.
Урок: Как сделать поиск в Экселе
Закрепление областей
Удобно при создании БД закрепить ячейки с наименованием записей и полей. При работе с большой базой – это просто необходимое условие. Иначе постоянно придется тратить время на пролистывание листа, чтобы посмотреть, какой строке или столбцу соответствует определенное значение.
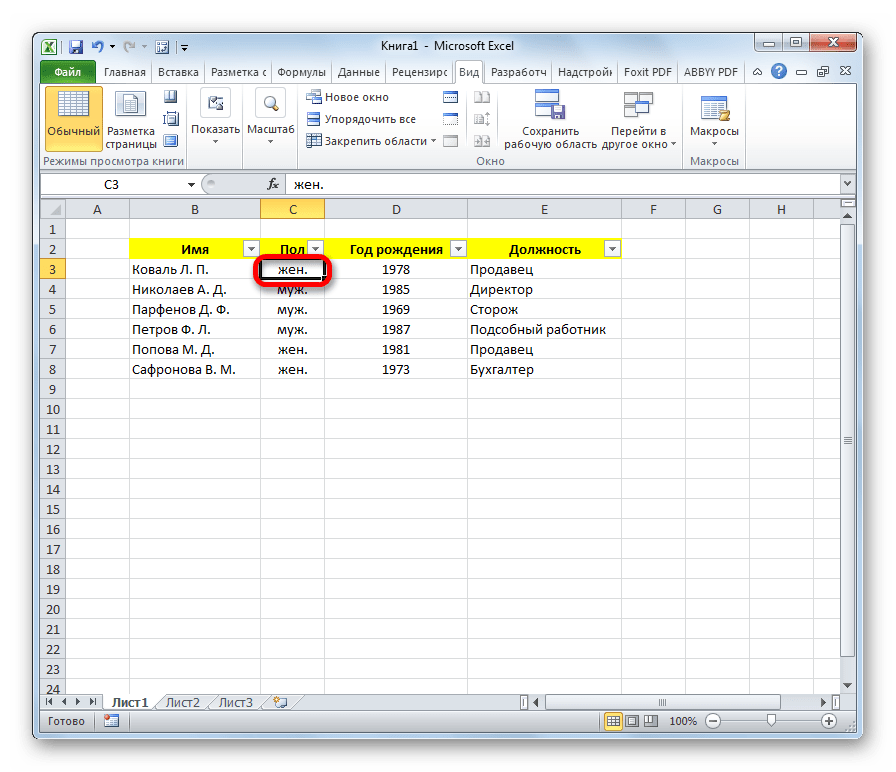
- Выделяем ячейку, области сверху и слева от которой нужно закрепить. Она будет располагаться сразу под шапкой и справа от наименований записей.
- Находясь во вкладке «Вид» кликаем по кнопке «Закрепить области», которая расположена в группе инструментов «Окно». В выпадающем списке выбираем значение «Закрепить области».
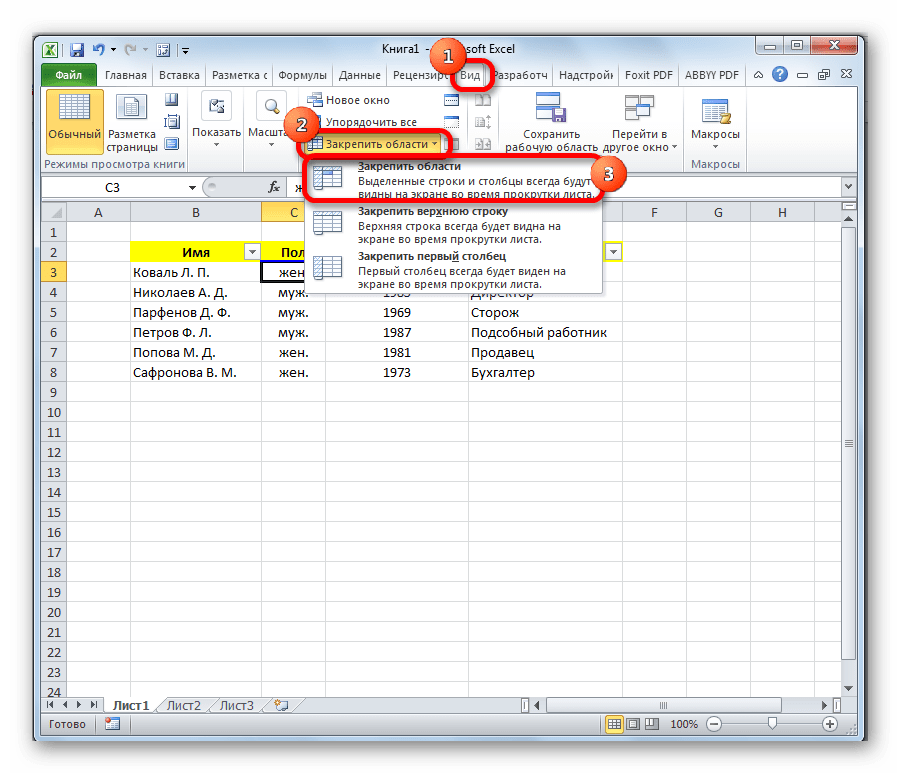
Теперь наименования полей и записей будут у вас всегда перед глазами, как бы далеко вы не прокручивали лист с данными.
Урок: Как закрепить область в Экселе
Выпадающий список
Для некоторых полей таблицы оптимально будет организовать выпадающий список, чтобы пользователи, добавляя новые записи, могли указывать только определенные параметры. Это актуально, например, для поля «Пол». Ведь тут возможно всего два варианта: мужской и женский.
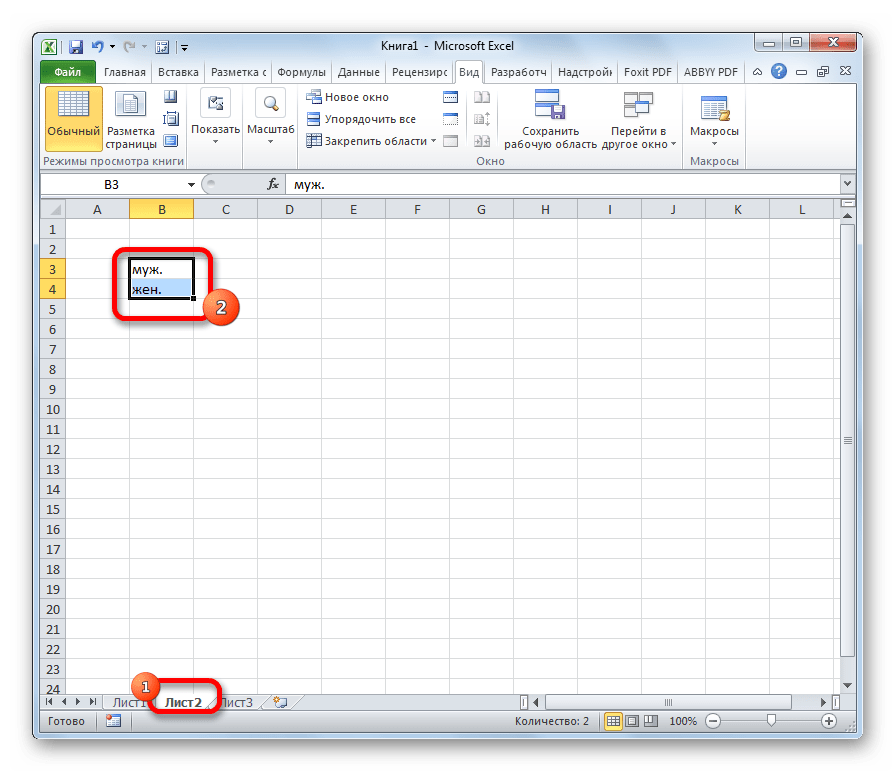
- Создаем дополнительный список. Удобнее всего его будет разместить на другом листе. В нём указываем перечень значений, которые будут появляться в выпадающем списке.
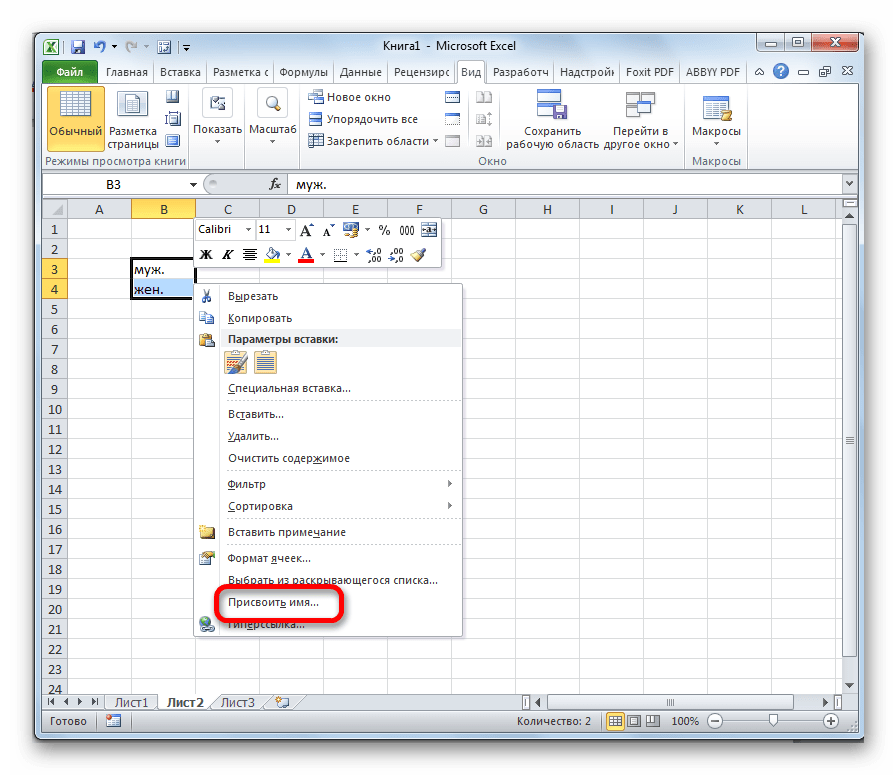
- Выделяем этот список и кликаем по нему правой кнопкой мыши. В появившемся меню выбираем пункт «Присвоить имя…».
- Открывается уже знакомое нам окно. В соответствующем поле присваиваем имя нашему диапазону, согласно условиям, о которых уже шла речь выше.
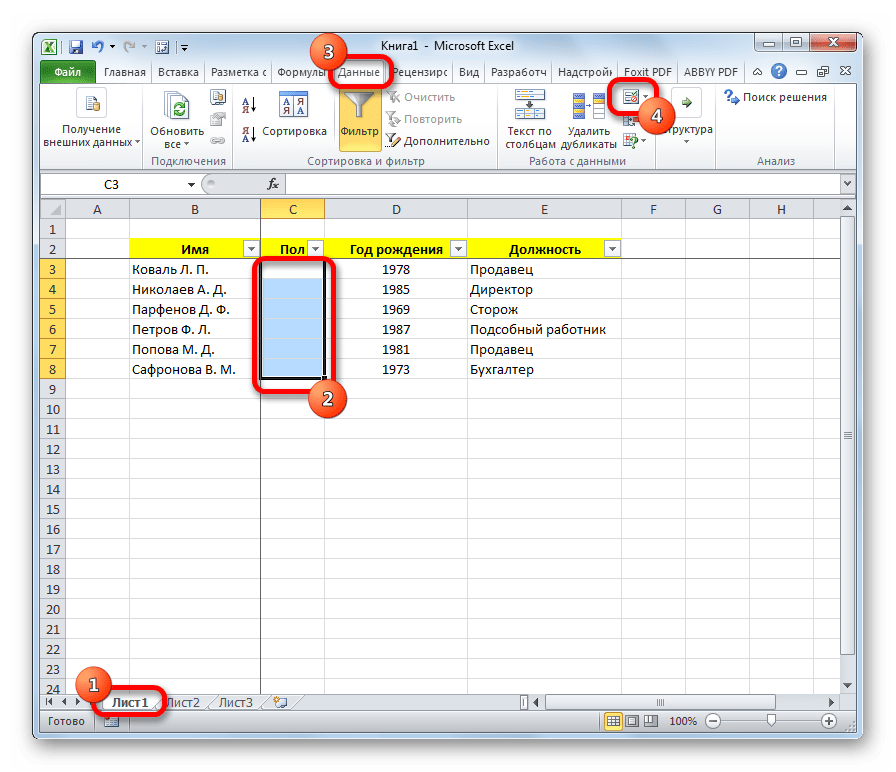
- Возвращаемся на лист с БД. Выделяем диапазон, к которому будет применяться выпадающий список. Переходим во вкладку «Данные». Жмем на кнопку «Проверка данных», которая расположена на ленте в блоке инструментов «Работа с данными».
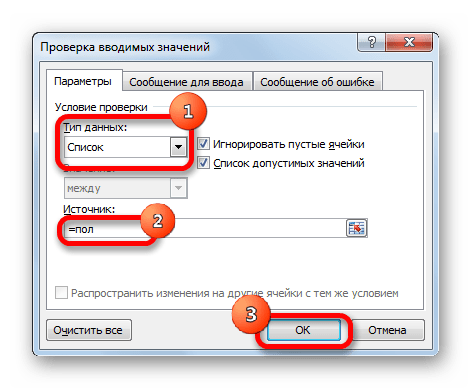
- Открывается окно проверки видимых значений. В поле «Тип данных» выставляем переключатель в позицию «Список». В поле «Источник» устанавливаем знак «=» и сразу после него без пробела пишем наименование выпадающего списка, которое мы дали ему чуть выше. После этого жмем на кнопку «OK».
Теперь при попытке ввести данные в диапазон, где было установлено ограничение, будет появляться список, в котором можно произвести выбор между четко установленными значениями.
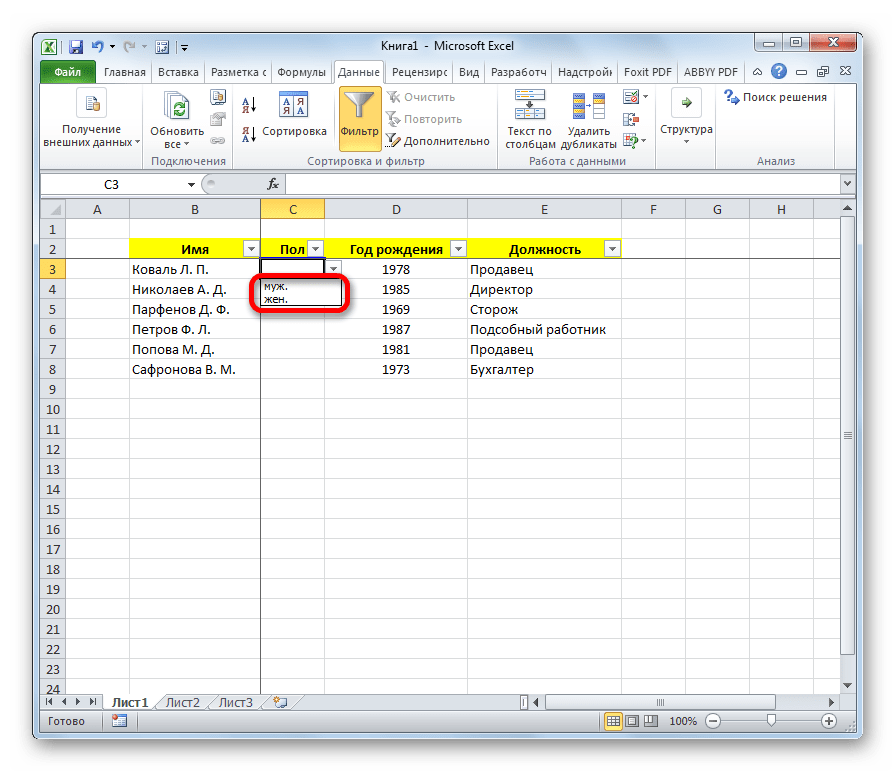
Если же вы попытаетесь написать в этих ячейках произвольные символы, то будет появляться сообщение об ошибке. Вам придется вернутся и внести корректную запись.

Урок: Как сделать выпадающий список в Excel
Конечно, Excel уступает по своим возможностям специализированным программам для создания баз данных. Тем не менее, у него имеется инструментарий, который в большинстве случаев удовлетворит потребности пользователей, желающих создать БД. Учитывая тот факт, что возможности Эксель, в сравнении со специализированными приложениями, обычным юзерам известны намного лучше, то в этом плане у разработки компании Microsoft есть даже некоторые преимущества.
Many users are actively using Excel to generate reports for their subsequent editing. Reports are using for easy viewing of information and a complete control over data management during working with the program.
Table is the interface of the workspace of the program. A relational database structures the information in the rows and columns. Despite the fact that the standard package MS Office has a standalone application for creating and maintaining databases named Microsoft Access, users are actively using Microsoft Excel for the same purpose. After all program features allow you to: sort; format; filter; edit; organize and structure the information.
That is all that you need for working with databases. The only caveat: the Excel program is a versatile analytical tool that is more suitable for complex calculations, computations, sorting, and even for storage structured data, but in small amounts (no more than one million records in the same table, in the 2010 version).
Database Structure — Excel table
Database — a data set distributed in rows and columns for easily searching, organizing and editing. How to make the database in Excel?
All information in the database is contained in the records and fields:
- Record is database (DB) line, which includes information about one object.
- Field is the column in the database that contains information of the same type about all objects.
- Records and database fields correspond to the rows and columns of a standard Microsoft Excel spreadsheet.
If you know how to do a simple table, then creating a database will not be difficult.
Creating DB in Excel: step by step instructions
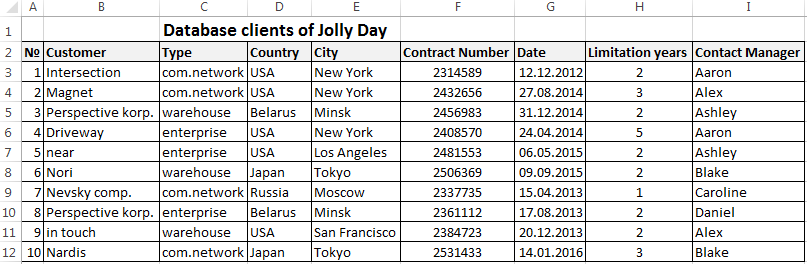
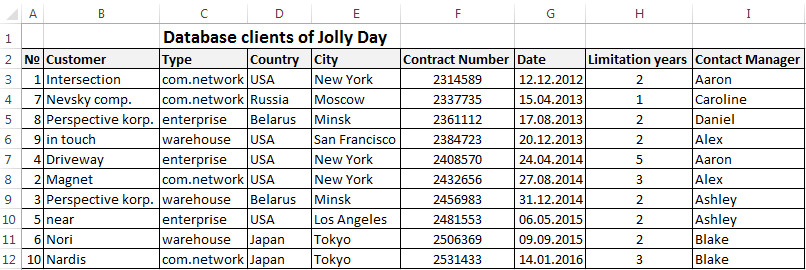
Step by step to create a database in Excel. Our challenge is to form a client database. For several years, the company has several dozens of regular customers. It is necessary to monitor the contract term, the areas of cooperation and to know contacts, data communications, etc.
How to create a customer database in Excel:
- Enter the name of the database field (column headings).
- Enter data into the database. We are keeping order in the format of the cells. If it is a numerical format so it should be the same numerical format in the entire column. Data are entered in the same way as in a simple table. If the data in a certain cell is the sum on the values of other cells, then create formula.
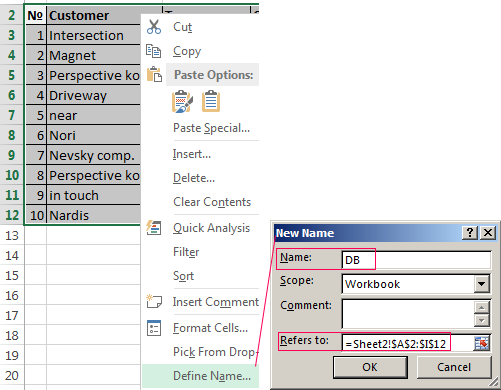
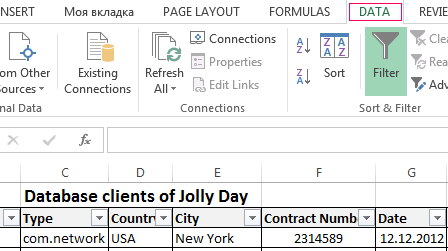
- To use the database turn to tools «DATA».
- Assign the name of the database. Select the range of data — from the first to the last cell. Right mouse button — the name of the band. We give any name. Example — DB. Check that the range was correct.

The main work of information entering into the DB is made. For easy using this information it is necessary to pick out the needful information, filter and sort the data.
How to maintain a database in Excel
To simplify the search for data in the database, we’ll order them. Tool «Sort» is suitable for this purpose.
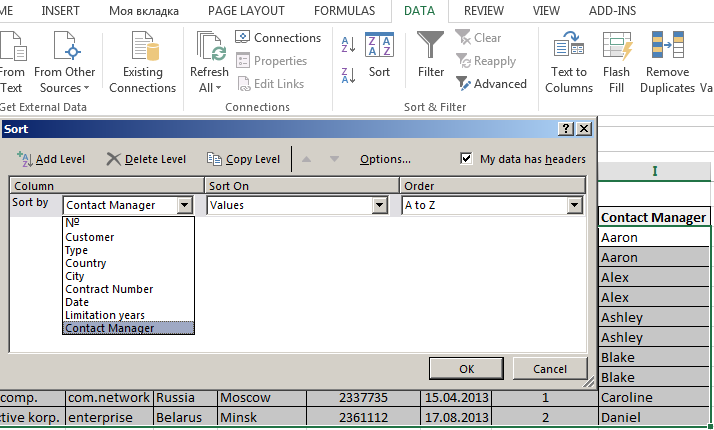
- Select the range you want to sort. For the purposes of our fictitious company the column «Date». Call the tool «Sort».
- Then system offers automatically expand the selected range. We agree. If we sort the data of only one column and the rest will leave in place so the information will be wrong. Then the menu will open parameters where we have to choose the options and sorting values.
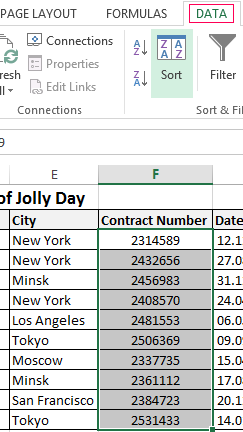
The data distributed in the table by the term of the contract.
Now, the manager sees to whom it is time to renew the contract and with which companies we continue the partnership.
Database during the company’s activity is growing to epic proportions. Finding the right information is getting harder. To find specific text or numbers you can use:
By simultaneously pressing Ctrl + F or Shift + F5. «Find and Replace» search box appears.
Filtering the data
By filtering the data the program hides all the unnecessary information that user does not need. Data is in the table, but invisible. At any time, data can be recovered.
There are 2 filters which are often used In Excel:
- AutoFilter;
- filter on the selected range.
AutoFilter offers the user the option to choose from a pre-filtering list.
- On the «DATA» tab, click the button «Filter».
- Down arrows are appearing after clicking in the header of the table. They signal the inclusion of «AutoFilter».
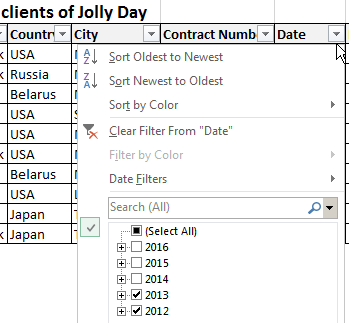
- Click on the desired column direction to select a filter setting. In the drop-down list appears all the contents of the field. If you want to hide some elements reset the birds in front of them.
- Press «OK». In the example we hide clients who have concluded contracts in the past and the current year.
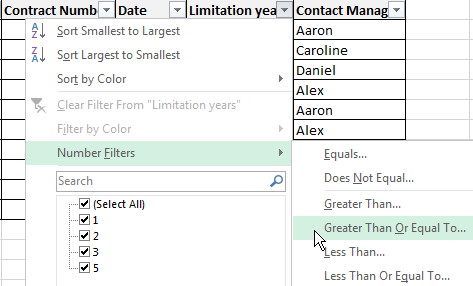
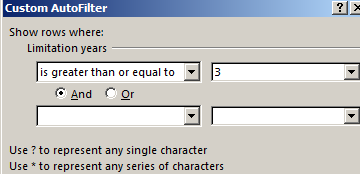
- To set a condition to filter the field type «Greater Than», «Less Than», «Equals», etc. values, select the command «Number Filters» in the filter list.
- If we want to see clients in a customer table whom we signed a contract for 3 years or more, enter the appropriate values in the AutoFilter menu.

Done!

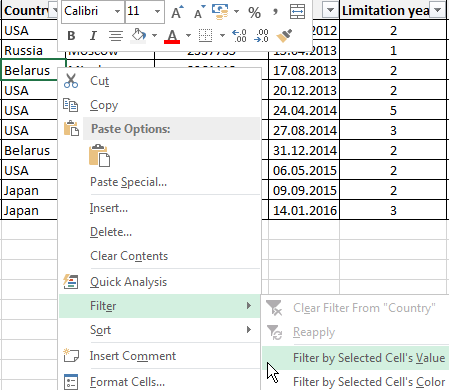
Let’s experiment with the values filtered by the selected cells. For example, we need to leave the table only with those companies that operate in Belarus.
- Select the data with information which should remain prominent in the database. In our case, we find the column country — «РБ «. We click on the cell with right-click.
- Perform a sequence command: «Filter»–«Filter by Selected Cell’s Value». Done.

Sum can be found using different parameters if the database contains financial information:
- the sum of (summarize data);
- count (count the number of cells with numerical data);
- average (arithmetic mean count);
- maximum and minimum values in the selected range;
- product (the result of multiplying the data);
- standard deviation and variance of the sample.
Using the financial information in the database:
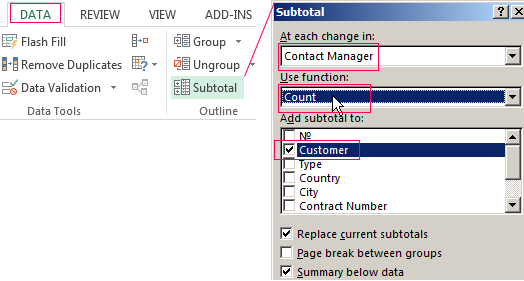
- Then the menu will open parameters where we have to choose the options and sorting values «Contact Manager».
- Select the database range. Go to the tab «DATA» — «Subtotal».
- Select the calculation settings In the dialog box.
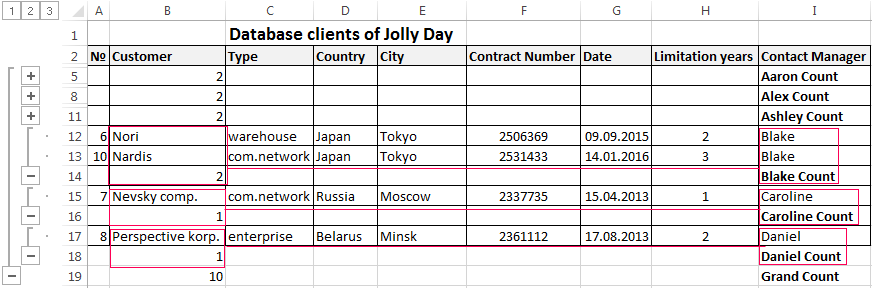
Tools on the «DATA» tab allows to segment the DB. Sort information in terms with relevance to company goals. Isolation of purchasers of goods groups help to promote the marketing of the product.
Prepared sample templates for conducting client base segment:
- Template for manager which allows monitors the result of outgoing calls to customers download.
- The simplest template. Customer in Excel free template database download.
- Example database from this article download example.
Templates can be adjusted for your needs: reduce, expand, and edit.
Do you need to create and use a database? This post is going to show you how to make a database in Microsoft Excel.
Excel is the most common data tool used in businesses and personal productivity across the world.
Since Excel is so widely used and available, it tends to get used frequently to store and manage data as a makeshift database. This is especially true with small businesses since there is no budget or expertise available for more suitable tools.
This post will show you what a database is and the best practices you should follow if you’re going to try and use Excel as a database.

Get the example files used in this post with the above link and follow along below!
What is a Database?
A database is a structured set of data that is often in an electronic format and is used to organize, store. and retrieve data.
For example, a database might be used to store customer names, addresses, orders, and product information.
Databases often have key features that make them an ideal place to store your data.
Database vs Excel
An Excel spreadsheet is not a database, but it does have a lot of great and easy-to-use features for working with data.
Here are some of the key features of a database and how they compare to an Excel file.
| Feature | Database | Excel |
|---|---|---|
| Create, read, update, and delete records | ✔️ | ✔️ Excel allows anyone to add or edit data. This can be viewed as a negative consideration. |
| Data types | ✔️ | ⚠️ Excel allows for simple data types such as text, numbers, dates, boolean, images, and error values. But lacks more complex data types such as date and timezones, files, or JSON. |
| Data validation | ✔️ | ⚠️ Excel has some data validation features, but you can only apply one rule at a time and these can easily be overridden on purpose or by accident. |
| Access and security | ✔️ | ❌ Excel doesn’t have any access or security controls. This is usually managed through your on-premise network or through SharePoint online. But anyone can access your Excel file if it’s downloaded and sent to them. |
| Version control | ✔️ | ❌ Excel has no version control. This can be managed through SharePoint. |
| Backups | ✔️ | ❌ Excel has no automated backups. These can be manually created or automated in SharePoint. |
| Extract and query data | ✔️ | ✔️ Excel allows you to extract and query data through Power Query which is easy to learn and use. |
| Perform calculations | ✔️ | ✔️ Excel has a large library of functions that can be used in calculated columns inside tables. Excel also has the DAX formula language for calculated columns in Power Pivot. |
| Aggregate and summarize data | ✔️ | ✔️ Excel can easily aggregate and summarize data with formulas, pivot tables, or power pivots. |
| Relationships | ✔️ | ✔️ Excel has many lookup functions such as XLOOKUP, as well as table merge functionality in Power Query, and 1 to many relationships in Power Pivot. |
| Scale with large amounts of data | ✔️ | ⚠️ Excel can hold up to 1,048,576 rows of data in a single sheet. Tools like Power Query and Power Pivot can help you deal with larger amounts of data but they will be constrained based on your hardware specifications. |
| User friendly | ❌ A database might not be user-friendly and may come with a steep learning curve that your intended users won’t be able to handle. | ✔️ Most people have some experience with using Excel. |
| Cost | ❌ Can be expensive to set up, run, and maintain a proper database tool. | ✔️ Your organization might already have access to and use Excel. |
This is not a comprehensive list of features that a database will have, but they are some of the major features that will usually make a proper database a more suitable option.
The features that a database has depends on what database it is. Not all databases have the same features and functionality.
You will need to decide what features are essential for your situation in order to decide if you should use Excel or some other database tool.
💡 Tip: If you have Excel for Microsoft 365, then consider using Dataverse for Teams as your database instead of Excel. Dataverse has many of the great database features mentioned above and it is included in your Microsoft 365 license at no additional cost.
Relational Database Design
A good deal of thought should happen about the structure of your database before you begin to build it. This can save you a lot of headaches later on.
Most databases have a relational design. This means the database contains many related tables instead of one table that contains all the data.
Suppose you want to track orders in your database.
One option is to create a single flat table that contains all the information about the order, the products, and the customer that created the order.
This isn’t very efficient as you end up creating multiple entries of the same customer information such as name, email, and address. You can see in the above data, column G, H, and I contains a lot of duplicate values.
A better option is to create separate tables to store the Order, Product, and Customer data.
The Order data can then reference a unique identifier in the Product and Customer data that will relate the tables and avoid unnecessary duplicate data entry.
This same example data might look like this when reorganized into multiple related tables.
- An Orders table that contains the Item and Customer ID field.
- A Products table that relates to the Item fields in the Orders table.
- A Customers table that relates to the Customer ID in the Orders table.
This avoids duplicated data entry in a flat single table structure and you can use the Item or Customer ID unique identifier to look up the related data in the respective Products or Customers tables.
Tabular Data Structure in Excel
If you’re going to use Excel as your database, then you’re going to need your data in tabular format. This refers to the way the data is structured.
The above example shows a product order dataset in tabular format. A tabular data format is best suited for Excel due to the row and column structure of a spreadsheet.
Here are a few rules your data should follow so that it’s in tabular format.
- 1st row should contain column headings. This is just a short and descriptive name for the data contained below.
- No blank column headings. Every column of data should have a name.
- No blank columns or blank rows. Blank values within a field are ok, but columns or rows that are entirely blank should be removed.
- No subtotals or grand totals within the data.
- One row should represent exactly one record of data.
- One column should contain exactly one type of data.
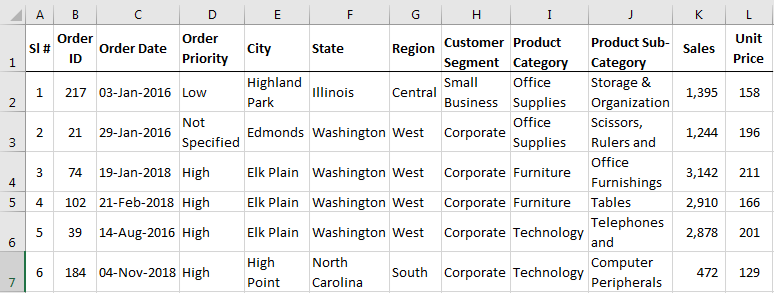
In the above orders example data, you can see B2:E2 contains the column headings of an Order ID, Customer ID, Order Date, Item, and Quantity.
The dataset has no blank rows or columns, and no subtotals are included.
Each row in the dataset represents an order for one type of product.
You’ll also notice each column contains one type of data. For example, the Item column only contains information on the name of the product and does not include other product information such as the price.
⚠️ Warning: If you don’t adhere to this type of structure for your data, then summarizing and analyzing your data will be more difficult later. Tools such as pivot tables require tabular data!
Use Excel Tables to Store Data
Excel has a feature that is specifically for storing your tabular data.
An Excel Table is a container for your tabular datasets. They help keep all the same data together in one object with many other benefits.
💡 Tip: Check out this post to learn more about all the amazing features of Excel Tables.
You will definitely want to use a table to store and organize any data table that will be a part of your dataset.
How to Create an Excel Table
Follow these steps to create a table from an existing set of data.
- Select any cell inside your dataset.
- Go to the Insert tab in the ribbon.
- Select the Table command.
This will open the Create Table menu where you will be able to select the range containing your data.
When you select a cell inside your data before using the Table command, Excel will guess the full range of your dataset.
You will see a green dash line surrounding your data which indicates the range selected in the Create Table menu. You can click on the selector button to the right of the range input to adjust this range if needed.
- Check the My table has headers option.
- Press the OK button.
📝 Note: The My table has headers option needs to be checked if the first row in your dataset contains column headings. Otherwise, Excel will create a table with generic column heading titles.
Your Excel data will now be inside a table! You will immediately see that it’s inside a table as Excel will apply some default format which will make the table range very obvious.
💡 Tip: You can choose from a variety of format options for your table from the Table Design tab in the Table Styles section.
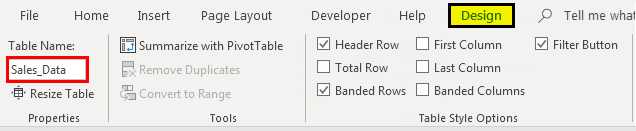
The next thing you will want to do with your table is to give it a sensible name. The table name will be used to reference the table in formulas and other tools, so giving it a short descriptive name will help you later when reading formulas.
- Go to the Table Design tab.
- Click on the Table Name input box.
- Type your new table name.
- Press the Enter key to accept the new name.
Each table in your database will need to be in a separate table, so you will need to repeat the above process for each.
How to Add New Data to Your Table
You will likely need to add new records to your database. This means you will need to add new rows to your tables.
Adding rows to an Excel table is very easy and you can do it a few different ways.
You can add new rows to your table from the right-click menu.
- Select a cell inside your table.
- Right-click on the cell.
- Select Insert from the menu.
- Select Table Rows Above from the submenu.
This will insert a new blank row directly above the selected cells in your table.
You can add a blank row to the bottom of your table with the Tab key.
- Place the active cell cursor in the lower right cell of the table.
- Press the Tab key.
A new blank row will be added to the bottom of the table.
But the easiest way to add new data to a table is to type directly below the table. Data entered directly underneath the table is automatically absorbed into the table!
Excel Workbook Layout
If you are going to create an Excel database, then you should keep it simple.
Your Excel database file should contain only the data and nothing else. This means any reports, analysis, data visualization, or other work related to the data should be done in another Excel file.
Your Excel database file should only be used for adding, editing, or deleting the data stored in the file. This will help decrease the chance of accidentally changing your data, as the only reason to open the file will be to intentionally change the data.
Each table in the database should be stored in a separate worksheet and nothing else except the table should be in that sheet. You can then name the worksheet based on the table it contains so your file is easy to navigate.
💡 Tip: Place your table starting in cell A1 and then hide the remaining columns. This way it is clear the sheet should only contain the table and nothing else.
The only other sheet you might optionally include is a table of contents to help organize the file. This is where you can list each table along with the fields it contains and a description of what these fields are.
💡 Tip: You can hyperlink the table name listed in the table of contents to its associated sheet. Select the name and press Ctrl + K to create a hyperlink. This can help you navigate the workbook when you have a lot of tables in your database.
Use Data Validation to Prevent Invalid Data
Data validation is a very important feature for any database. This allows you to ensure only specific types of data are allowed in a column.
You might create data validation rules such as.
- Only positive whole numbers are entered in a quantity column.
- Only certain product names are allowed in the product column.
- A column can’t contain any duplicate values.
- Dates are between two given dates.
Excel’s data validation tools will help you ensure the data entered in your database follow such rules.
Follow these steps to add a data validation rule to any column in your table.
- Left-click on the column heading to select the entire column.
When you hover the mouse cursor over the top of your column heading in a table, the cursor will change to a black downward pointing arrow. Left-click and the entire column will be selected.
The data validation will automatically propagate to any new rows added to the table.
- Go to the Data tab.
- Click on the Data Validation command.
This will open up the Data Validation menu where you will be able to choose from various validation settings. If there is no active validation in the cell, you should see the Any values option selected in the Allow criteria.
Only Allow Positive Whole Number Values
Follow these steps from the Data Validation menu to allow only positive whole number values to be entered.
- Go to the Settings tab in the Data Validation menu.
- Select the Whole number option from the Allow dropdown.
- Select the greater than option from the Data dropdown.
- Enter 0 in the Minimum input box.
- Press the OK button.
💡 Tip: Keep the Ignore blank option checked if you want to allow blank cells in the column.
This will apply the validation rule to the column and when a user tries to enter any number other than 1, 2, 3, etc… they will be warned the data is invalid.
Only Allow Items from a List
Selecting items from a dropdown list is a great way to avoid incorrect text input such as customer or product names.
Follow these steps from the Data Validation menu to create a dropdown list for selecting text values in a column.
- Go to the Settings tab in the Data Validation menu.
- Select the List option from the Allow dropdown.
- Check the In-cell dropdown option.
- Add the list of items to the Source input.
- Press the OK button.
📝 Note: If you place the list of possible options inside an Excel Table and select the full column for the Source reference, then the range reference will update as you add items to the table.
Now when you select a cell in the column you will see a dropdown list handle on the right of the cell. Click on this and you will be able to choose a value from a list.
Only Allow Unique Values
Suppose you want to ensure the list of products in your Products table is unique. You can use the Custom option in the validation settings to achieve this.
- Go to the Settings tab in the Data Validation menu.
- Select the Custom option from the Allow dropdown.
=(COUNTIFS(INDIRECT("Products[Item]"),A2)=1)- Enter the above formula in the Formula input.
- Press the OK button.
The formula counts the number of times the current row’s value appears in the Products[Item] column using the COUNTIFS function.
It then determines if this count is equal to 1. Only values where the formula evaluates to 1 are allowed which means the product name can’t have been in the list already.
📝 Note: You need to reference the column by name using the INDIRECT function in order for the range to grow as you add items to your table!
Show Input Message when Cell is Selected
The data validation menu allows you to show a message to your users when a cell is selected. This means you can add instructions about what types of values are allowed in the column.
Follow these steps to add an input message in the Data Validation menu.
- Go to the Input Message tab in the Data Validation menu.
- Keep the Show input message when cell is selected option checked.
- Add some text to the Title section.
- Add some text to the Input message section.
- Press the OK button.
When you select a cell in the column which contains the data validation, a small yellow pop-up will appear with your Title and Input message text.
Prevent Invalid Data with Error Message
When you have a data validation rule in place, you will usually want to prevent invalid data from being entered.
This can be achieved using the error message feature in the Data Validation menu.
- Go to the Error Alert tab in the Data Validation menu.
- Keep the Show error alert after invalid data is entered option checked.
- Select the Stop option in the Style dropdown.
- Add some text to the Title section.
- Add some text to the Error message section.
- Press the OK button.
📝 Note: The Stop option is essential if you want to prevent the invalid data from being entered rather than only warning the user the data is invalid.
When you try to enter a repeated value in the column your custom error message will pop up and prevent the value from being entered in the cell.
Data Entry Form for Your Excel Database
Excel doesn’t have any fool-proof methods to ensure data is entered correctly, even when data validation techniques previously mentioned are used.
When a user copies and pastes or cuts and pastes values, this can override data validation in a column and cause incorrect data to enter into your database.
Using a data entry form can help to avoid data entry errors and there are a couple of different options available.
- Use a table for data entry.
- Use the quick access toolbar data entry form.
- Use Microsoft Forms for data entry.
- Use Microsoft Power Automate app for data entry.
- Use Microsoft Power Apps for data entry.
💡 Tip: Check out this post for more details on the various data entry form options for Excel.
Tools such as Microsoft Forms, Power Automate, and Power Apps will give you more data validation, access, and security controls over your data entry compared with the basic Excel options.
Access and Security for Your Excel Database
Excel isn’t a secure option for your data.
Whatever measures you set up in your Excel file to prevent users from changing data by accident or on purpose will not be foolproof.
Whoever has access to the file will be able to create, read, update, and delete data from your database if they are determined. There are also no options to assign certain privileges to certain users within an Excel file.
However, you can manage access and security to the file from SharePoint.
💡 Tip: Check out this post from Microsoft about recommendations for securing SharePoint files for more details.
When you store your Excel file in SharePoint you’ll also be able to see recent changes.
- Go to the Review tab.
- Click on the Show Changes command.
This will open up the Changes pane on the right-hand side of the Excel sheet.
It will show you a chronological list of all the recent changes in the workbook, who made those changes, when they made the change, and what the previous value was.
You can also right-click on a cell and select Show Changes. This will open the Changes pane filtered to only show the changes for that particular cell.
This is a great way to track down the cause of any potential errors in your data.
Query Your Excel Database with Power Query
Your Excel database file should only be used to add, edit, or delete records in your tables.
So how do you use the data for anything else such as creating reports, analysis, or dashboards?
This is the magic of Power Query! It will allow you to connect to your Excel database and query the data in a read-only manner. You can build all your reports, analysis, and dashboards in a separate file which can easily be refreshed with the latest data from your Excel database file.
Here’s how to use power query to quickly import your data into any Excel file.
- Go to the Data tab.
- Click on the Get Data command.
- Choose the From File option.
- Choose the From Excel Workbook option in the submenu.
This will open a file picker menu where you can navigate to your Excel database file.
- Select your Excel database file.
- Click on the Import button.
⚠️ Warning: Make sure your Excel database file is closed or the import process will show a warning that it’s unable to connect to the file because it’s in use!
Clicking on the Import button will then open the Navigator menu. This is where you can select what data to load and where to load it.
The Navigator menu will list all the tables and sheets in the Excel file. Your tables might be listed with a suffix on the name if you’ve named the sheets and tables the same.
- Check the option to Select multiple items if you want to load more than one table from your database.
- Select which tables to load.
- Click on the small arrow icon next to the Load button.
- Select the Load To option in the Load submenu.
This will open the Import Data menu where you can choose to import your data into a Table, PivotTable, PivotChart, or only create a Connection to the data without loading it.
- Select the Table option.
- Click on the OK button.
Your data is then loaded into an Excel Table in the new workbook.
The best part is you can always get the latest data from the source database file. Go to the Data tab and press the Refresh All button to refresh the power query connection and import the latest data.
💡 Tip: You can do a lot more than just load data with Power Query. You can also transform your data in just about any imaginable way using the Transform Data button in the Navigator menu. Check out this post on how to use Power Query for more details about this amazing tool.
Analyze and Summarize Your Excel Database with Power Pivot
Power Query isn’t the only database tool Excel has. The data model and Power Pivot add-in will help you slice and dice relational data inside your Excel pivot tables.
When you load your data with Power Quer, there is an option to Add this data to the Data Model in the Import Data menu.
This option will allow you to build relationships between the various tables in your database. This way you’ll be able to analyze your orders by category even though this field doesn’t appear in the Orders table.
You can build your table relationships from the Data tab.
- Go to the Data tab.
- Click on either the Relationships or Manage Data Model command.
Now you’ll be able to analyze multiple tables from your database inside a single pivot table!
Conclusions
Data is an essential part of any business or organization. If you need to track customers, sales, inventory, or any other information then you need a database.
If you need to create a database on a budget with the tools you have available then Microsoft Excel might be the best option and is a natural fit for any tabular data because of its row and column structure.
There are many things to consider when using Excel as a database such as who will have access to the files, what type of data will be stored, and how you will use the data.
Features such as Tables, data validation, power query, and power pivot are all essential to properly storing, managing, and accessing your data.
Do you use Excel as a database? Do you have any other tips for using Excel to manage your dataset? Let me know in the comments below!
About the Author
John is a Microsoft MVP and qualified actuary with over 15 years of experience. He has worked in a variety of industries, including insurance, ad tech, and most recently Power Platform consulting. He is a keen problem solver and has a passion for using technology to make businesses more efficient.
This article is a detailed step-by-step guide to creating a database in Excel. We will learn to create a database both manually and automatically using formulas and Excel options in detail in Excel.
You can either create a database using Forms or creating headings and put the appropriate data manually, one-by-one.
1. Creating a database using Forms (Recommended)
To begin creating a database using the Forms option, you must know how to insert the option in the ribbon first.
To insert the forms option in the Excel ribbon, follow these steps.
- Right-click in a blank space on the Excel ribbon.
- Click Customize Ribbon.
- Or, go to the File tab.
- Click Options.
- If you cannot the Options button, click on More and then click Options.
- Now, choose the All command in the Choose command from menu.

- Select the tab you want to insert the Form option.
- Or create a new tab by clicking New Tab below.
- Select the newly created tab.
- Rename the tab if you like.
- Now, scroll down until you find Form on the left.
- Click on the group under the newly created tab.
- Press Add in the middle.
- Click OK.

You can see that a new tab has been created in Excel.
Recommended read: How to Create Forms in Excel?
Let’s move to the further steps to create a database using the Form option in Excel.
- Select the cells where you want the headings to be.
- Press CTRL+T to create a table.
- The Create Table window opens to confirm if you want to create a table.
- Check My table has headers if you have already created the headers.
- Click OK.

You can see that a table has been created for you.
- Enter the headers by renaming the Column1, Column2, etc. fields.

We have successfully renamed the table headers in Excel.
Now, it’s time to add data to the table. Follow these steps below to quickly add entries in the empty fields.
- Click on a cell in the table range.
- Go to the Form tab that we created a few moments ago.
- Click Form.
- A window with the current sheet name opens showing a form.

- You can see all your created headers in the form of fields here.
- Enter the details of the first person in all empty fields. For example- Enter a name in the Name field.

This is how you will enter the records one person at a time.
- Once you’re done, click New.
- Continue adding details of other people as well.
- Notice that every time you press New, those details are reflected in the database.
- Click Close when you have filled in all details.

Here is your mini database ready! Created using the forms option.
In case, you want to add additional data to the database, repeat these steps.
- Click on a cell in the table range.
- Go to the Form tab that we created a few moments ago.
- Click Form.
You will be able to enter new entries or alter existing entries in the table at any time in the future.
2. Generating random numerical database in Excel
If you want to create a large random numerical database in Excel, here are the steps to follow.
- Open an Excel sheet.
- Type the RANDBETWEEN formula in a cell.
- Type =RANDBETWEEN( and type the minimum number in the random data.
- Put a comma and type the maximum number you want to have in the random data.
- Hit ENTER.

- Now, drag the cell vertically or horizontally from the bottom right corner until you see a plus sign.

Note that these numbers are dynamic in nature. Meaning, the figures will change as soon as you make changes in the file. If you’re okay with it, it’s great. But if you want to stop the figures from changing, follow these steps below.
- Select the cells with the changing figures.
- Press CTRL + C or click Copy in the Home tab.
- Pull down on Paste in the Home tab and select Paste Special.
- Choose Values under Paste and press OK.

Try making changes in the sheet, and you will see that the values are no longer dynamic!
3. Creating a database automatically
This was probably something you were waiting to read or maybe the only reason why you came here.
Yes, fortunately, you CAN create a database automatically using Excel templates! Follow the steps below to automatically create a database.

- Open the Excel application on your system.
- Click on More Templates.
- Type “database” in the search box and hit ENTER. Make sure you’re connected to the Internet, or Excel won’t show results.
- Currently, there are two templates available under this search.
- We’re going for the Membership list template for now.
- Click on the template and click Create.

Edit the fields and headers as per your will in this automatically created database template.
Conclusion
This article was a detailed step-by-step guide to creating a database in Microsoft Excel. We learned to create a database both manually and automatically using formulas and Excel options in detail in Excel.
Excel is a combination of rows and columns, and these rows and columns store our data, which in other terms are named records. As Excel is the most common tool, we reserve the data in Excel, making it a database. Therefore, when we put data in Excel in some form of tables in rows and columns and give the table a name, that is a database in Excel. We can also import data from other sources in Excel, given the data format is proper with the Excel format.
For example, you may create a company’s sales report of different regions on a database in Excel for easy access and complete control over data management while working with the program.
Creating an Excel Database
Having the data in Excel will make life easier for you because Excel is a powerful tool where we can play with the data. If you maintain the data in other sources, you may not correctly get all the formulas, dates, and time format. I hope you have experienced this in your daily work. Having the data in the right database platform is very important. Having the data in Excel has its pros and cons. However, if you are a regular user of Excel, it is much easier to work with Excel. This article will show you how to create a database in Excel.
Table of contents
- Creating an Excel Database
- How to Create a Database in Excel?
- Things to Remember While Creating a Database in Excel
- Recommended Articles
How to Create a Database in Excel?
We do not see any of the schools are colleges teaching us to Excel as the software in our academics. Whatever business models, we learn a theory until joining the corporate company.
The biggest problem with this theoretical knowledge is it does not support real-time life examples. But, nothing to worry about; we will guide you through the process of creating a database in Excel.
We need to design the Excel worksheet carefully to have accurate data in the database format.
You can download this Create Database Excel Template here – Create Database Excel Template
Follow the below steps to create a database in Excel.
- We must first ensure all the required columns and name each heading properly.

- Once the headers of the data table are clear, we can easily start entering the data just below the respective column headings.

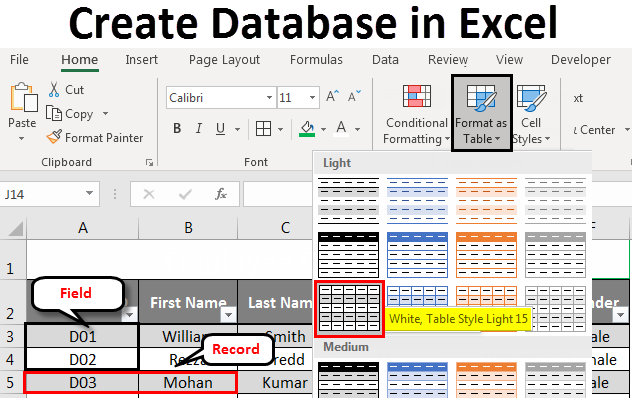
In database terminology, rows are called Records, and columns are called Fields.
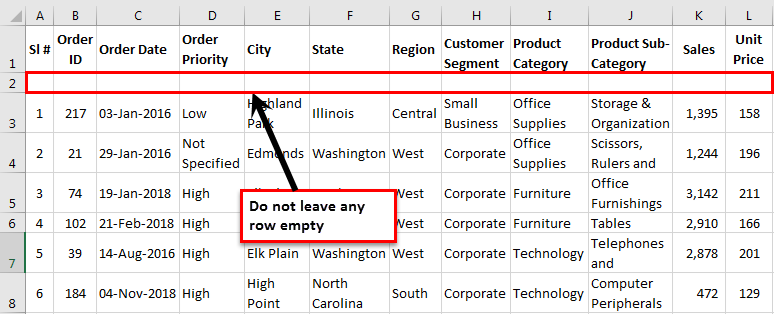
- We cannot leave a single row empty when entering the data. For example, we have entered the headings in the first row, and if we start entering the data from the third row by leaving the 2nd row empty, we are gone.

Not only the first or second row, but we also cannot leave any row empty after entering certain data into the database field.
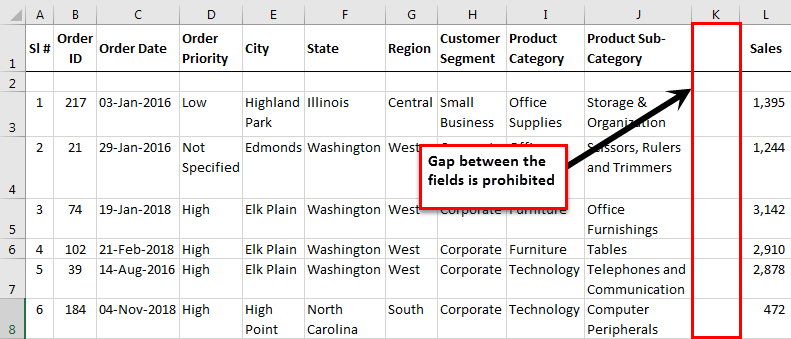
- As we said, each column is called Fields in the database. Similarly, we cannot have an empty field between the data.
We need to enter the fields one after the other. Having a gap of even one column or field is strictly prohibited.

I am so stressed about not having an empty record or field because when the data needs to be exported to other software or the web, as soon as the software sees the blank record or field, it assumes that it is the end of the data. Therefore, it may not consider the full data.
- We must fill in all the data carefully.
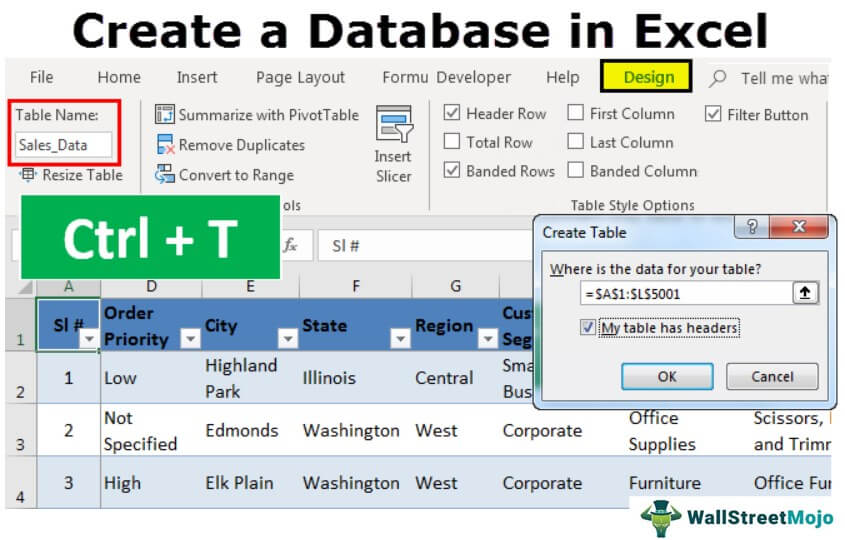
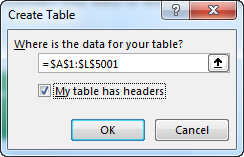
In the above image, I have data all the way from row 1 to row 5001. - The final thing we need to do is convert this data to an excel table. By selecting the data, press Ctrl + T.

- Here, we need to make sure the My table has a header checkbox is ticked and the range is selected properly.

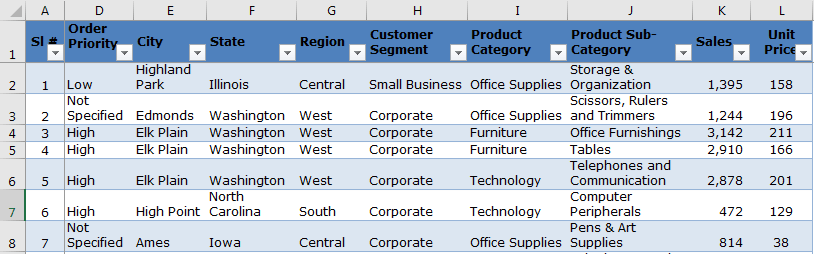
- Then, we must click on OK to complete the table creation. As a result, we may have a table like this now.

- We must now give a proper name to the table under the table Design tab.

- Since we have created a table, automatically, it would expand whenever we enter the data after the last column.
We have the database ready now. Follow the pros and cons below to have a good hand on your database.


Things to Remember While Creating a Database in Excel
- We can upload the file to MS Access to have a secure database and back up a platform.
- Since we have all the data in Excel, it is very easy for your calculations and statistics.
- Excel is the best tool for database analysis.
- Easy to read and not complicated because of clear fields and records.
- We can filter out the records by using auto filters.
- If possible, sort the data according to date-wise.
- As the data keeps growing, Excel will slow down considerably.
- We cannot share more than 34 MB files with others in an email.
- We can Apply the Pivot tableA Pivot Table is an Excel tool that allows you to extract data in a preferred format (dashboard/reports) from large data sets contained within a worksheet. It can summarize, sort, group, and reorganize data, as well as execute other complex calculations on it.read more and give a detailed analysis of the database.
- We can download the workbook and use it for your practice purpose.
Recommended Articles
This article is a guide to Databases in Excel. Here, we discuss creating a database in Excel with examples and downloadable Excel templates. You may also look at these useful functions in Excel: –
- Excel Database Template
- Match Data using Excel Functions
- Forms for Data Entry in Excel
- Create a Data Table in Excel
- SUMIFS with Dates
Excel Create Database (Table of Contents)
- Create a Database in Excel
- How to Create a Database in Excel?
Introduction to Create Database in Excel
If you want to create a database, MS Access is the tool you ideally should look for. However, it is a bit complicated to learn and master the techniques therein as MS Access. It would help if you had ample time to master those. In such cases, you can use excel as a good resource to create a database. It is easier to enter, store, and find specific information in the Excel Database. A well-structured, well-formatted excel table can be considered as a database itself. So, all you have to do is create a table that has a proper format. If the table is well-structured, you can sort the data in many different ways. Moreover, you can apply the filters to well-structured data to slice and dice it as per your requirements.
How to Create a Database in Excel?
We’ll be creating an employee database for the organization. Let’s see how to create a database in Excel by following the below process:
You can download this Create Database Excel Template here – Create Database Excel Template
Data Entering to Create Excel Database
Data entering is the main aspect while you are trying to create a database in Excel.
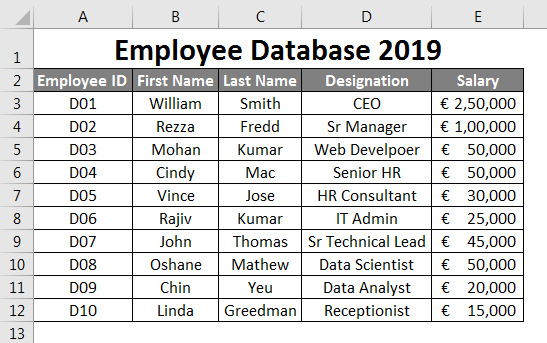
Suppose this is the data thatq1 you are going to use as an employee database.
I have added the first few Employee ID’s. Say D01, D02, D03 and then dragged the remaining till row 12 using Fill Handle. Column second onwards contains the general employee information like First Name, Last Name, Designation, and Salary. Filthis informationon in cells manually as per your details. Make sure the Salary column format is applied to all the cells in the column (Otherwise, this database may cause an error while using).
Entering Correct Data
It is always good to enter the correct data. Make sure there is no space in your data. When I say no other blanks, it covers the column cells, which are not blank as well. Try to the utmost that no data cells are blank. If you don’t have any information available with you, prefer to put NA over a blank cell. It’s also important to make the right input to the right column.
See the screenshot below:
Suppose,uy as shown in the image above, you wrongly interchanged the column inputs. i.e. you have mentioned Designation under Last Name and Last Name under Designation, which is a serious drop-back when you are thinking of this as a master employee data for your organization. It may mislead some of your conclusions.
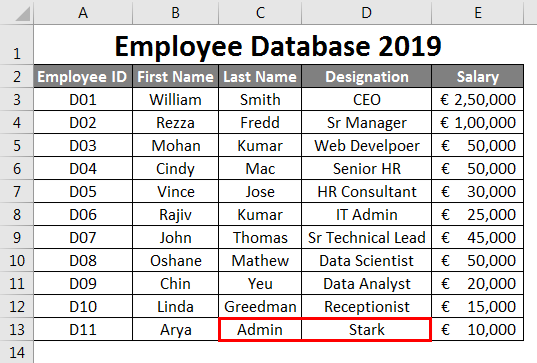
Suppose you have added a correct entry, but at the 2nd row after the last row (i.e. one row is left blank). It is also not recommended to do so. It is a breakdown for your data. See screenshot given below:
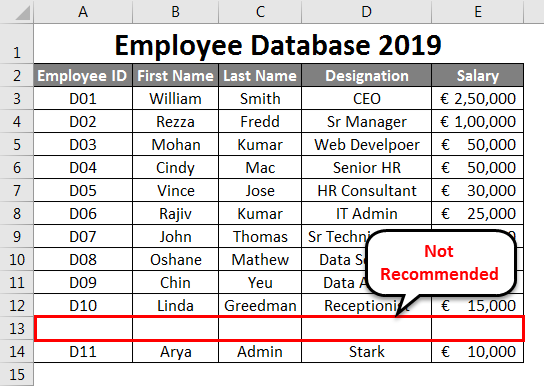
As you can see, there is one row left blank after row no. 12 ( second last row of the dataset) and added one new row, which is not recommended. On similar lines, you should not leave any blank column in the database.
Let’s see the screenshot below:
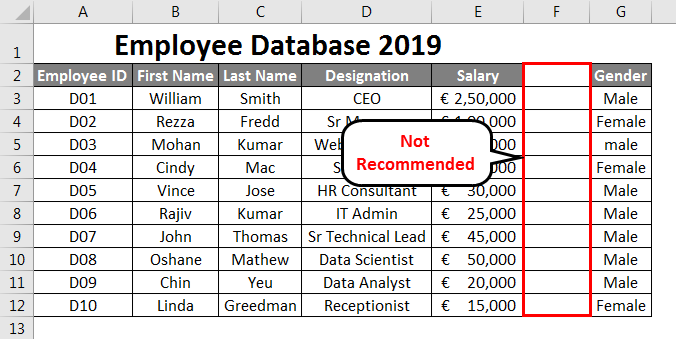
As you can see, column F is left blank. Which causes Excel to think there is a split of data. Excel considers that a blank column is a separator for two databases. It is misleading, as the column after the blank column is a part of your original database. It’s not the start column of a new database.
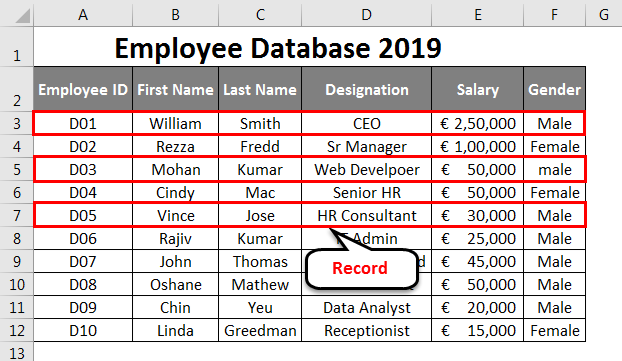
All the Rows are called Record in Excel Database.
It is a kind of basic knowledge we should have about the database we are creating. Every single row we create/add is called as a Record in the database. See the below screenshot for your reference:
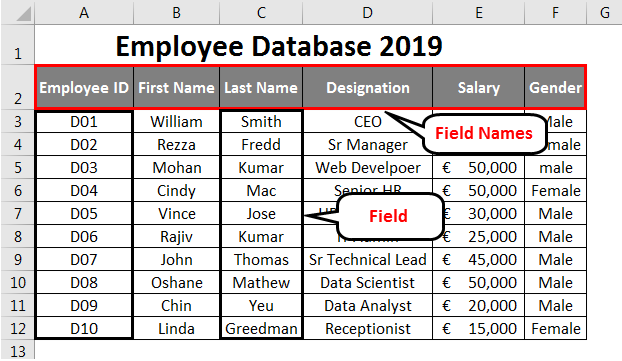
Every Column is a Field in Excel Database
Every column is called Field in the Excel database. The column headings are called Field Names.
Format Table
Once you are done with inputting the data, it should be converted into a better visualisation table.
- Select cells A2 to F12 from the spreadsheet.
- Go to the Home tab.
- Select Format as Table drop-down menu. You can choose a table layout of your own.
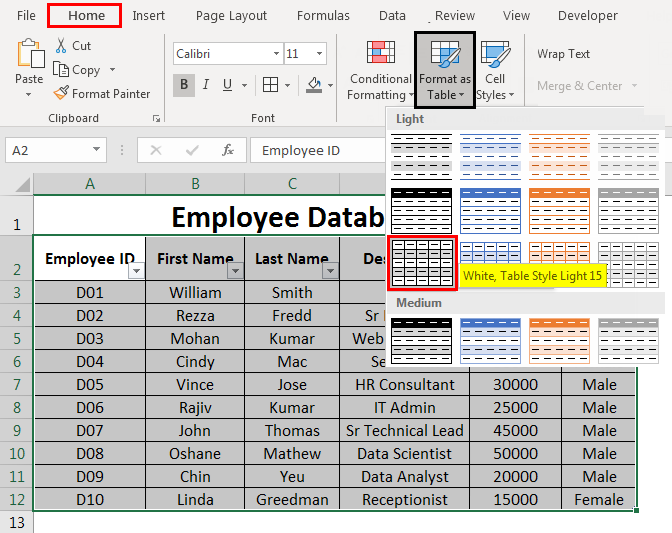
Once you click a particular table format, a table window will pop up with the range of data selected, and a dotted line will surround that range. You can change the range of the data therein in the table dialog box as well.
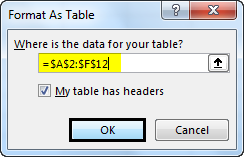
Once you are happy with the range, you can choose, OK. You can see your data in a tabular form now. See the screenshot given below:
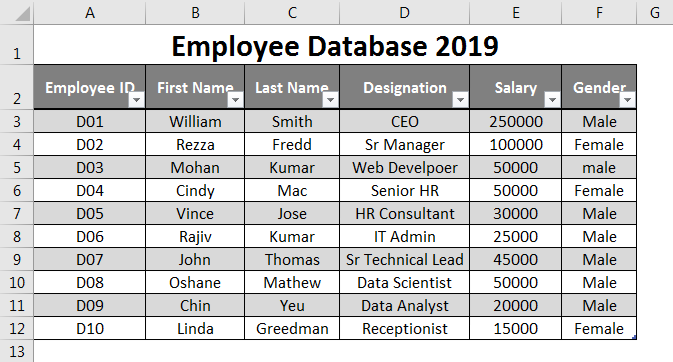
Use Excel Database Tools to Sort or Filter the Data
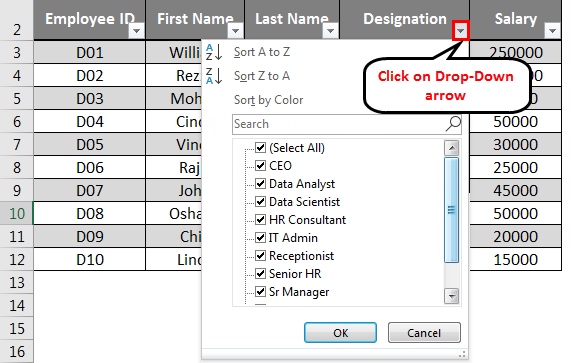
You can use the drop-down arrows situated beside each Field Name to Sort or Filter the data as per your requirement. These options are really helpful when you are dealing with a large amount of data.
Expanding the Database
If you want to add some more records to your table, you can do it as well. Select all the cells from your table.
Place your mouse at the bottom of the last cell of your table. The mouse pointer will turn into a two-headed arrow. You can drag down the pointer from there until you want to add that many blank rows in your database. Subsequently, you can add data under those blank cells as well.
Database Formatting
Highlight cell A1 to F1 from the spreadsheet.
- Select Home tab
- Under the Home tab, go to Wrap Text as well as Merge and Center.
- You can also change the fill colour. Select Fill Color. Choose the colour of your interest. Here I have selected Green as a colour.
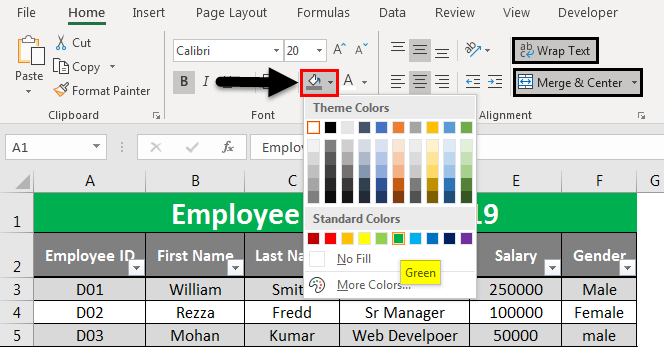
This is how we have created our Database in Excel.
Things to Remember About Create Database in Excel
- Information about one item should be populated in one single row entirely. You can’t use multiple lines to add different data of the same item in the excel database.
- The field should not be kept empty. (Including Column Headings/Field Name).
- The data type entered in one column should be homogeneous. For, e.g. If you are entering Salary details in the Salary column, there should not be any text string in that column. Similarly, any column containing text strings should not contain any numerical information.
- The database created here is really a very small example. It becomes huge in terms of employees joining every now and then and becomes hectic to maintain the data again and again with the standard formatting. That’s why it is recommended to use databases.
Recommended Articles
This has been a guide to Create a Database in Excel. Here we discuss how to Create a Database in Excel along with practical examples and a downloadable excel template. You can also go through our other suggested articles –
- Excel Import Data
- Table styles in Excel
- Toolbar in Excel
- Excel Rows and Columns

Creating a database in Excel for your invoices, to-do’s, project timesheets, and more is an excellent way to cut down on data entry time and gain new business insights. Data, particularly numerical data, can be used for everything from reviewing past sales to predicting future costs in your business.
Businesses from every sector use data in their day-to-day activities, and while data is an integral part of any organisation, it’s no use on its own. Without proper data management, your information will be pretty much useless.
Using Excel as a database or a similar data management tool will help categorise and segment your data, so it’s accessible and usable.
If you’re interested in learning more about using Excel in business as a database and how it compares to other Microsoft solutions like Access, this post is for you!

What Is A Database?
Before we dive into using Excel as a database, let’s define what a database is for those who haven’t created or used a database before.
A database is a broad term for a system that stores multiple records of data. Databases come in many different forms and allow users to store, search, filter data and review numerical information.
Databases can have a one-to-one relationship, one-to-many relationship or many-to-many relationship meaning that one record can have multiple other records or that other records can exist without a primary record.

These solutions can be offline or stored online using the Cloud. Databases come in a variety of styles and can be customised to suit your organisation’s unique requirements.
Relational databases, for example, allow data to be shared between several different computer systems, which gives users the ability to store, update and share data.
Databases can store a wide variety of information and can be split up into sections making searching for data and identifying patterns easier and less time-consuming. A database might also include user permissions, a drop-down menu, complex calculations and advanced filtering options.

What Programmes Can You Use To Create A Database?
Databases can be made using a wide range of offline and online programmes. As well as creating a database in Excel, you can also use a selection of other solutions to create a database for your organisation.
Many of these tools are specialist database solutions, such as Knack and IBM Informix, which you can get subscriptions to and use to build databases.

Another Microsoft tool that can be used to create databases is Access. Both Access and Excel are part of the Microsoft Office 365 suite of products, meaning that they’re easily accessible to many business users.
Access is part of the Professional suite of tools, so users do need to pay extra to upgrade their licence to use it. However, it is a valuable tool similar to other Microsoft programs, making it user-friendly and useful for small-mid size businesses.

Creating a Database in Excel Vs Access
While Excel is a helpful tool for storing and managing your data there are many spreadsheet and database programmes to explore.
For example, Microsoft Access is specifically designed for creating and managing databases and storing data. Many businesses use it as their single database, so they have a master copy of their data set.
Some of the differences between Microsoft Excel and Access when it comes to data management include:
- Access is designed to manage databases and can act as your master database
- Excel is specifically created to allow data management and visual representation of information
- Excel is easier to use than Access for Microsoft novices
- Excel is non-relational as opposed to Access, which allows relational data
- Access has a greater capacity for data storage than Excel

Do you need Excel database help?
We are Excel Experts, so contact a member of our team today.
What Are The Benefits Of Using Excel?
Excel and Access are two unique tools, and each has its own benefits. While Access was designed to manage databases, Excel has many handy features to let you make calculations, automate data functions, generate reports, build a searchable database and more.
Some of the many benefits of using Excel to manage your data and create small databases are:
- Excel is already tabular, and it’s easy to view an Excel worksheet and access data
- Most business leaders have access to and know the basics of Excel
- Excel is perfect for numerical data, and making calculations, and it’s easy to enter data
- The rows and columns are easier to understand than some more complex database layouts
- VBA allows users to automate tasks and link Excel to other software programs

When To Use Excel As A Database
Excel can be used as a database when you’re only dealing with a small amount of information, or it’s not particularly business-critical.
An Excel database might also be used as a starter database for small business leaders who want to experiment or learn more about managing their data. For example, by creating a customer database or a database that only requires a simple database record.

As your business grows, you might want to explore more specific database software specifically designed to act as a database and deal with all the data your company collects.
Such a database will often have better security and can manage and store larger amounts of data.
Excel can handle just over a million records, but if you have more data records or regularly add new records to your data, it might struggle to deal with these volumes. In this case, you should consider using a specially-designed database program.

How Excel & Other Databases Can Work Together
While Excel might not be an ideal database if you’re dealing with over a million records, using a database in Excel is a useful tool for managing data. As such, you can still use Excel to manage your data and use the formulas to create unique predictions and insights.
You can then sync your Excel sheet with a larger database on a SQL server to transfer the data into a larger collection of information without entering the data again.
This approach will reduce your chances of corrupting your Excel files and spreadsheets, which aren’t designed to hold extremely large amounts of data.

It’ll also mean that you can still use Excel for small sections of your data and easily transfer it to a larger and more secure database tool.
Excel can be used in conjunction with most tools, both Microsoft’s own suite of products and third-party solutions. It has many functions and capabilities, including the ability to calculate averages and insert complex formulas easily.
So, if you’re struggling to perform these functions in another database program, you can combine its superior storage and security functions with Excel’s innovative capabilities.

How To Create A Database in Excel
Creating a database in Excel is surprisingly straightforward and can be done by almost anyone. The tool is intuitive and easy to use, so making a simple database is quick and easy.
Excel is a tabular tool, so the best layout is a database table. All you need to do is create the columns and rows, which will act as the database field and then enter data.
Once your data is in, you can search the database, review your information and even summarise data. You can also add formulas and use VBA, the programming language for Excel, to create instructions and automate the management of your database.
With Excel, you can also create multiple tabs and link them to input data to spread the content around and ensure that everything is clearly labelled.
However, Excel doesn’t allow the creation of a relational database, but you can still cross-reference and cross-link different tables and pull the data into a master table.

Learn how to create, analyse, import and export large amounts of data with the Excel 365 Bible.
Choose the Type of Database
The first step in creating a database is to decide which type of database you need. There are four basic types of databases:
1. Relational databases
A relational database is a type of database that stores and retrieves data by using tables. Tables are a collection of related data, and each table has a unique name. Tables are similar to folders in a file system, where each folder contains a collection of related files
2. Object-oriented databases
An object-oriented database is a type of database that stores and retrieves data by using objects. Objects are a collection of related data, and each object has a unique name. Objects are similar to files in a file system, where each file contains a collection of related data
3. Hierarchical databases
A hierarchical database is a type of database that stores and retrieves data by using a hierarchy. A hierarchy is a structure of connected nodes, where each node has a unique name. Nodes are similar to folders in a file system, where each folder represents a node in the hierarchy
4. Network databases
A network database is a type of database that stores and retrieves data by using a network. A network is a collection of connected nodes, where each node has a unique name. Nodes are similar to files in a file system, where each file represents a node in the network.

What Can You Use a Database For?
As Excel databases are easy to use and completely customisable, they can be made to suit the needs of a variety of organisations. There are many ways you can use them to save your company time and effort.
Some examples of what to use a database for in your business include:
- Listing customer or student data related to times/ appointments
- Calculating total sales figures over a set timeframe
- Tracking the productivity of team members
- Reviewing work orders
- Storing and managing data on stock
- Storing digital assets and marketing material
- Keeping supply chain management records and processes
- Storing customer details and order information
- Managing product information
- Automating data entry using Excel automation
Using databases for your business, and even for personal use, can bring a wealth of benefits. You can free up your time, increase your productivity and slice through information quickly.
It’s much easier to understand data when it’s organised in an Excel database compared with an unstructured list or via another type of cloud-based program.

Summary: Creating A Database In Excel
Ultimately, Excel is not technically a database but a spreadsheet and data management tool. That being said, Excel is a useful tool for business leaders who want to use it to create their first initial database and learn how to manage their information.
Whether you’re a small business or an organisation that wants to manage a small amount of data, Excel can be the perfect tool. The best thing about using Excel as a database is that it’s an easily accessible tool that can be used by almost everyone on your team.
For larger businesses, Microsoft Access could be a useful solution to help you to expand your database and manage more information. Excel can be used in conjunction with Access and other database solutions, even for larger organisations, as it has many innovative capabilities and data management functions.
If you’re planning on using Excel as a database, you need to understand the basics of using Excel and how it can interact with other Microsoft solutions, including Access.

About The Excel Experts
At The Excel Experts, we pride ourselves on helping businesses to learn more about the Microsoft suite of software solutions.
Check out our MS Office training and Excel training courses to find a solution that works for your business. Our team can create a custom training solution for your organisation and help you and your team make the most of Excel.
We also offer a range of Excel consultancy services, including creating custom Excel workbooks that can be used as databases for reporting data and much more.
If you’d like to learn more about our services and how we can help you use Excel to its full potential, then contact us today.
NEED HELP WITH AN EXCEL PROJECT, BIG OR SMALL?
The Excel Experts can help you or your business complete an unfinished project, integrate web applications, automate tasks, and much more.

Most of the time, you are probably using Microsoft Excel for works such as making reports, forecasting, and planning. It is possible to build a database in Excel.
To build a database in Excel- easy to enter, store, and find specific information in an Excel database file. Whether it’s a personal list of contact numbers, a contact list for an institution, or a finding of parts, Microsoft Excel has built-in tools to track data and search for specific information.
Excel has a lot of databases functionality. Excel can build a simple searchable database, but it can also apply to make a proper relational database. A relational database build of a master table linked to its slave tables also called child tables.
In this guide, you will learn the following
Before start building a database in Excel
Unfortunately, hardcore Excel and MS Office tools are not taught in our respective schools and colleges. Several of the complex functions and laws that you learned in your impressive degree have now become a concept that isn’t backed up by empirical data. You’d think this is just data. However, you should be conscious that we know this as a “Data dump.”
It is, therefore, essential to be able to organize this dump in a very readable format. This format at least vaguely resembles this theoretical concept, which defined the phenomenon for this data.
When you’re stuck in a situation like this, MS Office’s features come in useful. Access is the standard database you should be using, but it is a bit tricky to learn and master. On the other hand, Excel is more familiar and comfortable to use.
You can easily use your Excel workbook as a database if you plan it properly. The most important thing to remember is that you must create your workbook correctly. You can sort the data in different ways. You can filter the database to display only data that matches specific criteria.
The table is the interface to the program’s workspace—a relational database structure information in rows and columns. While Microsoft Access, a stand-alone program for building and managing databases, is included in the standard MS Office package, users also use Microsoft Excel for the same purpose. After all, you can use the program’s features to sort, format, filter, edit, organize, and structure data.
To build a database in excel, you need to work that all. One warning: the Excel program is a versatile analytical tool, more suitable for complex calculations, calculations, sorting, and even storing structured data, but in small quantities.
What is the need or benefit of building a database in Excel?
We mainly used Excel spreadsheets for data analysis and object sorting in order to store raw data for a limited period. We primarily used the spreadsheet for number crunching and storing a single list of objects. Hence, it is the best application for maintaining inventory, calculation data, and statistical data modeling.
But when it comes to storing large amounts of data, it’s best to build a database in Excel. If more than two users need to share information, the database is best suited.
Apart from that, the two most important advantages of the database in Excel are:
- Reduced data redundancy.
- Data integrity capability will increase.
- Reduced update errors and increased consistency.
- Greater integrity and independence of data from application programs
- You can easily manage reports and share data.
- Better data security.
- Reduction of the costs of data entry, storage, and retrieval.
Database structure–Excel table
Database: a set of data distributed in rows and columns to facilitate research, organization, and editing. How to build a database in Excel?
All the database information is including in the records and fields:
- Record is a database row (DB), which provides information about an object.
- The field is a database column that contained data of the same type for all objects.
- In a standard Microsoft Excel spreadsheet, database records, and fields correspond to rows and columns.
Build a database in Excel is not difficult if you know how to make a simple table.

We will, therefore, take this example and show you the steps to build a database in Excel.
Step 1: Enter data
It’s time to enter your information. Make it as many rows as you think are necessary. The arrow keys should help you navigate your worksheet while confirming your entry in a cell; you need to hit the enter key. To type your data, keep your mouse cursor under headers in the excel worksheet then enter your data. If you type data below the line, press the Enter button or press the Tab button in the right cell. If you want to manage data from different datasheets, you can copy and paste it into your spreadsheet. To paste it into your database, click on cell A3 and press Ctrl + V on your keyboard. It will pass the data under your headers:
A button in the upper left corner of your worksheet allows you to pick all of the cells in your spreadsheet. The intersection of the column and row headers is where you’ll find this button. We will select all cells in our worksheet when you click this button. Navigate to the Data tab on the ribbon. A category called “Sort and Filter” can be found there. The “Filter” button, which looks like a funnel, is on the left side of the screen. Select it by clicking on it.
Fields are the names given to the columns in a database. You can add as many as needed.
Thus, this database’s fields are SL, Product ID, Product Name, Order Quantity, Unit Price, Total Price, Delivery Date, State, Customer Name.

You can now quickly enter data into the database. Each new entry will add to the first empty row after the fields.
I made some. Let me show you how to enter another entry.
Say this is the entry that needs to insert into the database:

So you see that entering data into an Excel database is pretty basic.
Step 2: Enter the data correctly
When entering data into a database, you cannot leave a row blank. That is strictly prohibited.
Say after the last row; I put data in the second row:

That is a clear breakdown of this database.
Although some cells in a row may be empty, let’s say something like this is legal.

Along the same lines, another rule is: there won’t be an empty column in a database.

As soon as Excel encounters an empty row or column, it is impossible to include that row or column in the database. For Excel, we split this database into two parts, an entirely new and unconnected set of information.
Whatever functions you plan to do, your data will not perform on this disconnected information. For example, something as simple as filtering will fail, as you can see from experience.
Although rows in an Excel database are called records, columns are called fields. Each column needs a header to identify the data it contains. These headers are called field names.
- Use the field names to ensure the data is entered each record in the same order.
- Make sure the same format to enter data in a column. If you enter digits as numbers (such as 10 or 20), continue. Don’t change halfway through and start entering numbers as words (such as ten or twenty) you need to be consistent.
- The table must not contain any empty columns.
Note: It is essential to format the field names differently from other rows in the database. These table field names formatting with styles that are different from those of other table cells.
Step 3: Create the table
Once the data is entered, it can convert into a table. To convert data to a table:
- Highlight you’re entering data range to press Ctrl+A or manually (like A2 to G8) in the worksheet.
- Select the Insert tab.
- Click on the table which is available in the table group, and press OK.
- Before press OK, you need to make sure the My data has headers checkbox is ticked, and the range is selected properly.
- You can do the same tusk by press Ctrl+T.
- You can give a proper name to the table under the table design tab.
- To change the table design, click on the table style’s drop-down arrow under the table design tab and select anyone you want.
- For your table, expand automatically, enter the data after the last column because we have created a table.
Step 4: Use the Excel database tools
Once the database is built, you can use the tools below the drop-down arrows next to each field name to sort and filter your data.
Sort data
- Click on the drop-down arrow to that column you want to sort.
- To sort the database alphabetically, select sort A to Z.
- We have the database sorted now, Adjustable Laptop Stand is the first record in the table, and Sabrent 60W 10-Port USB 3.0 Hub is the last.
Filter data
- Click on the drop-down arrow to that column you want to field.
- Need to make sure unchecked select all checkboxes.
- Add a checkmark to the box that you want to show filtered.
- Select OK.
- To display all records, select the drop-down arrow next to the filtered column and select Clear filter from the “State”.

Step 5: Develop the Excel database.
Now that all is up and running, you can index more fields and records to your database. To enter extra records to your database:
Place your mouse arrow above the tiny dot in the below right corner of the table.
- The mouse pointer changes to a two-headed arrow.
- Drag the mouse pointer down to add one or more blank rows to the database bottom by holding down the right mouse button.
- Please enter the data after the last column because we have created a table.
- Or you enter that data in the last table row, and the table would expand automatically.
- Add the data to this new line.

Build a database in Excel: finish formatting
- Highlight cells A1 to I1 in the worksheet.
- Select Home.
- To center the database title, click Merge and Center from the alignment group.
- To change the fill color of the selected cells, click the Fill Color drop-down list and select your choosable fill color.
- To change the Font Color of the selected cells, click the Font Color drop-down list and select your choosable font color.

Excel Database: Pros and Cons
Excel database records are beneficial for building simplistic tables or worksheets based on numbers and formulas. When considering your data management options, consider these advantages and disadvantages of the Excel database. When we build a database in Excel, some pros and cons are as follows:
Excel database
- It is better to use it for calculations and statistical purposes.
- It is best for data analysis.
- It is an excellent solution for quick and occasional use, such as expense reports.
- Its format of rows and columns is easy to understand when creating your spreadsheet.
- It’s an affordable solution.
- It’s perfect for a single user.
Disadvantages of Excel database
- It is not the best option for data management.
- It isn’t easy to collaborate on the same document and to circulate an updated version within a team.
- It will report errors if cells or rows are left blank.
- It is challenging to master the formulas and use them correctly.
- Data is difficult to summarize when presented in a spreadsheet.
- It is challenging to create pivot tables.
Recommended Articles
This is a guide to building a database In Excel. Here we explain how to build a database in Excel along with practical examples. You can also go through our other submitted articles –
Excel database functions: What are the benefits
As a business owner or project manager, you’re handling most things on your own at the beginning. Marketing, brand strategy, client communication—the list goes on! But there’s one thing you must have to scale: data management.
Databases aren’t just for big companies with hundreds or thousands of clients and products. It’s for anyone who wants to put manual work on autopilot, so they can track, retrieve, and protect all types of information.
If you’re using Excel as a temporary tool to import and export work, try ClickUp! You’ll have free access to actionable reports, change records, and powerful integrations—without the tech headache.
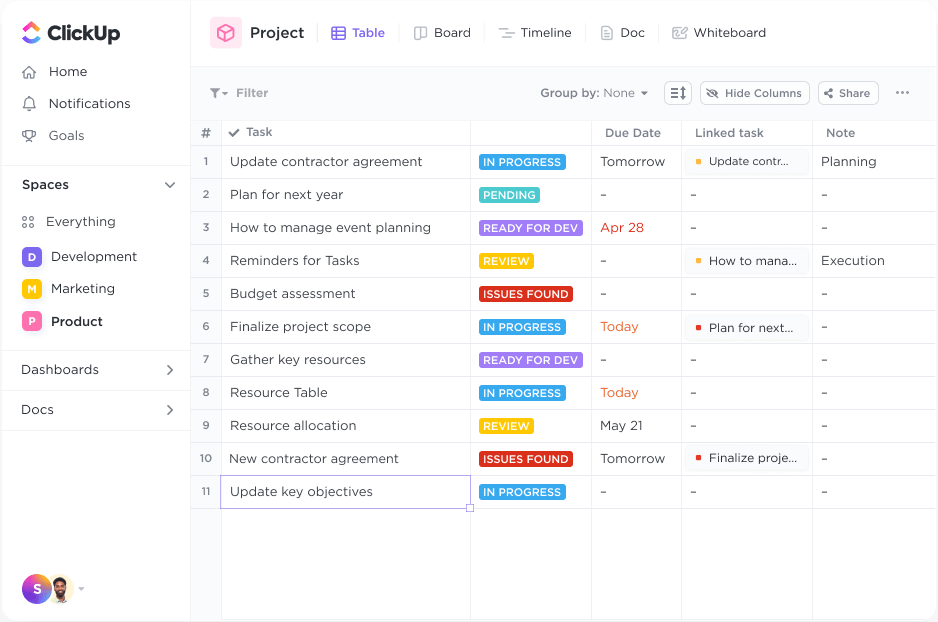
How to Create a Database in Excel (With Templates and Examples)
How to Create a Database in Excel
If you’ve struggled with creating or maintaining a database, you might feel every day is Day One because tracking is a labor-intense task in Excel.
So let’s learn how to create a database in Excel to sidestep the complexities and get to the good part: interacting with our data!
In this guide, we use Microsoft Word for Mac Version 16.54 to demonstrate a Client Management database. The features mentioned may look different if you’re on another platform or version.
Step 1: Set up a data spreadsheet framework
Open an Excel spreadsheet, place your cursor in the A1 cell, and type in your database title.
Go to the next row, and from left to right, use the Tab key to move through your blank database to add your column headers. Feel free to use this list as inspiration for your spreadsheet:
- Client Name
- Contact Name
- Health Level (drop down)
- Support Level (drop down)
- Engagement Level (drop down)
- Last Touchpoint
- NPS Score
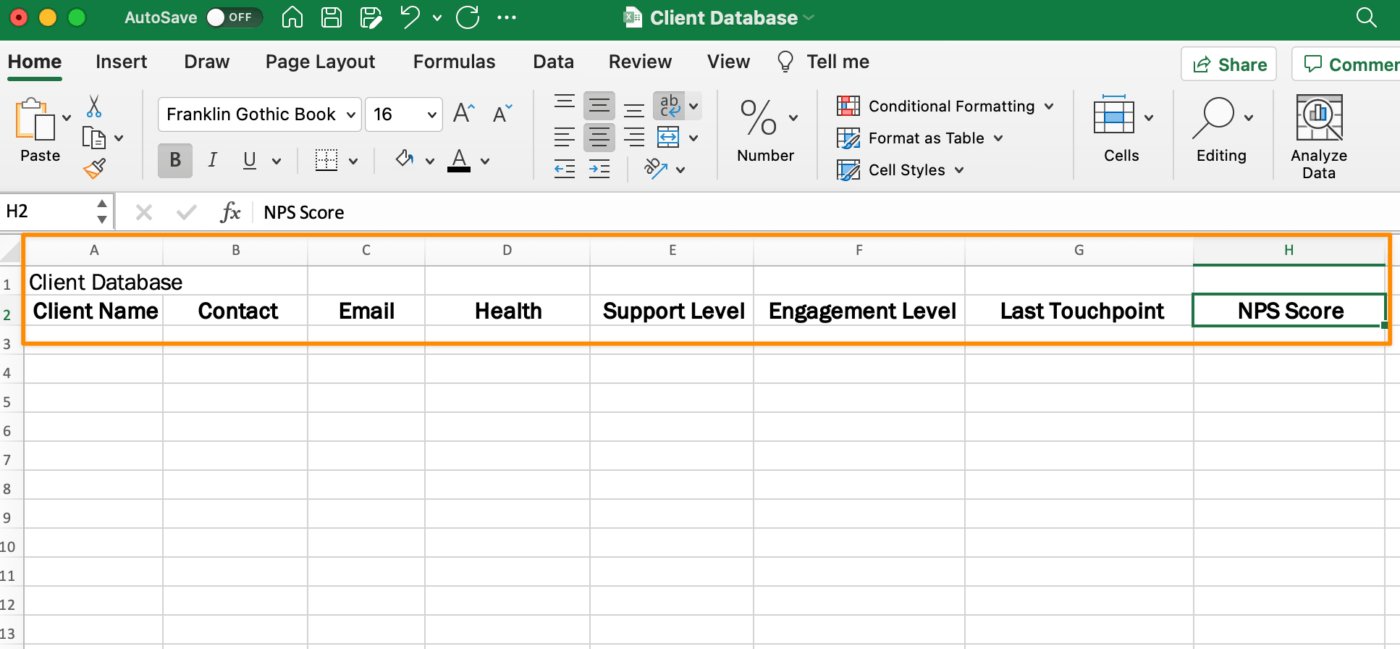
Go back to your database title and highlight the first row up to the last column of your table. From the Home tab in the menu toolbar, click Merge & Center.
Step 2: Add or import data
You have the option to manually enter data or import data from an existing database using the External Data tab. Keep in mind you will have a database field for certain columns. Here’s another list for inspiration:
- Client Name
- Contact Name
- Health Level (drop down: At Churn Risk, Average, Very Good)
- Support Level (drop down: Gold, Silver)
- Engagement Level (drop down: High, Medium, Low)
- Last Touchpoint
- NPS Score

Bulk editing can be scary in Excel, so take this part slow!
Step 3: Convert your data into a table
Now let’s convert your data into a data model table!
Click inside any cell with data (avoid blank rows), and from the menu toolbar, go to Insert tab > Table. All the rows and columns with your data will be selected. We don’t want the title to be included in the table, so we have to manually highlight the table without the title. Then, click OK.

Step 4: Format the table
From the Table tab in the menu toolbar, choose any table design to fit your preference. Knowing where your table will be displayed will help you decide. Looking at a spreadsheet on a big screen in a conference room versus a 16-inch laptop makes all the difference to a person’s experience with the data!
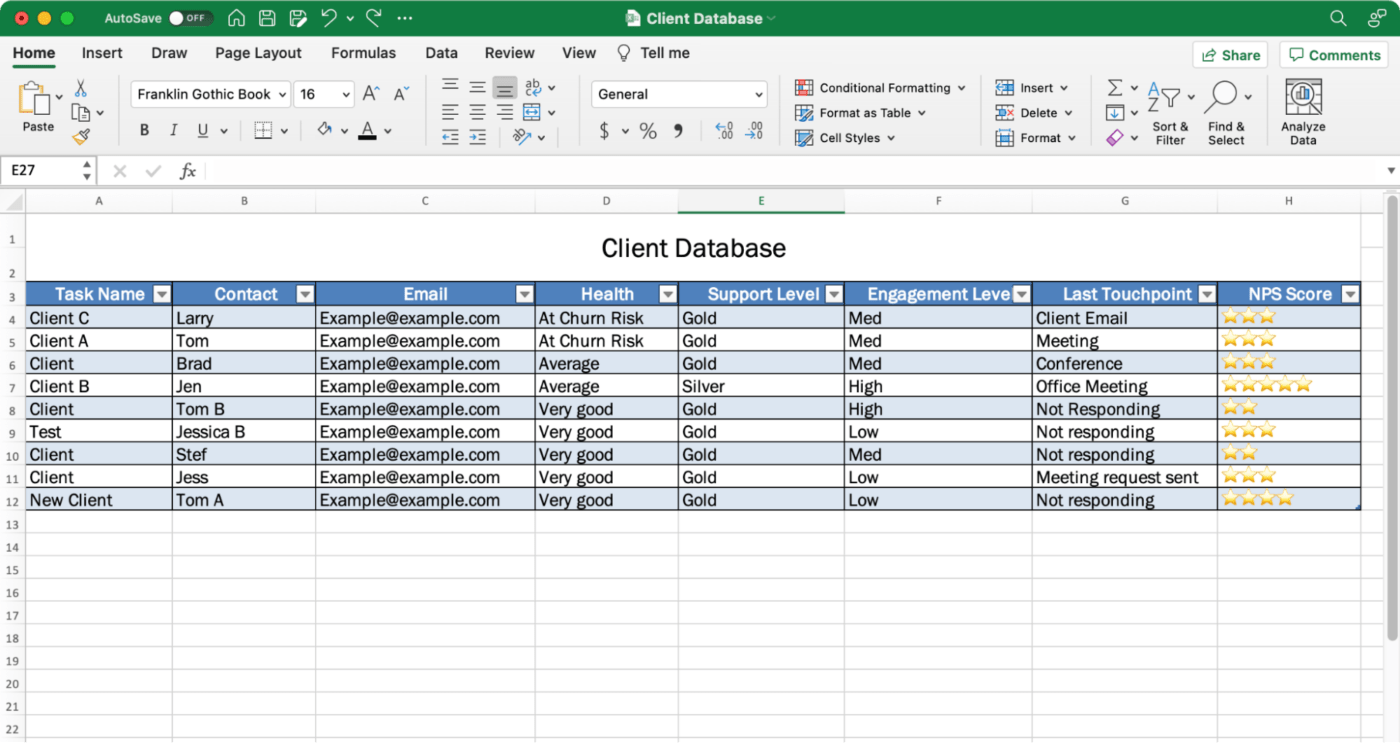
Step 5: Save your database spreadsheet
Finally, save your spreadsheet because you will have to come back and manually edit your database multiple times a day or week with the latest information. Set up Future You for success, so you don’t risk starting over!
Go to File > Save As > Name your database > click Save.
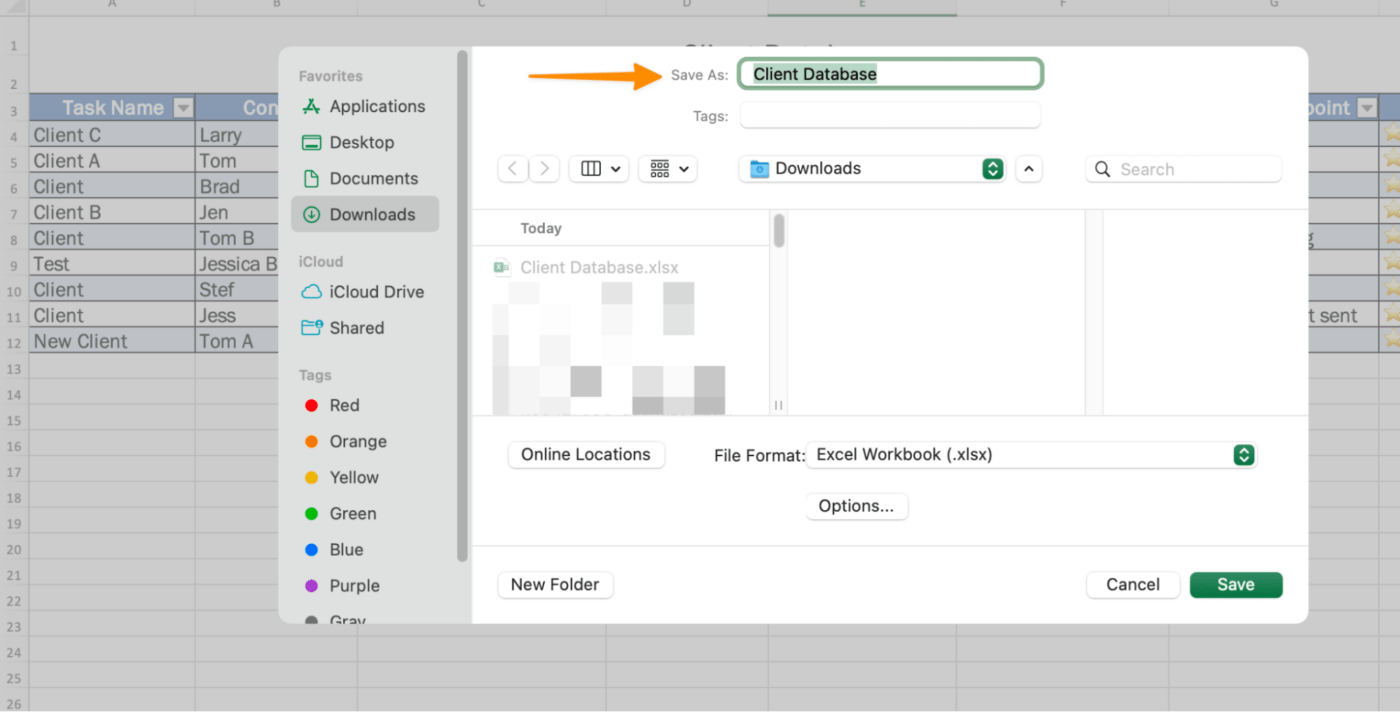
Free Database Templates
Check out these pre-made templates to jumpstart your database-building task!
1. Client Success Template by ClickUp
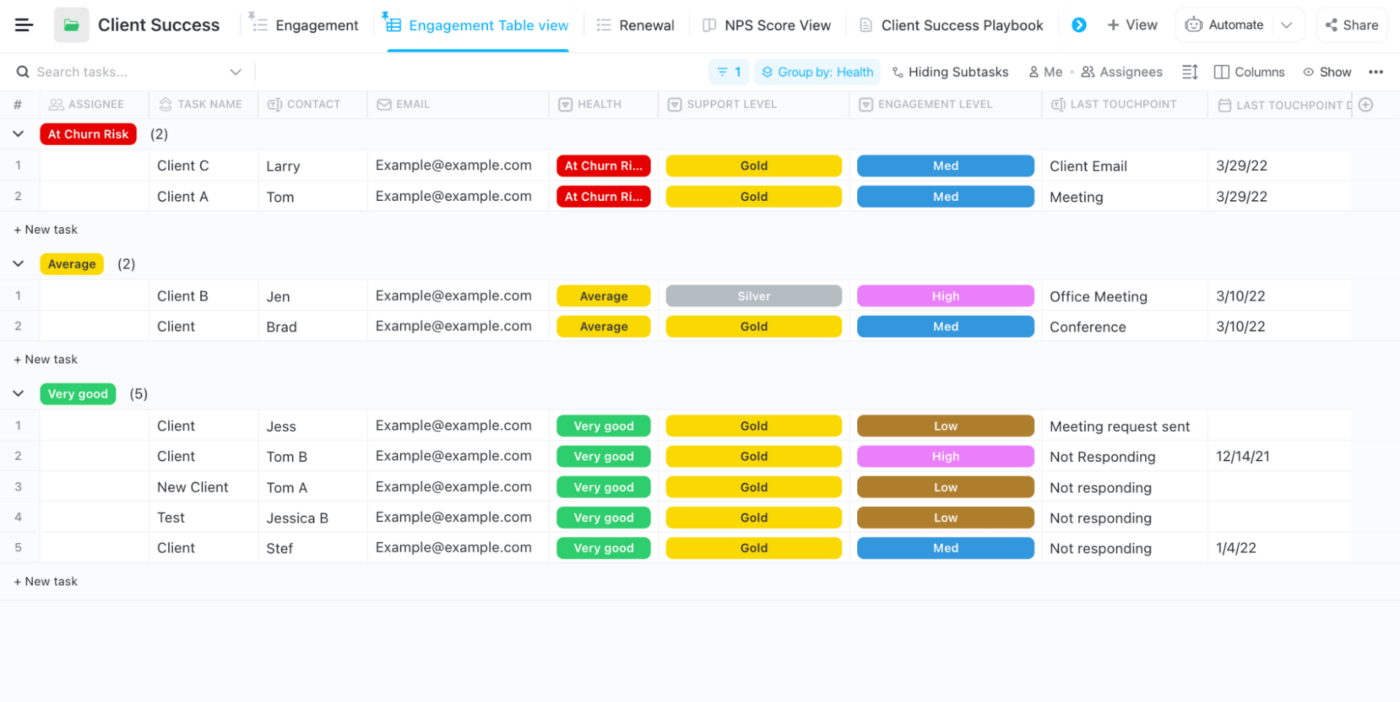
2. Excel’s Inventory List Template
3. Excel’s Warehouse Inventory Template
4. Excel’s Contact List Template
Related Resources:
- Excel Alternatives
- How to Create a Project Timeline in Excel
- How to Make a Calendar in Excel
- How to create Gantt charts in Excel
- How to create a Kanban board in Excel
- How to create a burndown chart in Excel
- How to create a flowchart in Excel
- How to Create an Org Chart in Excel
- How to Make a Graph in Excel
- How to Make a KPI Dashboard in Excel
How to Make a Database With ClickUp’s Table View
If you’re in a position where you’ll be using the database daily—meaning it’s an essential tool to get your work done—Excel won’t support your growth long-term.
Excel isn’t a database software built for the modern workplace. Workers are on-the-go and mobile-first. An Excel workflow sucks up time that should be spent making client connections and focusing on needle-moving tasks.
If you need a solution to bring project and client management under one roof, try ClickUp!
The process of building a simple but powerful database is easy in ClickUp. Import your work from almost anywhere with ClickUp’s free Excel and CSV import feature. Or vice versa! After you build a database in ClickUp, you can export it as an Excel or CSV file.
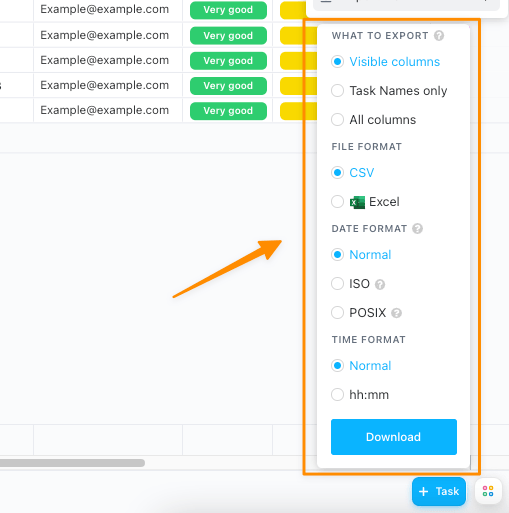
Is end-to-end security a non-negotiable term for your database tool? Same for ClickUp!
ClickUp has one of the strictest policies in our industry to ensure your data never gets into the hands of third parties. If you have a security question or concern, please feel free to ask us any time!
Using a Table view in ClickUp is like using an Excel spreadsheet, only:
- Data organization possibilities are endless with ClickUp Custom Fields
- Advanced filtering options make searching for data and activity stress-free
- Tasks in ClickUp empower you to plan, organize, and collaborate on any project
- Native or third-party integrations in ClickUp connect your favorite tools together
- Formatting options take fewer clicks to view only the data you need right away

There’s a stocked library of free Sales and CRM ClickUp templates for you to play in a digital sandbox with data examples if you want to see the potential of ClickUp—or get a few database ideas for your own.
We hope you feel more comfortable in the database-building process. You have other options than Excel to move your business closer to your goals.
![]()
Download Article
![]()
Download Article
This wikiHow teaches you how to create a database using data from a Microsoft Excel spreadsheet by importing the data directly into Access, which is Microsoft’s database management software, or by exporting the Excel data into a format that works with most database software. Microsoft Access is a part of the Microsoft Office software bundle and is only available for Windows.
-

1
Open Microsoft Access. It’s the red app with an A. Doing so opens the Access template page.
- Access is designed for use with Excel and comes bundled with Excel in Microsoft Office Professional and is only available for Windows.
-
2
Click Blank database. This option is in the upper-left side of the window.
- If you want to use a different template for your Access database, select the template that you want instead.
Advertisement
-
3
Click Create when prompted. This option is in the bottom-right corner of the pop-up window. Your Access database will open.
-
4
Click the External Data tab. It’s in the menu bar at the top of the Access window.
-
5
Click Saved Imports. You’ll find this in the far-left side of the External Data toolbar. A drop-down menu will appear.
-
6
Select File. It’s in the drop-down menu. Selecting this option prompts a pop-out menu.
-
7
Click Excel. This option is in the pop-out menu. Clicking it prompts the import window to open.
-
8
Click Browse. It’s in the upper-right part of the window.
-
9
Select an Excel spreadsheet. Go to the folder in which your Excel spreadsheet is located, then click the Excel spreadsheet which you want to open.
-
10
Click Open. It’s in the bottom-right corner of the window.
-
11
Specify how to transfer to the data. Click the radio button to the left of one of the following:
- Import the source data into a new table in the current database — Choose this option if you created a new database with no tables or if you want to add a new table to an existing database. By creating a new table you can edit the information in Access.
- Append a copy of the records to the table — Choose this option if you are using an existing database and want to add the data to one of the tables in the database. By appending an existing table, you can edit the information in Access.
- Link to the data source by creating a linked table — Choose this option to create a hyperlink in the database, which will open the Excel database in Excel. With this method, you cannot edit the information in Access.
-
12
Click OK. You’ll find this at the bottom of the window.
-
13
Select a sheet. At the top of the window, click the name of the sheet that you want to import from your selected Excel document.
- By default, Excel creates workbooks with three spreadsheets labeled «Sheet 1,» «Sheet 2,» and «Sheet 3.» You can only transfer one sheet at a time; if you have information on all three sheets, you must complete the transfer with one sheet and then go back to the «External Data» tab and repeat all the steps for each remaining sheet.
- You can delete, add, and edit the names of these sheets in Excel, and whatever changes you make will appear in the Access database.
-
14
Click Next. It’s in the bottom-right corner of the window.
-
15
Enable column headings. Check the «First Row Contains Column Headings» box if your Excel sheet has its own column headings in the top row (e.g., the A row).
- Uncheck the box if you want Access to create the column headings.
-
16
Click Next.
-
17
Edit your spreadsheet’s columns and fields if needed. If you want to import all the fields from the spreadsheet without change, skip this step:
- To edit a field, click the column header you want to change, then edit the name of the field, the data type, and/or whether or not it is indexed.
- If you don’t want to import a field, check the «Do Not Import Field (Skip)» box.
-
18
Click Next.
-
19
Set the primary key for the database. For best results, leave the default setting here as-is to let Access set the key.
- You can also set your own key by checking «Choose my own primary key» and entering it in the field next to that option, or you can select «No primary key» (not recommended).
-
20
Click Next.
-
21
Add a name. Type a name for the sheet into the «Import to Table» field.
- Skip this step to leave the database set to its default name.
-
22
Click Finish. This option is in the lower-right side of the window.
-
23
Click Close. It’s in the bottom-right corner of the window. This will close the import window and create your database.
- You can first check the «Save import steps» box if you want to ensure that Access will remember your settings for this database.


Advertisement
-
1
Open your Excel document. Double-click the Excel document which you want to convert into a database.
- If you haven’t yet created your document, open Excel, click Blank workbook, and create your document before proceeding.
-
2
Click File. It’s in the menu bar that’s either at the top of the Excel window (Windows) or at the top of the screen (Mac).
-
3
Click Save As. You’ll find this option in the File menu.
-
4
Double-click This PC. It’s in the middle of the page.
- Skip this step on a Mac.
-
5
Select a file format. Click the «Save as type» (Windows) or «File Format» (Mac) drop-down box, then select one of the following:
- If you’re using a computer-based database application, click a .CSV (comma separated values) format.
- If you’re using a Web-based database application, click an .XML format.
- If your Excel document doesn’t have any XML data in it, you won’t be able to choose XML.
-
6
Click Save. It’s at the bottom of the window. This will save your document using your selected preferences.
-
7
Create a new database in your database application. This process will vary depending on the application that you’re using, but you’ll usually open the application, click New (or File > New), and follow any on-screen instructions.
-
8
Locate the Import… button. It’s often found by clicking the File option, but your database application may vary.
-
9
Select your Excel file. Locate and double-click the file you exported from Excel.
-
10
Follow the database app’s prompts to import the data.
-
11
Save the database. You can usually open the «Save» menu by pressing Ctrl+S (Windows) or ⌘ Command+S (Mac).


Advertisement
Add New Question
-
Question
What is the difference between a database and a spreadsheet?

This answer was written by one of our trained team of researchers who validated it for accuracy and comprehensiveness.
wikiHow Staff Editor
Staff Answer
A spreadsheet stores information organized into rows and columns and is usually best used by one person at a time. A database might also have information organized into rows and columns, but it isn’t limited to just that and can store information according to a variety of different methodologies. Databases are typically made with multiple simultaneous users in mind and security features. Databases also allow for more complex and time consuming searches or operations and can eliminate some of the redundancy that becomes necessary when using spreadsheets extensively.
-
Question
How do I view this page in French?
Copy and paste onto Google Translate; when you copy the translated words onto Excel, it will automatically format it to its original form.
-
Question
I’ve imported data from Excel, but where does it go, and how do I access the information to populate my database?
You can go to «Insert > Pivot Table» and select «Use external connection» and pick the connection you’ve established. This will allow you to create a pivot table based on that external Access database.

Ask a Question
200 characters left
Include your email address to get a message when this question is answered.
Submit
Advertisement
-
There are several free online database websites that you can use to create a database, though you’ll have to sign up for an account with most of these services.
-
If you don’t have fully functional database software, you may also need a separate program to open database files on PC or Mac.
Thanks for submitting a tip for review!
Advertisement
-
Excel data doesn’t always transfer over to a database as neatly as you might hope for.
Advertisement
About This Article
Article SummaryX
To create a database from an Excel spreadsheet, you can use Microsoft Access, which is Microsoft’s database management software. When you have Microsoft Access, open the program and click “Blank database.” After creating your blank database, click the “External Data” tab at the top and then “New Data Source.” Then, select “File” from the drop-down menu and click “Excel.” Use the “Browse” button to locate your Excel spreadsheet. Once you’ve selected the spreadsheet, click “Open” and choose how you want to transfer the data. Select a sheet and enable column headings. To complete your database, set the primary key and click “Finish.” For best results, you can leave the default primary key setting as is. For more information, including how to use a third-party software to create a database from an Excel spreadsheet, read on!
Did this summary help you?
Thanks to all authors for creating a page that has been read 1,118,801 times.
Reader Success Stories
-

«Step-by-step help with pictures made this task easy for me. I’d still be attempting to achieve this task, but this…» more