Import or export text (.txt or .csv) files
There are two ways to import data from a text file with Excel: you can open it in Excel, or you can import it as an external data range. To export data from Excel to a text file, use the Save As command and change the file type from the drop-down menu.
There are two commonly used text file formats:
-
Delimited text files (.txt), in which the TAB character (ASCII character code 009) typically separates each field of text.
-
Comma separated values text files (.csv), in which the comma character (,) typically separates each field of text.
You can change the separator character that is used in both delimited and .csv text files. This may be necessary to make sure that the import or export operation works the way that you want it to.
Note: You can import or export up to 1,048,576 rows and 16,384 columns.
Import a text file by opening it in Excel
You can open a text file that you created in another program as an Excel workbook by using the Open command. Opening a text file in Excel does not change the format of the file — you can see this in the Excel title bar, where the name of the file retains the text file name extension (for example, .txt or .csv).
-
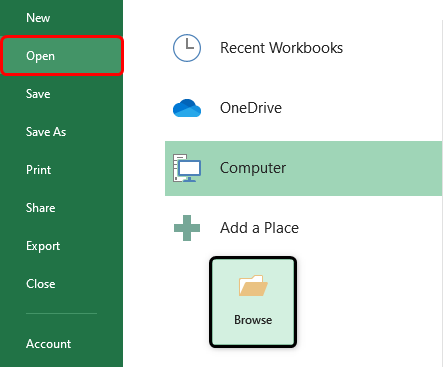
Go to File > Open and browse to the location that contains the text file.
-
Select Text Files in the file type dropdown list in the Open dialog box.
-
Locate and double-click the text file that you want to open.
-
If the file is a text file (.txt), Excel starts the Import Text Wizard. When you are done with the steps, click Finish to complete the import operation. See Text Import Wizard for more information about delimiters and advanced options.
-
If the file is a .csv file, Excel automatically opens the text file and displays the data in a new workbook.
Note: When Excel opens a .csv file, it uses the current default data format settings to interpret how to import each column of data. If you want more flexibility in converting columns to different data formats, you can use the Import Text Wizard. For example, the format of a data column in the .csv file may be MDY, but Excel’s default data format is YMD, or you want to convert a column of numbers that contains leading zeros to text so you can preserve the leading zeros. To force Excel to run the Import Text Wizard, you can change the file name extension from .csv to .txt before you open it, or you can import a text file by connecting to it (for more information, see the following section).
-
Import a text file by connecting to it (Power Query)
You can import data from a text file into an existing worksheet.
-
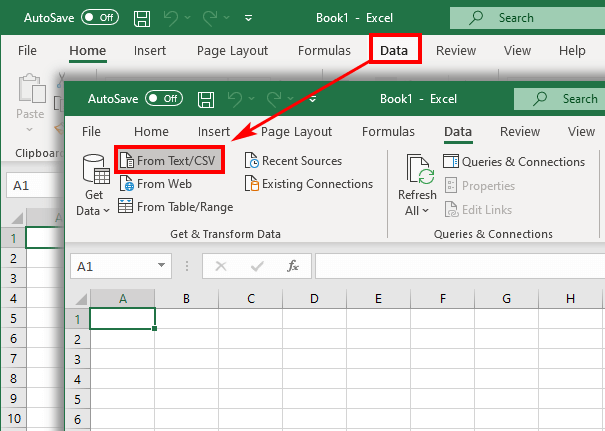
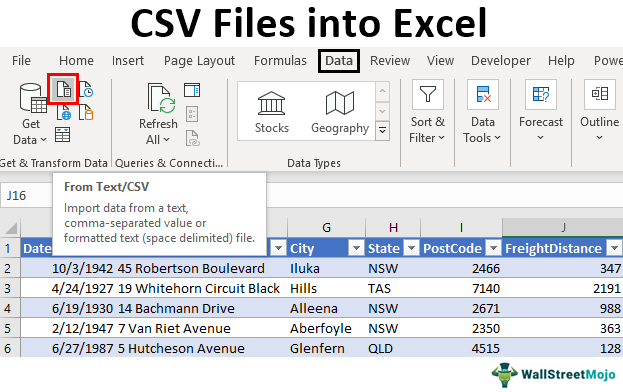
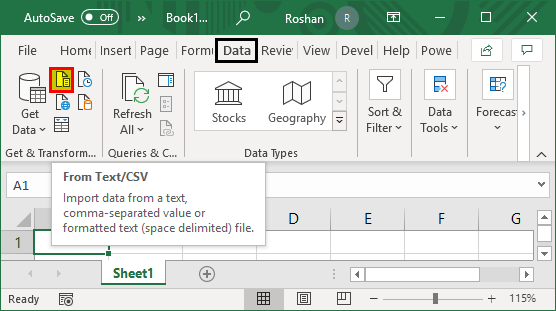
On the Data tab, in the Get & Transform Data group, click From Text/CSV.
-
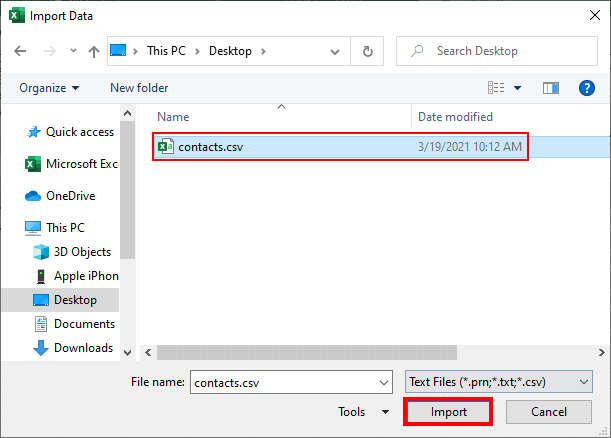
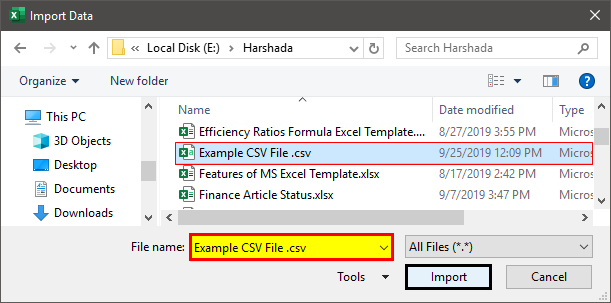
In the Import Data dialog box, locate and double-click the text file that you want to import, and click Import.
-
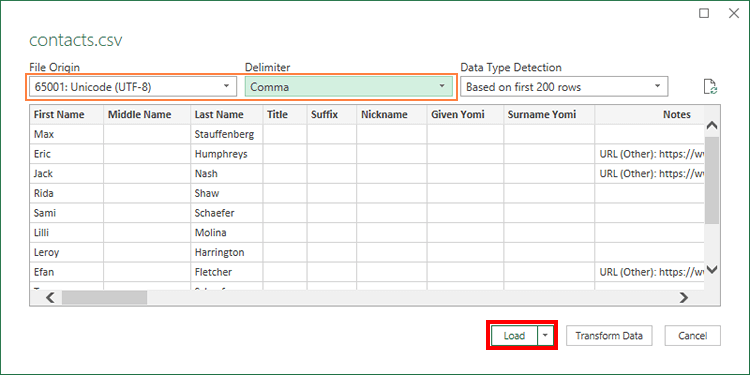
In the preview dialog box, you have several options:
-
Select Load if you want to load the data directly to a new worksheet.
-
Alternatively, select Load to if you want to load the data to a table, PivotTable/PivotChart, an existing/new Excel worksheet, or simply create a connection. You also have the choice of adding your data to the Data Model.
-
Select Transform Data if you want to load the data to Power Query, and edit it before bringing it to Excel.
-
If Excel doesn’t convert a particular column of data to the format that you want, then you can convert the data after you import it. For more information, see Convert numbers stored as text to numbers and Convert dates stored as text to dates.
Export data to a text file by saving it
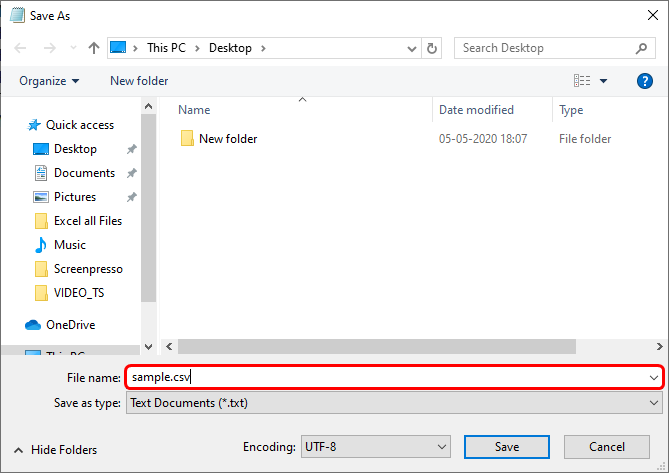
You can convert an Excel worksheet to a text file by using the Save As command.
-
Go to File > Save As.
-
Click Browse.
-
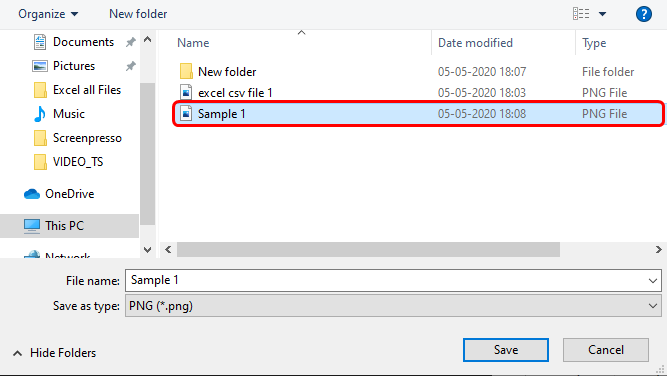
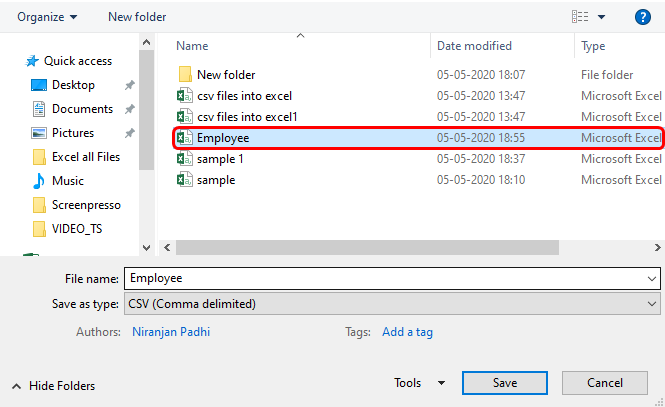
In the Save As dialog box, under Save as type box, choose the text file format for the worksheet; for example, click Text (Tab delimited) or CSV (Comma delimited).
Note: The different formats support different feature sets. For more information about the feature sets that are supported by the different text file formats, see File formats that are supported in Excel.
-
Browse to the location where you want to save the new text file, and then click Save.
-
A dialog box appears, reminding you that only the current worksheet will be saved to the new file. If you are certain that the current worksheet is the one that you want to save as a text file, click OK. You can save other worksheets as separate text files by repeating this procedure for each worksheet.
You may also see an alert below the ribbon that some features might be lost if you save the workbook in a CSV format.
For more information about saving files in other formats, see Save a workbook in another file format.
Import a text file by connecting to it
You can import data from a text file into an existing worksheet.
-
Click the cell where you want to put the data from the text file.
-
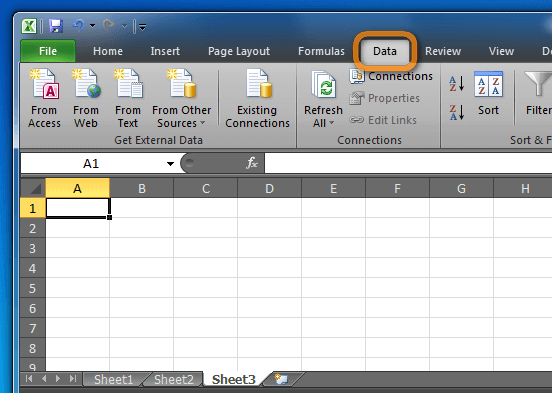
On the Data tab, in the Get External Data group, click From Text.
-
In the Import Data dialog box, locate and double-click the text file that you want to import, and click Import.
Follow the instructions in the Text Import Wizard. Click Help
on any page of the Text Import Wizard for more information about using the wizard. When you are done with the steps in the wizard, click Finish to complete the import operation.
-
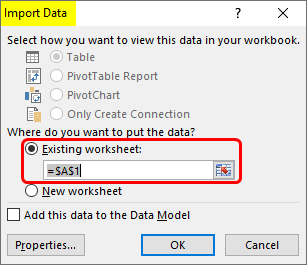
In the Import Data dialog box, do the following:
-
Under Where do you want to put the data?, do one of the following:
-
To return the data to the location that you selected, click Existing worksheet.
-
To return the data to the upper-left corner of a new worksheet, click New worksheet.
-
-
Optionally, click Properties to set refresh, formatting, and layout options for the imported data.
-
Click OK.
Excel puts the external data range in the location that you specify.
-
If Excel does not convert a column of data to the format that you want, you can convert the data after you import it. For more information, see Convert numbers stored as text to numbers and Convert dates stored as text to dates.
Export data to a text file by saving it
You can convert an Excel worksheet to a text file by using the Save As command.
-
Go to File > Save As.
-
The Save As dialog box appears.
-
In the Save as type box, choose the text file format for the worksheet.
-
For example, click Text (Tab delimited) or CSV (Comma delimited).
-
Note: The different formats support different feature sets. For more information about the feature sets that are supported by the different text file formats, see File formats that are supported in Excel.
-
-
Browse to the location where you want to save the new text file, and then click Save.
-
A dialog box appears, reminding you that only the current worksheet will be saved to the new file. If you are certain that the current worksheet is the one that you want to save as a text file, click OK. You can save other worksheets as separate text files by repeating this procedure for each worksheet.
-
A second dialog box appears, reminding you that your worksheet may contain features that are not supported by text file formats. If you are interested only in saving the worksheet data into the new text file, click Yes. If you are unsure and would like to know more about which Excel features are not supported by text file formats, click Help for more information.
For more information about saving files in other formats, see Save a workbook in another file format.
The way you change the delimiter when importing is different depending on how you import the text.
-
If you use Get & Transform Data > From Text/CSV, after you choose the text file and click Import, choose a character to use from the list under Delimiter. You can see the effect of your new choice immediately in the data preview, so you can be sure you make the choice you want before you proceed.
-
If you use the Text Import Wizard to import a text file, you can change the delimiter that is used for the import operation in Step 2 of the Text Import Wizard. In this step, you can also change the way that consecutive delimiters, such as consecutive quotation marks, are handled.
See Text Import Wizard for more information about delimiters and advanced options.
If you want to use a semi-colon as the default list separator when you Save As .csv, but need to limit the change to Excel, consider changing the default decimal separator to a comma — this forces Excel to use a semi-colon for the list separator. Obviously, this will also change the way decimal numbers are displayed, so also consider changing the Thousands separator to limit any confusion.
-
Clear Excel Options > Advanced > Editing options > Use system separators.
-
Set Decimal separator to , (a comma).
-
Set Thousands separator to . (a period).
When you save a workbook as a .csv file, the default list separator (delimiter) is a comma. You can change this to another separator character using Windows Region settings.
Caution: Changing the Windows setting will cause a global change on your computer, affecting all applications. To only change the delimiter for Excel, see Change the default list separator for saving files as text (.csv) in Excel.
-
In Microsoft Windows 10, right-click the Start button, and then click Settings.
-
Click Time & Language, and then click Region in the left panel.
-
In the main panel, under Regional settings, click Additional date, time, and regional settings.
-
Under Region, click Change date, time, or number formats.
-
In the Region dialog, on the Format tab, click Additional settings.
-
In the Customize Format dialog, on the Numbers tab, type a character to use as the new separator in the List separator box.
-
Click OK twice.
-
In Microsoft Windows, click the Start button, and then click Control Panel.
-
Under Clock, Language, and Region, click Change date, time, or number formats.
-
In the Region dialog, on the Format tab, click Additional settings.
-
In the Customize Format dialog, on the Numbers tab, type a character to use as the new separator in the List separator box.
-
Click OK twice.
Note: After you change the list separator character for your computer, all programs use the new character as a list separator. You can change the character back to the default character by following the same procedure.
Need more help?
You can always ask an expert in the Excel Tech Community or get support in the Answers community.
See Also
Import data from external data sources (Power Query)
Need more help?
Want more options?
Explore subscription benefits, browse training courses, learn how to secure your device, and more.
Communities help you ask and answer questions, give feedback, and hear from experts with rich knowledge.
CSV, or comma-separated values, is a common format for storing and transmitting content, such as contacts, calendars, databases, and spreadsheets. CSV files are used to move data between programs that aren’t ordinarily able to exchange data.
Excel is supposed to read CSV files, but in most cases, when you open CSV file in Excel, you see scrambled data that’s impossible to read. This article demonstrates how to convert CSV to excel.
How to open CSV file in Excel:
- Open CSV files in Excel 2016 and later
- Open CSV files in Excel 2003
BONUS: Find out how to export iPhone contacts to Excel.
Open a CSV file in Excel
Excel 2016 and later
- Create a new Excel file and click Data ➔ From Text/CSV.
- Find the CSV file on your PC and click Import.
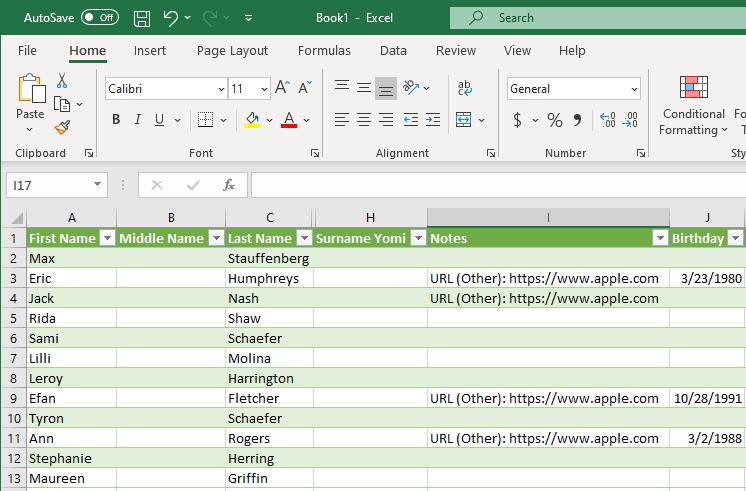
- Preview the resulting table in the pop-up window and click Load.
- All done.
Change the delimiter and encoding type if needed.
Excel 2003
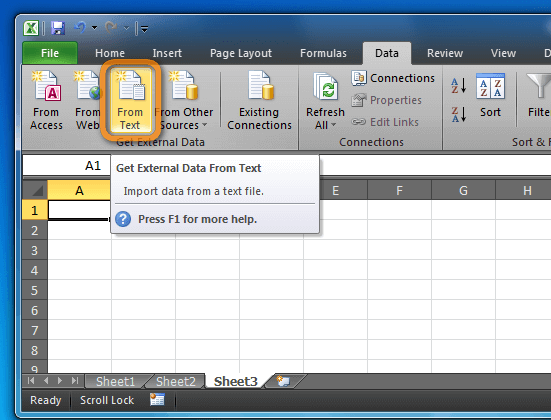
- Open a new Excel document and navigate to the Data tab.
- Click From Text.
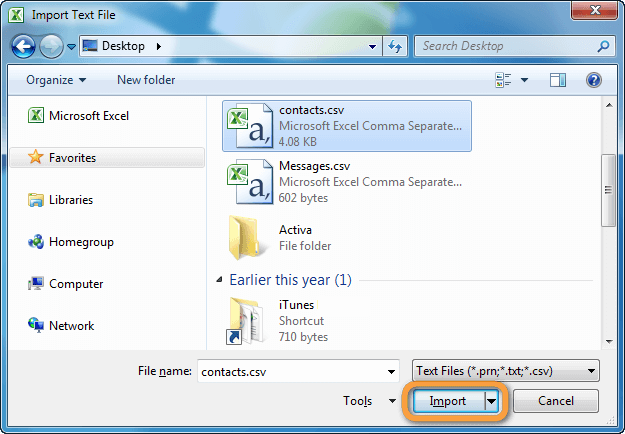
- Navigate to the CSV file you wish to open and click Import.
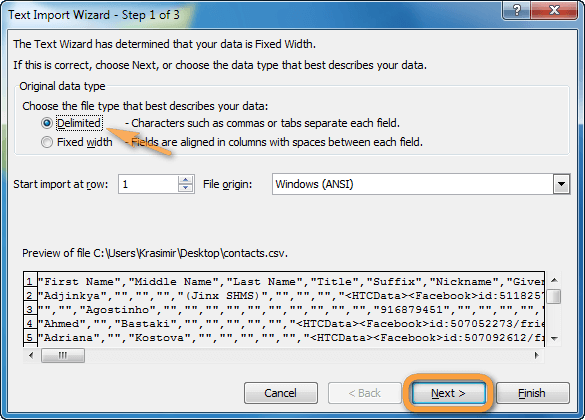
- In the newly-opened window, choose Delimited. Then click Next.
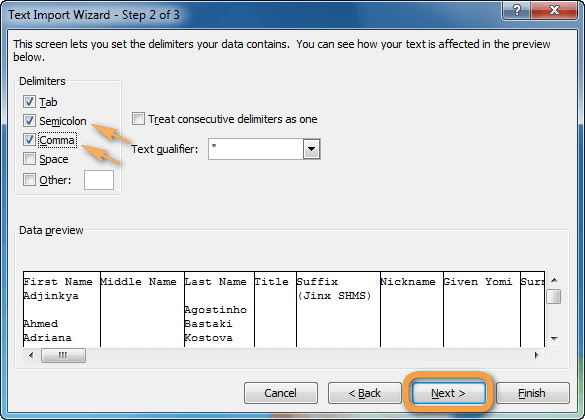
- Check the box next to the type of delimiter: in most cases, this is either a semicolon or a comma. Then click Next.
- Click Finish.
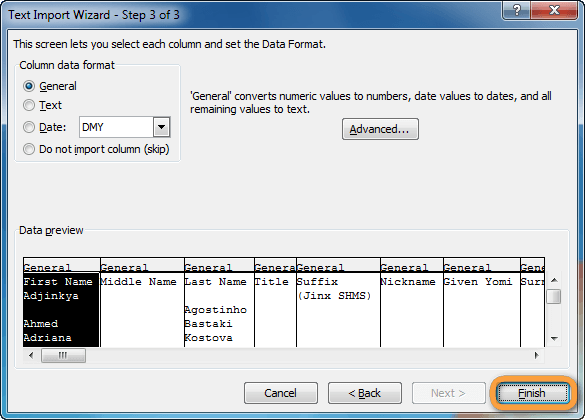
That’s it! you have just imported a CSV file to Excel!
Whether you’re generating financial reports, processing your accounts for month end, or simply moving information between data sources to analyze it for valuable insights, chances are you’ll need to get external data (e.g., access a text-based flat file format like a comma separated values (CSV) document). And when you do, it’s also probable you’ll do so by importing it from a text file into one of the most common applications for handling CSV files: Microsoft Excel.
The actual process for creating an excel workbook from text files like the CSV format is fairly straightforward. But it’s important to follow the process exactly to avoid potential pitfalls and make sure your data makes the transition smoothly and completely.
Why Knowing How to Open CSV Files in Excel Matters
Native Microsoft Excel files (.xlsx files) are designed for that application and provide support for macros, separate data tabs, and other advanced features. They’re meant to be used both as part of the larger Microsoft Office suite and as a data manipulation and management tool that can import and process data for exporting to other applications.
CSV files (their file extension mirrors their name: .csv) are rarely accessed directly. Instead, they’re used for storing and transferring information that’s been broken into manageable chunks, such as calendar appointments, statistics, customer databases, contact information, etc. They don’t support macros or plug-ins or more advanced features, but that’s intentional, as once the data’s in Excel, it can be manipulated, connected to other workbooks, analyzed using pivot tables, etc.
NOTE: Despite the name of the format, data values may be separated by commas, semicolons, or other punctuation, depending on how the original was created.
They’re text-based (and can even be created in very simple text editor applications such as Notepad, and can be saved directly to, and created from, the .txt format), easy to create and use, and let you handle large amounts of information without worrying about being locked into a specific application.
CSV files come in four types:
- CSV UTF-8 (Eight-bit Unicode Transformation Format) (Comma delimited)
- CSV (Comma delimited)
- CSV (Macintosh)
- CSV (MS-DOS)
Each format has its distinct uses, but all four are supported by Microsoft Excel. That’s important, because it gives you more flexibility in managing your data; you can easily import from any of the formats and export copies to any of the four CSV formats (using the Save As…dialogue) for use in other applications as needed.
That said, while all four formats are supported natively, simply opening a CSV file rather than importing it into an excel worksheet will often result in a screen full of gibberish. Importing to an Excel sheet from the CSV file preserves the data’s utility and accessibility (It saves you the headache of trying to pick through an improperly formatted document, too!).
Given Excel’s large market share and the near ubiquity it shares with CSV files in the modern office environment, understanding how to import data from the CSV format to Excel is a critical skill for financial and other professionals who need to access, create, collect, and manage data across different platforms, in various file types, on a regular basis.
Importing to an Excel sheet from the CSV file preserves the data’s utility and accessibility (It saves you the headache of trying to pick through an improperly formatted document, too!).
Open CSV Files in Microsoft Excel the Right Way
Generally, you’ll rely on Excel’s built-in Import Text Wizard to help you get data from your CSV file into your existing Excel workbook (or a new worksheet). You can also try opening it directly from Excel’s File menu or with a double-click on the file in Explorer, but that can be an exercise in frustration if your settings aren’t properly configured.
Depending on your location and the version of Excel you’re using, Excel will rely on its localized Region and Language settings to make certain assumptions about files you use, and how files will most likely be formatted. This includes the “default” file separator; different regions have different delimiters. In the United States, for example, commas are most often used, but in Germany, it’s the semicolon that gets the heaviest usage.
Naturally, things can get even more complicated if you’re working with files created in other locations with different regional settings.
The more data you’re working with, and the more diverse your data sources, the higher the chances simply double-clicking to open a .csv file (or using the Open command) will end in woe rather than work-friendly data.
Another important caveat: while .txt files and .csv files are essentially the same in many ways, always save any .txt file you plan to import into Excel as a .csv file before trying to import it. You can do this very easily in Notepad by simply changing the extension to “.csv” in the “Save As…” dialogue.
To use the more complicated, but also much more reliable, Text Import Wizard:
- Open a New Excel Document, or open a new worksheet in your existing Excel workbook.
- Navigate to the “Data” tab.
- Click on the “From Text” button.
- Navigate to the folder holding the .csv file you want to open and click on the correct file name.
- Click “Import.”
- The Text Import Wizard will open. Make sure you choose the “Delimited” radio button/checkbox under “Original Data Type” in the open dialog box. If your data has headers, don’t forget to select the “My data has headers” checkbox as well.
- Click “Next.”
- Select the checkbox corresponding to the correct delimiter used in the original .csv document. This will usually be a comma or a semicolon, but could be a tab, a space, or even a special character. It’s important to choose the correct delimiter to ensure the data fields can be properly parsed during the import.
- Choose the correct text qualifier (usually double quotes) from the drop-down list.
- Click “Next.”
- In the Data Preview field, only the first column of data will be highlighted. Drag the horizontal window control all the way to the right.
- While holding down the Shift key, click on the final column heading. This should select and highlight every column in the Data Preview pane.
- Choose “Text” as your Column Data Format. Every column should now be labeled “Text” in the Data Preview pane.
- Review the Data Preview window to ensure your data looks the way it should.
- Click “Finish.”
- If prompted to select a location for your data (e.g., “Where do you want to put the data?”), click on whichever cell in the worksheet (or new workbook, or new worksheet in your existing workbook) you want to receive the first item in the .csv file and then click “OK.”
Your data should appear in your spreadsheet, organized in columns and, where relevant, with their original headers. If your data contained fields with leading zeros, double-check to make sure they made the transition through the Import Text Wizard.
Bringing CSV Data into Microsoft Excel Doesn’t Have to Be Difficult
When it comes to your data, it pays to be cautious, even when dealing with a relatively simple task like importing CSV data into Excel. By taking the time to practice proper protocols when you either open or import data from CSV files, you can save time and frustration, and make sure your information is complete and accurate for optimal reporting, analysis, and strategic planning.
It is easy to read the data presented in comma-separated values format by opening with Excel but scrambled data makes it hard to read. There are also a few problems associated, like unexpected data changes, by changing the format when the CSV file is opened directly. This article shows different ways to convert the CSV files into Excel by covering the following topics.
Excel has a handling feature for various data presented in different formats, including Comma Separated Values (CSV). In addition, it contains various useful functions that help import these files and easily convert them into Excel sheet tables. As a result, it is the most commonly used for transmitting and storing data related to contacts, statistical information, and calendar appointments.
This section facilitates examples of ways to convert the Comma Separated Values files into excel.
Table of contents
- What Is Converting CSV Files In Excel?
- Explanation
- How To Open, Import & Convert CSV File Into Excel?
- How to Use CSV Files in Excel?
- Important Things To Note
- Recommended Articles
- Converting CSV files in excel is an easy process. CSV stands for Comma separated Values. It indicates that the values will be separated by a comma.
- We can have CSV files in Excel in two different ways. One is by importing the file, and the other one is by opening the file.
- We should remember that the format of the CSV file inserted using the open method will be in .csv format and will not change into .xlsx or .xls formats.
- For CSV files, excel allows a maximum of 1,048,576 rows and 16,384 columns.
Explanation
We have been using the data available in CSV format for several years. It indicates that data is separated by a comma using the common fields. Different ways are available to convert the CSV files into Excel. Those include:
- Direct opening of CSV files with Excel.
- Double-clicking and opening the file through the windows explorer option.
- Importing CSV files into worksheets.
The main intention behind the conversion of CSV data into Excel is that supportability. Each comma-separated value is placed into each cell to separate easily with the conversion. The data presented in the CSV format limits the capabilities of a user in generating insights from the data in performing the data analysis.
How To Open, Import & Convert CSV File Into Excel?
Let us discuss some examples of the comma-separated values file in Excel to understand how to open, import and convert CSV files into Excel.
You can download this CSV Files into Excel Template here – CSV Files into Excel Template
Example #1 – Open CSV File In WorkSheet
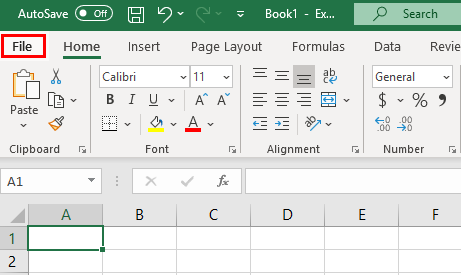
Step 1: We must open the Excel worksheet and go to the File menu.
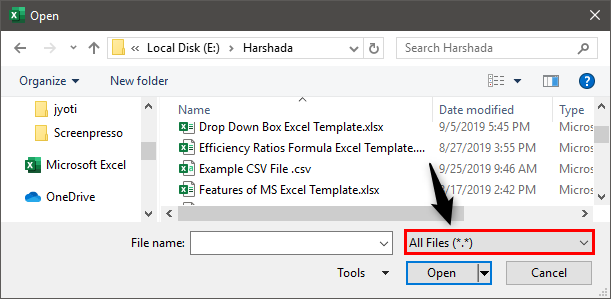
It shows the Open dialog box, as shown in the figure.
Step 2: Then, we need to go to the CSV file’s directory. Select All Files on the right of the File name field.
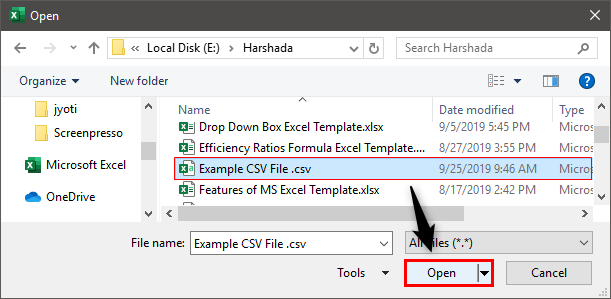
Select the name of the CSV file. Then, click on Open to open the file with Excel.
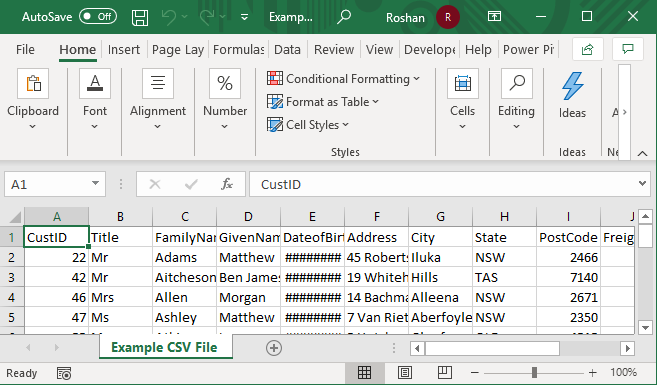
Step 3: It directly displays the data in the new workbook, as shown in the figure.
Data separated by a comma is placed into each cell in the Excel sheet.
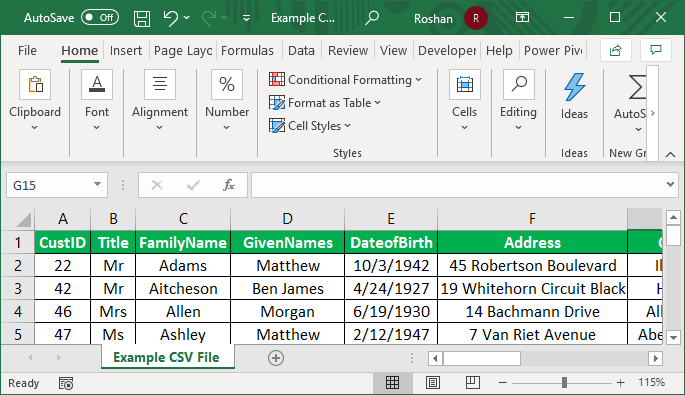
Step 4: We need to apply the formatting to the title fields to differentiate the headers of columns.
Step 5: Use the data for required purposes by applying the excel functions and formula.
Note: In this Excel, if we open a .txt file instead of a .csv file, Import Text Wizard is used to import the data into Excel.
Example #2 – Using Windows Explorer
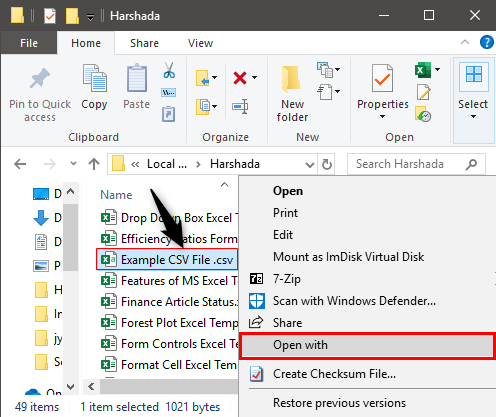
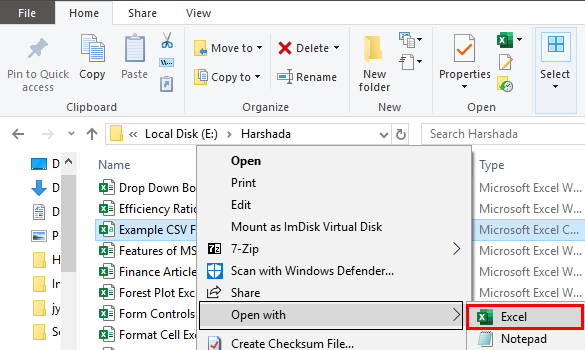
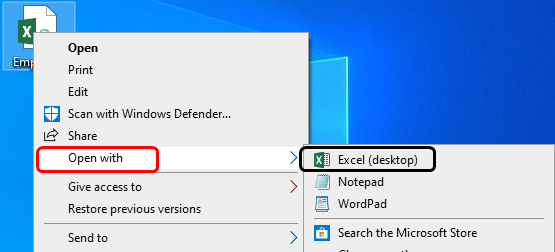
Step 1: We must go to the CSV file’s directory. Right-click on the file and choose Open with.
Step 2: Select the choose default program option on the right side of the Open with command, as shown in the figure. Then, choose Excel (desktop) among the recommended programs.
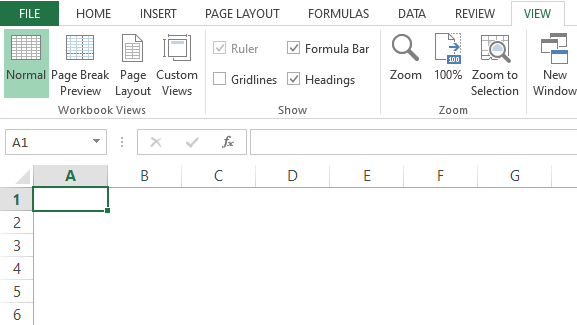
Step 3: As a result, now, the file is opened, and data is displayed, as shown in the figure.
Example #3 – Import CSV File Through External Data
This method requires a lot of steps to import data compared to the other two techniques. However, it helps in importing the data into the current worksheet.
The steps to import CSV files through external data are as follows:
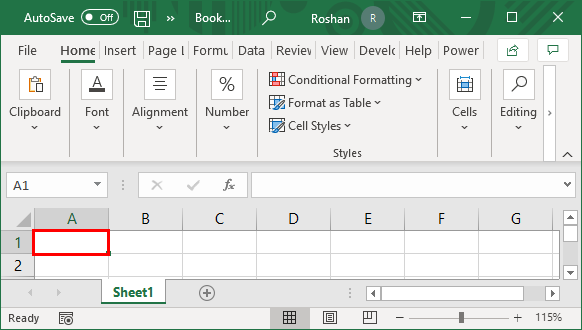
- First, we must open an Excel worksheet and place the cursor into a cell where we want to locate the data by importing from a .txt file or .csv file.
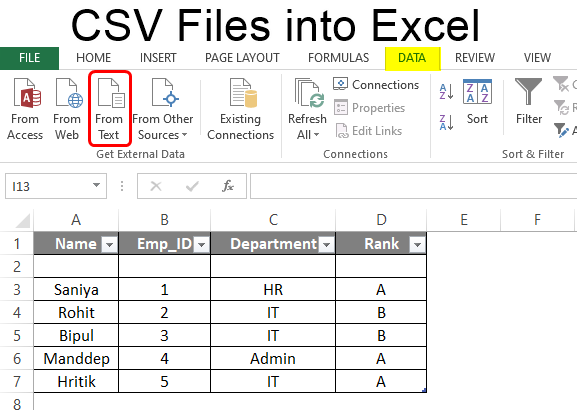
- Then, we need to go to the Data tab on the ribbon and click From Text/CSV under the Get External Data group, as shown in the screenshot.
- Browse to the location of the CSV or txt file to import the data. Then, select the .csv file and click on the Import button.
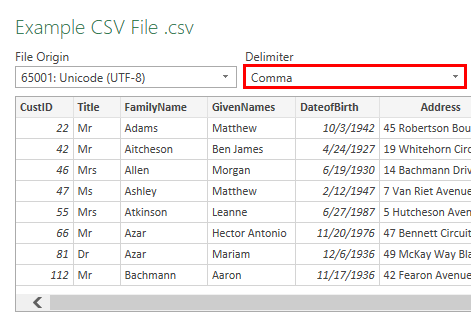
- The Example CSV File wizard will open when clicking on Import.
- Then we need to set the delimiter as Comma and click on ‘Load to’ to move to the next step.
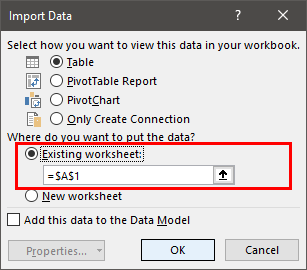
- It opens the ‘Import data’ dialog box. Here, we must choose the existing worksheet, place the cell address, and click OK.
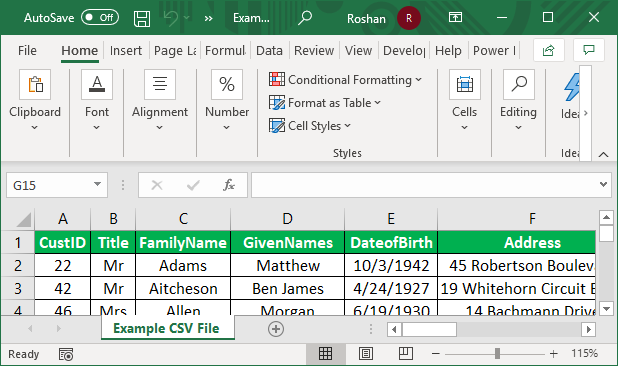
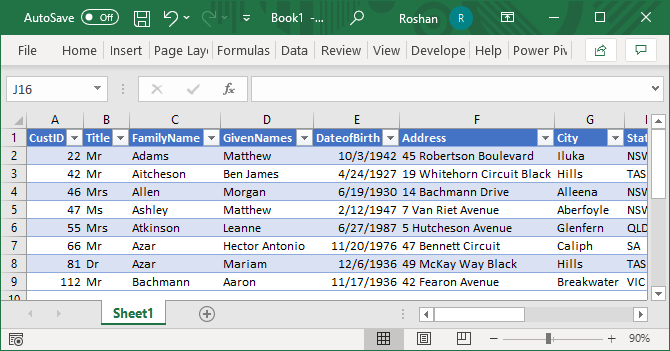
- Consequently, the data will be imported into the Excel sheet, as shown in the screenshot.
We can use the data for various purposes in Excel.
How to Use CSV Files in Excel?
- Storing data and performing the required calculations on the data.
- Improving the security of the files as Excel files are not opened by any other software.
- Possible to save the data in tabular format with the extension of .xls and .xlsx.
- Display of data in rows and columns to represent the fields.
- Using the required format for the data of different types.
- Development of graphs and charts on the numerical data if presented.
- Using the statistical analysis of the data.
- Using the programming and macros and developing the data in developer mode.
- Improving the flexibility in reading large data by using sorting and filtering.
Important Things To Note
- Opening the CSV files is an easy way to convert the CSV data into Excel, and it does not change the file format to .xls or .xlsx
- Default settings are provided for when the .csv file is opened with Excel.
Frequently Asked Questions
1. What is CSV file in excel?
CSV (Comma separated Values) are the values separated by commas in Excel. This feature is available in any version, from 365 to 2007 version.
2. What are the two ways to insert CSV files into Excel?
In Excel, we have 2 ways to insert CSV files. One is by importing and another, by opening. The shortcut to open a CSV file in Excel is Ctrl +O.
3. Which is better? Opening or importing a CSV file into Excel?
Though both methods are used commonly to insert CSV files into Excel, opening a file uses default data formatting settings. We cannot decide how to display the data.
If the data has other values (such as data formats), it is better to import the CSV file into Excel to control how to display the data.
Recommended Articles
This article is a guide to CSV files into Excel. Here, we discuss how to open, import, and convert CSV files into Excel, practical examples, and a downloadable Excel template. You may learn more about Excel from the following articles: –
- Excel CSV UTF8
- CSV vs. Excel
- What is OneDrive Excel?
- Power Query Excel
CSV Files into Excel (Table of Contents)
- Introduction to CSV Files into Excel
- Methods to Open CSV Files in Excel
Introduction to CSV Files into Excel
MS Excel is an interesting tool when it comes to handling data. Excel data can be imported in many software, and even Excel can import data from different sources. Most of the time, we have unstructured data or data in different formats. For that, the solution is Excel. It converts data into a tabular structure. CSV or Comma Separated Values file is a commonly used format to store important data related to statistics, contacts, etc. Importing data makes it easier to read CSV files, but sometimes there are unexpected data changes with change in format and data looks scrambled. CSV files can be imported further to many software like SAS, Tableau, etc., for Data analysis and visualization.
There are different techniques for CSV data to look better and organized in Excel. Below are some examples and methods to import and read data in Comma Separated Values format.
Example
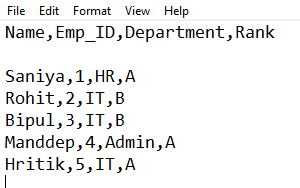
Let us suppose we have a text file that has data separated by commas.
- This file is saved as CSV file with .csv extension.
- Now, the CSV file is ready for use. Next, we’ll go to Excel > File > Open > Browse. Then select the saved CSV file as shown below.
- We can see that the CSV file is imported now.
- But the data is not clear. We can apply formatting to the data and see the change as shown below.
Finally, the CSV file is converted into an Excel file and is organized now.
Explanation
CSV files have data separated by commas. These files can be created in Notepad, Excel, etc. CSV files are used in organizations for transmitting and storing data. There are multiple ways for converting CSV files into Excel, as given below:
- Directly open CSV files with Excel.
- Opening CSV files through the windows explorer option.
- Importing CSV file data into Excel.
CSV files are converted into Excel for supportability as it is hard for Data analysts to draw insights from the data. After conversion, each value separated by commas is placed into each cell separately, which makes the data clear. There are multiple advantages of converting CSV files into Excel, including
- Better storing of data and calculations as per need.
- Any other software cannot open improved data security as Excel files.
- Saving CSV file in tabular manner with .xlsx extension.
- Data display in a perfect manner with each value in each cell.
- The formatting of data becomes easier and convenient.
- Analysis, Graph plotting, and Visualization of numerical data after conversion of CSV file into Excel.
- Programming and macros using VBA for data development.
Methods to Open CSV Files in Excel
There are various methods of opening CSV files in Excel, as mentioned above. We’ll see in detail how these methods work.
1. Opening CSV file in Excel
- CSV files can be opened in Excel, and it becomes a new file in Excel later. Suppose we have a CSV file with data separated with commas, as shown below. This file is a text file saved with a .csv extension.
- Here the first row is the header, and below are the data about employees of the company. A comma separates each value. We’ll import the file in Excel by going to Excel now.
- We can Go to File at the top left corner and then Open > Browse, as shown below.
- Then we’ll select the file from the location. If we can’t see the file, then at file type “All Excel files” can be changed to “All files” and then select the CSV file as shown below.
- Now, our CSV file is ready in Excel.
- To make the data clear and organized, we can apply some formatting to differentiate the headers from other fields, and finally, the file is ready for further use.
2. Using Windows Explorer if we’re using Windows OS
- We’ll have to go to the directory where the CSV file is located and right-click on it. Here our file is located on the desktop. Then go to Open with > Excel, and the file will be opened in Excel.
- After selecting Excel, it becomes the default program from then onwards; when we click on it, it will be opened in Excel by default. Here is the CSV file open in Excel.
After a bit of formatting, the file is ready to use.
3. Importing CSV File by Importing Data Externally
- This method helps in importing data in the current worksheet but is a bit longer process than the above two processes. First, we need to open MS Excel and select a blank workbook from it. A new workbook is now ready. we’ll place the cursor where we want to import the data.
- Next, we’ll have to go to the “Data” tab then go to “Get External Data”, as shown below.
- Then we’ll select “From Text” from the option as the CSV file was created in “Notepad”.
- We have to browse to the location where the file is stored. As we have imported the file earlier, it is showing as a CSV file. If we are using it for the first time also, the process is the same.
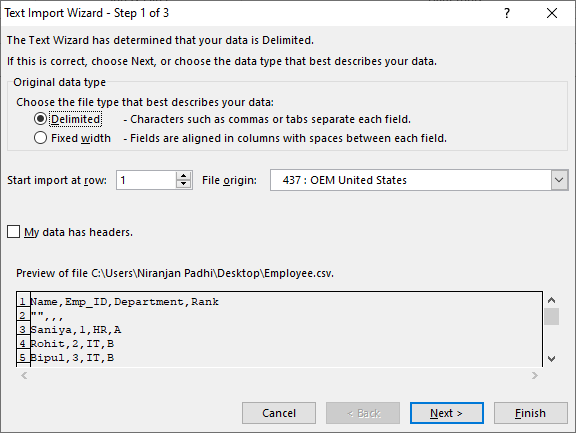
- Now, we can see a window that has some options, as shown below.
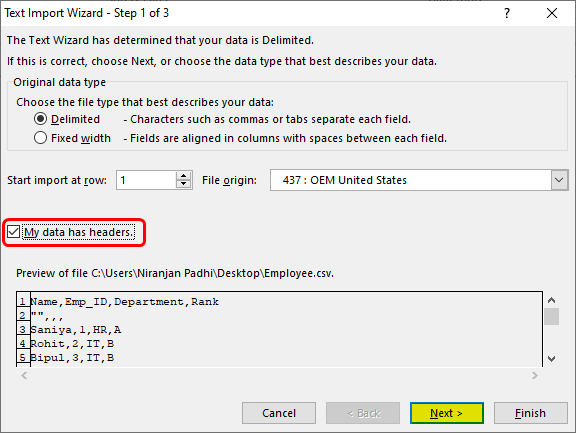
- Then, we have to click on “My data has headers” and choose the file type as “Delimited”, and click “Next”, as shown below.
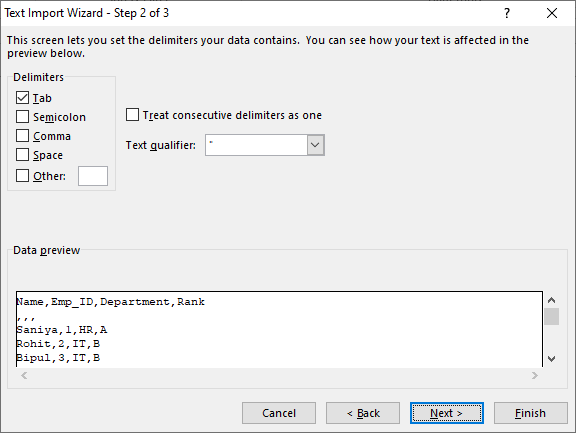
- A new window comes as shown below.
Now, untick the “Tab” and select “Comma”, and click “Next”.
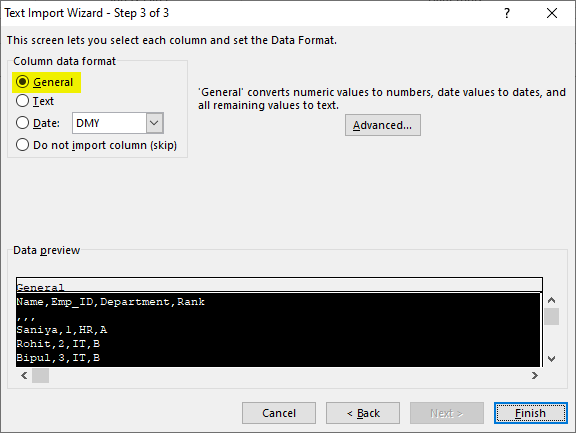
Then we’ll click on the “Finish” button, and a new window is displayed where we need to select the “Existing worksheet”.
- Finally, the CSV file will be imported, and the data is displayed below.
- With little formatting, the data can be organized and used further for analysis.
Things to Remember
- Opening a CSV file is easy, and it doesn’t change the format of the file to .xlsx or any other file.
- By default, the file is not organized. After importing it, we need to apply formatting to make the data look better.
Recommended Articles
This is a guide to CSV Files into Excel. Here we discuss How to open CSV Files in Excel along with practical examples and a downloadable excel template. You can also go through our other suggested articles –
- Formatting Text in Excel
- HLOOKUP Formula in Excel
- Excel Export to PDF
- Autofit Row Height in Excel

 on any page of the Text Import Wizard for more information about using the wizard. When you are done with the steps in the wizard, click Finish to complete the import operation.